Cisco Webex Instruction Manual

Webex Desk Camera Administration Guide
First Published: 2021-02-15
Last Modified: 2021-09-30
Americas Headquarters
Cisco Systems, Inc.
170 West Tasman Drive
San Jose, CA 95134-1706
USA
http://www.cisco.com
Tel: 408 526-4000
800 553-NETS (6387)
Fax: 408 527-0883

THE SPECIFICATIONS AND INFORMATION REGARDING THE PRODUCTS IN THIS MANUAL ARE SUBJECT TO CHANGE WITHOUT NOTICE. ALL STATEMENTS,
INFORMATION, AND RECOMMENDATIONS IN THIS MANUAL ARE BELIEVED TO BE ACCURATE BUT ARE PRESENTED WITHOUT WARRANTY OF ANY KIND,
EXPRESS OR IMPLIED. USERS MUST TAKE FULL RESPONSIBILITY FOR THEIR APPLICATION OF ANY PRODUCTS.
THE SOFTWARE LICENSE AND LIMITED WARRANTY FOR THE ACCOMPANYING PRODUCT ARE SET FORTH IN THE INFORMATION PACKET THAT SHIPPED WITH
THE PRODUCT AND ARE INCORPORATED HEREIN BY THIS REFERENCE. IF YOU ARE UNABLE TO LOCATE THE SOFTWARE LICENSE OR LIMITED WARRANTY,
CONTACT YOUR CISCO REPRESENTATIVE FOR A COPY.
The following information is for FCC compliance of Class A devices: This equipment has been tested and found to comply with the limits for a Class A digital device, pursuant to part 15
of the FCC rules. These limits are designed to provide reasonable protection against harmful interference when the equipment is operated in a commercial environment. This equipment
generates, uses, and can radiate radio-frequency energy and, if not installed and used in accordance with the instruction manual, may cause harmful interference to radio communications.
Operation of this equipment in a residential area is likely to cause harmful interference, in which case users will be required to correct the interference at their own expense.
The following information is for FCC compliance of Class B devices: This equipment has been tested and found to comply with the limits for a Class B digital device, pursuant to part 15 of
the FCC rules. These limits are designed to provide reasonable protection against harmful interference in a residential installation. This equipment generates, uses and can radiate radio
frequency energy and, if not installed and used in accordance with the instructions, may cause harmful interference to radio communications. However, there is no guarantee that interference
will not occur in a particular installation. If the equipment causes interference to radio or television reception, which can be determined by turning the equipment off and on, users are
encouraged to try to correct the interference by using one or more of the following measures:
• Reorient or relocate the receiving antenna.
• Increase the separation between the equipment and receiver.
• Connect the equipment into an outlet on a circuit different from that to which the receiver is connected.
• Consult the dealer or an experienced radio/TV technician for help.
Modifications to this product not authorized by Cisco could void the FCC approval and negate your authority to operate the product.
The Cisco implementation of TCP header compression is an adaptation of a program developed by the University of California, Berkeley (UCB) as part of UCB’s public domain version of
the UNIX operating system. All rights reserved. Copyright ©1981, Regents of the University of California.
NOTWITHSTANDING ANY OTHER WARRANTY HEREIN, ALL DOCUMENT FILES AND SOFTWARE OF THESE SUPPLIERS ARE PROVIDED "AS IS" WITH ALL FAULTS.
CISCO AND THE ABOVE-NAMED SUPPLIERS DISCLAIM ALL WARRANTIES, EXPRESSED OR IMPLIED, INCLUDING, WITHOUT LIMITATION, THOSE OF
MERCHANTABILITY, FITNESS FOR A PARTICULAR PURPOSE AND NONINFRINGEMENT OR ARISING FROM A COURSE OF DEALING, USAGE, OR TRADE PRACTICE.
IN NO EVENT SHALL CISCO OR ITS SUPPLIERS BE LIABLE FOR ANY INDIRECT, SPECIAL, CONSEQUENTIAL, OR INCIDENTAL DAMAGES, INCLUDING, WITHOUT
LIMITATION, LOST PROFITS OR LOSS OR DAMAGE TO DATA ARISING OUT OF THE USE OR INABILITY TO USE THIS MANUAL, EVEN IF CISCO OR ITS SUPPLIERS
HAVE BEEN ADVISED OF THE POSSIBILITY OF SUCH DAMAGES.
Any Internet Protocol (IP) addresses and phone numbers used in this document are not intended to be actual addresses and phone numbers. Any examples, command display output, network
topology diagrams, and other figures included in the document are shown for illustrative purposes only. Any use of actual IP addresses or phone numbers in illustrative content is unintentional
and coincidental.
All printed copies and duplicate soft copies of this document are considered uncontrolled. See the current online version for the latest version.
Cisco has more than 200 offices worldwide. Addresses and phone numbers are listed on the Cisco website at www.cisco.com/go/offices.
Cisco and the Cisco logo are trademarks or registered trademarks of Cisco and/or its affiliates in the U.S. and other countries. To view a list of Cisco trademarks, go to this URL:
https://www.cisco.com/c/en/us/about/legal/trademarks.html. Third-party trademarks mentioned are the property of their respective owners. The use of the word partner does not imply a
partnership relationship between Cisco and any other company. (1721R)
©2021 Cisco Systems, Inc. All rights reserved.
CONTENTS
Your Camera 1
CHAPTER 1
About the Webex Desk Camera 1
New and Changed Information for Firmware Release 2.3(1) 2
Camera Hardware 2
Physical and Operating Environment Specifications 4
Supported Languages 5
Clean Your Camera 5
Additional Help and Information 5
Cisco One-Year Limited Hardware Warranty Terms 6
Deploy Your Camera 7
CHAPTER 2
Best Practices 7
Connect Your Camera 8
System Requirements of the Camera App 10
Install the Webex Desk Camera App 10
Check Camera Inventory in Control Hub 12
Firmware Upgrade 12
Upgrade the Camera Firmware on Cisco Accessory Hub 13
Upgrade the Camera Firmware with the Camera App 14
Troubleshoot Your Camera 17
CHAPTER 3
Troubleshoot Your Camera 17
My Computer Doesn't Recognize the Camera 17
I Can't See My Preview on Webex App or Webex Meetings 18
Video Quality is Poor 18
Accessory Hub Can't Detect the Camera 19
Webex Desk Camera Administration Guide
iii

CHAPTER 1
Your Camera
•About the Webex Desk Camera, on page 1
•New and Changed Information for Firmware Release 2.3(1), on page 2
•Camera Hardware, on page 2
•Physical and Operating Environment Specifications, on page 4
•Supported Languages, on page 5
•Clean Your Camera, on page 5
•Additional Help and Information, on page 5
•Cisco One-Year Limited Hardware Warranty Terms, on page 6
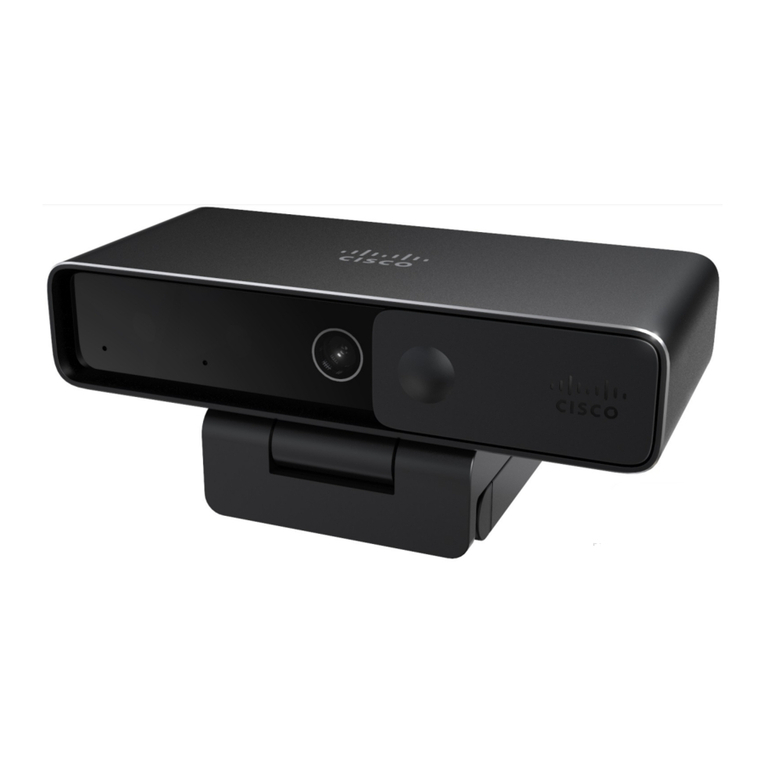
About the Webex Desk Camera
Figure 1: Webex Desk Camera
The Webex Desk Camera is a USB web camera for video conferencing, video streaming, and video recording.
The camera provides up to 4K Ultra HD video and high-definition audio.
With multiple options for resolution and frame rate, the camera meets the use cases with Webex App, Webex
Meetings, Cisco Jabber, and all popular third-party video conferencing and video streaming apps. The autofocus,
face detection, and 10x digital zoom enhance your video experience for meeting and video streaming.
Webex Desk Camera Administration Guide
1

The camera has a privacy shutter. You can use it to turn off the video stream and block the camera lens when
the device isn't in use.
The camera has two Omni Directional Microphones with noise-canceling features, providing audio input for
calls, meetings, and recordings.
The camera supports Windows Hello for secure login to your system.
The adjustable clip with a tripod screw thread offers mounting flexibility on a laptop, an external display, a
tripod, or a desk stand in various open office spaces, huddle rooms, and home offices. The two USB cables
shipped with the camera allow easy connection to computers or devices with fully functional USB-A or USB-C
ports.
The Webex Desk Camera app works with the camera and allows you to record videos, take snapshots, customize
the camera settings, and upgrade the firmware.
The camera supports easy device inventory and workplace management on Control Hub.
For more technical specifications, see Webex Desk Camera Data Sheet.
New and Changed Information for Firmware Release 2.3(1)
The following information is new or changed for Firmware Release 2.3(1).
Table 1: New and Changed Information for Firmware Release 2.3(1)
New and Changed ContentFeature
Upgrade the Camera Firmware with the Camera App, on
page 14
Updated the camera firmware download steps.
Camera Hardware
The figures below show the front, back, and bottom of the camera. Use this information to familiarize yourself
with the hardware features before you use your camera.
Figure 2: Webex Desk Camera front view
Webex Desk Camera Administration Guide
2
Your Camera
New and Changed Information for Firmware Release 2.3(1)

Table 2: Hardware Components on the Front
DescriptionComponent
Supports video stream and static snapshots.1. RGB camera
Indicates the camera status:
• Solid green for 1.5 seconds: camera is booting.
• Solid green: RGB camera is in use.
• Off: RGB camera is in standby mode or the shutter is closed.
2. LED indicator
Supports Windows Hello via the IR sensor.3. IR camera
Indicates the IR camera status:
• Flash red: The IR camera is in use by Windows Hello.
• Off: The IR camera is not in sue.
4. IR LED
The audio input channel of the camera. You can mute the audio or adjust
the input volume from the Webex Desk Camera app.
5. Microphones
Turns the video stream on or off and blocks the camera lens when closed
to protect privacy.
6. Shutter
Figure 3: Webex Desk Camera back view
Table 3: Hardware Components at the Back
DescriptionComponent
The USB cable plugs into this port to connect the camera to a computer.7. USB-C port
Supports multiple mounting options on flat surfaces or on top of displays.
The adjustable hinges provides flexible angles.
8. Camera base and clip
Webex Desk Camera Administration Guide
3
Your Camera
Camera Hardware

Figure 4: Webex Desk Camera bottom view
Table 4: Hardware Component at Bottom
DescriptionComponent
Use the 1/4"-20 screw thread to mount the camera to a tripod.9. Tripod screw thread
Physical and Operating Environment Specifications
The following table shows the physical and operating environment specifications for the Webex Desk Camera.
For more information, see the Webex Desk Camera Data Sheet at https://www.cisco.com/c/en/us/products/
collateral/collaboration/datasheet-c78-744525.html.
Table 5: Physical and Operating Specifications
DescriptionSpecification
0℃ to 40℃ (32℉ to 104℉)Operating temperature
10% - 90%Operating relative
humidity
90.64 mm (3.57 in.)Length
41 mm (1.61 in.)Width
19.5 mm (0.77 in.)Height
-25℃ to 70℃ (-13℉ to 158℉)Storage temperature
153g (0.33 lb)Weight
Power supply via USB 2.0 (< 2.5W) or USB 3.0 (< 4.5W)Power
USB 3.0/2.0 Type C-A cable
USB 3.0/2.0 Type C-C cable
Cables
Webex Desk Camera Administration Guide
4
Your Camera
Physical and Operating Environment Specifications

Supported Languages
When you install the Cisco Webex Desk Camera application on your computer, choose the language for the
application user interface.
Your device supports the following languages:
• Chinese (Simplified)
• Chinese (Traditional)
• Dutch
• English (US)
• English (UK)
• French (Canada)
• French (France)
• German
• Italian
• Japanese
• Korean
• Portuguese (Brazil)
• Portuguese (Portugal)
• Russian
• Spanish (LATAM)
• Spanish (Spain)
• Swedish
Clean Your Camera
To clean your Webex Desk Camera, use only a dry soft cloth to gently wipe the camera and the front panel.
Do not apply liquids or powders directly to the camera. As with all non-weatherproof electronics, liquids and
powders can damage the components and cause failures.
Additional Help and Information
The Cisco website (https://www.cisco.com) contains more information about the camera.
•For administration guide, release notes, quick reference guide, and user guide, go to https://www.cisco.com/
c/en/us/support/collaboration-endpoints/webex-desk-camera/model.html#%7Etab-documents.
Webex Desk Camera Administration Guide
5
Your Camera
Supported Languages

• For Help articles, go to https://cisco.com/go/webexcamhelp.
Cisco One-Year Limited Hardware Warranty Terms
Special terms apply to your hardware warranty and services that you can use during the warranty period.
Your formal Warranty Statement, including the warranties and license agreements applicable to Cisco software,
is available on Cisco.com at this URL: https://www.cisco.com/go/hwwarranty.
Webex Desk Camera Administration Guide
6
Your Camera
Cisco One-Year Limited Hardware Warranty Terms

CHAPTER 2
Deploy Your Camera
•Best Practices, on page 7
•Connect Your Camera, on page 8
•System Requirements of the Camera App, on page 10
•Install the Webex Desk Camera App, on page 10
•Check Camera Inventory in Control Hub, on page 12
•Firmware Upgrade, on page 12
Best Practices
Keep these limitations in mind when you set up and use your Webex Desk Camera.
• Your device needs a dry and well-ventilated space. Webex Desk Camera operates at 32° to 104°F (0° to
40°C).
• Don't expose the device to water or liquids as they could damage your camera.
• Keep the USB drivers on your computer up to date.
• Make sure the USB port that you connect your camera to provides both power delivery and data transfer.
• Use the camera in appropriate lighting. A bright backlighting or front lighting may cause underexposure
or overexposure on your video image. If you can't change the lighting, then you manually adjust the
brightness with the Webex Desk Camera app.
• The privacy shutter on your camera turns the video stream on and off. Slide the shutter right or left to
turn the video stream on and off, instead of disconnecting and reconnecting your camera.
• When using your camera with an application on your computer, close the other applications that may
use the camera at the same time. Your camera supports one application on Windows, and more than one
application on Mac OS at a time.
•For optimal performance of the Best Overview feature, make sure that you're centered in the frame before
you enable this feature.
• The camera has an IR sensor for Windows Hello. Don't block the sensor.
• Gently wipe your camera with a dry and soft cloth on the surface and the front panel. Rough materials
may scratch the front panel and affect image clarity.
• A Getting Started Document is shipped with the camera. Leave it with your user.
Webex Desk Camera Administration Guide
7

Related Topics
System Requirements of the Camera App, on page 10
Supported Languages, on page 5
Physical and Operating Environment Specifications, on page 4
Clean Your Camera, on page 5
Connect Your Camera
Your camera gets power from the computer through the USB cable. It's shipped with a USB-A and a USB-C
cable. Use the cable that fits the USB port on your computer.
You can mount your camera on your computer, on a display screen, on a desk stand or on a tripod, and
participate in a video call or meeting.
Procedure
Step 1 Open the camera clip.
Step 2 Adjust the camera.
a) Place your camera on the top edge of your computer display and close the clip until the camera is steady.
Refer to the bottom arrow of the previous figure.
b) Lift the back end of the camera to adjust the angle. Refer to the top arrow of the previous figure.
Step 3 Connect your camera to your computer with one of the provided USB cables.
Webex Desk Camera Administration Guide
8
Deploy Your Camera
Connect Your Camera

Figure 5: Connection for the Camera Mounted on a Computer
Figure 6: Connection for the Camera Mounted on a Display Screen
You can also mount your camera on a tripod, as needed. If you have a separate tripod, refer to its manual for
information about how to mount your camera on the tripod.
Webex Desk Camera Administration Guide
9
Deploy Your Camera
Connect Your Camera

Figure 7: Mount the Camera on a Tripod
System Requirements of the Camera App
The following list shows the computer system requirements for using the Webex Desk Camera app. You
should confirm that your computer meets or exceeds these requirements before you install the camera app.
• Minimum operating system requirements:
• Windows 10 with Universal C Runtime
• Mac OS X 10.12
•CPU: [email protected] GHz / [email protected] GHz Intel processor, or a processor with the equivalent processing capabilities
• RAM: 8 GB or more
• Hard drive space for media file storage
• USB 2.0 port (4K resolutions require a USB 3.0 or USB-C port.)
Install the Webex Desk Camera App
The Webex Desk Camera is designed to function out of the box with the default settings. You can customize
the settings with the Webex Desk Camera app to meet your network or video image requirements.
Webex Desk Camera Administration Guide
10
Deploy Your Camera
System Requirements of the Camera App

Before you begin
The Webex Desk Camera app supports Windows and Mac OS. Make sure that your computer meets or exceeds
the minimum requirements. For the system requirements, see System Requirements of the Camera App, on
page 10.
Procedure
Step 1 Download the app installer for your computer operating system. Do any of the following actions:
• Go to Cisco Accessory Hub and download the installation file from Accessory Apps.
Select the version compatible with your operating system to download.
• Go to Cisco Software Download and download the latest version that is compatible with your operating
system. Login is required for downloading.
Step 2 Double-click the executable file to start the installation.
Webex Desk Camera Administration Guide
11
Deploy Your Camera
Install the Webex Desk Camera App

Step 3 Follow the onscreen instructions to complete the installation.
Related Topics
System Requirements of the Camera App, on page 10
Check Camera Inventory in Control Hub
When the camera is working with Webex App or Webex Meetings, the Webex App or Webex Meetings
detects the device connection and reports the device inventory to Control Hub. You can view and sort through
individual cameras in Control Hub. Each camera page displays the camera model, serial number, firmware
version, connection status, and how long the camera has been connected.
Procedure
Step 1 Log into Control Hub and go to Devices.
Step 2 Search for your camera in the inventory.
Step 3 Click your camera from the results to view the details.
Firmware Upgrade
You can upgrade the camera firmware from:
• Cisco Accessory Hub
Upgrade the camera either online or with a local firmware file.
• Webex Desk Camera App
Upgrade the camera with a local firmware file.
Webex Desk Camera Administration Guide
12
Deploy Your Camera
Check Camera Inventory in Control Hub

Related Topics
Upgrade the Camera Firmware with the Camera App, on page 14
Upgrade the Camera Firmware on Cisco Accessory Hub, on page 13
Upgrade the Camera Firmware on Cisco Accessory Hub
The Cisco Accessory Hub enables you to upgrade the camera firmware through your Google Chrome web
browser. The tool automatically checks your camera model and current firmware version, and gives you the
option to upgrade your camera if there is a newer version available. You can also upgrade your camera with
a local firmware file using Cisco Accessory Hub.
Visit Cisco Accessory Hub with the latest version of Google Chrome or Microsoft Edge.
Note
Before you begin
Close any apps that may use your camera.
Procedure
Step 1 Connect your camera to your computer.
Step 2 Go to Cisco Accessory Hub in your web browser.
Step 3 Click Connect.
Step 4 Select Cisco Webex Desk Camera from the prompted device list and click Connect.
Webex Desk Camera Administration Guide
13
Deploy Your Camera
Upgrade the Camera Firmware on Cisco Accessory Hub

Step 5 Follow the onscreen instructions.
Keep your camera connected to your computer during the upgrade.
Note
Step 6 When the upgrade completes, wait about 30 seconds for your camera to reboot.
Related Topics
Upgrade the Camera Firmware with the Camera App, on page 14
Upgrade the Camera Firmware with the Camera App
If you have installed the Webex Desk Camera app version 2.3, the camera app checks for firmware update
when you start it. If an update is detected, the Updates button shows a number 1 or 2. You click Updates >
Start update to download and install the new firmware.
If you’re using the Webex Desk Camera app version 2.2, upgrade your firmware with the following steps.
Before you begin
Close any apps that may use your camera.
Procedure
Step 1 Open the Webex Desk Camera app.
Step 2 Click Cisco Webex Desk Camera >Camera information from the menu bar.
Step 3 Click Download firmware to download and save the latest firmware to your local drive.
If your current firmware is up to date, the Download firmware button is inactive.
You can also download the firmware from Cisco Software Download. Login is required for downloading.
Step 4 Navigate to Basic >Firmware.
Step 5 Click Select file and choose the downloaded firmware file from your local drive.
Webex Desk Camera Administration Guide
14
Deploy Your Camera
Upgrade the Camera Firmware with the Camera App

If you select a wrong firmware file, click Remove and select the correct file.
Step 6 Click Upgrade to start the upgrade.
Keep your camera connected to your computer during the upgrade.
Note
Step 7 When the upgrade completes, wait about 30 seconds for your camera to reboot.
Related Topics
Upgrade the Camera Firmware on Cisco Accessory Hub, on page 13
Webex Desk Camera Administration Guide
15
Deploy Your Camera
Upgrade the Camera Firmware with the Camera App

Webex Desk Camera Administration Guide
16
Deploy Your Camera
Upgrade the Camera Firmware with the Camera App
Other manuals for Webex
2
Table of contents
Other Cisco Webcam manuals

Cisco
Cisco LINKSYS WVC54GC User manual

Cisco
Cisco PrecisionHD USB User manual

Cisco
Cisco WVC200 - Wireless-G PTZ Internet Camera Instruction Manual

Cisco
Cisco WVC54GCA User manual

Cisco
Cisco TelePresence PrecisionHD Assembly instructions

Cisco
Cisco Linksys WVC54G Operator's manual

Cisco
Cisco VT Camera III User manual

Cisco
Cisco Webex User manual