Citizen E31 M Manual

CITIZEN QUARTZ
Cal. No. E31 M
TECHNICAL INFORMATION
INFORMACION TECNICA

ENGLISH
Contents
§1. FEATURES................................................................................................ 1
§2. SPECIFICATIONS..................................................................................... 1
§3. PART NAMES AND THEIR MAIN FUNCTIONS....................................... 1
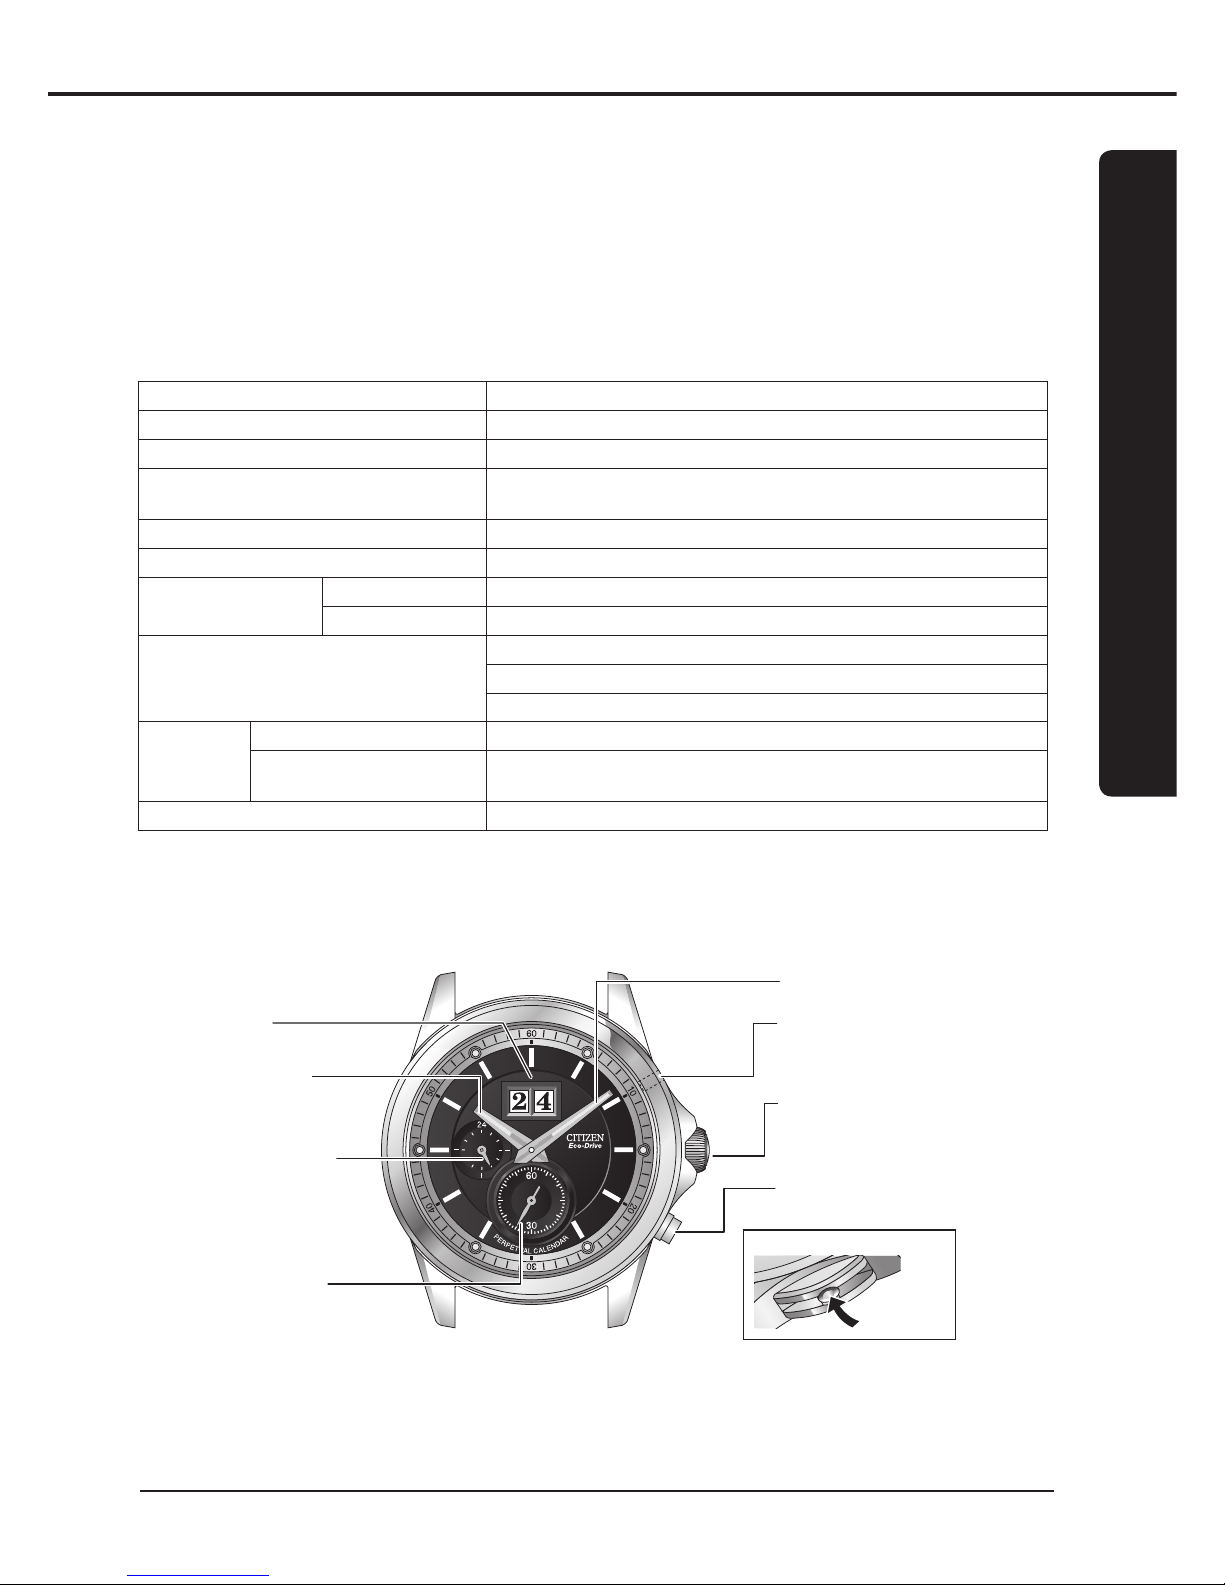
§4. OPERATING THE CROWN ....................................................................... 2
§5. CHARGING THE BATTERY...................................................................... 2
A. Charging the Battery ......................................................................... 2
B. When the Battery Becomes Short of Power – Insufficient
Charge Warning Function ................................................................. 2
C. Charging Time .................................................................................... 3
D. After the Battery is Fully Charged – Overcharge Prevention
Function.............................................................................................. 3
§6. SETTING THE TIME .................................................................................. 4
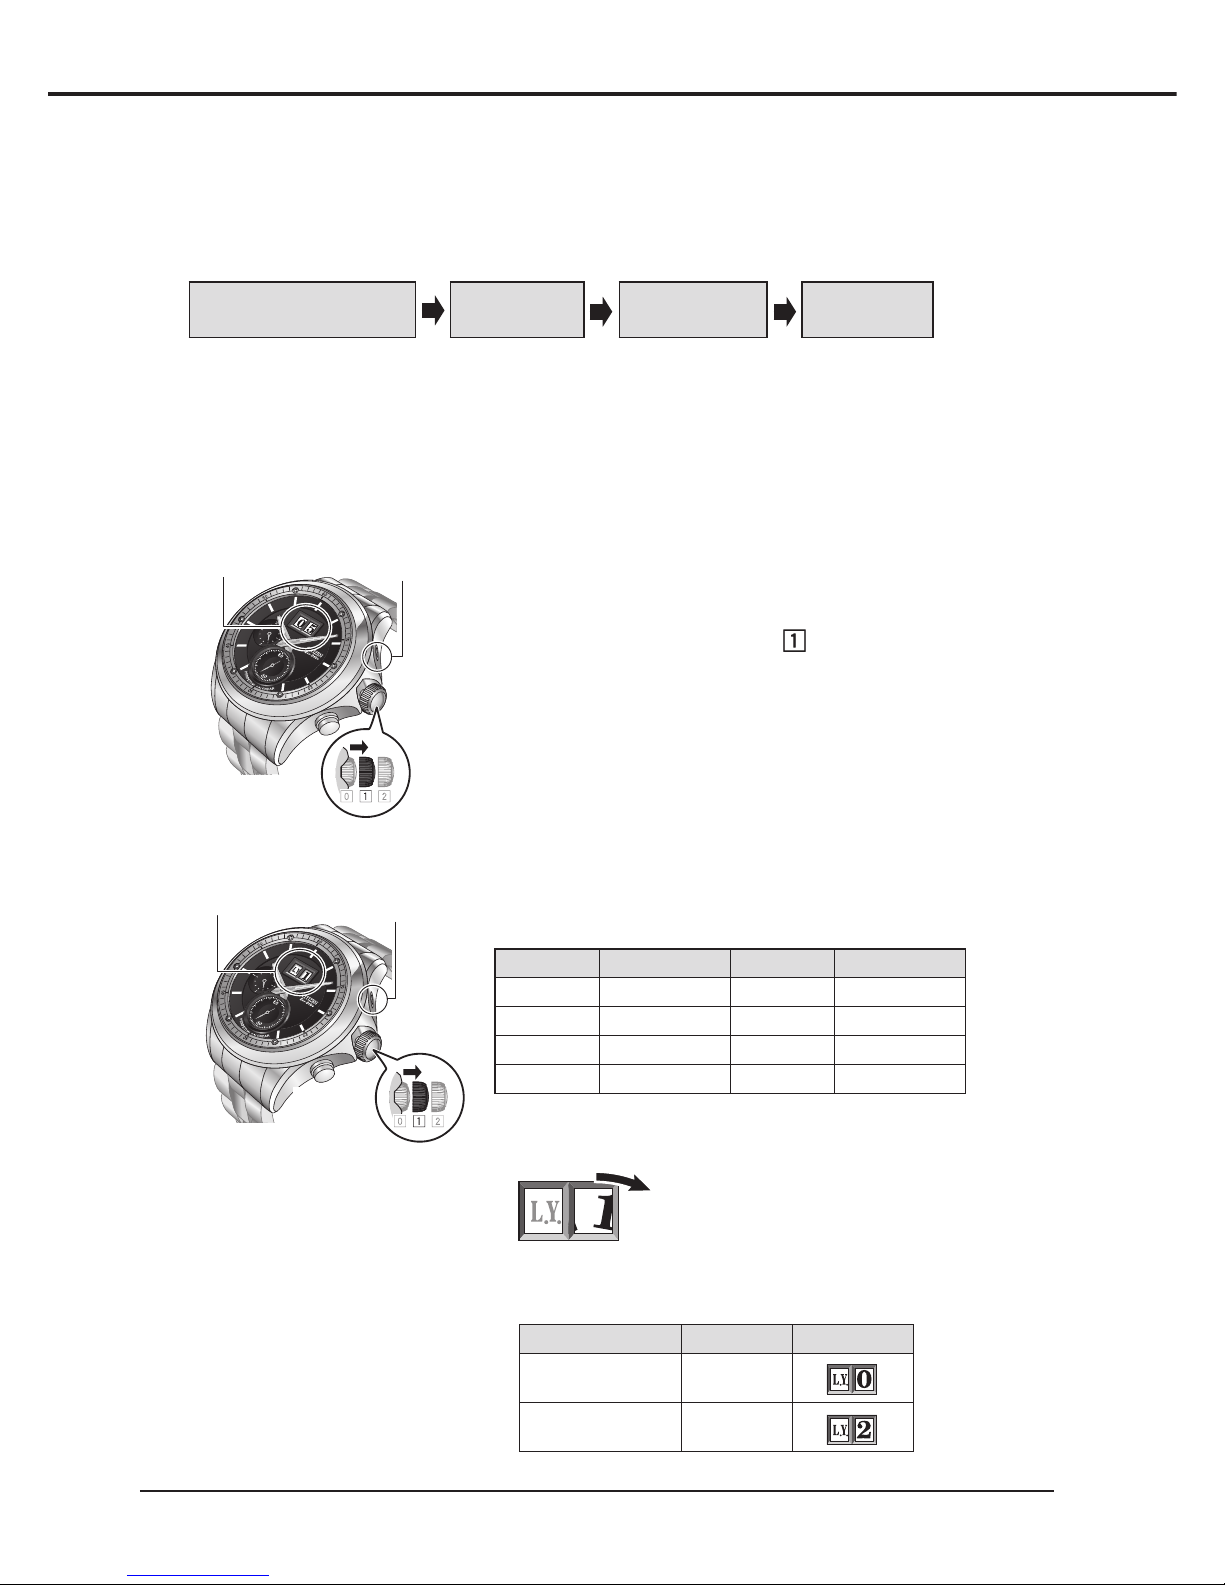
§7. CHECKING THE DATE, MONTH, AND YEAR .......................................... 4
§8. SETTING THE YEAR, MONTH, AND DATE.............................................. 5
§9. HANDLING SOLAR POWERED WATCH ................................................. 7
§10. TROUBLESHOOTING .............................................................................. 7
§11. CHECKING AND CORRECTING THE REFERENCE POSITION ............ 8
§12. RESETTING THE WATCH......................................................................... 9
§13. MAINTENANCE ........................................................................................ 9
§14. HANDS FITTING PROCEDURE............................................................. 10
§15. DISASSEMBLY AND ASSEMBLY OF MOVEMENT .............................. 12
§16. TROUBLESHOOTING AND ADJUSTMENT METHOD ......................... 19
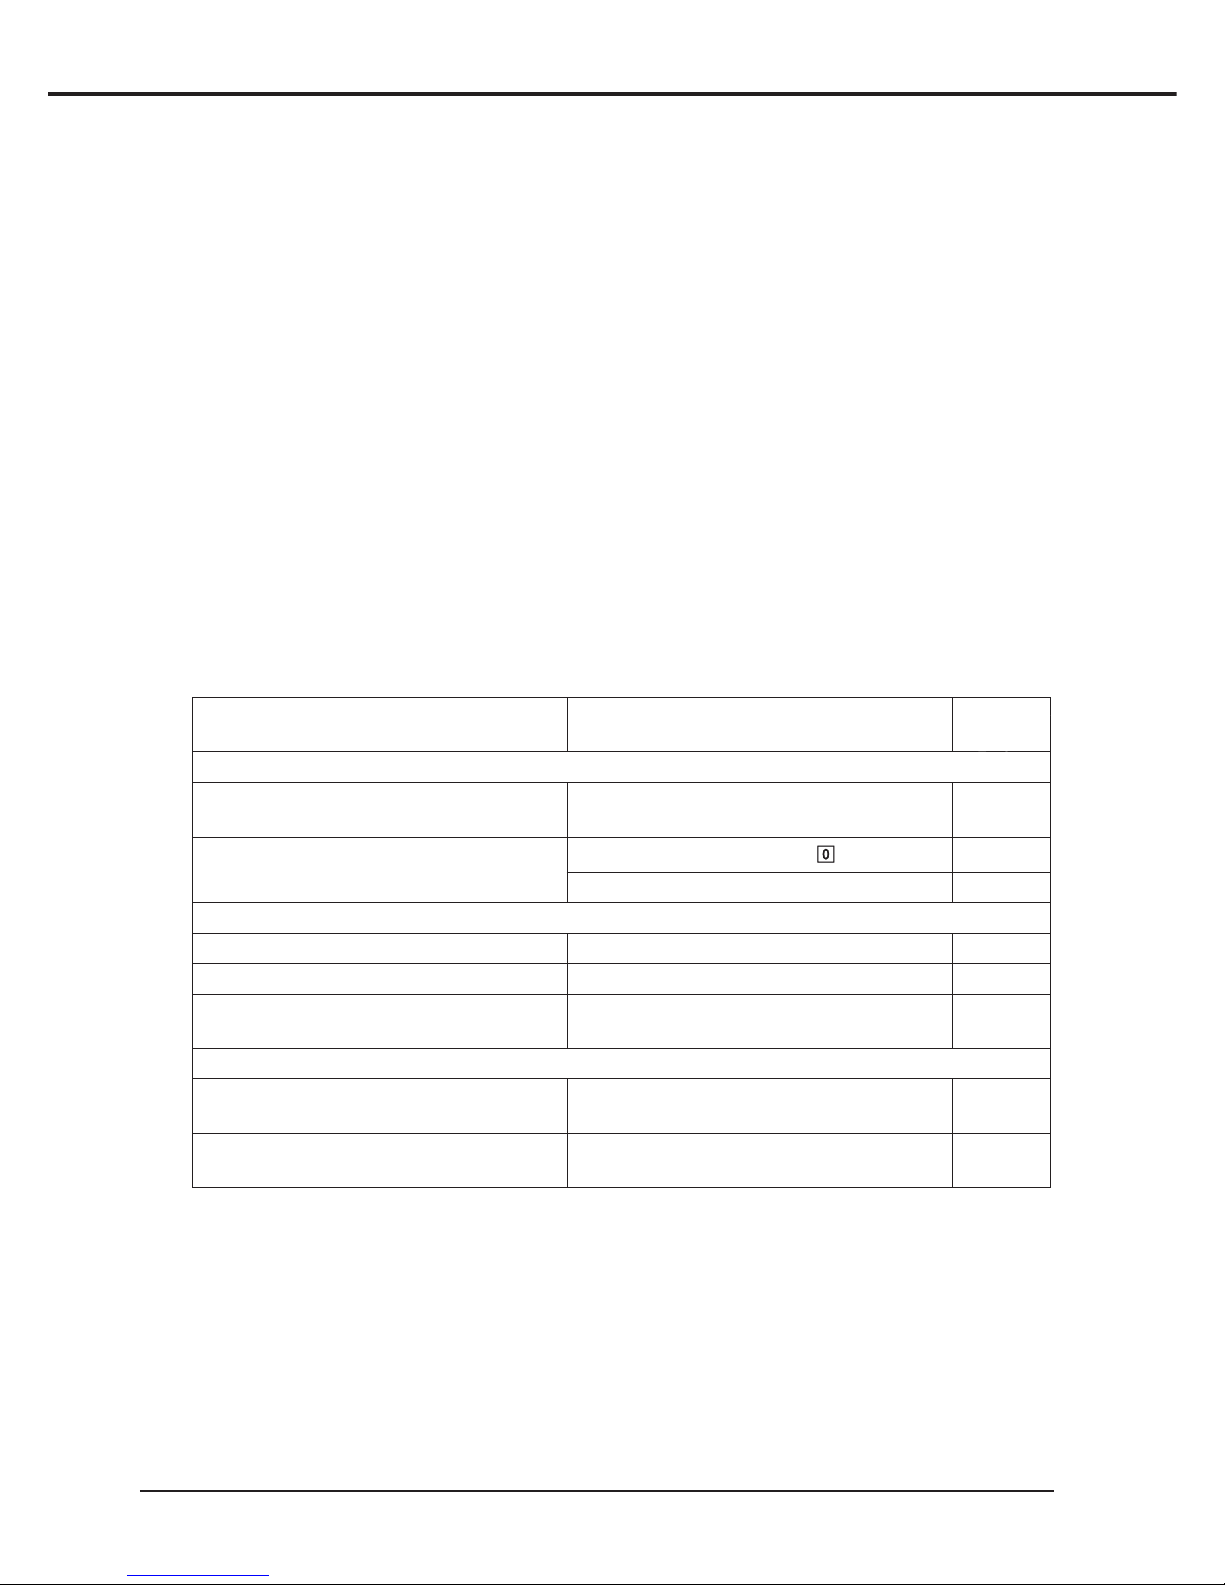
Individual service policy
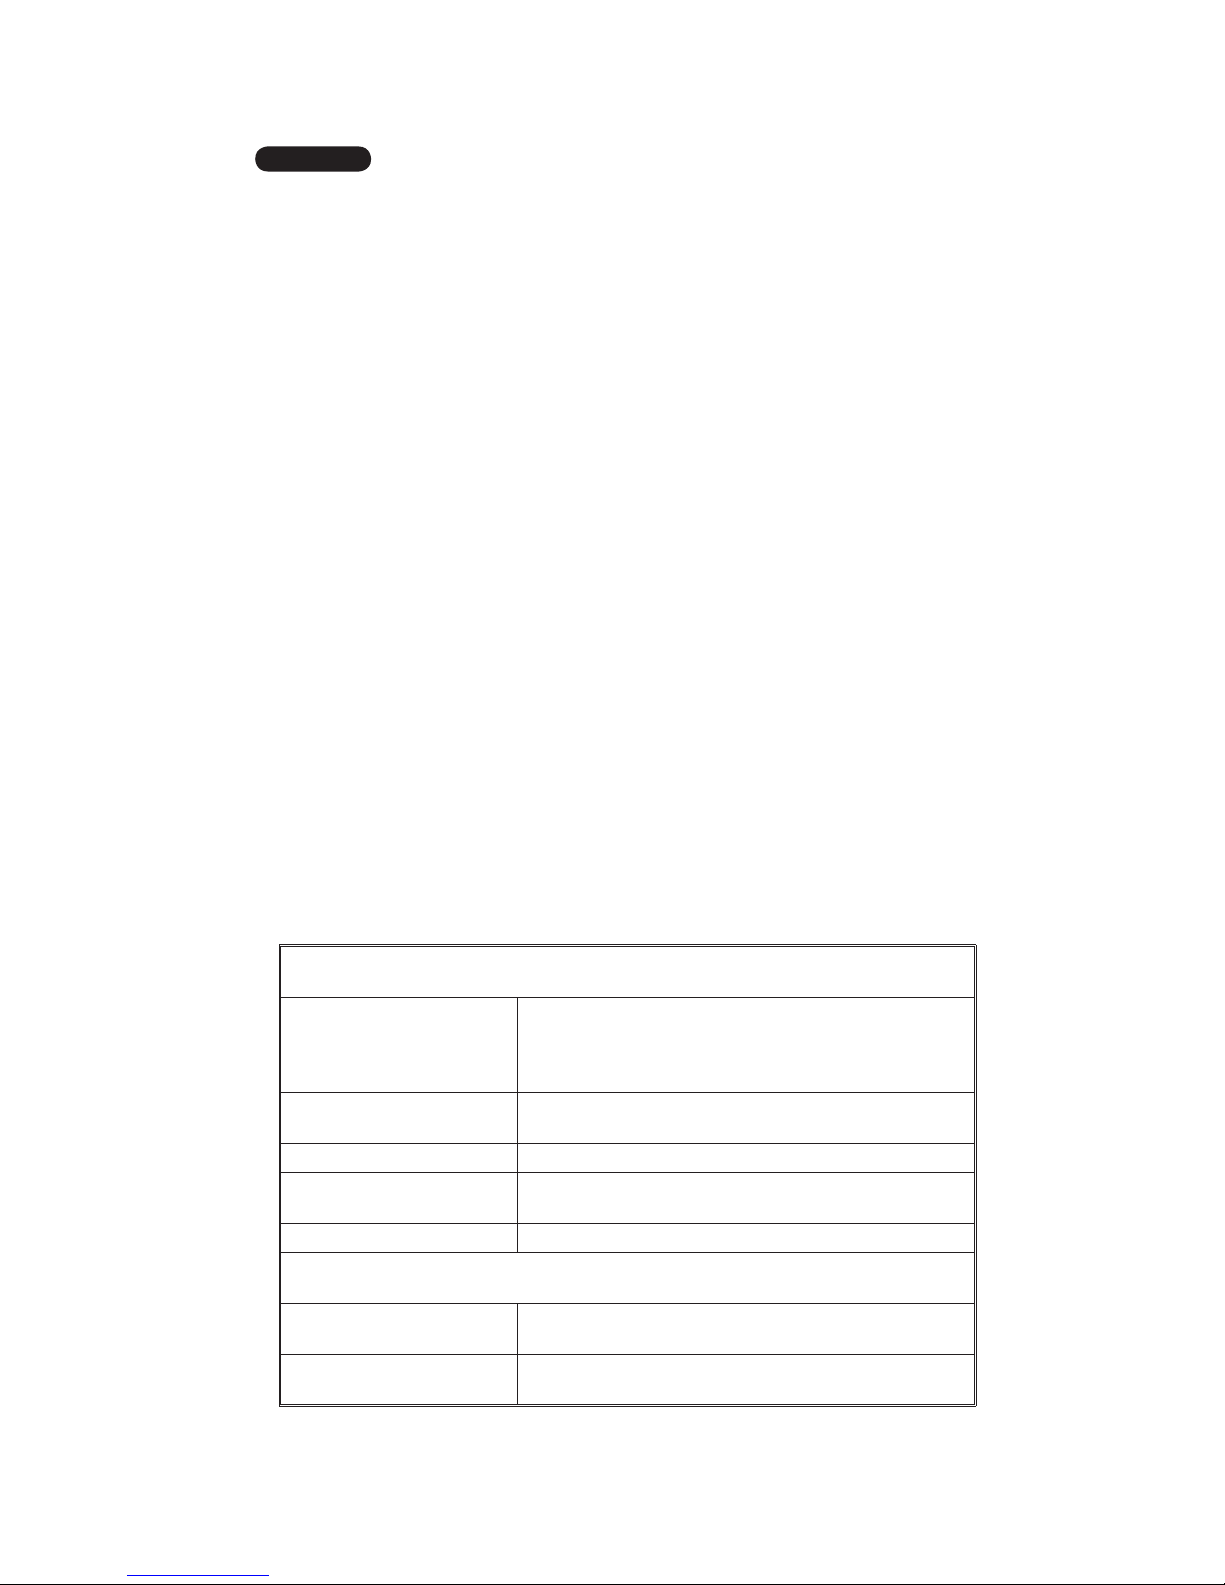
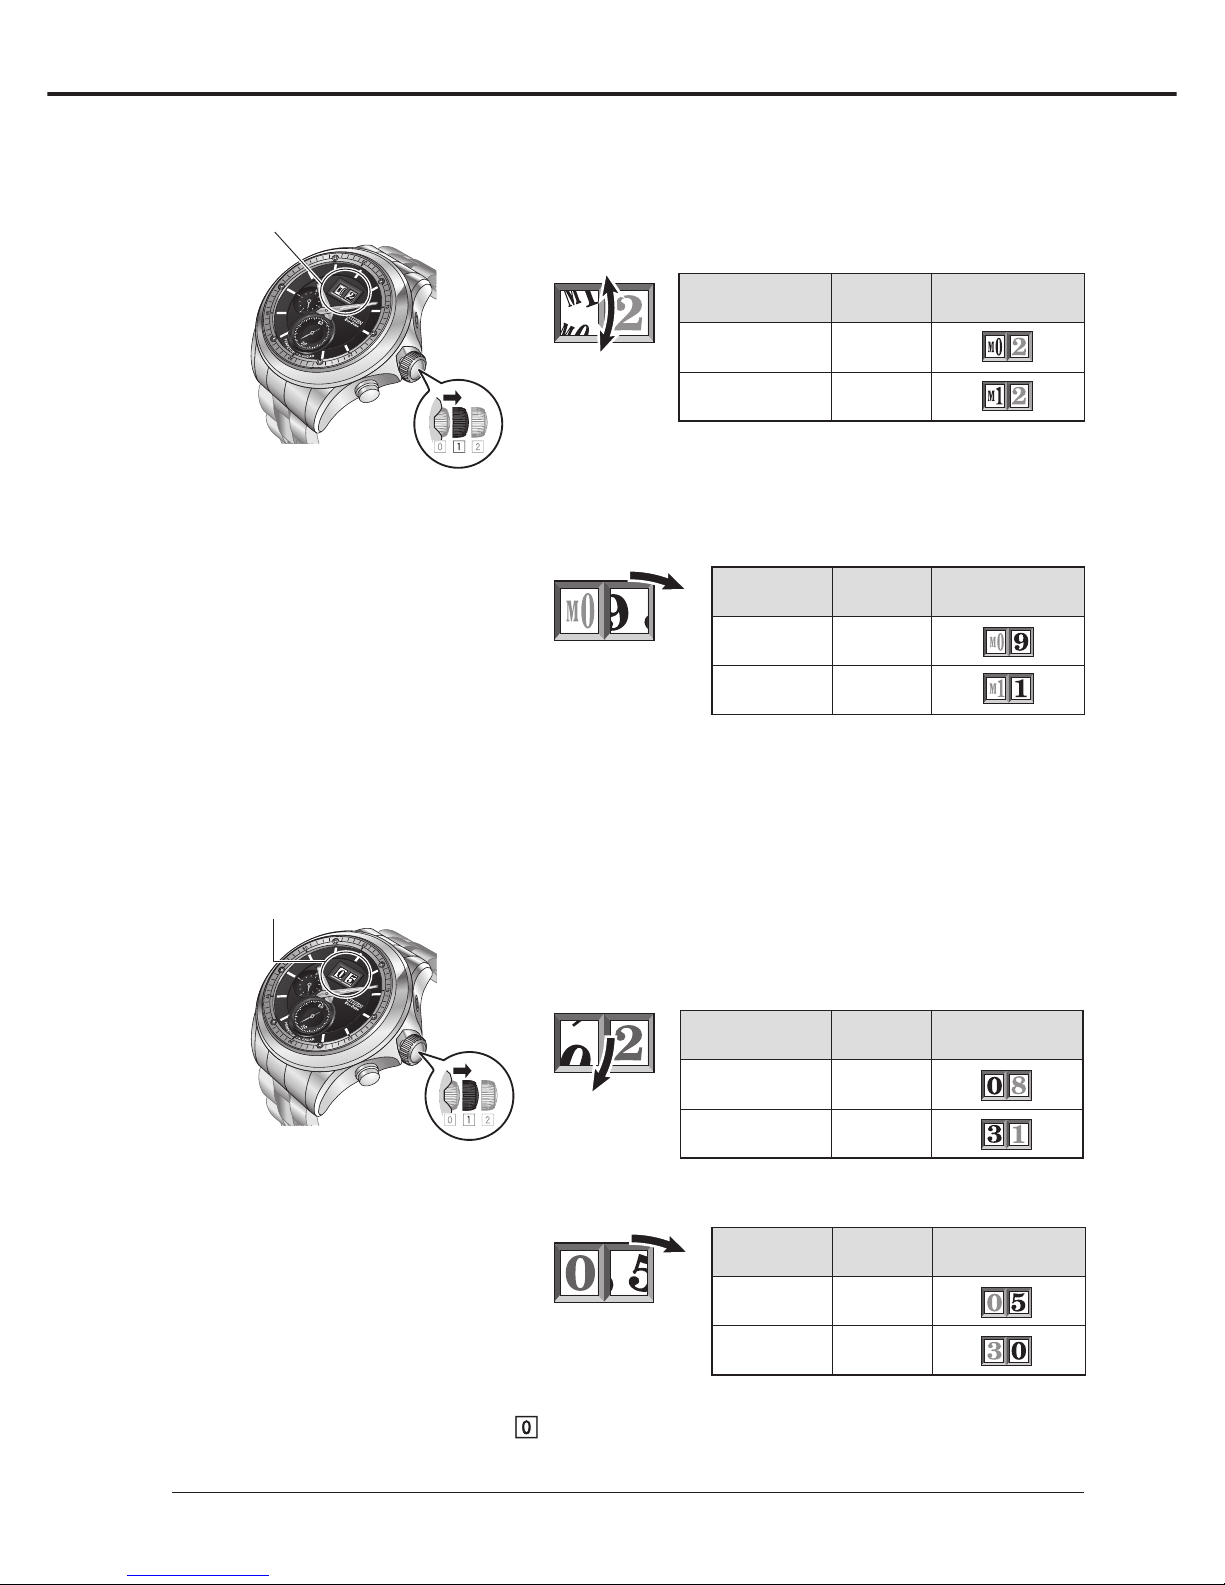
1) Outline Men's analog quartz watch having a large calendar
easy to see consisting of the Eco-Drive "twin date"
disc date dial (1) and date dial (2) and having the
Eco-Drive function.
2) Sales area U.S.A, Asia, Europe
3) Service rank B
4) Guarantee period:
1 year
5) Repair: • Place Any Service Center
Remarks:
6) Parts 7 years after manufacture is stopped
7) Time to start sale 2007 July

ESPAÑOL
Índice
§1. CARACTERÍSTICAS............................................................................... 25
§2. ESPECIFICACIONES.............................................................................. 25
§3.
NOMBRES DE LOS COMPONENTES Y FUNCIONES PRINCIPALES
...... 25
§4. FUNCIONAMIENTO DE LA CORONA ................................................... 26
§5. CARGA DE LA PILA............................................................................... 26
A. Carga de la Pila ................................................................................ 26
B. Cuando Disminuya el Nivel de Carga de la Pila
— Función de Aviso de Carga Insuficiente ................................... 26
C. Tiempos de Carga............................................................................ 27
D. Después que la Pila Esté Completamente Cargada
— Función de Prevención de Sobrecarga..................................... 27
§6. PUESTA EN HORA................................................................................. 28
§7. COMPROBACIÓN DE LA FECHA, MES Y AÑO.................................... 28
§8. AJUSTE DEL AÑO, MES Y FECHA........................................................ 29
§9. MANEJO DE SU RELOJ ALIMENTADO POR ENERGÍA SOLAR........ 31
§10. LOCALIZACIÓN Y SOLUCIÓN DE PROBLEMAS................................. 31
§11.
COMPROBACIÓNY CORRECCIÓN DE LA POSICIÓN DE REFERENCIA
..... 32
§12. REPOSICIÓN DEL RELOJ..................................................................... 33
§13. MANTENIMIENTO................................................................................... 33
§14. PROCEMENTO DE FIJACIÓN DE LAS MANECILLAS......................... 34
§15. DESMONTAJE Y MONTAJE DEL MECANISMO ................................... 36
§16. MÉTODO DE INSPECCIÓN Y DE AJUSTE DEL MECANISMO............ 43
Política de servicio individual
1) Descripción general Reloj de cuarzo analógico para caballeros con
calendario grande fácil de ver compuesto por el disco
de fecha “Eco-Drive Big Date" (1) y el disco de fecha
(2) y que posee la función Eco-Drive.
2) Mercado inicial de
ventas
EE.UU, Asia, Europa
3) Categoría de servicio B
4) Período de garantía:
1 año
Garantía Internacional: Aplicada
5) Reparación: • Lugar Cualquier centro de servicio
Observaciones:
6) Piezas Hasta 7 años después de la última producción
masiva.
7) Fecha de inicio de las
ventas
2007 July

4
1
§2. SPECIFICATIONS
§1. FEATURES
• Eco-Drive: Solar-powered and no battery replacement (page 3)
• The date window: Large and highly visible
• The calendar: No date correction at the end of months (page 4)
Caliber No. E310-00M
Type Analog solar-powered watch
Movement size (mm) ø28.8 x 27.9 x 4.16t
Accuracy Within ±15 seconds per month on average (when worn at normal
temperatures between 5°C/41°F and 35°C/95°F)
IC 1 unit of C/MOS-LSI
Operating temperature −10°C/14°F to +60°C/140°F
Display functions Time 24 hours, hours, minutes, seconds
Calendar Years passed since the last leap year, Month, Date
Additional functions
Perpetual calendar (until February 28, 2100)
Overcharge prevention function
Insufficient charge warning function
Operation
time
Fully charged to empty Approx. 12 months
Two second interval
movement to stop Approx. 3 days
Battery Secondary battery, 1pc.
*Specification may change without notice.
§3. PART NAMES AND THEIR MAIN FUNCTIONS
Button A:
For setting the date etc.
The illustrations in this instruction manual may differ from the actual appearance of your watch.
Hour hand
Minute hand
Button B:
For setting the
calendar-related functions
Crown:
For setting the time,
checking the date, etc.
Press HERE.
Example of a button
Date
24-hour hand:
Goes around
once a day
Second hand
English

5
2
§4. OPERATING THE CROWN
How to use the screw down crown
To release the crown
Turn the crown to the left until it pops out slightly.
To lock again
Tighten the crown completely by pressing and turning it to right.
When leaving the watch unused for an extended period of time
Pull out the crown to position .
All hands stop moving and the battery power is saved.
• The date will change to the following day every 24 hours
once you have pulled out the crown to position .
§5. CHARGING THE BATTERY
A. Charging the Battery
This watch has a battery which is charged by exposing the dial to light such as direct
sunlight or fluorescent lamps.
To obtain the best performance:
• Expose the dial to direct sunlight at least once a month.
• After taking off the watch, put it where the dial is exposed to bright light, such as by a
window.
• Before storing the watch in a dark place for an extended period of time, fully charge the
battery.
When the watch is covered with long sleeves, for example, the battery may not be charged
sufficiently. Try to keep the watch exposed to light.
Do not charge the battery at a high temperature (about 60°C/140°F or higher).
B. When the Battery Becomes Short of Power—Insufficient Charge Warning
Function
When the battery becomes short of power, the second hand moves once every two
seconds—insufficient charge warning function. Charge the battery by exposing the
dial to light.

6
3
C. Charging Time
Below are the approximate values when exposing to the light continuously. The charging
time differs depending on the color of dial or other conditions. Use the table below only for
your reference.
Illuminance
(Lx) Environment Charging time
to work for one
day (approx.)
Charging time to
start working
normally when
the battery is
empty (approx.)
Time for
charging fully
when the
battery is
empty
(approx.)
500 Interior lighting 4 hours 60 hours –––
1,000 60-70 cm (24-28 in.) under a fluorescent
lamp (30 W) 2 hours 25 hours –––
3,000 20 cm (8 in.) under a fluorescent lamp
(30 W) 40 minutes 7.5 hours –––
10,000 Under cloudy weather 11 minutes 2.5 hours 70 hours
100,000 Under direct sunlight in summer 2 minutes 45 minutes 35 hours
Battery duration after full charging (without further charging) : About 12 months
D. After the Battery is Fully Charged—Overcharge Prevention Function
After the battery is fully charged, charging automatically stops to prevent overcharging,
which may damage to the battery, or affect the accuracy, functions, and performance of
the watch.
Eco-Drive
This watch has the ”Eco-Drive” system, which converts light into electrical energy with the
solar cell beneath the dial.
The system makes you free from care of battery replacement and is environment-friendly
because of no battery disposal.
The two-second
interval movement
• After the battery is charged for a while, the second
hand will move normally.
• If you have not charged the battery for three days
or more since the warning movement began, the
battery will run out and the watch will stop.
Note: You cannot check or adjust the settings while
the warning movement continues, though you
can see the time.

7
4
§6. SETTING THE TIME
Date window
Second hand
24-hour hand
1. Pull out the crown to position .
All hands stop moving.
• To set the time accurately, pull out the crown when the
second hand is at the 0 second position.
2. Turn the crown to set the time.
All hands other than the second hand will move.
• Take care of the position of the 24 hour hand to set A.M. or P.M.
correctly.
• When you set the hands to around midnight, the date will change to
the following day. To return to the previous day, set the hands to any
position before 23:30.
Go to step 3 after the date has completely stopped.
3. Push in the crown to position .
The watch starts moving.
• To set the time accurately, push in the crown by the time signal.
§7. CHECKING THE DATE, MONTH, AND YEAR
You can check the date, month, and year*1.
The crown
position The button
operation
To check a date —
To check a month —
To check an year Pressing button
A*2
Button A
Date window
*1 This watch shows the number of years passed since the last leap year.
*2 Each time you press button Awhile the crown is set to position , you can display the month
and year alternately.
Display examples of the date window
When checking a date Ex. 5th day
When checking a
month
Ex. February
• “M” stands for Month.
When checking an year Ex. Next year of a leap year
• “L.Y.” stands for Leap Year.
The figures in the date window change slowly.
Perpetual calendar:
The date is automatically adjusted
until February 28, 2100.
So you do not need to correct it at
the end of months.

8
5
§8. SETTING THE YEAR, MONTH, AND DATE
Note: Do not operate between 23:00 and 0:30; otherwise, the date may not change even if the
24-hour hand moves past midnight.
The calendar setting has the following stages:
Enter the setting mode
(page 5)
Set the year
(page 5)
Set the month
(page 6)
Set the date
(page 6)
Before setting:
• You cannot go back to the previous setting.
• You cannot go to the next step while the figures in the date window are moving.
• To stop setting, change the position of the crown. In this case, the settings you have made are
cleared. The calendar setting has the following stages:
Date window
Date window
Button B
Button B
The figures in the date window move slightly up and down or
right and left, or change to tell you that you can do the next
operation.
1-1. Pull out the crown to position .
The month appears in the date window.
1-2. Press and hold button Buntil the figures in the date
window start moving.
The figures in the date window change slowly.
Set the number of years passed since the last leap year.
Button A
Year Passed year Year Passed year
2004 Leap year 2008 Leap year
2005 One year 2009 One year
2006 Two years 2010 Two years
2007 Three years 2011 Three years
Quick reference chart for number of years passed since
leap year
Ex. Setting value Window
When the current
year is a leap year 0
When two years
have passed 2
2-1. Press button Arepeatedly to set the year.
2-2. Press button B.
Now you can set the month.
1. Enter the setting mode
2. Set the year

9
3-2. Press button B.
Now you can set the ones digit.
3-3. Press button Arepeatedly to set the ones digit of the
month.
6
Date window
3-1. Press button Ato set the tens digit of the month.
Button B
Button A
Month Setting
value Window
From January to
September M0
From October to
December M1
Ex. Setting
value Window
September 9
November 1
4-1. Press button Arepeatedly to set the tens digit of the
date.
4-2. Press button B.
Now you can set the ones digit.
Ex. Setting
value Window
5th day 0
30th day 3
Ex. Setting
value Window
5th day 5
30th day 0
4-3. Press button Arepeatedly to set the ones digit of the
date.
3. Set the month
Set the month—tens digit, then ones digit.
4. Set the date
Set the date—tens digit, then ones digit.
The selectable date differs depending on the year and month you have set.
3-4. Press button B.
Now you can set the date.
5. Finish the setting
Push in the crown to position .
The settings are stored.
Date window
Button B
Button A

10
7
§9. HANDLING SOLAR POWERED WATCH
WARNINGS Handling the secondary battery
• Do not remove the battery. When it is required, keep the battery out of the reach of children to
prevent them from swallowing it.
• If the battery is swallowed, consult a doctor and seek medical treatment.
CAUTIONS Cautions about charging
• Excessively high temperature at charging battery may cause discoloration and deformation of
the exterior, and malfunction of the movement.
• Do not charge the battery at a high temperature (about 60°C/140°F or higher).
Examples:
− charging the battery by light such as an incandescent lamp or halogen lamp
− charging the battery where the temperature becomes extremely high—such as on the
dashboard
§
10.
TROUBLESHOOTING
If you have a problem with your watch, check the table below for a possible solution before
calling for service.
Symptoms Remedies Reference
page
The hands do not work properly
The second hand moves only once every
two seconds.
Charge the battery. 2
All hands stop moving. Push in the crown to position .4
Charge the battery. 2
The date display is not correct
The figures are not displayed upright. Check and correct the reference position. 8
The date is wrong. Set the year, month, and date correctly. 5 - 6
The date changes to the following day at
around noon.
Check if the 24-hour hand indicates the
correct time. 4
Others
The watch does not work properly even if
you have tried the remedies on page 7.
Reset the watch, then adjust the reference
position. 9
The watch does not move even if the
battery is fully charged.
Contact the Citizen Service Center or the
store where you purchased your watch. −

11
8
§
11.
CHECKING AND CORRECTING THE REFERENCE POSITION
The figures of the date window rotate referring to the “0” position as the initial position. If the “0”
position, the reference position, has moved off because of shock or other reasons, the figures
are not displayed upright. Correct the reference position following the procedure below when
the figures are not displayed upright.
1. Check the current reference position
1-1. Set the crown to position .
1-2. Press and hold button Buntil the figures start
moving to show the current reference position.
Check the current reference position after the figures
have stopped moving.
Position of figures The status of the reference position
“0”s of both digits are
shown upright.
The reference position is correct.
Go to step 1-3.
Other than above Ex. The reference position is wrong.
Go to step 2-1 to correct it (page 8).
• Follow step 2-1 within two minutes.
1-3. Press button Bto finish the procedure.
The current date will appear in the date window.
• The current date will also appear in the date
window if no operation is done for about two
minutes after step 1-2.
2. Correct the reference position
The figures in the date window move slightly up and down or right and left, or change to tell
you that you can do the next operation.
Date window
Date window
Button B
Button B
Button A
2-1. Pull out the crown to position .
You can correct the tens digit of the reference
position.
2-2. Press button Arepeatedly to display the “0” upright.
Each time you press the button, the “0” moves step
by step.
• When you press and hold button A, the “0” moves
seamlessly.
3. Finish the correction
Push in the crown to position .
The settings are stored and the current date will appear in the date window.
2-3. Press button Bto advance to the ones digit setting.
Each time you press the button, you can select the
tens digit and ones digit alternately.
2-4. Repeat step 2-2 to correct the ones digit of the
reference position.

12
9
§
12.
RESETTING THE WATCH
The watch may not work properly if it is affected by static electricity or shock.
In this case, reset the watch, then adjust the reference position and set the time, year, month,
and date again.
1. Pull out the crown to position .
All hands stop moving.
2. Press buttons Aand Bat the same time.
The reference position and the calendar are reset.
• When the reset is performed, the figures in the date
window move slightly up and down or right and left to
tell you that the operation has been completed.
3. Set the reference position.
Follow the procedure from step 2-2 to 2-4 on page 8.
4. Push in the crown to position .
The settings are stored and “01” appears in the date
window.
The calendar is set to “January 1st of a leap year.” To set
the time, year, month, and date again, refer to “Setting the
time” (page 4) and “Setting the year, month, and date”
(page 5).
Date window
Button B
Button A
§
13.
MAINTENANCE
Daily maintenance
• Rotate the crown while it is pressed in (position ) and press the buttons periodically so that
they will not be rusty.
• Wipe off dirt, perspiration, and water from the case and glass with a soft cloth.
• To clean a metal, plastic, or rubber watchband, wash away dirt with water. Use a soft brush to
remove dust and dirt stuck in the gaps in a metal band.
• Do not use solvents (thinner, benzine, etc.), as they may damage the finish.
Periodical inspections
Your watch needs an inspection once every two or three years for safety and longer usage. To
keep your watch water-resistant, the packing needs to be replaced regularly.
Other parts need to be inspected and replaced if necessary.
Ask for genuine Citizen parts upon replacement.

13
10
§14. HANDS FITTING PROCEDURE
Hand installation method
Process Point of work
1Installation of
hands
There are convex parts for fixing the dial
near by the 3 and 9 o'clock positions.
Fix the dial by setting its concave parts
to the convex parts.
2Preparation
for hand
installation
Manual setting
(1) Pull out the crown from the normal
position to the second click position.
Turn the crown counterclockwise
(Turn the hands clockwise) and find
the point at which the date dial starts
moving (Rough positioning).
(2) Install the minute hand to the 12
o'clock position temporarily when the
data dial starts.
60
24
30

14
Hand installation method
Process Point of work
3Preparation
for hand
installation
Manual setting
(3) Turn the crown clockwise (Turn the
hands counterclockwise) slowly
and stop when the date dial returns
(Move by 30 - 60 minutes).
(4) Turn the crown counterclockwise
(Turn the hands clockwise) more
slowly and stop precisely when the
date dial starts moving (Move by
about 40 minutes).
(5) Repeat steps (3) and (4) again for
cofirmation to find the precise point
at which the date dial starts moving.
4Installation of
hands
(6) Remove the minute installed
temporarily and install the second
hand, 24-hour hand, hour hand, and
minute hand to the 0 hour position.
Set in the case, and the work is
completed.
60
24
30
60
24
30
60
24
30
11

15
12
§15. DISASSEMBLY AND ASSEMBLY OF MOVEMENT
E
310
M
JAPAN
C1
A1
AR
B1
EV
PUSH
CITIZEN
WATCH CO.
NO JEWELS
E
310
M
JAPAN
C1
A1
AR
B1
EV
PUSH
CITIZEN
WATCH CO.
NO JEWELS
295
923
720
279
923
246
903
227
100
923
701
025
023
087
028
072
075
027
190
750
923
246
923
246
019
071
227
067
017
084
285
076
064
087
027
212
065
190
190

16
13
226
310
902
107
019
109
922
186
103
719
087
087
084
285
233
922
293
922
027
109
027
922
714
087
087
084
285
108 108

17
Process-1
Parts Name Parts No.
1Plate complete 750-***
2Stator 190-***
3Date stator 1 190-***
4Date stator 2 190-***
Process-2
Parts Name Parts No.
1Setting stem spacer 212-***
2Circuit board spacer x 2 027-***
3Coil unit 246-***
4Date coil unit 1 246-***
5Date coil unit 2 246-***
6Coil screw 923-***
7Clutch wheel 064-***
8Setting wheel 076-***
9Setting lever 067-***
10 Switch spring 227-***
11 Yoke 071-***
Process-3
Parts Name Parts No.
1 Hour wheel 075-***
2 Intermediate 24-hour
wheel
087-***
3 Intermediate minute
wheel
087-***
4 Minute wheel and pinion 072-***
Lubrication: [AO-2]=F, [AO-3]=A, [AO-V]=V, [AO-G08]=CH-1
1-1
1-2
1-3 1-4
2-2
2-1
2-4
2-3
2-5
2-11
2-6
2-9
2-10
2-7
2-8
2-6
2-6
2-2
3-3
3-4
3-1
3-2
14
Process 1 →15: Assembly procedure
Process 15 →1: Disassembly procedure

18
Process-4
Parts Name Parts No.
1 Rotor 285-***
2 Second wheel 025-***
3 Fourth wheel and pinion 023-***
4 Fifth wheel and pinion 084-***
5 Cannon pinion with wheel 028-***
6 Third wheel and pinion 017-***
Process-5
Parts Name Parts No.
1 Lub. cannon pinion with
driving wheel slipping
part
AO-G08
2 Lub. yoke shaft AO-V
3 Lub. setting lever - yoke
click point AO-V
4 Lub. setting lever shaft AO-V
5 Lub. switch spring -
circuit unit supporter
sliding part
AO-V
6 Lub. Yoke - clutch wheel
sliding part AO-V
7 Lub. setting wheel boss AO-V
Process-6
Parts Name Parts No.
1 Lub. Train wheel bridge
center pipe AO-3
2 Train wheel bridge 701-***
3 Train wheel bridge screw
x 3 923-***
4 Additional time wheel 100-***
5 24 hour corrector wheel 227-***
6 Minus lead plate 903-***
Lubrication: [AO-2]=F, [AO-3]=A, [AO-V]=V, [AO-G08]=CH-1
15
4-6
4-5
4-1
4-4
4-2
4-3
5-1
5-2
5-3
5-4
5-5
5-6
5-7
6-3
6-5
6-2
6-3
6-3
6-4
6-6
6-1
6-1
Set the mark of the additional time wheel to the
contact point of the longer one / Do not pile up
multiple pieces.

19
16
Process-7
Parts Name Parts No.
1Lub. rotor upper shaft AO-2
2Lub. fth wheel upper shaft AO-2
3Lub. second wheel upper
shaft AO-3
4Lub. fourth wheel and pinion
upper shaft AO-3
5Lub. third wheel and pinion
upper shaft AO-3
6Lub. intermediate minute
wheel AO-3
7Lub. minute wheel and
pinion upper shaft AO-3
8Lub. intermediate 24-hour
wheel upper shaft AO-3
9Lub. date rotor 1 lower shaft AO-2
10 Lub. date rotor 2 lower shaft AO-2
11 Setting lever spring 019-***
Process-8
Parts Name Parts No.
1 Unit of electronic circuit 279-***
2 Circuit unit supporter 720-***
3 Circuit unit supporter
screw x 5
923-***
4Lub. setting stem AO-V
5 Setting stem 065-***
6Lub. additional time
wheel upper shaft
AO-3
Process-9
Parts Name
Parts No.
1
Lower plate
719-***
2
Lub. rotor lower shaft
AO-2
3
Lub. fth wheel and pinion lower shaft
AO-2
4
Lub. second wheel lower shaft
AO-3
5
Lub. fourth wheel and pinion lower shaft
AO-3
6
Lub. third wheel and pinion lower shaft
AO-3
7
Lub. intermediate 24-hour wheel lower shaft
AO-3
8
Lub. additional time wheel lower shaft
AO-3
9
Lub. minute wheel and pinion lower shaft
AO-3
10
Lub. intermediate minute wheel lower shaft
AO-3
11
Lub. intermediate date wheel 1 lower shaft
AO-2
12
Lub. intermediate date wheel 2 lower shaft
AO-3
13
Lub. intermediate date wheel 3 lower shaft
AO-3
14
Lub. intermediate D driving wheel 1 lower
shaft
AO-2
15
Lub. intermediate D driving wheel 2 lower
shaft
AO-3
16
Lub. intermediate D driving wheel 3 lower
shaft
AO-3
17
Lub. date dial driving wheel lower shaft
AO-3
Lubrication: [AO-2]=F, [AO-3]=A, [AO-V]=V, [AO-G08]=CH-1
7-1
7-2
7-3
7-4
7-5 7-6
7-7
7-8
7-9
7-10
7-11
8-1
8-3
8-3
8-2
8-5
8-3
8-3
8-6
8-3
8-4
9-2
9-3
9-4
9-59-6
9-7
9-8
9-9
9-10
9-11
9-12
9-13
9-14
9-15
9-16
9-17
9-1

20
17
Process-10
Parts Name Parts No.
1 Shield plate 186-***
2 Date rotor 1 285-***
3
Intermediate date wheel 1
084-***
4
Intermediate date wheel 3
087-***
5
Intermediate date wheel 2
087-***
6 Date rotor 2 285-***
7 Intermediate date driving
wheel 1
084-***
8 Intermediate date driving
wheel 2
087-***
9 Intermediate date driving
wheel 3
087-***
10 Date dial driving wheel 103-***
Process-11
Parts Name Parts No.
1 Calendar supporter 714-***
2 Date dial guard gib 027-***
3 Calendar supporter gib 027-***
4 Date jumper 109-***
5 Date dial driving wheel
jumper
109-***
Process-12
Parts Name Parts No.
1
Date dial driving wheel
jumper guard
019-***
2
Date dial driving jumper
guard screw x 2
922-***
3
Calendar supporter screw
× 2
922-***
4
Lub. date rotor 1 upper
shaft
AO-2
5
Lub. intermediate date
wheel 2 upper shaft
AO-3
6
Lub. date rotor 2 upper
shaft
AO-2
7
Lub. intermediate D driving
wheel 2 upper shaft
AO-3
8
Lub. intermediate D driving
wheel 3 upper shaft
AO-3
Lubrication: [AO-2]=F, [AO-3]=A, [AO-V]=V, [AO-G08]=CH-1
10-7
10-1
10-2
10-3
10-5
10-4
10-9
10-8
10-10
10-6
11-2
11-3
11-4
11-1
11-5
12-3
12-3
12-1
12-2
12-2
12-4
12-5
12-6
12-7
12-8
Table of contents
Languages:
Other Citizen Watch manuals

Citizen
Citizen Avion Blue User manual

Citizen
Citizen B110 Operating manual

Citizen
Citizen 6870 Manual

Citizen
Citizen GP10 User manual

Citizen
Citizen JS20 User manual

Citizen
Citizen 6P26 User manual

Citizen
Citizen Eco-Drive BP1 User manual

Citizen
Citizen W770 Operating instructions

Citizen
Citizen JS50 User manual

Citizen
Citizen H504 User manual

Citizen
Citizen 7980E Manual

Citizen
Citizen J304 User manual

Citizen
Citizen AT8260-18A User manual

Citizen
Citizen AIR DUNK ME5 series User manual

Citizen
Citizen JW00 Series User manual

Citizen
Citizen JS06 User manual

Citizen
Citizen C45 User manual

Citizen
Citizen F158 User manual

Citizen
Citizen 0S21 User manual

Citizen
Citizen E610 User manual