manuals.online logo
Brands
  1. Home
  2. •
  3. Brands
  4. •
  5. CLA-VAL
  6. •
  7. Control Unit
  8. •
  9. CLA-VAL 34AR Series User manual

CLA-VAL 34AR Series User manual

This manual suits for next models

2

Other CLA-VAL Control Unit manuals

CLA-VAL 790-01 Owner's manual

CLA-VAL

CLA-VAL 790-01 Owner's manual

CLA-VAL 50B-5KG Owner's manual

CLA-VAL

CLA-VAL 50B-5KG Owner's manual

CLA-VAL 92-07 Owner's manual

CLA-VAL

CLA-VAL 92-07 Owner's manual

CLA-VAL 81-02/681-02 Owner's manual

CLA-VAL

CLA-VAL 81-02/681-02 Owner's manual

CLA-VAL 90-21 Owner's manual

CLA-VAL

CLA-VAL 90-21 Owner's manual

CLA-VAL 50B-5KG Installation and operating instructions

CLA-VAL

CLA-VAL 50B-5KG Installation and operating instructions

CLA-VAL 43-01/643-01 User manual

CLA-VAL

CLA-VAL 43-01/643-01 User manual

CLA-VAL 90-01 Owner's manual

CLA-VAL

CLA-VAL 90-01 Owner's manual

CLA-VAL 90-48 Owner's manual

CLA-VAL

CLA-VAL 90-48 Owner's manual

CLA-VAL 50B-4KG1 Installation and operating instructions

CLA-VAL

CLA-VAL 50B-4KG1 Installation and operating instructions

CLA-VAL 40-01/640-01 Installation and operating instructions

CLA-VAL

CLA-VAL 40-01/640-01 Installation and operating instructions

CLA-VAL 50-49 Instruction manual

CLA-VAL

CLA-VAL 50-49 Instruction manual

CLA-VAL CRL-60 Owner's manual

CLA-VAL

CLA-VAL CRL-60 Owner's manual

CLA-VAL 36 Series Instruction manual

CLA-VAL

CLA-VAL 36 Series Instruction manual

CLA-VAL 49-01 Installation and operating instructions

CLA-VAL

CLA-VAL 49-01 Installation and operating instructions

CLA-VAL 340-07 General instructions

CLA-VAL

CLA-VAL 340-07 General instructions

CLA-VAL RF-DBF Instruction manual

CLA-VAL

CLA-VAL RF-DBF Instruction manual

CLA-VAL 131-01 General instructions

CLA-VAL

CLA-VAL 131-01 General instructions

CLA-VAL 50B-4KG1 Installation and operating instructions

CLA-VAL

CLA-VAL 50B-4KG1 Installation and operating instructions

CLA-VAL 134E-83 User manual

CLA-VAL

CLA-VAL 134E-83 User manual

CLA-VAL 50-01 Installation and operating instructions

CLA-VAL

CLA-VAL 50-01 Installation and operating instructions

CLA-VAL 581 Owner's manual

CLA-VAL

CLA-VAL 581 Owner's manual

CLA-VAL 50-20 Instruction manual

CLA-VAL

CLA-VAL 50-20 Instruction manual

CLA-VAL 81-02 User manual

CLA-VAL

CLA-VAL 81-02 User manual

Popular Control Unit manuals by other brands

Seitz 14A80 user manual

Seitz

Seitz 14A80 user manual

Wilo RS485 Installation and operating instructions

Wilo

Wilo RS485 Installation and operating instructions

Becker CentralControl CC41 Commissioning Instruction

Becker

Becker CentralControl CC41 Commissioning Instruction

SICK CDB650 operating instructions

SICK

SICK CDB650 operating instructions

Panduit NetKey NKP5E88M Series installation instructions

Panduit

Panduit NetKey NKP5E88M Series installation instructions

MX Options Concentric Petite Fitting instructions

MX

MX Options Concentric Petite Fitting instructions

Clean Water Systems Fleck 2510 Installation & start?up guide

Clean Water Systems

Clean Water Systems Fleck 2510 Installation & start?up guide

Fairchild FSB44104A user guide

Fairchild

Fairchild FSB44104A user guide

LEGRAND Wattstopper LMIN-104 installation instructions

LEGRAND

LEGRAND Wattstopper LMIN-104 installation instructions

PMK ATT10BNCS instruction manual

PMK

PMK ATT10BNCS instruction manual

Tektronix TDS3FFT user manual

Tektronix

Tektronix TDS3FFT user manual

Woodward easYgen Technical manual

Woodward

Woodward easYgen Technical manual

Balluff BNI EIP-502-105-R015 user guide

Balluff

Balluff BNI EIP-502-105-R015 user guide

NXP Semiconductors TWR-LS1021A Getting started

NXP Semiconductors

NXP Semiconductors TWR-LS1021A Getting started

Advantech PCM-3117 Startup manual

Advantech

Advantech PCM-3117 Startup manual

Danfoss MCO 101 manual

Danfoss

Danfoss MCO 101 manual

Moons' Lin Engineering R701P user manual

Moons'

Moons' Lin Engineering R701P user manual

Aventics RV1 operating instructions

Aventics

Aventics RV1 operating instructions

manuals.online logo
manuals.online logoBrands
  • About & Mission
  • Contact us
  • Privacy Policy
  • Terms and Conditions

Copyright 2025 Manuals.Online. All Rights Reserved.

34AR
INTRODUCTION
Cla-Val Air Release Valves (ARVs) are built with stainless
steel trim to insure years of maintenance free service on
water systems. ARVs are float operated and have a
resilient orifice button for water tight shut off. Model num-
ber and working pressure (psi) are shown on the metal tag
on each ARV. According to AWWA Std’s C512-92
ote: These ARVs are not recommended for raw sewage
use or fluids containing a major percentage of suspended
solids. For this service use Series 34WW ARVs.
RECEIVING AND STORAGE
Upon receipt inspect shipment for damage, ARVs should
remain boxed until they are ready to be installed.
DESCRIPTION OF OPERATION
ARVs operate automatically to release pockets of air from
high points of water system (See fig. 1 & 2). ARVs are ini-
tially normally open and will vent air thru the orifice as the
water system is filled with fluid. As the fluid level rises in the
ARV so does the float to shut off the orifice. Subsequently
as air in the system collects in the ARV, the fluid is dis-
placed, allowing the float to drop, opening the orifice and
the collected air pocket is vented. The cycle is continually
repeated automatically, as air collects in the ARV.
INSTALLATION
ARV must be installed vertically in each high point for prop-
er operational performance. Pipeline installations may
require a valve vault or freeze protection. When ARVs shut
some fluid may spill, therefore piping the outlet to a drain is
recommended particularly in a pump room. A shut off valve
could be installed at the ARV inlet for servicing.
SERIES
INSTALLATION / OPERATION / MAINTENANCE
SIMPLE & COMPOUND LEVER AIR RELEASE VALVE
Fig. 2
Fig. 1
Open Position
Simple Lever
ARV
Open Position
Compound Lever
ARV
CONSTRUCTION MATERIALS
Standard materials of construction are listed in Tables below for Simple and Compound Level ARVs.
All internal componets are stainless steel with the exception of the orifice button.
General details of construction are illustrated in Figure 2. The body (1) is threaded for connection to the pipline. The seat
(4) is threaded into the cast cover (2).
OUTLET
17
34
PIPE PLUG
OPTIONAL
4 3/4"
INLET
5 1/4"
21
4
2
6
3
13
12
10
11
7
5
1
TEST PRESSURE
1.5 TIMES
WORKING PRESSURE
INLET
OUTLET
4
7
2
6
11
22
34
18
3
33
1
5
14
30
8
12
13
19
10
17
14
21
TEST PRESSURE
1.5 TIMES
WORKING PRESSURE
7"
10"
Item Description
1 Body
10 Float Arm*
2 Cover
11 Orifice Button*
3 Lever Frame*
12 Pivot Pin*
4 Seat*
13 Pin Retainer*
5 Float*
17 Float Retainer*
6 Gasket*
21 Locator*
7 Cover Bolt
34 Lock Washer*
Item Description
1 Body
13 Retaining Ring*
2 Cover
14 Pipe Plug
3 Lever Frame*
17 Float Retainer*
4 Seat*
18 Lock ut*
5 Float*
19 Link*
6 Gasket*
21 Locating Pin*
7 Cover Bolt
22 Orifice Button Arm*
8 Retaining Screw*
30 Washer*
10 Float Arm*
33 Clevis*
11 Orifice Button*
34 Lock Washer*
12 Pivot Pin*
*Recommended Repair Part Kit
Figure 2. Simple Lever Air Release Valves
Figure 2. Compound Lever Air Release Valves
PARTS LIST
PARTS LIST
MAINTENANCE
The simple and compound Air Release Valves (ARV)
require no regular lubrication or maintenance.
A Periodic inspection to verify operation can be performed.
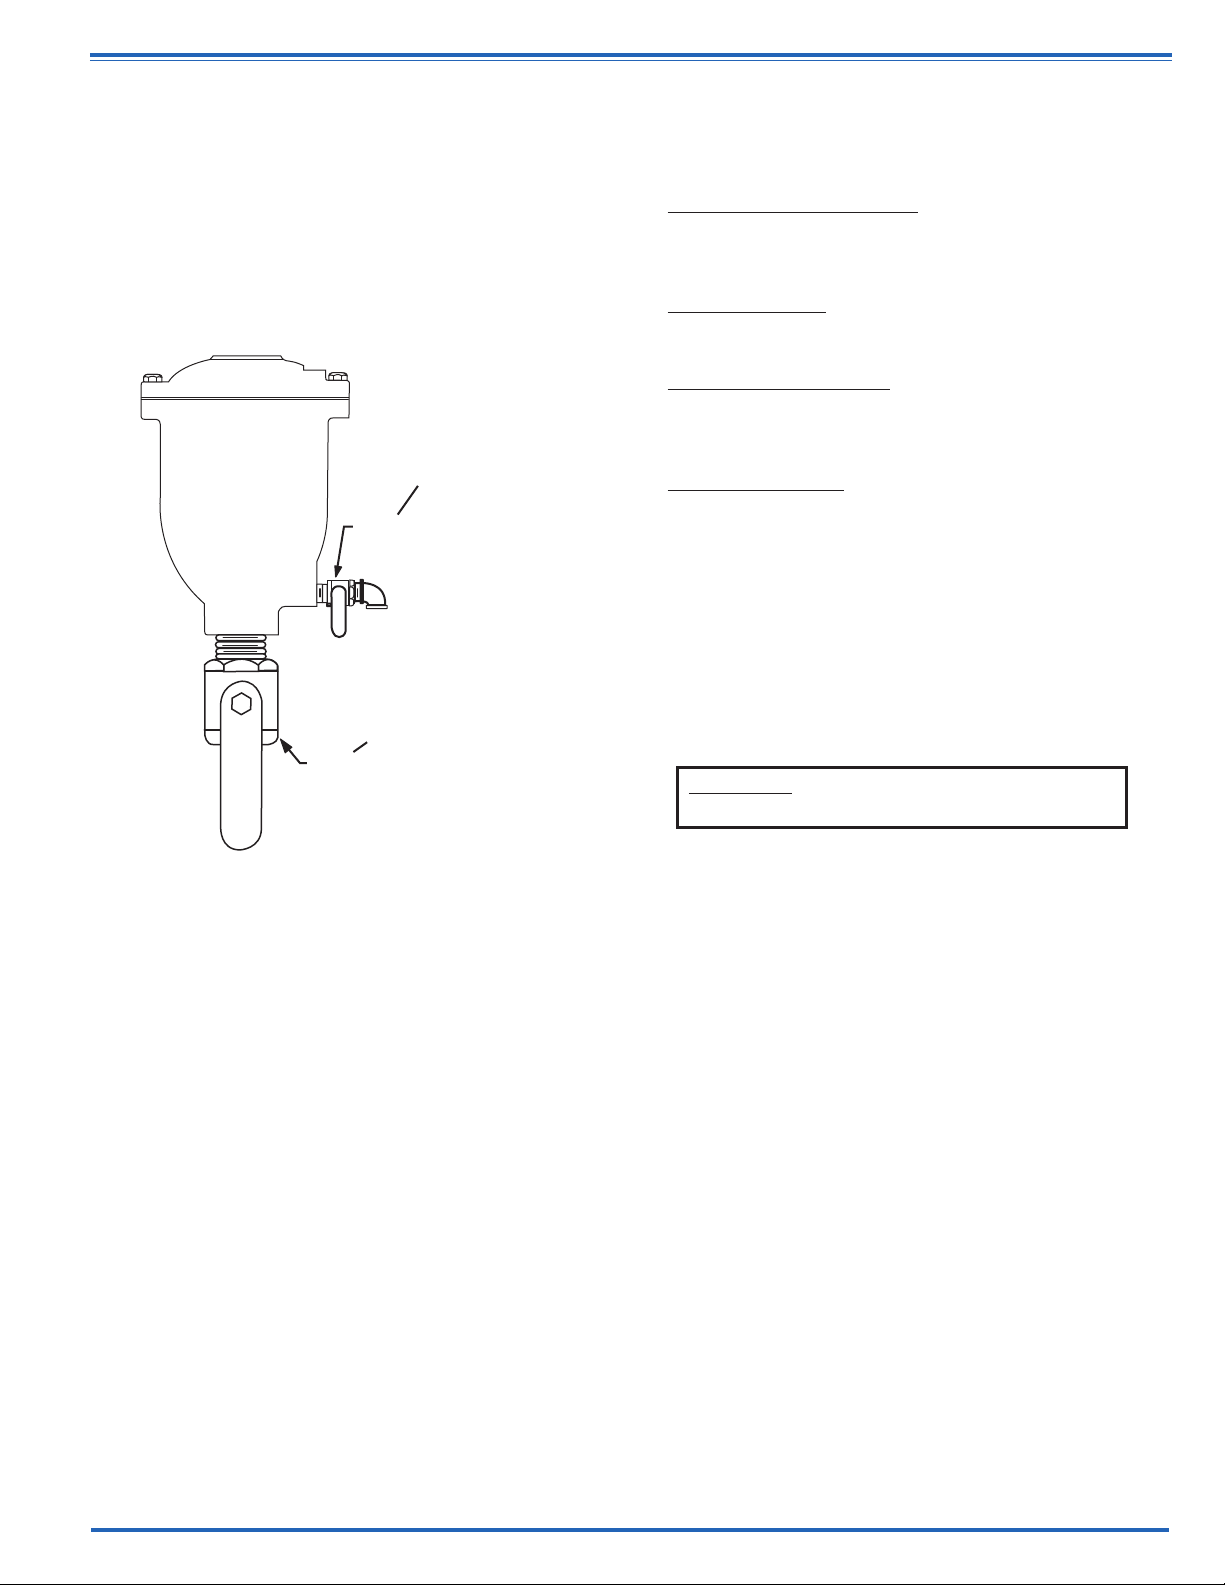
A manual drain valve can be installed in place of the lower
drain plug (14 - Fig. 2) to perform this operation as shown in
Figure 3.
1. Partially open inlet shut off valve until water flow is
visible. This will indicate the ARV is working properly. If
only air flow observed is follow steps 2-6.
2. Close inlet shut-off valve.
3. Slowly open drain valve to allow fluid in ARV to drain. If
draining is difficult, the orifice may be clogged (valve
requires service).
4. Close drain valve.
5. Slowly crack open inlet shut-off valve to fill ARV with fluid.
Observe the seating action and verify that valve closes
without leakage.
6. If leakage occurs, remove ARV to inspect internals for
wear or damage from foreign objects.
PROBLEMS
Solutions, presented below, will assist you troubleshooting
the ARV assembly in an efficient manner.
•Leakage at Inlet Connection: Tighten valve threaded
connection. If leaks persists, remove valve and seal
threads with pipe sealant.
•Leakage at Cover: Tighten bolts per Table 2, or replace
cover gasket.
•ARV Leaks when Closed: Flush ARV to remove debris.
Disassemble and inspect seat, orifice button, for damage
and float for water content.
•ARV not Venting Air: Check that system operating
pressure does not exceed Working Pressure on ARV
nameplate. Inspection per steps 2-6 and disassemble
valve if problems persists.
DISASSEMBLY
Work on the ARV Should be one by a Qualified Mechanic
The ARV can be disassembled without removing it from the
pipeline. Or for the ARV can be removed from the line. o
special tools are required to make repairs.
1. Close inlet shut-off valve. Open drain valve or slowly remove
drain plug. Remove the cover bolts (7) from top cover
2. Pry cover (2) loose and lift off ARV body.
3. Remove the 2 retainer rings (13) and pivot pins (12) that
pass through the lever frame (3). The float (5) and linkage will
be free from the cover. Disconnect float from lever (10).
4. To remove lever frame (3), remove two rounded-head
fasteners (8). Rotate seat (4) counter-clockwise to remove.
5. Remove locknut (18) and orifice button (11) from orifice
button arm (22).
6. Clean and inspect parts. ote: some floats contain sand
for required weight; if water is detected, replace float.
Replace worn parts as necessary and lubricate parts with
food grade grease.
WARNING: The valve must be depressurized
before taking the over off.
OUTLET
Can be installed on
Compound Lever Only
Drain
Valve
Can be installed on
Simple and Compund
Lever ARV
Inlet
Shut-Off
Valve
FIG. 3 INSPECTION
REASSEMBLY
Clean all parts and gaskets surfaces with a wire brush in the
direction of the serrations or machine marks. Replace worn
parts, gaskets and seals before reassembly. Refer to Figure 2.
1. Apply Loctite PST o. 565 thread sealant to seat (4) and
screw into cover with maximum torque of 20 ft-lbs;
DO NOT OVER-TORQUE.
2. Screw down lever frame (3) to cover, over locating pin (21)
in cover, with screws (8) and washers (30).
3. Install new orifice button (11) flush to arm (22). Assemble
lockwasher (34) and locknut (18) over orifice button but do
not tighten. (see 5)
4. Connect arms (10 & 22) and assemble to lever frame (3) with
four pivot pins (12) and retaining rings (13); rings should
snap over pins.
5. Adjust orifice button (11) so that orifice button arm (22)
slopes up about 1/16” when resting gently against seat (4) as
shown in Figure 4. Secure button by tightening lockwasher
(34) and nut (18).
6. Attach float (5) by installing last pivot pin (12) into lever frame
(3). Float should lift freely pressing the orifice button (11)
against the seat (4) when pushed upward. Verify that all
retainers rings (13) are properly secured.
7. Lay new cover gasket (6) on clean surface and apply a
gasket compound such as Garlock 101-S to both surfaces.
Assemble gasket (6) and cover (2) over bolt holes in body (1).
8. Lubricate bolts (7) and tighten to the torques in Table 2.
9. Install ARV back in service. Refer to installation instructions.
Slowly open inlet shut-off valve. Valve is now back in
operation mode.
For above parts description and recommended spare parts kit see page 2
PARTS AND SERVICE
Parts and service are available from Cla-Val agent or distributor
or the factory.
ote the ARV Model o. and Working Pressure are on the ARV
nameplate. 3/2011
SIZE
1/4”
5/16”
3/8”
7/16”
1/2”
7/8”
TORQUE (FT-LBS)
6
11
19
30
45
202
1/16"
4
2
11
22
34
18 3
OUTLET
12
19
13
8
CLA-VAL
1701 Placentia Ave •Costa Mesa CA 92627 •Phone: 949-722-4800 •Fax: 949-548-5441 •E-mail: [email protected] •www.cla-val.com
Copyright Cla-Val 2018
•
Printed in USA
•
Specifications subject to change without notice.
©
-Air Release Valve 34AR (R-01/2018)
Figure 4. C mp und Lever ARV mechanism
f r Orifice Butt n Adjustment