manuals.online logo
Brands
  1. Home
  2. •
  3. Brands
  4. •
  5. claber
  6. •
  7. Lawn And Garden Equipment
  8. •
  9. claber Oasis 8053 User manual

claber Oasis 8053 User manual

Oasis
Oasis
Page 1
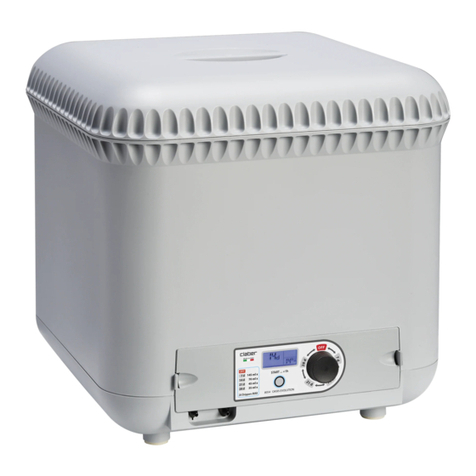
Position. Oasis® must be installed in closed environments, protected from atmospheric agents and poor weather conditions. To
prevent the water in the internal tank from overheating, position Oasis® in a shaded and cool area, away from windows or glass parti-
tions and in any case, away from direct sunlight.
Once the installation position has been selected, lift Oasis® holding it at the bottom with both hands and place it on a unit or a shelf,
at a height of approximately 70-80 cm from the ground: the unit or the shelf must be stable, level and be able to support the weight
of Oasis® when full of water (approximately 30 kg). Also, make sure that Oasis® is at least 50 cm from the edge of the tallest pot.
Position. Position the plant pots on the oor near the unit where Oasis® is positioned.
Remember to place a pot saucer below the plants to collect any excess water.
Plant the plastic stakes provided in the soil: each stake will correspond to a dripper (the maximum number of
drippers which can be used with Oasis® is 20). Useful suggestions: place the stakes close to the stems of the
plants; use one or more stakes per pot, depending on the pot size and individual plants' water requirements.
For Oasis (cod.): 8053
60
120
ml
30
40
20DAYS
10DAYS
OFF
40DAYS
30DAYS
70 - 80 cm (MIN)
50 cm (MIN)
User manual
User manual
1
12
2
1
12
2
60
120
ml
30
40
20DAYS
10DAYS
OFF
40DAYS
30DAYS
Oasis
Oasis
Page 2
Fitting the battery. In order to operate, Oasis® requires a new 9V (6LR61) Alkaline battery, with an expiry date exceeding one year.
To insert or replace the battery, proceed as follows: Act on the keys on the sides of the front panel (1) until you hear it engage. SIf
present, remove the at battery (2). Connect the new battery to the connector respecting the polarity (3). Put the new battery into
the battery compartment (4). Replace the front panel (5). For optimal operation, it is recommended that the battery is replaced at
least once a year. In any case, before using Oasis®, check the battery charge by turning the programming selector switch to any
programme and checking the led light: the led ashes approximately every 2 seconds the battery is charged, the led stays o the
battery is drained and needs to be replaced.
Connection. In order to ensure that Oasis® operates correctly, the two lengths of hose leading from the tank panel must be
long enough to touch the oor before they are connected to the drippers in the rst pots: this simple precaution is necessary
to make sure that watering starts correctly.
Unroll the hose moving around the plants making sure that they do not obstruct people or animals and select the shortest
possible path. Insert the hose into the forks of the individual stakes until it takes on the correct shape, taking care not to
create kinks in the hose. Once all the pots have been connected, bring the hose back to the second connector in the front
panel of Oasis® (if necessary, cut o the excess hose using scissors).
For Oasis (cod.): 8053
User manual
User manual
9 V 6LR61
Alkaline
2
23
3
1
12
23
3
60
120
ml
30
40
20 DAYS
10 DAYS
OFF
40 DAYS
30 DAYS
1
1
4
4
60
120
ml
30
40
20 DAYS
10 DAYS
OFF
40 DAYS
30 DAYS
5
5
60
120
ml
30
40
20 DAYS
10 DAYS
OFF
40 DAYS
30 DAYS
60
120
ml
30
40
20DAYS
10DAYS
OFF
40DAYS
30DAYS
60
120
ml
30
40
20DAYS
10DAYS
OFF
40DAYS
30DAYS
20 DAYS
10 DAYS
OFF
40 DAYS
30 DAYS
c
c
a
a
b
b
a
a
b
b
Oasis
Oasis
Page 3
Connection. Cut the distribution hose approximately 2 cm from the stake. Connect a dripper by pressing the
hose rmly onto each end: make sure that the dripper outlet is facing downwards. Use the same procedure for
all the other stakes, until all the drippers required have been tted. You have now created the circuit which will
distribute the water to the pots, complete with drippers.
Filling. Check that the programming selector switch is set to - OFF and use a watering can to rell the water
tank with 25 litres of water.
Any liquid or granular fertilisers are to be added directly to the soil in the pots, do not under any circumstances
put them into the water in the tank. Close the cover before activating Oasis®.
For Oasis (cod.): 8053
User manual
User manual
2
2
1
12
2
1
1
2 cm
b
b
a
a
25 Lt
60
120
ml
30
40
20DAYS
10DAYS
OFF
40DAYS
30DAYS
60
120
ml
30
40
20 DAYS
10 DAYS
OFF
40 DAYS
30 DAYS
25 Lt
OFF
OFF
60
120
ml
30
40
20DAYS
10DAYS
OFF
40DAYS
30DAYS
Oasis
Oasis
Page 4
Selecting the watering programme.
Oasis® has 4 programmes, specially designed to allow independent opera-
tion for 10, 20, 30 or 40 days autonomy which can be selected using the programming selector switch on the
front.
Distribution of the four programmes takes place at two separate times during the day as follows:
Selecting thte watering programme.
To select the required programme, set the programming selector switch
from - OFF to the required position: 10, 20, 30 or 40 days. Oasis® is now in operation, automatically controlled
by the electronic timer. Regardless of the water level in the tank, Oasis® will deliver the same amount of water to
your pots each day, throughout the programmed period, thanks to a special internal device which automatically
regulates the water pressure. As you can see from the table, the total amount delivered is always 24 litres. Since
the tank's capacity is 25 litres, it will never be completely emptied. This will prevent air bubbles from entering the
distribution hose.
For Oasis (cod.): 8053
60
120
ml
30
40
20DAYS
10DAYS
OFF
40DAYS
30DAYS
60
120
ml
30
40
20 DAYS
10 DAYS
OFF
40 DAYS
30 DAYS
60
120
ml
30
40
20 DAYS
10 DAYS
OFF
40 DAYS
30 DAYS
User manual
User manual
1
1
1
1
PROGRAMME
O - 10 DAYS
O - 20 DAYS
O - 30 DAYS
O - 40 DAYS
20 days
40 days
60 days
80 days
10 days
20 days
30 days
40 days
12 l
12 l
12 l
12 l
24 l
24 l
24 l
24 l
12x2
6x2
4x2
3x2
60x2 cc per days
30x2 cc per days
20x2 cc per days
15x2 cc per days
TIME
(in min)
20
pots
10
pots
20
pots
10
pots
AUTONOMY
(no. days) WATER
DISTRIBUTION
PER DRIPPER
(in cm3)
TOTAL DELIVERED
(in litres)
Oasis
Oasis
Page 5
Venting the air from the circuit.
For your Oasis® to operate correctly, you must expel all the air from inside the
circuit. The procedure is very simple.
Set up the system and switch on your Oasis® with your preferred program.
Disconnect the hose connected to the dripper halfway along the loop circuit, put your nger over one end to
seal it, and wait for water to ow from the free end. Now put a nger over the end of the hose from which water
is owing, and at the same time remove your nger from the other end of the circuit allowing the water to ow.
At this point, reconnect the hose to the dripper and restore the loop circuit.
Cleaning the lter. The lter must only be removed and retted when the tank is empty.
Before each use check the state of the lter and eliminate any impurities from the water which may have been
caught by the mesh. If necessary, remove the lter and rinse under running water.
Cleaning the drippers.
The drippers can be cleaned and inspected to allow them to be cleaned inside if neces-
sary: to do this, separate the two pieces which make up the dripper and rinse them under running water.
For Oasis (cod.): 8053
User manual
User manual
2
23
3
1
1
4
45
56
6
2
23
3
1
1
4
45
56
6
Oasis
Oasis
Page 6
Cleaning and maintenance.
When no longer in use:
- Set the programming selector switch to - OFF.
- disconnect both ends of the hose from their connectors, blow into the hose to drive all the water out and into
a container (for example, a watering can).
- Remove the cover and lift Oasis® from the bottom using both hands and then empty into a sink.
For Oasis (cod.): 8053
User manual
User manual
1
1
2
2
3
3
a
ac
c
b
b
60
120
ml
30
40
20DAYS
10DAYS
OFF
40DAYS
30DAYS
60
120
ml
30
40
20 DAYS
10 DAYS
OFF
40 DAYS
30 DAYS
b
b
60
120
ml
30
40
20DAYS
10DAYS
OFF
40DAYS
30DAYS
60
120
ml
30
40
20 DAYS
10 DAYS
OFF
40 DAYS
30 DAYS
60
120
ml
30
40
20 DAYS
10 DAYS
OFF
40 DAYS
30 DAYS
60
120
ml
30
40
20DAYS
10DAYS
OFF
40DAYS
30DAYS
60
120
ml
30
40
20DAYS
10DAYS
OFF
40DAYS
30DAYS
60
120
ml
30
40
20DAYS
10DAYS
OFF
40DAYS
30DAYS
a
a
Oasis
Oasis
Page 7
Cleaning and maintenance.
- check the state of the lter and eliminate any impurities from the water which may have been caught by the
mesh.
- Remove the battery.
- Use a soft cloth to dry the inside and outside of the tank and put Oasis® back with the cover tted.
Do not disconnect the drippers from the hose: this avoids the risk of pieces being lost, and the distribution circu-
it will be ready the next time it is needed. Remove any remaining soil from the stakes. For convenient storage, all
the parts can be placed inside the empty tank.
For Oasis (cod.): 8053
For more information and further details, please consult the instruction manual supplied with the product.
User manual
User manual
1
1
2
2
3
3
60
120
ml
30
40
20DAYS
10DAYS
OFF
40DAYS
30DAYS
60
120
ml
30
40
20 DAYS
10 DAYS
OFF
40 DAYS
30 DAYS
a
a
c
c
b
b
60
120
ml
30
40
20DAYS
10DAYS
OFF
40DAYS
30DAYS
60
120
ml
30
40
20 DAYS
10 DAYS
OFF
40 DAYS
30 DAYS
60
120
ml
30
40
20 DAYS
10 DAYS
OFF
40 DAYS
30 DAYS
c
c
60
120
ml
30
40
20 DAYS
10 DAYS
OFF
40 DAYS
30 DAYS
b
b
a
a
a
a
b
b

Other claber Lawn And Garden Equipment manuals
claber OASIS EVOLUTION 8054 User manual

claber

claber OASIS EVOLUTION 8054 User manual

claber 90480 User manual

claber

claber 90480 User manual

claber AQUAUNO PRATICO PLUS User manual

claber

claber AQUAUNO PRATICO PLUS User manual

claber Colibri Series User manual

claber

claber Colibri Series User manual

claber TURBO-JET User manual

claber

claber TURBO-JET User manual

claber HYDRO-4 RF User manual

claber

claber HYDRO-4 RF User manual

claber 8061 User manual

claber

claber 8061 User manual

claber Rotoroll User manual

claber

claber Rotoroll User manual

claber IDRIS SPIKE User manual

claber

claber IDRIS SPIKE User manual

claber AQUAUNO VIDEO 8428 User manual

claber

claber AQUAUNO VIDEO 8428 User manual

claber 90832 User manual

claber

claber 90832 User manual

claber 8423 User manual

claber

claber 8423 User manual

claber Rotoroll Technical specifications

claber

claber Rotoroll Technical specifications

claber OASIS EVOLUTION User manual

claber

claber OASIS EVOLUTION User manual

claber Rotoroll User manual

claber

claber Rotoroll User manual

claber AQUAUNO SELECT User manual

claber

claber AQUAUNO SELECT User manual

claber AQUAUNO LOGICA 8422 User manual

claber

claber AQUAUNO LOGICA 8422 User manual

claber Hydro 4 User manual

claber

claber Hydro 4 User manual

claber DUAL LOGIC User manual

claber

claber DUAL LOGIC User manual

claber 8900 User manual

claber

claber 8900 User manual

claber Aquauno PRATICO User manual

claber

claber Aquauno PRATICO User manual
claber 8487 User manual

claber

claber 8487 User manual

claber Aquauno PRATICO User manual

claber

claber Aquauno PRATICO User manual

claber 90831 User manual

claber

claber 90831 User manual

Popular Lawn And Garden Equipment manuals by other brands

Johnson Z-20 Instructions for use

Johnson

Johnson Z-20 Instructions for use

Grillo CLIMBER 780 Operator's manual

Grillo

Grillo CLIMBER 780 Operator's manual

Meec tools 001-445 operating instructions

Meec tools

Meec tools 001-445 operating instructions

Behlen Country M-15 Assembly instructions

Behlen Country

Behlen Country M-15 Assembly instructions

Costway GT4076 manual

Costway

Costway GT4076 manual

OLT RB63T manual

OLT

OLT RB63T manual

IXOM Medora GridBee SN10 owner's manual

IXOM

IXOM Medora GridBee SN10 owner's manual

Oypla GARDEN 3096 user manual

Oypla GARDEN

Oypla GARDEN 3096 user manual

Brandco GROUND SHARK BC72GS Operator and parts manual

Brandco

Brandco GROUND SHARK BC72GS Operator and parts manual

Stihl HTA 50.0 instruction manual

Stihl

Stihl HTA 50.0 instruction manual

Wolf Garten Accu BS 50 instruction manual

Wolf Garten

Wolf Garten Accu BS 50 instruction manual

Sabo 31-V EL Operator's manual

Sabo

Sabo 31-V EL Operator's manual

Solaris Garden Carousel Assembly guide

Solaris

Solaris Garden Carousel Assembly guide

JELÍNEK BioComp S-650 quick start guide

JELÍNEK

JELÍNEK BioComp S-650 quick start guide

Davaon Pro 36cm Use and care instructions

Davaon

Davaon Pro 36cm Use and care instructions

Land Pride RTA10 Series Operator's manual

Land Pride

Land Pride RTA10 Series Operator's manual

Gardena C 1030 plus operating instructions

Gardena

Gardena C 1030 plus operating instructions

Echo Power Pruner PPF-2100 Service data

Echo

Echo Power Pruner PPF-2100 Service data

manuals.online logo
manuals.online logoBrands
  • About & Mission
  • Contact us
  • Privacy Policy
  • Terms and Conditions

Copyright 2025 Manuals.Online. All Rights Reserved.