Clarion M606 Repair manual

WATERTIGHT MARINE USB/MP3/WMA RECEIVER
LECTEUR MARINE ÉTANCHE USB/MP3/WMA
RECEPTOR USB/MP3/WMA ESTANCO PARA EMBARCACIONES
Owner's manual & Installation manual
Mode d'emploi et manuel d'installation
Manual de instrucciones y de instalación
M606

English
2
M606
Thank you for purchasing this Clarion product.
• Please fully read this owner’s manual before operating this equipment.
• Check the contents of the enclosed warranty card and store it in a safe place with this manual.
Contents
1. FEATURES ....................................................................................................................... 3
2. PRECAUTIONS ................................................................................................................ 3
Front Panel / General Information.................................................................................. 4
USB Port ........................................................................................................................ 4
3. CONTROLS ...................................................................................................................... 5
Operational Panel .......................................................................................................... 5
Remote Control (RCX001: Sold separately) .................................................................. 6
Notes for use of Optional Remote Control ..................................................................... 6
Optional Wired Remote Control Unit Operations ........................................................... 7
Zone Control .................................................................................................................. 7
5. OPERATIONS................................................................................................................... 8
Basic Operations............................................................................................................ 8
System Setup................................................................................................................. 8
Audio Setup.................................................................................................................... 9
Radio Operations ......................................................................................................... 10
SiriusXM Satellite Radio Operations............................................................................ 10
USB Operations ........................................................................................................... 11
iPod, iPhone & iPad Operations................................................................................... 12
Bluetooth Operations ................................................................................................... 13
AUX Operations ........................................................................................................... 14
6. TROUBLE SHOOTING................................................................................................... 15
7. ERROR DISPLAYS......................................................................................................... 16
8. SPECIFICATIONS .......................................................................................................... 16
9. INSTALLATION / WIRE CONNECTION GUIDE ............................................................ 17
CLARION PRODUCT REGISTRATION INFORMATION
For USA and Canada only
www.clarion.com
Dear Customer,
Congratulations on your purchase of a Clarion mobile electronic product. We are condent
that you’ll enjoy your Clarion experience.
There are many benets to registering your product. We invite you to visit our website at
www.clarion.com to register your Clarion product.
We have made the product registration process simple with our easy to use website.
The registration form is short and easy to complete. Once you’re registered, we can keep you
posted on important product information.
Register at www.clarion.com - it’s easy to keep your Clarion product up to date.
INFORMATIONS DE L’ENREGISTREMENT DE PRODUITS CLARION
Pour les États-Unis et le Canada seulement
www.clarion.com
Cher(e) client(e),
Nous vous remercions d’avoir acheté ce produit électronique mobile Clarion. Nous sommes
conants que vous apprécierez votre expérience Clarion.
II y a beaucoup d’avantages à enregistrer votre produit. Nous vous invitons à visiter notre site
Web www.clarion.com pour enregistrer votre produit Clarion.
Nous avons facilité la tâche de l’enregistrement de produit sur notre site Web. Le formulaire
d’enregistrement est court et facile à compléter. Une fois enregistré(e), nous pouvons vous tenir
informé(e) des informations importantes sur les produits.
Enregistrez-vous sur www.clarion.com - c’est facile de mettre à jour votre produit Clarion.
INFORMACIÓN DEL REGISTRO DE PRODUCTO DE CLARION
Para EE. UU. y Canadá solamente
www.clarion.com
Querido Cliente:
Felicitaciones por su compra de producto electrónico móvil de Clarion. Estamos seguros de que
gozará de su experiencia con el producto de Clarion.
Hay muchas ventajas al registrar su producto. Le invitamos a que visite nuestro sitio en Internet
www.clarion.com para registrar su producto de Clarion.
Hemos hecho el registro del producto en nuestro sitio fácil de usar. El formulario de registro es
breve y fácil de completar. Una vez que lo registre, podremos proporcionarle la información de
su producto.
Regístrese en www.clarion.com: es fácil mantener su producto de Clarion actualizado.
Under Industry Canada regulations, this radio transmitter may only operate using an antenna of
a certain type and maximum (or lesser) gain approved for the transmitter by Industry Canada.
To reduce potential radio interference to other users, the antenna type and its gain should be
chosen so that the equivalent isotropically radiated power (e.i.r.p.) is no more than the required
one for successful communication.
Conformément à la réglementation d’lndustrie Canada, le présent émetteur radio peut fonctionner
avec une antenne d’un type et d’un gain maximal (ou inférieur) approuvé pour l’émetteur par
Industrie Canada. Dans le but de réduire les risques de brouillage radioélectrique à l’intention des
autres utilisateurs, il faut choisir le type d’antenne et son gain de sorte que la puissance isotrope
rayonnée équivalente (p.i.r.e.) ne dépasse pas l’intensité nécessaire à l’établissement d’une
communication satisfaisante.

English
3
M606
8 Channel Amplier
iPod/iPhone/iPad
(Connect via USB)
Expanding audio features
1. FEATURES
Compatible with iPod® / iPhone® / iPad® with Pandora® internet radio App
SiriusXM-Ready™ (Tuner and Subscription required and sold separately)
8ch RCA Output and BEAT-EQ with 3 Band Parametric Equalizer
Note:
•The items listed only show connectivity options and are not included with the unit.
Expanding System Options
2. PRECAUTIONS
For your safety, the driver should not operate the controls while driving.
Also, while driving, keep the volume to a level at which external sounds can be heard.
1. When the interior of the boat is extremely
cold and the player is used soon after
switching on the heater, moisture may
form on the internal circuitry of the player
and proper playback may not be pos sible.
If moisture forms inside of the player, do
not use the player for about one hour.
The condensation will disappear naturally
allowing normal operation.
2. This unit uses precision parts and compo-
nents for its operation. In the event of any
operating issues, never open the case,
disassemble the unit, or lubricate the
rotating parts. Contact your Clarion dealer
or service center.
3. FCC STATEMENT
1.This device complies with Part 15 of the
FCC Rules. Operation is subject to the
following two conditions:
(1)This device may not cause harmful
interference.
(2)This device must accept any interfer-
ence received, including interference that
may cause undesired operation.
2.Changes or modications not expressly
approved by the party responsible for
compliance could void the user’s authority
to operate the equipment.
NOTE:
This equipment has been tested and
found to comply with the limits for a Class
B digital device, pursuant to Part 15 of
the FCC Rules. These limits are designed
to provide reasonable protection against
harmful interference in a residential instal-
lation.
This equipment generates uses and can
radiate radio frequency energy and, if not
installed and used in accordance with the
instructions, may cause harmful interfer-
ence to radio communications. However,
WARNING
there is no guarantee that interference
will not occur in a particular installation. If
this equipment does cause harmful inter-
ference to radio or television reception,
which can be determined by turning the
equipment off and on, the user is encour-
aged to try to correct the interference by
one or more of the following measures:
• Reorient or relocate the receiving
antenna.
• Increase the separation between the
equipment and receiver.
• Connect the equipment into an outlet on
a circuit different from that to which the
receiver is connected.
• Consult the dealer or an experienced
radio/TV technician for help.
FCC Radiation Exposure Statement
This equipment complies with FCC
radiation exposure limits set forth for an
uncontrolled environment. This equip-
ment should be installed and operated
with minimum distance 20cm between the
radiator & your body
4. “Made for iPod”, “Made for iPhone” and
“Made for iPad” mean that an electronic
accessory has been designed to connect
specifically to iPod, iPhone or iPad,
respectively, and has been certified by
the developer to meet Apple performance
standards.
Apple is not responsible for the operation
of this device or its compliance with safety
and regulatory standards.
Please note that the use of this accessory
with iPod, iPhone or iPad may affect wire-
less performance.
iPod, iPhone, iPad and iTunes are trade-
marks of Apple Inc., registered in the U.S.
and other countries.
SiriusXM-Connect™
Boat Tuner
USB Memory
Portable Player
(Connect via AUX IN Jack)
Bluetooth®
cellular phone

English
4
M606
USB Port
• The USB memory sticks must be recognized
as “USB” to work properly. Some models
may not operate correctly.
When the memorized data is lost or dam-
aged under any condition, Clarion shall
not be liable for any damage.
When using the USB memory stick, we rec-
ommend that you backup your data stored
on it before using a personal computer etc.
• Data files may be broken when using USB
memory sticks in the following situation:
When disconnecting the USB memory stick
or turning the power off during reading data.
When affected by static electricity or electric
noise. Connect/disconnect the USB memory
stick when it is not accessed.
• Connecting with the computer is not covered.
INFORMATION FOR USERS:
Changes or modifications to this product
unapproved by the manufacturer will void the
warranty and will violate FCC approval.
Front Panel / General
Information
For a longer service life, be sure to read the
following cautions.
• Do not allow any liquids or fluids to enter
the unit. Doing so may damage the internal
circuitry.
• Do not disassemble or modify the unit in any
way. Doing so may result in damage.
• Do not let any materials burn the display.
Doing so may damage or deform the body.
• If a problem should occur, have the unit
inspected at your store of purchase.
• The remote control unit may not work if the
remote control sensor is exposed to direct
sunlight.
Cleaning the body
• Use a soft, dry cloth and gently wipe off any
dirt or dust.
• For tough dirt, apply some neutral detergent
diluted in water to a soft cloth, wipe off the
dirt gently, then wipe again with a dry cloth.
• Do not use benzene, thinner, boat cleaner,
etc., as these substances may damage the
body or cause the paint to peel. Also, leaving
rubber or plastic products in contact with
the body for long periods of time may cause
stains.
Supported iPod/iPad/iPhone devices:
iPhone 6s
iphone 6s plus
iPhone 6
iPhone 6 plus
iPhone 5S
iPhone 5C
iPhone 5
iPhone 4s
iPhone 4
iPod nano 7th generation
iPod nano 6th generation 16G
iPod nano 6th generation 8G
iPod nano 5th generation 8G
iPod touch 4th generation 8G
iPod touch 5th generation 32G
iPod touch 6th generation 64G
ipod classic 2nd generation120GB
iPad 1st generation
iPad mini 2nd generation
iPad Mini4
iPad Air2
5. Pandora, the Pandora logo, and the Pan-
dora trade dress are trademarks or regis-
tered trademarks of Pandora Media, Inc.
used with permission.
Pandora is currently only available in the
United States, Australia and New Zealand.
If you have any issues with the Pandora
application on your mobile phone, please
direct them to pandora-support@pandora.
com.
6. The Bluetooth word mark and logos are
registered trademarks owned by the Blue-
tooth SIG, Inc. and any use of such marks
by Clarion Co., Ltd is under license.
Other trademarks and trade names are
those of their respective owners.
7. Sirius, XM and all related marks and logos
are trademarks of Sirius XM Radio Inc. All
rights reserved.
8. IC warning
This device complies with Industry Cana-
da’s licence-exempt RSSs.
Operation is subject to the following two
conditions:
(1) this device may not cause interference,
and
(2) this device must accept any interfer-
ence, including interference that may
cause undesired operation of the device.

English
5
M606
3. CONTROLS
Operational Panel
With the front panel opened
[PS/AS]
Remote
Sensor
[ SRC]
[ BND ]
[ ]
[VOLUME]
[1~6] Buttons [DISP]
[OPEN] [MENU]
[ENT]
[ , ]
[UP/DOWN]
Names of Buttons
[ / SRC ] Button
• Toggle the audio source
• Power on / Power off (long press)
[ BND ] Button
• RADIO mode – Select tuner band
• USB mode – Top play
[ ] Button
• Sound effect setting
[VOLUME] Knob
• Adjust volume level
[PS/AS] Button
• RADIO mode –Preset scan /
Auto store(long press)
[OPEN] Button
• Unlock the front panel
[ MENU/ ] Button
• USB mode – Search function
• iPod mode – iPod menu
• Pandora mode – Station select
• SiriusXM mode – Direct select (long
press) / Instant Replay (Short Press)
• In menu/le list – Back
[ENT] button
• Conrm
[ / ]Buttons
• RADIO mode – Manual tuning /
Auto search (long press)
• USB/iPod mode
– Previous / next track
– Fast Forward / Fast Backward (long
press)
• Pandora mode – Skip track ( )
• SiriusXM mode – Channel Up/Down
[UP/DOWN] Knob
• Radio mode - Tune
• USB mode - Select folder/le
• Pandora mode – Select search mode/
station
[RESET]
• SiriusXM Radio mode – Select category /
(Operates on Category and Channel modes)
[1~6] Buttons
• [1] Button: Scan play / Preset station 1 /
Preset station memory 1 (long press)
• [2] Button: Repeat play / Preset station 2
/ Preset station memory 2 (long press) /
Pandora mode – Bookmark track
• [3] Button: Random play / Preset station
3 / Preset station memory 3 (long press) /
Pandora mode - Bookmark artist
• [4] Button: Play/Pause / Preset station 4 /
Preset station memory 4 (long press)
Note: When in “Replay” feature will Play/
Pause
• [5] Button: Previous folder / Preset station
5 / Preset station memory 5 (long press) /
Pandora mode - Thumbs down
• [6] Button: Next folder / Preset station 6
/ Preset station memory 6 (long press) /
Pandora mode - Thumbs up
[DISP] Button
• Display change
• System setup (long press)
[RESET] button
• Press the button when the following
symptoms occur.
* Nothing happens when buttons are
pressed.
* Display is not accurate.
* The settings will remain in the memory
even if you turn the power off or press
the reset button.
Only operate the device when the front panel is properly latched shut. Leaving
the front panel open during operation could permanently damage the device.

English
6
M606
Remote Control (RCX001: Sold separately)
[ , ]
[ ]
[DISP]
[ISR]
[RDM
][RPT
]
[ , ]
[MUTE]
[SCN/
PS/AS]
[SRC / ] [BAND/TOP]
Notes for use of Optional Remote Control
1. Aim the remote control at the remote sensor
on the unit.
2. Remove the battery from the remote control
or insert a battery insulator if the battery has
not been used for a month or longer.
3. DO NOT store the remote control under
direct sunlight or in high temperature envi-
ronment, or it may not function properly.
4. Use “button shaped” lithium battery
“CR2025” (3V) only.
5. DO NOT subject battery to recharge, disas-
semble, heat or dispose in re or water.
6. Insert the battery in proper direction
according to the (+) and (-) polarities.
7. Store the battery in a place where children
cannot reach to avoid the risk of accident.
Inserting the Battery
1. Slide remote control unit’s rear cover in the
direction shown.
2. Insert battery (CR2025) into insertion guides
with printed side (+) up.
3. Press battery into compartment as shown.
4. Replace and slide cover until it clicks into
place.
Insertion guide
[SRC / ] Button
• Toggle the audio source
• Power on / Power off (long press)
[, ] Buttons
• Radio mode - Manual Tune up or down /
Seek Tune up or down (long press)
• Previous / next track
• SiriusXM mode - Channel up or down /
Rapid Channel Browsing (long press)
• Pandora mode – Skip
[SCN/PS/AS] Button
• Scan play / Preset scan
• Auto memory store (long press)
•Pandora mode – Thumbs down
• SiriusXM mode– Channel scan (in current
category) / Preset scan (long press)
[BAND/TOP] Button
• USB mode – Top play
• RADIO mode – Select tuner band
• SiriusXM mode – Select tuner band / Cate-
gory Browsing mode (long press)
[ , ] Buttons
• Volume up / down
[ ] Button
• Play / Pause
[ISR] Button
• No function
[DISP] Button
• Display switch
[RDM] Button
• Random play
• Pandora mode – Thumbs up
[RPT] Button
• Repeat play
• Pandora mode – Bookmark track / Book-
mark Artist (long press)
[MUTE] Button
• Mute the volume

English
7
M606
Optional Wired Remote Control Unit Operations
Zone Control
Following operations are enabled by remote control with the separately sold Clarion Wired Remote
Control Units.
Note:
If the remote control is connected with this unit while the power on, please restart this unit again to con-
rm the normal display.
[ /SOURCE] button
• Press the [ /SOURCE] button to turn the
power on and press and hold it (1 sec.) to
turn the power off.
• Each time the [ /SOURCE] button is
pressed, the mode switches.
Note:
• Iftheaboveequipmentisnotconnected,cor-
responding mode cannot be selected.
[ENTER] button
• RADIO mode – No function
• USB mode – No function
• iPod mode – Conrm (in Menu mode)
• AUX mode – No function
• Pandora mode – No function
• SiriusXM mode – Conrm (in Menu mode)
[ ], [ ] buttons
• Press the [ ] button to increase the volume.
• Press the [ ] button to decrease the volume.
[ ], [ ] buttons
• RADIO mode – Station up-down /Seek up -
down (long press)
• USB mode – Previous - next track / Fast for-
ward-reverse (long press)
• iPod mode – Previous - next track / Fast for-
ward-reverse (long press)
• AUX mode – No function
• Pandora mode – skip track ( )
• SiriusXM mode – Channel up - down / Rapid
tune up-down – (Long press) / Move cursor
(direct mode) / Channel up - down in current
category (Category mode)
CAUTION
Lower the volume level before powering
the source unit off. The source unit
stores the last volume setting.
WARNING
EXPOSING THE UNIT TO WATER
WITH THE FRONT PANEL OPEN WILL
CAUSE DAMAGE OR UNIT MALFUNC-
TION!
Optional Wired Remote Control Unit Operations
[ ], [ ] buttons
• RADIO mode – Preset station up / down
• USB mode – No function
• iPod mode – Navigate (in Menu mode)
• AUX mode – No function
• Pandora mode – No function
[MENU/BAND] button
• Each time the button is pressed, the band
switches in the following order:
Radio : FM1 -> FM2 -> FM3 -> AM ->
WB.....
SiriusXM : SXM1 -> SXM2 -> SXM3 ->
SXM1.....
• Press and hold the button to enter the Cate-
gory Browsing mode. (in SiriusXM mode)
• Press and hold the button to enter the iPod
menu. (in iPod mode)
When power on rst time, you need choose the
audio conguration type: rotate the [VOLUME]
knob to select “STANDARD” or “MULTI
ZONE”, and press [ENT] button to conrm.
When choose “STANDARD”, all the zones will
be congured together. When choose “MULTI
ZONE”, the zones can be configured sepa-
rately.
To reselect the audio conguration type, please
access system setup mode.
[ ] button
• RADIO mode – Mute ON-OFF
• USB mode – Play-Pause
• iPod mode – Play-Pause
• AUX mode – Mute ON-OFF
• Pandora mode – Play-Pause
• SiriusXM mode – Play-Pause
IR-Receiver
• Receiver for optional IR remote control unit.
(Operating range: 30° in all directions)
[MENU/BAND]
[ENTER]
[[ /SOURCE]]
[ ], [ ]
[ ]
[ ]
[ ], [ ]
IR-Receiver

English
8
M606
5. OPERATIONS
Basic Operations
Note:
• Refer to the diagrams in “3. CONTROLS”
when reading this chapter.
CAUTION
When the unit is turned on, starting and
stopping the engine with its volume raised to
the maximum level may harm your hearing.
Be careful about adjusting the volume.
Power on / off
Note:
• Start the engine before using this unit.
• Be careful about using this unit for a long
time without running the engine. If you
drain the battery too far, you may not be
able to start the engine and this can reduce
the service life of the battery.
1. Start the engine. The power button / knob
illumination on the unit will light up.
Engine ON
position
2. Press the [ SRC] button on the front
panel or remote control to turn on the
power under standby mode. The unit goes
back to the last status after power on.
3. Press and hold the [ SRC] button on the
front panel or the remote control to turn off
the power.
Mute
Press the [MUTE] button on the remote control
to mute the volume from the unit.
Note:
Doing the operation above again or adjusting
volume will release muting.
Volume adjustment
STANDARD: Rotate the [VOLUME] knob
on the front panel or press the [ ] or [ ]
button on the remote control.
MULTI ZONE: In Volume adjustment mode,
rotate the [UP/DOWN] knob to select ZONE
number, then rotate the [VOLUME] knob to
adjust.
The adjustable range of volume is 0 to 40.
CAUTION
While driving, keep the volume level at
which external sounds can still be heard.
Playing source selection
Press the [ SRC] button to change the
operation mode.
Display system time
Press the [DISP] button on the front panel or
remote control to switch the display infor-
mation from clock, station information (radio
mode), or track information (USB mode).
RESET
If you have the following problems, please
press [RESET] button.
• Unit can not power on
• Nothing happens when buttons are pressed
• Display is not accurate
Note:
* When the [RESET] button is pressed, preset
radio stations, audio setting, etc.stored in
memory are retained.
[RESET]
System Setup
DX/LO (RADIO mode)
Rotate the [UP/DOWN] knob to choose radio
local or distant at RADIO mode.
• LO: Only stations with strong signal can
be received.
• DX: Stations with strong and weak sig-
nals can be received.
AUX SENS (AUX mode)
Rotate the [UP/DOWN] knob to choose AUX
Input sensitivity LOW, MID or HIGH in AUX
mode.
PARENTAL (SiriusXM mode)
Change parental password. Original code is
“0000”
LOCK CH (SiriusXM mode)
Lock the current channel
UNLOCK ALL CH (SiriusXM mode)
Unlock all parental locked channels.
SELECT
This “SELECT” menu is intended to auto-
matically pair with a stored mobile device.
This unit can store a maximum of three
mobile devices. The mobile devices will be
stored in the order they are paired to the
unit. If you wish to add a different device
than those already paired, you will need to
delete the unwanted mobile device from the
“DELETE” menu.
1. Press the [ENT] button.
2. Rotate the [UP/DOWN] knob to choose
the paired mobile phone name from the
pairing list.
3. Press the [ENT] button.to conrm.
DELETE
1. Press the [ENT] button.
2. Rotate the [UP/DOWN] knob to choose
the paired mobile phone name from the
pairing list.
3. Press the [ENT] button.to conrm.
To change adjustment setting
1. Press and hold [DISP] button to switch to
system setup mode.
2. Press the [ ] or [ ] button to select
the “item name”.
3. Rotate the [UP/DOWN] knob to select the
“desired setting value”.
* For some options, you should press the
[ENT] button to adjust the setting value.
4. After completing the setting adjustment,
press the [MENU] button to return to the
previous mode.
CLOCK
1. Press the [ENT] button.
2. Press the [ ] or [ ] button to select
the hour or the minute.
3. Rotate the [UP/DOWN] knob to set the
correct time.
* The clock is displayed in 12-hour format
by default.
4. Press the [ENT] button to store the time
into memory.
Note:
• Youcannotset the clockwhenitisdis-
played with only the ignition on. If you
drainorremovetheboat’sbatteryortake
outthisunit,theclockis reset. While
settingtheclock,ifanotherbuttonoroper-
ationisselected,theclock set modeis
canceled.
ZONE SELECT
1. Rotate the [UP/DOWN] knob to select
STANDARD or MULTI ZONE.
2. Press the [ENT] button to conrm.
ZONE LINK (MULTI ZONE mode)
1. Press the [ENT] button.
2. Rotate the [UP/DOWN] knob to select the
ZONE number from 2, 3, 4. And press the
[ ] or [ ] button to select “LNK
ZONE” or “UNLNK ZONE”.
3. Press the [ENT] button to conrm.

English
9
M606
System Setup Audio Setup
DISCON (BT mode)
Disconnect currently connected mobile phone.
1. Press the [ENT] button, mobile phone dis-
plays are currently connected.
2. Press the [ENT] button to disconnect.
PIN CODE
1. Press the [ENT] button.
2. Rotate the [UP/DOWN] knob and press
[ ] or [ ] button to choose a 4-digit
password.
3. Press the [ENT] button.to conrm.
The PIN CODE default setting is “ 0000 ”.
SCREEN SAVE: ON/OFF
Rotate the [UP/DOWN] knob to choose screen
saver ON or OFF.
ON: The screen saver will appear on the LCD
screen after 30 seconds of non-use.
SCROLL: ON/OFF
For track information that is longer than the
display panel:
When SCOLL is ON, the LCD will scroll the
ID3 TAG information across the display, e.g.:
TRACK->FOLDER->FILE->ALBUM->TITLE-
>ARTIST->TRACK->...
When SCROLL is OFF, the LCD will display
one of the ID3 TAG information, the default
is TRACK, but user can adjust it to other ID3
TAG information by pressing [DISP] button.
PANDORA: ON/OFF
Select OFF if the Pandora application has not
been installed on your iPod touch or iPhone.
DIMMER: ON/OFF
Rotate the [UP/DOWN] knob to choose
DIMMER ON or OFF.
• ON: LCD dimmer is active when small
light of boat is turned ON.
• OFF: LCD always maximum brightness
regardless of the boat small light.
BEEP: ON/OFF
Rotate the [UP/DOWN] knob to choose
button beep sound ON or OFF.
12/24H
Rotate the [UP/DOWN] knob to choose time
format: 12 HOURS or 24 HOURS.
REGION
Rotate the [UP/DOWN] knob to choose a
Radio Region from N.America/Europe/Asia/
Australia.
FACTORY RST
1. Rotate the [UP/DOWN] knob to choose
YES or NO.
2. YES: Press the [ENT] button to show
“CONFIRM”.
3. Rotate the [UP/DOWN] knob to choose
YES or NO.
4. YES: Pressing the [ENT] button will reset
the unit.
STANDARD
1. Press the [ ] button to enter sound effect
setting mode. First press shows current
BEAT EQ setting. Rotate the [VOLUME]
knob to change BEAT EQ in this order:
EQ OFF ->POP -> CLASSIC -> JAZZ ->
CUSTOM.
On CUSTOM setting mode, press the [ENT]
button. Then rotate the [UP/DOWN] knob
to select BAS, MID, or TRE Gain, rotate the
[VOLUME] knob to select a value:(-6)- (+6),
press [ENT] button to conrm.
2. After pressing the [ ] button, press [ ]
or [ ] button to select USER preset
including:
LOUDNESS -> BALANCE -> FADER ->
HPF (high pass filter) -> LPF (low pass
filter) -> THROUGH(HPF/LPF), rotate the
[VOLUME] knob to select a value.
3. After pressing the [ ] button, rotate the
[UP/DOWN] knob to show NON FADE, and
press [ENT] button to enter. Rotate the [UP/
DOWN] knob to select LPF, PHASE or SUB
VOL, rotate the [VOLUME] knob to select
the value.
MULTI ZONE
1. Press the [ ] button to enter sound effect
setting mode.
2. Rotate the [VOLUME] knob to select the
value of BALANCE (LEFT 1-7 -> CENTER
-> RIGHT 1-7). Rotate the [UP/DOWN]
knob to select ZONE 1, 2, 3 or 4.
3. After selecting a ZONE number, rotate the
[VOLUME] knob to change BEAT EQ.
On CUSTOM setting mode, press the [ENT]
button. Then rotate the [UP/DOWN] knob
to select BAS, MID, or TRE Gain, rotate the
[VOLUME] knob to select a value:(-6)- (+6),
press [ENT] button to conrm.
4. After selecting a ZONE number, press
[ ] or [ ] button to select THOUGH,
HPF or LPF. Rotate the [VOLUME] knob to
select a value.

English
10
M606
Select tuner as playing source
Press [SRC] button once or more to enter
RADIO mode.
Selecting the radio band
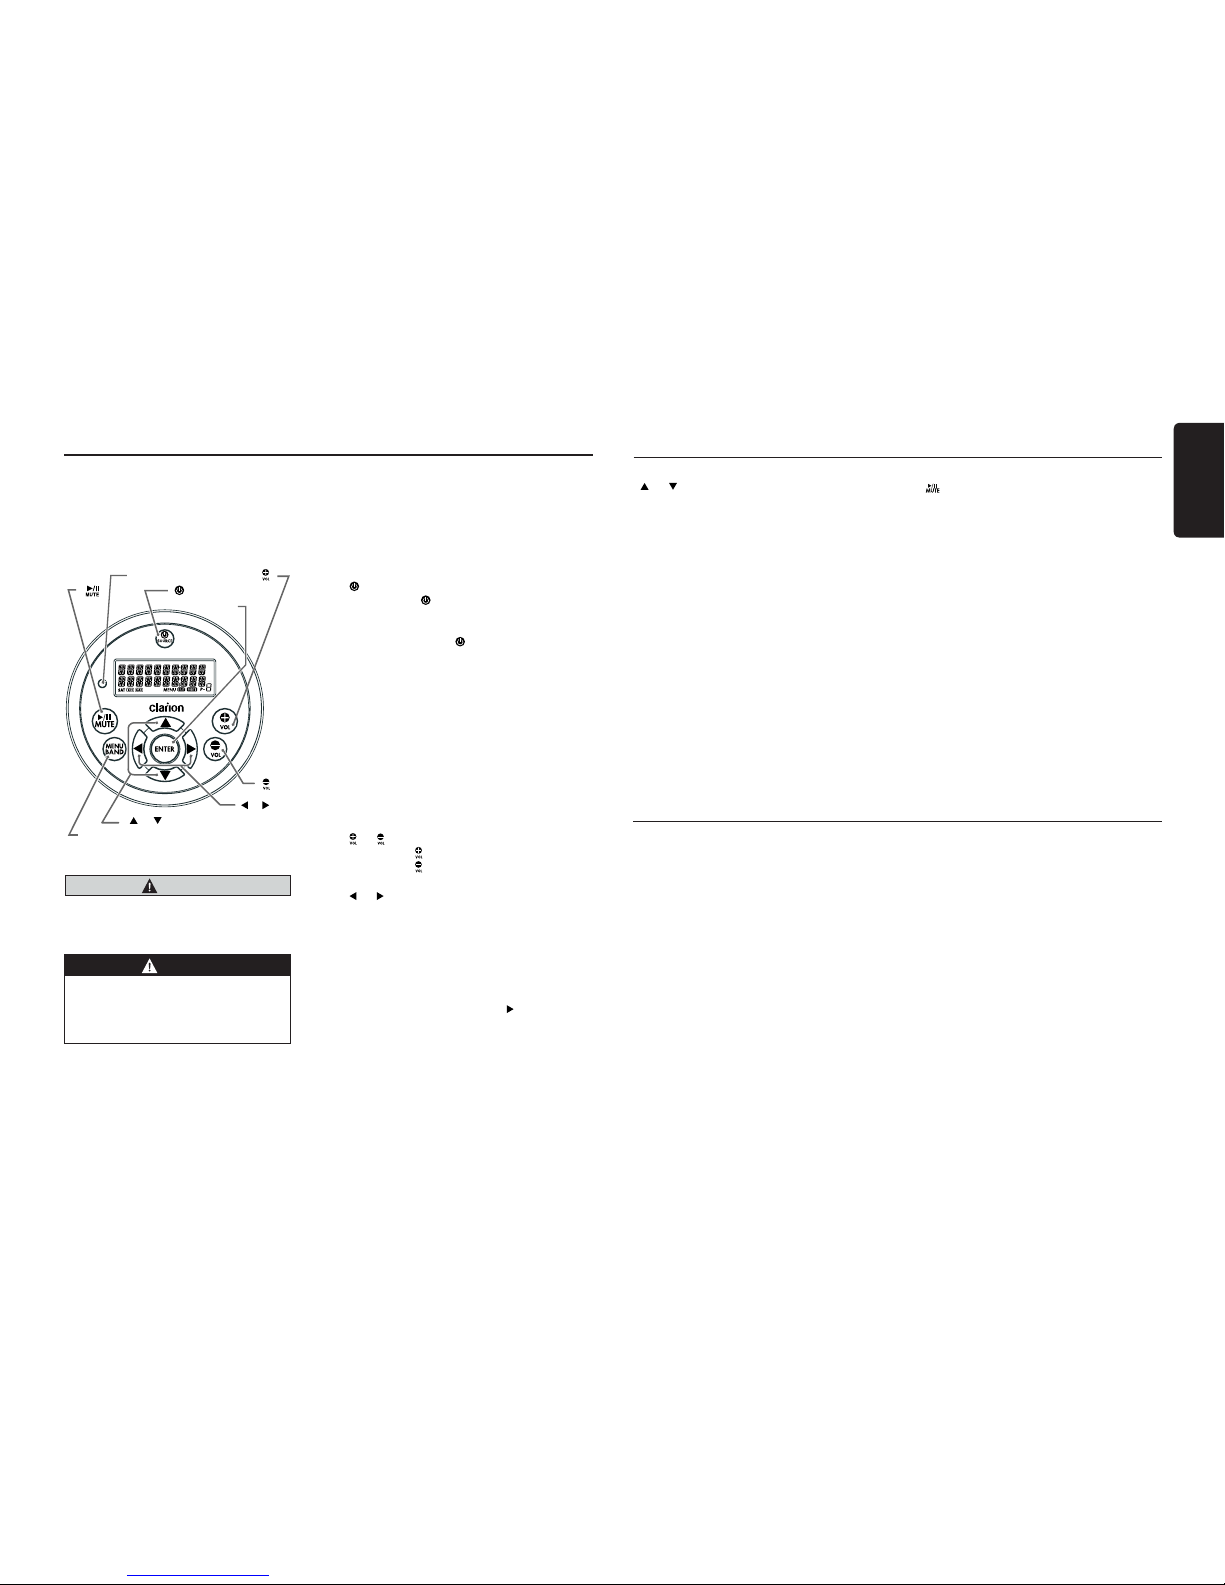
Press the [ BND ] button on the panel or
[BAND] on the remote control to select one
radio band among FM1, FM2, FM3, AM, WB.
Manual tuning
During manual tuning, the frequency will be
changed in steps.
Press the [ ] or [ ] button on the panel
to tune in a lower / higher station.
Press the [ ] or [ ] button on the remote
control to select preset stations.
Auto tuning
Press and hold the [ ] or [ ] button to
seek a lower / higher station.
To stop searching, repeat the operation above
or press other buttons having radio functions.
Note:
When a station is received, searching stops
and the station is played.
Preset Scan
Preset Scan receives the stations stored
in preset memory in order. This function is
useful when searching for a desired station
in memory.
1. Press the [PS/AS] button on the panel or
remote control.
2. When a desired station is tuned in, press
the [PS/AS] button again to continue
receiving that station.
Note:
Be careful not to press and hold the [PS/AS]
button for 1 second or longer, otherwise the
auto store function will begin and the unit
starts storing stations.
Radio Operations
Auto store
The unit stores the strongest stations found
in the entire Band.
Press and hold the [PS/AS] button (1 sec.) to
start automatic station search.
To stop auto store, press other buttons having
radio functions.
Notes:
1. After auto store, the previous stored stations
will be overwritten.
2. The unit has 5 bands, such as FM1, FM2,
FM3, AM and WB. Each band can store
6 stations, M606 can store 30 stations in
total.
Manual store
When one expected radio station has been
detected, press and hold number button 1-6
to store it in the memory.
Recall the stored stations
Press one numeric button among 1 to 6 on
the panel to select the corresponding stored
station.
Local seeking
When LOCAL seeking is ON, only those radio
stations with strong radio signal will be received.
To select LOCAL function, press and hold the
[ DISP ] button on the front panel, then press
[ ] button repeatedly until LO or DX displays
on the screen, and rotate the [UP/DOWN] knob
to select Local or Distant mode.
Note:
The number of radio stations that can be
received will decrease when Local mode is
ON.
SiriusXM Satellite Radio Operations
Only SiriusXM® brings you more of what you
love to listen to, all in one place.
Get over 140 channels, including commer-
cial-free music plus the best sports, news,
talk, comedy and entertainment. Welcome to
the world of satellite radio.
A SiriusXM boat Tuner and Subscription are
required. For more information, visit www.
siriusxm.com.
Displaying the Radio ID
Before you listen to satellite radio, you must
subscribe to the service using the SiriusXM
Radio ID number.
1. Press [SRC] button to activate SiriusXM
mode.
2. Press [ ] or [ ] to select channel “0”.
The unit displays Radio ID.
Note: Unit does not display “0CH” when
you tune to channel “0”.
Activating your SiriusXM Subscrip-
tion
After installing your SiriusXM-Connect Boat
Tuner and antenna, power on your headunit
and select SiriusXM mode. You should be
able to hear the SiriusXM preview channel
on Channel 1. If you cannot hear the preview
channel, please check the installation instruc-
tions to make sure your SiriusXM Connect
tuner is properly installed.
Once you can hear the Preview channel,
tune to Channel 0 to nd the Radio ID of your
tuner. In addition, the Radio ID is located on
the bottom of the SiriusXM Connect Boat
Tuner and its packaging. You will need this
number to activate your subscription. Write
the number down for reference.
Note: The SiriusXM Radio ID does not
include the letters I, O, S or F.
In the USA, you can activate online or by
calling SiriusXM Listener Care:
• Visit www.siriusxm.com/activatenow
• Call SiriusXM Listener Care at 1-866-635-
2349
For Canadian Subscriptions, please contact:
• Visit www.siriusxm.ca/activatexm
• Call XM Customer Care at 1-877-438-9677
As part of the activation process, the Siri-
usXM satellites will send an activation mes-
sage to your tuner. When your radio detects
that the tuner has received the activation
message, your radio will display: “Subscrip-
tion Updated”. Once subscribed, you can
tune to channels in your subscription plan.
Note, the activation process usually takes 10
to 15 minutes, but may take up to an hour.
Your radio will need to be powered on and
receiving the SiriusXM signal to receive the
activation message.
Storing Channel Presets
1. Press [ BND ] button to select the desired
band you want to store the preset in.
There are 3 Satellite Radio Preset bands.
Each press of [ BND ] button changes the
band:
SXM1 -> SXM2 -> SXM3 -> SXM1
2. Tune to the desired channel and then
press and hold one of the preset buttons (1
through 6), to store the channel.
3. Repeat the procedure to store up to 5
other channels on the same band.
Note:
• A total of 18 channels can be stored in the
preset memory, 6 channels for each band
(SXM1, SXM2 and SXM3).
Tuning Channels using Presets
1. Press [ BND ] button to select the desired
band of presets you wish to access.
2. Press the preset button (1 through 6) that
has your desired Satellite Radio channel
stored in memory.
Category Browsing
1. Press and hold [ BND ] button to activate
the Category Browsing mode.
2. Rotate the [UP/DOWN] knob to select
desired category.
3. Press [ ] or [ ] to select desired
channel within the selected Category. You

English
11
M606
SiriusXM Satellite Radio Operations
3. For unlocking the locked channel, tune
to the channel you wish to unlock, press
and hold [DISP] and press [ ] to select
“UNLOCKCH”. Enter the password to
unlock the channel.
4. To access the locked channels, select a
channel by “DIRECT SELECT”.
Press [MENU] and select “DIRECT
SELECT” by pressing the [ENT] button.
Input the desired locked channel (you
need to input 3 digits) and enter the pass-
word, then you can tune into that locked
channel.
This unit can playback MP3/WMA
les
Note:
• Ifyouplay a WMAfilewithactiveDRM
(DigitalRightsManagement),therewillbe
no audio.
To disable DRM
(Digital Rights Management)
When using Windows Media Player 9/10/11,
click on Tool -> Options -> Copy Music tab,
then under Copy settings, unclick the Check
box for Copy protect music. Then, recon-
struct les.
Personally constructed WMA les are used
at your own responsibility.
Precautions when creating MP3/
WMA le
Usable sampling rates and bit rates
1. MP3: Sampling rate 8 kHz-48 kHz, Bit rate
8 kbps-320 kbps / VBR
2. WMA: Bit rate 8 kbps-320 kbps
File extensions
1. Always add a file extension “.MP3”,
“.WMA” to MP3, WMA le by using single
byte letters. If you add a file extension
other than specified or forget to add the
le extension, the le cannot be played.
2. Files without MP3/WMA data will not play.
The les will not play if you attempt to play
les without MP3/WMA data.
* When VBR les are played, the displayed
play time may differ from the actual play
location.
1. Insert a USB device into the rear of the
unit USB cable.
When connecting a USB device, the unit
will read the les automatically.
2. To remove the USB device, you should
rst select another source or turn off the
power, in order to avoid damaging the
USB device. Then you can remove the
USB device safely.
USB Operations
SiriusXM Satellite Radio Operations
can see channel name, channel number,
artist, title or content by pressing [DISP].
4. Press [ENT] to tune to selected channel.
Note:
If no operation is performed for 10 seconds,
the Category Browsing mode is canceled.
Preset scan
Preset scan receives the channels stored
in preset memory in order. This function is
useful when searching for a desired channel
in memory.
1. Press and hold the [PS/AS] button.
2. When a desired channel is tuned in, press
the [PS/AS] button again to select that
channel.
Category scan
This function is useful when scanning for a
desired channel within a specic category.
1. Press the [BND] button on the panel.
Selectable options CHN/CAT will appear.
2. Short Press [PS/AS] button to begin
channel scan.
3. When the desired channel is playing,
press the [PS/AS] button again to select
that channel.
Note:
• Be careful not to press and hold the
[PS/AS] button for 1 second or longer,
otherwise the preset scan function will
begin and the unit starts scanning presets.
Instant Replay
1. In SiriusXM mode, press [MENU] button to
enter INSTANT REPLAY mode.
2. Press [ ] or [ ] button to skip back
or forward.
3. Press and hold [ ] or [ ] button to
rewind (REW) or fast forward (FF).
4. Press the [ 4 ] button on the panel or [ ]
on the remote control for play/pause.
5. Press [MENU] or [ BND ] button to exit.
Changing the Display
Text information, such as the channel name,
artist name/feature, song/program title and
content is available with each SiriusXM
channel. The unit can display this text informa-
tion as explained below.
1. In SiriusXM mode, press [DISP] button.
Each time you press this button, the display
changes as shown below.
Band/Channel number/channel name =>
Artist Name => Song Title=> Content Info
=> Category Name => Clock => Band/
Channel number/channel name
* If there is no text information, nothing will be
displayed.
Parental Lock / Unlock
The SiriusXM Parental Control feature allows
you to control access to channels that you con-
sider inappropriate for younger listeners.
When enabled, the Parental Control feature
requires you to enter a password to tune into
the locked channels. Information on setting up
the password, setting up the channels to be
locked, and the method to access the locked
channels is described below.
1. To set up the password, press and hold [DISP]
then release [DISP] and press [ ] to
scroll to “PARENTAL PASSWORD”. Press
[ENT] button to change password. Enter
old password, then enter new password. To
enter password, rotate [UP/DOWN] knob to
choose the numbers (0-9) and press [ ]
or [ ] to enter the next number in the
password. Once all 4 numbers are entered,
press [ENT] button to confirm password.
Note: Original password is “0000”.
2. To set up the channels to be locked, tune
to the channel you wish to lock. Press
and hold [DISP] then release [DISP] and
press [ ] to scroll to “LOCK CH”, press
[ENT] button to conrm. Input password as
explained in step 1 and then press [ENT]
button to set the locked channel. You will be
asked to input password. Enter password
and “LOCK” will be displayed if it is suc-
cessful.

English
12
M606
* When MP3/WMA files are played, there
will be a small gap of no sound between
tunes.
Logical format (File system)
1. The folder name and file name can be
displayed as the title during MP3/WMA
play but the title must be within 32 single
byte alphabetical letters and numerals
(including an extension).
2. Do not afx a name to a le inside a folder
having the same name.
Number of les or folders
1. Up to 999 files can be recognized per
folder.
Up to 99 folders can be recognized.
Up to 3000 les can be played.
2. Some noise may occur depending on
the type of encoder software used while
recording.
Pausing play
1. Press the [ 4 ] button to pause play.
“PAUSE” appears in the display.
2. To resume play, press the [ 4 ] button again.
Selecting a track
Track-up
1. Press the [ ] button to skip ahead to
the beginning of the next track.
2. Each time you press the [ ] button, the
track advances ahead to the beginning of
the next track.
Track-down
1. Press the [ ] button to go back to the
beginning of the current track.
2. Press the [ ] button twice to go back to
the beginning of the previous track.
Fast-forward/Fast-reverse
Fast-forward
Press and hold the [ ] button .
Fast-reverse
Press and hold the [ ] button .
USB Operations USB Operations
* For the USB with many files, it takes
some time until the start of searching and
between tracks. In addition, some errors
may occur in the play time.
Folder Select
This function allows you to select a folder
containing MP3/WMA les and start playing
from the rst track in the folder.
1. Press the [ 5 ] or [ 6 ] button.
Press the [ 6 ] button to move to the next
folder. Press the [ 5 ] button to move to
the previous folder.
2. To select a track, press the [ ] or [ ]
button.
Search Function
1. Press the [ MENU ] button to enter
FOLDER SEARCH mode.
2. Turn the [UP/DOWN] knob to select a folder.
3. Press the [ENT] button to enter the le list
search mode. The track list appears in the
display.
4. Turn the [UP/DOWN] knob to select a
track.
5. Press the [ENT] button to play.
* When playing back MP3 / WMA le, this
function is performed in the current folder.
Top function
The top function resets to the first track of
the storage. Press [ 4 ] button to play the rst
track (track No. 1).
* In case of MP3/WMA, the rst track of the
current folder will be played.
Other various play functions
Scan play
This function allows you to locate and play
the rst 10 seconds of all the tracks.
Press the [ 1 ] button to perform scan play.
Repeat play
This function allows you to play the current
track, tracks currently being played in the
folder, or all the tracks repeatedly.
iPod, iPhone & iPad Operations
Connect
Connect an iPod, iPhone or ipad to the USB
connector via accessory cable for iPod/
iPhone/iPad.
When connecting a device, the unit will read
the les automatically. The track information
displays on the screen once playback starts.
MENU
Press [ MENU ] button, rotate the [UP/
DOWN] knob to select from PLAY LIST /
ARTIST / ALBUM / GENRE / SONGS / COM-
POSERS / AUDIO BOOK / PODCASTS,
press the [ENT] button to conrm.
Play/Pause
Press the [ 4 ] button on the panel or [ ]
on the remote control for play/pause.
Repeat play
This function allows you to play the current
track repeatedly or play all tracks in your
iPod/iPhone repeatedly.
1. Press the [ 2 ] button until “REPEAT ONE”
appears on the LCD to perform repeat
play current song.
2. Press the [ 2 ] button until “REPEAT ALL”
appears on the LCD to perform repeat
play all songs.
3. Press [ 2 ] button repeatedly until
“REPEAT OFF” appears on the LCD to
cancel repeat playback.
Random play
This function allows you to play all tracks
recorded on your iPod/iPhone in a random
order.
1. Press the [ 3 ] button once or more until
“RANDOM ON” appears on the LCD to
perform random play.
2. Press [ 3 ] button repeatedly until “RANDOM
ALUM” appears on the LCD for album
random play.
1. Press the [2 ] button once or more until
“REPEAT ONE” appears on the display
to perform repeat play, and “ ” segment
lights on.
2. Press [2 ] button repeatedly until
“REPEAT FOLD” appears on the display
for folder repeat play,
3. Press [2 ] button repeatedly until
“REPEAT ALL” appears on the display for
all tracks repeat play.
4. Press [2 ] button repeatedly until
“REPEAT OFF” appears on the display
to cancel repeat playback, and “ ” seg-
ment goes off.
Random play
This function allows you to play all tracks in a
random order.
Press the [ 3 ] button to perform random
play, and “ ” segment lights on.

English
13
M606
The Bluetooth allows you to utilize your boat’s
built-in audio system for wireless mobile
phone or music handsfree communication.
Some Bluetooth mobile phones have audio
features and some portable audio players
support Bluetooth features. This system can
play audio data stored in a Bluetooth audio
device.
Notes:
• Do not leave the microphone of Bluetooth
handsfree in the places with wind passing
such as air outlet of the air conditioner,
etc. This may cause a malfunction.
• Do no leave device in direct sunlight or
exposed to high temperatures. Extreme
heat can cause distortion and discoloration
which may result in a malfunction.
• This system will not operate or may
operate improperly with some Bluetooth
audio players.
• Clarion cannot guarantee the compatibility
of all mobile phones together with unit.
BT Pairing
1. Turn on Bluetooth function of your mobile
phone.
2. Enter mobile phone’s Bluetooth setup
menu.
3. Search for new Bluetooth devices.
4. Select M606 from the pairing list on the
mobile phone.
5. Enter “0000” as the password if necessary
(The password default setting is “ 0000 ”).
6. After pairing successfully, “BT AUDIO” will
appear on the LCD for 1 second.
7. Press [ SRC] button to select “B T
AUDIO”.
8. The unit can connect up to three units.
* During pairing, depending on type of
mobile phone, a six digit PIN code will be
shown on both the source unit’s display
and the mobile phone.
In this case, please make sure that you
have the same PIN code on both devices,
and then conrm on the mobile phone.
Bluetooth Operations
Audio Streaming Operations
What is audio streaming?
Audio streaming is a technique for trans-
ferring audio data such that it can be pro-
cessed as a steady and continuous stream.
Users can stream music from their external
audio player to their boat stereo wirelessly
and listen to the tracks through the boat’s
speakers. Please consult your nearest
Clarion dealer for more information on the
product of wireless audio streaming trans-
mitter offered.
CAUTION
Please avoid operating your connected
mobile phone while audio streaming as
this may cause noise interference on the
song playback.
Depending on your mobile phone, audio
streaming may or may not resume after a
telephone interruption.
System will always return to Radio mode
if audio streaming is disconnected.
Note:
Be sure to read the chapter “Pairing” before
proceeding.
Play / Pause a track
1. Press the [4] button or [ ] button on the
remote control to pause audio playback.
2. To resume audio playback, push the [4]
button or [ ] button on the remote con-
trol again.
Selecting a track
Track-up
1. Press the [ ] button to move to the
beginning of the next track.
2. Each time the [ ] button is pressed,
playback proceeds to another track in the
advancing direction.
Track-down
1. Press the [ ] button to move to the
beginning of the previous track.
3. Press [ 3 ] button repeatedly until
“RANDOM OFF” appears on the LCD to
cancel random playback.
iPod menu alphabet search
This function searches the subfolders for
desired alphabetical letters.
1. Press the [MENU] button to select the iPod
menu mode.
2. Rotate the [UP/DOWN] knob to switch
between categories.
PLAY LIST, ARTIST, ALBUM, GENRE,
SONGS, COMPOSERS, AUDIO BOOK,
PODCASTS.
3. Press the [ENT] button. (The contents of
the category are displayed.)
4. Rotate the [UP/DOWN] knob to select the
desired letter to search.
5. Press the [ENT] button to conrm.
Listening to Pandora®
You can stream Pandora internet radio by
connecting an iPod/iPhone/iPad that has the
Pandora mobile application already installed.
To start streaming, connect the iPod/iPhone
with Pandora already launched.
In Pandora mode, when the unit displays
“PLEASE LAUNCH PANDORA APPLICA-
TION ON MOBILE DEVICE”, please launch
the Pandora Application by operating the iPod/
iPhone connected.
1. Press the [SRC] button to enter the Pan-
dora mode.
Selecting a station from list
Press the [MENU] button and select “BY
DATE” or “BY NAME” by rotating the [UP/
DOWN] knob and press the [ENT] button.
• BY DATE: List in an created date order
• BY NAME: List in an alphabetical order
Go to next station or previous station(in
alphabetical order)
Rotate the [UP/DOWN] knob on the panel
anticlockwise to go to previous station.
Rotate the [UP/DOWN] knob on the panel
clockwise or press the [BAND/TOP] button on
the remote control to go to next station.
Thumbs up/down
Thumbs up:
Press the [ 6 ] button on the panel or the [RPT]
button on the remote control for thumbs up.
Giving a track the thumbs up will tell Pandora
to play more tracks like that one.
Thumbs down:
Press the [ 5 ] button on the panel or the [SCN]
button on the remote control for thumbs down.
Giving a track the thumbs down will skip to the
next track (subject to skip limit), and Pandora
will remember not to play that track on the
station again.
Notes:
• You can personalize your stations by
“thumbs up” or “thumbs down”.
• If you give a track the thumbs down after
the skip limit has been exceeded, your
feedback will be saved but the current track
will continue to play.
BOOKMARK track
Short-press the [2] button to Bookmark cur-
rent track.
BOOKMARK artist
Short-press the [3] button to Bookmark cur-
rent artist.
Skip
Press the [ ] button on the panel or on the
remote control for the next tracks in station.
Note:
• Pandora limits the number of skips allowed
on their service. If you attempt to skip
tracks beyond the limit, “SKIP LIMIT” is
displayed.
Play/Pause
Press the [ 4] button on the panel or [ ] on
the remote control for play / pause.
iPod, iPhone & iPad Operations

English
14
M606
The rear AUX terminals of this system is pro-
vided to allow playback of sounds and music
from external devices connected to this unit.
Press [ SRC] button on the panel to select
“AUX”.
AUX Input sensitivity setting
Select the following settings to set the sensitivity
level of the sound from an external device con-
nected to this system, that are difcult to hear,
even after adjusting the volume.
* The factory default setting is “MID”.
1. Long press the [DISP] button.
2. Press the [ ] button until “AUX SENSE”
appears in the display.
3. Rotate the [UP/DOWN] knob to select “HIGH”,
“MID” or “LOW”.
Note:
• WhenAUXmodeisselected,AUXINsensi-
tivity can be set.
AUX Operations
Bluetooth Operations
2. Each time the [ ] button is pressed,
playback proceeds to previous track in the
reverse direction.
Note:
Playing order will depend on Bluetooth audio
player. When the [ ] button is pressed,
some A2DP devices will restart the current
track depending on the duration of playback.
During music streaming playback, “A2DP”
will be shown on the display. Information
about tracks (e.g. the elapsed playtime, song
title, etc.) cannot be displayed on this unit.
When an A2DP device is disconnected, “NO
DEVICE” will be shown on the display and
the unit will return to previously selected
audio source. Some Bluetooth audio players
may not have play / pause synchronized with
this unit. Please make sure both device and
main unit are in the same play / pause status
in BT MUSIC mode.
ID3 display
During music streaming playback, for music
information that is longer than the display
panel:
When SCROLL is ON, the LCD will display
ID3 TAG information cyclely, e.g:
ALBUM->TITLE->ARTIST..
When SCROLL is OFF, the LCD will display
one of the ID3 TAG information, the default
is TRACK, but user can adjust it to other ID3
TAG information by press the [DISP] button.

English
15
M606
6. TROUBLE SHOOTING
GENERAL
Problem Cause Measure
Unit can not power on. Unit fuse blown. Replace with new fuse of correct rating.
Boat battery fuse blown. Replace with new fuse of correct rating.
Unit can not power on.
Nothing happens
when buttons are
pressed.
Display is not
accurate.
The microprocessor has
malfunctioned due to noise, etc.
Turn o the power and open the front panel.
Press the [RESET] button with a thin rod.
Note:
When the [RESET] button is pressed, turn o
the ACC power.*
* When the [RESET] button is pressed,
frequencies of radio stations, titles, etc. stored in
memory are cleared.
No/low audio output.
Improper audio output connection. Check wiring and correct.
Volume set too low. Increase volume level.
Speakers damaged. Replace speakers.
Heavily biased volume balance. Adjust the channel balance to center position.
Speaker wiring is in contact with
metal part of boat. Insulate all speaker wiring connections.
Speaker power rating does not
match unit. Replace speakers.
Wrong connections. Check wiring and correct.
Speaker is shorted. Check wiring and correct.
Unit resets itself when
engine is off. Incorrect connection between ACC
and Battery. Check wiring and correct.
USB
Problem Cause Measure
USB device cannot
be inserted.
The USB device has been
inserted with wrong direction.
Reversing the connection direction of the USB
device, try it again.
The USB connector is broken. Replace with a new USB device.
USB device is not
recognized.
The USB device is damaged. Disconnect the USB device and reconnect. If the
device is still not recognized, try replacing with a
different USB device.
Connectors are loose.
No sound heard with
the display “No File”
shown.
No MP3/WMA le is stored in the
USB device. Store these les properly in the USB device.
Sound skips or is
noisy.
MP3/WMA les are not encoded
properly. Use MP3/WMA les encoded properly.
SiriusXM Advisory Messages
Message Description
CHECK TUNER Check the SiriusXM tuner connection on the back of the unit to ensure that it is
correctly connected.
CHECK ANTENNA
Ensure the SiriusXM antenna cable is connected to the SiriusXM tuner correctly.
Check the SiriusXM antenna wire for breaks or sharp bends. Replace the antenna if
necessary. SiriusXM products are available at your local car audio retailer or online at
www.shop.siriusxm.com.
NO SIGNAL
The antenna must have a clear view of the southern sky.
The magnetic antenna must be mounted on the outside of the boat for the best
reception.
CHAN UNSUB
This channel is not included in your SiriusXM subscription plan.
In the U.S.A., visit www.siriusxm.com or call 1-866-635-2349 if you have questions
about your subscription package or would like to subscribe to this channel. In Canada,
visit www.siriusxm.ca or call 1-877-438-9677.
CH UNAVAIL
This channel is not a valid SiriusXM channel.
The channel number has been entered incorrectly, or the channel was removed from
the SiriusXM channel lineup. Visit www.siriusxm.com for more information about the
SiriusXM channel lineup.
CH LOCKED
The selected channel has been locked by the parental controls, or a mature channel
has been selected.
A prompt to enter the unlock code will appear. Enter the unlock code as described
on page 11.
SUBSCRIPTN
UPDATED
An update to your SiriusXM subscription has been received by the SiriusXM tuner.
Press any button to continue.

English
16
M606
8. SPECIFICATIONS
FM Tuner
Frequency Range:
North America: 87.9-107.9MHz
Europe: 87.5-108MHz
Asia & Australia: 87.5-108MHz
Usable Sensitivity: 8 dBμV
Alternate Channel Selectivity: 60 dB
Stereo Separation (1 kHz): 30 dB
Frequency Response (±3 dB):
30 Hz to 15 kHz
AM Tuner
Frequency Range:
North America: 530 kHz to 1710 kHz
Europe: 531 kHz to 1602 kHz
Asia & Australia: 531 kHz to 1629 kHz
Usable Sensitivity: 28 dBμV
WB Tuner
Frequency Range: 162.400 to 162.550 MHz
Step length: 25 kHz
MP3/WMA mode
MP3 sampling rate: 8 kHz to 48 kHz
MP3 bit rate: 8 kbps to 320 kbps / VBR
WMA bit rate: 8 kbps to 320 kbps
Logical format: ISO9660 level 1,2
Joliet le system
USB
Specication: USB 1.1
Playable audio format:
MP3(.mp3): MPEG 1/2/Audio Layer-3
WMA(.wma): Ver 7/8/9.1/9.2
Bluetooth
Specication: Bluetooth Ver. 2.1+EDR
Prole:
A2DP (Advanced Audio Distribution Prole)
AVRCP (AV Remote Control Prole)
Send/Receive Sensitivity: Class 2
Audio Amplier
Maximum Power Output: 180 W (45 W × 4 ch)
Bass Control Action (100 Hz): +6 dB, –6 dB
Treble Control Action (10 kHz): +6 dB, –6 dB
Line Output Level (USB 1 kHz): 4 V
Input
Audio input sensitivity:
High: 320mV (at 1V output)
Mid: 650mV (at 1V output)
Low: 1.3V (at 1V output)
(input impedance 10 k or greater)
Aux-in level: ≤2V
General
Power supply voltage:
14.4VDC (10.8 to 15.6V allowable),
negative ground
Pre-Amp output voltage:
4.0V (USB play mode: 1kHz, 0dB, 10k load)
Fuse: 15A
Dimensions of the Main Unit:
196mm Width × 88.8mm Height × 235.6mm Depth
7-23/32(width) × 3-16/32(Height) ×
9-9/32(Depth)
Weight of the Main Unit: 1.94 lb. (0.88 kg)
Dimensions of the Remote Control unit:
43mm Width × 11mm Height × 113mm Depth
1-2/3(Width) × 2/5(Height) × 4-2/5(Depth)
Weight of the Remote Control Unit:
1.16oz. (36g) (including battery)
Note:
• Specifications and design are subject to
change without notice for further improvement.
Power Output:
18W RMS x 4 Channels at 4
and 1% THD+N
Signal to Noise Ratio:
94dBA (reference: 1W into 4 )
7. ERROR DISPLAYS
Display Cause Measure
ERROR 2 Do not support iPod, iPhone & iPad. Change another device.
* The head unit will return to RADIO mode.
If an error occurs, one of the following errors is displayed.
Take the measures described below to solve the problem.
If an error display other than the ones described above appears, press the [RESET] button. If
the problem persists, turn off the power and consult your store of purchase.
* When the [RESET] button is pressed, frequencies of radio stations, titles, etc. are stored in
memory are cleared.
Bluetooth
Problem Cause Measure
Cannot pair the
Bluetooth enabled
device with the boat
audio system.
The device does not support the
proles required for the system. Use another device to connect.
The Bluetooth function of the
device is not enabled.
Refer to the user manual of the device for how to
enable the function.
The audio quality is
poor after connection
with a Bluetooth-
enabled device.
The internal microphone gain is
not set correctly.
Adjust the gain of the internal microphone in
System Setup.

English
17
M606
9. INSTALLATION / WIRE
CONNECTION GUIDE
1) Before Starting
1. This set is intended exclusively for use with a
negative ground 12V power supply.
2. Read these instructions carefully.
3. Be sure to disconnect the battery “terminal” before
starting. This is to prevent short circuits during
installation. (Figure 1)
2) Package Contents
3) General Cautions
1. Do not open the case. There are no
user serviceable parts inside. If you
drop anything into the unit during
installation, consult your dealer or an
authorized Clarion service center.
2. Use a soft, dry cloth to clean the case.
Never use a rough cloth, thinner,
benzine, or alcohol etc. For tough dirt,
apply a damp soft cloth and wipe dirt
off gently.
CONTENTS
Battery
Figure 1
Source unit .................................................. 1
Hole block seal (black) ................................ 1
Support strap............................................... 1
M4 Nut......................................................... 1
M4 washer................................................... 2
Screws M4x30 mm...................................... 6
Power supply cable ..................................... 1
Owner’s manual........................................... 1
Warranty card.............................................. 1
Installation template..................................... 1
4) Cautions on Installation
1. Prepare all articles necessary for
installing the source unit before
starting.
2. Install the unit within 30° of the
horizontal plane. (Figure 2)
3. If you have to do any work on the boat
body, such as drilling holes, consult
your boat dealer beforehand.
4. Use the enclosed screws for
installation.
Using other screws can cause
damage.
(Figure 3)
5) Installing the Source Unit
Max 30˚
Figure 2
• Marine stereo mounting dimensions
Using the supply template to cut the hole and drill the
holes. (Figure 4)
Hole
Holes (6x)
CAUTION
Drill appropriately prepared holes at the
6 places for xing the screw depending
on the materials and plate thickness of
the panel.
180.9
34.5
22.2
39
29
185
179
60
Figure 4
1) Before Starting ...................................................................... 17
2) Package Contents................................................................. 17
3) General Cautions .................................................................. 17
4) Cautions on Installation......................................................... 17
5) Installing the Source Unit ...................................................... 17
6) Cautions on Wiring ............................................................... 18
7) Sample Systems .................................................................. 18
8) Wiring and Connections ........................................................ 19/20
9) Connecting the accessories .................................................. 19/20
Chassis Chassis
Damage
Max. 5/16 (8 mm)
Figure 3

English
18
M606
1. Be sure to turn the power off when wiring.
2. Be particularly careful where you route the wires.
Keep them well away from the engine, exhaust pipe, etc. Heat may damage the wires.
3. If fuse is blown, check that the wiring is correct.
If it is, replace the fuse with a new one with the same amperage rating as the original one.
4. To replace the fuse, open the lock on the source unit side, remove the old fuse and insert the
new one. (Figure 6)
* There are various types of fuse cases. Do not let the battery side terminal touch other metal
parts.
7) Sample Systems
6) Cautions on Wiring
Fuse
Fuse case
Figure 6
1
2
2
3
4
5
6
7
8
1 Source unit
2RCA extension cable (sold separately)
3 4-Channel power amplier
4Front speakers
5Rear speakers
6Wired remote control unit
7SiriusXM-Connect Boat Tuner
8AUX
1. Insert the source unit into the cutout hole until to the end. (Figure 5)
2. Using the supply screws (4 × 30) to secure the source unit. (Figure 5)
3. Using support strap to secure the source unit on the back side by supply M4 nut.
(Figure 5)
Note:
Some boat models require special mounting kits for proper installation.
Consult your Clarion dealer for details.
Support Strap
M5 Nut
M5 washer
M5 washer
4 × 30 Screws
Rubber Gasket
Source unit
Support Strap
M5 Nut
Stud Bolt
4 × 30 Screws
Note:
Confirmthattherubber gasket isfastened
securely to the base panel.
Figure 5

English
19
M606
Standard mode connections
8) Wiring and Connections
• Connecting to the external amplier
External ampliers can be connected to the 4 channel RCA output connections.
Ensure that the connectors are not grounded or shorted to prevent damage to the unit.
• If M606 is connected as a MULTI-ZONE system with Zone 3 and Zone 4 RCAs con-
nected to ampliers, do not switch M606 to STANDARD mode.
Doing so will cause the Zone 3 amplier to reproduce only low frequencies and the
Zone 4 amplier to reproduce full range frequencies at maximum volume.
This may result in potential speaker and/or hearing damage.
9) Connecting the accessories
16-Pin Connector Extension Lead
(attached to the source unit)
Yellow wire (Memory back-up lead)
Red wire (Power lead)
Blue/White wire (Amplier turn-on lead)
Blue wire (Auto ANT lead)
Black wire (Ground lead)
Orange/White wire (Illumination lead)
Connect to remote turn-on lead of amplier
Connect to Auto antenna
Connect to ground
Connect it to the power supply terminal
for illumination
Connect directly to battery
Accessory 12V
Right
Right
Front
Front
Rear
Gray
Gray
White
White
Purple
Purple
Green
Green
Gray/Black
Gray/Black
White/Black
White/Black
Purple/Black
Purple/Black
Green/Black
Green/Black
4-Speaker system
2-Speaker system
or
Right
Left
Not used.
Insulate
each wire
Left
Left
FUSE 15A
Radio Antenna
Refer to the right
AUX IN 1
Wired Remotes
SWC
AUX IN 2
Connect to USB memory/
iPod/iPad/iPhone device
SiriusXM
Steering Wheel Remote Control Terminal
8-Channel
Amplier
SiriusXM Connect
Tuner
(sold separately.)
Connect
to external
wired Remote
Control Unit (sold separately)
Right
(Red)
Right
(Red)
Right(Red)
Right(Red)
Right
(Red)
Right
(Red)
Front
Rear
Non-Fade/Sub
Fixed
Gray
Black
Black
Black
Black
Black
Black
USB cable
Purple
Grey
Green
Left
(White)
Left
(White)
Left(White)
Left(White)
Left
(White)
Left
(White)

English
20
M606
Multi-Zone mode connections
8) Wiring and Connections
• Connecting to the external amplier
External ampliers can be connected to the 4 channel RCA output connections.
Ensure that the connectors are not grounded or shorted to prevent damage to the unit.
• If M606 is connected as a MULTI-ZONE system with Zone 3 and Zone 4 RCAs con-
nected to ampliers, do not switch M606 to STANDARD mode.
Doing so will cause the Zone 3 amplier to reproduce only low frequencies and the
Zone 4 amplier to reproduce full range frequencies at maximum volume.
This may result in potential speaker and/or hearing damage.
9) Connecting the accessories
16-Pin Connector Extension Lead
(attached to the source unit)
Yellow wire (Memory back-up lead)
Red wire (Power lead)
Blue/White wire (Amplier turn-on lead)
Blue wire (Auto ANT lead)
Black wire (Ground lead)
Orange/White wire (Illumination lead)
Connect to remote turn-on lead of amplier
Connect to Auto antenna
Connect to ground
Connect it to the power supply terminal
for illumination
Connect directly to battery
Accessory 12V
Right
Right
ZONE 1
ZONE 1
ZONE 2
Gray
Gray
White
White
Purple
Purple
Green
Green
Gray/Black
Gray/Black
White/Black
White/Black
Purple/Black
Purple/Black
Green/Black
Green/Black
4-Speaker system
2-Speaker system
or
Right
Left
Not used.
Insulate
each wire
Left
Left
FUSE 15A
Radio Antenna
Refer to the right
AUX IN 1
Wired Remotes
SWC
AUX IN 2
Connect to USB memory/
iPod/iPad/iPhone device
SiriusXM
Steering Wheel Remote Control Terminal
8-Channel
Amplier
SiriusXM Connect
Tuner
(sold separately.)
Connect
to external
wired Remote
Control Unit (sold separately)
Right
(Red)
Right
(Red)
Right(Red)
Right(Red)
Right
(Red)
Right
(Red)
ZONE 1
ZONE 2
ZONE 3
ZONE 4
Gray
Black
Black
Black
Black
Black
Black
USB cable
Purple
Grey
Green
Left
(White)
Left
(White)
Left(White)
Left(White)
Left
(White)
Left
(White)
Other manuals for M606
3
Table of contents
Other Clarion Marine Audio manuals

Clarion
Clarion CM1624TB Repair manual

Clarion
Clarion CMD4 Instruction Manual

Clarion
Clarion M455A User manual

Clarion
Clarion CL92700 Repair manual

Clarion
Clarion M255 User manual

Clarion
Clarion CMD4 User manual

Clarion
Clarion CMS5 User manual

Clarion
Clarion APX490M User manual

Clarion
Clarion CMD8 Repair manual

Clarion
Clarion CMS2 User manual