Clas Ohlson FL-999 User manual

Important!
Read the entire instruction manual carefully
and make sure that you fully understand
it before you use the equipment. Keep the
manual for future reference.
Viktig information:
Läs hela bruksanvisningen noggrant och
försäkra dig om att du har förstått den innan
du använder utrustningen och spara den för
framtida bruk.
Viktig informasjon:
Les disse anvisningene nøye og forsikre deg
om at du forstår dem før du bruker enheten
og oppbevar dem for senere bruk.
Tärkeätä tietoa:
Lue nämä ohjeet huolellisesti ja varmista
että olet ymmärtänyt ne, ennen kuin alat
käyttää laitetta. Säilytä ohjeet myöhempää
tarvetta varten.
Färgspruta
Malingssprøyte
Maaliruisku
Art.no Model
18-3056 FL-999-UK
30-9579 FL-999
ENGLISHSVENSKANORSKSUOMI
Spray Gun
Ver. 200802


3
ENGLISH
Spray Gun
Art.no: 18-3056 Model: FL-999-UK
30-9579 FL-999
Please read the entire instruction manual before using and save it for future use.
We apologise for any text or photographic errors and any changes in technical data.
If you have any questions concerning technical problems please contact our Custo-
mer Service Department (see address on reverse.)
Table of Contents
Description
Safety
Before starting
Use
Cleaning
Care and Maintenance
Troubleshooting Guide
Disposal
Technical Specications
4
ENGLISH
4
35
1
2
1
2
3
4
5
6
7
8
9
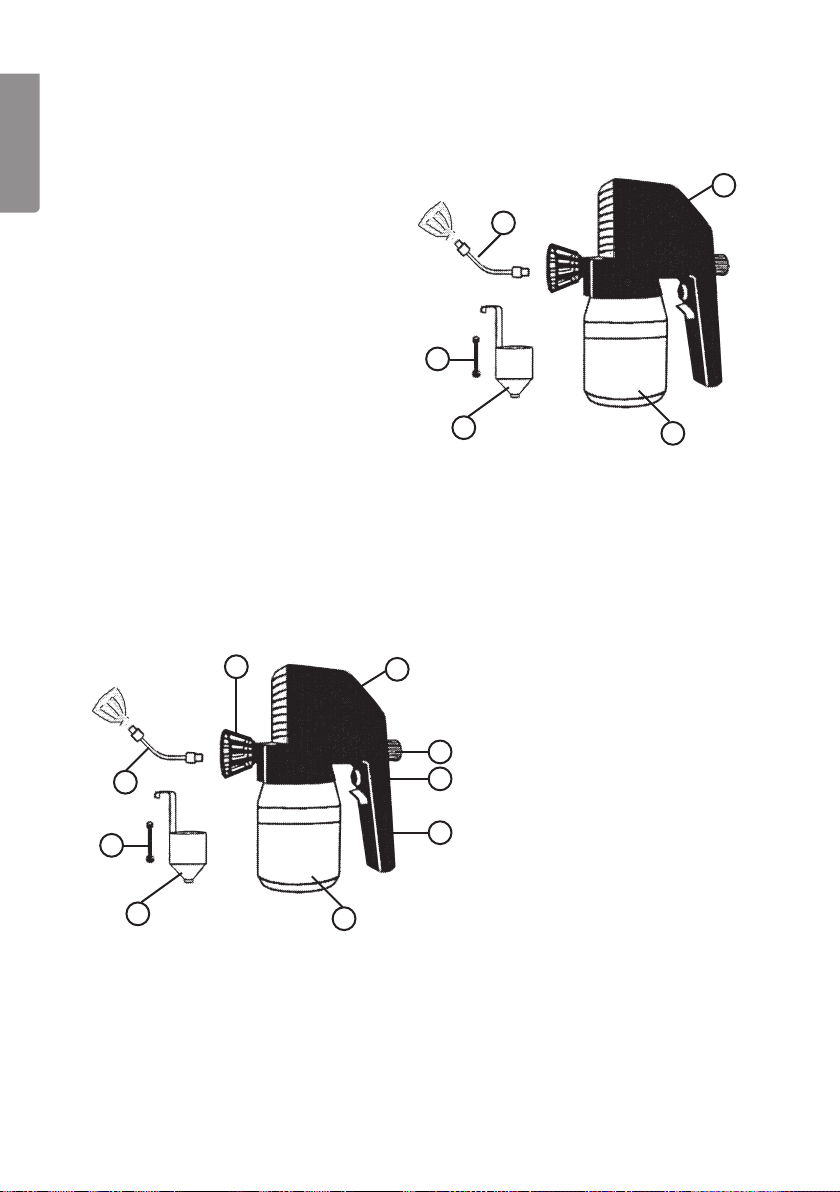
Description
Contents
1. Spray Gun
2. Flexible Extension
3. Viscosity Cup
4. Non-Return Valve
5. Paint Container with Suction Tube
and Filter
Parts Guide
1. Motor Housing
2. Output Control Knob
3. Trigger
4. Handle
5. Paint Container
6. Nozzle
7. Flexible Extension
8. Non-Return Valve
9. Viscosity Meter

5
ENGLISH
General Safety Instructions
Warning: Read all the instructions. Failing to adhere to the following instructions
may lead to electric shocks, res and/or serious injury. The term “electrical hand
tools” in the warning text below is referring to your mains operated or battery
operated hand tool. Save the instructions.
1) The Work Area
a) Keep the work space clean and well illuminated. Cluttered and poorly lit
areas invite accidents.
b) Do not use electrical hand tools in explosive environments, i.e. nearby
ammable liquids, gas or dust. Electrical hand tools generate sparks that
could easily ignite dust or fumes.
c) Keep away from children and other spectators while using the electrical
hand tool. Disturbances can cause you to lose your concentration and control.
2) Electrical Safety
a) The electrical hand tool’s plug must t correctly into the wall socket. Never
modify the plug in any way. Never use an adaptor together with earthed
electrical hand tools. Unmodied plugs and suitable wall sockets decrease the
risk of electric shock.
b) Avoid physical contact with earthed objects, such as pipes, radiators,
ovens or refrigerators. There is an increased risk of electrical shock if your
body is earthed.
c) Do not expose the electrical hand tool to rain or other wet conditions.
If water gets inside an electrical hand tool it increases the risk of electrical
shock.
d) Do not abuse the lead. Never use the lead to carry the tool, drag or pull the
plug out of the wall socket. Keep the lead away from heat, oil, sharp edges
and movable parts. Damaged or tangled leads increase the risk of electrical
shock.
e) When you use an electrical hand tool outdoors; use an extension cord
suitable for this purpose. Use of an extension cord for outdoor use decreases
the risk of electrical shock.

6
ENGLISH
3) Personal Safety
a) Pay attention to what you do and use common sense when using electrical
hand tools. Never use an electrical hand tool if you are tired or under
the inuence of drugs, alcohol or medication. One moment of not paying
attention while using an electrical hand tool may result in serious injury.
b) Use protective equipment. Always use safety glasses. Using protective
clothing such as a face mask, non-slip safety shoes, a helmet and ear defenders
when needed decreases the risk of injury.
c) Avoid accidental starts. Make sure that the power switch is set to OFF
before you connect the device to the wall socket. Never carry an electrical
hand tool with one nger on the trigger or never connect the hand tool to a wall
socket when the switch is set to ON, since it may result in injury.
d) Remove all service tools/keys before switching on the hand tool.
A service tool forgotten on a rotating part of the electrical hand tool may result in
injury.
e) Do not overreach. Make sure you stand steady and well balanced at all
times. This gives better control in unexpected situations.
f) Wear suitable clothing. Do not wear loose tting clothes or jewellery. Keep
hair, clothes and gloves away from movable parts. Loose tting clothes,
jewellery or long hair could get caught in movable parts.
g) If the equipment for suctioning or collecting dust is available make sure
it is connected and used properly. Using technical aids may decrease dust
related hazards.
4) Use and maintenance of the electrical hand tool.
a) Do not force the hand tool. Use a hand tool suitable for the work you are to
perform. The correct electrical hand tool will perform the task better and safer if
used at the correct feed rate.
b) Never use the electrical hand tool if the power switch does not switch the
tool on and off properly. All electrical hand tools that cannot be controlled by
the power switch are dangerous and must be repaired.
c) Unplug the lead from the wall socket before making any adjustments,
changing accessories or storing the electrical hand tool away. These
precautions reduce the risk of the electrical hand tool starting unexpectedly.
d) Store electrical hand tools that are not being used out of the reach of
children. Do not allow people who are unfamiliar with the tool or its
functions to operate the tool. Electrical hand tools can be dangerous if they
get into the hands of inexperienced users.

7
ENGLISH
e) Maintenance of electrical hand tools. Check if anything is incorrectly set,
if moving parts are catching, if anything is broken or if there is anything
which could cause the electrical hand tool to malfunction. If something
is damaged it must be repaired before use. Many accidents are caused by
poorly maintained electrical hand tools.
f) Keep the tools sharp and clean. Properly maintained cutting tools with sharp
blades are less likely to jam and are easier to control.
g) Use the electrical hand tool, accessories and such according to the
instructions and in a way suitable for the type of electrical hand tool
used. Using the electrical hand tool for work other than suitable work could
result in a dangerous situation.
5) Service
a) Repairs and service should only be performed by qualied persons, and
only with original spare parts. This guarantees the safety of the electrical
hand tool.

8
ENGLISH
Safety Symbols
Read the entire instruction manual
Safety glasses or a visor, a face mask
and ear protectors must be worn.
Safety Instructions Specific to Spray Guns
• Do not use the spray gun for easily ignitable* paints or substances.
• Do not use the spray gun with liquids containing particles or bres such as
metallic paint, re-retardant paint and paints containing asbestos.
• Do not clean the spray gun using easily ignitable solvents.
• Be aware of any possible hazards due to the nature of the material being
painted.
• Carefully read all the instructions and warning texts for the product to be used
in the spray gun including any requirements for protective clothing.
• Do not use any paint product without knowing how dangerous it is.
• Always pull the plug out of the power point when you stop working
(to prevent unexpected starts).
• Never point the spray gun at yourself or anyone else.
* Substances/liquids having a ash point above 55 °C.
9
ENGLISH
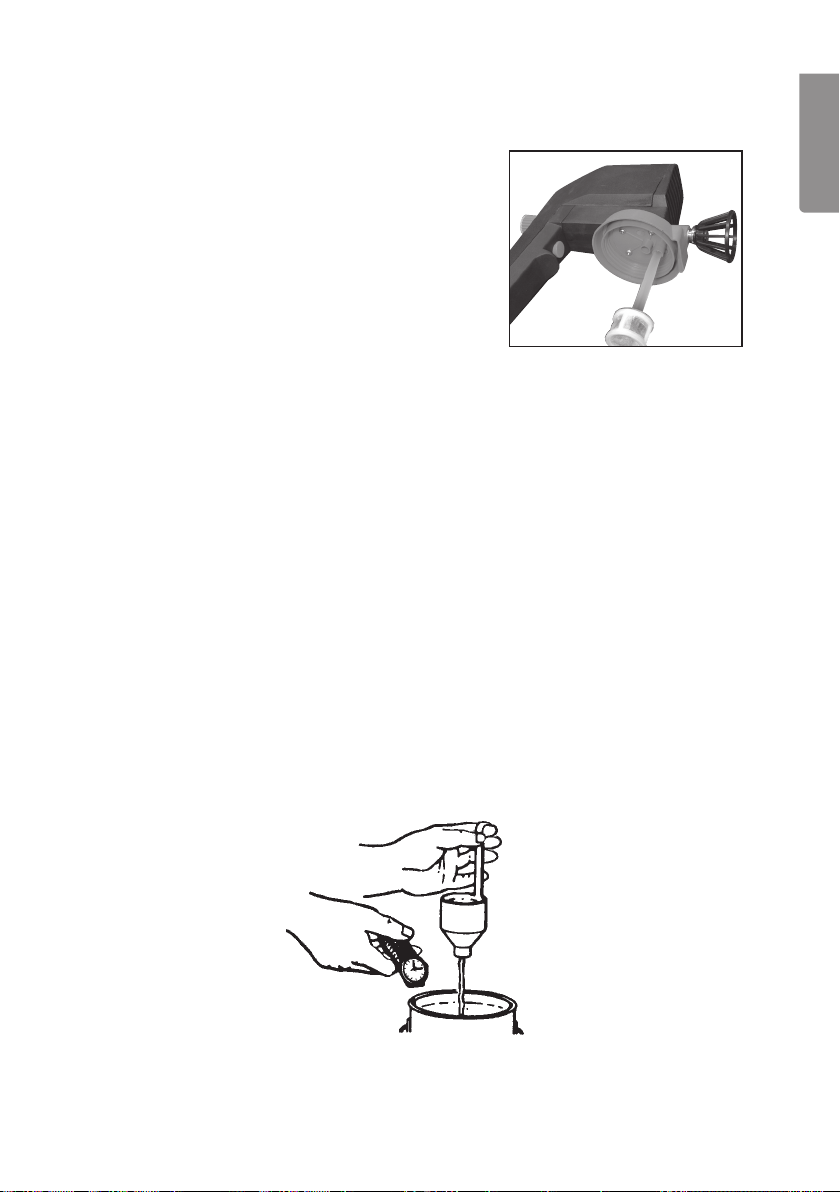
Before Starting
Practice
When using the spray gun for the rst time it
is advisable to practice spraying on a piece of
waste chipboard or similar to get a feel for the
spray gun.
1. Make sure that the suction tube is securely
fastened onto the front tube in the lid of the
paint container. Make sure that the non-
return valve is in place and that the nozzle is
Viscosity
The viscosity cup and a clock or watch are all that are needed to check the
viscosity of the paint.
1. Fill the measuring cup by dipping it into the paint (stir the paint rst if
it is lumpy).
2. Lift the cup above the surface of the paint and time how long it takes for the
paint to run through the hole at the bottom of the cup. (The longer it takes,
the higher the viscosity (thickness) of the paint.)
screwed on.
2. The pressure can be adjusted using the knob
on the handle. Set the pressure to medium
before starting to spray and then adjust whilst
spraying.

10
ENGLISH
Viscosity Table
Note: These viscosities are only recommendations. Test the spray gun on
a surface with the same texture and incline as that to be sprayed before spraying
the real object if you are the least bit unsure as to which viscosity is suitable.
Plastic and latex paint 24-28 seconds
Water based paint 20-25 seconds
Primer 24-26 seconds
Varnish 20-25 seconds
Oil based paint 18-22 seconds
Enamel paint 18-22 seconds
Aluminium paint 22-25 seconds
Car underseal 25-35 seconds
Wood sealant 28-35 seconds
Anti-corrosive paint No thinning required
Wood stain No thinning required
Use
Preparations
Note: Never start the spray gun without liquid in the container; it can shorten
the life of the pump.
1. Make sure that the power supply that you are using is compatible with the
rated power of the tool.
2. Pour the liquid to be sprayed into the container.
3. Thin the liquid if necessary and check its viscosity.
4. Place the container on a level surface; cover the surface with paper to catch
any drops.
5. Hold the spray gun over the container and attach the container by screwing the
container anticlockwise.
6. The spray gun is now ready for use.
This manual suits for next models
1
Table of contents
Languages:
Other Clas Ohlson Paint Sprayer manuals


Popular Paint Sprayer manuals by other brands


zogics
zogics Z-DAS instruction manual

KISANKRAFT
KISANKRAFT KK-KBS-165 Operation manual

Matrix
Matrix SG 650 Translation of the original instructions

Anest Iwata
Anest Iwata SGA-3 Installation, use & maintenance instruction manual

paasche
paasche VV Instructions and parts list

Carlisle
Carlisle DeVilbiss JGA-510 Service manual


