Clas Ohlson SPDV-1020US-UK User manual
EnglishSvenskaNorskSuomi
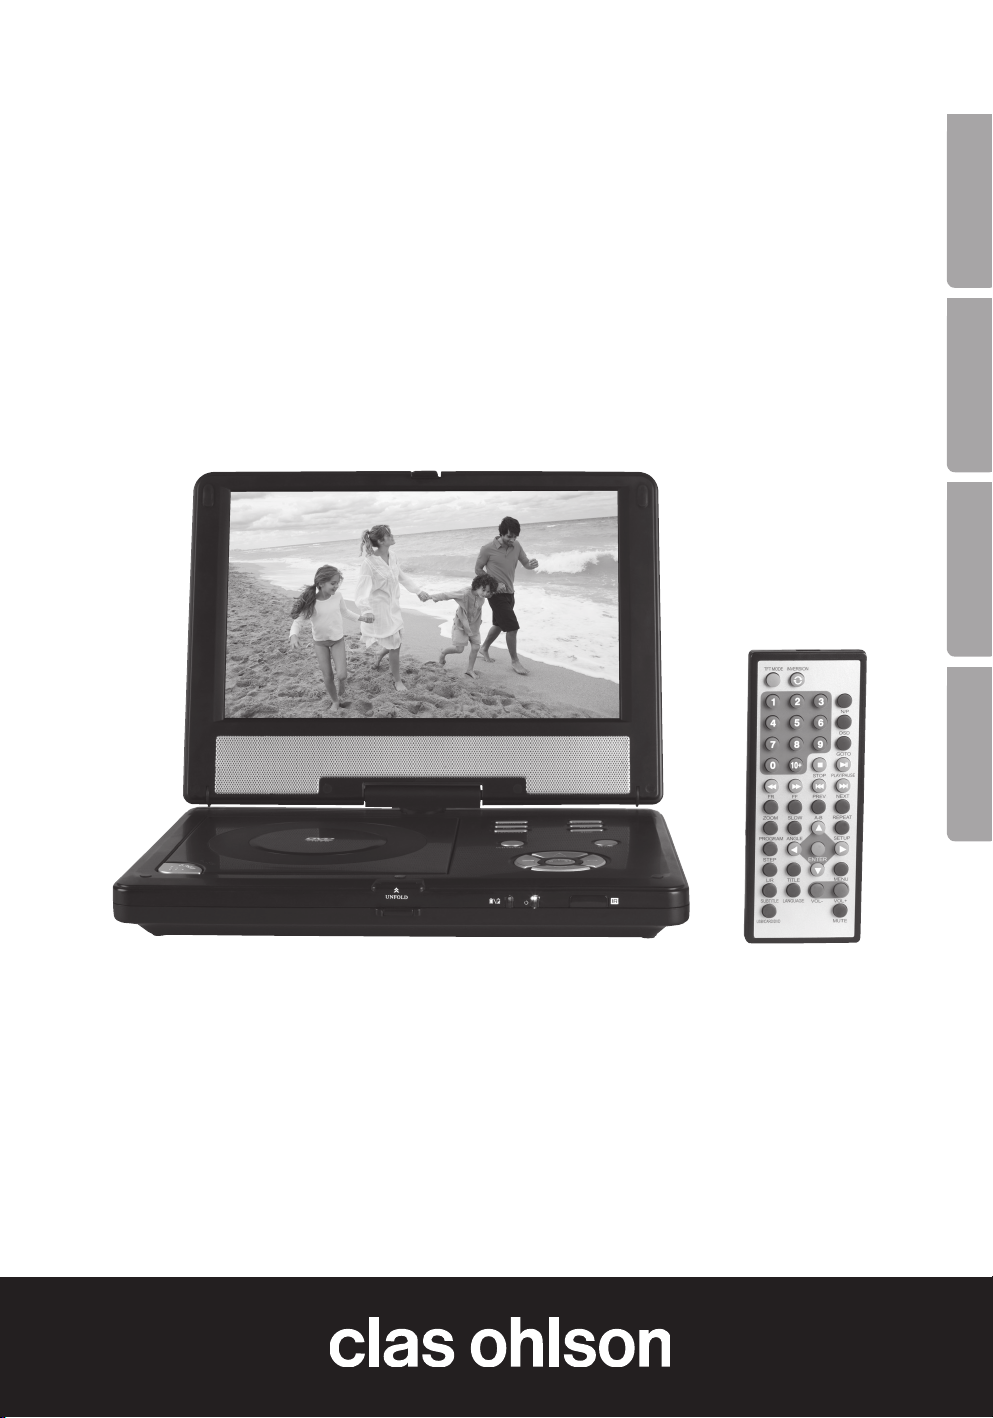
Portable DVD Player
Portabel dvd-spelare
Portabel dvd-spiller
Kannettava DVD-soitin
Art.no. Model
18-8152 SPDV-1020US-UK
38-3783 SPDV-1020US Ver. 201005

2
English
CLASS 1
LASER PRODUCT
Portable DVD Player
Art.no 18-8152 Model SPDV-1020US-UK
38-3783 SPDV-1020US
Please read the entire instruction manual before using the product and save it for future reference.
We reserve the right for any errors in text or images and any necessary changes made to technical data.
If you have any questions regarding technical problems please contact Customer Services.
Contents
Safety
Contents of pack
Buttons and functions
Getting started
Use
Setup
Care and maintenance
Troubleshooting guide
Disposal
Specifications
Safety
• The product should only be repaired by qualified service technicians.
• The product should not be taken apart or modified.
• The product is designed for indoor use only.
• Never expose the device to high temperatures, blows, dampness or moisture.
• Do not place the product where there is a risk of it falling into water or other liquid. Do not place any objects
which contain liquid on the product such as vases, drinks, etc.
• Do not place the device in damp, dusty environments or where there are heavy vibrations.
• The standby switch on the front of the device does not disconnect the device from the mains. To completely
disconnect the device from the mains, the plug has to be removed from the socket.
• Shut off the standby function and pull out the plug at night, or if you plan to be away for an extended period.
• Never expose the battery to high temperatures.
• Prolonged exposure to high volume can damage your hearing.
CLASS 1 LASER PRODUCT
Warning!
Do not open the casing. Invisible laser beams can cause eye damage. Do not
look directly into the laser beam or look directly at it using an optical instrument.
Contents of pack
1. Main unit
2. Remote control and battery
3. AC/DC adaptor
4. AV lead
5. Car adaptor
6. Case with two straps

3
English
1
2
4
5
6108
3
7 9
13 14 15
12
11
16 17 18 19
20
21
22
23
24
25
26
27
Buttons and functions
DVD player
1. TFT screen
2. Speakers
3. OPEN – Opens the disc player
4. Charge indicator – shines red during charging,
shines green when charging is completed
5. On/off indicator – shines when device is on
6. Remote control sensor
7. ◄ – Navigate left button
8. ▼ – Navigates down
9. ► – Navigate right button
10. ▲ – Navigates up
11. ENTER – Confirm settings
12. LCD ON/OFF – Turns the display screen on/off
Power save mode – the audio is still on but the
screen is off
13. PLAY/PAUSE – Starts or pauses playback
14. PREV – Skips to previous chapter/track
15. LANGUAGE – Select film dialogue language
(if the DVD supports this)
16. SETUP – Activates the settings menu
17. STOP – Stops playback
18. NEXT – Skips to next chapter/track
19. USB/CARD/DVD – Function selector
20. DC IN 12 V – Input for external power
supply/charger
21. POWER ON/OFF – Power switch, turns the
device on/off completely
22. USB – USB memory input
23. SD/MMC – Memory card slot
24. AV OUT – Connection for TV or other AV
device for watching films or listening to music
25. PHONE 2 – 3.5 mm stereo headphone jack
26. PHONE 1 – 3.5 mm stereo headphone jack
27. VOLUME – Volume control
4
English
STOP
PLAY/PAUSE
TFT MODE INVERSION
SUBTITLE LANGUAGE
GOTO
OSD
1 2
4 5 6
3
97 8
0
10
+
N/P
STEP
L/R TITLE MENU
FR FF PREV NEXT
ZOOM SLOW A-B REPEAT
P
ROGRAM
ANGLE
SETUP
USB/CARD/DVD
MUTE
VOL- VOL+
▲
►
▼
◄
►►I
►►
►II
►►I►►
1
2
3
4
5
7
9
10
12
14
15
22
26
27
28
30
31
20
16
24
25
17
18
19
29
21
23
8
6
11
13
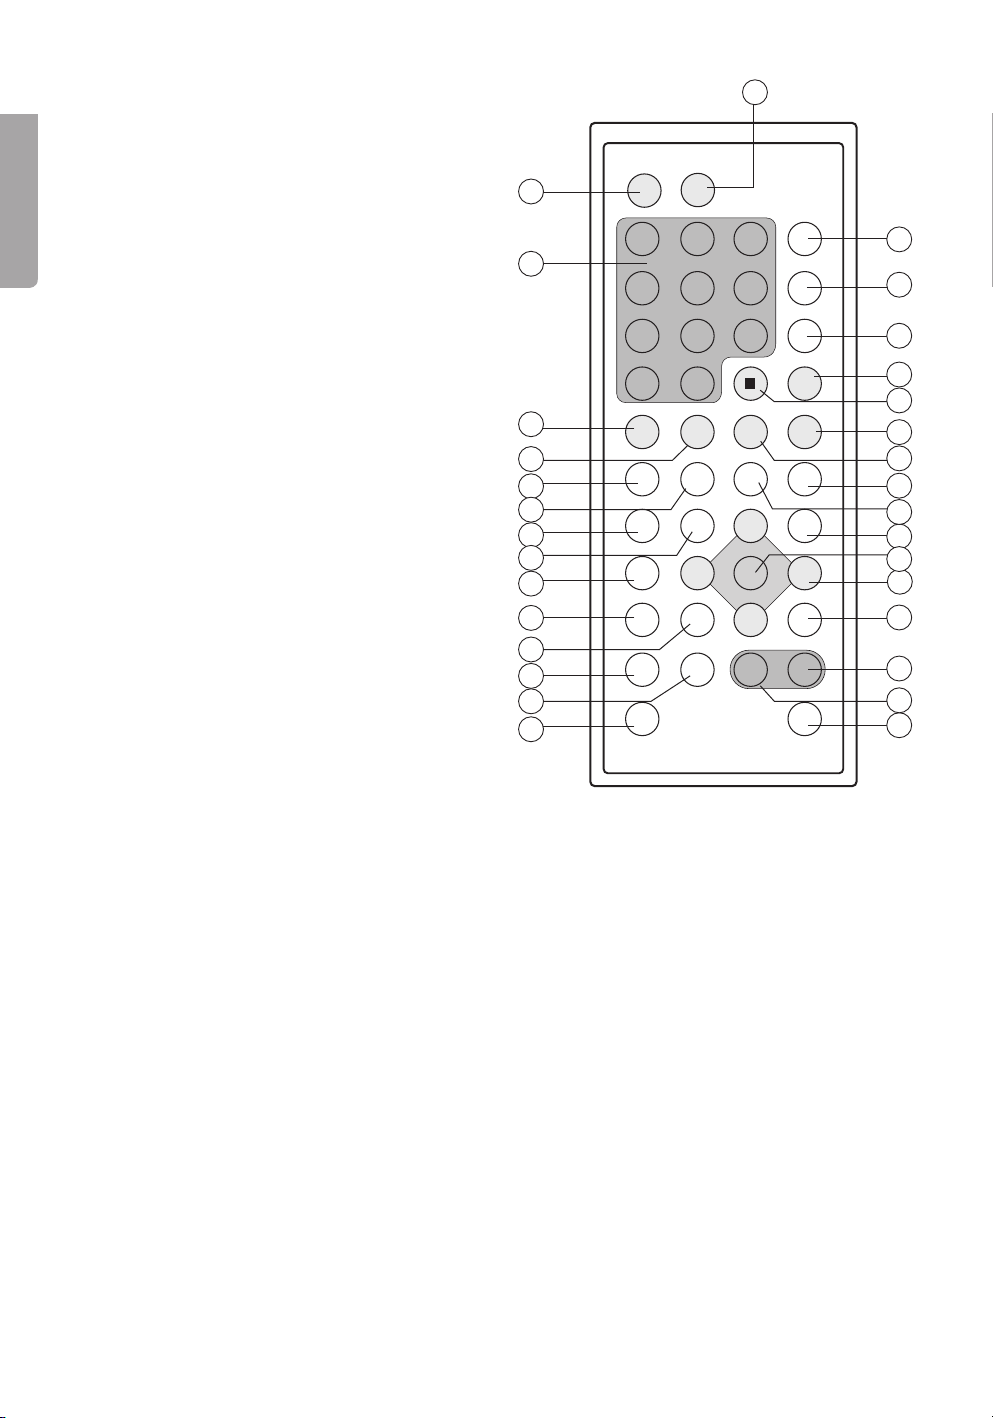
Remote control
1. TFT MODE – Detailed settings and screen setup.
2. Numerical buttons.
3. ◄◄ – Rewind Select 2/4/8/16/32 times faster
than normal playback speed.
4. ►► – Fast forward Select 2/4/8/16/32 times
faster than normal playback speed.
5. Zoom – Increases/decreases picture size.
6. SLOW – Slow-motion playback Select 2/4/8/16
times slower than normal playback speed.
7. PROGRAM – Programmes the order of audio
track or film chapter playback.
8. ANGLE – Changes the picture angle
(if supported by the DVD).
9. STEP – Step forward when playing films.
10. L/R – Select audio setting. Pressing during audio
playback allows the selection of left, right, mix or
stereo settings.
11. TITLE – Press during DVD playback to go to the
DVD’s title menu.
12. SUBTITLE – Selects subtitle language.
13. LANGUAGE – Select film dialogue language
(if the DVD supports this).
14. USB/CARD/DVD – Function selector for USB/
memory card/DVD.
15. N/P – Select TV-system (NTSC or PAL).
16. OSD – Press during playback to display
information on-screen: elapsed time, remaining
time, etc.
17. GO TO – Starts playback at
a predetermined place.
18. PLAY/PAUSE – Starts or pauses playback.
19. STOP – Stops playback.
20. NEXT – Skip to next chapter/track.
21. PREV – Skips to previous chapter/track.
22. REPEAT – Press once or several times to select
repeat mode:
SINGLE – Repeat one track/chapter.
REPEAT ONE – Repeat one file.
REPEAT FOLDER – Repeat all files in a folder.
SHUFFLE – Play all tracks/chapters/files in
random order.
RANDOM – Play one random file/track/chapter.
23. A-B – Select the start and end of a section for
repeated playback.
24. SETUP – Press to view details of current
settings and make new settings.
25. ENTER – Confirms selections.
26. Direction buttons – For navigating up, down,
left, right in menus.
27. MENU – Press during DVD playback to
go to the DVD’s main menu.
28. VOL+ – Volume control – increases
the volume.
29. VOL- – Volume control – decreases the
volume.
30. MUTE – Turns off the sound.
31. INVERSION – Press once to turn displayed
image upside down Press once more to turn
image back over again.

5
English
VOLUME
PHONE.1 PHONE.2 AV OUT
SD/MMC USB
OFF ON
POWER
IN PUT9-12V
VOLUME
PHONE.1 PHONE.2 AV OUT
SD/MMC USB
OFF ON
POWER
IN PUT9-12V
White connector to “AUDIO L”
Red connector to “AUDIO R”
Yellow connector to “VIDEO IN”
Plug the 3.5 mm connector into the socket marked “A/V OUT”.
MS/SD/MMC
USB
COAXIAL AV OUT
HDMI
THE INFORMATION SIDE OF THE DISC MUST BE FACE BACK
MS/SD/MMC
USB
COAXIAL AV OUT
HDMI
THE INFORMATION SIDE OF THE DISC MUST BE FACE BACK
POWER
LINK
ETHERNET
POWER
LINK
ETHERNET
POWER
LINK
ETHERNET
POWER
LINK
ETHERNET
Getting started
Power supply
Connecting to the mains
Connect the included adaptor to the power connection on the DVD player and then to an available power point.
In-car power supply
This DVD player can be used in the car. Connect the car adaptor to the DVD’s power connection and
then to a 12 V cigarette lighter outlet.
N.B. Only use the supplied car adaptor.
N.B. Always unplug the car/power adaptor when the DVD player is not being used.
Using the built-in battery
The device has a built-in rechargeable lithium polymer battery. The battery symbol
will flash if the battery is weak. If the battery is completely discharged, the device
will automatically shut off.
Charging
Connect the adaptor as pictured above.
• Set the power switch to the [OFF] position for quick charging. The battery must be charged for about 3 hours.
• Set the power switch to the [ON] position for slow charging. The battery now needs to be charged for
about 12 hours.
• The red indicator light shines during charging. When the battery is fully charged, the indicator light goes out.
Connecting to an external TV or Home Theatre Amplifier
The DVD player can be connected to an external TV or home theatre system using the included cables.
1. First make sure that the DVD player and TV/Home Theatre Amp. are turned off before connecting.
2. Connect the 3 RCA connectors between the player and your TV according to the diagram.
6
English
VOLUME
PHONE.1 PHONE.2 AV OUT
SD/MMC USB
OFF ON
POWER
IN PUT9-12V
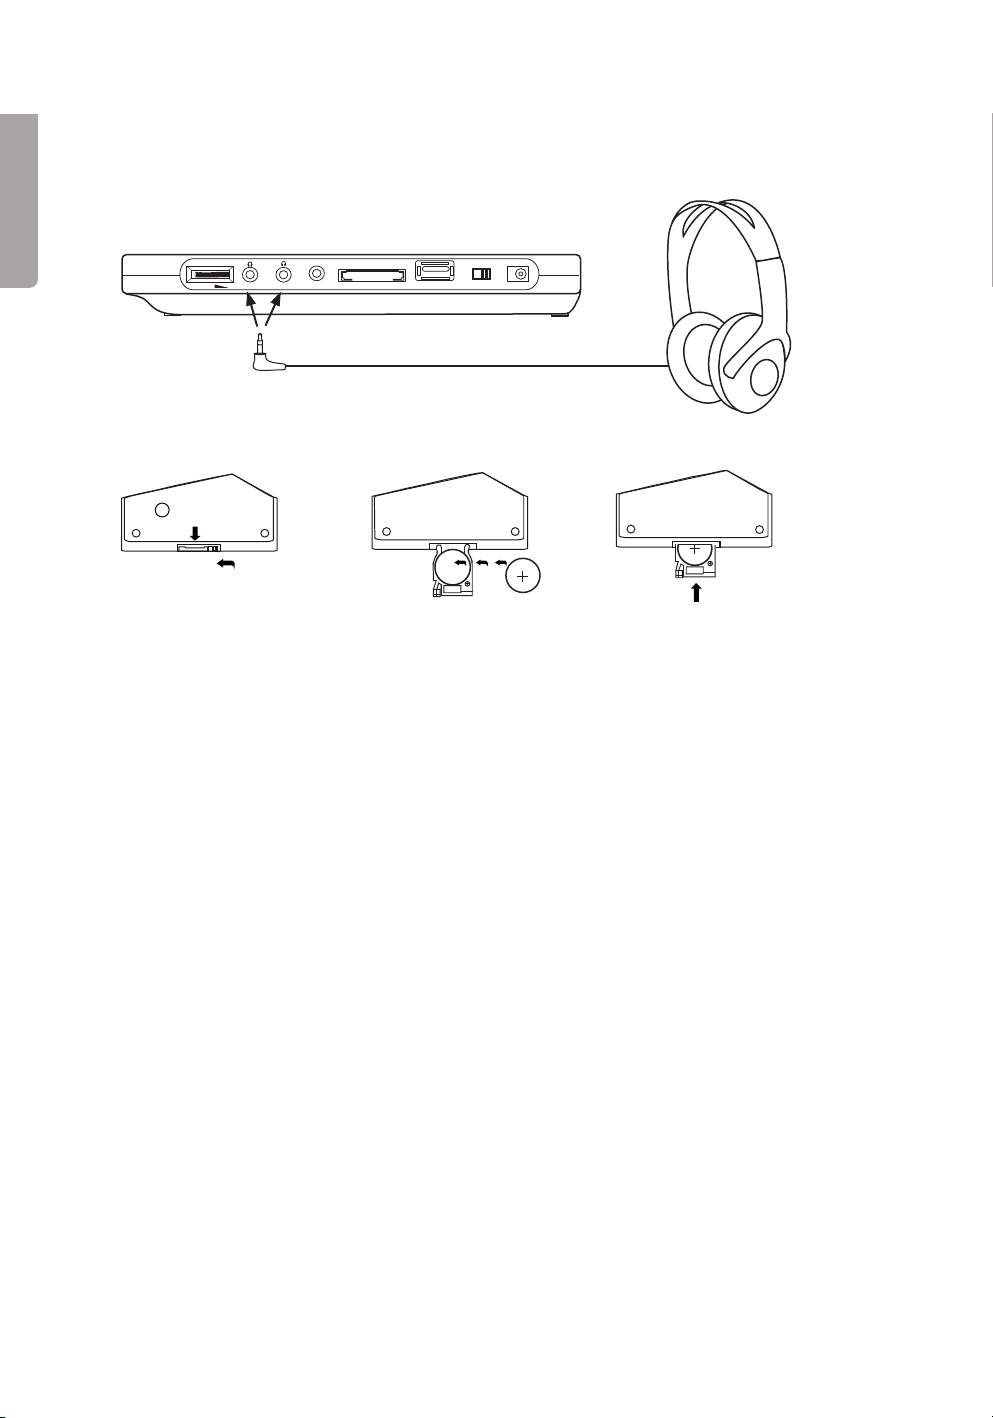
Connecting headphones
1. First, lower the volume of the device before connecting the headphones.
2. Connect headphones (with a 3.5 mm stereo plug) to the headphone jack (PHONE 1 or PHONE 2).
3. Adjust the volume to the desired level.
N.B. Prolonged exposure to high volume can damage your hearing.
Inserting batteries into the remote control
Using the remote control
Aim the remote control towards the sensor on the front of the player and press the relevant button for the desired
function.
NOTE! The battery in the remote control has a plastic film on it to prevent it from discharging. The plastic film must
be removed before the remote control can be used.
Use
Starting the DVD player
Set the power switch to the [ON] position to start the device.
Playing a CD or DVD
1. Open the disc compartment.
2. Place in a CD/DVD with the label facing up and close the disc compartment. Playback will start automatically.
3. If a menu is displayed on screen, move the cursor using the direction buttons and confirm your selection by
pressing ENTER.
Connecting a USB memory
1. Connect a USB memory to the USB port (22).
2. In stop mode or when there is no DVD in the device, press [USB/CARD/DVD].
3. It will take a moment for the data to be read. When the device is ready the USB menu will be displayed.
4. Select the file with the navigation buttons and press [PLAY] to start playback.
1. Press the locking tab in
the direction of the arrow.
2. Remove the battery holder.
3. Insert 1 x CR2025 battery
with the positive terminal
facing upwards.
4. Reinsert the battery holder.

7
English
Connecting an SD/MMC memory card
1. Insert a memory card into the slot (23).
2. In stop mode or when there is no DVD in the device, press [USB/CARD/DVD].
3. It will take a moment for the data to be read. When the device is ready the memory card’s menu
will be displayed.
4. Select the file with the navigation buttons and press [PLAY] to start playback.
Stopping playback
During video playback
• Press [STOP] once to stop playback. The player will go into standby mode. Press [PLAY] to resume playback.
• Press [STOP] again to completely stop playback. The player will go into standby mode.
During audio playback:
Press [STOP] to stop playback.
Next/previous track/chapter
Use the I◄◄ or ►►I buttons in order to go to the next or previous track/chapter.
Fast forward/rewind
• Press and hold ◄◄ or ►► to quickly search backwards or forwards in a track. The fast forward/rewind
speed is shown on the display.
• Press the same button again to change the speed. You can choose between 2, 4, 8, 16 or 32 times the
playback speed.
Slow-motion
• Press [SLOW] to view the film in slow-motion. The current playback speed is shown on the display.
• Press the same button again to change the playback speed. You can choose between 2, 4, 8 or 16 times
slower playback speed.
Enlarging or reducing picture size
• Press [ZOOM] on the remote control once or repeatedly to enlarge the image. The display will show
the current zoom setting.
• Use the direction buttons to position the enlarged area.
Displaying playback information
During playback, press the [OSD] button repeatedly in order to view playback information.
Audio setting (DVD)
Works only with discs with more than one audio track.
• Press [L/R] once or repeatedly to change the audio setting. You can select either mono left, mono right,
mix-mono or stereo. The current audio settings will also be displayed.
Language selection (DVD)
Works only with discs with more than one audio track.
• Press [LANGUAGE] once or repeatedly to change audio tracks. The current language selection will be shown
on the display.

8
English
Picture angle setting (DVD)
Only works with certain DVD’s.
• During playback, press and hold [ANGLE] to display and select from available picture angles.
Subtitle setting (DVD)
Only works with certain DVD’s.
• During playback, repeatedly press [SUBTITLE] in order to select the subtitle language. The current language
selection will be shown on the display.
MP3/MPEG4
1. Insert a CD/DVD containing MP3 or MPEG files.
2. The display shows the folders found on the disc and playback of the first folder begins automatically.
3. If an MPEG4 film contains a text file, highlight the desired text file and confirm using [ENTER].
4. Use the navigation buttons to select the folder or file that you wish to play. Press [ENTER] to confirm
and start playback. Playback of the first file in the folder starts automatically.
5. Use I◄◄ or ►►I to go to the next or previous track.
Slideshow
1. Insert a CD or DVD with image files in JPEG format. After a moment the display will show the folders
on the disc.
2. Use the direction buttons to select the folder or image file to be shown. Press [ENTER] to confirm.
The slideshow should now begin.
3. Use I◄◄ or ►►I to go to the next or previous picture.
• During playback, press the direction buttons to rotate or flip the images.
• Press [ZOOM] once or repeatedly to enlarge the image. The display will show the current zoom setting.
• The transition effect between images can be changed by pressing PROGRAM once or several times whilst
in slideshow mode.
Programmed playback
1. Press [PROGRAM] whilst in standby mode to enter the
programming mode. The display shows: [infoga bild 15]
2. Use the direction buttons to select a memory index and press
[ENTER] to start programming.
3. Programme the titles and chapters using the numerical buttons.
Navigate through the programming box using the direction
buttons.
NOTE!
• If, for example, you wish to programme chapter 12, first press [10+] and then 2.
• If, for example, you wish to programme chapter 22, first press [10+] twice and then 2.
4. To start playing the programmed section, go to “START” in the programming menu and press [ENTER].
Alternatively, you can select “EXIT” in the programming menu and then press [ENTER] to exit the menu
without starting playback.
5. In order to delete tracks/files during playback, use the direction buttons to highlight the track/file.
Then press [ENTER] to delete the highlighted track/file.
PROGRAM: CHAPTER/TRACK (01-00)
1
2
3
4
5
6
7
8
9
10
Exit Next ►►I
9
English
--G ENE R AL SE T UP PAG E--
TV DISPLAY WI DE
TV TYPE PAL
A NGLE MAR K ON
O SD LANG EN G
C APTI ONS OF F
S CRE EN SAV ER ON
D EFAULT
GO TO GENERAL SETUP PAGE
--AU DI O SET UP PAGE --
SPE AKER SET UP
EQUAL IZER
GO TO AUDIO SETUP PAGE
Setup
Setting the brightness and colour
The display’s brightness and colour can be set at anytime during playback.
• Press [TFT MODE] on the remote control to set the display screen properties.
• Press repeatedly to select BRIGHTNESS, CONTRAST, SATURATION, HUE or aspect ratio.
Adjust the value with ◄ and ►.
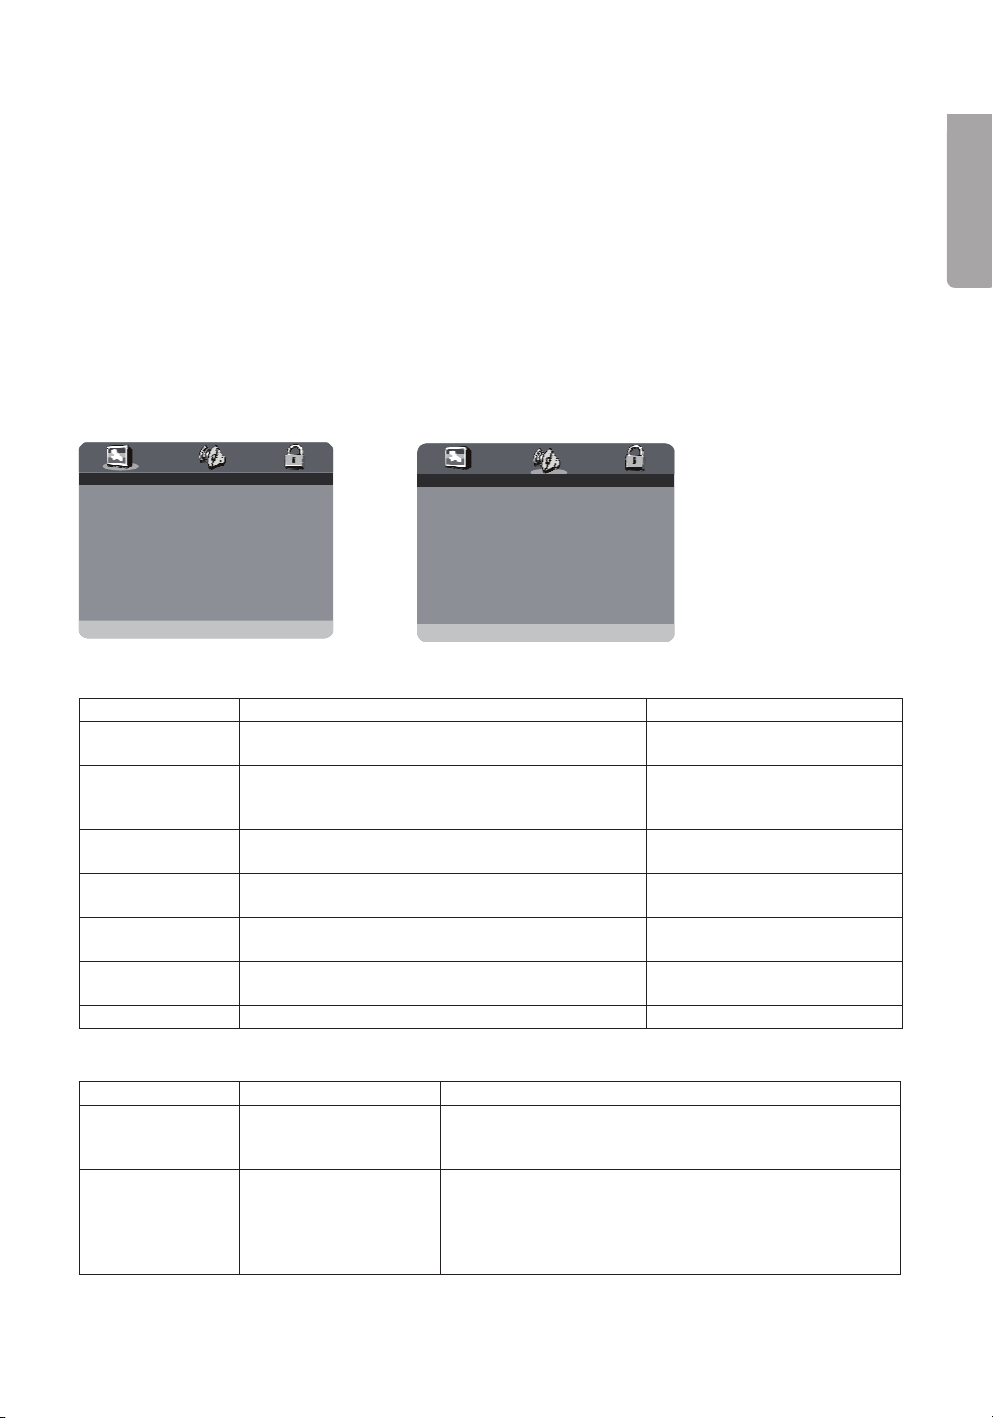
Setup menu
Enter the setup menu by pressing [SETUP].
• Use the direction buttons to move between menus and press [ENTER] to confirm your selections and settings.
• Press [SETUP] again to finish and exit the menus.
Key to the menus
General setup
Feature Description Options
TV TYPE Sets the TV system for receiving signals from the
DVD player.
PAL
NTSC
TV DISPLAY Sets the desired aspect ratio. Normal/PS: Panscan
Normal/LB: Letterbox
Widescreen: 16:9
ANGLE MARK Sets the picture angle (works only on certain DVDs). On (symbol displayed)
Off (symbol not displayed)
OSD LANG Sets menu language. English
Spanish
CAPTIONS Turns captioning of DVD film on/off. On
Off
SCREEN SAVER Turns screen saver on/off. On
Off
DEFAULT Restores the DVD player to factory default settings.
AUDIO SETUP
Feature Description Options
SPEAKER SETUP Loudspeaker settings. LT/RT = Mixes down from stereo to mono.
STEREO = Mixes down from 5.1 stereo to stereo.
V SURR = Mixes to surround sound.
EQUALIZER Sets the type of audio. EQ TYPE = Type: Mono, rock, pop, live, dance, techno,
classic, soft.
BASS BOOST = Amplified bass on/off.
SUPER BASS = Super bass on/off.
TREBLE BOOST = Amplified treble on/off.

10
English
-- PAS S WO R D SE T UP PAG E --
PA SS WO R D
PARENTAL
GO TO PASSWORD SETUP PAGE
- -PA SSW ORD S E TUP PA GE--
PASSWORD
PARE NTAL 1 KID SAFE
2 G
3PG
4 PG 13
5 PG R
6 R
7 NC 1 7
8 ADULT
S ET P AR E NTAL CON TR O L
PASSWORD SETUP
Feature Description Options
PASSWORD Changes the child lock pass-
word. Select “CHANGE” and
confirm by pressing ENTER
Use the numerical keys on
the remote control to enter
the password.
Enter the current password in the “OLD PASSWORD” box.
Enter the new password in the “NEW PASSWORD” box.
Enter the new password again in the “CONFIRM PWD” box.
Confirm with OK. Your password has now been changed.
Preset password: 136900.
PARENTAL Sets access restrictions for
children and prevents any
inappropriate material from
being shown. Sets appro-
priate access level (1–8).
1 = suitable for children
8 = suitable for adults only
Care and maintenance
Cleaning
• Always unplug the adaptor from the wall socket before cleaning.
• Make sure that no liquids penetrate the player.
• Use only a damp cloth when cleaning the exterior.
• Never use solvents or strong cleaning agents.
Disc care
• Hold the disk by the hole and edge when handling in order to avoid fingerprints and dirt
from contaminating the disk.
• Do not bend the disc or expose it to direct sunlight or heat.
• Store the discs upright in their cases.
• Clean the discs with a soft dry cleaning cloth starting from the centre and working outwards.
Never use solvents or strong detergents.
This manual suits for next models
3
Table of contents
Languages:
Other Clas Ohlson Portable DVD Player manuals

Clas Ohlson
Clas Ohlson DPX3270V SSD70S User manual

Clas Ohlson
Clas Ohlson DPU3270V+SSD70S-UK User manual

Clas Ohlson
Clas Ohlson PDV-196-UK User manual

Clas Ohlson
Clas Ohlson DPX3270V SSD70S-UK User manual

Clas Ohlson
Clas Ohlson PDVD-163BHD2P-UK User manual

Clas Ohlson
Clas Ohlson PDVD-196-UK User manual

Clas Ohlson
Clas Ohlson DPU2290MB User manual


