Classic Fire CHICAGO User manual
871125254211
A.I.&E. Adriaan Mulderweg 9-11,
5657 EM Eindhoven,
The Netherlands
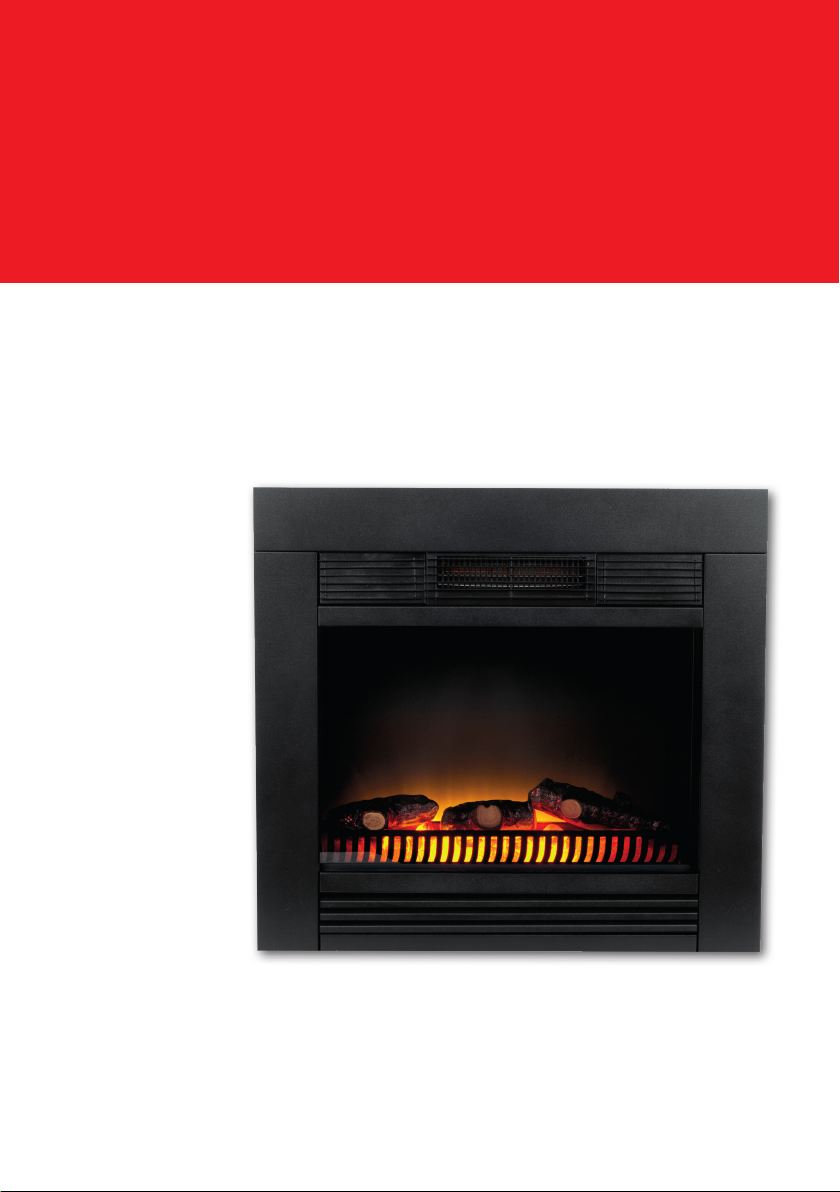
UK Electric heater for building-in purposes with replace effect (AJ55C-LED)
DE Elektrische Heizung für Einbauzwecke mit Kamineffekt (AJ55C-LED)
FR Chauffage électrique à encastrer avec effet cheminée (AJ55C-LED)
NL Elektrische inbouw kachel met haardeffect (AJ55C-LED)
Instruction manual
Bedienungsanleitung
Manuel d’utilisation
Gebruiksaanwijzing CHICAGO

1
a Electric replace
Operation and Safety Notes

2
Table of content
Introduction
Intended use........................................................................ Page 4
Technical specications....................................................... Page 4
Scope of delivery................................................................. Page 4
Description of parts.............................................................. Page 5
Safety Instructions
Avoid danger to life by electric shock .................................. Page 7
Avoid injuries and damages of the electric unit ................... Page 8
Avoid danger to life by environmental effects...................... Page 10
Before operation.................................................................. Page 11
Operation
Switching ame simulator on / off........................................ Page 12
Using the dimmer function................................................... Page 12
Switching heating function on / off....................................... Page 13
Using the thermostat. .......................................................... Page 15
Maintenance and cleaning
Cleaning the housing........................................................... Page 16
Disposal.............................................................................. Page 17
Information
Service / Warranty ............................................................... Page 17
Declaration of conformity..................................................... Page 18

3
The following pictograms are used in this operating manual / on
the unit:
Read the operating
manual!
Danger to life and of
accidents for toddlers
and children!
Observe warning and
safety instructions! Warning! Do not cover.
Beware of electric
shock! Danger to life!
Wear protective
gloves!
Risk of explosion! Watt (actual power)
Fire hazard! Volt (alternating
current)
Beware of hot
surfaces!
Dispose of packaging
and product in an
environmentally
friendly manner!
Introduction

4
Electric replace AJ55C-LED / AJ55C-LED-RC
Introduction
Unfold the page with the illustrations and become
acquainted with the functions of the unit before putting it
into operation for the rst time. In order to do so, please
read the following operating and safety instructions. Only use the unit
as described and for the indicated range of operation. Keep these
instructions in a safe place. Please also hand over all documents to
third parties when passing on the unit.
Intended use
The unit is intended for the generation of hot air in closed, dry rooms.
The unit is intended for installation into existing replaces. The electric
ame simulator conveys a log re atmosphere. Other types of use
or modications of the unit are not regarded as intended and pose
serious danger of accidents.
The manufacturer is not liable for any damages caused by any use
other than for the intended purpose.
The unit is designed for use in private households and not suitable for
industrial purposes.
Technical specications
Model: AJ55C-LED / AJ55C-LED-RC
Nominal voltage: 230 V ~, 50 Hz
Rated power: max. 1.800 W
Power stages: 2 (900 W, 1.800 W)
Illuminants: 2 x 1 W LED
Dimensions: 67 x 23 x 62 cm (w x d x h)
Installation
dimensions: 58 x 22 x 54 cm (w x d x h)
Weight: approx. 14.8 kg
Scope of delivery
Immediately after unpacking please check if the delivery is complete
and also if all parts of the product are in good condition.
1 Fireplace insert, electric
1 Operating instructions Avoid injuries and damages of the electric unit
5
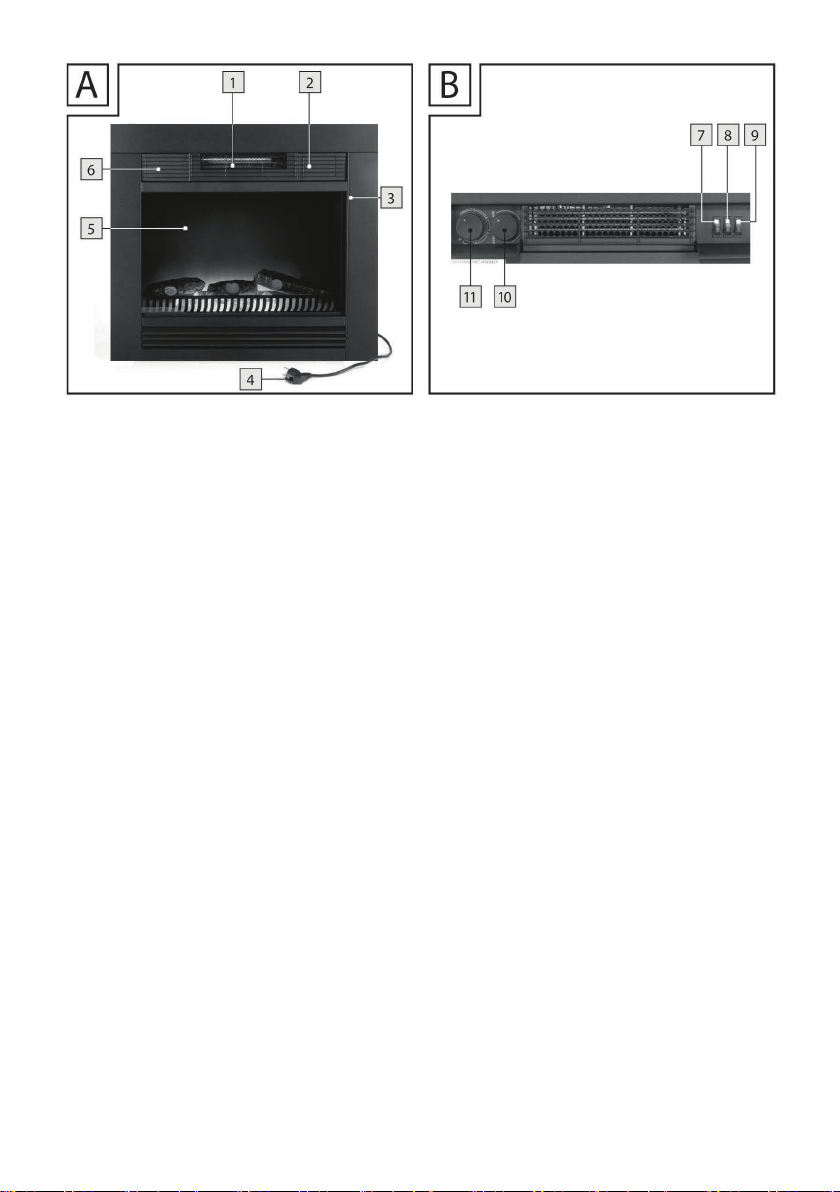
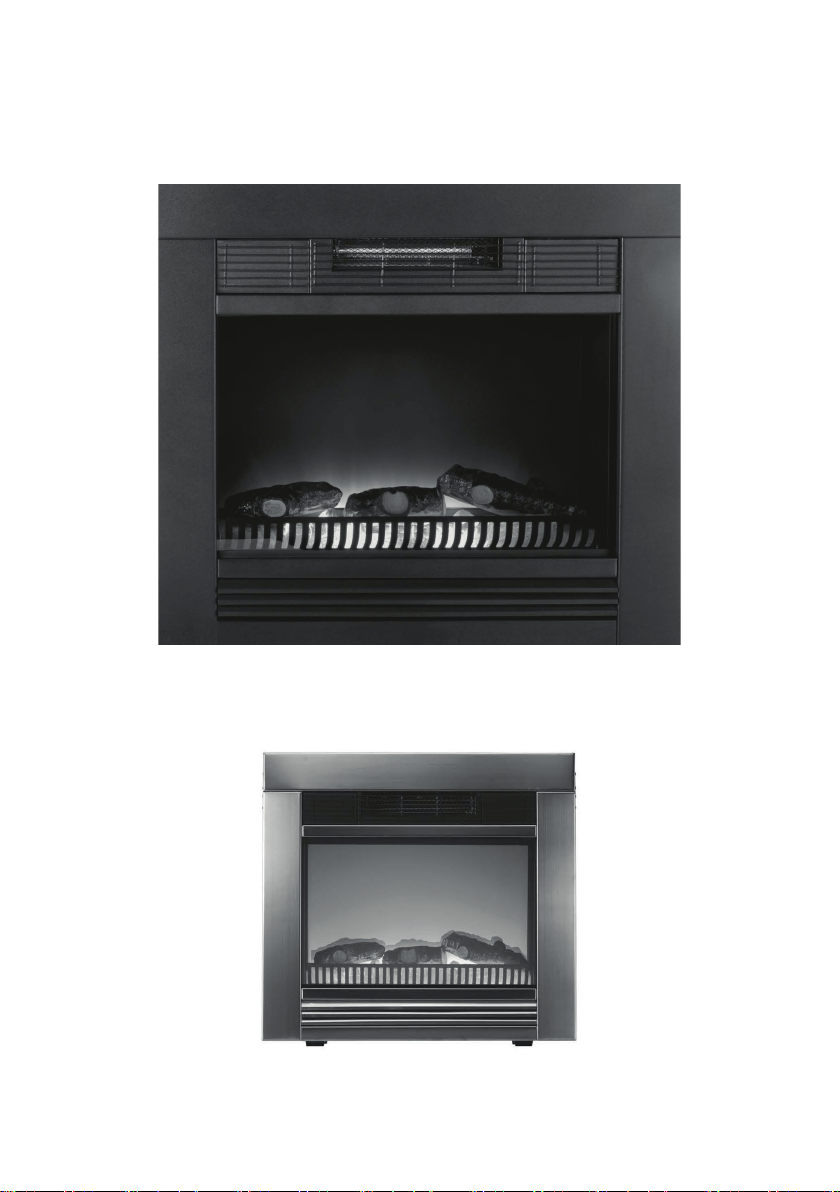
Description of parts
1. Ventilation slots
2. Right hand cover
3. Front
4. Power plug
5. Glass plate
6. Left hand cover
7. Switch second heating stage
8. Switch rst heating stage
9. ON / OFF switch
10.Thermostat control
11. Dimmer switch

6
Safety Instructions
WARNING! Please read all safety
instructions. Failure to adhere to the safety
instructions can cause electric shock, re
and / or serious injuries.
SAVE ALL SAFETY INSTRUCTIONS FOR THE FUTURE!
WARNING! DANGER TO LIFE AND OF
ACCIDENTS FOR TODDLERS AND
CHILDREN!
This appliance can be used by children aged from 8
years and above and persons with reduced physical,
sensory or mental capabilities or lack of experience
and knowledge if they have been given supervision
or instruction concerning use of the appliance in a
safe way and understand the hazards involved.
Children shall not play with the appliance. Cleaning
and user maintenance shall not be made by children
without supervision.
Children of less than 3 years should be kept away
unless continuously supervised.
Children aged from 3 years and less than 8 years
shall only switch on/off the appliance provided that
it has been placed or installed in its intended normal
operating position and they have been given
supervision or instruction concerning use of the ap-
pliance in a safe way and understand the hazards
involved. Children aged from 3 years and less than 8
7
years shall not plug in, regulate and clean the
appliance or perform user maintenance.
ATTENTION! RISK OF EXPLOSION!
Do not operate the electric unit in explosion
endangered environments in which there are
ammable liquids or gases.
Avoid danger to life by electric shock
The heater must not be located immediately
below a socket outlet.
Do not use this heater in the immediate
surroundings of a bath, a shower or a swimming
pool.
Do not use this heater with a programmer, timer,
separate remote-control system or any other device
that switches the heater on automatically, since a re
risk exists if the heater is covered or positioned
incorrectly.
• Do not operate the unit with a damaged power
line or damaged power plug.
ATTENTION! Damaged power lines represent
danger to life by electric shock.
• Check the power lines regularly for damages and
aging.
• Attention! If the appliance or the supply cord is

8
damaged, it must be repaired by manufacturer, its
• service agent or qualied person.
• Protect the power line against sharp edges,
mechanical strain and hot surfaces.
• Only operate the unit with an earthed outlet.
• Do not operate the unit outdoors. Make sure that
the power line never gets wet or damp during
• operation.
• Do not switch on the unit if you notice visible
damages (e.g. tears or cracks) or if you assume
that the unit is damaged (e.g. after having fallen
down).
• Never operate the unit in the immediate vicinity of
a bathtub, shower or wash basin or a pool.
• In the case of disturbances immediately pull the
power plug out of the outlet.
• Only let an electrical technician conduct repairs.
• Pull the power plug out of the outlet when you are
not using the electric replace insert for a longer
period of time.
Avoid injuries and damages of the
electric unit
ATTENTION! FIRE HAZARD! Do not place
any ammable objects such as clothing or
the like on the electric replace insert.

9
ATTENTION! In no case should the
ventilation slots of 1 the electric replace
insert be covered. Otherwise there is a re
hazard.
ATTENTION! Never leave the electric replace
insert unattended when it is in operation. There is a
risk of injury in the case of non-observance.
ATTENTION! FIRE HAZARD! Please make
sure that the distance between the front of
the electric replace insert and ammable
objects such as furniture, curtains or the like is at
least 1 m.
ATTENTION! DANGER OF BURNING!
Please make sure that the surfaces which
radiate heat can achieve temperatures
exceeding 50 °C. Make sure that the unit is switched
off and cooled off before you touch it.
CAUTION — Some parts of this product can
become very hot and cause burns. Particular
attention has to be given where children and
vulnerable people are present.
Prevent the power line from becoming a trip hazard.
Therefore, always run it away from the unit from the
back.

10
Wear protective gloves for all maintenance
work on the unit. The edges of the electric
replace insert are very sharp!
Make sure that children or pets are not endangered
by the operation of the unit.
ATTENTION! Never operate the unit using external
switchgear such as a time switch for example.
Never connect the unit to an electric circuit which is
regularly switched on and off by a mechanism.
Injuries as well as damage to the product could
result.
Disconnect the power supply by pulling the power
plug out of the outlet. Never pull on the power line.
Always place the unit on a level, dry surface.
Do not install or operate the unit in vehicles.
Pull the power plug before moving the unit to a
different location.
Pull the power plug before you clean the unit.
Store the unit in a dry, dust- and vibration-free place.
Avoid damage to the unit
Avoid danger to life by environmental
effects
WARNING! Please make sure that the unit is not
covered with towels, curtains or similar objects.
Otherwise there is danger of overheating. Therefore,

11
always pay attention that the ventilation slots 1
are kept clear.
• Do not operate the unit in rooms in which
dampness can develop or in which it can come in
contact with water.
Before operation
Note: Make sure that the dimensions of your replace correspond to
the assembly dimensions of the electric replace insert.
• Insert the electric replace insert into your existing replace. Pay
attention that you insert the electric replace insert into the existing
replace from the front.
ATTENTION! Do not place the unit directly beneath
a wall outlet. In the case of non-observance
danger of injury and / or damage to the unit can
result.
ATTENTION! Please pay attention that you do not
pinch the power line and protect it against sharp
edges. Damaged power lines increase the risk of an
electric shock.
Note: Make sure that the electric replace insert is correctly installed
in the existing replace.
Refer to the assembly instructions (see separate supplement) for your
existing replace and / or call on a professional.
• Insert the power plug 4 into an earthed outlet.
Note: Please observe that the power plug must still be able to be rea-
ched after installation of the electric replace insert.
Your electric replace insert is now ready for operation.

12
Operation
The voltage of the power source must comply with the specications
on the name plate of the heater.
Devices marked with 230 V can also be operated with 220 V. Before
operation it is imperative to make sure that the installation location
corresponds to the requirements of the safety instructions.
Note: When the heater is turned on for the rst time, a slight, harm-
less odour can develop. This odour develops due to the heating up of
the inner heating elements. Provide sufcient ventilation.
Switching ame simulator on / off
Note: You can also switch on the ame simulator when you are not
using the heating function.
Note: Power consumption of the electric replace insert with illuminati-
on switched on but without heating function amounts to approx. 2 W.
• Open the right hand cover 2 by opening it up towards the front.
• Set the ON / OFF switch 9 to position I.
• Set the ON / OFF switch 9 to position 0 if you would like to turn off
the ame simulator.
• Close the right hand cover 2.
Using the dimmer function
Note: Your electric replace insert has a dimmer function. With it you
can adjust the brightness of
the ame simulator.
Note: You can only use the dimmer function when the ame simulator
is switched on (see “Switching ame simulator on / off“).
• Open the left hand cover 6 by opening it up towards the front.
• Turn the dimmer 11 in the direction of rotation to increase the
brightness of the ame simulator or as the case may be turn the

13
dimmer 11 in the direction of rotation to reduce the brightness of
the ame simulator.
Switching heating function on / off
Note: The electric replace insert has 2 heating stages with different
heat intensities.
• Open the right hand cover 2 by opening it up towards the front.
• Set the switch for the rst heating stage 8 to position I if you would
like a low supply of heat. Set the switches for the rst 8 and se-
cond heating stages 7 to positions I and II if you would like a high
supply of heat.
Note: You can only put the second heating stage into operation if the
switch for the rst heating stage 8 is set to position I.
ATTENTION! DANGER OF BURNING!
Please observe that the surfaces which
radiate heat can achieve temperatures
exceeding 50 °C. Make sure that the unit is switched
off and cooled off before you touch it.
ATTENTION! Please make sure that the unit
is not covered with towels, curtains or similar
objects.
Otherwise there is danger of overheating. Therefore,
always pay attention that the ventilation slots 1 are
kept clear.
• Flip the switches for the rst heating stage 8 and the second hea-
ting stage 7 up in order to turn of the heating function.

14
Remote control (optional)
The maximum range of use is 5 metres. The buttons on the remote
control have the following functions:
On / Off
Press this button once for 900W output and twice for 1800W output. If
button is pressed a third time the heater reverts to “Cold Blow” functi-
on.
Press this button and the heater is programmed to run for 30 minutes
e.g . press once = 30 minutes, press twice = 60 minutes, etc.
Cold blow function.
Warning: it takes time for the receiver to respond to the transmitter.
Do not press the buttons more than once within two seconds for
correct operation.
Batteries:
1. Slide open the battery holder on the side of the remote control.
2. Install one CR2025 battery (not included) into the holder. Take care
of the polarity (+ | -)when inserting the battery.
3. Slide back the battery holder into the remote control.
15
If inserted incorrectly or if the batteries are not replaced at the same
time or when disposed of in a re or when an attempt is made
to charge a battery not intended to be recharged this may cause
dangerous situations.
Remove the batteries when you dispose of the
appliance. Used batteries must not be disposed of as
household refuse. Take them to your appliance retailer
or to a special collection point for disposal.
Using the thermostat
Note: Your electric replace insert is equipped with a thermostat. You
can therefore consistently maintain a preset room temperature by me-
ans of automatic on and off switching.
• Turn the thermostat control 10 in the direction of rotation or until
you hear a clicking sound.
Note: The clicking sound signalises the current room temperature.
• Set the switch for the rst heating stage 8 to position I if you would
like a low supply of heat. Set the switches for the rst 8 and se-
cond heating stages 7 to positions I and II if you would like a high
supply of heat.
• Now turn the thermostat control 10 in the direction of rotation until
you reach the desired room temperature.
• Now the heating function begins automatically.
ATTENTION! DANGER OF BURNING!
Please observe that the surfaces which
radiate heat can achieve temperatures
exceeding 50 °C. Make sure that the unit is switched
off and cooled off before you touch it.
ATTENTION! Please make sure that the unit is not
covered with towels, curtains or similar objects.
Otherwise there is danger of overheating. Therefore,

16
always pay attention that the ventilation slots 1 are
kept clear.
• As soon as the set room temperature is reached, the heating
function of your electric replace insert switches off automatically.
• As soon as the set room temperature falls short, the heating
function of your electric replace insert switches on automatically.
• Switch off the electric replace insert when it is no longer needed
(see “Switching heating function on / off“).
Maintenance and cleaning
WARNING! DANGER TO LIFE BY ELEC
TRIC SHOCK!
Before conducting cleaning or maintenance
work please pull the power plug 4 out of the outlet
and let the unit completely cool off.
ATTENTION! DANGER OF BURNING!
It is imperative to let the unit completely cool
off before any work is done on it.
ATTENTION! Only let an electrical technician con-
duct repairs.
Cleaning the housing
• In no case should aggressive or corrosive cleaning agents be
used. Otherwise damage to the product could result.
• Clean the housing with a slightly dampened cloth.
• Clean the ventilation slots regularly and thoroughly 1 (e.g. with a
vacuum cleaner) so that no dust can accumulate.
• Clean the glass plate 5 with a damp cloth and if necessary with a
glass cleaner.

17
Disposal
All the packaging and packaging material consist of en
vironmentally friendly materials. They can be disposed of in
local containers.
Meaning of crossed –out wheeled dustbin:
Do not dispose of electrical appliances as unsorted
municipal waste, use separate collection facilities.
Contact you local government for information regarding the
collection systems available.
If electrical appliances are disposed of in landlls or dumps, hazar-
dous substances can leak into the groundwater and get into the food
chain, damaging your health and well-being.
When replacing old appliances with new ones, the retailer is legally
obligated to take back your old appliance for disposals at least free of
charge.
Information
You receive a 2-year warranty on this unit from the date of purchase.
The unit was carefully manufactured and diligently inspected before
being dispatched. Damage which is attributed to improper use as well
as wearing parts are not included in the warranty.
WARNING! Only let your units be repaired by
qualied specialists using only original spare
parts. This ensures that the safety of your unit is
maintained.
WARNING! Always have the manufacturer of
the unit or his / her customer service conduct the
replacement of the power plug 4 or the power line.
This ensures that the safety of your unit is
maintained.

18
Declaration of conformity CE
A.I&E Eindhoven B.V., Adriaan Mulderweg 9-11, NL-5657 EM Eindho-
ven, herewith declares the conformity with the following EC Directives
for this product:
EC Low Voltage Directive (2006 / 95 / EC)
Electromagnetic Compatibility (2004 / 108 / EC)
Name of the unit: Electric Fireplace AJ55C-LED / AJ55C-LED-RC
19
b Elektrokamin
Bedienungs- und Sicherheitshinweise
This manual suits for next models
1
Table of contents
Languages:
Other Classic Fire Electric Heater manuals


