manuals.online logo
Brands
  1. Home
  2. •
  3. Brands
  4. •
  5. Claypaky
  6. •
  7. Projector Accessories
  8. •
  9. Claypaky C52324 User manual

Claypaky C52324 User manual

1
2
1
34
5
6
7
1
I
GB
D
E
F
Il presente foglio di istruzioni deve essere letto unitamente al manuale di istruzioni fornito con il proiettore sul quale si intende montare questo accessorio.
Questo accessorio può essere montato sul V.I.P. 1200 singolarmente o in abbinamento con altri accessori.
Disimballo - Figura 1
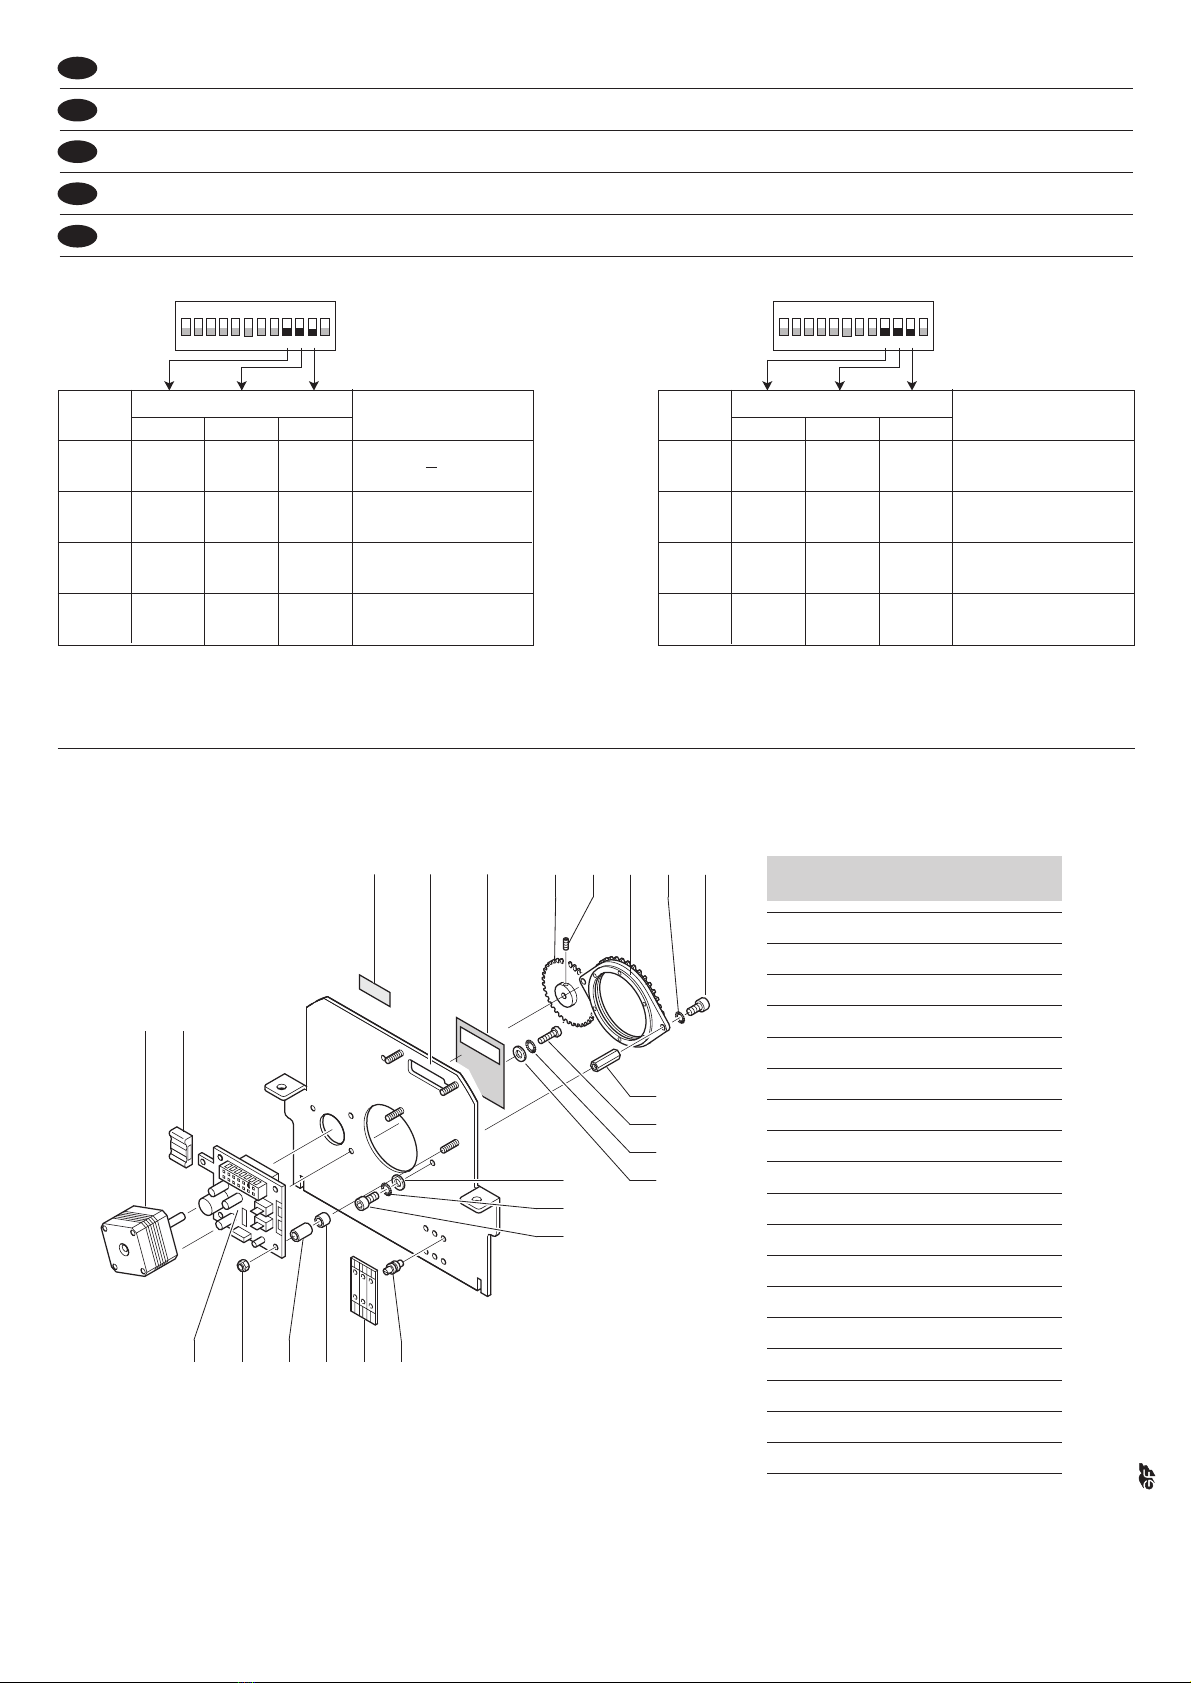
Montaggio accessorio - Figura 2
Inserire l’accessorio nella posizione più vicina alla lampada.
Manutenzione - L’accessorio non richiede alcuna manutenzione ordinaria e in caso di malfunzionamento deve essere affidato a un tecnico autorizzato.
This instructions sheet must be read together with the instructions manual supplied with the projector to be fitted with this accessory.
This accessory can be fitted on V.I.P. 1200 projectors on its own or in combination with other accessories.
Unpacking - Fig. 1
Fitting accessory - Fig. 2
Put the accessory in the position closest to the lamp.
Maintenance - This accessory requires no routine maintenance and, in the event of malfunctioning, it must be passed over to an authorized technician.
Lire la présente fiche d'instructions en même temps que le manuel d'instructions forni avec le projecteur sur lequel l'accessoire doit être monté.
Cet accessoire peut être monté sur les projecteurs V.I.P. 1200 seul ou en combinaison avec d'autres accessoires.
Déballage - Figure 1
Montage accessoire - Figure 2
Introduire l’accessoire dans la position la plus proche de la lampe.
Entretien - L'accessoire ne nécessite aucun entretien ordinaire, et en cas de mauvais fonctionnement, il doit être confié à un technicien agréé. a un técnico autorizado.
Diese Bedienungsanleitung sollte parallel mit dem Bedienungshandbuch des Projektors, mit dem dieses Zubehörteil benutzt werden soll, gelesen werden.
Dieses Zubehörteil kann an V.I.P.1200-Projektoren, einzeln oder in Kombination mit anderei Zubehörteilen montiert werden.
Auspacken - Abb. 1
Montage Zubehör - Abb. 2
Das Zubehör in die der Lampe am nächsten gelegenen Position einsetzen.
Wartung - Das Zubehörteil bedarf keinerlei ordentlichen Wartung, und im Falle einer Betriebsstörung muss es von einem autorisierten Techniker repariert werden.
La presente hoja de instrucciones debe leerse junto con el manual de instrucciones del proyector en el cual se montará este accesorio.
Este accesorio puede montarse en proyectores V.I.P. 1200 sólo o en combinación con otros accesorios.
Desembalaje - Figura 1
Montaje accesorio - Figura 2
Inserte el accesorio en la posición más cerca de la lámpara.
Mantenimiento - El accesorio no requiere ningún mantenimiento ordinario y ante cualquier desperfecto, acuda a un técnico autorizado.
ISTRUZIONI PER L’USO OPERATING INSTRUCTIONS
INSTRUCTIONS D’UTILISATION BEDIENUNGSANLEITUNG INSTRUCCIONES DE USO
I
F
GB
D E
GOBO ROTANTE per VIP 1200
ROTATING GOBO for VIP 1200
GOBO ROTATIF pour VIP 1200
DREHENDER GOBO für VIP 1200
GOBO GIRATORIO por VIP 1200
C52324
®
1 2
2
OPTION FUNCTION in DMX MODE
1 - 9
Impostazione indirizzo per segnale DMX
Address setting for DMX signal
Sélection adresse pour signal DMX
Einstellung der Adresse für DMX Signal
Programación de la dirección para señal DMX
10, 11 Non usata – Not used – Non utilisé – Nicht belegt – No utilizada
12 DMX MODE
AUTO MODE
ON
OFF
-
-
1
123456789101112
DMX MODE
ON
2
4
8
16
32
64
128
256
AUTO MODE
1
123456789101112
DMX MODE
ON
2
4
8
16
32
64
128
256
AUTO MODE
FUNZIONE CANALE ED OPZIONI CHANNEL FUNCTION AND OPTIONS
FONCTION CANAL ET OPTIONS KANALFUNKTION UND OPTIONEN FUNCIÓN DEL CANAL Y OPCIONES
IGB
DEF
Funzionamento in modo DMX (opzione 12 ON)
Operation in DMX mode (option 12 ON)
Fonctionnement en mode DMX (option 12 ON)
Funktion in Modalität DMX (Option 12 ON)
Funcionamiento en el modo DMX (opción 12 ON)
II
GB
D
E
F
Funzionamento in modo AUTO (opzione 12 OFF)
Operating in AUTO mode (option 12 OFF)
Fonctionnement en mode AUTO (option 12 OFF)
Funktion in Modalität AUTO (Option 12 OFF)
Funcionamiento en el modo AUTO (opción 12 OFF)
II
GB
D
E
F
Impostazione dell’indirizzo DMX
Agire sugli appositi microinterruttori considerando che il GOBO ROTANTE occupa 1 canale di controllo.
L’operazione di impostazione dell’indirizzo DMX può essere effettuata anche a proiettore spento.
Address setting for DMX signal
Use the special microswitches keeping in mind that the ROTATING GOBO occupies 1 control channel. The
DMX address can also be set with the projector switched off.
Sélection adresse pour signal DMX
Agir sur les microinterrupteurs prévus à cet effet en considérant que le GOBO ROTATIF occupe 1 canal de
contrôle. L’opération de sélection de l’adresse DMX peut également être effectuée avec le projecteur éteint.
Einstellung der Adresse für DMX Signal.
Die entsprechenden Mikroschalter betätigen, dabei beachten, dass der DREHENDE GOBO 1 Steuerkanal
belegt. Die Einstellung der DMX Adresse kann auch bei ausgeschaltetem Projektor erfolgen.
Programación de la dirección para señal DMX
Intervenga en los correspondientes microinterruptores considerando que el GOBO GIRATORIO ocupa 1
canal de control. La operación de programación de la dirección DMX se puede realizar también con el
proyector apagado.
I
GB
D
E
F
0
1
2
3
4
5
6
7
8
9
10
STOP
540°
360°
0°
STOP
FAST ROTATION (120 rpm)
SLOW ROTATION (2 rph)
FAST ROTATION (120 rpm)
BIT % EFFECT
191 - 192 74.7 - 75.0
255 100
193 75.0
190 74.2
128 50.0
0 0.0
POSITION 540°127 49.7
POSITION 450°
POSITION 360°
POSITION 270°
POSITION 180°
POSITION 90°
POSITION 0°
105 41.7
84 33.0
63 24.7
42 16.2
21 8.2
Accessory 4
- Channels
4
Accessory 5
- Channels
5
Accessory 3
- Channels
3
Accessory 2
- Channels
2
ON
OFF
ON
OFF
ON
OFF
1
2
4
8
16
32
64
128
256
OFF
ON
OFF
ON
CODE
Accessory 1
- Channels
1
OPTION FUNCTION in DMX MODE
1, 2
Selezione del tipo di sequenza
Chase type selection
Sélection du type de séquence
Wahl der Art der Sequenz
Selección del tipo de secuencia
3, 4 Non usata – Not used – Non utilisé – Nicht belegt – No utilizada
5, 6, 7
Impostazione della velocità di rotazione del gobo
Setting for gobo rotation speed
Sélection de la vitesse de rotation du gobo
Einstellung der Drehgeschwindigkeit des Gobos
Programación del tiempo de permanencia del gobo
9, 10, 11
Impostazione della durata di uno step
Step duration setting
Sélection de la durée d’un pas
Einstellung der Dauer eines Schritts
Programación de la duración de un step
8Non usata – Not used – Non utilisé – Nicht belegt – No utilizada
12 DMX MODE
AUTO MODE
ON
OFF
-
-
-
-
-
CHASE No. of
steps
DIL SWITCH POSITION SCENE/CHASE DESCRIPTION
12
0
1
2
3
▼ ▼
▼
▼
▲
▲
▲
▲
OFF OFF 2
OFF ON 2
ON OFF 4
ON ON 2
1. gobo still - 2. clockwise rotation (Continuous clockwise rotation with DIL SWITCH 9,10,11 OFF)
1. gobo still - 2. counterclockwise rotation (Continuous counterclockwise rotation with DIL SWITCH 9,10,11 OFF)
1. gobo still - 2. clockwise rotation - 3. gobo still - 4. counterclockwise rotation (Gobo still with DIL SWITCH 9,10,11 OFF)
1. clockwise rotation - 2. counterclockwise rotation (Gobo still with DIL SWITCH 9,10,11 OFF)
123456789101112
ON
Selezione del tipo di sequenza microinterruttori 1 e 2 4 possibilità
Chase type selection microswitches 1 and 2 4 possibilities
Sélection du type de séquence microinterrupteurs 1 et 2 4 possibilités
Wahl der Art der Sequenz Mikroschalter 1 und 2 4 Möglichkeiten
Selección del tipo de secuencia microinterruptores 1 y 2 4 opciones
I
GB
D
E
F
MODALITÀ AUTO AUTO MODE
AUTOMODE AUTO MODALITÄT MODALIDAD AUTO
IGB
DEF
Impostazione della velocità di rotazione del gobo microinterruttori 5, 6 e 7 8 possibilità
Setting for gobo rotation speed microswitches 5, 6 and 7 8 possibilities
Sélection de la vitesse de rotation du gobo microinterrupteurs 5, 6 et 7 8 possibilités
Einstellung der Drehgeschwindigkeit des Gobos Mikroschalter 5, 6 und 7 8 Möglichkeiten
Programación del tiempo de permanencia del gobo microinterruptores 5, 6 y 7 8 opciones
I
GB
D
E
F
NSPEED
DIL SWITCH POSITION
567
1
2
3
4
▼ ▼
▼
▼
▼
OFF OFF OFF
OFF
▼
OFF
OFF
▼
OFF
▲
ON
▲
ON
▼
OFF
▲
ON
▲
ON
1 rpm
2 rpm
4 rpm
8 rpm
3
123456789101112
ON
NSPEED
DIL SWITCH POSITION
567
5
6
7
8
▼
▼
▼
OFF OFF
OFF
▲
ON
▲
ON
▲
ON
▲
ON
▼
OFF
▲
ON
▲
ON
▲
ON
▲
ON
15 rpm
30 rpm
60 rpm
120 rpm
123456789101112
ON
CLAY PAKY SPA -Via Pastrengo, 3/b - 24068 Seriate (BG) - Italy - Tel. +39-035-654311(10 linee) - Fax +39-035-301876 - Internet: www.claypaky.it
studio
Rev. 1 02/03 Cod. 099451
Impostazione della durata di uno step microinterruttori 9, 10 e 11 8 possibilità
Step duration setting microswitches 9, 10 and 11 8 possibilities
Sélection de la durée d’un pas microinterrupteurs 9, 10 et 11 8 possibilités
Einstellung der Dauer eines Schritts Mikroschalter 9, 10 und 11 8 Möglichkeiten
Programación de la duración de un step microinterruptores 9, 10 y 11 8 opciones
I
GB
D
E
F
NSPEED
DIL SWITCH POSITION
910 11
1
2
3
4
▼ ▼
▼
▼
▼
OFF OFF OFF
OFF
▼
OFF
OFF
▼
OFF
▲
ON
▲
ON
▼
OFF
▲
ON
▲
ON
3 seconds for step
5 seconds for step
10 seconds for step
123456789101112
ON
NSPEED
DIL SWITCH POSITION
910 11
5
6
7
8
▼
▼
▼
OFF OFF
OFF
▲
ON
▲
ON
▼
OFF
▲
ON
▲
ON
▲
ON
▲
ON
▲
ON
▲
ON
20 seconds for step
30 seconds for step
60 seconds for step
120 seconds for step
123456789101112
ON
1
2
3
4
5
6
7
8
9
10
11
12
13
14
15
16
17
18
699085/003
020101/001
030004
030005
699086/001
030034
020002/002
020201/002
020210/005
021602/001
164027/801
020016/002
081203/002
083647/002
083650/006
198023/001
031732
179014/001
N. Code
5 64321
1718
13 12 11 7
141615
10
7
8
99
8
7
8

Other Claypaky Projector Accessories manuals

Claypaky C52132 User manual

Claypaky

Claypaky C52132 User manual

Claypaky C52323 User manual

Claypaky

Claypaky C52323 User manual

Claypaky DISPLAY LINE User manual

Claypaky

Claypaky DISPLAY LINE User manual

Popular Projector Accessories manuals by other brands

Christie Brio Enterprise quick start guide

Christie

Christie Brio Enterprise quick start guide

Xpand RF PRO AE125-RF user guide

Xpand

Xpand RF PRO AE125-RF user guide

Optoma BX-AL133 user manual

Optoma

Optoma BX-AL133 user manual

EPV Polar Max Recessed Series installation guide

EPV

EPV Polar Max Recessed Series installation guide

WE-EF FLD111 3 LED Installation and maintenance instructions

WE-EF

WE-EF FLD111 3 LED Installation and maintenance instructions

Navitar NuView 490MCL1625 installation instructions

Navitar

Navitar NuView 490MCL1625 installation instructions

Extron electronics Pole Mount Kit PMK 450 Specifications

Extron electronics

Extron electronics Pole Mount Kit PMK 450 Specifications

Presentation Switchers PS110 Programmer's guide

Presentation Switchers

Presentation Switchers PS110 Programmer's guide

Epson ELPMB29 user guide

Epson

Epson ELPMB29 user guide

Sharp AN-PH80LP installation manual

Sharp

Sharp AN-PH80LP installation manual

Lindy 32698 user manual

Lindy

Lindy 32698 user manual

Vutec VU-PRO VT08X installation instructions

Vutec

Vutec VU-PRO VT08X installation instructions

Christie 003-006191-01 instruction sheet

Christie

Christie 003-006191-01 instruction sheet

Navitar 491MCZ500 installation instructions

Navitar

Navitar 491MCZ500 installation instructions

Extron electronics PMP Series Specifications

Extron electronics

Extron electronics PMP Series Specifications

PEERLESS PRS 274 Technical data sheet

PEERLESS

PEERLESS PRS 274 Technical data sheet

Taiden TES-5600 Installation and operating manual

Taiden

Taiden TES-5600 Installation and operating manual

Epson ELPLX03 user guide

Epson

Epson ELPLX03 user guide

manuals.online logo
manuals.online logoBrands
  • About & Mission
  • Contact us
  • Privacy Policy
  • Terms and Conditions

Copyright 2025 Manuals.Online. All Rights Reserved.