Clean Cut CC3100 User manual

1
Touchless Paper Towel Dispenser
INSTALLATION MANUAL
Expendedor Automático de Toallas de Papel
MANUAL DE INSTALACIÓN
Distributeur de serviettes en papier sans contact
MANUEL D’INSTALLATION
Dispenser di Carta da Cucina No Touch
MANUALE D’ISTALLAZIONE
MODELS
MODELOS
MODÈLES
MODELLI
CC3100
CC3200
CC3300
Questions/Accessories/Parts (USA/Canada)
Consultas/Accesorios/Repuestos (EE.UU/Canadá)
Questions/Accessoires/Pièces (États-Unis/Canada)
1-866-599-7066
REGISTER ONLINE AT
INSCRÍBASE EN LÍNEA EN
INSCRIVEZ-VOUS EN LIGNE À
www.cleancutdispenser.com
Domande/Accessori/Ricambi (Italia)
800-942-952
REGISTRATI ONLINE ALL’INDIRIZZO
www.cleancutdispenser.eu


English ........................2
Español ......................14
Français ......................26
Italiano.......................38
Warranty .....................50
Garantía ......................51
Garantie ......................52
Garanzia......................53
2
IMPORTANT SAFEGUARDS
• Read all instructions before using.
DANGER: To reduce the risk of electric shock:
• Always unplug this appliance from the electrical outlet before cleaning.
WARNING: To reduce the risk of burns, re, electric shock, or injury to persons:
• Make sure the appliance is unplugged before installing or uninstalling.
• Use this appliance only for its intended use as described in these instructions.
Do not use attachments not recommended by the manufacturer.
• Never operate this appliance if it has a damaged cord or plug, if it is
not working properly, if it has been dropped or damaged, or dropped
into water. Return the appliance to an authorized service facility for
examination, repair or adjustment. Or, call the appropriate toll-free
number on the cover of this manual.
• Do not place on or near a hot gas or electric burner.
• Keep cord away from heated surfaces.
• To reduce the risk of re, do not place any heating or cooking appliance
beneath the appliance.
• To reduce the risk of re, do not mount unit over or near any portion of a
heating or cooking appliance.
• Do not use outdoors.
• To disconnect, remove plug from outlet.
When using electrical appliances, basic safety precautions should always be followed,
including the following:

3
TAMPER-RESISTANT STICKERS
WARNING: This appliance is equipped with tamper-resistant stickers to prevent
removal of the outer cover. To reduce the risk of re or electric shock, do not attempt
to remove the outer cover. There are no user-serviceable parts inside. Repair should
be done only by authorized service personnel.
ELECTRICAL CORD
A short power-supply cord (or detachable power-supply cord) is to be provided to reduce the
risk resulting from becoming entangled in or tripping over a longer cord.
NOTE: If the power supply cord is damaged, it should be replaced by qualied personnel.
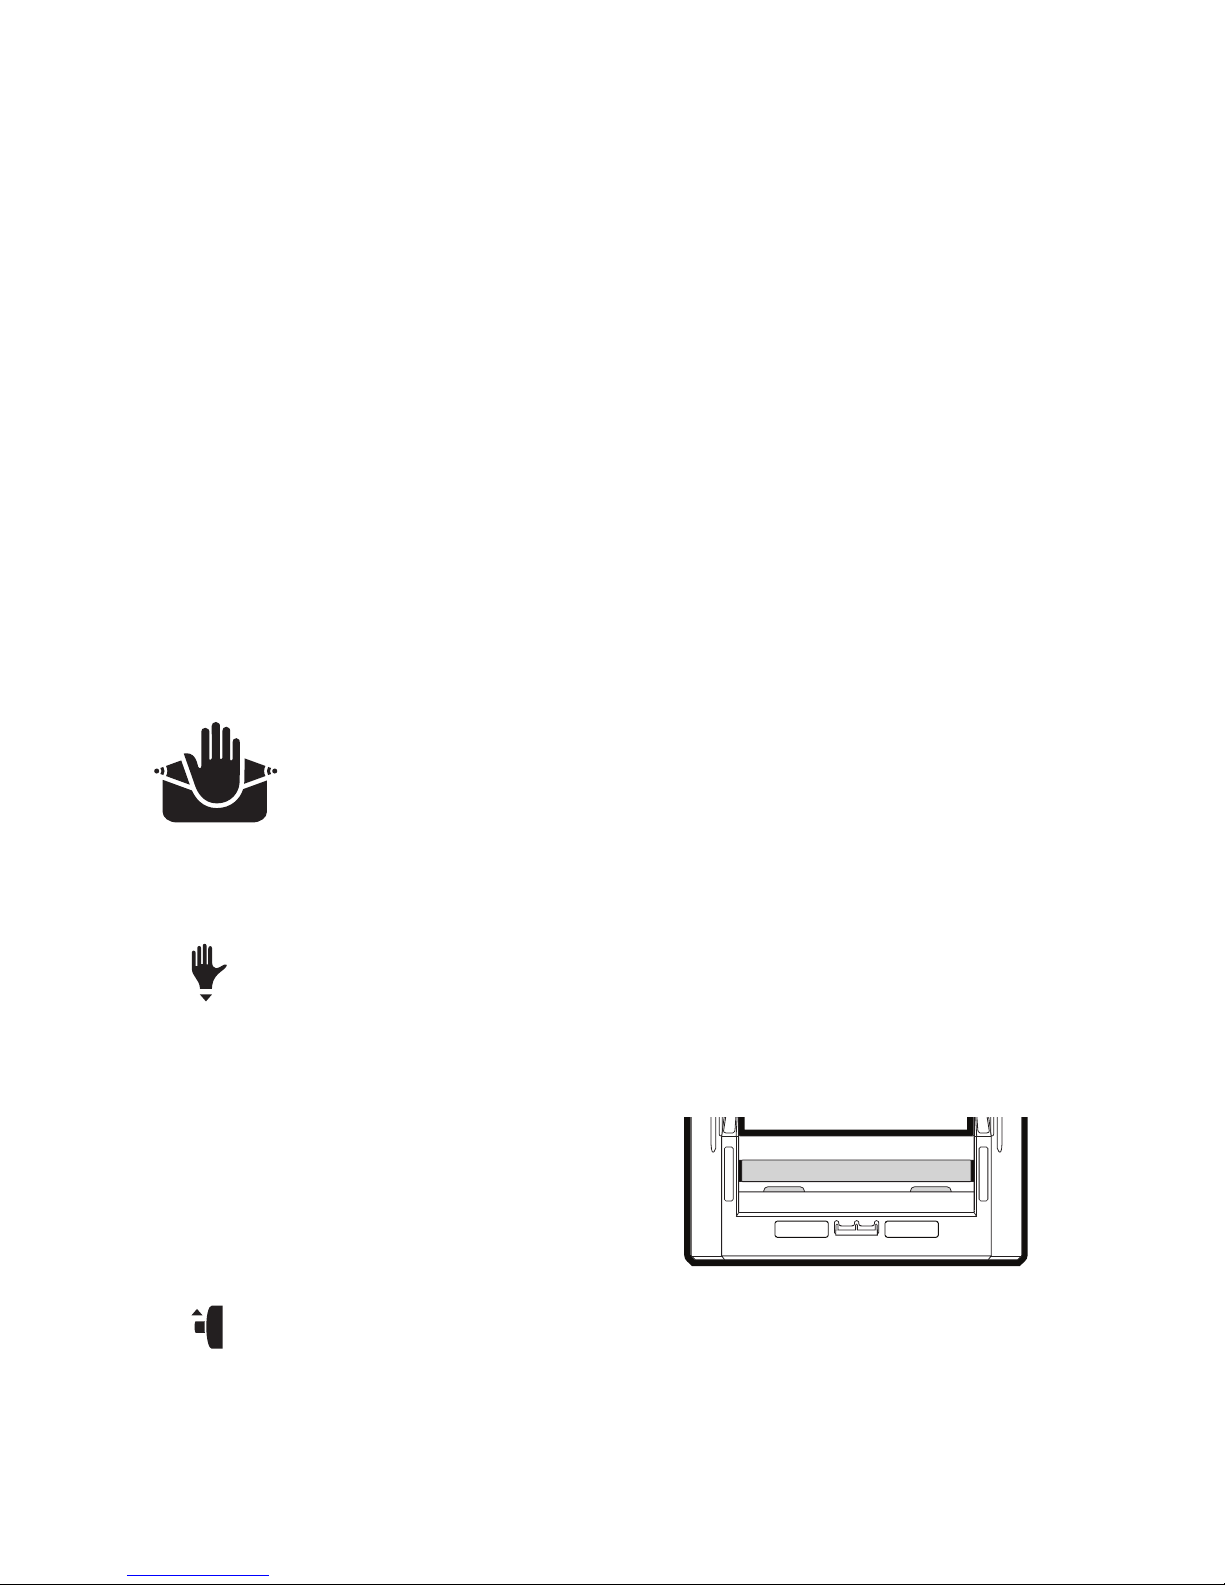
CAUTION: Make sure power cord does not fall into the roll. Use cord management hooks
behind the appliance to hang extra cord.
SAVE THESE INSTRUCTIONS
1
1
4
3
6
9
10
A
B
C
5
2
7
8
1716
15
14
TOP DOWN
Mounting Bracket Opened
and Hidden from Illustration
13
11
12
BACK
4

5
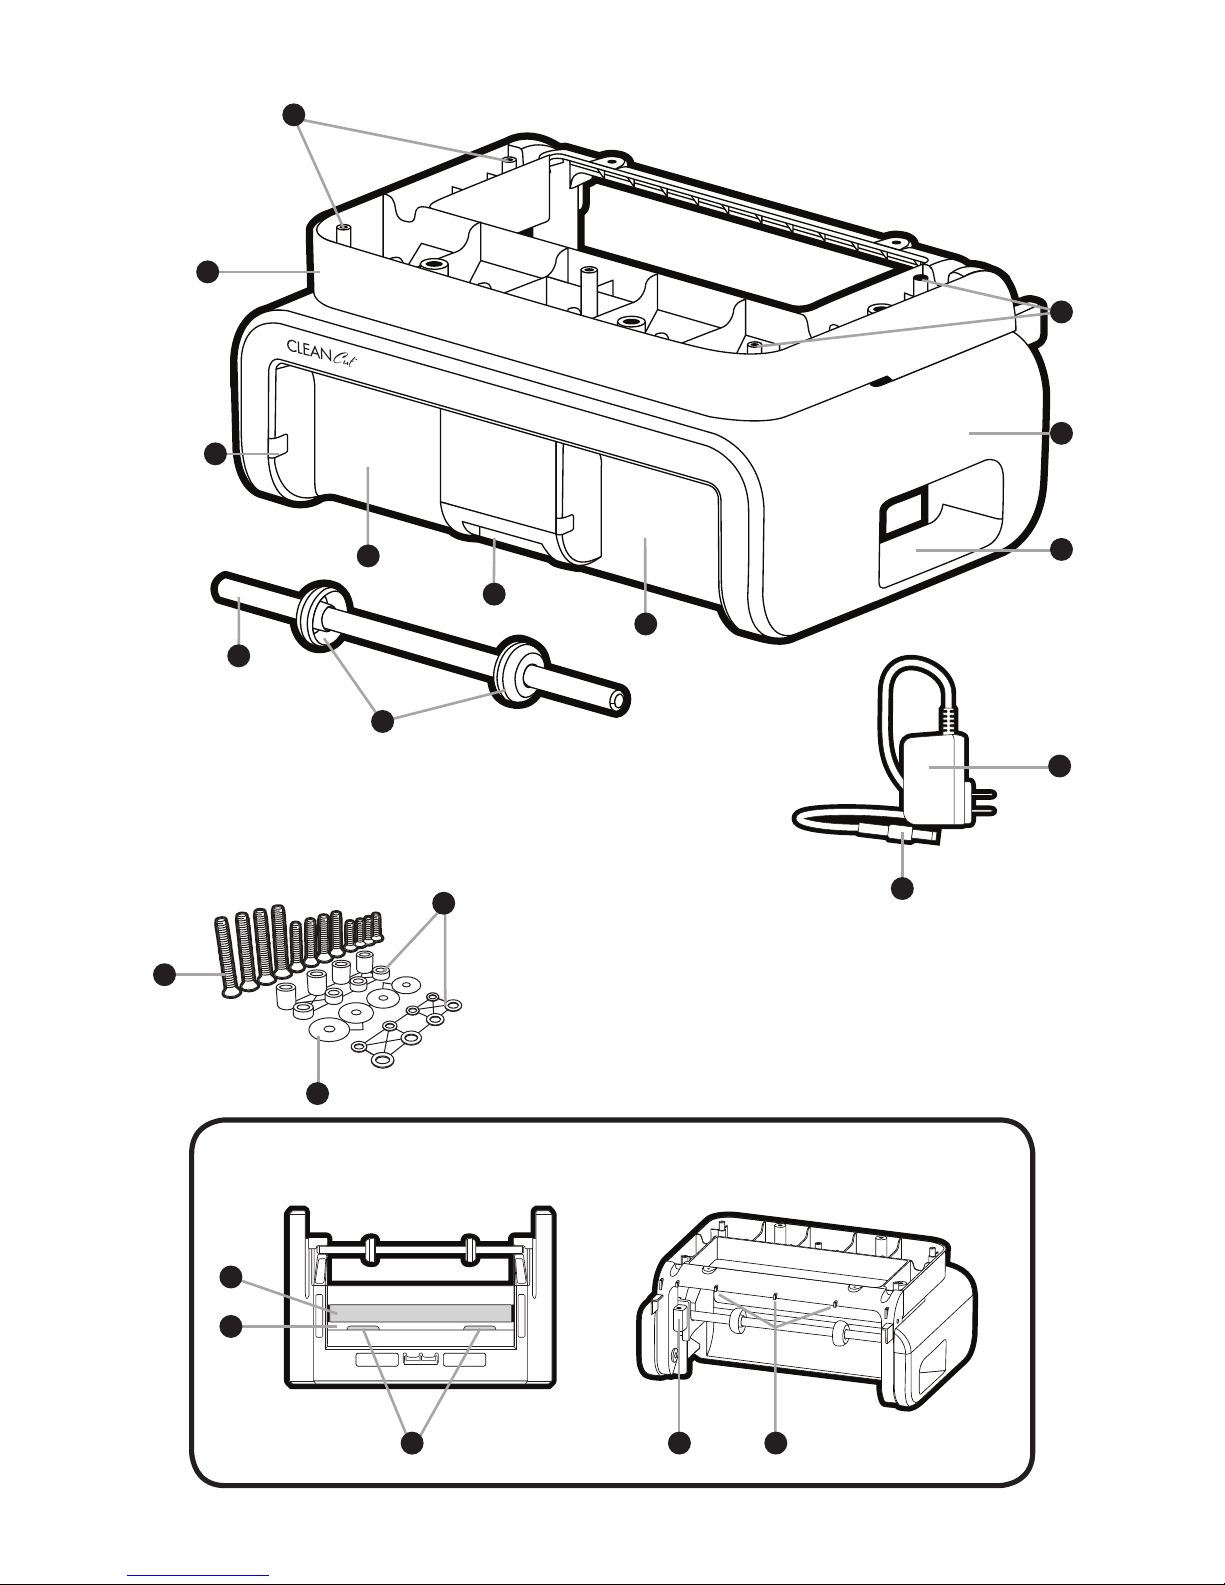
UNIT PARTS:
1. Mounting Holes
2. Mounting Bracket
3. LED Sensor Windows
4. Cut Zone
5. Dispense Zone
6. Opening Latch
7. Viewing Window
8. Main Body
9. Dowel Rod
10. Dowel Rod Guide
11. Power Cord Connector
12. Power Adapter (exact model
varies by country)
13. Paper Roller
14. Insertion Slot (space between
paper roller and pinch rollers)
15. Pinch Rollers (Inside)
16. Power Jack
17. Cord Management Hooks
MOUNTING PARTS:
A. 12 Screws
4 1”
4 1 1/2”
4 2 1/4”
B. 4 Washers
C. 16 Spacers
4 1/2”
4 1/4”
4 3/16”
4 1/16”
D. Mounting Template (in box)
YOU WILL ALSO NEED:
• Tape
• Ruler (or you may cut out the
ruler provided on the template)
• Electric drill with a 1/4” drill bit
• Phillips-head screwdriver
[B] [C]
6
GETTING STARTED
1. Remove all packing material.
2. Remove and save literature.
3. Unpack mounting washers, screws and spacers for mounting and set them aside in a safe
place where they will not roll away or get lost.
IMPORTANT: Do not attempt to operate appliance until it is properly installed. This appli-
ance will be damaged if operated while sitting on a surface or on its side.
CHOOSE A LOCATION
When choosing your location, consider the following:
• DO make sure to mount within reach of an electrical outlet.
• DO consider your normal work patterns in the kitchen when choosing location. As
this will become your most used kitchen appliance, it is recommended to mount the
CLEANCut™ close to your sink or food prep area.
• DO NOT mount over any heating or cooking appliance such as your range or oven.
• DO NOT mount under, in front of or behind any under-cabinet light xtures.
CAUTION: When selecting a location for your CLEANCut™, make sure you have
adequate room to reach the power jack. Be sure to unlatch the main body to ensure that
nothing hits the power jack.
CAUTION: There needs to be a minimum of 13-1/4” of space between the surface that the
CLEANCut™ is mounted to and the counter top.
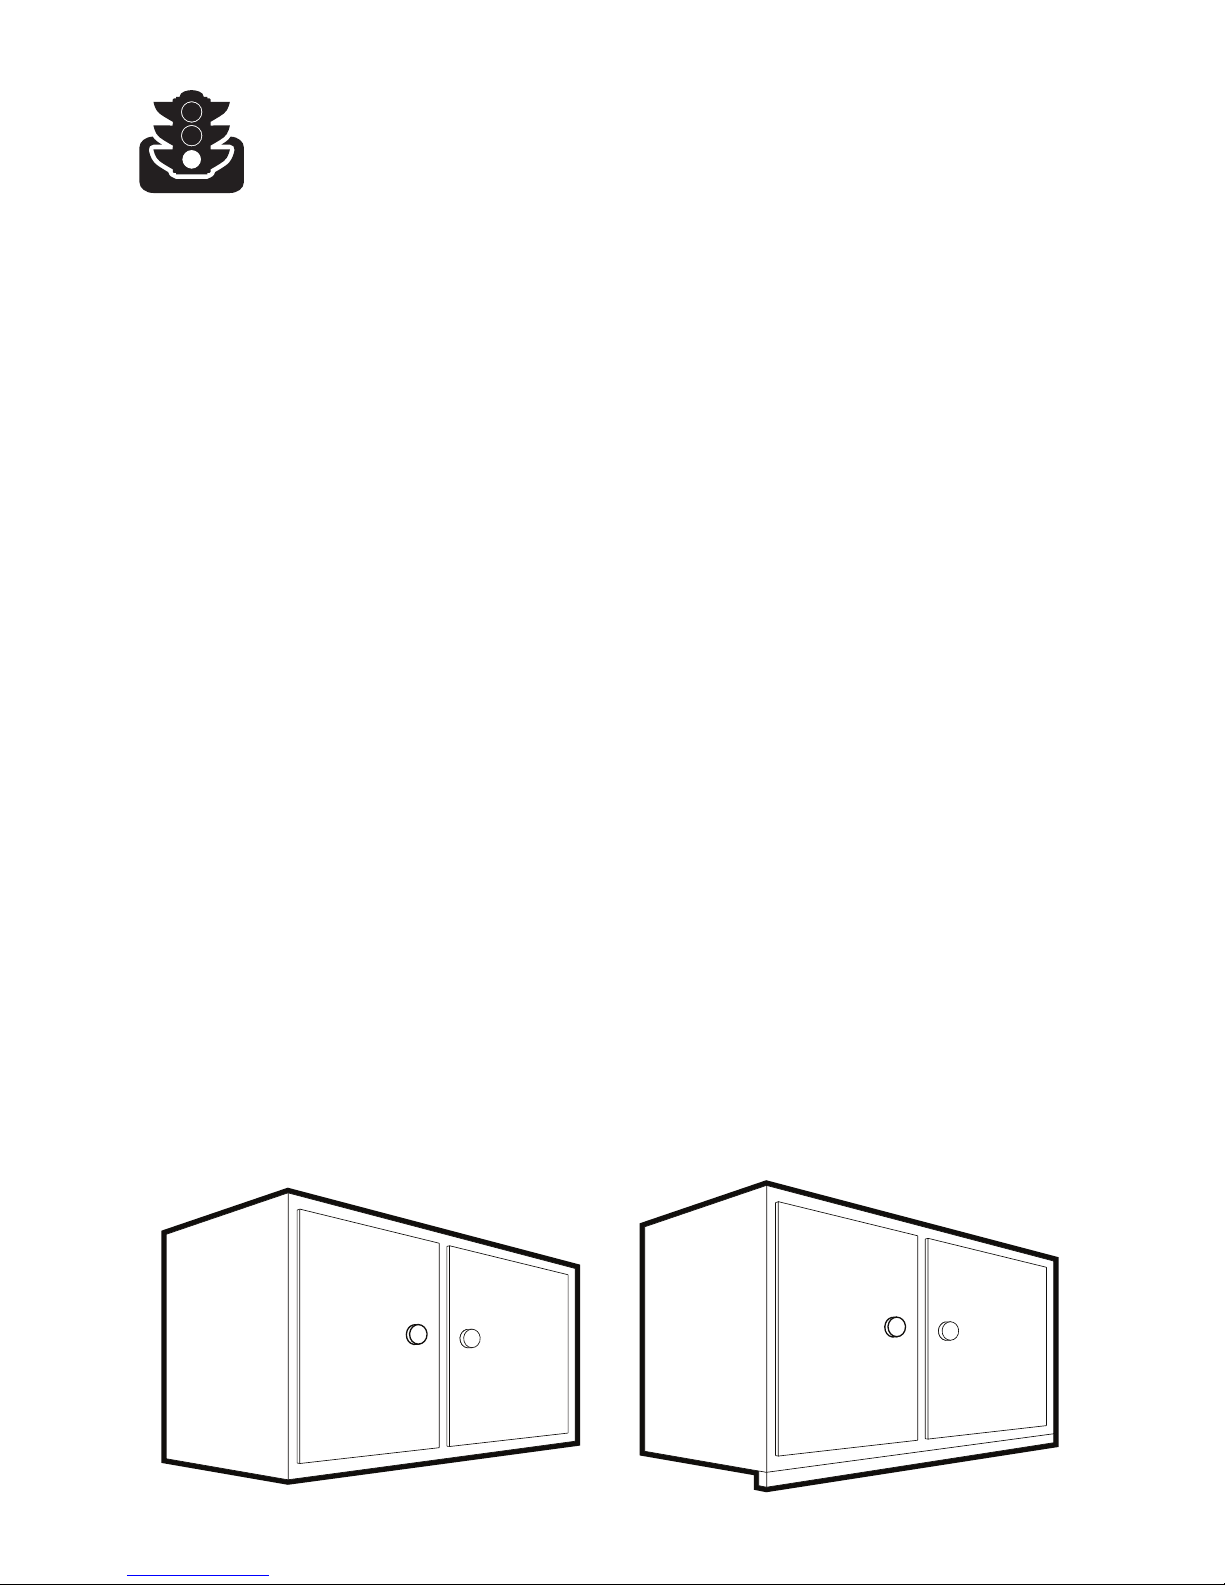
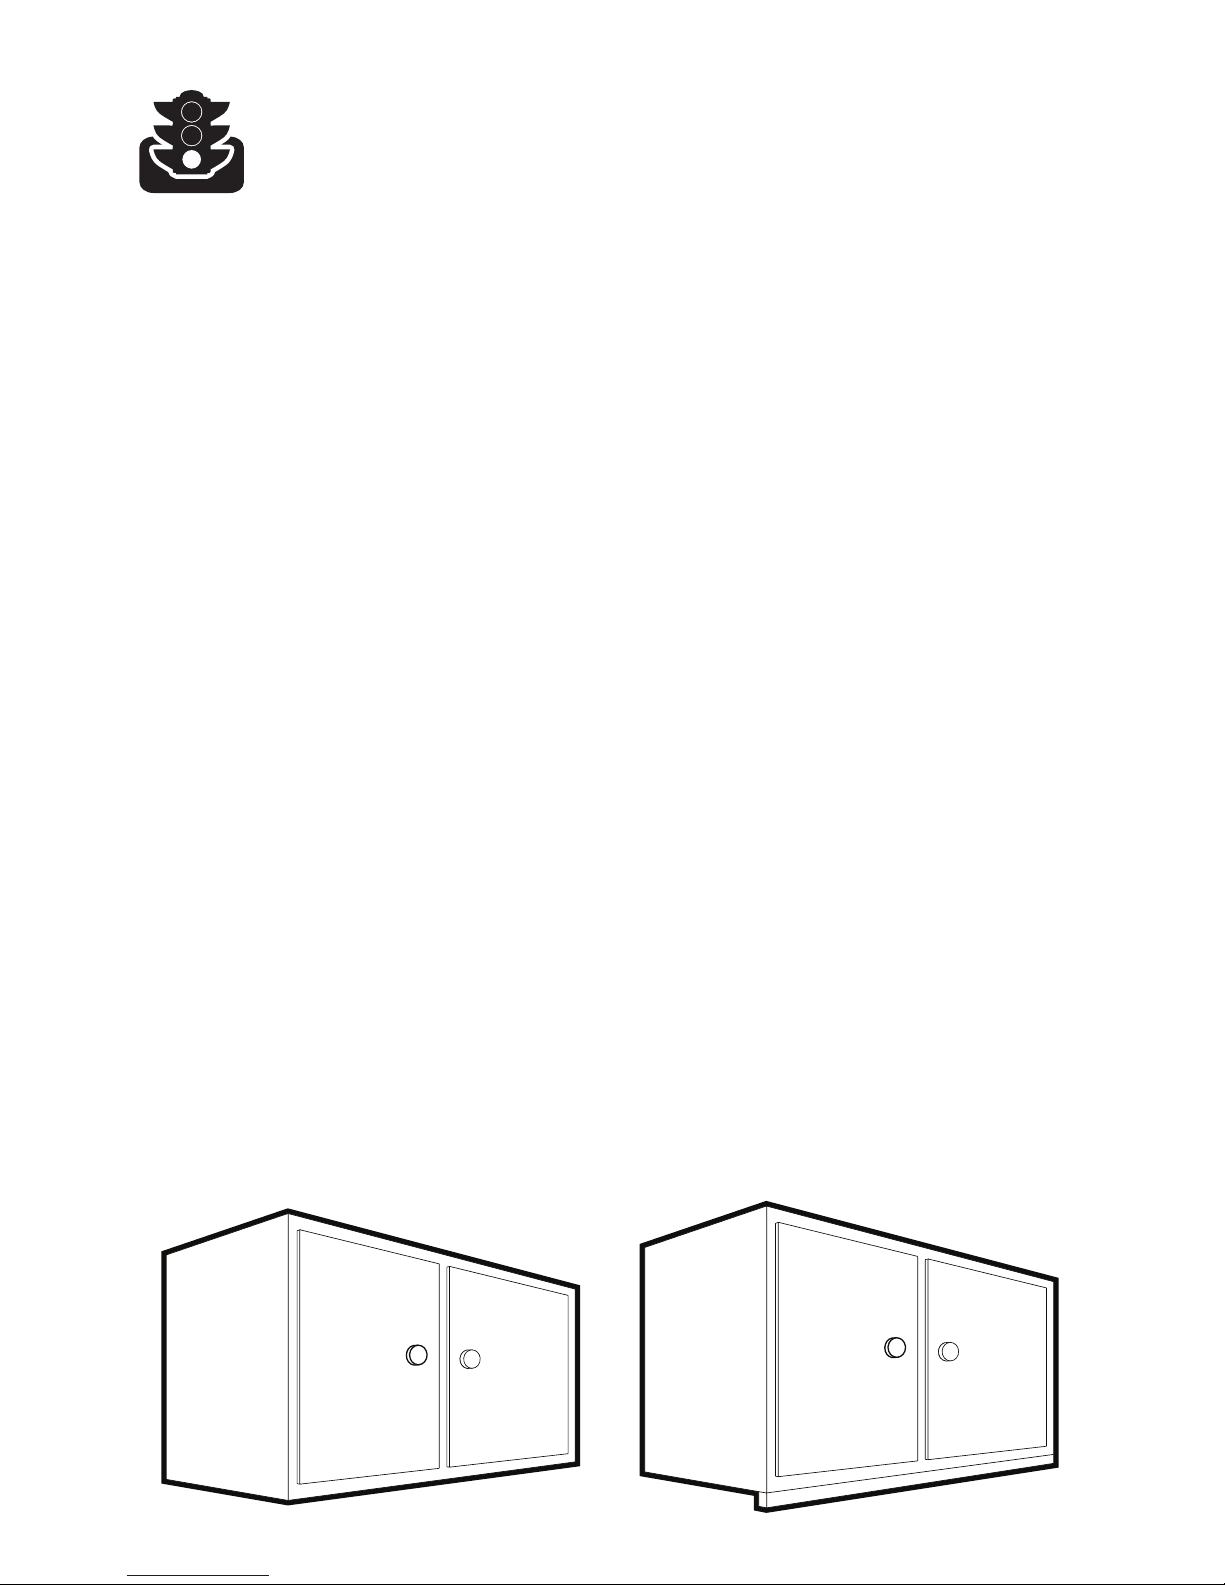
DETERMINE CABINET TYPE
Prior to taping the mounting template and beginning to drill your holes, determine if your
cabinet has a at bottom [B]or an overhanging lip [C]. If your cabinet is at, follow STANDARD
INSTALLATION; if the cabinet has a lip, refer to SPACER MOUNTING INSTALLATION.

[D]
7
FLAT CABINET INSTALLATION
IMPORTANT: Always wear protective glasses or goggles to prevent injury when drilling.
1. Clear counter top under installation
area to avoid getting dust or debris
on other appliances or items. Open
cabinets and remove contents to make
mounting easier.
2. Fold mounting template along Flat Cabinet Fold Line. Place template under cabinet
with fold line even against the front edge, and tape securely in place [D].
NOTE: Use center line to align unit with center of cabinet if desired.
IMPORTANT: Do not align screw holes on template with the partition between cabinets, as
this will prevent you from installing the appliance properly. Pay close attention to where the
drill holes will be set so as not to damage your cabinets during mounting. Drilling through your
cabinet’s partition may cause damage to cabinets and prevent proper installation.
3. Drill from under the cabinet up. Drill holes through the 4 places marked on the
template using a 1⁄4-inch drill bit.
IMPORTANT: Always ensure you are drilling straight up through the marked mounting
hole on the template. Drilling at an angle may prevent proper installation and may damage
cabinets if the drill bit pierces the partition.
4. Once holes are drilled, remove tape and mounting template and save template with your
instructions in case you move or wish to remount at a later time.
5. Wipe dust and debris off inside cabinet surface. Also, make sure under side of
cabinet is clean.
6. Place a washer inside the cabinet over each of the 4 holes you drilled.
7. Drop one of your screws through each of the washers covering the holes in the cabinet,
from inside the cabinet down.
8. Hold CLEANCut™ and mounting bracket up and tighten screws into mounting
holes to secure.
NOTE: Always tighten screws to ensure the appliance does not move or shake during op-
eration. Be careful not to over-tighten the screws to avoid damaging the mounting bracket.

[E]
[F]
8
9. Plug power cord connector into the
power jack in the back of the appliance.
Plug the power adapter into a standard
electrical outlet. Extra cord should be
hung over cord management hooks
behind unit [E].
CAUTION: Make sure power cord does not fall into the roll.
NOTE: If you wish to conceal the power cord, drill a 3/8” hole through the bottom of the
cabinet fl oor at the rear and to the side of the cabinet. Now the power cord connector can
be run down through the 3/8” hole and connected to the power jack. The power adapter can
be plugged into a standard electrical outlet available inside the cabinet. If this outlet is not
available then one can be installed by a quali ed electrician.
10. Your CLEANCut™ appliance is now ready for use! For operating instructions, see the
HOW TO USE section of this manual.
OVERHANG LIP INSTALLATION
IMPORTANT: Always wear protective glasses or goggles to prevent injury when drilling.
1. Clear counter top under installation
area to avoid getting dust or debris
on other appliances or items. Open
cabinets and remove contents to make
mounting easier.
2. Fold mounting template along Overhang Lip Fold Line. Place template under cabinet
with fold line ush against inside overhang, and tape securely in place [F].
NOTE: Use center line to align unit with center of cabinet if desired.
IMPORTANT: Do not align screw holes on template with the partition between cabinets, as
this will prevent you from installing the appliance properly. Pay close attention to where the
drill holes will be set so as not to damage your cabinets during mounting. Drilling through your
cabinet’s partition may cause damage to cabinets and prevent proper installation.
3. Drill from under the cabinet up. Drill holes through the 4 places marked on the
template using a 1⁄4-inch drill bit.
IMPORTANT: Always ensure you are drilling straight up through the marked mounting
hole on the template. Drilling at an angle may prevent proper installation and may damage
cabinets if the drill bit pierces the partition.
[H]
[G]
9
4. Once holes are drilled, remove tape and
mounting template and save template
with your instructions in case you move
or wish to remount at a later time.
5. Wipe dust and debris o inside cabinet
surface. Also, make sure under side of
cabinet is clean.
6. Place a washer inside the cabinet over each of the 4 holes you drilled.
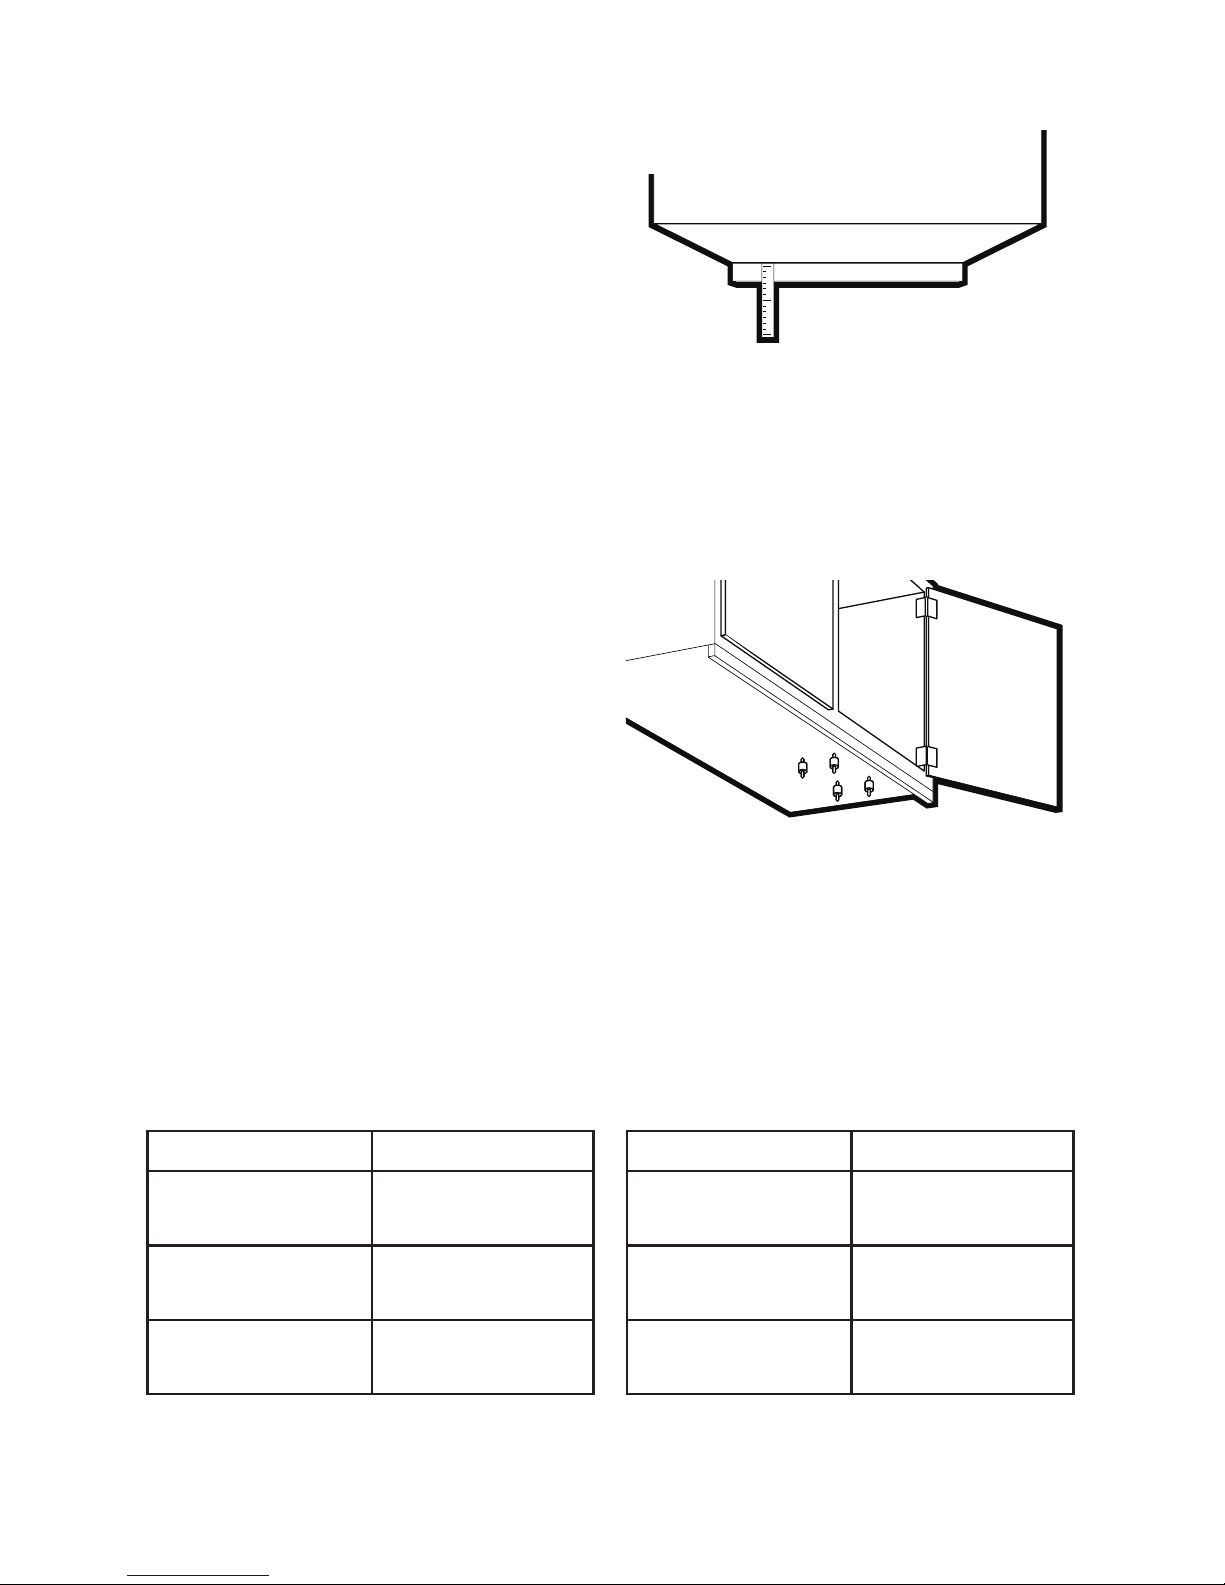
7. Now, use your ruler or the paper ruler provided to measure the overhang height, placing
your ruler vertically against the underside of the cabinet behind the overhang [G]. If this
measurement is less than 1-3/4”, you may skip step 9. If it is greater than 1-3/4”, this number
determines the number of spacers you need, using the SPACER MOUNTING GUIDE
found below.
8. Drop one of your screws through each
of the washers covering the holes in the
cabinet, from inside the cabinet down.
9. Place the appropriate number of spacers
determined in step 7 on each screw
so the appliance will be even with the
front overhang [H].
NOTE: For spacer installation, you may require assistance (in mounting) in order to hold
spacers in place while securing the appliance at the same time. If assistance is not avail-
able, use pieces of tape to hold the spacers in place while you position the appliance.
SPACER MOUNTING GUIDE
MEASUREMENT SPACER
1-3/4” or less None
1-13/16” 1/16”
1-15/16” 3/16”
MEASUREMENT SPACER
2” 1/4”
2-1/16” 1/4” + 1/16”
2-3/16” 1/4” + 3/16”
[J]
10
LOADING INSTRUCTIONS
1. Pull opening latch to release the main body.
2. Push the main body down completely until it stops to ensure it is FULLY opened.
NOTE: Make sure pinch rollers are recessed to completely open the insertion slot [J].
NOTE: The CLEANCut™ appliance is equipped with a security feature to prevent opera-
tion while the unit is opened.
3. Lift dowel rod to remove from device
and dispose of empty cardboard tube
from previous use (if any).
4. Insert the dowel rod through the center
of a new paper towel roll.
5. Once paper towel roll is loaded
onto the dowl rod, place into the dowel cradle.
NOTE: It is recommended that you place the roll into the cradle so that the paper comes
up from the bottom front of the roll [SEE ILLUSTRATION K].
HOW TO USE
10. Once spacers are set (if necessary), hold CLEANCut™ and mounting bracket up and
tighten screws into mounting holes to secure.
NOTE: Always tighten screws to ensure the appliance does not move or shake during op-
eration. Be careful not to over-tighten the screws to avoid damaging the mounting bracket.
NOTE: If you wish to conceal the power cord, drill a 3/8” hole through the bottom of the
cabinet fl oor at the rear and to the side of the cabinet. Now the power cord connector can
be run down through the 3/8” hole and connected to the power jack. The power adapter can
be plugged into a standard electrical outlet available inside the cabinet. If this outlet is not
available then one can be installed by a quali ed electrician.
11. Plug power cord connector into the power jack in the back of the appliance. Plug into
standard electrical outlet. Extra cord should be hung over cord management hooks
behind unit [SEE ILLUSTRATION E].
CAUTION: Make sure power cord does not fall into the roll.
12. Your CLEANCut™ appliance is now ready for use! For operating instructions, see the
HOW TO USE section of this manual.

[K]
11
6. Load end of paper sheet through
paper path [K].
7. Push unit up until the opening latch
clicks to securly close.
OPERATING INSTRUCTIONS
1. Place hand between LED sensors in the dispense zone.
NOTE: The CLEANCut™ is designed to dispense the amount of paper towel you desire.
For short sheets, briefl y hold your hand in the dispense zone. For longer sheets, hold your
hand in the dispense zone for a longer period of time.
2. Once the desired amount of paper has been dispensed, remove hand.
CAUTION: To prevent paper jams, do not try to remove the paper towel without cutting. The
CLEANCut™ is designed to give you the perfect size sheet regardless of the roll’s perferation.
3. To cut, place hand between LED sensors in the cutting zone.
4. Remove cut paper towel sheet from the bottom of the CLEANCut™ appliance.
CLEANING INSTRUCTIONS
is product contains no user-serviceable parts. Repair should be done only by
authorized service personnel.
1. Make sure the main body is opened or the power cord is removed before cleaning.
2. Small pieces of paper may remain in the paper path after numerous rolls are cut.
3. Clean with a mild, non-abrasive cleaner being careful not to soak the LED sensor windows.

PROBLEM POSSIBLE CAUSE SOLUTION
CLEANCut™ does not
dispense paper
Paper does not load
12
TROUBLESHOOTING
Power adapter is not
plugged into the wall
Power cord connector is not
plugged into the power jack
Main body is open
Power cord is hitting roll
Make sure the power adapter
is plugged into a live outlet
Fully press power cord
connector into the power jack
Close the main body and
make sure the opening
latch is fully locked
Use cord management
hooks to keep power cord
from hitting the paper roll
First sheet is either curled
or damaged
Paper path is clogged
Tear o the rst sheet to
make sure its at
Make sure the main body
is fully open and clear any
loose paper
Cutter is blocking the path Unplug and replug the power
cord connector to reset cutter
Main body is not fully open Push the main body
completely down to fully open
Paper is jammed
Unplug the power cord
connector then remove
any jammed paper. Replug
power cord connector

PROBLEM POSSIBLE CAUSE SOLUTION
Paper does not cut
Paper roll does not t in
main body
A new brand of paper towel
is not dispensing
13
HELPFUL HINTS
• After the main body is plugged in and closed, placing your hand into
the dispense beam side will activate the dispense roller. is can be done
with or without paper in the unit. e cut operation however can not be
activated unless the unit is loaded and can sense paper in the paper path.
• Once cut, you can remove the paper by easily pulling the paper out or by
dispensing another sheet. Paper can be loaded so it enters the paper path
from the top of the roll, but this usually causes the paper to curl to the
back of the unit and makes it more dicult to judge the length.
ere is no paper in the
paper path
Make sure paper is dispensed
so it is hanging out of the
bottom of the main body
Paper is jammed
Unplug the power cord
connector then remove
any jammed paper. Replug
power cord connector
Dowel rod is not seated
in slots
Main body is not fully open
Some rolls are cut unevenly
and may jam
Make sure dowel rod is fully
seated in slots
Push the main body
completely down until the
paper roll ts inside
Try another roll
Roll may be smashed in
shipping or storing
Moisture may cause the roll
to be sticky
Squeeze the roll back into a
round shape
Allow the roll to dry or
use another

14
PRECAUCIONES DE SEGURIDAD
IMPORTANTES
• Leer todas las instrucciones antes de usar.
PELIGRO: Para reducir el riesgo de una descarga eléctrica:
• Siempre desenchufe este aparato de la toma corriente antes de limpiarlo.
ADVERTENCIA: Para reducir el riesgo de quemaduras, incendio, descarga
eléctrica o lesiones a personas:
• Asegúrese de que el aparato esté desenchufado antes de instalarlo o desinstalarlo.
• Use este aparato sólo para el uso previsto y como se especica en estas
instrucciones. No use accesorios no recomendados por el fabricante.
• Nunca opere este aparato si el cordón eléctrico o el enchufe están dañados,
si no está funcionando correctamente, si se ha dejado caer o se ha dañado,
o ha caído en agua. Devuelva el aparato a un centro de servicio autorizado
para su revisión, reparación o ajuste. O bien, llame al número de teléfono
gratuito que se menciona en la portada de este manual.
• No ubicar sobre o cerca de hornallas calientes, de gas o eléctricas.
• Mantener el cordón eléctrico lejos de supercies calientes.
• Para reducir el riesgo de incendio, no colocar ningún aparato de
calefacción o de cocina debajo de este aparato.
• Para reducir el riesgo de incendio, no instalar la unidad encima o cerca de
alguna parte de un aparato de calefacción o cocina.
• No usar al aire libre.
• Para desconectar, retirar el enchufe del toma corriente.
Al utilizar aparatos eléctricos hay precauciones de seguridad básica que siempre deberán
seguirse, incluyendo lo siguiente:

15
ETIQUETAS INVIOLABLES
ADVERTENCIA: Este aparato está equipado con una etiqueta inviolable para
prevenir que la cubierta sea removida. Para reducir el riesgo de incendio o descarga
eléctrica, no trate de remover la cubierta. No hay componentes que puedan ser repa-
rados por el usuario dentro del aparato. Las reparaciones deben hacerse sólo por
personal autorizado para el servicio.
CORDÓN ELÉCTRICO
Se provee un cordón eléctrico de alimentación corto (o cordón eléctrico de alimentación
desmontable) para reducir el riesgo de enredos o tropiezos con un cordón eléctrico largo.
NOTA: Si el cordón eléctrico de alimentación sufre daños, debe ser reemplazado por
personal calicado.
PRECAUCIÓN: Asegurarse que el cordón eléctrico de alimentación no caiga en el rodillo.
Utilizar ganchos para ordenar cordones eléctricos por detrás del aparato, para ajustar el
exceso de cordón.
GUARDE ESTAS INSTRUCCIONES

1
1
4
3
6
9
10
A
B
C
5
2
7
8
1716
15
14
VISTA EN PLANTA
Soporte de Montaje Abierto
y Oculto en la Ilustración
13
11
12
VISTA DE ATRÁS
16

17
PARTES COMPONENTES:
1. Agujeros de Montaje
2. Soporte de montaje
3. Ventanas Sensoras LED
4. Area de Corte
5. Area de Expendio
6. Cerrojo de apertura
7. Ventana de visualización
8. Cuerpo Principal
9. Barra Portapapel
10. Guía de la Barra Portapapel
11. Conector del cordón eléctrico
12. Adaptador de Energía (El modelo
exacto varía según el país)
13. Rollo de Papel
14. Ranura de Inserción (espacio
entre el rollo de papel y los
rodillos tensores)
15. Rodillos tensores (Interiores)
16. Toma corriente
17. Ganchos para ordenar
cordones eléctricos
PIEZAS DE MONTAJE:
A. 12 Tornillos
4 1”
4 1 1/2”
4 2 1/4”
B. 4 Arandelas
C. 16 Separadores
4 1/2”
4 1/4”
4 3/16”
4 1/16”
D. Planilla de montaje (en el recuadro)
TAMBIÉN NECESITARÁ:
• Cinta Adhesiva
• Regla (o puede cortar la regla
provista en la planilla de montaje)
• Taladro eléctrico con broca de 1/4”
• Destornillador de punta Phillips
[B] [C]
18
PARA COMENZAR
1. Retire todo el material del embalaje.
2. Retire y guarde la documentación y folletos.
3. Desempaque arandelas, tornillos y espaciadores para el montaje/instalación y ubíquelos
en un lugar seguro donde no se deslizarán o perderán.
IMPORTANTE: No trate de operar el aparato hasta que esté correctamente instalado. El mis-
mo se dañará si es usado mientras está ubicado en una super cie o sobre uno de los lados.
SELECCIONE UNA UBICACIÓN
Al escoger la ubicación, tenga en cuenta lo siguiente:
• ASEGÚRESE de instalarlo al alcance de una toma corriente.
• TENGA en cuenta sus hábitos de trabajo en la cocina al seleccionar la ubicación. Ya
que este será el electrodoméstico de mayor uso, se recomienda instalar el CLEANCut™
cerca de su fregadero o del área de preparación de alimentos.
• NO INSTALAR sobre ningún aparato de calefacción tal como su estufa u horno.
• NO INSTALAR debajo, en frente o detrás de las luces de alacenas.
PRECAUCIÓN: Cuando seleccione la ubicación para su CLEANCut™, cerciórese de que
haya su ciente espacio para alcanzar el toma corriente. Asegúrese de quitar el seguro del
cuerpo principal del aparato para evitar que algo toque el toma corriente.
PRECAUCIÓN: Debe haber un mínimo de 13-1/4” de distancia entre la super cie en que
el CLEANCut™ está instalado y la mesada de las alacenas.
DETERMINE EL TIPO DE ALACENA
Antes de adherir la planilla de montaje y comenzar con las perforaciones, determine si su
alacena tiene un fondo plano [B]o un borde que sobresale [C]. Si su alacena es plana, siga la
INSTALACIÓN PARA ALACENA PLANA; si la alacena tiene un borde que sobresale,
remítase a la INSTALACIÓN PARA ALACENA DE BORDE SOBRESALIENTE.
This manual suits for next models
2
Table of contents
Languages:
Popular Dispenser manuals by other brands

Georgia Pacific
Georgia Pacific SofPull installation instructions

U-Line
U-Line TORK XPRESSNAP H-4581 quick start guide

Caroma
Caroma URBANE II installation instructions

Hadeco
Hadeco Better Packages MATIC 80 PLUS Instructions for use

Go Jo
Go Jo Dispenser FMX-12 installation instructions

Cater Chef
Cater Chef 445.001 user manual


