Cleanmate S 930 User manual

Cleanmate
Robotic Vacuum Cleaner
Cleanmate S 930
USER MANUAL

1
7
7
7
Contents
Safety Instructions
Product Feature
User Friendly Design
Washable Dust Bin
Product Components 8
Main Body and Accessories 8
Main Body Diagram 9
Dust Bin / Rolling Brush Kit
Charging Docking / Remote Control
Product Operation
Touch Panel Operation
Battery Charging
Starting Up/ Standby/ Sleeping
Schedule
Cleaning Modes
Product Maintenance
Cleaning Side Brush
Cleaning Dust Bin and Filters
Cleaning Sensors and Wheels
Cleaning Charging Poles
Cleaning Rolling Brush Kit
Product Specification
Battery Removal
Usage of Magnetic Strip
Trouble Shooting
Customer support & Warranty
10
11
12
12
13
14
15
17
18
19
19
20
20
20
21
22
22
23
24

1
It indicates that any violations of instruction or improper operation are probably to
cause casualties or severe injuries.
Danger
It indicates that any violations of instruction or improper operation are probably to
cause casualties or severe injuries.
Caution
It indicates that any violations of instruction or improper operation are probably to
cause injuries to people and damage to property.
Notice
It indicates prohibited behavior. Detailed content refer to the sign or the explanation of the sign.
It indicates enforcement behavior. Detailed content referto the sign or the explanation of the sign.
It indicates attention (including warning) content. Detailed content refer to the sign or the
explanation of the sign.
*1. Possible Severe injuries: Blindness, Burns, Electricity Injury, Fracture, Poisoning and other severe injuries that
leave sequela and lead to longterm hospitalization.
*2. Possible Injuries: Burns, and electricity wound that does not require hospitalization.
*3. Possible Property Damage : Damage to furniture, valuable objects and injuries to pets.
Graphic and Sign explanation
Safety Instructions
Before using this product, please read the safety instructions and follow all regular safety precautions.
Warranty service is not applicable to any damage caused by violation of instructions. S 930 cleaning robot
is a sophisticated product which is restricted for indoor cleaning only. DO NOT use the robot for non-cleaning
purpose. Please refer to user manual.
Warning Sign
When the appliance is to be used by a child, the child must be of 8 years old and above. It is recommended
for first time users to keep sight of the appliance during vacuuming to ensure safe operation. For personswith
reduced physical, sensory or mental capabilities or lack of experience and knowledge, proper supervision or
instruction should be given concerning use of the appliance in a safe way to help them understand the hazards
involved. Children should not play with appliance. Cleaning and maintenance should not be made by
children without supervision.
Warning

2
Safety Instructions
Safety Instructions of Product, Charging dock, virtual wall,
power adapter and other accessories.
No Disassembling
Prohibited
Prohibited
Prohibited
Prohibited
Clean Dirt
Alternating Current
Prohibited
Only authorized technicians can disassemble the product. Users are not allowed to
disassemble, repair or modify the product. Otherwise it may cause electric shock,
malfunction and leading to injuries.
It is prohibited to dismantle the battery case.
Dismantling battery case may cause damage or leakage of battery that leads to
re or explosion.
Prohibit using metal or other conducting substance to connect battery postive and
negative ends. It will lead to short circuit and cause explosion.
Do not use a power adapter with AC inverter. It may lead to over heating,
malfunction or fire.
If there are dust accumulations on the metal terminals of the power plug and
surroundings, be sure to clean the dust with a dry cloth.Otherwise it may lead to
electric shock, over temperature or re.
The adapter must use an alternating voltage from 100-240 Vac. Please plug in the
socket correctly.
Only use the original power adapter.
Do not destroy or modify the power cord. Do not over-bend, heat, pull or press the
inflexible cord with heavy objects. Otherwise it will cause damage to cord and
may lead to fire or electric shock
Warning

3
Prohibited
Only use the
product indoors
Prohibited
Prohibited
Prohibited
Prohibited
Do not touch
Do not touch
Do not touch the power cord, plug or adapter with wet hands. Otherwise, it may
cause electric shock.
Never use the product in an environment with volatile substancesto
avoid possibility of fire and danger.
This product is a sophisticated machine for indoor use only.
DO NOT leave the product to children without supervision. Otherwise it may
cause injury.
Do not use this product around flammable substances or in a combustible
environment. Do not use this product around propane gas, gasoline and other
flammable gas and in dustyenvironment; it may lead to explosion or fire.
Do not wash and do not leave this product in a wet or damp environment.
Do not wash main body, charging device. Washing or soaking will cause internal
short circuit.
Do not sit on top of this product. Do not allow adults, children or animals to sit on
this product to avoid damage to the product.
To avoid stumbling on the product, all people in the household should be noticed
when this product is on. Do not touch the wheels or roller brush while product is
working to avoid being pinched by the machine.
Notice

4
Prohibited
Turn off the power
Prohibited
Prohibited
Prohibited
Prohibited
Prohibited
Safety Instructions
Turn the power switch to off when you don’t need to use this product for a long
time. Battery leakage may cause fire, injury or pollution to enviroment. Cut off
power source when unplugging the power adapter and disconnect the plug from
the charging socket. Otherwise, it may cause fire.
Do not cover or wrap the robot while in use.
This product is for indoor use only. Do not use this product to clean bathrooms,
warehouses, factories or bedsetc.
Air outlet
Putting a small or sharp object into air outlet will damage this product.
Do not wash this product. Do not wash the HEPA-filter.
Only dustbin and primary mesh filter are washable. Put dustbin and primary filter
back into main body when dry.
Do not use or expose the product to intense sunlight.
Use the dedicated battery and charging base only. Use of other
batteries or charging base can cause leakage, overheating and/or
explosion.
Charging Notice
Danger

5
Attention
No Disassembling
Prohibited
Prohibited
Prohibited
Unplug the robot when you are not using the robot to avoid short circuit.
Do not dissemble the battery, otherwise, it may cause leakage, overheating
and explosion.
Do not keep necklaces, hairpinsand other metal materials together with this
product during transportation.
Do not throw the battery into a fire or heat the battery.
If there is overheating during charging, stop using theproduct immediately.
To extend the battery’s life, take out the battery and put it in a cool and dry place
when not in use.
Do not immerse this product in water or wash it under running water.
Do not use this product if there are signs of color changes or changes to the
shape.
The battery mush be insulated with tape if recycled or disposed. Contact with
other metal will lead to heating, burst or fire. Bring the used battery to technical
service center, recycler or authorized reseller for disposal. Or dispose the battery
according to local laws.

6
Safety Instructions
Warning
Prohibited
Prohibited
Prohibited
Prohibited
Do not keep necklaces, hairpinsand other metal materials together with this
product during transportation.
Do not charge this battery on other devices.This chargeable battery is designed
for this robot cleaner only.
Do not put the battery back to main body or charge it if there is deformation,
swelling and/or electrolyte leakage from battery case.
Wash off any battery leakage immediately with clean water if there is contact with
skin or clothes.No measures taken may lead to skin inflammation.Do not crush or
throw the battery.
It’s not allowed to copy, publish or record this user manual and related material in any searchable media or
translate to any other languages without our written authorization.
We have made our best efforts to make sure the precision and completeness of this user manual. If there are
any mistakes or omissionsfound, we sincerely thank you for giving us feedback through your local retailer.
As a safety measure, the Cleanmate robot comes with the power switch set to 0 (off). Make sure to
turn it to the on position (1) before charging. See page 9 for the placement of the power switch.

7
Product Feature
Cleanmate S 930 is anautomatic cleaning robot, it has a common sweeping function, double side brush,
strong vacuum power and also a rolling brush kit. It can determine how best to work in order to make it more
efficient in cleaning the floor.
touch the
on the robot, to activate the robot.
User Friendly Design
Operation is simplified,
Washable Dust Bin
Dust bin and primary mesh filter can be washed with water.
Do not wash the HEPA-filter. Simply wash the dust bin under
water after use to avoid dust blowing in the air and cause a second
pollution.

8
Product Components
Main Body and Accessories
Item Description Quantity
1Robot vacuum cleaner 1
2 Charging Docking 1
3 Power Adapter 1
4 Remote Control (no battery inside) 1
5Side Brushes 4
6HEPA-filter 1
7Cleaning brush 1
8User Manual 2
9Magnetic strip 1

9
Main Body Diagram
Dust Bin
Rolling Brush Cover Plate
Left Side Brush
Right Side Brush
Right Wheel
Charging Socket
Battery Cover
Front Wheel
Auto-Charging Pole
LED - display
Touch panel
Top cover
Bumper
Infrared sensors
Left Wheel
Bottom Cover
Rolling Brush
Power switch

10
Dust Bin
Primary Filter
Dustbin Lower Cover
Rolling Brush
Bushing A
Rolling Brush
Axle
Rolling Brush Bushing B
Bearing
Silicone Bushing
Rolling Brush Kit
Dustbin Upper
Cover
Dustbin Lower
Cover
Press Button
HEPA-lter
Press Button spring
Filter latch
Filter latch, spring
Dustbin tinside

11
Charging Docking
Docking Top Cover
Docking Middle Cover
Charging Poles
Power Socket
Note:
A. Please install AAA type batteries into the remote control before use it.
B. Remove the batteries if the remote control will be left unused for a long period.
C. If you use the remote control near the charging docking, the robot may not recognize the command
and may not respond.
1
6
2
3
7
854
Remote Control
1. LED display
2. HOME: Auto-recharging
3. Direction Buttons: control robot move to certain direction.
(Only works when robot in standby status)
4. Max: robot change to powerful cleaning mode.
(Only works when robot in standby status)
5. CLK: robot timer setting
6. PLAN: robot schedule cleaning time setting
7. ON/OFF: turn on/off the robot
8. Mode: robot cleaning modes
(Only works when robot is in standby status)

Product Operation
1
2 3
Touch Panel Operation
1. Cleaning Operation
A. Press to start the robot, and press again to enter auto cleaning mode.
B. Make the robot change from Sleeping status to Standby; or press over 3 second make the robot
change from Standby to Sleeping status.
C. In Schedule cleaning process, press this to conrm the schedule setting.
D. In time setting process, press it to conrm the time setting.
E. In Standby status, press this to start the robot.
2. “HOME” auto-charging/ number increase (+) operation
A. In Schedule setting process, press this to make the setting time increase or system time number
increase; when you keep pressing this button, the number will increase automatically.
B. When robot in other mode, press this to make the robot start looking for auto-charging docking.
3. “PLAN” schedule setting operation
In Standby or Charging status, press this to Enter/Quit System Time Setting process; press this over
5 second to Enter/Quit Schedule Setting
4. “PLAN” + “HOME” operation
In Standby, press “PLAN”+”HOME” together at the same time to Mute / Unmute voice
notifications.
12

13
Battery Charging
1. Battery Charging
Place charging station against the wall, and remove
obstacles about 1m at two sides and 2m in front of the
station as show in the right gure.
Note:
If the robot is powered off, then switch on the robot
first before charging.
2. Charge the robot in either way as shown below:
A. Plug one end of the adapter into the robot and the other end into the power socket as shown
in Fig a.
B. Press “HOME” button on remote control or robot to make the robot search for the
chargingstation and dock automatically as shown in Fig b
Note:
A. When the robot is charging, the LED panel will gradually show “1111” from left to right.
B. When charging is done, LED panel will show “FULL”
C. In standby status, the robot will broadcast voice “Please Charge” when battery level is low.
D. In working status, the robot will start searching for the charging station automatically when
battery level is low.
FigureA
FigureB

14
In Order to Extend Battery’s Life:
A. Please charge the robot up to 12 hours before first use.
B. Charge the robot as soon as possible when battery capacity is low
C. The robot will return to the charging docking automatically when accomplish cleaning or battery
capacity is low.
D. When you will not use the robot for some time, please fully charge the battery first, then switch off
the robot and keep it in a cool but dry place.
E. If the robot has been put aside over 3 months, please charge the robot for 12 hours first before use
it for cleaning.
1. Starting Up
A. Switch on the robot by turn on the switch button on the right side of the
robot, see page 9 for location of the power switch.
B. In Standby status, pressIn Standby status, press on robot or “ON/OFF” on the remote control to start the robot.
Note:
If the robot is in Sleeping status, press on robot or “ON/OFF” on remote control to wake
up the robot rst, then press again to make robot start up cleaning.
2. Standby
Standby means the robot is power on, waiting for users operation. Could be achieved by:
When robot in working status, pressA.A. When robot in working status, press on robot o
standby status.
3. Sleep
When robot in Sleep status, press on robot or “ON/OFF” on remote control to wake up the robot. To
make robot enter Sleep Status by following ways could maximize battery’s life:
A. in Standby status, keep pressingin Standby status, keep pressing on robot over
B. in Standby status, if the robot is connected to the APP and left for 10 minutes without any
commands, the robot will enter Sleep status automatically.
C. in Standby status, if the robot isn´t connected to the APP and left for 2 minutes without any
commands, the robot will enter Sleep status automatically.
Starting Up/ Standby/ Sleeping

15
Schedule
1. Make schedule setting by LED display on robot body
A. robot system time setting (make sure the robot in Standby or Power on
status)
a. Press “PLAN” on robot body to enter robot system setting, LED display will show
current time set.
b. the left two number on LED panel will ash. Press “HOME” on robot to increase hour
number one by one till the number you want to set. When you keep press “HOME” on
robot, the number will continuous increase automatically till you release it.
c. Press to conrm the hour number setting and enter into minute setting, right side two
number will ashing, press “HOME” to increase the number till you get the number want
to set. If you keep press “HOME” on robot, the number will continuous increase
automatically till you release it.
d. Press to save the setting, and press “PLAN” to quit the setting. (If you not press
to save the setting but press “PLAN” directly to quit the setting, it will quit without save
the setting).
You can schedule the robot to make it start cleaning automatically at a certain time every day.
B. Schedule Time Setting (make sure the robot in Standby or Power On status)
a. Keep press “PLAN” over 5 second to enter robot schedule setting, the left two number on
LED display panel will ashing.
b. Press “HOME” on robot to increase the number till you nd the one you want to set.
c. Press to conrm the hour setting and enter minutes setting, right side two number will
ashing, press “HOME” to increase the number till you nd the one want to set. Please
note: when you keep pressing “HOME”, the number will increase continues automatically
till you release it.
d. Press to save previous step setting, then press “PLAN” to quit schedule setting.
(If you not save the setting before you press “PLAN” to quit schedule setting, robot would
not save this data setting)

16
C. Cancel Schedule Setting
Set the schedule time to be “00:00”
Note:
a. Schedule setting by robot body is based on the robot system time. So you need to set the
robot system time to be correct rst, after that you could set the schedule time.
b. once schedule cleaning time setting was conrmed, robot will clean automatically every
day at the schedule time. When switch off the robot, the schedule would be canceled, if
need the robot work schedule, need to make schedule setting again.
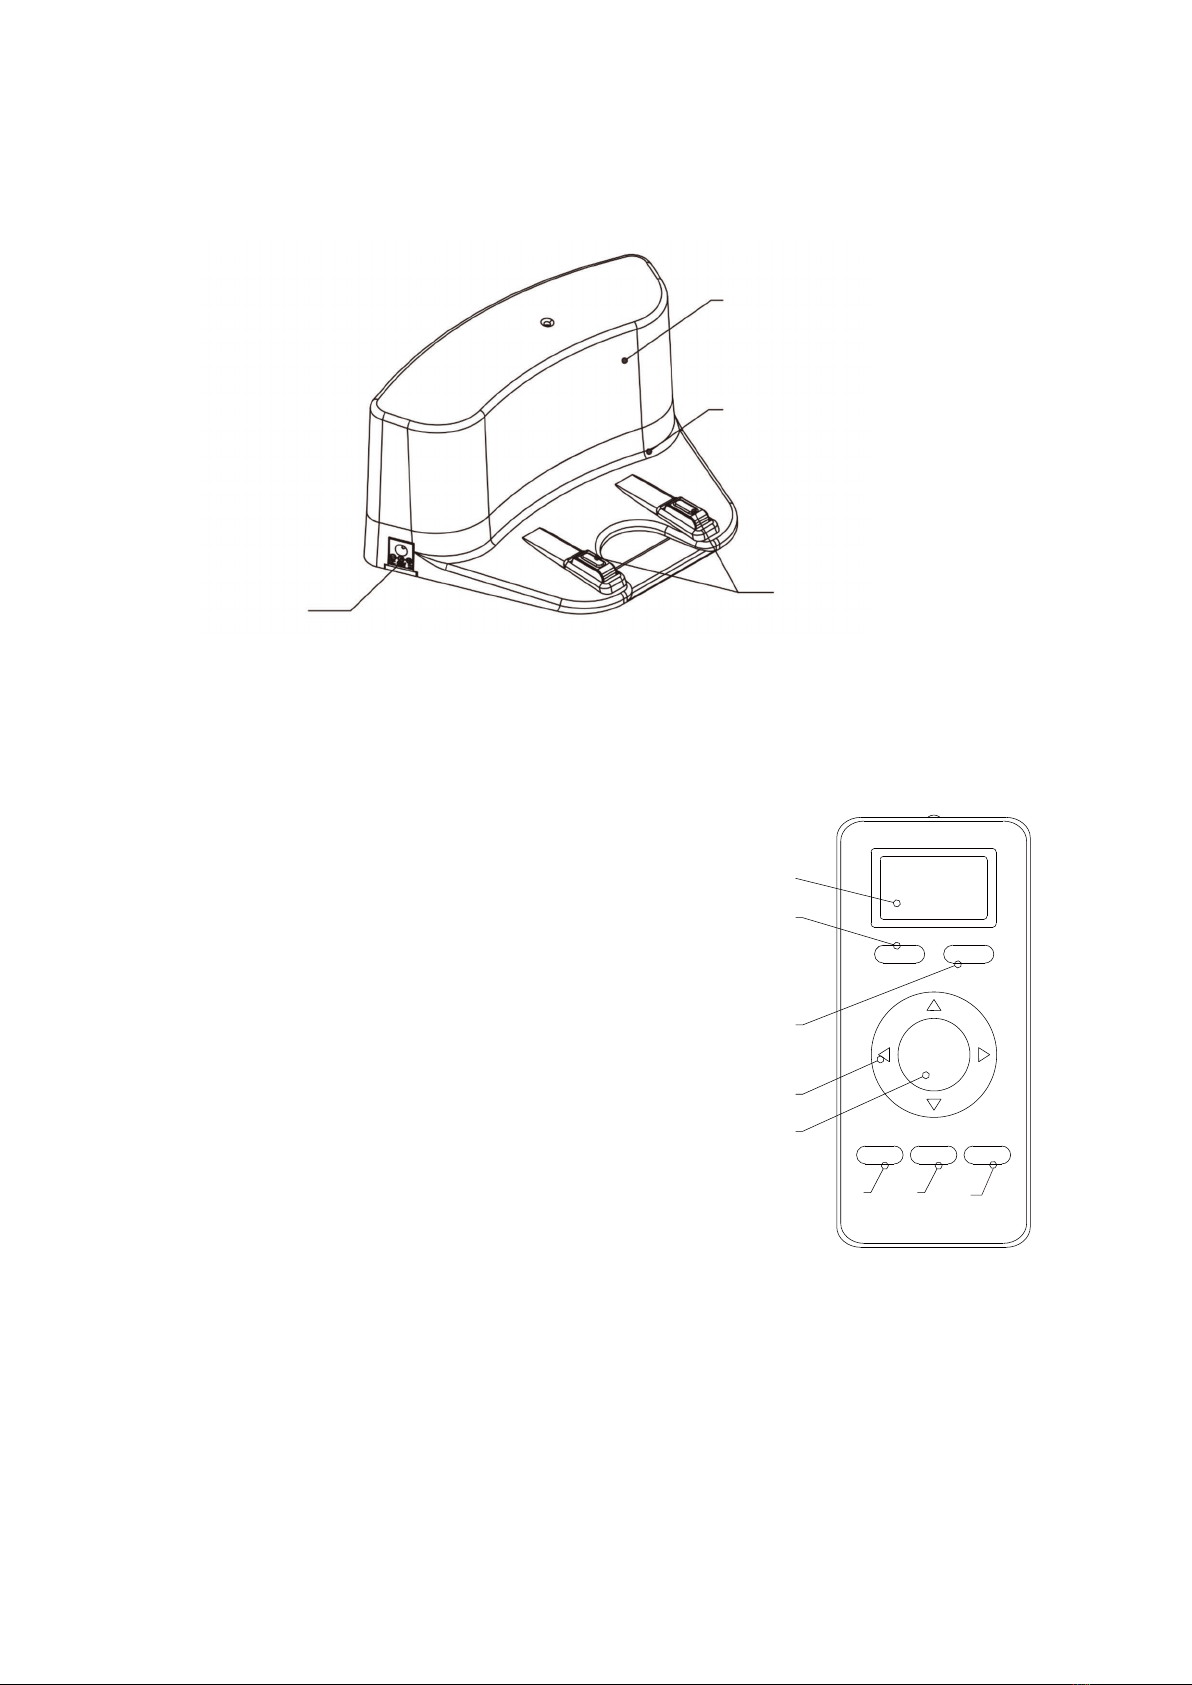
2. Make Schedule Setting by Remote Control
A. Schedule time setting
a. Make sure robot is in standby or charging status, press and hold “PLAN” on remote
control over 5 second, remote control will enter schedule setting;
b. Left two number on remote control LCD panel will flashing, press direction keys on remote
control to change the number till you find the time would like to set.
c. When you find the time you could like to set, make the remote control point to the robot,
and then press “ON/OFF” key on remote control to confirm the setting. When setting
success, the LED display panel on robot body will show the schedule time.
Note:
Schedule setting time by remote control is the delay time after current robot system time. E.g: robot
current system time is 8:00 am, time on remote control number Is: 01:30, this means robot will start
work at 9:30am and set this time 9:30am every day as the schedule time
B. Cancel Schedule Setting
When remote control in schedule setting status, press again “ON/OFF” key on remote control.
(If robot display 00:00 on robot body that means schedule was canceled, if not, press again
“ON/OFF” to cancel the setting.)
Note:
A. in time setting process, press “ON/OFF” key on remote control to conrm the hour and minutes
setting. Press “PLAN” on remote control to enter or quit time setting.
B. “ON/OFF” on remote control is the same function as on robot body.
3. Set up scheduling via the Cleanmate app
Scheduling can also be set in the Cleanmate app. There you can set a weekly schedule and
choose any time on any weekday. The scheduled time will continue until you delete it in the app.

17
Cleaning Modes
Cleanmate S 930 have 4 different cleaning modes to meet different cleaning request.
1. Automatic Cleaning Mode
In standby status, press on robot body or press “ON/OFF” on
remote control, robot will enter automatic cleaning mode.
2. You can also select the cleaning mode when the
robot is cleaning, press the MODE button on remote
control to select the cleaning mode, the mode type will
appear on the robot’s 4 Digits LED Display as follow:
A. 1111: Spot Cleaning Mode
B. 2222: Zig-Zag Cleaning Mode
C. 3333: Random Cleaning Mode
D. 4444: Spot x 2 Cleaning Mode
3. Schedule Cleaning
You can set the schedule cleaning time according to your personal request.
Product Operation
Rolling brush kit, dust bin kit should be well installed (refer to below diagram)
4. MAX-cleaning
Press “MAX” on the remote control to start a powerful cleaning mode, The Cleanmate increases the vacuum power. and
increases the rolling brush RPM.

18
Product Maintenance
Rolling brush
cover plate
Step 2: Install rolling
brush cover plate
Step 1: Put in rolling
brush
Robot main body
Step 3: Install the dust
bin into the spacing.
Rolling brush
Dust bin
Table of contents
Other Cleanmate Vacuum Cleaner manuals

Cleanmate
Cleanmate RV500 Series User manual

Cleanmate
Cleanmate LDS700 User manual

Cleanmate
Cleanmate S 995 User manual

Cleanmate
Cleanmate S 970 User manual

Cleanmate
Cleanmate S400 User manual

Cleanmate
Cleanmate QQ6Pro Series User manual

Cleanmate
Cleanmate S300 User manual

Cleanmate
Cleanmate S 850 User manual

Cleanmate
Cleanmate S 600 User manual

Cleanmate
Cleanmate S 1000 User manual