Cleanmate S 990 User manual
Robotic Vacuum Cleaner
Cleanmate S 990
Laser Mapping / APP Control / Electrical water tank
Instruction Manual
Cleanmate

Please keep this instruction manual in your sight,
read it thoroughly and carefully before using this product
Contents
Safety Instructions---------------------------------------------------------------------------------------------------------1
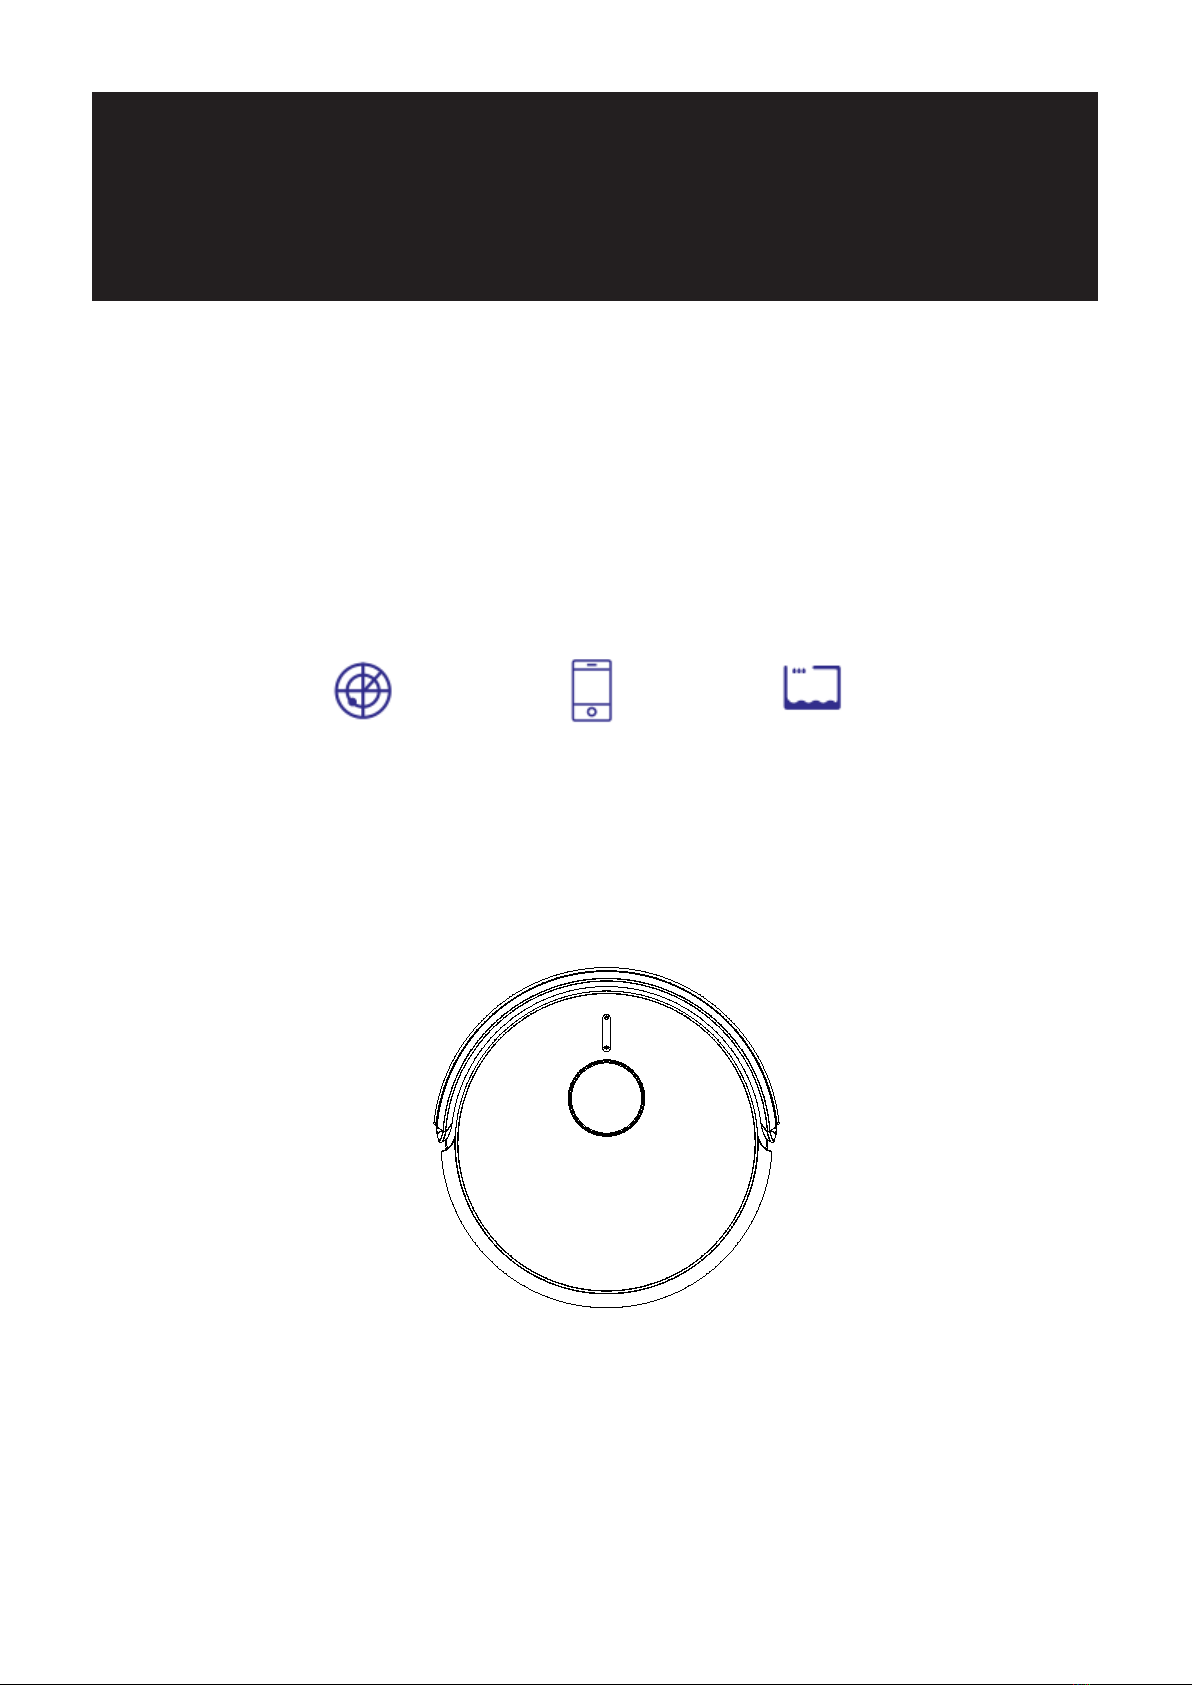
Product Features------------------------------------------------------------------------------------------------------------2
User Friendly Design-------------------------------------------------------------------------------------------------------2
Washable Dust Bin--------------------------------------------------------------------------------------------------------- 2
Smart Navigation------------------------------------------------------------------------------------------------------------2
Product Components-----------------------------------------------------------------------------------------------------3
Main Body and Accessories----------------------------------------------------------------------------------------------3
Main Body Diagram--------------------------------------------------------------------------------------------------------4
Dust Bin / Main Brush------------------------------------------------------------------------------------------------------5
Docking Station / Remote Control--------------------------------------------------------------------------------------6
Product Operation----------------------------------------------------------------------------------------------------------7
Control Panel-----------------------------------------------------------------------------------------------------------------7
Battery Charging-------------------------------------------------------------------------------------------------------------8
Starting Up/ Standby/ Sleeping-------------------------------------------------------------------------------------------9
Scheduling---------------------------------------------------------------------------------------------------------------------9
Cleaning Modes--------------------------------------------------------------------------------------------------------------11
Main Brush and Dust Bin Installation-----------------------------------------------------------------------------------12
Product Maintenance-----------------------------------------------------------------------------------------------------13

Cleaning Side Brushes----------------------------------------------------------------------------------------------------13
Cleaning Dust Bin and Filters--------------------------------------------------------------------------------------------13
Cleaning Sensors and Wheels-------------------------------------------------------------------------------------------14
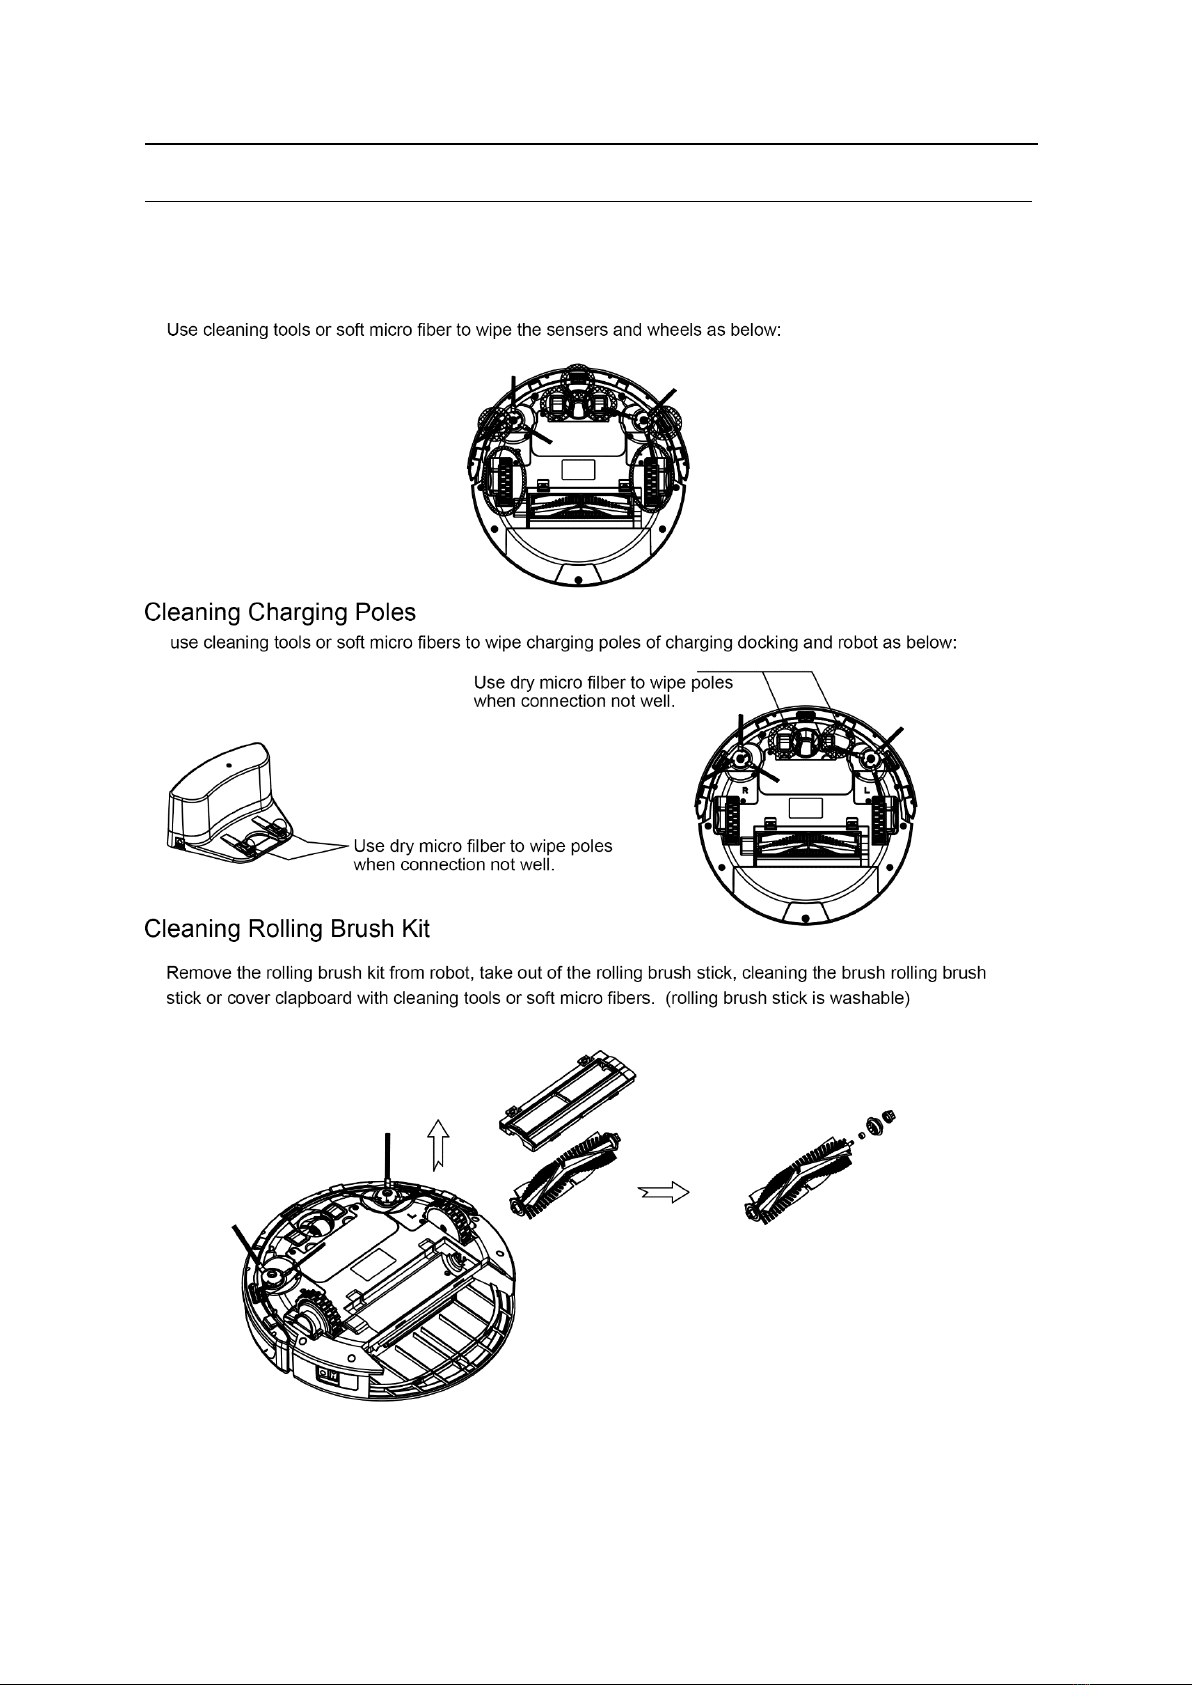
Cleaning Charging Poles-------------------------------------------------------------------------------------------------14
Cleaning Rolling Brush Kit-------------------------------------------------------------------------------------------------14
How to assemble 2-in-one Water Tank--------------------------------------------------------------------------------15
How to clean the Dust Bin in 2-in-one Water Tank------------------------------------------------------------------16
Troubleshooting--------------------------------------------------------------------------------------------------------------17
Product Specifications---------------------------------------------------------------------------------------------------18
Battery Removal-------------------------------------------------------------------------------------------------------------18

1
Safety Instructions
Before using this product, please read the safety instructions and follow all regular safety
precautions.
1. Only authorized technicians should disassemble the product. Users are not allowed to
disassemble or repair the product.
2. Only use the original battery and power adapter (Model: GQ15-24006-AG) of the product for
charging. Using an unmatched adapter may cause electric shock, fire or product damage.
3. Do not touch the power cord, plug or adapter with wet hands.
4. Do not use this product in wet or moist environment (any environment with liquid), e.g.
bathroom or laundry.
5. Do not have curtains, any kind ofwrapping material, clothes or loose objects caught in the
wheels.
6. Before use, clear the floor (remove all fragile objects and cords, clothing, paper, loose cables,
as well as make sure to lift curtains and drapes off the floor to avoid any possible accidents.)
7. Make sure this product isnot close to cigarette butts,lighters, matches or any flammables.
8. Never use the product to clean combustible or highly volatile liquids, such as gasoline.
9. Only use the product indoors, do not use it outdoors.
10. If the product needscleaning, clean it after the power isswitched off.
11. Do not over-bend or put pressure on the flexible cord with heavy or sharp objects.
12. Do not sit on or attach an item on the top of this product. Beware of children or petswhile
the product isin operation.
13. Do not place this product where it’s possible for the robot to drop off (table, chairs, etc.)
14. Turn off the power switch during transportation or for long term storage.
15. Before charging, check whether adapter and outlet are properly connected.
16. To avoid tripping, all the people in the house should be noticed when this product ison.
17. Check that the dustbin isempty prior to use.
18. Use this product in temperature from 0ºC to 40ºC.
19. Do not use this product in high-temperature environment or under intense sunlight for a
long time.

2
20.This appliance contains batteries that should only be replaceable by skilled persons. The battery
must be removed from the product before it is scrapped. The battery should be disposed of
properly for safety and environmental sake.
22.For the purposes of recharging the battery, only use the detachable supply unit provided with
this appliance.
23 This appliance contains batteries that are only replaceable by skilled persons.
24. Do not press or lift the LIDAR housing by hand this may case damage to the LIDAR module.
Warning:
The appliance is not intended for children under 8years old. First time users should
monitor the robot during work to ensure safe operations. People with reduced physical,
sensory or mental capabilities, or lack of experience and knowledge,proper supervision or
instruction should be given to help them understand the hazards involved, and how to use the
appliance in a safe way.
First time users should keep sight of the appliance during vacuuming to ensure safe operation.
Do not use the product inany area higher than the height of the user, so as to prevent the
machine from falling to cause injury.
Children should not play with the appliance. Cleaning and user maintenance should not be made
by children without supervision.
For the purposes ofrecharging the battery,onlyuse the detachable supply unit provided with
this appliance.
Please avoid below operation.
Please clear the floor in order to
to avoid getting the robot stuck. Do not push or pull on the laser sensor.
Do not use the robot to clean up any liquids.
4
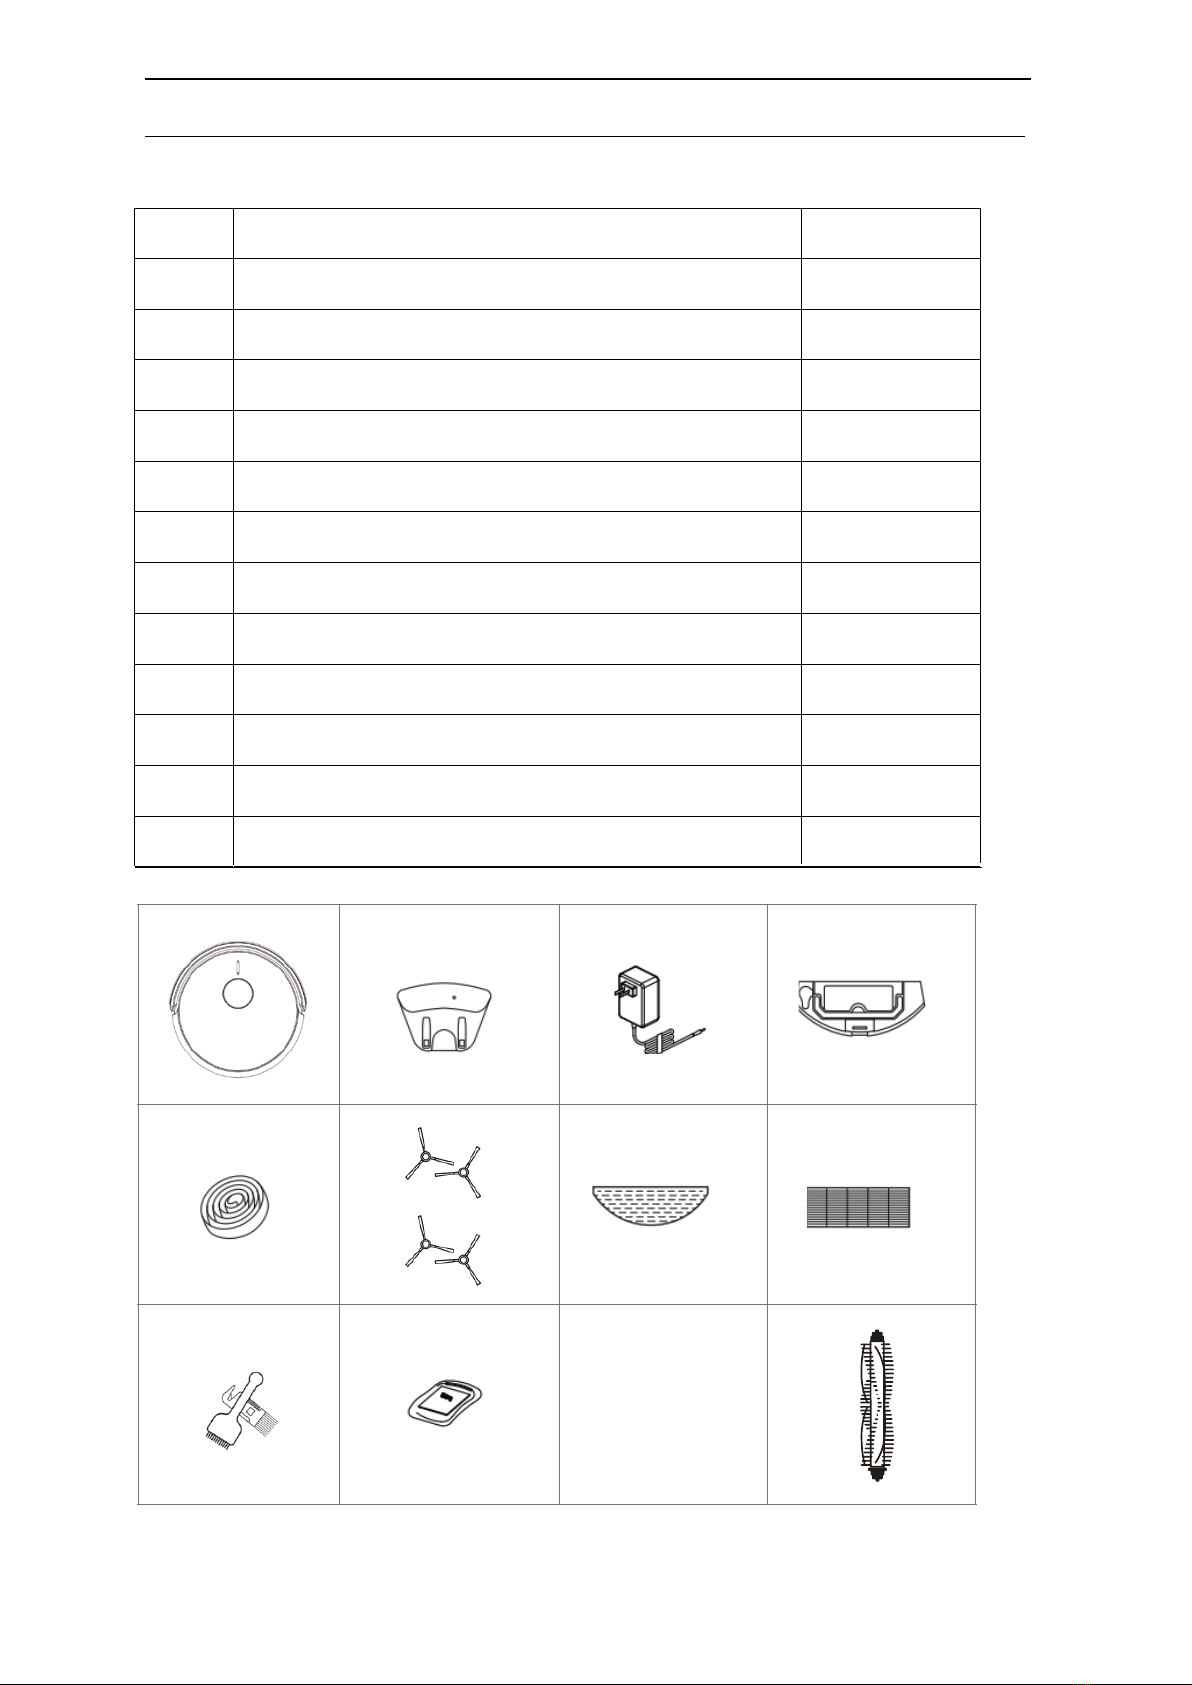
Product Components
Main Body and Accessories
Item Description Quantity
1 Main Body 1
2 Charging dock 1
3 Power Adapter 1
4 2 in 1 Electronic Water Tank 1
5 Magnetic strip 2
6 Side Brush 4
7 Mopping Cloth 2
8 HEPA 1
9 Cleaning Brush 2
10 Manual
1 2 3 4
5 6 78
9 10 11
10 2
11 Remote control 1
1
12
12Main brush 11

5
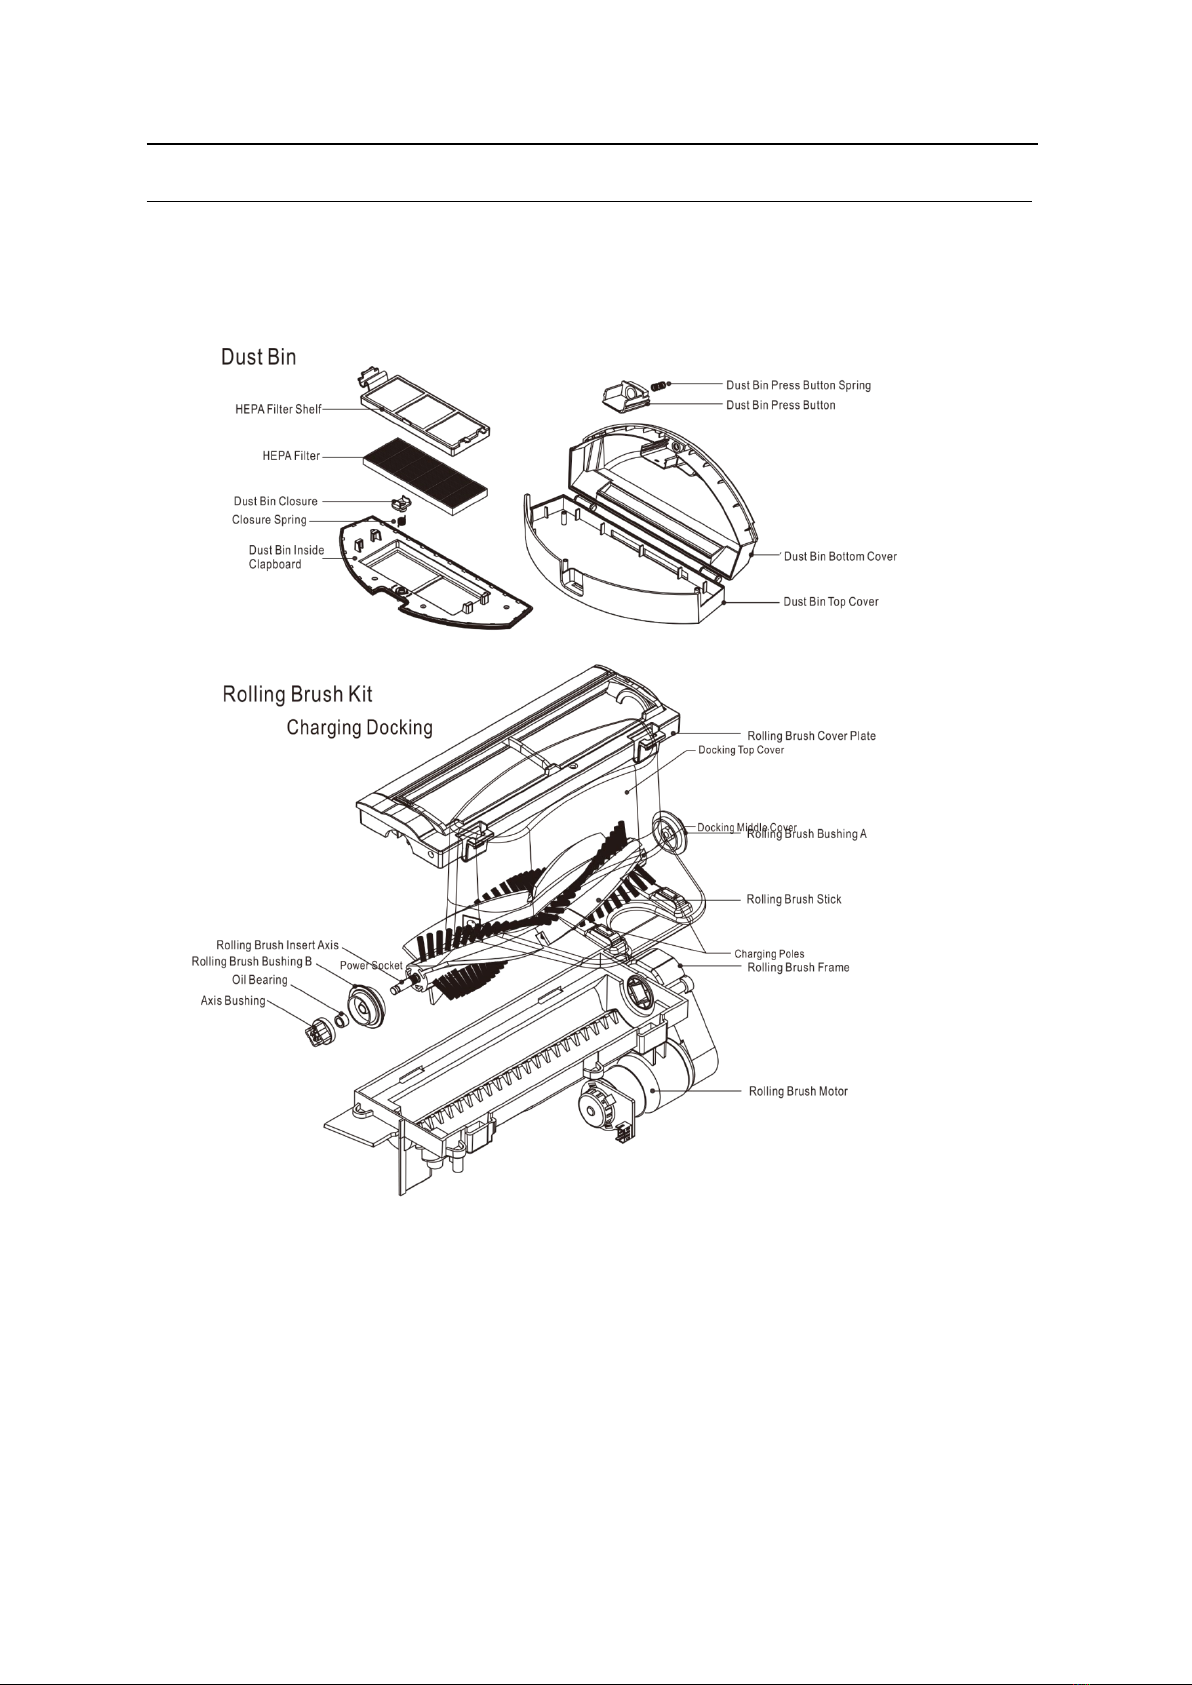
Product Components
Main Body Diagram

6
Product Components
7
Product Components

8
Product Operation
1. APP Connection
Step 1: Download the APP
Step 2: Connect the robot to the WiFi network per the instruction in the APP
Step 3: Control the robot, set up schedule or select cleaning mode via the APP
2. Robot Standby
Press the ON/OFF button till the circle LED light on the button is on, or Press the “Pause”
button on the APP to let robot enter standby mode.
3. Start Cleaning
Press the ON/OFF button on the robot, or press the START button on the APP and the robot will
start cleaning.

9
Product Operation
4. Stop Cleaning
Press the ON/OFF button on the robot, or press the “Pause” button on the APP and the robot
will stop cleaning.
5. Auto-charging
A, When the robot runs out of power, itwill look for the charging station automatically.After
automatically charging, robot will continue to clean the remaining area if cleaning was
not completed before re-charging.
B, When robot is in stand by mode, press “Re-charge” button on the APP or remote and the robot will start
looking for its charging station.

10
Product Operation
6. Schedule setting operation
In standby or charging status, press “Schedule” button on the APP to set up schedule, and
robot will start cleaning on scheduled time.
Note:
a, When the robot is connect to the APP, the robot system time will synchronize with your mobile
phone’s time.
b, Once the cleaning time schedule setting is confirmed, robot will start cleaning automatically
at the scheduled time.
c, If the robot is powered off, its schedule will be canceled. The robot must be kept in standby
on the charging station in order to keep the schedules.

11
7. LED Indication
Product Operation
Battery Charging
1, Charging Station Placement
Place the charging station against the wall,
remove obstacles about 1 meter at both
sides and 2 meters in front of the station as
show in the right figure.
Note: ifrobot isswitched off, then switch on the robot firstly before charging.
2, Charge the robot in either way as shown below:
a, plug one end of the adapter into the robot and the other end into the power socket
b, Press “Re-charge” button on APP to operate the robot looking for the charging station
automatically.

12
Product Operation
C.Press the“ ” button twice in a short time, robot will go back to charging station for
charging.
Note:
A. In standby or working status, the robot will looks for charging docking automatically when
battery capacity is low.
B. During the process of looking for charging station, if the robot run out of power before arriving
the charging station, itwill broadcast voice “Battery low, robot isshutting down” and shut
down within twenty minutes.
C. When the robot is in working status, you should “Pause” it first, let it “Standby”, then press
“Re-charge”.
In Order to Extend Battery’s Life
A. Please charge the robot up to 12 hours upon first charge.
B. Charge the robot as soon as possible when battery capacity islow.
C. The robot will return to the charging station automatically when accomplished cleaning or
battery capacity is low.
D. When you will not usethe robot for ab extended period of time, please fully charge the
battery, then switch off the robot and keep it in a cool but dryplace.
E. If the robot has been put aside over 3 months, please charge the robot for 12 hours before
using it for cleaning.

13
Product Operation
Cleaning Modes
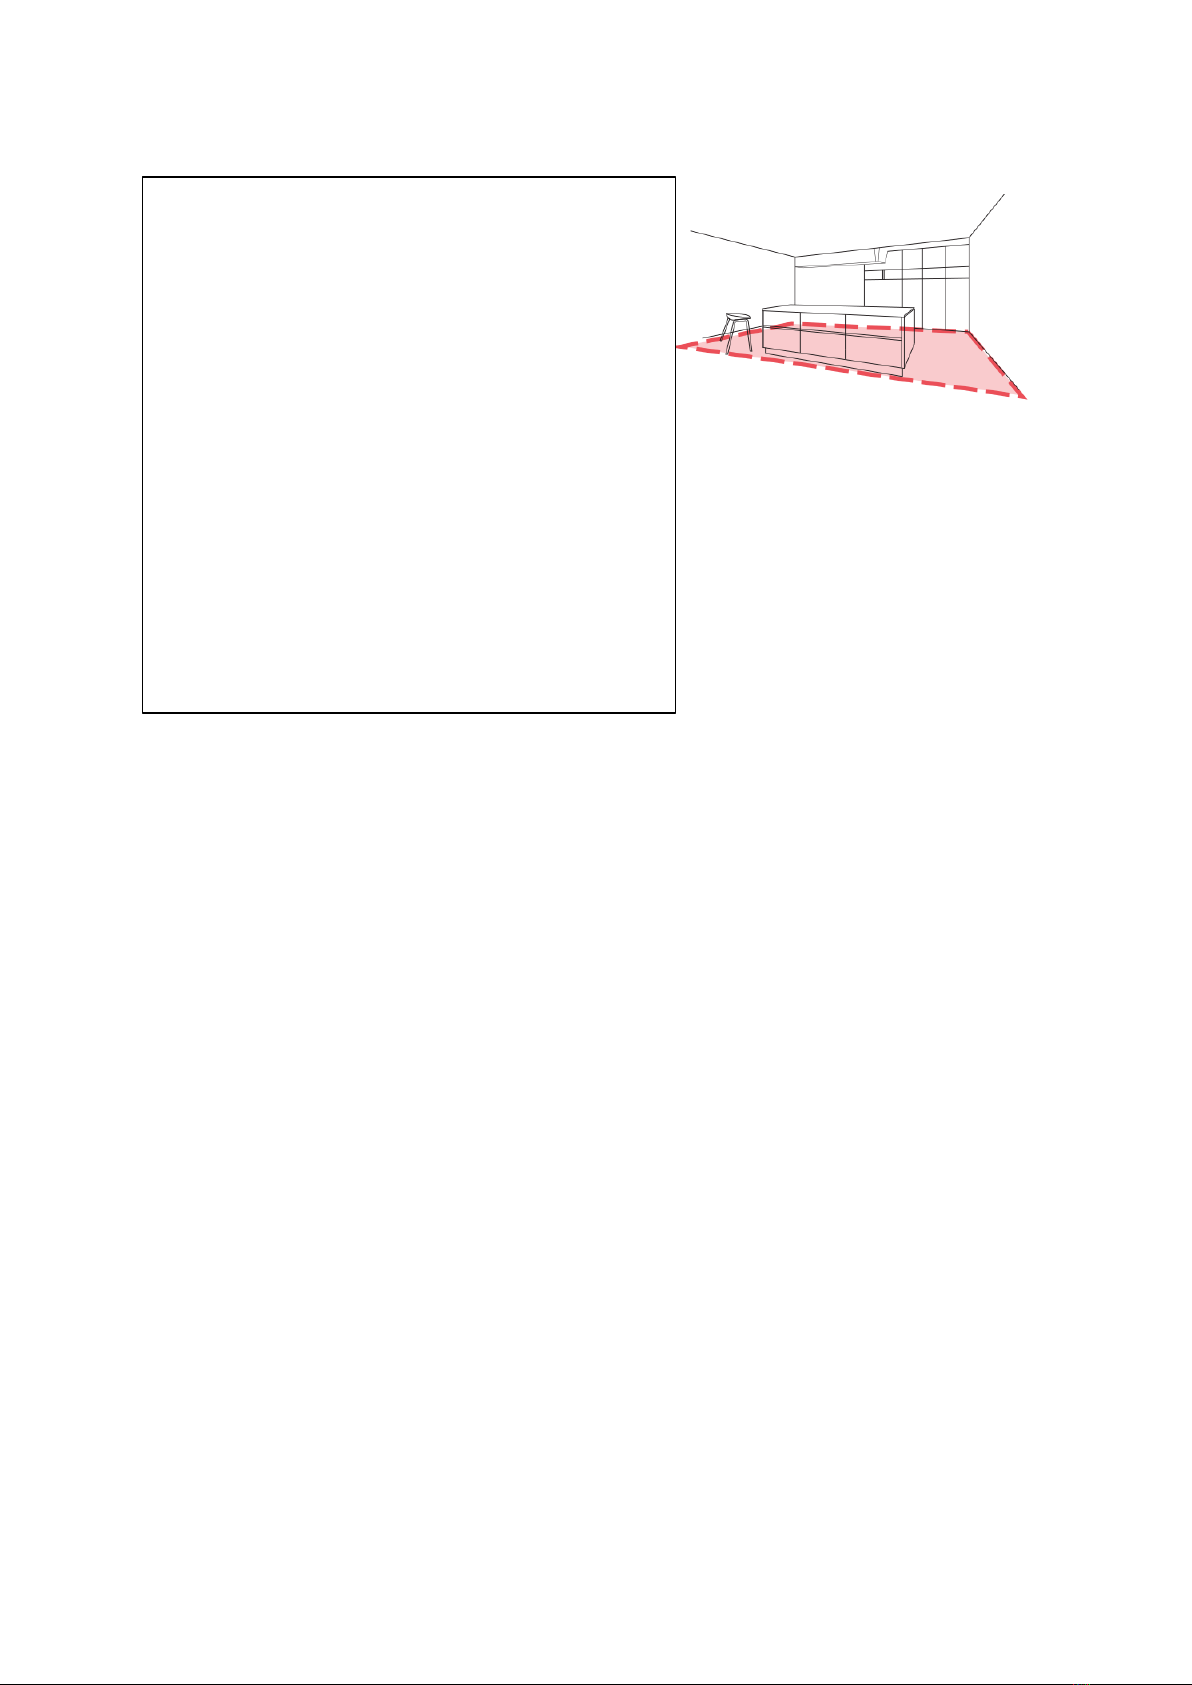
Below are the cleaning modes to meet different cleaning requirements ofyou.
1. Automatic Cleaning Mode
In standby status, press “” on robot body or press “ON/OFF”
on APP, robot will enter automatic cleaning mode. Robot will start
along the wall and plan the cleaning of a 4X4 ㎡area with Zig-zag
mode, and then after that moves to next 4X4 ㎡area.
2. Max Cleaning Mode
Press “MAX” on APP to enter powerful cleaning mode,
Robot will slow down its speed and increase its vacuum power, and speed up the mainbrush
rotation for a deeper cleaning.
.
3. Mute Cleaning Mode
Press “Mute”on APP to enter low noise
cleaning mode. The robot will slow down its moving
speed and mainbrush rotating speed, and decrease
its vacuum power to minimize the noise level.
4. Area Cleaning
Based on the existing complete map of house, press
“Area”on the mapping page of APP, chose the size
and location of a target area, and confirm it and start
cleaning. Robot will go straight for cleaning the target
area
14
5. Forbidden Aera Setting
Based on the existing complete map of house, press
“Forbidden area” on the mapping page of APP,chose
the size and location of the forbidden area, and
confirm itand start cleaning. Robot will then clean
the remaining area.
15
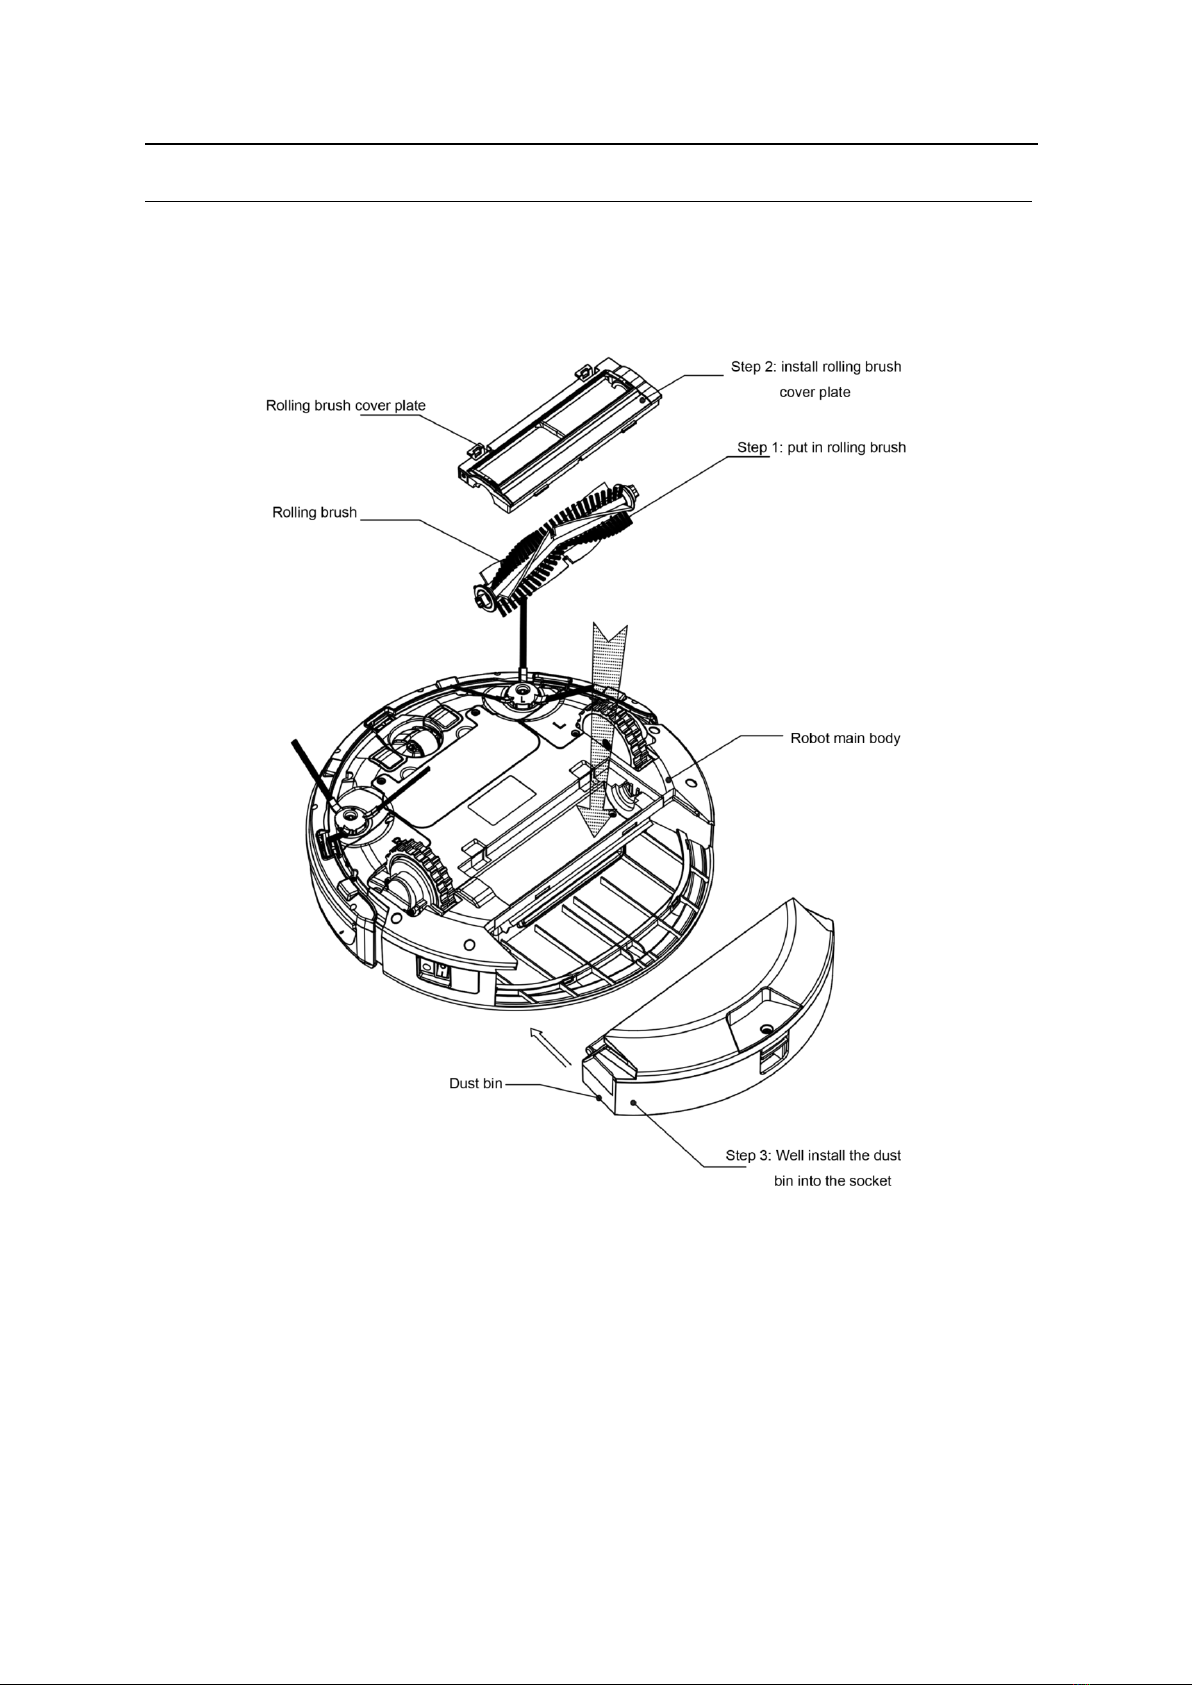
Product Operation
Rolling brush kit, dust bin kit should be well installed in the corresponding position (refer to below
diagram)

19
Handle
Step 2 : Put the dust bin
back in the corresponding
position of water tank.
Electrical Water
Tank
Dust Bin
Step 3 : Align the mop cloth to the edge of water tank’s bottom, then
stick the mop cloth on water tank and press it flat.
Product Operation
How to assemble 2-in-one Water Ta nk
Step 1 : Take off the dust bin, unplug the rubber plug
of water tank and inject water until filling it up,
then plug its lid.
Step 4 : Put the 2-in-one water tank
int
o the corresponding position of
t
he machine. You can replace the
original Dust Bin for your needs.

16
Product Maintenance
Cleaning Side Brush
1. Check if side brush is broken or something is stuck
2. Clean the side brush
3. If side brush is curly or deform, put them in hot water for 5 seconds
4. If side brush is worn out then please change
Cleaning Dust Bin and Filters
Empty and clean dust bin every time when you use it, cleaning steps as
below:
A. Wash the primary filter after every cleaning session, at least every 15-30 days to maximize
its use life.
B. Before installing the primary filter make sure it is dry.
C. HEPA filter should be replaced if it has lost its shape or no longer fit tight against the filter
frame.
D. Recommended changing intervalls for the HEPA filter:
i. Once per month if the robot is vacuuming seven days a week
ii. Every other month if it is used 3-4 days per week
iii. Every four months if used less than once per week.
18
Product Maintenance
Cleaning Sensors and Wheels
Table of contents
Other Cleanmate Vacuum Cleaner manuals

Cleanmate
Cleanmate S 930 User manual

Cleanmate
Cleanmate QQ6Pro Series User manual

Cleanmate
Cleanmate S300 User manual

Cleanmate
Cleanmate S 1000 User manual

Cleanmate
Cleanmate S 850 User manual

Cleanmate
Cleanmate RV500 Series User manual

Cleanmate
Cleanmate S400 User manual

Cleanmate
Cleanmate S 995 User manual

Cleanmate
Cleanmate S300 User manual

Cleanmate
Cleanmate S 950 User manual


