Clearblue Digi 2.0 User manual
user’s guide
LED curing light (For wireless unit)
Clear Blue
Digi 2.0
digi 2.0

SPECIAL INFORMATION ON
Clear Blue LED Curing Light
Transparent Light Guide
Light guides are often made of bundled optical fibers with an external cladding or
dark coating in order to transmit light without dazzling the operator. This leads to
significant power losses.
1) Because bundled fibers cannot be in full contact inside the light guide, there is
a 10 to 15% loss of power proportional to the cross-section of the fibers.
2) An external cladding or dark coating limits operator dazzling but changes
the refractive index and absorbs a great deal of energy, resulting in a 30 to 35% loss!
This is why we use a light guide composed of treated glass with an internal reflector
for maximum efficiency without excessive dazzling. The LED emits
full-power cool light, illuminating the back of the mouth while avoiding excessive
contrasts in light intensity. However, if you still prefer the dark coated light guide,
we can provide that to you upon request.
Lithium-Ion Batter
The Rolls-Royce of batteries!
For many years, only nickel-cadmium (Ni-Cad) batteries could be used in portable
devices. n 1990, nickel-metal hydride (Ni-MH) batteries became available.
However, it is only recently that lithium-ion batteries have made their appearance.
Lithium- on batteries are more costly than their predecessors but require less
maintenance, have no memory effect, do not require periodic cycling
(discharge/recharge) and, most importantly, boast an elevated energy density
for their relatively light weight and small volume! The self-discharge rate of
lithium-ion batteries is half that of Ni-Cad and Ni-MH batteries. Although less sen-
sitive, like all batteries they must be treated with care, stored on the
appropriate charger, and not be left discharged for too long (three months max).
Dual Function – Cordless or Corded
• Leave in the battery for long lasting powerful curing.
• Unscrew the battery, screw in the cord adapter, and plug in the cord
from the charging base for use as a traditional plug-in type curing light.
• Great backup in case the battery ever loses charge.
1. Cordless Curing – battery operated
2. Corded Curing – plug directly into wall socket
t
Check out
the
New
Improvement!

Introduction
This user guide describes the normal properties and operations of the blue series of
LED curing light and introduces important information on safety, installation, usage
and maintenance.
Before using the product, please check the accessories; make sure they are all in
good condition:
1. Handle
2. Charger Base
3. Charger Cord and Plug
4. Lithium Battery
5. Light Guide Rod
6. Eye Protection Shield
Safet Information
Caution: Please read the following information before using this product!
1. This unit must be used as instructed in the user guide, and not for any other use or
purpose. Damage or harm caused by improper usage will void all warranties.
2. Do not shine the curing light directly in eyes without proper protection, and ensure
the eye protection shield is in place before use.
3. Before use, let the unit reach room temperature. Do not operate unit immediately
after rapid fluctuations in temperature.
4. Never use any other battery except the original battery or a manufacturer supplied
replacement battery; otherwise severe damage may result.
5. Don’t place unit near flammable items and do not touch a flammable liquid with
this light.
6. To avoid electric shock, do not insert any other parts into the unit.
7. Please only use original manufacturer replacement parts such as light guides,
chargers and batteries to avoid damaging the product and voiding the warranty.
8. Do not allow any disinfectant, detergent or other chemicals to enter into the unit,
which can result in a short circuit or damage to the unit.
9. Do not modify the unit in any way. Modifications will void the warranty and could
damage the unit.
10. Electromagnetic environments can interfere with the normal operation of the unit.
11. Do not use the unit with a patient who has a pacemaker.
12. When discarding any components of the unit, please abide by local regulations
and if necessary contact our service center for a return for disposal.
13. Do not expose the battery in lower than 5° or higher than 30°C temperatures and
keep unit within 10%-80% humidity range.
Installation
1. Sterilize the light guide rod before each use.
2. Turn the battery in to the handle, screwing it tight. nsert the light guide rod into the
handle. When the light guide rod is in the proper position, there will be a slight
connection sound made.
3. nsert the eye protection shield onto the rod.
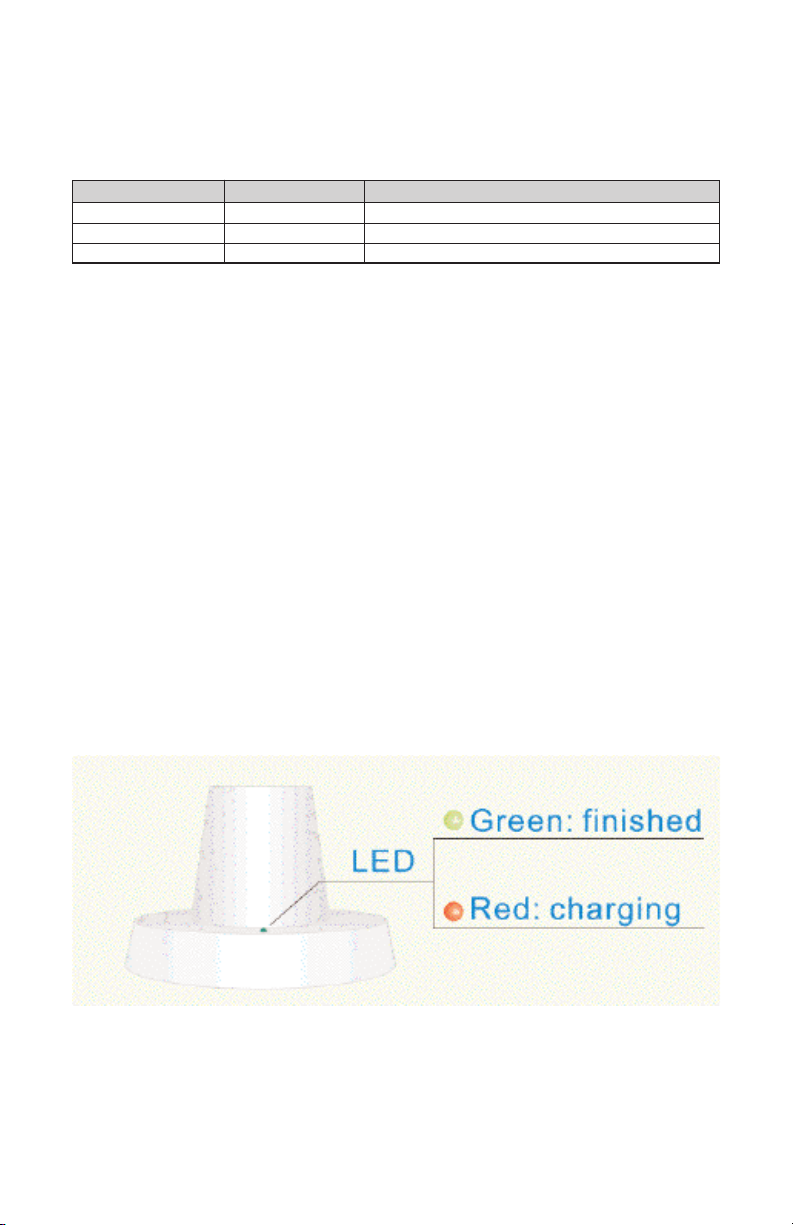
4. Put the charge base on a level solid surface, connect the charger to a suitable
power source, place the handle in the charger base and the indicator on the
charger base will indicate the status of the battery.
5. f the indicator is red, that means the battery is being charged. When the light turns
green, charging has completed. Charging time should take no longer than 4 hours
for a complete charge.
Function Description
Follow the simple directions below to use the unit correctly:
Handle:
The Clear Blue Digi 2.0 has 3 modes to choose from. You can select the proper mode
by pressing the “M” mode select button. When you press the mode button, the digital
screen will display 01, 02 or 03 which corresponds to the different modes. Continue
pressing the mode button to cycle through the modes to get to the desired one. The
device will stay on the selected mode after use or when turned off until you change
it again.
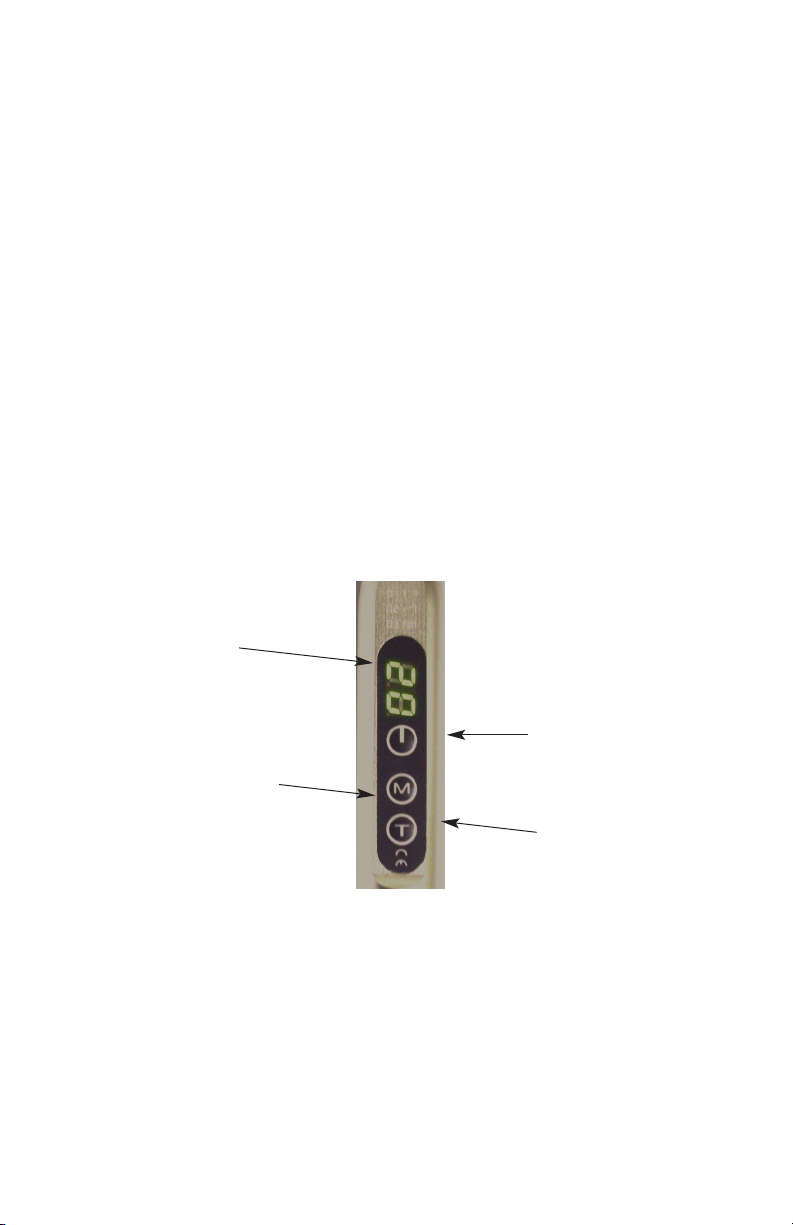
Digital Screen
Mode Select Button
Time Select Button
(setting range: 5S, 10S,
15S, 20S)
On/off Button
Digital Screen
01
02
03
Mode
Strong
Ramp Up
Pulse
Function
Continuous full power
Light gradually ramps up from weak to strong
Light pulses at peak frequency
nitially press the on/off power button to switch the unit on. You can then select the
mode of operation. With the Clear Blue Digi 2.0, you now can select the amount of
working time. Press the time select button “T” and scroll through the options of 5
seconds, 10 seconds, 15 seconds or 20 seconds. During operation, the digital
display will show the time countdown and the unit will also provide an audible beep
after every 5 seconds. You may press the on/off button during operation to
immediately shut off the light.
After three minutes without any operation, the unit switches to standby mode to
conserve the battery. Press the on/off button to turn the unit back on. The Clear
Bluedigi comes with new battery warning indicators to ensure you have the proper
light strength during curing procedures. The digital screen will display LO and the
unit will begin to beep when the battery is low and needs to be placed upon the
base and recharged.
Base:
When inserting the handle into the base, the LED light on the base will indicate the
status of the battery.

Operation Instructions
1. Default mode on the unit is strong high power mode. By pressing the mode select
button, you can change the operation mode to the desired setting.
2. After selecting the proper mode, press the power button. You can stop the light at
any time by pressing the power button again.
3. After one working period, press the power button again to start the next
working period. We suggest that you do immediate restarts no more than
10 times continuously.
4. The distance from the light to the material should be 1-2mm.
Maintenance
• Sterilize the light guide before first use.
• Avoid the use of detergents or disinfectants.
• The main handle and accessories can be cleaned with alcohol. Do not use a caustic
or rubbing detergent and do not use ultrasonic cleaning.
• The light rod must be cleaned and sterilized before use with each patient. t can be
sterilized with alcohol or it can be sterilized in an autoclave for 18 minutes at 134°C.
• Please carefully protect the curing light rod to ensure maximum performance. The
rod is easily scratched and should be kept from touching any hard surfaces. Check
the ends to ensure that no foreign material are on them which would reduce
performance. Clean with gauze or soft cloth. f the light rod gets damaged,
discontinue use immediately and replace it with a new rod.
• Frequently check to make sure that there is no dirt or debris on the gilt surface of
the printed circuit board of both sides of the batter and no dirt or material on the
connection chip. These can be cleaned with alcohol.
• f the unit is not going to be used for a long time, please take the light guide rod
out of the unit and separate the handle and the battery to maintain the unit in
good condition

Technical Specifications:
Power Adaptor nput: 100-240Vac 50/60Hz
Output: DC5V/1.5A
Lithium Battery Rechargeable battery (Li-ion) with capacity of 250 expo-
sures of 10 seconds per charge
Voltage: DC3.7V
Capacity:2200mAh
LED Source
Light Guide Rod
Temperatures
Power (max): 6W
Wavelength: 430-480nm
Lightpower: >1200mW/cm2
8mm angle: 60˚ with 360° rotatory movement, autoclavable.
With fiber optic point exchangeable with dark cover.
Operating: +50˚F - +110˚F (+10˚C - +40˚C)
Electrical Shock Protection: class (adapter) / Type B
Weight: 150 grams (includes battery and light guide rod)

Contact us with any questions o p oblems at:
1-800-210-8945
o w ite to us at:
618 Co po ate Way, Unit 1
Valley Cottage, New Yo k 10989
Revision 1 August 2017
Table of contents


