NOTE: A concentric .0630" diameter (1.60 mm) cylindrical shank (ISO 1797-1. Type 3) bur should be used.
NOTE: Before installing bur, install motor to the motor-to-angle adapter; then install friction grip chuck
angle to motor-to-angle adapter as described in Angle Installation.
INSTALLATION into the Friction Grip Autochuck Angle (Fig 4)
1. Insert bur into autochuck until resistance is felt.
2. Depress autochuck end cap button and continue to feed-in bur until it clicks and stops.
3. Release end cap button. Now, apply light inward force to the dental bur.This will help set the chucking
mechanism for initial start up.(Always tug on bur after it has been installed to confirm that it is secured.)
DO NOT USE FOR ORAL SURGERY
LUBRICATE THE TRANSMISSION GEAR DAILY
1. To disassemble angle: unthread knurled ring. Remove knuckle and
transmission gear from angle head.
2. Place a drop of DentaLube II in the two transmission gear joints
between the gear and gear housing and a drop of DentaLube II in
the hole in the center of the gear housing. Rotate the gears to allow
DentaLube II to work into the bearings.Apply a light coat of DentaLube
II to the gear teeth. (Fig. 6)
3. To reassemble angle, insert transmission gear into angle head.
Engage splines of knuckle with mating splines of head to achieve
proper alignment.
4. Tighten knurled ring onto knuckle threads until snug.
5. Place angle on motor, connect to handpiece tubing;insert bur and run for 20 seconds to evenly distribute
lubricant and disperse any residual lubricant.
6. Proceed to Cleaning & Sterilization procedures before use.
REMOVAL FROM AUTOCHUCK
Grasp angle firmly so that your thumb touches the end cap and push until a slight click is felt. Pull bur
straight out, then release end cap.
Before operating the angle, carefully read and follow all of these instructions. Save these instructions for future
reference and observe all warnings and cautions.
BUR INSTALLATION AND REMOVAL
LUBRICATION - For Lubricated Angles ONLY
CONTENTS
FEATURES
ANGLE ADJUSTMENT
ANGLE INSTALLATION
BUR INSTALLATION AND REMOVAL
SAFETY INSTRUCTIONS
LUBRICATION
CARTRIDGE REPLACEMENT
CLEANING AND STERILIZATION
TROUBLESHOOTING
REPLACEMENT PART NUMBERS
WARRANTY
MOTOR
MOTOR-TO-ANGLE ADAPTER
BALL BEARING
FRICTION GRIP AUTOCHUCK ANGLE
PUSH ON
CENTER OF END CAP
NOTICE LubeFree Angles denoted by having 3 rings on neck are lubricated for life. Never clean
ultrasonically or immerse in solvent that would dilute the lubricant.
CAUTION Never depress the autochuck end cap button or rest the end cap against any part
of the oral anatomy during handpiece operation. Depressing the end cap while a bur is rotating can
activate the chuck mechanism and result in end cap heat-up and/or loss of bur retention.
1. Thread angle onto the motor-to-angle adapter,
StarDentalTitan 3 Part #264073 orTitanT Part
# 263970, by hand. Seat completely. (Fig 2)
NOTE: If angle does not seat on adapter, gears
are not meshed correctly. Remove angle;
spin motor-to-angle adapter drive gear and
repeat Step 1.
2. Fit angle disconnect wrench, StarDental
Part #203048, furnished with every angle, to
mating indentations on angle neck; tighten
securely. (Fig.3)
1. Loosen knurled ring enough to disengage splines.(Fig.1)
2. Pull head assembly up; turn to desired position.
3. Carefully mesh the splines on the knuckle with the
splines of the head.
4. Tighten knurled ring onto knuckle threads until snug.
ANGLE ADJUSTMENT ANGLE HEAD
KNURLED RING SPLINES KNUCKLE
StarDental® Instrument Solutions
RED TIP APPLICATOR
KNUCKLE TRANSMISSION
GEAR
KNURLED
RING
INDICATIONS FOR USE
Used intraorally by trained dental professionals for drilling and preparation of dental cavities for restoration,
such as fillings, disking, cavity and crown preps, polishing, post and pin drilling and pin setting.
Under normal operating conditions, air is exhausted from the back of the head of this
handpiece. If air is directed into an open soft tissue wound or beneath the mucosa or
dermis, injury to the patient could result from air emphysema of air embolism.
Thisanglehasnointernalairorwatercoolingcapabilities.Externalwaterforcoolingmayberequired.
WARNING
WARNING
TO MINIMIZE RISK OF SERIOUS INJURY:
• Always insert bur the full length of the chuck. If you attempt to extend it from the chuck, the bur may
dislodge during use and possibly injure you or your patient.
• Use only recommended burs to prevent damage to the autochuck and in some cases to prevent burs from
improper or incorrect placement. An improperly clamped bur may dislodge during use, causing injury to you
or your patient. A sudden high-pitched sound or increased vibration while handpiece is operating alerts the
operator to the possibility that the chuck is not latched properly to retain the bur or a bent bur is inserted.
TO MINIMIZE RISK OF INJURY OR DAMAGE TO ANGLE:
• Replace cartridge when handpiece does not run at full speed or runs noisily.
• Follow these safety instructions:
- Confirm bur is secure by tugging on it after it is loaded
- Verify concentric rotation by operating handpiece outside oral cavity. Do not use if it does not
run concentrically or runs with excessive noise.
- Do not operate angle without an installed bur.
- Always use burs with overall length of less than 24mm. Shank length must be at least 7.3mm.
- When using autochuck angle, never depress end cap while bur is rotating.
CAUTION
WARNING
Rated for use with StarDental Motors and Attachments
Easy Maintenance
Friction Grip Auto Contra Angles
Long Term Reliability
Smooth Running, Low Friction Performance
Steam sterilization: 275° F (135° C) max.
Field Replaceable Cartridges andTransmission Gears
Sterilizable up to 135°C
135°C
FEATURES
Motor 5K 5K 20K 20K 20K
Accessories MTA 16:1 Endodontic Motor
to Angle Adapter
MTA Torque Multiplier
& MTA
Torque Multiplier & 16:1 Endodontic
Motor to Angle Adapter
Ratio 1:1 16:1 1:1 4:1 64:1
Max Allowable RPM 5,000 300 20,000 5,000 300
1. Pull handle back on manual bur tool, StarDental Part #203108, and slide open end of tool onto head
of angle as shown in (Fig 5); release spring loaded handle and seat shaft of tool into the opening in
the rear of angle head.
2. Tounlockchuck,turn manual burtoolhandle
counterclockwise.
3. After inserting a 1.6 mm diameter friction
grip bur fully into chuck, turn handle of tool
clockwise to tighten chuck.
4. Disengage tool and tug on bur to verify
that it is completely engaged and holding
securely.
INSTALLATION INTO THE MANUAL CHUCK
REMOVAL FROM MANUAL CHUCK
Use manual bur tool and turn counterclockwise one full turn, 360° rotation. Pull bur straight out.
HANDLE
MANUAL
BUR TOOL
ANGLE INSTALLATION
MOTOR-TO-ANGLE
ADAPTER DRIVE
GEAR
DISCONNECT
WRENCH
MATING
INDENTATIONS
MOTOR-TO-
ANGLE ADAPTER
BALL BEARING
FG CHUCK ANGLE
NOTICE Any serious incident occurring from the use of this device should be reported to
StarDental immediately. If incident occurred in a EU Member State the Competent
Authority must be notified.
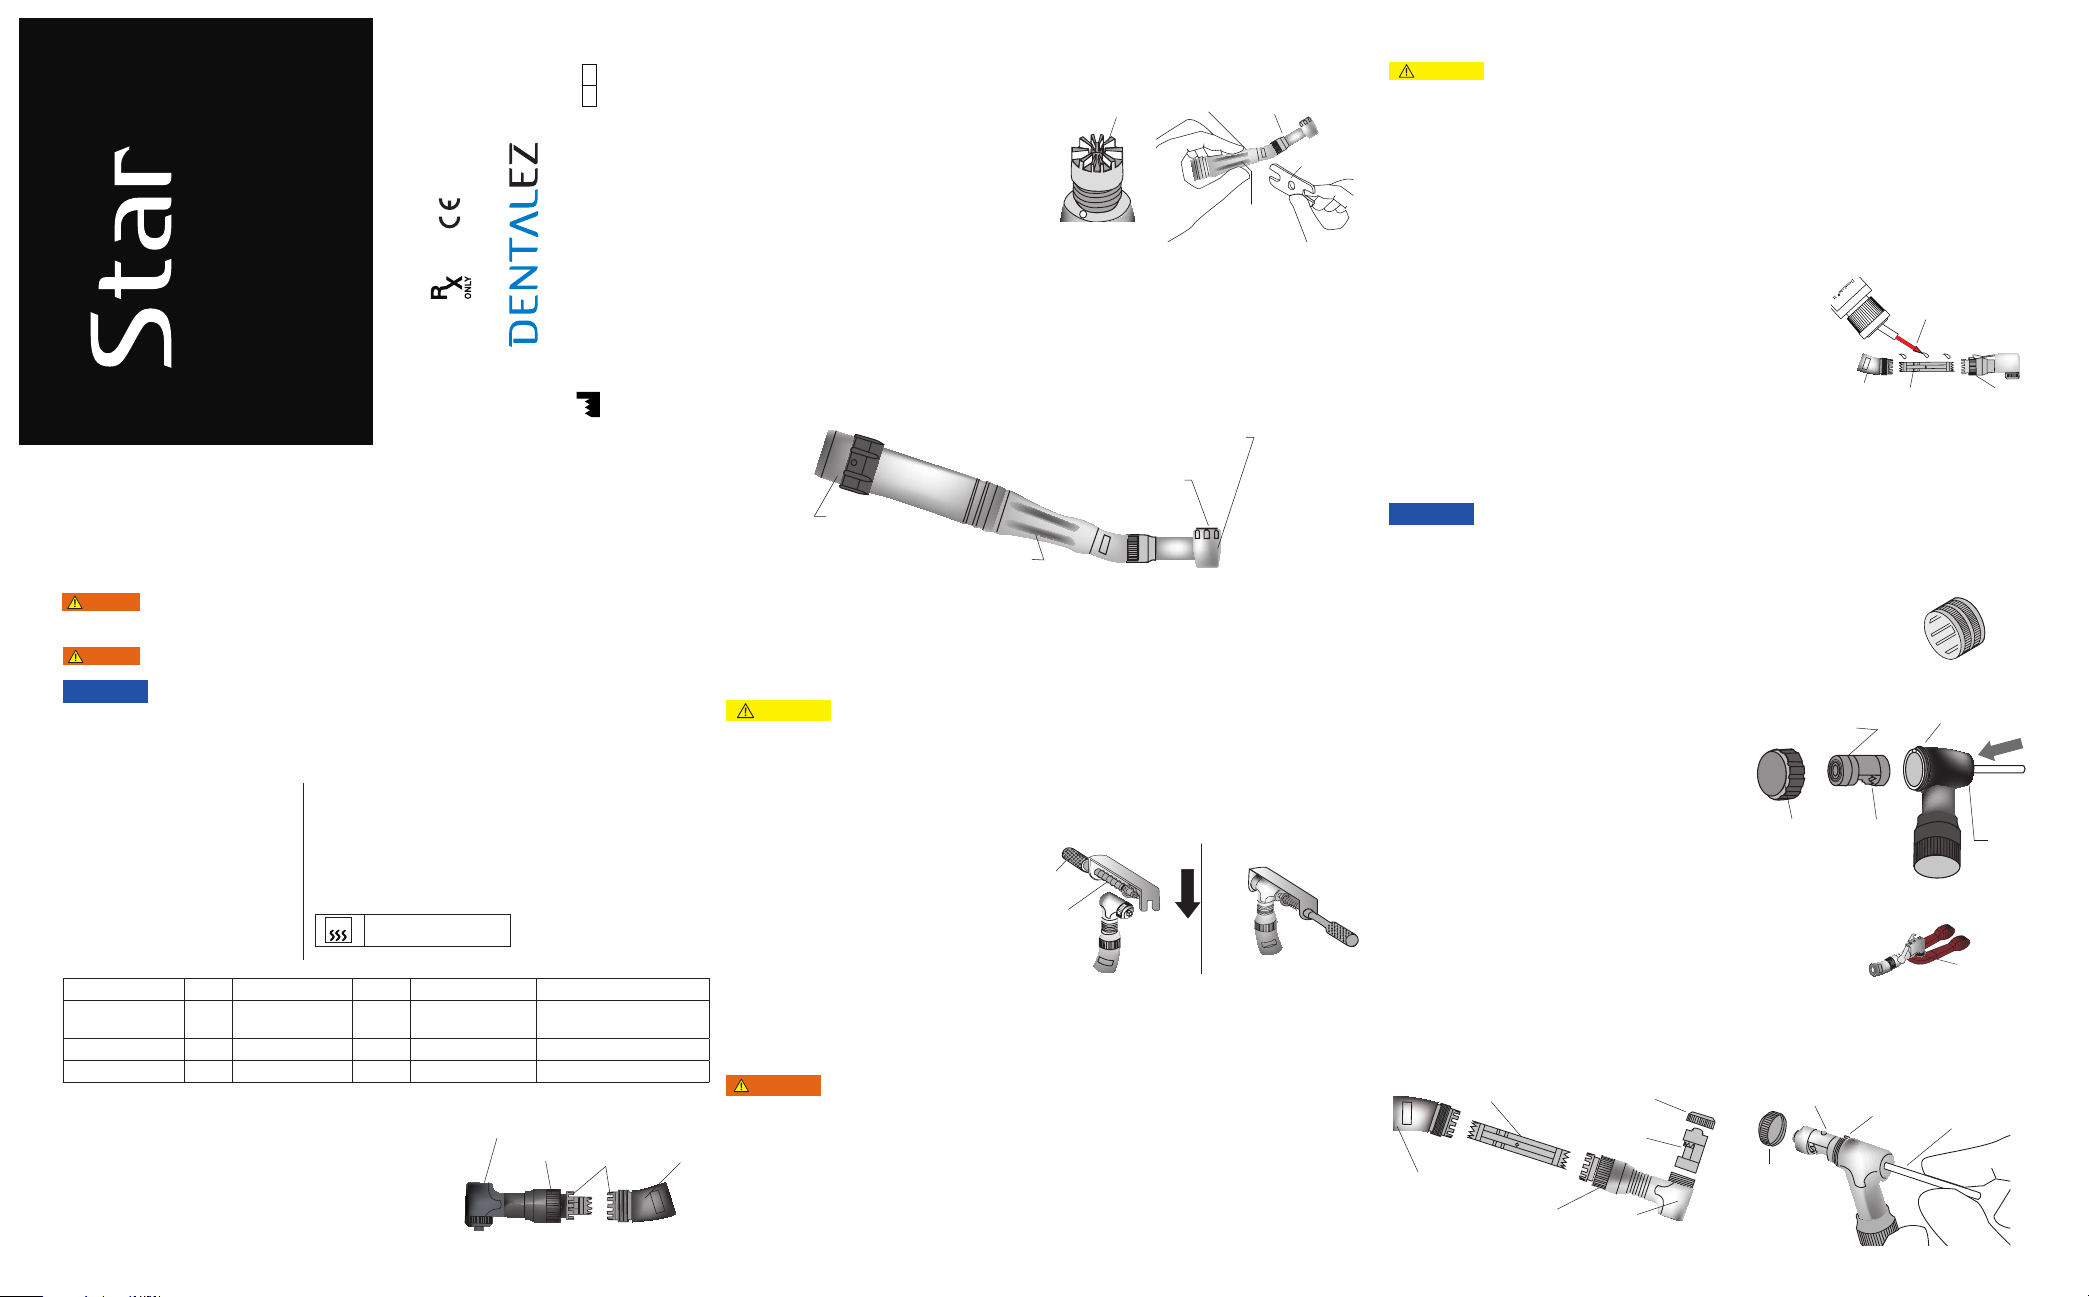
REPLACEMENT OF THE AUTOCHUCK CARTRIDGE
1. Unthread knurled ring.
2. Remove knuckle and transmission gear from head.
3. Unthread end cap using end cap wrench(Fig.7), StarDental Part #261339.
NOTE: Remove transmission gear first before removing cartridge from head.
4. Pushing from the front of the head, remove the cartridge by using a 1/16" pin (Fig.8).
5. Clear housing of all dirt, debris, and/or remaining parts
of previous cartridge. Insert new cartridge by installing
gear and small bearing end first. Slide cartridge into
housing with alignment tab of cartridge mating with
groove in head. Install end cap.
6. To reassemble angle, insert transmission gear into angle
head. Engage splines of knuckle with mating splines of
head to properly align.
7. Tighten knurled ring onto knuckle threads until snug.
CARTRIDGE REPLACEMENT
END CAP
3/32” PIN
ALIGNMENT TAB MATING
GROOVE
TRANSMISSION GEAR
KNURLED RING
KNUCKLE
END CAP
CARTRIDGE
HEAD
REPLACEMENT OF THE MANUAL CHUCK CARTRIDGE
1. Unthread knurled ring.
2. Remove knuckle and transmission gear from head.
NOTE: Remove transmissiongear firstbeforeremovingcartridgefromhead(Fig9).
3. Unthread end cap using plastic wrench (Fig.10).
4. At rear of head, push out old cartridge using a 3/32" pin (Fig.11).
5. Clear housing of all dirt, debris, and/or remaining parts of previous cartridge.
Insert new cartridge with alignment
tab of cartridge and gears toward end
cap and align with mating
groove in head. Install end cap.
6. To reassemble angle, insert transmission gear into angle head. Engage splines of knuckle with mating
splines of head to achieve proper alignment.
7. Tighten knurled ring onto knuckle threads until snug.
PLASTIC
WRENCH
FIG.1
NON-STERILE MEDICAL DEVICE
0344
062734 Rev M Date of Issue 2021-04-30 ©2021 DENTALEZ, Inc.
EC REP
Emergo Europe
Prinsessegracht 20 2514AP
The Hague The Nettherlands
DENTALEZ, Inc.,
StarDental ®Division
1816 Colonial Village Lane
Lancaster, PA 17601 USA
TITAN LOW-SPEED
BALL BEARING FRICTION GRIP
CHUCK ANGLES
TI TAN 3 L U BE FRE E BB F G AU TO C HU CK
TI TAN 3 L U BR ICATE D BB FG AU TOC HUC K
TITAN-T LUBEFREE BB FG AUTOCHUCK
TITAN 3 LUBEFREE BB FG MANUAL CHUCK
FIG.2
FIG.3
FIG.4
FIG.5
SAFETY INSTRUCTIONS
FIG.6
CARTRIDGE
ALIGNMENT TAB
END CAP GEARS
MATING GROOVE
1/16" PIN
HEAD
FIG.7
FIG.8
FIG.11
FIG.10
FIG.9
END CAP
WRENCH


