Clearwater Spas CLEAR A-400 User manual

CLEAR | State of the Art Water Management | 1
USER GUIDE

2 | User Guide
MODEL A-400
MINERAL ION RELEASING DEVICE FOR SPAS
COMMERCIAL
WARNING: Copper levels over 1ppm and a pH reading over 7.8 may
cause copper to precipitate.
READ THE LABEL AND THE INSTALLATION AND OPERATION
MANUAL BEFORE USING
KEEP OUT OF REACH OF CHILDREN
18800 Woodinville-Snohomish Rd
Woodinville, WA 98072
Tel. (425) 483-1877
www.clearwaterspas.com

CLEAR | State of the Art Water Management | 3
ATTENTION
1. Ensure hardness, pH, alkalinity and TDS are within acceptable levels
(see Maintenance section in operating manual for details).
2. Excessive amounts of algae or bacteria must be controlled prior to
installation.
3. Run the pump a minimum of 4 hours per day.
4. A residual of chlorine or bromine or alternative non-toxic oxidizer
should be maintained to break down organics (sweat, hair, urine,
make-up, sunscreen, etc.)
5. Keep your ion level between 0.2ppm – 0.6ppm. Test your water
with the Copper Test Kit periodically to ensure ion level is within this
range. Do not reduce the amount of sanitizer used until the ion
level reaches 0.2ppm.
6. Shock may be required in cases of extreme weather conditions or
increased bather loads resulting in high contaminants.
7. Do not plug the controller into a timer. It
should always have power.
8. Install electrodes parallel to the water ow
and ensure the tee is always full of water.

4 | User Guide
INSTALLATION & OPERATION MANUAL
PLEASE CAREFULLY READ AND SAVE THESE INSTRUCTIONS
Thank you for purchasing Clearwater Spas CLEAR. This device will assist
in controlling bacteria and algae in spas by augmenting the bactericidal
and algicidal activity of primary disinfectants such as chlorine or
bromine. Health Canada suggests 3 – 5ppm of free available chlorine
in all spas. Regulated pools and spas must follow provincial, state or
municipal guidelines.
TABLE OF CONTENTS
Important Safety Instructions.................................................................... 4
How CLEAR Works ................................................................................... 6
Quick Start Guide..................................................................................... 8
Grounding Instructions........................................................................... 10
Installation Instructions........................................................................... 10
The Digital Display ................................................................................. 12
Operating Instructions............................................................................ 14
Maintenance........................................................................................... 15
Cleaning & Care ..................................................................................... 17
Warranty ................................................................................................. 18
Specications ......................................................................................... 19
Replacement Parts & Accessories .......................................................... 19
Need help?............................................................................................. 19
IMPORTANT SAFETY INSTRUCTIONS
When installing and using this electrical equipment, basic safety
precautions should always be followed. Please read all instructions
before using this system.
• Protect controller from direct elements (rain, sun). Installing
underneath the spa skirt is recommended.
• To prevent corrosion and extend the longevity of your controller,
add lithium grease to the inside of the pink connector before the
mineral cell is plugged in.
• To reduce the risk of injury, do not permit children to operate this
device.

CLEAR | State of the Art Water Management | 5
• Follow all aspects of the local and national electrical code(s) when
installing this device.
• Install or locate this equipment only in accordance with the provided
installation instructions.
• This unit is only water resistant when the mineral cell cable is
plugged into the socket on the controller. Failure to do this may
result in internal water damage.
• Use this equipment only for its intended use as described in this
manual.
• This system should only be serviced by the manufacturer. Contact
the manufacturer for examination, repair or adjustment.
• Do not operate this system if it has a damaged cord or plug.
• Do not immerse cord or plug in water.
• Keep cord away from heated surfaces.
• Heavy bather loads may trigger the need for additional chlorine/
bromine or oxidizer.
• Check the expiry date of the test kit as test results may be inaccurate
if used after that date.
• Use a registered or scheduled spa sanitizer to maintain an
appropriate chlorine/bromine residual in the water.
• The expected life expectancy of the mineral cell is 2 years under
normal use conditions.
• When replacing the mineral cell, only use replacement cells having
a label that clearly states that it is a replacement mineral cell for the
mineral ion releasing device CLEAR.
• Refer to the Directions for use of your chlorine/bromine sanitizer for
appropriate water parameters.
6 | User Guide
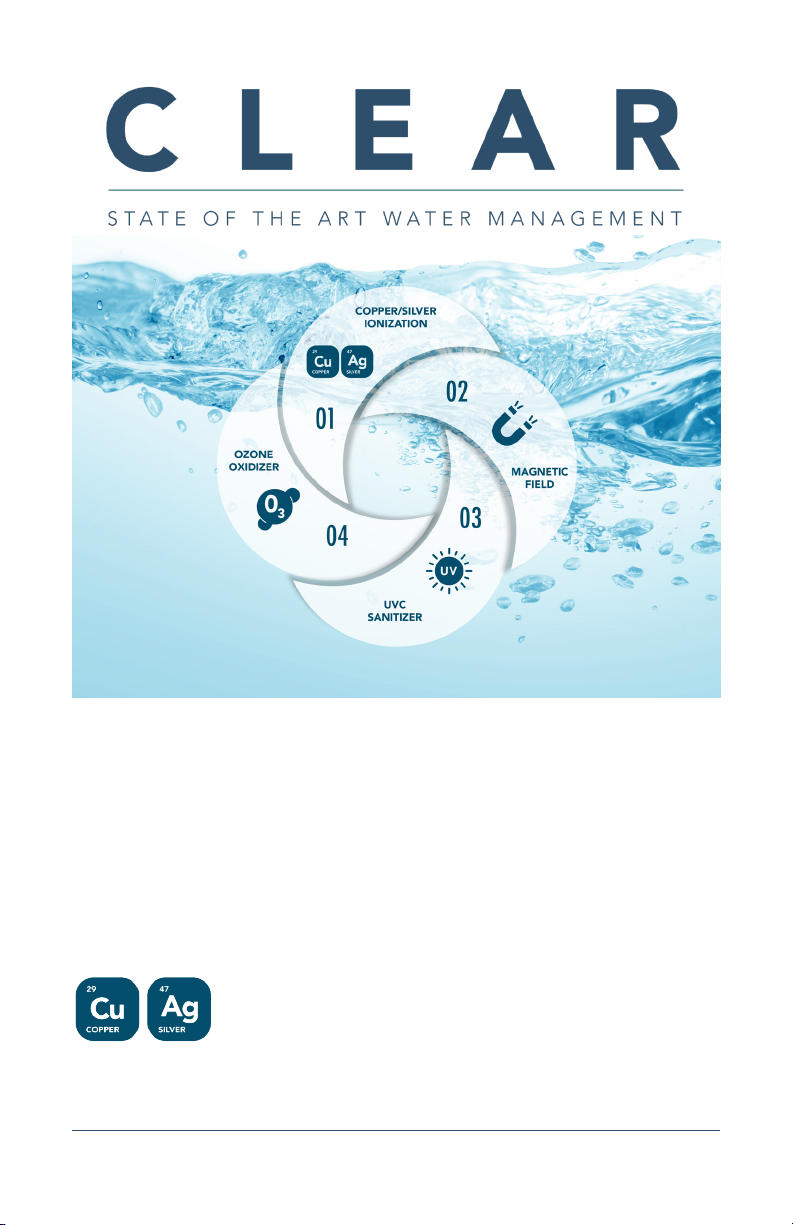
CLEAR is a state of the art water management that is a Clearwater
exclusive, combines four of the best technologies available to provide
you the best fresh water experience. We can’t say this is a chemical
free system, BUT the only time you need sanitizer in your water is when
bacteria is present.
STAGE 1 Copper/Silver Ionization System: This
helps dramatically reduce the amount of sanitizer you
will have in your spa. Positively charged mineral ions
are attracted to negatively charged particulates and
helps the lter to work at its optimum performance.

CLEAR | State of the Art Water Management | 7
Why is it better? CLEAR helps eliminate red eyes, dry itchy skin,
bleached out swimsuits, and the odor of chemicals.This system
essentially transforms your spa into an oasis of mineral pure water.
To make CLEAR work at its optimum level, we have also included a
35 gallon per minute circulation pump. To put in in perspective, a
Clearwater Spa working with our cleaning system and circulation pump,
will put every drop of water through the ltration system 5 times an hour.
Most manufacturers use the jets pumps to do two jobs; lter the
water on low speed and move water to the jets on high speed. We at
Clearwater Spas believes it’s more important to dedicate a pump to 24/7
water ltration. Every Clearwater Spa includes a 24/7 circulation pump.
STAGE 2 Magnetic Field: In conjunction with the
copper/silver ionization, this tee Water passes by the
powerful magnetic eld which polarizes molecules
and gives water a positive (+) charge. This gives a
silky smooth feel and eliminates the need for adding
chemicals.
STAGE 4 Ozone Generator: Ozone allows you to
use less chemicals. Ozone is a gas that eliminates
particulates in the water and breaks down chloramines
via oxidation.
STAGE 3 UVC Sanitizer: This is used to sanitize water
in EPA-approved devices with little to no chemical
sanitizer. Ultraviolet light is used by passing water over
a focused wavelength ultraviolet (UV) lamp.

8 | User Guide
QUICK START GUIDE
Items included with CLEAR:
• Copper testing Kit
• Four-in-one Test strips (alkaline, pH, calcium and chlorine)
• Bacteria test kit
• Bottle of Alkaline Up, pH Up, and pH Down
• Spa chlorine granulars
FIRST VISIT (1st Day):
1. Fill your hot tub with water to the appropriate level (check your spa
manual for reference).
2. Test the alkalinity, pH, and calcium levels using the test strips
provided. Adjust the water if necessary using the provided products.
3. If the TA (total alkalinity) and pH both need adjusting, correct the TA
rst. Reference the test strip to determine the levels. Plan to adjust
the pH at the next visit. Your water should read as follows:
pH: 7.2-7.6
TA: 80-120 ppm
CH: 150-300 ppm
4. Setting the copper level: Set the ‘Ion/Action’ and ‘Large Dose’
values according to the operating manual. Set the‘Ion/Action’ rst,
then set the ‘Large Dose’. When the ‘Large Dose’ expires, test the
water with the copper test kitprovided. The recommended range is
0.2-0.4 ppm. If the ion level is below 0.2ppm, run the ‘Large Dose’
functionagain and repeat until the range of 0.2-0.4ppm is reached.
5. Bacteria Test: Once the copper has reached optimum level, you may
test water for bacteria by following the directionson the bacteria
test kit provided. Use the bacteria test strips and repeat as needed.
IMPORTANT! CLEAR IS DESIGNED TO WORK IN CONJUCTION
WITH LOW LEVELS OF CHLORINE. A minimum of0.5 to 1 ppm is
recommended by the EPA. Check the sanitization levels regularly.
IMPORTANT! Do not use bromineor chlorine tablets.
If your spa tests positive for bacteria, immediately super-chlorinate
your spa using spa chlorine only and do not usefor 8 hours.

CLEAR | State of the Art Water Management | 9
Your spa comes with an ozone system (an oxidizer) which burns up
organic material (body oil, urine, etc.). Potassium Monopersulfate
(spa shock) may also be needed as an oxidizer if bather load is
unusually heavy. Two ounces of spashock for every 6-8 people or 6-8
uses is recommended.
SECOND VISIT (Week 2):
1. Check the pH and TA using the provided four-in-one test strips.
Once your levels are set correctly, continue to check your levels
weekly.
2. Check the copper level using the provided copper test kit. Once
your levels are set correctly, continue to check yourlevels weekly.
THIRD VISIT (every week):
1. Check the pH and TA using the provided four-in-one test strips.
Once your levels are set correctly, continue to check your levels
weekly.
2. Check the copper level using the provided copper test kit. Once
your levels are set correctly, continue to check your levels weekly.
GENERAL GUIDELINES:
A good guideline is to check lters after every 6-8 people have soaked
in the tub, or every 6-8 uses. Use granular chlorine and/or spa shock as
needed.
NOTE: Your system has a UVC germicidal bulb that needs to be
replaced every 12-18 months. Check with manufacturers manual for
details.
NOTE: Copper electrodes need to be replaced every 2-3 years and may
need to be cleaned periodically depending on varying water conditions.
See operation manual for details.

10 | User Guide
GROUNDING INSTRUCTIONS
Caution: This system must be grounded while in use to protect
the operator from electric shock. If it should malfunction or break
down, grounding provides a path of least resistance for electric current
to reduce the risk of electric shock. This system is equipped with
a cord having an equipment-grounding conductor and grounding
plug. The plug must be plugged into an appropriate outlet that is
properly installed and grounded in accordance with all local codes and
ordinances.
Electrical Requirements
The electrical requirements are a 120 or 240-volt 60 Hz, AC only, 15+
AMP protected electrical supply. Please check the label on the back of
the controller for voltage requirement. The retailer and manufacturer
cannot accept any liability for damage to the equipment or personal
injury resulting from failure to observe the correct electrical connection
procedures.
INSTALLATION INSTRUCTIONS
CLEAR can be installed in under 30 minutes. The PVC tee is usually
installed in the spa circulation system after the pump and heater.
However, you may install the tee anywhere in the ltration system that it
ts. Please follow these instructions:
1. Ensure hardness, alkalinity, pH and TDS are within acceptable levels
(see maintenance section).
2. Excessive amounts of algae and bacteria should be controlled prior
to start-up.
3. Turn off the pump.
4. Plan the placement of the tee and controller so that there is
adequate cable length for the cell to reach the controller and the
controller to reach the power source. A qualied electrician can
extend the mineral cell cable if required using standard 18/3 cable.
5. Drain the water pipe in which you have chosen to install the tee.
6. Cut out a 2.5” section of the run of pipe where you have chosen to
install the tee.

CLEAR | State of the Art Water Management | 11
7. Replace this part of the pipe with the tee and fasten with standard
PVC primer and glue
8. Mount the controller with the screws provided on a suitable surface.
9. Connect cable from mineral cell into the controller.
10. Use your hand to turn the cell clockwise into the tee until it is secure.
To ensure even wearing of electrodes, tighten the cell so that so
water ows between the two metal prongs.
11. Plug into suitable ground fault protected outlet or power port on a
spa pack
12. Do not reduce your current sanitizer until the ion level reaches 0.2
ppm.

12 | User Guide
THE DIGITAL DISPLAY
Ionizing When the “Ionizing” light is illuminating, it conrms
that the system is ionizing the water. To illuminate, the
electrodes must be fully submersed in water, and current
must be owing from the electrodes into the water.
The more ions that are being released into the water,
the faster the light will blink. The light will look solid at
maximum dose.
Ion/Action This setting represents the percentage of time in each
hour the Ionizer is on for. The suggested setting follows
in the operating instructions.
Large Dose Press this button to release the maximum amount of
ions for the number of hours you choose. The display
will count down the number of hours left. The system
will return to the previously set Ion/Action setting when
the large dose ends. Use this when the ionizer is rst
installed, upon re-lling, or after large amounts of rain
or spillage.
“-” This button will decrease the setting for Ion/Action or
Large Dose.
“+” This button will increase the setting for Ion/Action or
Large Dose.
Program Lock This feature will lock the controller at the currently
programmed settings. To lock the program, hold down
the “-“ button and the “+” button simultaneously for 20
seconds. You will see “PL” (program lock) appear on the
screen. To unlock, use the same process.

CLEAR | State of the Art Water Management | 13
TOPSIDE CONTROL
Ionizing When the mode of the controller is set to “Ion/
Action” and the “Ionizing” light is illuminated
on the controller, the area in the center of the
topside control will illuminate in blue.
Large Dose Press the center of the logo to engage the
“Large Dose” mode for the number of hours
programmed on the controller. When “Large
Dose” is active, the area in the center of the
topside control will ash in blue. Once the cycle
expires, the controller will go back to “Ion/
Action”, the center area will illuminate in blue
and the ashing will stop. To stop the Large
Dose mode before the cycle nishes, hold
down the button in the center of the logo for 10
seconds.
Turn Off Ionizing If the mineral level is too high, or you would like
to shut off the ionizing for any other reason,
hold down the button in the center of the logo
for 10 seconds or until the blue light goes off.
Turn On Ionizing If the ionizing function has been turned off,
press the button in the center of the logo to
turn it back on. The center of the logo will
illuminate in blue to indicate that the system is
ionizing.
Cell Connection When the mineral cell is unplugged, the
eletrode bars are not under water, or the cell is
worn past its useful life, the light in the center of
the topside control will ash red.

14 | User Guide
OPERATING INSTRUCTIONS
1. Power Up Plug in the controller. The digital display will turn on.
2. Program Press the “Ion/Action” button to set the ion cycle time.
Follow the guidelines below based on the gallons or
liters you are ionizing.
3. Optional Press the “Large Dose” button to set the hours of large
dose. You may set from 1 to 99 hours. Follow the
guidelines below. When the large dose cycle is nished
it will return to the previously set Ion/Action setting.
Model A-400 (Maximum 2,500 gal / 9,500 L)
Please note these are general guidelines only. You will need to adjust
the levels based on your copper test kit readings. See the maintenance
section for more information.
It will take approximately 2 days to attain the minimum copper residual
of 0.2ppm and 5 days to attain the copper residual of 0.6ppm in the
maximum spa volume stated above.
Liters Gallons Ion/Action Large Dose
750 200 11 11
1,500 400 19 21
1,900 500 24 27
3,800 1,000 35 37
5,700 1,500 53 55
7,550 2,000 72 75
9,500 2,500 90 95

CLEAR | State of the Art Water Management | 15
MAINTENANCE
1. Copper Ion Test: Using the included copper test kit, ensure ions
are between 0.2 - 0.6 ppm; Test the ion level once a week until you
have found the proper Ion/Action setting for your spa. Increase
or decrease the Ion/Action setting as required. Carefully read and
follow the instructions for your copper test kit. Check the expiry date
of the copper test kit as test results may be inaccurate if used after
that date.
2. Mineral Cell: The mineral cell that delivers minerals to the water
must be checked every 6 months and will last roughly 2 years
under normal use conditions. You can purchase additional cells
from your authorized dealer. To replace your cell, simply turn old
cell counterclockwise to release it from the tee. Use your hand to
turn the cell clockwise into the tee until it is secure. To ensure even
wearing of electrodes, turn until the two prongs are oriented such
that water ows between them.
3. You will need to oxidize the water to break down excess organic
matter (i.e. sweat, urine, makeup, suntan oils). Chlorine or bromine
tablets are recommended over liquid shock as they are extremely
stable and slow releasing. You may prefer a non-chlorine oxidizer
such as Spaboss Energize (or equivalent brand) which is pH neutral.
Your spa may be equipped with an Ozone generator which is also an
effective oxidizer.
4. Keep the total alkalinity between 80 and 120 ppm.
5. Keep pH between 7.2 -7.8.
6. Keep calcium hardness between 200 and 300 ppm.
7. Keep total dissolved solids (TDS) between 500 and 2,000 ppm.
8. Ensure phosphates are at 100ppb or less by testing phosphates
on an algae free spa (chlorine must be below 5ppm). If phosphates
are above 100ppb use PHOSfree or similar product to remove the
phosphates. Once the phosphates are below 100ppb, maintain
with Pool Perfect+PHOSfree or similar. If phosphate levels continue
to rise, the following may be the cause: fertilizers, organics, metal
sequestering products, scale products, or extreme rainfall. The
above will cause phosphates to continue to rise above what Pool

16 | User Guide
Perfect+PHOSfree can maintain. It is important to reduce/eliminate
the source of the phosphates for Pool Perfect+PHOSfree to
work properly. If possible, prevent runoff from gardens and lawns
from entering the spa. Remove leaves from the spa regularly and
promptly.
9. You may need to add a clarier or occulent if you see cloudy
water or ne particles in the water which the lter cannot catch. With
the pump turned off, the clarier clumps ne particles together and
causes them sink to the bottom. When the particles have settled on
the bottom of the pool they are easily removed by vacuuming. This
is not a dangerous chemical and it is used in small quantities. Please
follow the directions on the product label.
Note: ‘Stain and Scale’ or sequestering products conict with
CLEAR. If you use a stain and scale or other sequestering product, it will
remove the CLEAR minerals from the water and neutralize new minerals
for several weeks. Before adding a sequestering product, turn off the
CLEAR controller by unplugging it from the power source, or turning
down the ‘Ion/Action’ setting to 00 to preserve the life of the electrodes.
After three to ve weeks, you can turn the controller back on. You will
need to ramp up the copper level to 0.2ppm to 0.6ppm again using the
method described above.
If you have iron or other contaminants in your source water, it can also
be treated using a lter that attaches to your garden hose.

CLEAR | State of the Art Water Management | 17
CLEANING & CARE
Mineral Cell Electrodes: Some deposits may form on the electrodes
depending on the water conditions. Clean the at face of the electrodes
using a smooth metal le and some water. The surface does not have
to be polished; simply remove any traces of oxidization and other
sediments.
System Controller Exterior Housing: The housing of the controller
is made from a durable PVC plastic. Clean the outside with a mild
soap and water; rinse and dry with a soft cloth. Do not use any type of
household or abrasive cleaner.
System Controller Panel: Care should be taken in cleaning the
controller panel. If the panel becomes soiled, wipe it with a cloth
dampened slightly with water only. Dry with a soft cloth. Do not scrub or
use any sort of chemical cleaners.

18 | User Guide
WARRANTY
CLEAR carries a ve (5) year limited warranty to be free from all
manufacturing defects. This warranty does not include replacement
mineral cells, which are subject to normal wear and must be replaced
periodically. You must obtain a Return Materials Authorization (RMA)
number from Customer Service before returning a product. The device
will be repaired or replaced within fteen business days following a
claim. This warranty is in effect starting the date of purchase and is only
applicable to units with an unopened enclosure and a serial number
that is in its original unaltered state. This warranty does not apply to
the following incorrect operating procedures, breakage, or (transport/
impact) damages caused by fault, abuse, misuse, carelessness,
misapplication, alteration, modication, improper maintenance, over
voltage of the unit as well as act of God, re, chemical alteration or
natural corrosion or any other casualty. This warranty does not apply to
the spa but solely to the components manufactured by ClearBlue Ionizer
Inc.

CLEAR | State of the Art Water Management | 19
SPECIFICATIONS
Input Voltage: 120 or 240 Volts AC
Input Frequency: 50 to 60 Hertz
Output Voltage: 12 VDC
Output Current: 2 AMP Max
Outside Dimensions: 5” x 3” x 2.5”
Controller: 0-99 variable settings
Tee: 2” Slip x 2” Slip x 1 ½” Fipt S40 PVC Tee
Mineral Cell Size: 3” x ½” x 5/16” Each x (2) Bars
Mineral Cell Weight: 8 ounces
Typical Mineral Cell Life: 2 years
Capacity: Max 2,500
REPLACEMENT PARTS & ACCESSORIES
Description / Part No
Controller (120V) / A-400H
Controller (240V) / A-400UH
Mineral Cell / A-750E
2” PVC tee / PLA-85142
NEED HELP?
Contact your local dealer for assistance.
Find a local dealer at
www.clearwaterspas.com

Table of contents
Other Clearwater Spas Spa Accessories manuals

Popular Spa Accessories manuals by other brands


Takara Belmont
Takara Belmont YUME ESPOIR installation instructions

COVANA
COVANA EVOLUTION COVER owner's manual

Leisure Concepts
Leisure Concepts Covermate Vanish XL installation instructions

Gecko
Gecko BAHAMA SPAS Quick reference card

Takara Belmont
Takara Belmont YUME SWING installation manual

MAR PLAST SPA
MAR PLAST SPA KOMPATTO SPRAY SENSOR Use and maintenance manual