Click PFM7-SZ User manual
AFTER SALES SUPPORT
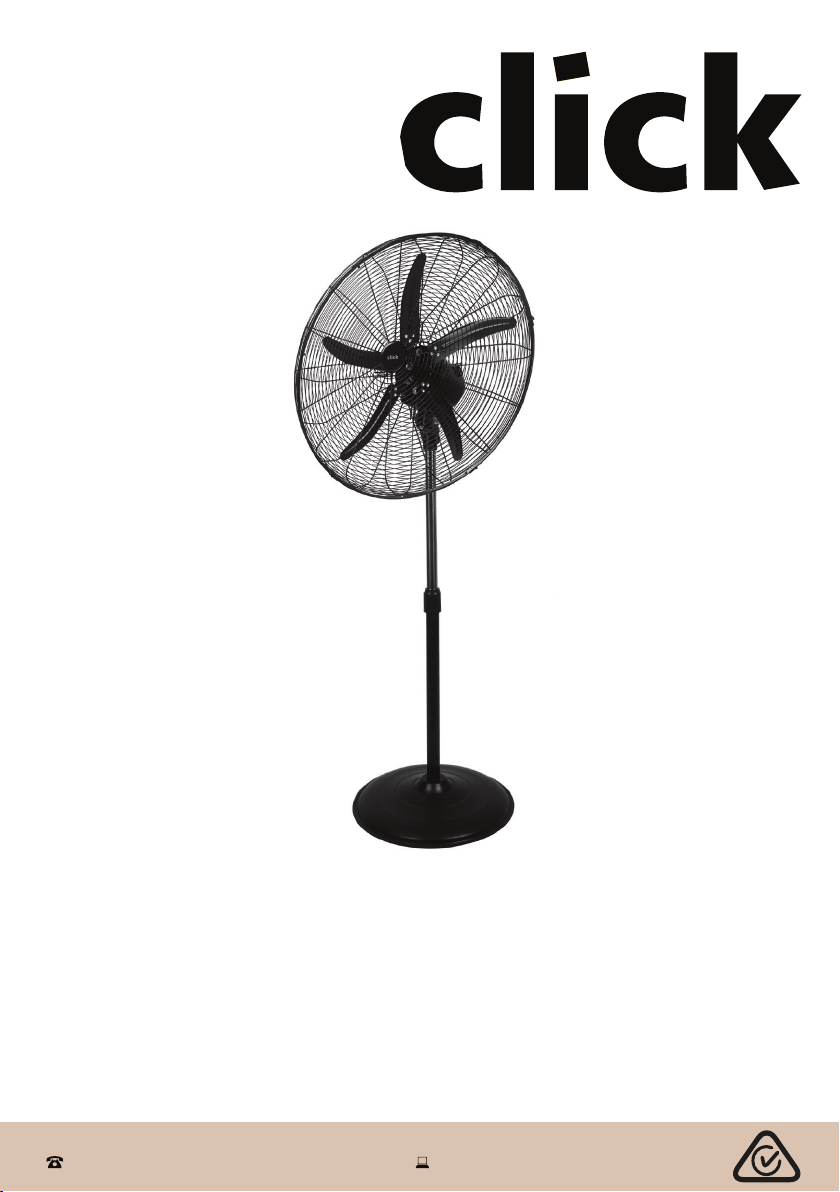
E209
70cm Metal Pedestal Fan
INSTRUCTION MANUAL
MODEL: PFM7-SZ

2AFTER SALES SUPPORT
Contents
Important Safety Instructions 3
Product Overview 6
Getting Started 7
Instructions 13
Other Useful Information 14

3
AFTER SALES SUPPORT
Important Safety Instructions
Read this manual thoroughly before first use, even if you are familiar with this type of
product. The safety precautions enclosed herein reduce the risk of fire, electric shock
and injury when correctly adhered to. Make sure you understand all instructions
and warnings. Keep the manual in a safe place for future reference, along with any
warranty information, your purchase receipt and the original carton. If this appliance
is going to be used by a third party, please pass the manual on to them.
Always follow basic safety precautions and accident prevention measures when using
an electrical appliance, including the following:
Electrical safety and cord handling -Do not put any stress on the cord
where it connects to the product.
-Never carry the fan by the cord.
-Arrange the cord away from any
traffic area so no one will trip over it.
-Do not run the cord under carpeting
or cover it with rugs or runners.
• WARNING! Do not use this fan with an
extension cord, plug adaptor, external
timer or separate speed control
device.
• If an extension cord must be used,
make sure its technical specifications
match or exceed those of the
appliance.
• To insert the plug, grasp it firmly and
guide it into outlet.
• Do not use the On/Off switch as the
sole means for disconnecting power.
• Always unplug the fan from the
power outlet when it is not in use and
before cleaning, servicing, moving or
storing the appliance.
• Unplug the fan from the power supply
during lightning storms.
• Ensure the fan is switched off from
the supply mains before removing a
guard (grille).
• Grip the plug and remove it from the
outlet, do not pull the cord when
disconnecting at the mains.
• Make sure your outlet voltage and
circuit frequency correspond to the
voltage stated on the rating label.
• To protect against fire and electric
shock, do not immerse the cord,
plug or fan in water or other liquid,
or expose the electrical connections
to water. Ensure your hands are dry
before handling the plug or switching
on the fan. Do not use the fan
outdoors or on wet surfaces. Protect
it from liquid spills.
• Check the power cord regularly for
visible damage. If the cord is dam-
aged, do not use the fan. A damaged
cord must be replaced by the manu-
facturer, its authorised service centres
or appropriately qualified personnel in
order to avoid any hazards.
• WARNING! Do not pick up or operate
the fan if the supply cord, plug
or housing is damaged, or after it
malfunctions or has been dropped or
damaged in any manner. If damaged,
contact our after sales support centre
for advice.
• Protect the power cord:
-Do not operate the fan with the cord
coiled up; always fully unwind.
-Do not twist or kink the cord or let
it touch heated surfaces.

4AFTER SALES SUPPORT
Important Safety Instructions (Cont.)
• Unless your home is already fitted
with a residual current device (safety
switch), we recommend installing an
RCD with a rated residual operating
current not exceeding 30mA to
provide additional safety protection
when using electrical appliances.
See your electrician for professional
advice.
• WARNING! Do not leave unattended
during use. Switch it off and unplug
it when not in use, if left unattended
and before cleaning and storing.
• Do not block any ventilation open-
ings. Do not insert or allow foreign
objects to enter the grille openings as
this may cause damage to the appli-
ance and/or injury to the user.
• Position the assembled fan on a
dry, flat, stable surface, keeping a
sufficient distance (at least 300mm)
around the fan and any objects that
could get damaged or caught in the
rotating fan blades.
• Do not install the fan on other
appliances, on uneven surfaces or
where it could be subject to heat
sources, direct sunlight, excessive
dust or mechanical vibrations.
• Do not cover the fan or place
anything on top of fan.
• Do not operate the fan until fully
assembled.
• WARNING! DO NOT use the fan in the
following areas:
- near an open flame, a hot burner,
oven or other source of high heat
- on a soft surface (such as carpet) or
where it may tip over during use
- outdoors or in areas of high
humidity without suitable
ventilation (such as in a bathroom,
laundry area or near a pool)
- near curtains or other flammable or
combustible materials
- in areas where paint, petrol, etc.
is stored and there is a risk of
explosion or fire from flammable
gases, or in areas where substances
are being sprayed.
Usage conditions and restrictions
• This appliance is intended for indoor
household use only. It is not suitable
for commercial or industrial use.
• Do not use the fan for anything other
than its intended purpose, and only
use it as described in this manual.
Any other use may cause fire, electric
shock or injury.
• Do not use the fan outdoors unless
the fan and the supply cord plug
are positioned under cover (such as
on a covered patio) and away from
weather.
• Do not use this fan to dry clothes.
• This fan is not intended for use by
persons (including children) with
reduced physical, sensory or mental
capabilities, or lack of experience
and knowledge, unless they have
been given supervision or instruction
concerning use of the appliance by a
person responsible for their safety.
• This fan is not a toy. Supervise
children to ensure they do not play
with it. Close supervision is necessary
when any appliance is used by or near
children.
• Do not move the fan while it is in use.
Do not shake it.

5
AFTER SALES SUPPORT
• Do not allow curtains, drapes or
any other items to drape across the
appliance or openings.
• CAUTION! Avoid contact with moving
parts. Never insert fingers, pencils or
any other objects through the grilles/
housing when the fan is running.
Keep hair and loose clothing well
away from the fan when it is in use.
• Ensure nothing is blocking the air out-
let and intake. Do not insert objects
into any opening as this may cause
electric shock and/or a fire hazard.
• The use of accessory attachments
not recommended in this manual
may cause injury or hazards.
• Always wait until the fan has stopped
completely and unplug it from the
power supply before cleaning the
fan. 、Wipe the fan with a damp cloth
and allow to dry thoroughly. 、Do not
clean it with abrasive chemicals or
materials such as scourers, as they
may damage the fan. 、Do not spray it
with insecticide or chemical solvents.
• Do not disassemble the appliance.
There are no user-serviceable parts
inside.
• WARNING! If a strong odour is emit-
ted from the fan, turn it off and un-
plug it from the mains power supply.
• We accept no liability for any
damages or personal injury caused by
misuse of the product and/or failure
to follow these instructions.
Important Safety Instructions (Cont.)
6AFTER SALES SUPPORT
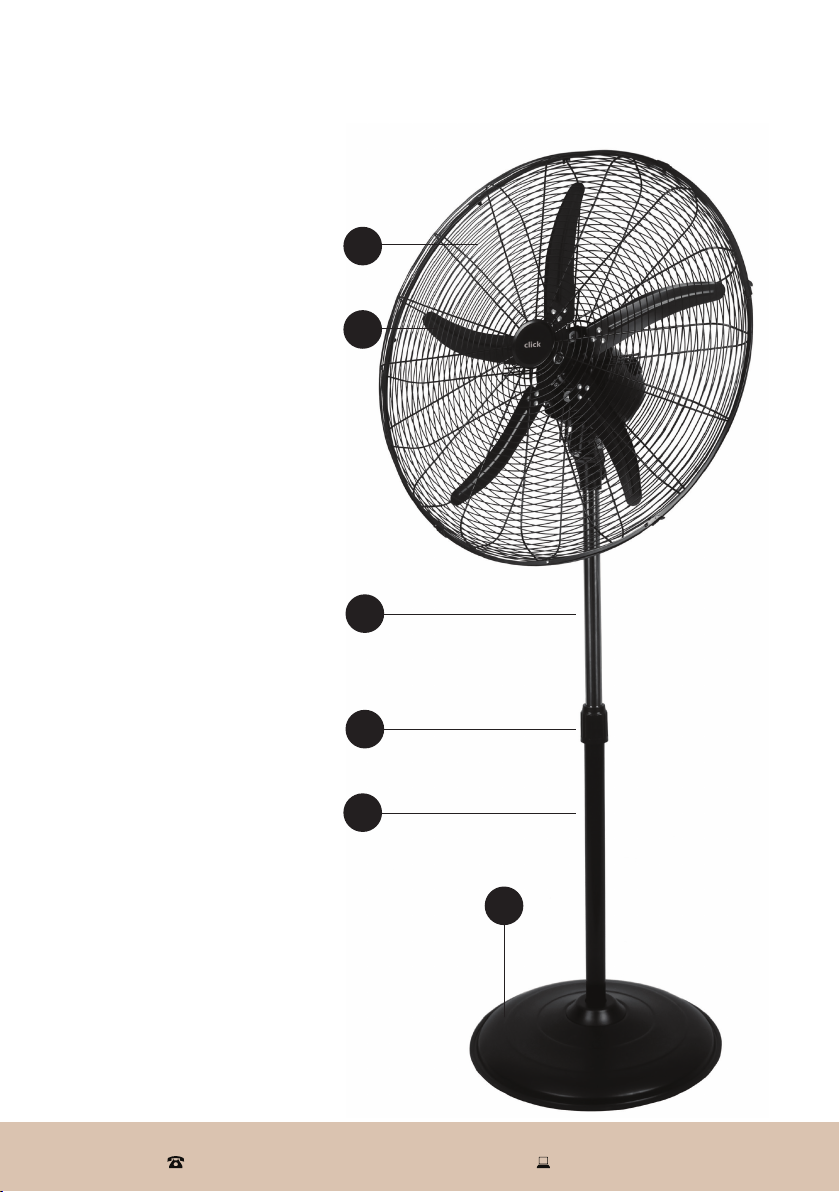
Product Overview
Scope of delivery
1 Front and rear guards
(grilles)
2 Fan blade
3 Extension tube
4 Height adjustment
(clamping) ring
5 Stand post
6 Stand base
Also supplied, but not
shown:
Assembly hardware (as per
parts list, page 8)
Instruction manual
Warranty certificate
NOTE: Due to continued product
improvement, images and illustrations in this
manual may vary slightly from the product
purchased. All images in this manual are
for reference purposes only. Parts are not
necessarily pictured to scale.
1
2
3
4
5
6
7
AFTER SALES SUPPORT
Unpacking
• This product has been packaged
to protect it against transportation
damage. Unpack the appliance and
keep the original packaging carton
and materials in a safe place. It will
help prevent any damage if the
product needs to be transported in
the future, and you can use it to store
the appliance when it is not in use.
• Do not discard the packaging
material straight away. Make sure
you have unpacked the necessary
assembly hardware for the fan head
and base assembly. Please refer to
page 8 for a complete parts list.
• Plastic wrapping can be a suffocation
hazard for babies and young children,
so ensure all packaging materials are
out of their reach and disposed of
safely. In the event that the carton is
to be disposed of, please recycle it
where possible.
Getting Started
• Unwind the cord to its full length.
Inspect the power supply cord
and plug, and all other parts of the
appliance, for visual damage. Do not
use the appliance if anything appears
to be damaged or not working
properly. In case of damage, contact
our after sales support centre using
the details at the bottom of the page.
• Make sure you have read and under-
stood all instructions and warnings in
this manual.
• Please refer to the product overview
(page 5) and parts list (page 8) to
familiarise yourself with the product
and identify all parts. Pay particular
attention to the safety instructions on
the previous pages.
• Your new fan has been shipped
partially assembled to reduce
wastage of packaging material,
paper cartons and weight. The
illustration on page 8 shows how all
parts fit together. Detailed assembly
instructions are provided on the
following pages.
WARNING: Electric shock hazard!
Do not plug the power cord into an electrical outlet until the fan is fully assembled.
8AFTER SALES SUPPORT
Getting Started (Cont.)
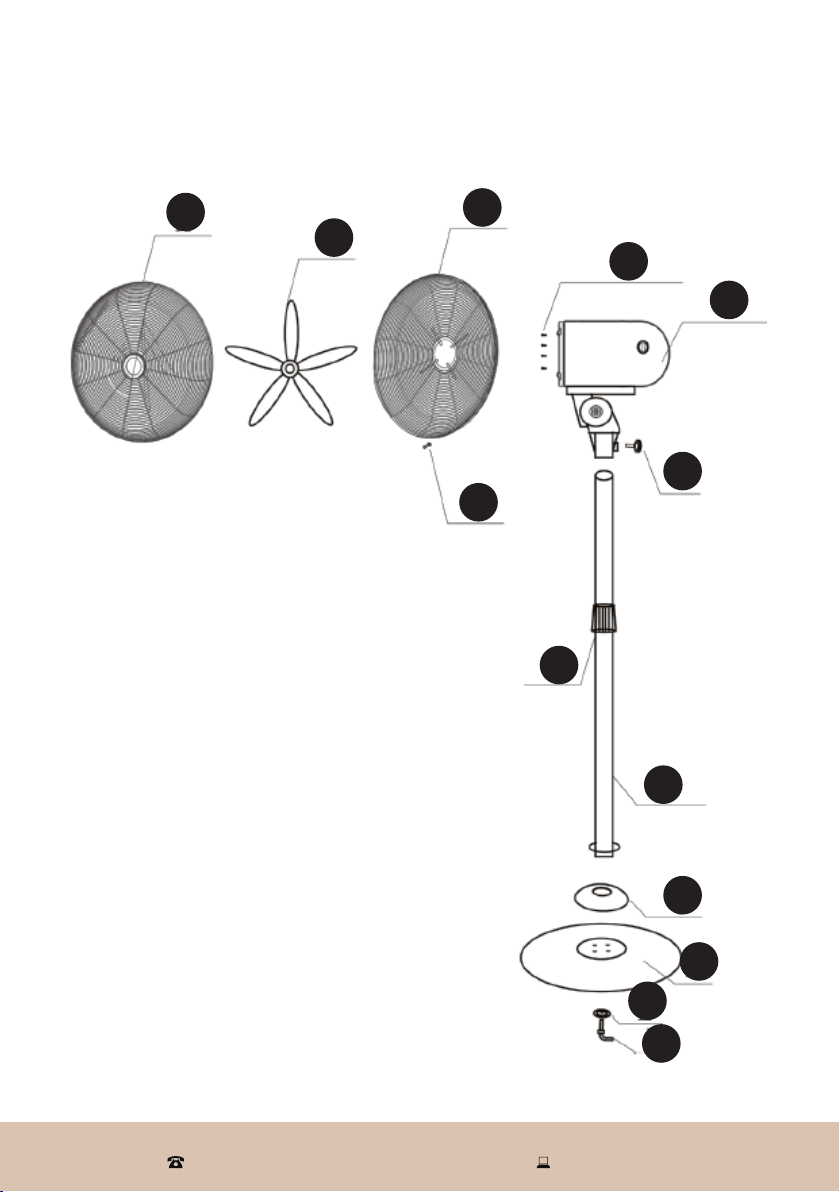
Parts list
A Front grille
B Fan blade
C Grille nut and bolt
D Rear grille
E Rear grille screws and washers
F Motor head assembly
G Locking thumb screw
H Clamping ring
I Stand post
J Cover
K Base
L Washer
M Locking lever
A
B
C
D
E
F
G
H
I
J
K
L
M
9
AFTER SALES SUPPORT
Getting Started (Cont.)
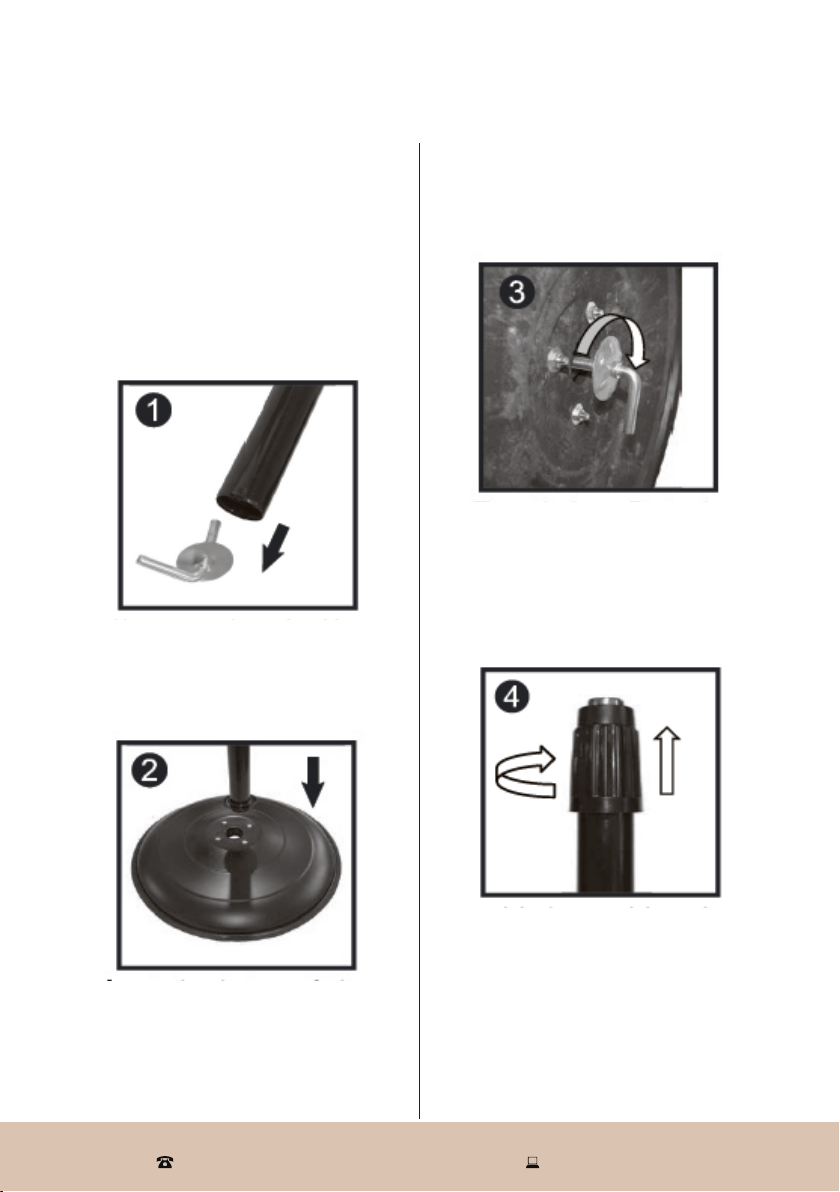
Assembling the base and stand
post
Each part of your new fan is designed to
fit together and be disassembled easily
for cleaning or storage
1 First, unscrew the locking lever and
washer from the bottom of the
stand post.
2 Insert the bottom of the stand post
through the hole in the top of the
base.
3 Tip up so that the underside of
the base is accessible. Then fasten
in place and tighten by using the
locking lever and washer.
4 Stand the base upright on the floor.
Fully unscrew (anticlockwise) the
clamping ring at the top and remove
it.

10 AFTER SALES SUPPORT
Getting Started (Cont.)
5 Place the cover over the top of the
post and drop it down.
6 Drop the cover all the way down so
that it sits on top of the base and
covers the base screws.
7 Pull out the chrome extension
tube as far as it will go, then refit
the clamping ring and tighten
(clockwise).
8 Take the motor assembly. Loosen
the thumb screw on the back. Align
the head assembly motor mount
over the top of the chrome tube,
lower it down and then tighten the
locking thumb screw.
11
AFTER SALES SUPPORT
Getting Started (Cont.)
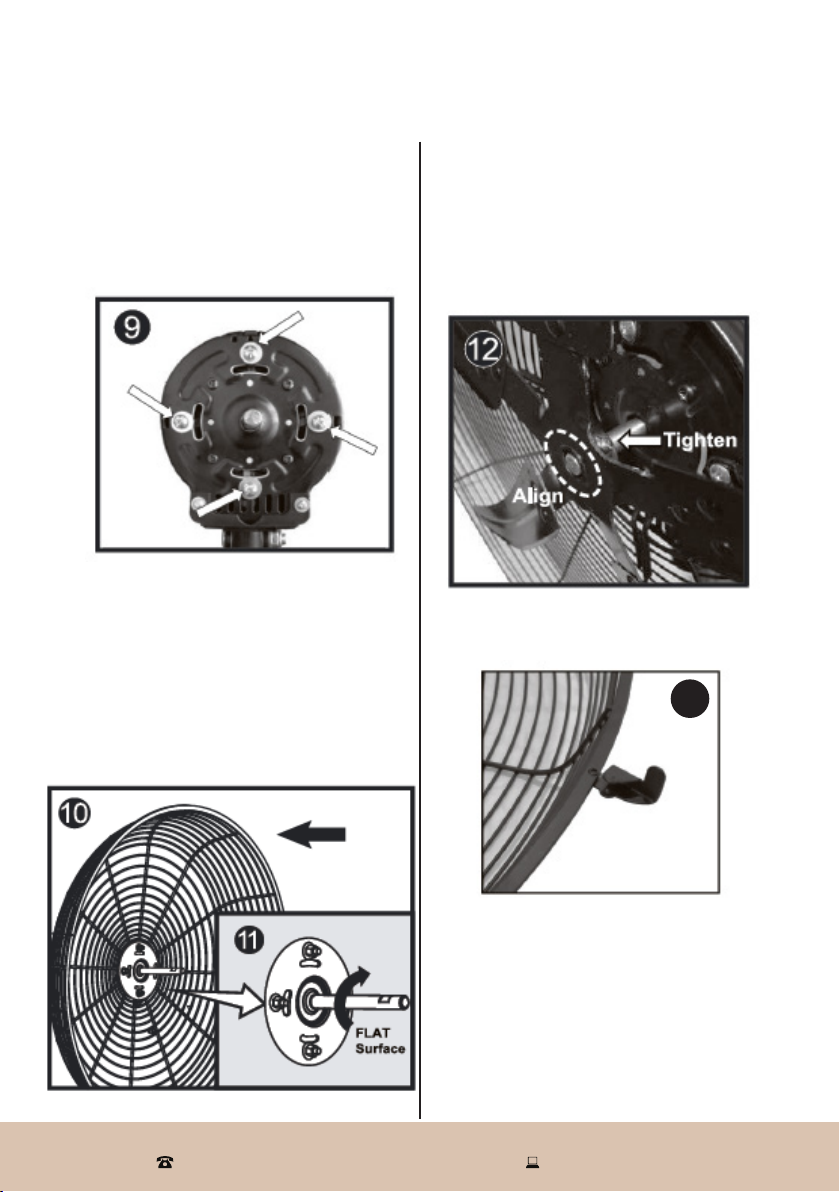
Assembling the grilles and blade
9 Remove the four screws and
washers as identified.
IMPORTANT: Do not remove any
other screw! Only use a hand
screwdriver.
10 Fit the back safety grille into position
and refit the four screws and
washers, and tighten.
NOTE: Ensure the small hole located
in the edge of the grille is at the
bottom.
11 Rotate the motor spindle until the
flat surface is facing up.
12 Slide and push the fan blade onto
the spindle. Push it until the end of
the fan blade hole is aligned with the
end of the spindle.
Then fix and tighten the screw.
NOTE: Ensure the screw is lined up
with the flat surface.
13 Open all the side locking clips of the
front grille.
13

12 AFTER SALES SUPPORT
Getting Started (Cont.)
17
14
14 Remove the small nut and bolt from
the bottom of the grille. Keep it in a
safe place.
15 Place the front safety grille into
position by lining up the location
fork over the top of the rear grille, as
shown, and push down.
16 Align the two small holes in the rim
of the front and rear grilles (at the
bottom) and fasten the two grilles
together using the small nut and
bolt.
15
16
17 Secure the grilles by closing all the
clips over the outer rim.
13
AFTER SALES SUPPORT
Instructions
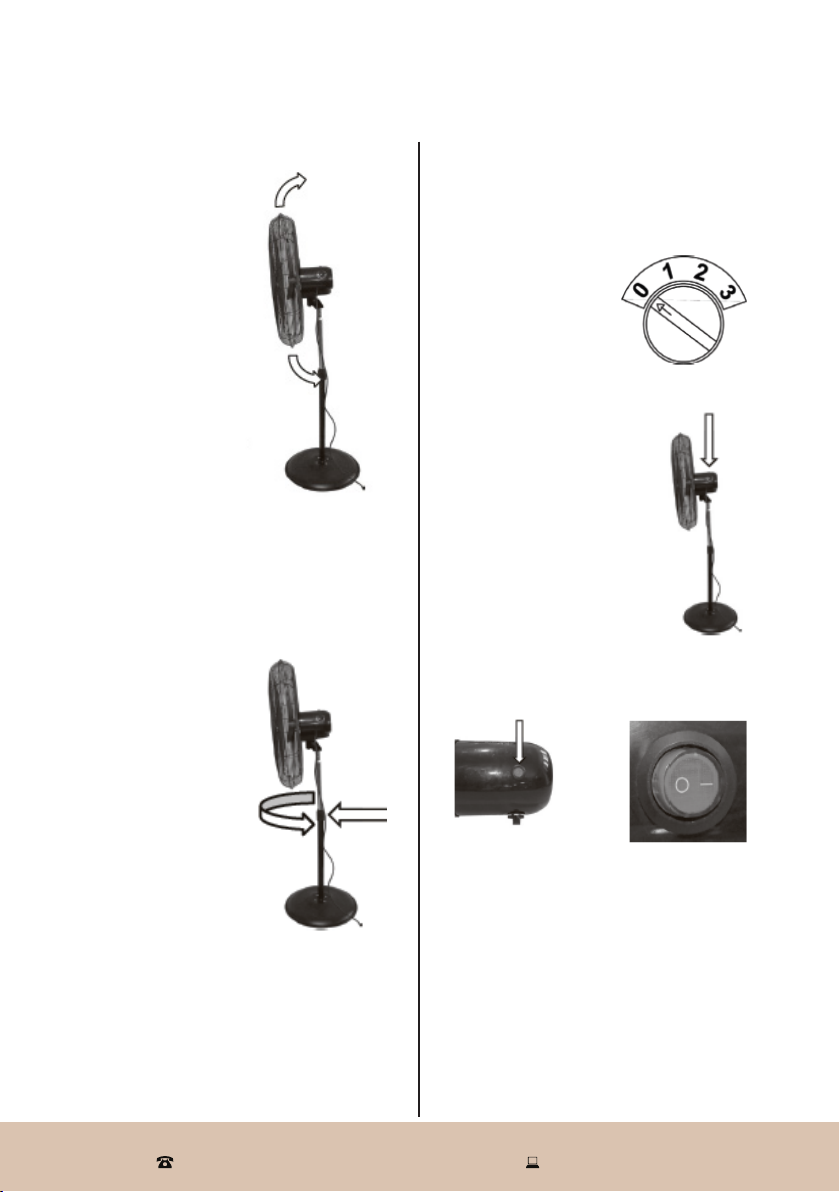
Tilting the fan head
The fan head can
be adjusted up and
down as required.
Before adjusting the
tilt angle, always
ensure the fan is
switched off and
unplugged.
To adjust the tilt
angle, grasp the fan
grilles and tilt the
head either upward
or downward as
required.
Height adjustment
CAUTION: The fan head is very
heavy. Ensure the weight of the head
assembly is being held securely while
the clamping ring is loosened as it may
drop!
To adjust the fan
height, unscrew to
loosen the clamping
ring (anticlockwise),
slide the extension
tube up or down to
your desired height
and then retighten
the clamping ring
(clockwise) to lock in
place.
Fan on / off / speed control
Rotate the speed control knob on
the motor housing to the appropriate
position to start the fan.
Speeds:
[ 1 ] = low
[ 2 ] = medium
[ 3 ] = high
[ 0 ] = OFF
Oscillation
The oscillation button
is located on top of the
motor housing.
To start the fan
oscillating from side to
side, first ensure the fan
speed is set to either
position [ 1 ], [ 2 ] or [ 3 ]
then press the oscillation
button to the ON [ I ]
position. The fan head
will start to swing from side to side while
blowing air.
To stop oscillation, press the oscillation
button to the [ O ] position.
NOTE: The fan must be running for
the oscillating function to work. If
the oscillation button is in the ON [ I ]
position when the fan speed control is
set to the OFF [ 0 ] position, the fan will
also stop oscillation.

14 AFTER SALES SUPPORT
Other Useful Information
Cleaning and maintenance
Clean your fan periodically by lightly
running the soft brush nozzle of a
vacuum cleaner over the front and
rear grilles to remove any dust or dirt.
Alternatively, use a soft, dry, lint-free
cloth for dusting.
Use a slightly damp, soapy cloth to
remove stubborn stains, but be sure the
cloth is not too wet and use caution
around the air openings on the motor
housing.
After cleaning, dry the unit thoroughly
with a soft cloth. Ensure the fan is
completely dry before reuse.
WARNING: Do not allow the motor
or other electrical components to be
exposed to water.
Blade cleaning
If the fan blade requires cleaning, make
sure the fan is disconnected from the
power supply.
Remove the front grille following the
assembly instructions in reverse order.
Either wipe the blade with a damp cloth
or use a vacuum cleaner attachment.
All parts must be completely dry before
reassembly. Ensure the front grille and
locking nut and bolt are refitted properly
before reuse.
WARNING!
• Always wait until the fan has stopped completely, then switch off the fan and
unplug it from the wall outlet before cleaning, maintenance or moving the fan.
• Do not immerse the fan in water or other liquid. Do not spray it with liquids.
Do not allow water to drip on or into the fan motor housing.
• Never use petrol, solvents, harsh detergents, or abrasive or alkaline cleaners on
the fan.
Storage
In the off season, store the clean and
dry fan in a safe, dry location, protected
from dust and disconnected from the
power supply.
We recommend using the original carton
for storage of the disassembled product.
To disassemble, follow the assembly
instructions in reverse order.
Alternatively, place a large plastic bag
or piece of material over the top of the
cleaned appliance for dust protection
during storage.
Service/repair
The appliance requires no maintenance
and contains no user serviceable parts.
Do not attempt to take the fan apart,
repair or modify it. Do not open the
enclosure, or operate the fan if its power
cord or plug is damaged, or when it is
working abnormally.
In case of damage or malfunction, or
if the cord is damaged, have the unit
repaired by qualified personnel only, or
contact our after sales support centre for
advice on repair or replacement.

15
AFTER SALES SUPPORT
Other Useful Information (Cont.)
CLASS II - DOUBLE INSULATED APPLIANCE
This symbol indicates that the appliance has been designed in such a way
that it does not require a safety connection to electrical earth (ground).
Compliance
This appliance has been fully tested and meets all requirements as set out by
standards AS/NZS 60335.1 and AS/NZS 60335.2.80.
The RCM Mark (Regulatory Compliance Mark) indicates that the product
complies with the relevant guidelines of the ACMA as well as corresponding
government requirements for the safety of electrical devices.
Power 230–240V~ 50Hz 130W
Fan speeds 3
Dimensions (approx.) (H)1650 x (L)712 x (W)490
Weight (approx.) 8.5kg
Technical specifications
Responsible disposal
At the end of its working life, do not throw this product out with your household
rubbish. Electrical and electronic items contain materials and substances which,
if handled or disposed of incorrectly, could be hazardous to the environment and
human health. An environmentally friendly method of disposal will ensure that
valuable raw materials can be recycled. Contact your local authority for your nearest
recycling centre.

AFTER SALES SUPPORT
Distributed by Tempo (Aust) Pty Ltd ABN 70 106 100 252
PO BOX 6056 Frenchs Forest, Australia NSW 2086
Customer Helpline:
(AU) 1300 886 649 (NZ) 0800 836 761
Email: [email protected]
For an electronic copy of this manual, please contact our after sales support centre.
IM Version No: V1.0 Issue: April 2020
Warranty returns
Should you for any reason need to return this product for
a warranty claim, make sure to include all accessories with
the product.
Product does not work?
If you encounter problems with this product, or if it fails to
perform to your expectations, make sure to contact our
After Sales Support Centre on (AU) 1300 886 649 or
(NZ) 0800 836 761 for advice.
Table of contents
Other Click Fan manuals


Popular Fan manuals by other brands

Mammoth
Mammoth INDUSTRIAL Series instruction manual

Craftmade
Craftmade BW116AG3-HW installation guide

BVN
BVN BPR 1012 User manual & certificate of warranty

Panasonic
Panasonic FV-10NLF1 installation instructions

Lomanco
Lomanco LomanCool 2000 installation instructions

KDK
KDK N48LG Operating and installation instructions


