Coffee Queen SL 2000 User manual

U/EN
12345678901234567890123456789012123456789012345678901234567890121234567890123456789012345678901212345678901234567890123456789012123456789012345678901
1
234567890123456789012345678901212345678901234567890123456789012123456789012345678901234567890121234567890123456789012345678901212345678901234567890
1
1
234567890123456789012345678901212345678901234567890123456789012123456789012345678901234567890121234567890123456789012345678901212345678901234567890
1
1
234567890123456789012345678901212345678901234567890123456789012123456789012345678901234567890121234567890123456789012345678901212345678901234567890
1
1
234567890123456789012345678901212345678901234567890123456789012123456789012345678901234567890121234567890123456789012345678901212345678901234567890
1
1
234567890123456789012345678901212345678901234567890123456789012123456789012345678901234567890121234567890123456789012345678901212345678901234567890
1
1
234567890123456789012345678901212345678901234567890123456789012123456789012345678901234567890121234567890123456789012345678901212345678901234567890
1
1
234567890123456789012345678901212345678901234567890123456789012123456789012345678901234567890121234567890123456789012345678901212345678901234567890
1
1
234567890123456789012345678901212345678901234567890123456789012123456789012345678901234567890121234567890123456789012345678901212345678901234567890
1
1
234567890123456789012345678901212345678901234567890123456789012123456789012345678901234567890121234567890123456789012345678901212345678901234567890
1
12345678901234567890123456789012123456789012345678901234567890121234567890123456789012345678901212345678901234567890123456789012123456789012345678901
User manual
Juice machine
SL 2000
Your retail dealer
...............................................................................
...............................................................................
Rev. 090914

2.
List of contents
List of contents page. 2
Dispenser description page. 3-7
Installation and users instruction page. 8-10
Maintenance page. 11-12
Trouble shooting page. 11-12
Handling & cleaning instructions page. 13.
Trouble shooting page. 14-15
Electrical connections page. 16
Technical data page. 17.
Notes page. 17.
Portion control page. 18.

12345678901234567890123456789012123456789012345678901234567890121234567890123456789012345678901212345678901234567890123456789012123456789012345678901
1
234567890123456789012345678901212345678901234567890123456789012123456789012345678901234567890121234567890123456789012345678901212345678901234567890
1
1
234567890123456789012345678901212345678901234567890123456789012123456789012345678901234567890121234567890123456789012345678901212345678901234567890
1
1
234567890123456789012345678901212345678901234567890123456789012123456789012345678901234567890121234567890123456789012345678901212345678901234567890
1
1
234567890123456789012345678901212345678901234567890123456789012123456789012345678901234567890121234567890123456789012345678901212345678901234567890
1
1
234567890123456789012345678901212345678901234567890123456789012123456789012345678901234567890121234567890123456789012345678901212345678901234567890
1
1
234567890123456789012345678901212345678901234567890123456789012123456789012345678901234567890121234567890123456789012345678901212345678901234567890
1
12345678901234567890123456789012123456789012345678901234567890121234567890123456789012345678901212345678901234567890123456789012123456789012345678901
3.
Generally!
Read the instructions carefully before you start working with
this equipment.
The equipment should be installed and serviced by trained staff
Dispenser
Dispenser description for Slim Line 2000
Slim Line 2000 is a dispenser for cooling water and mixing
juiceconcentrate to a ready drink product.
SL2000 has a chilled cabinet for the concentrate.
The dispenser is for two non-carbonated drinks and chilled water.
The dispenser is connected to the water mains by a pressurised tube
and to an electric wall socket by a power plug.
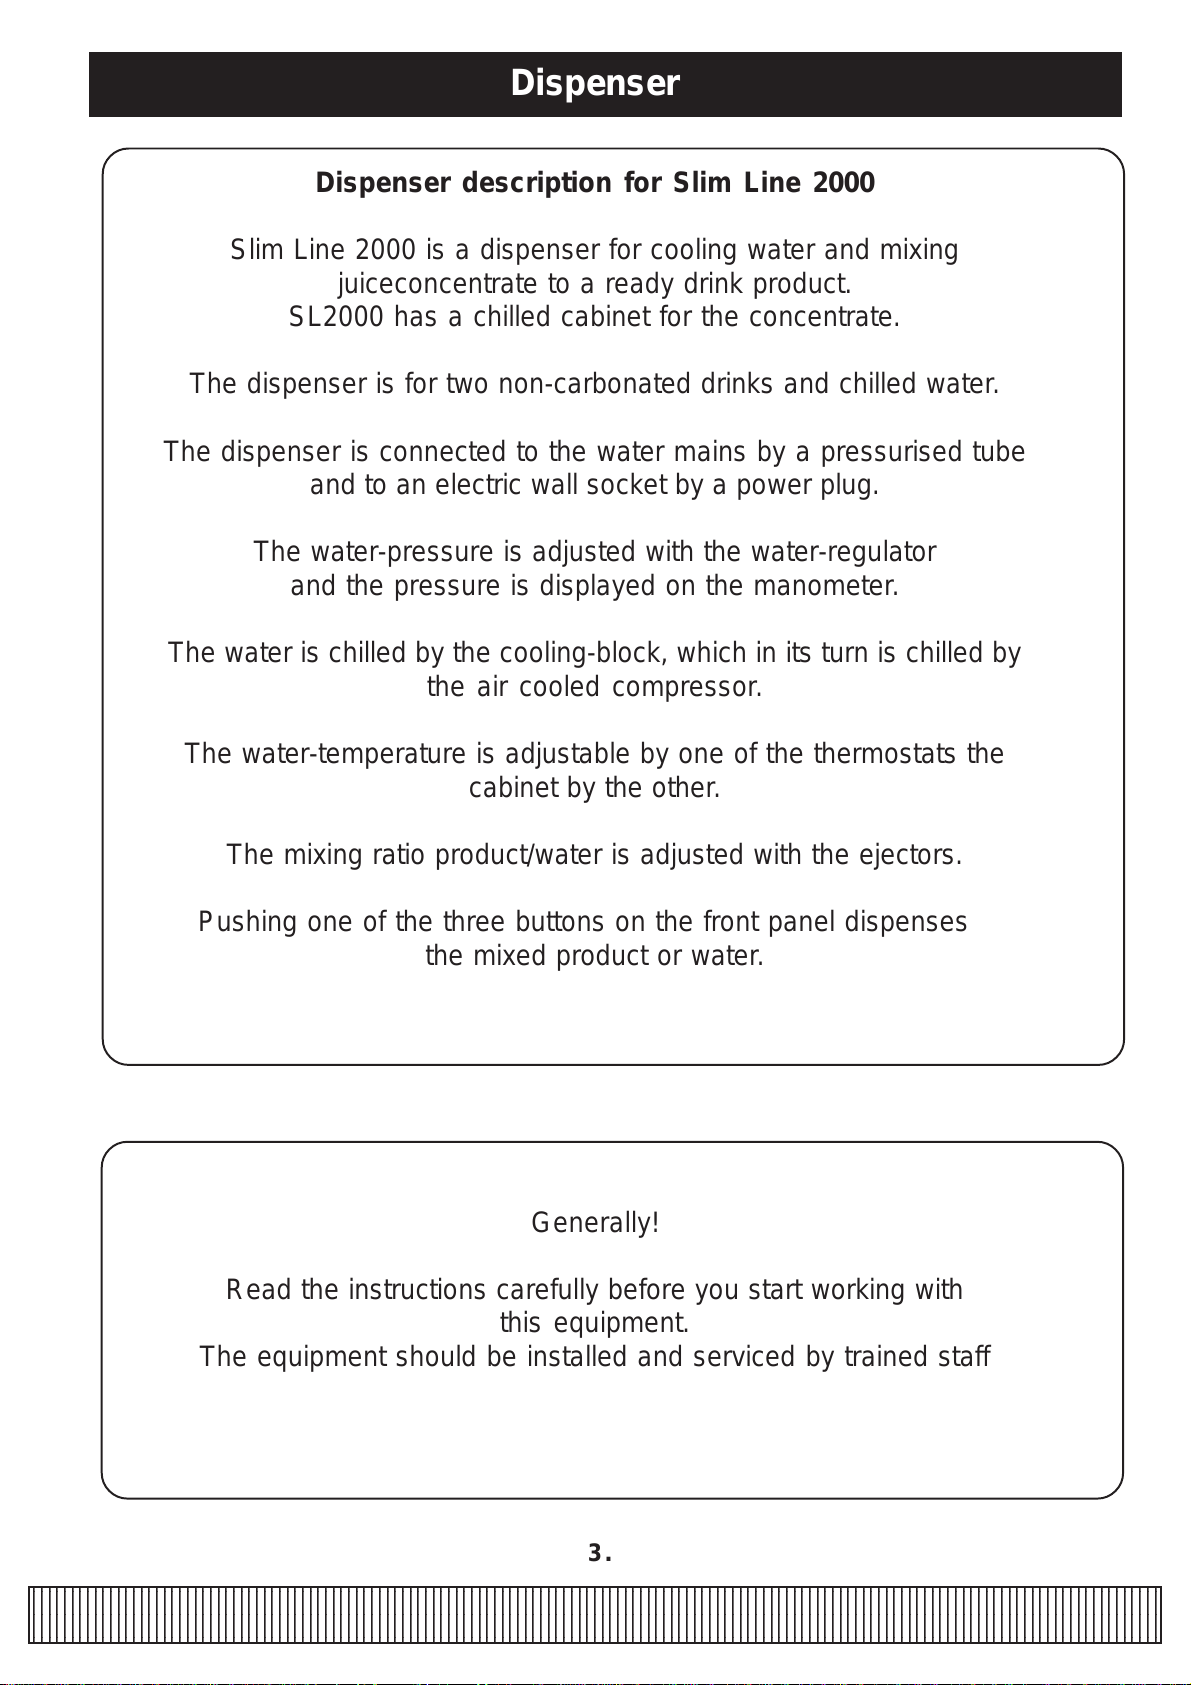
The water-pressure is adjusted with the water-regulator
and the pressure is displayed on the manometer.
The water is chilled by the cooling-block, which in its turn is chilled by
the air cooled compressor.
The water-temperature is adjustable by one of the thermostats the
cabinet by the other.
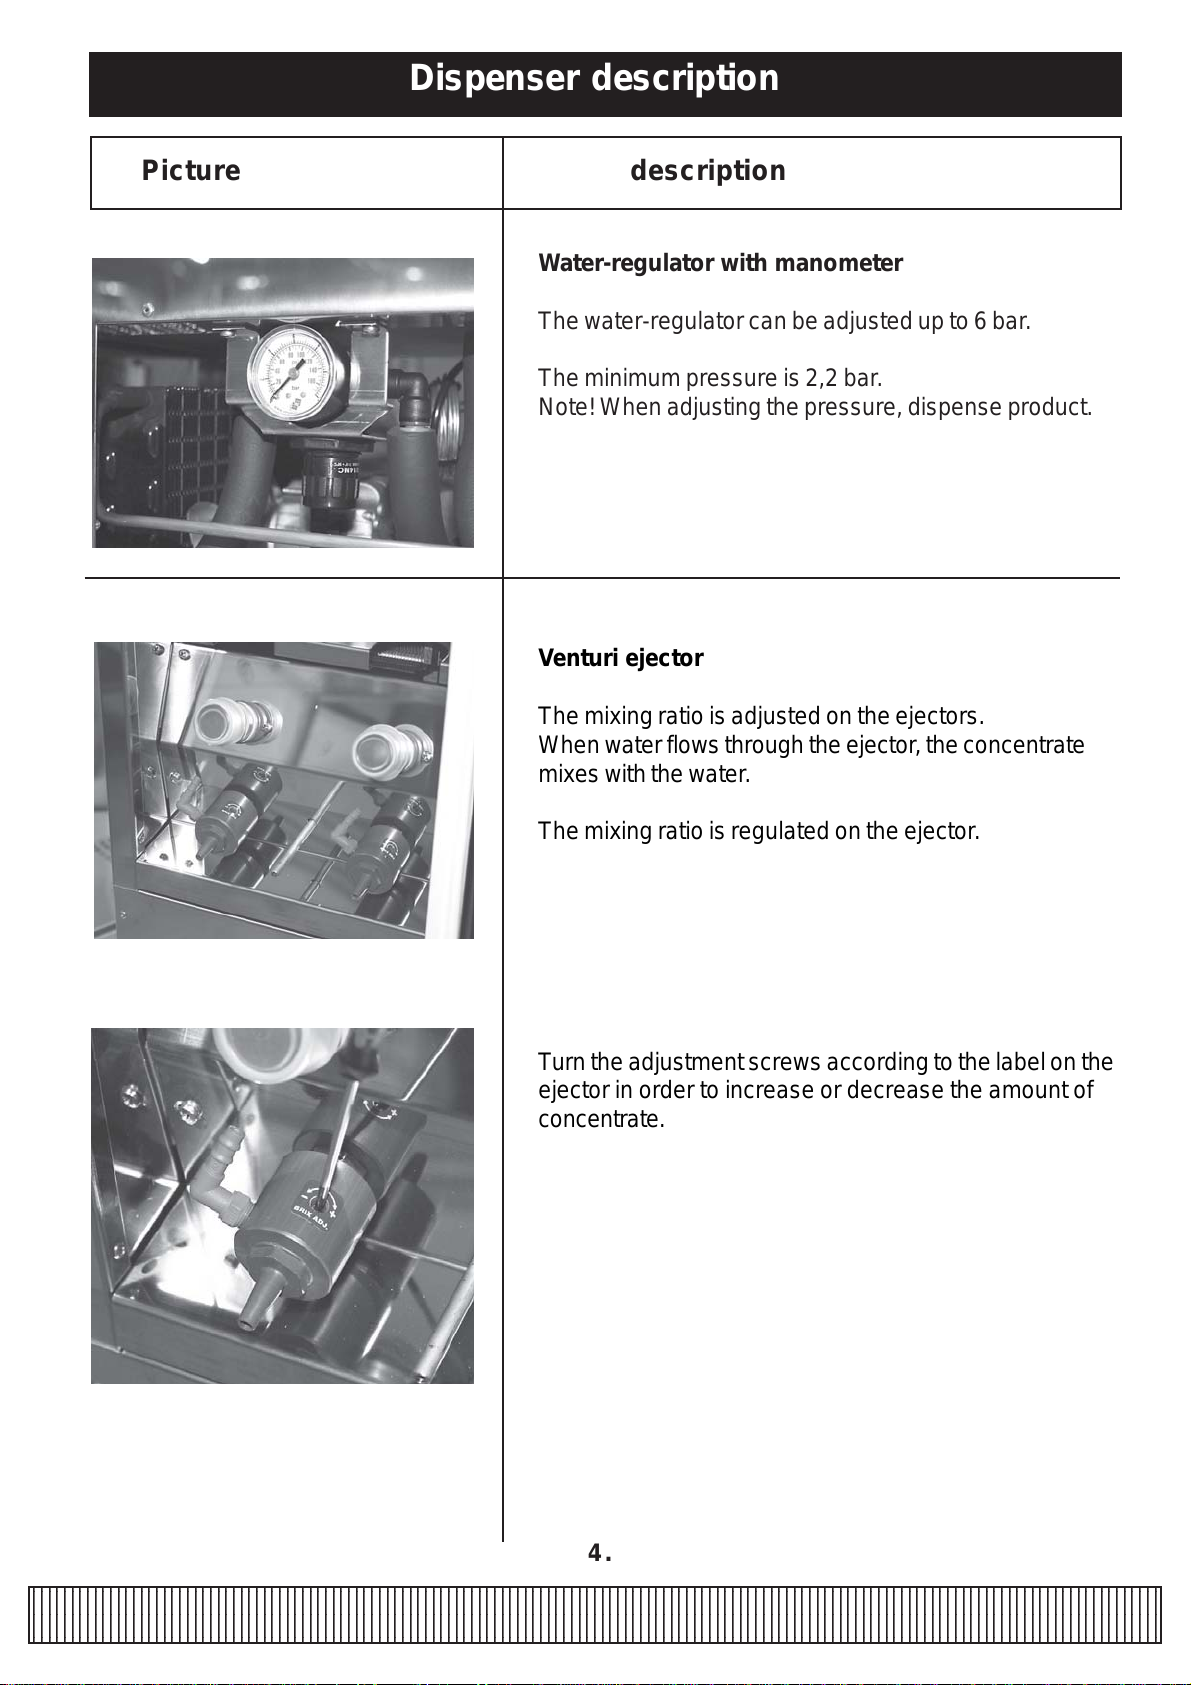
The mixing ratio product/water is adjusted with the ejectors.
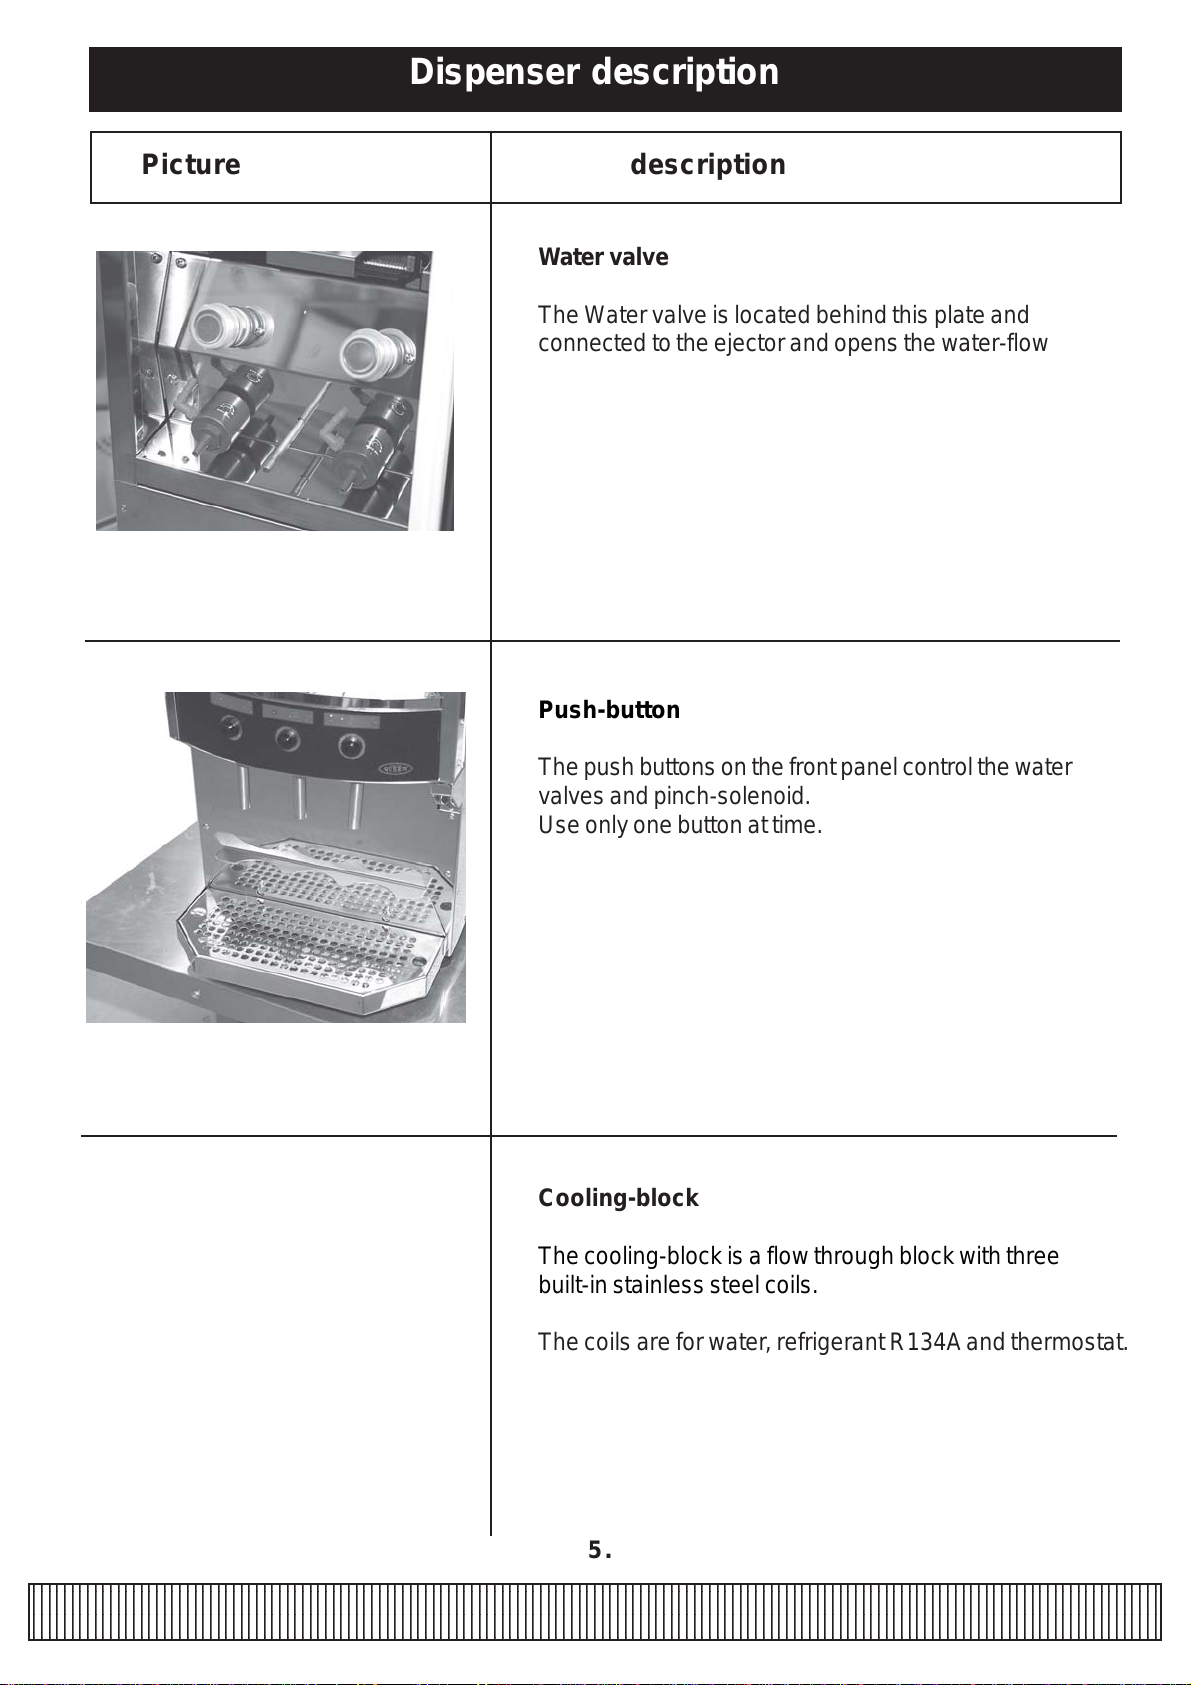
Pushing one of the three buttons on the front panel dispenses
the mixed product or water.

12345678901234567890123456789012123456789012345678901234567890121234567890123456789012345678901212345678901234567890123456789012123456789012345678901
1
234567890123456789012345678901212345678901234567890123456789012123456789012345678901234567890121234567890123456789012345678901212345678901234567890
1
1
234567890123456789012345678901212345678901234567890123456789012123456789012345678901234567890121234567890123456789012345678901212345678901234567890
1
1
234567890123456789012345678901212345678901234567890123456789012123456789012345678901234567890121234567890123456789012345678901212345678901234567890
1
1
234567890123456789012345678901212345678901234567890123456789012123456789012345678901234567890121234567890123456789012345678901212345678901234567890
1
1
234567890123456789012345678901212345678901234567890123456789012123456789012345678901234567890121234567890123456789012345678901212345678901234567890
1
1
234567890123456789012345678901212345678901234567890123456789012123456789012345678901234567890121234567890123456789012345678901212345678901234567890
1
12345678901234567890123456789012123456789012345678901234567890121234567890123456789012345678901212345678901234567890123456789012123456789012345678901
4.
Dispenser description
Picture description
Water-regulator with manometer
Thewater-regulatorcanbeadjustedupto6bar.
The minimum pressure is 2,2 bar.
Note!Whenadjustingthepressure,dispenseproduct.
Venturi ejector
Themixingratio is adjusted on the ejectors.
Whenwaterflowsthroughtheejector,theconcentrate
mixeswiththe water.
Themixingratioisregulatedontheejector.
Turnthe adjustment screwsaccordingtothelabelon the
ejector in order to increase or decrease the amount of
concentrate.

12345678901234567890123456789012123456789012345678901234567890121234567890123456789012345678901212345678901234567890123456789012123456789012345678901
1
234567890123456789012345678901212345678901234567890123456789012123456789012345678901234567890121234567890123456789012345678901212345678901234567890
1
1
234567890123456789012345678901212345678901234567890123456789012123456789012345678901234567890121234567890123456789012345678901212345678901234567890
1
1
234567890123456789012345678901212345678901234567890123456789012123456789012345678901234567890121234567890123456789012345678901212345678901234567890
1
1
234567890123456789012345678901212345678901234567890123456789012123456789012345678901234567890121234567890123456789012345678901212345678901234567890
1
1
234567890123456789012345678901212345678901234567890123456789012123456789012345678901234567890121234567890123456789012345678901212345678901234567890
1
1
234567890123456789012345678901212345678901234567890123456789012123456789012345678901234567890121234567890123456789012345678901212345678901234567890
1
1
234567890123456789012345678901212345678901234567890123456789012123456789012345678901234567890121234567890123456789012345678901212345678901234567890
1
12345678901234567890123456789012123456789012345678901234567890121234567890123456789012345678901212345678901234567890123456789012123456789012345678901
5.
Dispenser description
Picture description
Water valve
TheWatervalve is located behind this plate and
connected tothe ejector and opens the water-flow
Push-button
Thepush buttonsonthefront panel controlthewater
valvesand pinch-solenoid.
Useonlyone button at time.
Cooling-block
Thecooling-blockisaflow through block with three
built-instainlesssteelcoils.
Thecoilsareforwater, refrigerantR134Aandthermostat.

12345678901234567890123456789012123456789012345678901234567890121234567890123456789012345678901212345678901234567890123456789012123456789012345678901
1
234567890123456789012345678901212345678901234567890123456789012123456789012345678901234567890121234567890123456789012345678901212345678901234567890
1
1
234567890123456789012345678901212345678901234567890123456789012123456789012345678901234567890121234567890123456789012345678901212345678901234567890
1
1
234567890123456789012345678901212345678901234567890123456789012123456789012345678901234567890121234567890123456789012345678901212345678901234567890
1
1
234567890123456789012345678901212345678901234567890123456789012123456789012345678901234567890121234567890123456789012345678901212345678901234567890
1
1
234567890123456789012345678901212345678901234567890123456789012123456789012345678901234567890121234567890123456789012345678901212345678901234567890
1
1
234567890123456789012345678901212345678901234567890123456789012123456789012345678901234567890121234567890123456789012345678901212345678901234567890
1
1
234567890123456789012345678901212345678901234567890123456789012123456789012345678901234567890121234567890123456789012345678901212345678901234567890
1
12345678901234567890123456789012123456789012345678901234567890121234567890123456789012345678901212345678901234567890123456789012123456789012345678901
6.
Dispenser description
Picture description
Transformer
The transformer is a 230 / 24 V (55 VA).
Thetransformersupplies24V to the magnetic-valves.
Thermostat
Thetwothermostatskeep the temperature within correct
rangeforthe cold water and thecabinet.
Factoryadjusted do not adjust,this may cause damage
and water leakage in the dispenser.
Illumination
Behindthefront panel there is a low-energy 18W
fluorescentlamp.
ThefluorescentlampisaPL-lamp.

12345678901234567890123456789012123456789012345678901234567890121234567890123456789012345678901212345678901234567890123456789012123456789012345678901
1
234567890123456789012345678901212345678901234567890123456789012123456789012345678901234567890121234567890123456789012345678901212345678901234567890
1
1
234567890123456789012345678901212345678901234567890123456789012123456789012345678901234567890121234567890123456789012345678901212345678901234567890
1
1
234567890123456789012345678901212345678901234567890123456789012123456789012345678901234567890121234567890123456789012345678901212345678901234567890
1
1
234567890123456789012345678901212345678901234567890123456789012123456789012345678901234567890121234567890123456789012345678901212345678901234567890
1
1
234567890123456789012345678901212345678901234567890123456789012123456789012345678901234567890121234567890123456789012345678901212345678901234567890
1
1
234567890123456789012345678901212345678901234567890123456789012123456789012345678901234567890121234567890123456789012345678901212345678901234567890
1
1
234567890123456789012345678901212345678901234567890123456789012123456789012345678901234567890121234567890123456789012345678901212345678901234567890
1
12345678901234567890123456789012123456789012345678901234567890121234567890123456789012345678901212345678901234567890123456789012123456789012345678901
7.
Dispenser description
Picture description
Front panel
Thefront panel is dividedin three parts.
Two plastic sheets (made of acrylic and opaque) and in
betweenthese a branded film.
Allpartsare removable.
Drip-tray
The drip-tray is made of stainless steel with steel bars
andpositioncurvesfortheglass.
It is possible to connect drainage to the drip-tray.
Large particle filter
Thelarge particle filter islocated on the tubebetween the
coolingblockandthewater valves.
It is possible to open up the filter with a wrench so that it
can be rinsed.
Note: Turn of the water and electricity before any work is
doneto the machine.

12345678901234567890123456789012123456789012345678901234567890121234567890123456789012345678901212345678901234567890123456789012123456789012345678901
1
234567890123456789012345678901212345678901234567890123456789012123456789012345678901234567890121234567890123456789012345678901212345678901234567890
1
1
234567890123456789012345678901212345678901234567890123456789012123456789012345678901234567890121234567890123456789012345678901212345678901234567890
1
1
234567890123456789012345678901212345678901234567890123456789012123456789012345678901234567890121234567890123456789012345678901212345678901234567890
1
1
234567890123456789012345678901212345678901234567890123456789012123456789012345678901234567890121234567890123456789012345678901212345678901234567890
1
1
234567890123456789012345678901212345678901234567890123456789012123456789012345678901234567890121234567890123456789012345678901212345678901234567890
1
1
234567890123456789012345678901212345678901234567890123456789012123456789012345678901234567890121234567890123456789012345678901212345678901234567890
1
12345678901234567890123456789012123456789012345678901234567890121234567890123456789012345678901212345678901234567890123456789012123456789012345678901
8.
Installation and users instruction
Picture description
Unpack dispenser from the packaging and ensure
that nothing is damaged.
Place the dispenser to it´s position. Note:
The dispenser weights about 51 kg.
Don’t lift by door/front panel.
Allow a space of min. 40mm around the
frame for air circulation.
Makesurethatthedispenser level.
Adjustment can be made with the adjustable feet .

12345678901234567890123456789012123456789012345678901234567890121234567890123456789012345678901212345678901234567890123456789012123456789012345678901
1
234567890123456789012345678901212345678901234567890123456789012123456789012345678901234567890121234567890123456789012345678901212345678901234567890
1
1
234567890123456789012345678901212345678901234567890123456789012123456789012345678901234567890121234567890123456789012345678901212345678901234567890
1
1
234567890123456789012345678901212345678901234567890123456789012123456789012345678901234567890121234567890123456789012345678901212345678901234567890
1
1
234567890123456789012345678901212345678901234567890123456789012123456789012345678901234567890121234567890123456789012345678901212345678901234567890
1
1
234567890123456789012345678901212345678901234567890123456789012123456789012345678901234567890121234567890123456789012345678901212345678901234567890
1
1
234567890123456789012345678901212345678901234567890123456789012123456789012345678901234567890121234567890123456789012345678901212345678901234567890
1
1
234567890123456789012345678901212345678901234567890123456789012123456789012345678901234567890121234567890123456789012345678901212345678901234567890
1
12345678901234567890123456789012123456789012345678901234567890121234567890123456789012345678901212345678901234567890123456789012123456789012345678901
9.
Installation and users instruction
Picture description
Connectthewater-hosefromthedispenserto the
cold water mains (do not forget seals).
Turnon the water andcheckforleaks.
Note!
Itis strongly recommended to usesomeform of water
isolator in the water line in case of an emergency leakage.
Connectthepower-plug to the wall socket.
Thecompressorwill now start, and thefrontpanel
willlight up.
Thewaterpressureisfactoryadjustedto
2.2bar,whichis the correct working pressure.
Checkbypressingandholdingoneproductbuttonand
readthemanometer. If there is a variation, adjust by
pullingdownknoband turn it until you get a reading
of 2.2 bar.

12345678901234567890123456789012123456789012345678901234567890121234567890123456789012345678901212345678901234567890123456789012123456789012345678901
1
234567890123456789012345678901212345678901234567890123456789012123456789012345678901234567890121234567890123456789012345678901212345678901234567890
1
1
234567890123456789012345678901212345678901234567890123456789012123456789012345678901234567890121234567890123456789012345678901212345678901234567890
1
1
234567890123456789012345678901212345678901234567890123456789012123456789012345678901234567890121234567890123456789012345678901212345678901234567890
1
1
234567890123456789012345678901212345678901234567890123456789012123456789012345678901234567890121234567890123456789012345678901212345678901234567890
1
1
234567890123456789012345678901212345678901234567890123456789012123456789012345678901234567890121234567890123456789012345678901212345678901234567890
1
1
234567890123456789012345678901212345678901234567890123456789012123456789012345678901234567890121234567890123456789012345678901212345678901234567890
1
1
234567890123456789012345678901212345678901234567890123456789012123456789012345678901234567890121234567890123456789012345678901212345678901234567890
1
12345678901234567890123456789012123456789012345678901234567890121234567890123456789012345678901212345678901234567890123456789012123456789012345678901
10.
Installation and users instruction
Picture description
Place the bag-in-box in the dispenser and connect it to the
pinchsolenoid-valveand ejector.
Pushingthecentreofthepinchsolenoid valve and sliding
thetubeinfromtheside,fixesthetube.
Cutthetubetocorrectlengthand push it onto the elbow
connectoron the ejector.
Place a cup under the outlet pipe.
Dispense a glass of product by pressing
thepush-button.
Checkthatthebrix-value(mixing ratio) is
okay,if not adjust.
Toadjustthe brix, usetheadjustmentscrewonthe ejector.
The dispenser is now ready to use.

12345678901234567890123456789012123456789012345678901234567890121234567890123456789012345678901212345678901234567890123456789012123456789012345678901
1
234567890123456789012345678901212345678901234567890123456789012123456789012345678901234567890121234567890123456789012345678901212345678901234567890
1
1
234567890123456789012345678901212345678901234567890123456789012123456789012345678901234567890121234567890123456789012345678901212345678901234567890
1
1
234567890123456789012345678901212345678901234567890123456789012123456789012345678901234567890121234567890123456789012345678901212345678901234567890
1
1
234567890123456789012345678901212345678901234567890123456789012123456789012345678901234567890121234567890123456789012345678901212345678901234567890
1
1
234567890123456789012345678901212345678901234567890123456789012123456789012345678901234567890121234567890123456789012345678901212345678901234567890
1
1
234567890123456789012345678901212345678901234567890123456789012123456789012345678901234567890121234567890123456789012345678901212345678901234567890
1
12345678901234567890123456789012123456789012345678901234567890121234567890123456789012345678901212345678901234567890123456789012123456789012345678901
11.
Maintenance
Change of bag-in-box
1. Turn the box so the perforated side is turned upwards.
2. Brake the perforation on the box and place the main pipe
inthe punchedhole
3. Place the box in the dispenser so that the tube points
down to wards the pinch-solenoid. Press the end of the
pinch-solenoidandinsertthetube from the side
4. Checkthe tube length so that it will reach 1cm into the
venturenipple.
5. Ifthetubeistolong,cutittothe right length.
6. Slipthetubetotheventurenipple.
7. Makesure that the tube is nottwisted,and shut the door to
thedispenser.
8. Placea cup under the outlet-pipesanddrawuntilthejuice
comesout.
Daily cleaning
1. Cleaninternal andexternalsurfacewithadampedrag.
2. Usethecleaning-brushtocleantheoutlet-pipes
3. Wetthe brush in water andputitin the outlet pipe from the
inside of the door.
4. Cleanthedrip-tray.
5. The drip-tray is made-of stainless steel and can be
washed in a dishwasher.

12345678901234567890123456789012123456789012345678901234567890121234567890123456789012345678901212345678901234567890123456789012123456789012345678901
1
234567890123456789012345678901212345678901234567890123456789012123456789012345678901234567890121234567890123456789012345678901212345678901234567890
1
1
234567890123456789012345678901212345678901234567890123456789012123456789012345678901234567890121234567890123456789012345678901212345678901234567890
1
1
234567890123456789012345678901212345678901234567890123456789012123456789012345678901234567890121234567890123456789012345678901212345678901234567890
1
1
234567890123456789012345678901212345678901234567890123456789012123456789012345678901234567890121234567890123456789012345678901212345678901234567890
1
1
234567890123456789012345678901212345678901234567890123456789012123456789012345678901234567890121234567890123456789012345678901212345678901234567890
1
1
234567890123456789012345678901212345678901234567890123456789012123456789012345678901234567890121234567890123456789012345678901212345678901234567890
1
12345678901234567890123456789012123456789012345678901234567890121234567890123456789012345678901212345678901234567890123456789012123456789012345678901
12.
Maintenance
Periodic cleaning
1. Disconnect the bag-in-box tube from the
venture.
2. Fill the cleaning bottle with warm water and
some washing-up liquid and connect it to
the venture.
3. Shutthe dispenser door and put a cupunderthe
outlet-pipesrinse the ventureandtheoutlet-
pipesbypressingtherespectivepushbuttons.
4. Usethe cleaning-brushtocleantheoutletpipes
5. Wet the brush in water and put it in the
outlet pipe from the inside of the door.
Return the boxes and connect the tubes to
the ventures.

12345678901234567890123456789012123456789012345678901234567890121234567890123456789012345678901212345678901234567890123456789012123456789012345678901
1
234567890123456789012345678901212345678901234567890123456789012123456789012345678901234567890121234567890123456789012345678901212345678901234567890
1
1
234567890123456789012345678901212345678901234567890123456789012123456789012345678901234567890121234567890123456789012345678901212345678901234567890
1
1
234567890123456789012345678901212345678901234567890123456789012123456789012345678901234567890121234567890123456789012345678901212345678901234567890
1
1
234567890123456789012345678901212345678901234567890123456789012123456789012345678901234567890121234567890123456789012345678901212345678901234567890
1
1
234567890123456789012345678901212345678901234567890123456789012123456789012345678901234567890121234567890123456789012345678901212345678901234567890
1
1
234567890123456789012345678901212345678901234567890123456789012123456789012345678901234567890121234567890123456789012345678901212345678901234567890
1
1
234567890123456789012345678901212345678901234567890123456789012123456789012345678901234567890121234567890123456789012345678901212345678901234567890
1
12345678901234567890123456789012123456789012345678901234567890121234567890123456789012345678901212345678901234567890123456789012123456789012345678901
13.
Handling and cleaning instructions
1. Open the Bag-in-Box at the perforation. Pull out the
silicon tube and the plastic connector, so it is clear of the
box.
2. Place the box inside the dispenser. Press in the pinch
solenoid and slide the tube in to the opening. (Fig 2)
3. Push the tube onto the ejector nozzle. (Fig3)
4. The dispenser is now ready to use.
1. When changing the Bag-in-Box, the dispenser should
be cleaned with hot water.
2. Fill the rinsing bottle with a solution of hot water and a
sanitising agent. Add two drops of washing-up liquid.
Connect the tube to the nozzle and wash it through.
(Fig 4)
3. Wet the brush in a hot water and sterilising solution.
Clean the outlet pipes by pushing the brush all the way
through the pipe and back again. (Fig 5)
4. Rinse the pipes with the water solution from the bottle.
5. Thepinchsolenoidthatthe tube runsthroughshouldbe
cleaned on a regular basis, by pouring a hot water and
sterilisingsolutionoverit.Thiswilldissolveanyresidual
concentrate.
6. Theair inlet (condenser) at the backofthe machine should be
cleaned from dust on a regular basis by brushing or
vacuumingthe grid.
Fig. 1.
Fig. 2.
Fig. 3. Fig. 4. Fig. 5.

12345678901234567890123456789012123456789012345678901234567890121234567890123456789012345678901212345678901234567890123456789012123456789012345678901
1
234567890123456789012345678901212345678901234567890123456789012123456789012345678901234567890121234567890123456789012345678901212345678901234567890
1
1
234567890123456789012345678901212345678901234567890123456789012123456789012345678901234567890121234567890123456789012345678901212345678901234567890
1
1
234567890123456789012345678901212345678901234567890123456789012123456789012345678901234567890121234567890123456789012345678901212345678901234567890
1
1
234567890123456789012345678901212345678901234567890123456789012123456789012345678901234567890121234567890123456789012345678901212345678901234567890
1
1
234567890123456789012345678901212345678901234567890123456789012123456789012345678901234567890121234567890123456789012345678901212345678901234567890
1
1
234567890123456789012345678901212345678901234567890123456789012123456789012345678901234567890121234567890123456789012345678901212345678901234567890
1
12345678901234567890123456789012123456789012345678901234567890121234567890123456789012345678901212345678901234567890123456789012123456789012345678901
14.
Trouble shooting
Problem Probable cause Attend to
Concentrate is
Dripping from outlet
pipe.
The tube is not
properly fixed into the
pinch solenoid valve
Fix the tube properly into
the pinch solenoid valve
Mostly water or only
water coming from
outlet pipe
The tube is kinked due
to incorrect length Cut the tube to correct
length
The pinch solenoid needs
cleaning.
The tube is twisted. Untwist the tube.
Clean pinch solenoid
with hot water.
The bag is empty. Replace bag.
Nothing happens
when I push the
buttons, and there is
no ”clicking” sound.
No power to the valves Check the valve on/off sw.
inside the door.
Thermo fuse in the
transformer has cut.
(On older models, a fuse
has blown).
Remove power to the
dispenser and put it back
on after 10 sec.
(Change fuse).
Nothing happens
when you push the
buttons, and there is a
”clicking” sound.
Water supply turned off Check water supply
Water regulator turned off
or failed.
(Manometer =0 bar).
Check water regulator
(change needle valve in
water regulator).
The cooling coil has
frozen.
(Manometer = max
pressure)
Shut off water supply and
call service.

12345678901234567890123456789012123456789012345678901234567890121234567890123456789012345678901212345678901234567890123456789012123456789012345678901
1
234567890123456789012345678901212345678901234567890123456789012123456789012345678901234567890121234567890123456789012345678901212345678901234567890
1
1
234567890123456789012345678901212345678901234567890123456789012123456789012345678901234567890121234567890123456789012345678901212345678901234567890
1
1
234567890123456789012345678901212345678901234567890123456789012123456789012345678901234567890121234567890123456789012345678901212345678901234567890
1
1
234567890123456789012345678901212345678901234567890123456789012123456789012345678901234567890121234567890123456789012345678901212345678901234567890
1
1
234567890123456789012345678901212345678901234567890123456789012123456789012345678901234567890121234567890123456789012345678901212345678901234567890
1
1
234567890123456789012345678901212345678901234567890123456789012123456789012345678901234567890121234567890123456789012345678901212345678901234567890
1
1
234567890123456789012345678901212345678901234567890123456789012123456789012345678901234567890121234567890123456789012345678901212345678901234567890
1
12345678901234567890123456789012123456789012345678901234567890121234567890123456789012345678901212345678901234567890123456789012123456789012345678901
15.
Trouble shooting
Problem Probable cause Attend to
The taste is to strong/
weak.
The dispenser is not
cleaned properly. Clean ejector, outlet pipes
and pinch solenoid.
The ejector is not adjusted
correctly.
Dirt in the water valve. Call service.
Call service.
It constantly drips
fluid from the outlet-
pipes.
Call service.
Troubles with cooling
system.
The drinks are not
cold.
Failure in thermostat. Call service.
Failure in cooling system. Call service.

Electrical connections
12345678901234567890123456789012123456789012345678901234567890121234567890123456789012345678901212345678901234567890123456789012123456789012345678901
1
234567890123456789012345678901212345678901234567890123456789012123456789012345678901234567890121234567890123456789012345678901212345678901234567890
1
1
234567890123456789012345678901212345678901234567890123456789012123456789012345678901234567890121234567890123456789012345678901212345678901234567890
1
1
234567890123456789012345678901212345678901234567890123456789012123456789012345678901234567890121234567890123456789012345678901212345678901234567890
1
1
234567890123456789012345678901212345678901234567890123456789012123456789012345678901234567890121234567890123456789012345678901212345678901234567890
1
1
234567890123456789012345678901212345678901234567890123456789012123456789012345678901234567890121234567890123456789012345678901212345678901234567890
1
1
234567890123456789012345678901212345678901234567890123456789012123456789012345678901234567890121234567890123456789012345678901212345678901234567890
1
1
234567890123456789012345678901212345678901234567890123456789012123456789012345678901234567890121234567890123456789012345678901212345678901234567890
1
12345678901234567890123456789012123456789012345678901234567890121234567890123456789012345678901212345678901234567890123456789012123456789012345678901
16.
SL 2000 with two products + water and push-buttons

12345678901234567890123456789012123456789012345678901234567890121234567890123456789012345678901212345678901234567890123456789012123456789012345678901
1
234567890123456789012345678901212345678901234567890123456789012123456789012345678901234567890121234567890123456789012345678901212345678901234567890
1
1
234567890123456789012345678901212345678901234567890123456789012123456789012345678901234567890121234567890123456789012345678901212345678901234567890
1
1
234567890123456789012345678901212345678901234567890123456789012123456789012345678901234567890121234567890123456789012345678901212345678901234567890
1
1
234567890123456789012345678901212345678901234567890123456789012123456789012345678901234567890121234567890123456789012345678901212345678901234567890
1
1
234567890123456789012345678901212345678901234567890123456789012123456789012345678901234567890121234567890123456789012345678901212345678901234567890
1
1
234567890123456789012345678901212345678901234567890123456789012123456789012345678901234567890121234567890123456789012345678901212345678901234567890
1
12345678901234567890123456789012123456789012345678901234567890121234567890123456789012345678901212345678901234567890123456789012123456789012345678901
17.
Technical data
Electrical connection 230 V/50 Hz/ 2,5A
Water connection 3,0mTube with3/8"internalthread
(minimum2,5kgwaterpressure.)
Compressor ElektroluxGL 80
Cooling gas HFC-134a Amount to fill 200 gram
Cooling capacity 356 W
Cooling system Aluminium cold block with stainless-steel pipes inside.
Front light 18WFluorescent-tube
Front sign size 300*471mm.
Dispenser measurement Height: 800mm With: 295mm Depth: 550mm
Weight 51 Kg
Note 1. Thethermostatisfactory adjusted and improper adjustment
may cause the cooling system to freeze causing damage or
water leakage in the dispenser.
Note 2. Frequentopening and closing of thedoormay cause
ice build-up on the cooling plate inside the cabinet which
decreasestheefficiency.Ifthishappens,defrostthemachine
untilallicehasmelted.
Note 3. It is strongly recommended to use some sort of water isolator
in the water line in case of an emergency leakage.
Note 4. Maximumambienttemperatureintheroom where the dispenser
is located should not exceed more then 25 C.
Note 5. Ifthedispenser has frozen, check watertubsandconnections
inside the dispenser before running the dispenser again.
Notes

12345678901234567890123456789012123456789012345678901234567890121234567890123456789012345678901212345678901234567890123456789012123456789012345678901
1
234567890123456789012345678901212345678901234567890123456789012123456789012345678901234567890121234567890123456789012345678901212345678901234567890
1
1
234567890123456789012345678901212345678901234567890123456789012123456789012345678901234567890121234567890123456789012345678901212345678901234567890
1
1
234567890123456789012345678901212345678901234567890123456789012123456789012345678901234567890121234567890123456789012345678901212345678901234567890
1
1
234567890123456789012345678901212345678901234567890123456789012123456789012345678901234567890121234567890123456789012345678901212345678901234567890
1
1
234567890123456789012345678901212345678901234567890123456789012123456789012345678901234567890121234567890123456789012345678901212345678901234567890
1
1
234567890123456789012345678901212345678901234567890123456789012123456789012345678901234567890121234567890123456789012345678901212345678901234567890
1
12345678901234567890123456789012123456789012345678901234567890121234567890123456789012345678901212345678901234567890123456789012123456789012345678901
18.
Portion control
Picture description
Portion Programming
1. Removefrontpanel.
2. Set the jumper switch on the circuit board in prog.
YESposition.
3. Enterprogram mode by pushing and holding both
theSandXLbuttonsatthesametimeuntilthe
LED lights up.
Please observe that this procedure will only put one
side of the panel into program mode. To program the
other side followthe same procedure.
1. Programeachbuttonbypushingandholding until
requiredquantity is obtained.Top offfunction is
possible.Top up = Fill the cup until thefoam reaches
theedge,letthefoamsinkdown,thenfilltherestof
thecup.
Exit program mode by pushing stop/fill LED will
turnoff.
1. Checkthequantityoftheportionsbypushing
respectivebuttons.Ifany alteration has to bedone,
start again from step 4.
2. Whenprogramming is finalised move the jumper
switchtoprog NO.
Reinstall the front panel.

SL 2000
Juice machine
COFFEE QUEEN
Art. nr/Art. no. 1704141
FOR SERVICE
Please contact your retail dealer
Din återförsäljare / Your retail dealer
...............................................................................
...............................................................................
...............................................................................
COFFEE QUEEN AB, Box 960, 671 29 ARVIKA, besöksadress; Korpralsv 1B,
Tel vxl; +46(0)570-47700, Fax; +46(0)570-47719
E-mail:[email protected] www.coffeequeen.se
Table of contents
Other Coffee Queen Dispenser manuals