Cognionics CGX Quick-20m User manual

Quick-20m
This manual includes operating instructions, maintenance instructions, and
general information for use of the CGX Quick-20m.
Carefully read this manual to familiarize yourself with the headset, software, and
accessories before use.
CGX A Cognionics Company
Description
The Quick-20m is a wireless, battery-
operated 10-20 montage EEG headset
utilizing dry sensor technology. The
headset provides an integrated
approach to the wireless acquisition of
EEG signals. A seated patient is free to
exhibit natural movements while real-
time data is collected.
The Quick-20m includes advanced
amplification and shielding to reject
ambient electrical noise.
The headset obtains high-quality
EEG with minimal scalp preparation.
Patented mechanisms and a range
of replaceable dry sensors align
to various head shapes and sizes,
maintaining sensor positions in a
standard 10-20 layout. EEG channels
are digitized with 24 bits of resolution
at 500 Hz. The Quick-20m is suitable
for general-purpose EEG.
Caution: Federal law restricts this device to sale by or on the order of a physician.

2
Warnings
The Quick-20m is intended to be used to acquire
the electroenchephalogram (EEG) and transmit it
wirelessly to a computer.
The Quick-20m headset is not a diagnostic tool. Any
medical diagnosis related to the EEG should be derived by
a certied physician.
This Device Is Not Intended For The Following Uses:
• monitoring of patients in a clinical environment
• on patients undergoing surgery
• on patients on life support systems
• use in sterile environments
• use with sleeping patients
Do Not Use This Product In These Situations:
• near high-frequency surgical equipment
• if exposed to radio-band, ionizing, microwave, infrared,
ultraviolet, or gamma radiation
• in oxygen-rich environments (concentration > 25%
at 1 atm)
• in wet environments (i.e., steam rooms)
• in the presence of ammable anesthetics or gases
• in the presence of heavy machinery
• in dusty environments
Precautions For The Practitioner
• Check if your patient has a sensitive dermatological
condition causing sensor intolerance.
• To avoid cross-patient contamination, do not use with
patients having open wounds or scalp infections.
Patient Considerations
• This device is intended for human use only.
• Patient should have a healthy scalp.
• This device ts teens and adults with a head
circumference from 52 to 62 cm.
• Do not use with infants or neonates.
• Patients may or may not have hair.
• All sensors must be able to contact the patient’s scalp.
• The entire headset may come into contact with the
patient’s skin.

3
Warnings
Disposable Sensors
• Store clean sensors in the provided jars.
• Clean sensors after each session following instructions on
Page 16.
• Replace sensors at or before their stated lifecycle limits
(Specications, Page 18), or if they appear worn.
Always Use Supplied Accessories
Using accessories other than those supplied with your
Quick-20m system may result in damage or diminished
ecacy of the system.
The Quick-20m uses two AAA Alkaline or NiMH batteries.
Follow care and handling instructions provided by the
battery manufacturer.
Avoid Cross-Patient Contamination
Always inspect patient head to ensure skin surface is clean
and free of open wounds prior to use of EEG.
Clean the device and clean or replace sensors after use
following the cleaning instructions on Page 15 to avoid
cross-patient contamination.
Care Instructions
The Quick-20m is constructed of exible materials to
improve comfort and t. These materials are prone to
breakage under extreme conditions. Do not drop, sit on,
step on, fold, push, pull or stretch the product.
Patient Will Be In Direct Contact With:
• Sensors
• Headset
Safety Warnings
Do not:
• Sterilize the product.
• Immerse the product in any liquid.
• Expose the product to excessive: vibration, moisture or
humidity, mechanical shock, or dust.
• Disassemble or modify the product. This will void the
warranty.
• Use caustic or abrasive cleaners on the headset or
sensors.
NOTE: The EMISSIONS
characteristics of this
equipment make it suitable
for use in industrial areas and
hospitals (CISPR 11 class
A). If used in a residential
environment (for which
CISPR 11 class B is normally
required) this equipment
might not oer adequate
protection to radio-frequency
communication services.
The user might need to take
mitigation measures, such as
relocating or re-orienting the
equipment.

4
Cybersecurity
The Quick-20m does not pose an inherent cybersecurity
risk. The wireless bluetooth system relies on a built-in
security encryption method utilizing 128-bit AES encryption.
Performance Warnings
The Quick-20m is designed for use in a professional
healthcare facility by a trained healthcare professional.
• Use in environments near HF surgical equipment,
magnetic resonance imaging equipment, or other
equipment which produces a high level of EM
disturbances will aect the performance of the device.
• In case of EM disturbances, the recorded bio-potential
waveforms may have environmental artifacts including
unanticipated high frequency components.
• No harm to the patient or operator may occur when using
the device in an unsupported environment.
Performance Degradation
The Quick-20m presents no additional risk to the operator
or patient should the performance or ecacy of the system
be diminished.
Warnings
The Quick-20m is MR Unsafe.
Keep it outside the MRI
scanner room.

5
Symbol Title Of
Symbol
Standard Title Of Standard Description Of Symbol
Prescription
Only
21 CFR 801.15(c)(1)(i)(F)
21 CFR 801.109
Labeling - Medical device;
prominence of required
label statements.
Labeling - Prescription
devices.
Requires a prescription
in the United States of
America.
Caution: In the United
States of America, federal
law restricts this device to
sale or use by, or on the
order of, a physician.
Serial
Number
ISO 15223-1:2016 Medical devices: Symbols
to be used with medical
device labels, labeling
and information to be
supplied.
Part 1: General
Requirements
Indicates th
manufacturer’s serial
number so that a specic
medical device can be
identied.
Manufacturer ISO 15223-1:2016 Medical devices: Symbols
to be used with medical
device labels, labeling
and information to be
supplied.
Part 1: General
Requirements
Indicates the medical
device manufacturer, as
dened in EU Directives
90/385/EEC, 93/42/EEC
and 98/79/EC.
Keep Dry ISO 15223-1:2016 Medical devices: Symbols
to be used with medical
device labels, labeling
and information to be
supplied.
Part 1: General
Requirements
Indicates a medical
device that needs to be
protected from moisture.
Consult
Instructions
For Use
ISO 15223-1:2016 Medical devices: Symbols
to be used with medical
device labels, labeling
and information to be
supplied.
Part 1: General
Requirements
Indicates the need for
the user to consult the
instructions for use.
Caution ISO 15223-1:2016 Medical devices: Symbols
to be used with medical
device labels, labeling
and information to be
supplied.
Part 1: General
Requirements
Indicates the need for
the user to consult the
instructions for use for
important cautionary
information such as
warnings and
precautions that cannot,
for a variety of reasons,
be presented on the
medical device itself.
Warnings

6
Device Overview
Quick-20m Overview
EEG is the measurement — through the use of sensors and
ampliers — of scalp surface electrical potentials arising
from activity in the cortex.
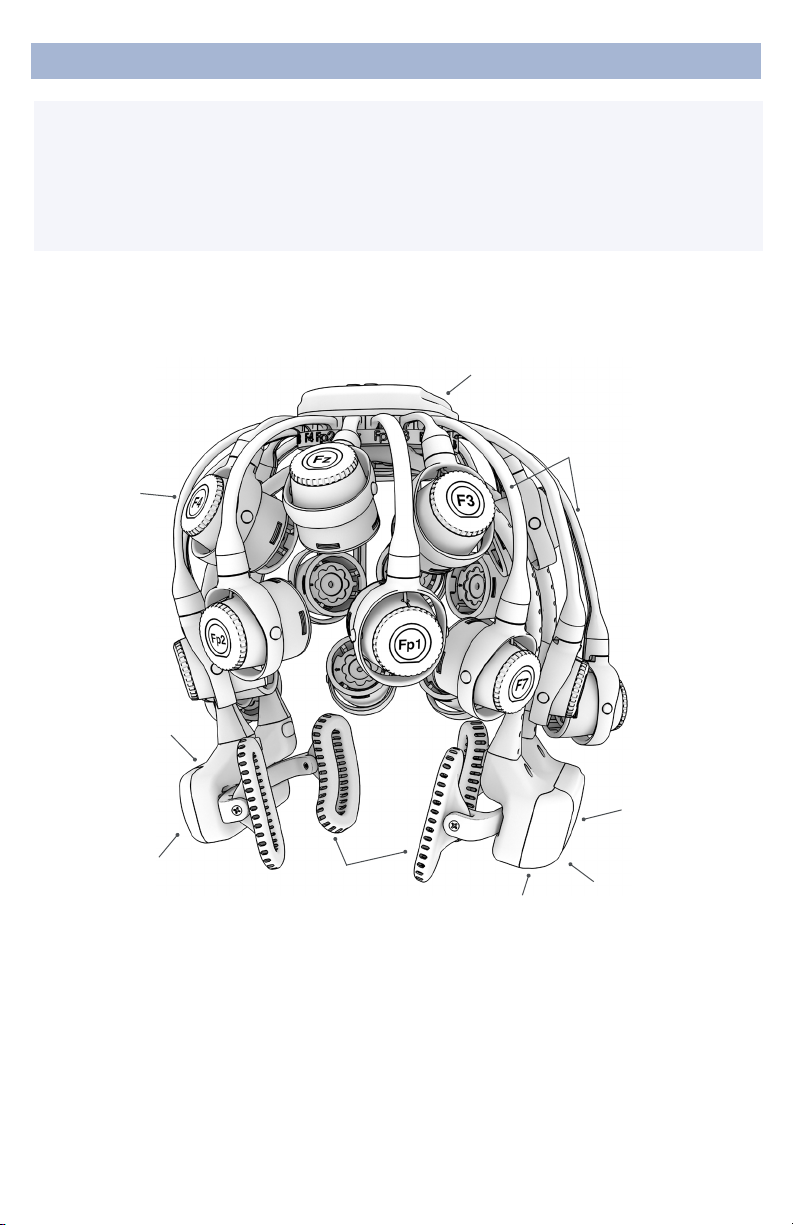
The Quick-20m follows the international 10-20 system
standardizing electrode placements across the scalp. The
10-20 system derives its name from measurements of 10%
and 20% of the distance between landmarks on the head,
specically, the depression above the bridge of the nose
(nasion), the bump at the back of the head (inion), and the
depressions in front of each ear (preauricular points).
Sensors are labeled with a combination of letters and
numbers indicating their respective locations, with even
numbers on the right and odd numbers on the left side of
the head. Midline locations are marked with a “z” for “zero.”
For instance, Fz sits on the frontal midline, while F3 sits left
of and F4 sits right of Fz.
The Quick-20m is sized to t heads with a circumference
between 52 and 62 cm as measured about the thickest
part of the skull.
The Quick-20m meets the
mechanical, electrical, and
sensor needs required to
make an eective dry EEG
system.
Conventional wet systems
rely on electrolytic gels
to penetrate hair, contact
the skin, and provide a
conductive path. The gel
serves as a buer lling in
gaps between the sensor and
skin.
No conductive gel is used in a
dry system. The benets are
obvious: faster set-up, and no
after-use clean-up required.
Yet, dry systems are prone
to several challenges. First,
the sensor must be designed
to directly touch the scalp or
skin, even through thick hair.
Second, the sensor must
remain securely in place to
minimize artifacts and noise.
Finally, the electronics must
tolerate impedances up to
200 times higher than wet
systems — while rejecting
noise and interference. A
high-end dry solution — like
the Quick-20m — balances
sensors, mechanics and
electronics achieving virtually
the same signal quality as a
traditional wet cap for most
EEG applications.

7
Device Overview
The Package Contains The
Following Items
Quick-20m Headset
Bluetooth Dongle
20 Drypad Sensors
40 Flex Sensors
10 Drypad Ear Sensors
A1 Earclip
A2 Earclip
3 Active Lead Wires
2 Passive Lead Wires
30 Skintact Sensors
5 Alcohol Wipes
4 Rechargeable AAA Batteries
Battery Charger
Carrying Case
Manual
Quick-20m Headset
Earpads
Sensor
Pods
Handle and
Battery
Compartment
Legs
Amplier
Handle
Ground
A2
Position A1
Position

8
Device Overview
Bluetooth Dongle
High-speed receiver
dongle plugs into
your computer’s
USB port.
Amplifier
Wireless amplier
collects signals
and transmits to
Bluetooth Dongle.
Flex Sensor
Flex sensors slide
through hair for
high-quality scalp
contact.
Drypad Sensor
Drypad sensors
make direct
skin contact for
ECG and EEG
recordings.
Drypad Ear Sensor Lead Wires
Dedicated Drypad
sensors for use with
Earclips.
Active lead wire
(3.5mm audio jack)
for Reference/A1
and A2.
Passive lead wire
(touchproof) for
Ground and EEG.
A1 Earclip
A1 earclip has two
sensor locations:
Reference and
Ground.
A2 Earclip
A2 earclip is used
in linked-ears
congurations.
Active Passive

9
Preparation
1. Select Sensors
Choose the appropriate sensor for your application.
Drypad Sensors
Use Drypad sensors in positions where the patient has no
hair (forehead and bald areas).
Flex Sensors
Use Flex sensors to penetrate hair. On most patients, these
are all the positions except Fp1, Fp2, F7 and F8.
2. Attach Sensors
Push at the center of the sensor when installing. For Flex
sensors, do not apply pressure to, or bend the sensor tips.
When removing sensors, pry between the sensor and the
connector.
3. Assemble The A1 Earclip
Ground and Reference contacts are required for proper use
of the headset. Be sure Ground and Reference cables are
properly attached to the Earclip and the headset.
1. Pinch the earclip.
2. Insert Drypad Ear Sensors into the grooved holes in the
earclip.
3. Attach the passive and active lead wires to either
Drypad Ear Sensor.
4. Attach the passive lead to the touchproof connector on
the A1 handle.
5. Attach the active lead to the 3.5mm audio jack on the
A1 handle.
4. (Optional) Assemble The A2 Earclip
Use the A2 Earclip for recordings requiring both ears.
1. Pinch the earclip.
2. Insert Drypad Ear Sensor into the grooved hole in the
earclip.
3. Attach the active lead wire (3.5mm) to the Drypad Ear
Sensor.
4. Attach the active lead to the 3.5mm audio jack on the
A2 handle.
Plug touchproof and audio
jack wires into headset,
matching orientation as shown
A1 EarclipDrypad Ear
Sensor
A1 uses a touchproof lead
wire for Ground and the
3.5mm audio jack lead wire
for Reference
Insert the Drypad Ear Sensor
into the Earclip with snap
facing out. Attach lead wire to
snap as shown.

10
Preparation
Slide to open battery door
Insert 2 AAA batteries as
shown
5. Charge And Insert The Batteries
Use fresh alkaline batteries, or if using NiMH batteries, fully
charge before using.
• Open the battery door on the A1 handle.
• Place the batteries in the correct conguration following
the markings inside the battery housing.
6. Check Power Status and Trigger Status Lights
On Top Of Amplifier
Amplifier
Power
Status
Light
Trigger Status Light
Power
Button
7. Insert Bluetooth Dongle
Plug the dongle into your computer and Windows should
automatically install the correct drivers. Verify driver
installation by checking the Device Manager for problems,
marked by a yellow exclamation mark.
• The dongle is specic to each headset.
• For best performance, ensure a clear line of sight
between the dongle and the front of the headset.
Each Quick-20m is permanently paired to a receiver
dongle. The pair automatically discover and initiate a
connection when both are powered on and within
a 10m range.
The light on the dongle indicates its current state: Dongle
Status indicator light
Power Light Status
O Headset O
Green Headset On
Yellow Low Battery
Red Critically Low Battery (replace immediately)
Trigger Light Status
O Trigger Out Of Range
Blue Trigger In Range
Dongle Light Status
Green Power On, Not Paired
Purple Searching For Device
Blue Device Found
Flashing Blue Data Transmitting

11
Donning
Sensor names and positions

12
Donning
Headset Placement For Accurate 10-20 Recordings
Fp1 and Fp2 sensor
pods resting 1cm
above the eyebrows
Crown (Cz channel position) sitting
directly on top of head
No legs or pods are
tilted or misaligned
Earpads resting
securely around
ears
Headset not tilted too
far towards the back of
the head
Position Of The Patient During EEG
Use the Quick-20m headset for patients in
an upright position. Do not let the patient lie
or sleep on the headset. It may damage the
headset.
Do Not Extend Legs Past 90°
Legs may break or deform if bent more than
90° from their resting position.
Maximum
bend

13
8. Place The Quick-20m On The Patient’s Head
Positioning The Headset
• Grasp both handles and gently pull them apart to open
the headset.
• Slide the headset over the patient’s head.
• Adjust the position of the headset so the earpads t
around the patient’s ears.
• Pull down rmly on the headset until Cz makes good
contact with the top of the head.
• Position headset back-to-front with Fp1 and Fp2 sensors
resting 1 cm above the eyebrows.
• Check that headset is level and not tilting to one side.
Adjustments
• Brush aside excess hair near and underneath the
earpads.
• Reorient misaligned legs and pods.
• Grasp and rotate each pod so the sensor is perpendicular
to the patient’s head.
• Push the headset downward again so the sensor at the
crown (Cz) makes rm contact with the patient’s head.
• Ensure pods lie at on the patient’s head.
• Brush aside excess hair on the forehead and any other
positions where Drypad sensors are installed.
Earclips
• Lift the earpad to access the ear lobe and clean with
supplied alcohol wipe.
• Place the A1 earclip on the earlobe of the patient, and
clip onto the back of the ear.
• Attach the A1 earclip on the A1 handle.
Optional Setup
• Option: Attach the A2 earclip on the A2 handle for
congurations requiring both ears.
• Option: Attach EEG passive lead wire on the A2 handle
for additional biometric measurements.
Before Starting A Session
• Verify headset is properly positioned on the patient’s
head.
• Ask the patient for any areas of discomfort and, if
necessary, reposition sensors to lay at on the head.
Don headset front-to-back
Pull down on handles until
the top sensor (Cz) makes
rm contact with the head,
and the headset is level from
side-to-side
Position two front channels
(Fp1 and Fp2) so the bottom
of the pod rests 1 cm above
the eyebrows
Apply earclip to earlobe
Donning

14
Donning
9. Optimize Sensor Contact
After properly positioning the headset on the patient, obtain
direct contact on all sensors before recording.
The range of impedances with dry sensors may be higher
than what you are accustomed to when working with
conventional wet sensor ampliers. CGX devices utilize
a combination of advanced electronics, shielding, and
mechanics to obtain EEG signals even when contact is
poor, and can tolerate sensor impedance up to 5,000 kΩ.
10. Start Third-Party EEG Analysis Software
Start third-party software. Connect Quick-20m to
software according to third-party EEG Analysis software
manufacturer’s directions.
11. Adjust Pods, If Required, To Improve
Impedance Measurements
Start the impedance check function on third-party software.
Check for acceptable impedance measurements on each
channel.
A1 Reference and Ground earclip must be applied for
impedance check to operate.
To ensure good impedance measurements:
• Gently pull down on the handles until the Cz position
reports adequate contact.
It is important the headset is seated properly in the
correct position and all legs and pods are aligned with
the patient’s head before pulling down. Failure to do
so may result in poor contact at the Cz position.
• Lift the pod slightly to move hair aside.
• Lower the pod back in place, keeping the sensor aligned
to the patient’s head.
• Gently twist the sensor adjustment back and forth to help
move the sensor through the patient’s hair.
• Lightly press down on the pod, holding for 5 seconds,
then gently release the pod.
Grasp pod on sides to
reposition
Gently twist
swivel mechanism without
displacing pod
Third-Party EEG Analysis
Software
Only use authorized FDA-
cleared third-party EEG
analysis software with the
Quick-20m. Contact CGX for
a list of authorized software
providers.
Use of non-authorized
software may lead to system
malfunction, data loss, and
data corruption.
Follow third-party analysis
software instructions for
installation and refer to
software manufacturer for
information on cybersecurity/
malware controls and ongoing
software support.

15
Recording
12. Record An EEG
After you have acceptable impedance levels, record
the EEG on the third-party EEG analysis software.
13. End The Session
Remove the batteries from the headset. The headset
should be placed either upside down, with the top of the
headset resting on a table top, or on its side resting on a
handle.
Preventative Care To Maintain Safety And Effectiveness
To avoid cross-patient contamination, follow the cleaning
instructions to clean sensors and headset after each use.
This device is not intended to be sterilized in an autoclave.
Cleaners listed below have been evaluated based on
their chemical compatibility with the device materials. The
cleaners and disinfectants tested and listed below may not
be available in all countries.
Sensor Performance
While sensors do not have a set expiration date, the
conductive coating will degrade with repeated uses.
Regularly check the sensor surface for coating degradation
and replace as needed. Contact CGX for replacement
sensors.
Recommended Cleaning Agent
The recommended cleaning agents for all parts of the
Quick-20m headset, including sensors and accessories is
a germicidal wipe, such as Super Sani-Cloth Germicidal
Wipe, or 70% isopropyl-based alcohol.
• Do not use water to clean the headset or accessories.
• Do not use 90% or 99% alcohol. These solutions will dry
out and damage the sensors.
• Do not use detergents, enzymatic cleaners, or
UV cleaners. These may damage the system and
accessories.
Use the supplied carrying
case when transporting the
headset.
It is not recommended to
leave the Quick-20m in the
carrying case for long term
storage since the legs may
become compressed. This
will not aect functionality,
but may cause the headset to
be excessively tight on larger
heads.
To restore the shape of
your headset, place on a
mannequin head for several
hours until the legs relax.
Super Sani-Cloth
Germicidal Disposable Wipe
SDS Number/Formula SDS:
0020-00/4FQ51801
Mfg: PDI, Inc.
Follow manufacturer’s
directions for cleaning and
disinfecting.

16
Cleaning Sensors
Use either of these two methods to clean sensors.
Immersion Method
1. Remove sensors from headset.
2. Immerse sensors in 70% isopropyl-based alcohol for 1
minute.
3. Remove from alcohol and let fully dry before re-installing
in headset.
In Situ Method
1. Keep sensors in headset.
2. Clean sensors with Super Sani-Cloth Germicidal
Disposable Wipes or 70% isopropyl-based alcohol
wipes.
3. Be sure to thoroughly wipe all surfaces.
4. Let dry before reusing headset.
Cleaning The Sensor Pods, Legs, and Lead Wires
Use Super Sani-Cloth Germicidal Disposable Wipes or 70%
isopropyl-based alcohol wipes to clean sensor pods, legs,
and lead wires.
Cleaning The Amplifier
1. Turn amplier O.
2. Clean amplier with Super Sani-Cloth Germicidal
Disposable Wipes, or 70% isopropyl-based alcohol
wipes.
3. Let amplier dry fully before restarting system.
Do Not Let The Headset Come Into Contact With Liquid
In the event headset comes into contact with liquid,
Immediately take the batteries out and let the headset dry
before resuming use.
Storage
• Transport headset in the case.
• Store headset in a temperature and humidity controlled
room without the batteries.
• Remove and charge batteries when headset is not in use.
Disposal Instructions
To protect the environment, always follow local law, rules,
and policies regarding electronic and battery disposal. You
may also return the headset to CGX for proper disposal.
Preventative Care To Maintain Safety And Effectiveness
Clean Sensors Between
Patients
The Quick-20m system
includes 2 full sets of sensors.
Remove sensors after use
with a patient, and replace
with cleaned sensors for the
next patient.
Clean one set while the other
is in use.
Contact CGX for replacement
sensors.

17
The most important aspect of EEG recording is that
output data is only as good as the recording input. While
algorithms exist to remove artifacts, poorly recorded data
cannot be xed in post processing.
Recording good EEG data requires preparation of the
participant for optimal sensor contact:
1. Participants should have their hair recently washed
and fully dried before recording. Wet hair, hair gel,
conditioners, and hair spray may cause interference and
degrade signal quality.
2. Clean the head directly below the intended sensor
location with a 70% isopropyl-based alcohol wipe.
3. In the event of diculty establishing good contact, apply
a small amount of water between the sensor and scalp
to create an electrical bridge.
4. It is important for patients to reduce tension in the head,
neck, and shoulders during readings.
Obtaining Clean EEG Data
Quick-20m sensor locations
lie within 1.0 centimeter on
the vast majority of hand-
measured 10-20 placements
on heads sized from 52-62
centimeters.
Quick-20m EEG data should
only be read and interpreted
by a qualied physician.
Preventative Care To Maintain Safety And Effectiveness
Follow These Advisories To Keep Your Quick-20m In
Good Working Order
• Do not immerse the headset in liquid.
• Do not expose headset to direct sunlight or heat source,
moisture, vibration, mechanical shock, excessive dust, or
humidity.
• Do not open, modify or disassemble the headset — this
will void the warranty.
• Do not use if the headset is damaged.
• Do not use when wet. If moisture penetrates the headset,
remove the batteries and let it thoroughly dry prior to use.
• Do not use caustic or abrasive cleaners on the headset or
sensors.
• Avoid bending the legs greater than 90° from resting
position.
• Only use 1.2 or 1.5 volt AAA batteries.
• Do not use concurrently with any subject electrical or
magnetic stimulation.

18
Specifications
Specifications
System
Number Of EEG
Physiological
Acquisition Channels
20
Number Of EEG
Reference Signal
Acquisition Channels
1
EEG Electrode
Material Ag/AgCl coated plastic
WirelessAmplier
Input Resistance >100 MΩ
Input Capacitance <5 pF
Frequency
Response
Linear between 0.1 and
100 Hz
Input Impedance >100 MΩ
Signal Input Range +/- 300 mV
Signal Output Range +/- 300 mV
Ground Type Active DRL
CMRR >90 dB at 60 Hz
Gain 3
A/D Resolution
24-Bit simultaneous
sampling analog-to-digital
converters
A/D Conversion 24-Bit Delta-Sigma
Sampling Rate 500 samples per second
Bandwidth 0-131 Hz with true DC
coupling
Accelerometer 3-axis, measures head
motion
Wireless Range 10 meters
Noise <0.6 μV RMS from 1-30
Hz, shorted inputs
CGX Product
Compatibility
Compatible with
CGX Wireless StimTigger
Sensors
Use Rating
Drypad: 200 uses
Flex: 200 uses
Drypad Ear Sensor: 200 uses
Wireless Transmitter
Modulation Type Bluetooth Low Energy GFSK
Frequency Band 2.4 GHz ISM
EectiveRadiated
Power 7 mW
RF Radiated Group 1 Class B Emissions, CISPR 11
Device uses RF energy for internal functions. Low RF
emissions are not likely to cause any interference in
nearby electronic equipment.
RF Conducted Group 1 Class B Emissions, CISPR 11
Device can be used in all establishments, including
domestic establishments.
Electrostatic Discharge (ESD), IEC 60100-4-2
±15 kV air ±8 kV contact
1. Floors should be wood, concrete, or ceramic tile.
If oors are covered with synthetic material, the
relative humidity should be at least 30%.
2. Electrodes are sensitive to ESD events. In case
of an ESD event, the device will automatically
recover.
3. In the unlikely event of unexpected malfunction,
turn the device OFF, then ON again.
RF Immunity, IEC 60100-4-3
Test level: 3V/m with 80% AM at 1 kHz modulation,
80 MHz – 2.7 GHz
Compliance level: 3/m
Portable and mobile RF communications equipment
should be used no closer to any part of the device,
including cables, than the recommended separation
distance calculated from the equation applicable to
the frequency of the transmitter.
Recommended separation distance:
d = 1.2√Ρ 80 MHz to 800 MHz
d = 2.3√P 800 MHz to 2.5 GHz
where Pis the maximum output power rating of
the transmitter in watts according to the transmitter
manufacturer and dis the recommended separation
distance in meters.
Field strengths from xed RF transmitters, as
determined by an electromagnetic site survey,
should be less than the compliance level in each
frequency range. Interference may occur in the
vicinity of equipment marked with the following
symbol:

19
Notes:
1. At 80 MHz, the higher frequency range applies.
2. These guidelines may not apply in all situations
3. Electromagnetic propagation is aected by
absorption and reection from structures, objects
and people.
Field strengths from xed transmitters, such as
base stations for radio (cellular/cordless) telephones
and land mobile radios, amateur radio, AM and
FM radio broadcast and TV broadcast cannot be
predicted theoretically with accuracy. To assess
the electromagnetic environment due to xed RF
transmitters, an electromagnetic site survey should
be considered. If the measured eld strength in the
location in which the device is used exceeds the
applicable RF compliance level above, the device
should be observed to verify normal operation.
If abnormal performance is observed, additional
measures may be necessary, such as re‐orienting or
relocating the device.
Over the frequency range 150 kHz to 80 MHz, eld
strengths should be less than 3 V/m.
Output Format
Real-Time
Streaming API Full access to raw data
Continuous
Impedance Check
Real-time monitoring of
all channels simultaneous
with EEG
Export Data To EDF, BDF, CSV
Resolution 24-Bit
Phase Jitter
Between Channels 0
Power
Power Two AAA Batteries:
Supply Voltage 3.0 V DC
Power Consumption 0.3 VA , 6 hour battery life
General
Applied Part Type BF
Ingress Protection IP22
Temperature Range 40-104° F (5-40° C)
Humidity Range 65 Rh +/- 20%
Pressure 70 kPA to 106 kPA
Altitude -390m to 3,012m
Weight 596g in use
Fits Heads Sized 52-62 cm
Dimensions (LWH) 20 x 18 x 19 cm
Certications
Safety Standards
IEC 60601-1 / AAMI ANSI
ES60601-1
IEC 60601-1-2
IEC 60601-2-26
IEC 80601-2-26
ISO 14971
IEC 62304 / AAMI ANSI
IEC 62304
AAMI ANSI ISO 10993-1
AAMI ANSI IEC 62366 IEEE
2010-2012
SweynTooth
Vulnerabilities
The Quick-20M has
been evaluated for
potential exposure to the
SweynTooth family of
vulnerabilities and is not
susceptible.
Validated Third-
Party EEG Analysis
Software
NeuroGuide™
Specifications

Covered by Patents issued and/or pending under
license from Cognionics, Inc.
US9314183B2, US9615761B2, US9935726B2,
US8798710B2, and International patents.
Quick is a trademark of CGX, LLC. NeuroGuide is a registered
trademark of Applied Neuroscience, Inc.
8445 Camino Santa Fe, #213
San Diego, CA 92121
858-864-9400
© 2022 CGX, LLC.
MAN-0001-A
CGX A Cognionics Company
Quick-20m Headset
3 year warranty on manufacturing defects. 90 day warranty
on accessories and disposable parts. Warranty is void if the
device has been opened or tampered with.
Replacement Sensors And Parts
System Support
System rmware can not be modied in the eld. In the
unlikely event rmware modication is required, CGX will
inform the original purchaser, and will arrange for the device
to be returned to CGX for modication.
Third-Party EEG Analysis Software Support
To ensure delivery of malware-free software, download
software and updates from approved third-party sources.
Third-party software updates should only be made
according to that manufacturer’s instructions. Refer to third-
party software provider for cybersecurity considerations.
Returns
All units returned to CGX for repair and assessment must
have an RA (return authorization) number issued by CGX.
CGX will pay outbound shipping costs only.
Ship all returns with an RA number to:
CGX
Attn: Service
8445 Camino Santa Fe, #213
San Diego, CA 92121
Warranty and Service
Table of contents
Other Cognionics Laboratory Equipment manuals
Popular Laboratory Equipment manuals by other brands

Teledyne
Teledyne ACCQPrep HP125 Installation and operation guide

Agilent Technologies
Agilent Technologies CrossLab RapidFire 400 quick start guide

Thermo Scientific
Thermo Scientific Centra-W Cell Washer Service manual

Thermo Scientific
Thermo Scientific Sorvall ST40R instruction manual

PHI
PHI VersaProbe Operations

Teledyne
Teledyne CETAC ASX-112FR Operator's manual

Thermo Scientific
Thermo Scientific FOCUS GC Site preparation and installation manual

Takara Bio
Takara Bio Thermal Cycler Dice Real Time System III Instrument manual

Lauda
Lauda PD 2 G operating instructions

THORLABS
THORLABS IO-F-2000 user guide

Keysight
Keysight 89600S Series Service guide

Exsys
Exsys EX-60315 manual