Cole Parmer Omega Zen User manual

Pipette Controller
Operator's Manual
RoHS
coleparmer.com
Omega Zen®


3
Table of Contents
Product Description . . . . . . . . . . . . . . . .3
Package Contents . . . . . . . . . . . . . . . . .3
Product Overview . . . . . . . . . . . . . . . . . .4
Materials and Specifications. . . . . . . . . . . .5
Getting Started .. . . . . . . . . . . . . . . . . .5
Using the Pipette Controller . . . . . . . . . . . .6
Maintenance and Safety Precautions . . . . . . .7
Troubleshooting . . . . . . . . . . . . . . . . . .8
Product and Parts Ordering Information . . . . .8
Warranty Information . . . . . . . . . . . . . . .9
Product Description
Thank you for your recent purchase of the Cole-Parmer®pipette controller.
This pipette controller is a portable, lightweight and ergonomic unit for use with
plastic or glass pipettes from 1 to 100 mL. Its balanced design and contoured
buttons help prevent hand fatigue even after hours of use. In addition, the speed
and battery displays make pipetting easy!
Note: Please be sure to read the safety and operating instructions before use. Also,
when performing the pipetting function, observe all laboratory safety guidelines
including the use of protective clothing, safety goggles and gloves when handling
biological samples or chemicals.
CAUTION: Never mouth pipette!
Package Contents
Carefully unpack the contents from shipping package. If any parts are missing
or damaged, please contact Cole-Parmer immediately for resolution
(see page 12 for contact information).
• Pipette controller
• Universal power supply
• Wall mount
• Charging desk stand
• Operator's manual
• Extra filter (sterile): 0.45 µm PTFE

4
Product Overview
1
2
3
4
5
6
7
8
9
10
11
1. Pipette controller
2. Filter
3. Pipette adapter
4. Nosepiece
5. Aspirate trigger
6. Dispense trigger
7. LCD
8. Thumbwheel
9. Wall mount
10. Desk stand
11. Power supply

5
Materials and Specifications
Operating Conditions
Getting Started
Charging the Pipette Controller
Before using the pipette controller for the first time,
attach proper plug into the power supply unit and
rotate clockwise to lock. Release by pushing on the
button as indicated, and turn plug counter-clockwise.
Plug the power supply into a standard electrical source.
Gently insert the power jack into the power supply charging socket
located in the base of the pipettor. Note: Using excessive force may
damage the pipettor.
Allow the battery to charge for 6 hours before using your pipette
controller for the first time.
CAUTION: Ensure that you are using the original power supply
supplied with the Cole-Parmer pipette controller. This power
supply must not be used for any other electrical equipment
other than this pipette controller.
Housing UV-resistant resin
Nosepiece UV-resistant resin
Pipette holder Silicone
Filter Standard, hydrophobic membrane filter, 0.45 μm
Dimensions 1.5" W x 5.9" D x 5.9" H (3.81 cm x 14.98 cm x 14.98 cm)
Weight 0.45 lb (206 g)
Power supply Input voltage: 100–240 VAC, 50/60 Hz, 0.3 A;
Output voltage: 5 VDC, 500 mA Center positive DC connector
Unit: Input voltage 5 VDC, 500 mA Center positive DC connector
Battery Lithium-ion battery 3.7 V / 2800 mAh
Battery charging time
(if fully discharged) ~6 Hours
Battery life ~9 Hours continuous use at full speed
Operating temperature +10°C to +40°C
Relative humidity 10% to 85% (no condensation)
Power supply Fluctuation not to exceed 10%
Push button to
unlock and turn plug
counter-clockwise

6
Left position
Low
Right position
High
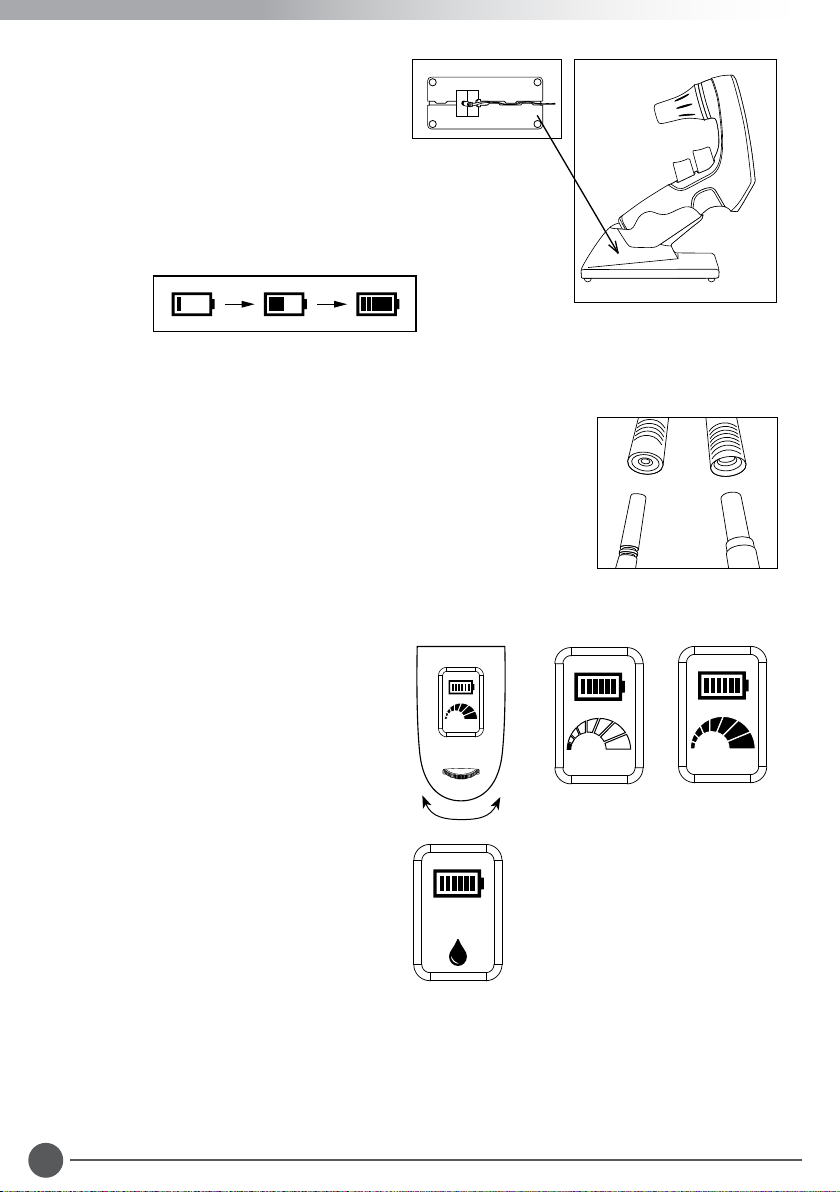
You can also charge the pipette controller
by using the charging desk stand. Simply
plug the desk stand into an electrical outlet,
then place the controller in stand.
When the controller is properly seated, the
battery icon will indicate the charging status.
The battery display shows between 1 to 6 bars
in sequence from empty to full.
Once the pipette controller is completely charged,
the battery icon shows as full (solid bars).
Using the Pipette Controller
1. Inserting the Pipette
Your pipette controller accommodates pipette capacities
from 1 mL to 100 mL. The controller comes assembled
with the adapter set to accept larger pipettes (>2 mL).
For pipettes ≤2 mL, remove the nosepiece. Flip position of pipette
adapter so the small hole faces down toward pipette.
Reattach nosepiece.
Once the adapter is set for your desired pipette size,
carefully insert the pipette into the nosepiece,
providing a secure fit.
2. Setting the Flow Rate
Adjust the max speed by turning the
thumbwheel until desired speed on
display is reached.
When pressing either trigger, the
speedometer reflects the speed up
to the set thumbwheel position.
For Gravity (drop) Mode
Set thumbwheel all the way to the left:
speedometer disappears and drop icon
flashes 3 times.
Press the Dispense (bottom) trigger slightly
to control speed of drops (no motor).
Aspirate is on low motor speed.
3. Filling and Dispensing
To fill the pipette, press the Aspirate (top) trigger. The unit will aspirate according to the
speed set with the thumbwheel setting.
To discharge the fluid from the pipette, press the Dispense (bottom) trigger. The unit will
dispense according to the speed set with the thumbwheel setting.

7
Maintenance and Safety Precautions
Replacing the Battery
1. Disconnect the power supply from the
unit.
2. Press down on top of battery cover (C)
and slide down to remove from unit.
3. Gently pull the battery pack (B) out of
the pipette controller until you can
access the cable connection mounted
on the PCB board.
4. Carefully remove the battery connector
(A) from the PCB board.
5. Take the replacement battery and line up front
of connector. Carefully reconnect the cable
connection to the PCB board. DO NOT FORCE: The
connector only works one way. There should be a slight
“click” when the cable connection is inserted properly.
6. Insert new battery pack into pipette controller with wires and
position between battery pack and housing wall.
7. Reattach battery cover.
8. Charge battery for 6 hours before use.
9. It’s imperative to dispose of used battery promptly and in accordance
with local disposal regulations. Keep away from children. Do not
disassemble the battery or dispose of in fire.
Replacing the Filter
Gently push nosepiece up and turn counter-clockwise until it is
separated from the pipette controller. Remove the filter from the
silicone pipette holder. Dispose of the filter and replace with
a fresh one.
The filter should be replaced every three months or when the
filter is contaminated by liquid or the suction capacity is slowed.
Note: Only use Cole-Parmer replacement filters to guarantee
a proper seal.
CAUTION: Never operate the pipette controller without a filter.
Cleaning
This pipette controller can be cleaned with most common laboratory
disinfectants including isopropanol. Never use aggressive organic solvents.
The nosepiece can be autoclaved at 121°C, with the exception of the filter.
Follow the procedure under “Replacing the Filter” to remove the filter prior to
sterilization. No other portions of the controller are autoclavable.
A
B
C
A
B
C

8
WARNING!!
-Before cleaning, disconnect the pipette controller from the power supply.
Never clean the power supply or immerse the unit in water.
-Never use with highly flammable or corrosive liquids.
-Never use or recharge in an explosive atmosphere.
-Ensure the current of your electrical source matches the voltage of the charger
unit. Only use the power supply supplied with the unit.
-When changing the filter, wear protective gloves to prevent accidental
contamination.
-Do not open the pipette controller housing as it will void the warranty.
-Never operate the pipette controller without a filter.
Troubleshooting
Problem Possible Cause Remedy
Slow aspiration Filter blocked Replace filter
Slow aspiration Battery low Recharge battery
Pipette drips Pipette not secure in holder Re-insert pipette into unit
Pipette drips Pipette adapter damaged or worn Replace pipette adapter
Note: There are no user-serviceable parts inside of the unit.
Product and Parts Ordering Information
Part No. Description
25300-96 Pipette controller, blue
25300-98 Pipette controller, gray
25303-34 Charging desk stand for pipette controller
25303-35 Standard wall mount for pipette controller
25303-36 Magnetic wall mount for pipette controller
25303-37 Filters (0.2 μm), sterile, 10/pk
25303-38 Filters (0.2 μm), non-sterile, 10/pk
25303-39 Filters (0.45 μm), sterile, 10/pk
25303-51 Filters (0.45 μm), non-sterile, 10/pk
25303-52 Power supply
25303-53 Lithium-ion battery
25303-54 Nosepiece for pipette controller
25303-55 Pipette adapter

9
Warranty Information
The Cole-Parmer®Pipette Controller is warranted to be free of defects in materials and
workmanship for a period of 12 months from the date of purchase, providing:
• The unit has not been opened or attempted to be opened by the end user
• The user ensures that it has been carefully cleaned and decontaminated
• The unit has been operated according to the instructions and not in any improper way.
Should warranty service be required, repair or replacement will be provided by Cole-Parmer
without charge. Freight shipping the unit to Cole-Parmer will be the responsibility of the
purchaser. There are no other warranties or guarantees, implied or otherwise expressed
including any warranties of application or merchantability.
Repair Service
Should your Pipette Controller require service or repair, please contact
Cole-Parmer Customer Service department. They will issue a Return Authorization (RA)
Number and advise on the proper packaging and method of shipment. Be sure to list your
RA number on the shipping label.
Environmental Protection /
WEEE Directive
This equipment is labeled with the crossed-out, wheeled-bin symbol to indicate that
the equipment must not be disposed of with unsorted waste. It is your responsibil-
ity to correctly dispose of the equipment by handing it over to an authorized facility
for separate collection and recycling. It is also your responsibility to decontaminate
the equipment in case of biological, chemical or radioactive contamination in order
to protect the persons involved in the disposal or recycling of products from health
hazards.
For more information about where you can drop off your waste equipment,
please contact your local dealer from whom you originally purchased the product.
By doing so, you will help to conserve our natural resources and you will ensure that
your waste products are recycled in a matter that protects human health and protects
the environment.

10
Declaration of Conformity
We certify that this equipment meets the essential requirements of the directives
and has been tested according to the specified test methods. A full copy of the
Declaration of Conformity document may be obtained from our website.

11

12
Cole-Parmer
625 E Bunker Court
Vernon Hills, IL 60061
Toll-free: +1.800.323.4340
International: +1.847.549.7600
sales@coleparmer.com
coleparmer.com
For pipettor accessories or
manuals in other languages,
scan this QR code.
In Canada: +1.514.355.6100
In China: +86.21.51099909
In France: +33(0)1486.37800
In Germany: +49(0)9377.92030
In India: 591.22.61394444
In Italy: +39(0)1313.89513
In UK: +44(0)1480.272279
1065Y41M
Made in China
Table of contents
Other Cole Parmer Controllers manuals