manuals.online logo
Brands
  1. Home
  2. •
  3. Brands
  4. •
  5. Coleman
  6. •
  7. Tent
  8. •
  9. Coleman Pegasus 2000001131 User manual

Coleman Pegasus 2000001131 User manual

Pegasus™17’x10’
1Layout & Positioning
of Tent, Pole Assembly
– Layout and position tent with front
door facing desired direction. (illus. 1)
– Unzip door.
– Stake down tent corners only, using
the stake loops. Keep the floor taut.
(illus. 2)(Intermediate loops will be
staked later.)
– Assemble main tent poles by
interlocking shock-corded poles.
(two poles)
– Insert the main poles into pole
sleeves.The poles should cross
forming an ”X” in the middle of tent.
(illus. 1)
2
When You Are Ready
To Set Up Your Tent
– Select a level campsite clear of
rocks, branches and other hard
or sharp objects.
– Do not set up your tent under trees.
– For best results in windy conditions,
position the end of tent into the wind.
Assembled Main poles
inserted through
pole sleeves
Instructions apply to Part Number 2000001131
illus. 1
illus. 2
Tent stake
through stake loop
illus. 4
Tent center
frame set-up
Side Pole
Main pole
Side pole
sleeve
Main pole
Part No. 9161-1051
Part No. 9161-1061
illus. 3
Insert pin into pole end
Rainfly
Part No.
9161-1091
(2) Main Tent Poles
(Black)
(2) Side Poles
(Gray)
(1) Rainfly Main Pole
Part No. 9161-1071
(2) Rainfly Side Poles
Part No. 9161-1081
POLE ASSEMBLY PARTS
Connect Frame to Tent
– Insert pin near tent corner into the end of
main tent pole. (illus. 3, illus. 4)
– Go to opposite end of pole and gradually
apply pressure to the pole forming an arch
until you are able to insert the pin into the
pole end. Repeat for second main pole.
(illus. 3, illus. 4)
– Assemble gray side shock-corded poles and
insert through side pole sleeves. (illus. 4)
– Insert one pin into the end of side tent pole
at tent center. (illus. 3, illus. 4)
– At the opposite pole end gradually apply
pressure to the pole forming an arch until
you are able to insert the pin into the pole
end. Repeat for second side pole.(illus. 4)
Pegasus™5,2 x 3 m
1Étalez et positionnez
la tente et les mâts
– Étalez et positionnez la tente en orientant
la porte dans la direction désirée (ill. 1).
– Ouvrez la glissière de la porte.
– Ancrez les coins de la tente en passant
les piquets dans les ganses prévues à
cet effet aux coins. Tendez bien le tapis
de sol (ill. 2). Vous ancrerez les ganses
intermédiaires plus tard.
– Emboîtez les (deux) mâts principaux
solidarisés de la tente pour les
assembler.
– Enfilez les mâts principaux dans les
passants. Ils se croiseront et formeront
un «X» au faîte de la tente (ill. 1).
2
Quand vous êtes prêt
à monter votre tente
– Choisissez un endroit propice:
de niveau et sans pierres, branches
ou matières dures et pointues
– Ne la placez pas sous les arbres
– Pour obtenir les meilleurs résultats
quand il y a du vent, n’orientez pas
la porte de la tente au vent.
Mâts principaux
assemblés et enfilés
dans les passants
Instructions applicables au modèle 2000001131
ill. 1
ill. 2
Piquet passé
dans la ganse
ill. 4
Armature
centrale montée
Mât latéral
Mât principal
Passant
latéral
Mât
principal
Pièce no9161-1051
Pièce no9161-1061
ill. 3
Introduisez la cheville
dans le bout du mât
Double toit
Pièce 9161-1091
2 mâts principaux
de la tente (noirs)
2 mâts latéraux
de la tente (gris)
2 mâts latéraux du
double toit
1 mât principal du
double toit
Pièce no9161-1071
Pièce no9161-1081
PIÈCES DES MÂTS
Fixez l’armature à la toile
– Insérez la cheville située près du coin de la tente
dans l’extrémité du mât principal (ill. 3 et 4).
– Allez à l’autre bout du mât et arquez
progressivement celui-ci jusqu’à ce que vous
puissiez rentrer la cheville du coin dans le bout
du mât. Agissez de la même façon pour
positionner le deuxième mât principal (ill. 3 et 4).
– Enclenchez alors les mâts latéraux gris – ils
sont solidarisés – afin de les assembler, puis
enfilez-les dans les passants latéraux (ill. 4).
– Insérez une cheville dans le bout du mât latéral,
au milieu de la tente (ill. 3 et 4).
– Allez au bout opposé du mât latéral et arquez
petit à petit le mât jusqu’à ce que vous puissiez
insérer la cheville dans le bout. Agissez de la
même façon avec le deuxième mât latéral (ill. 4).
3
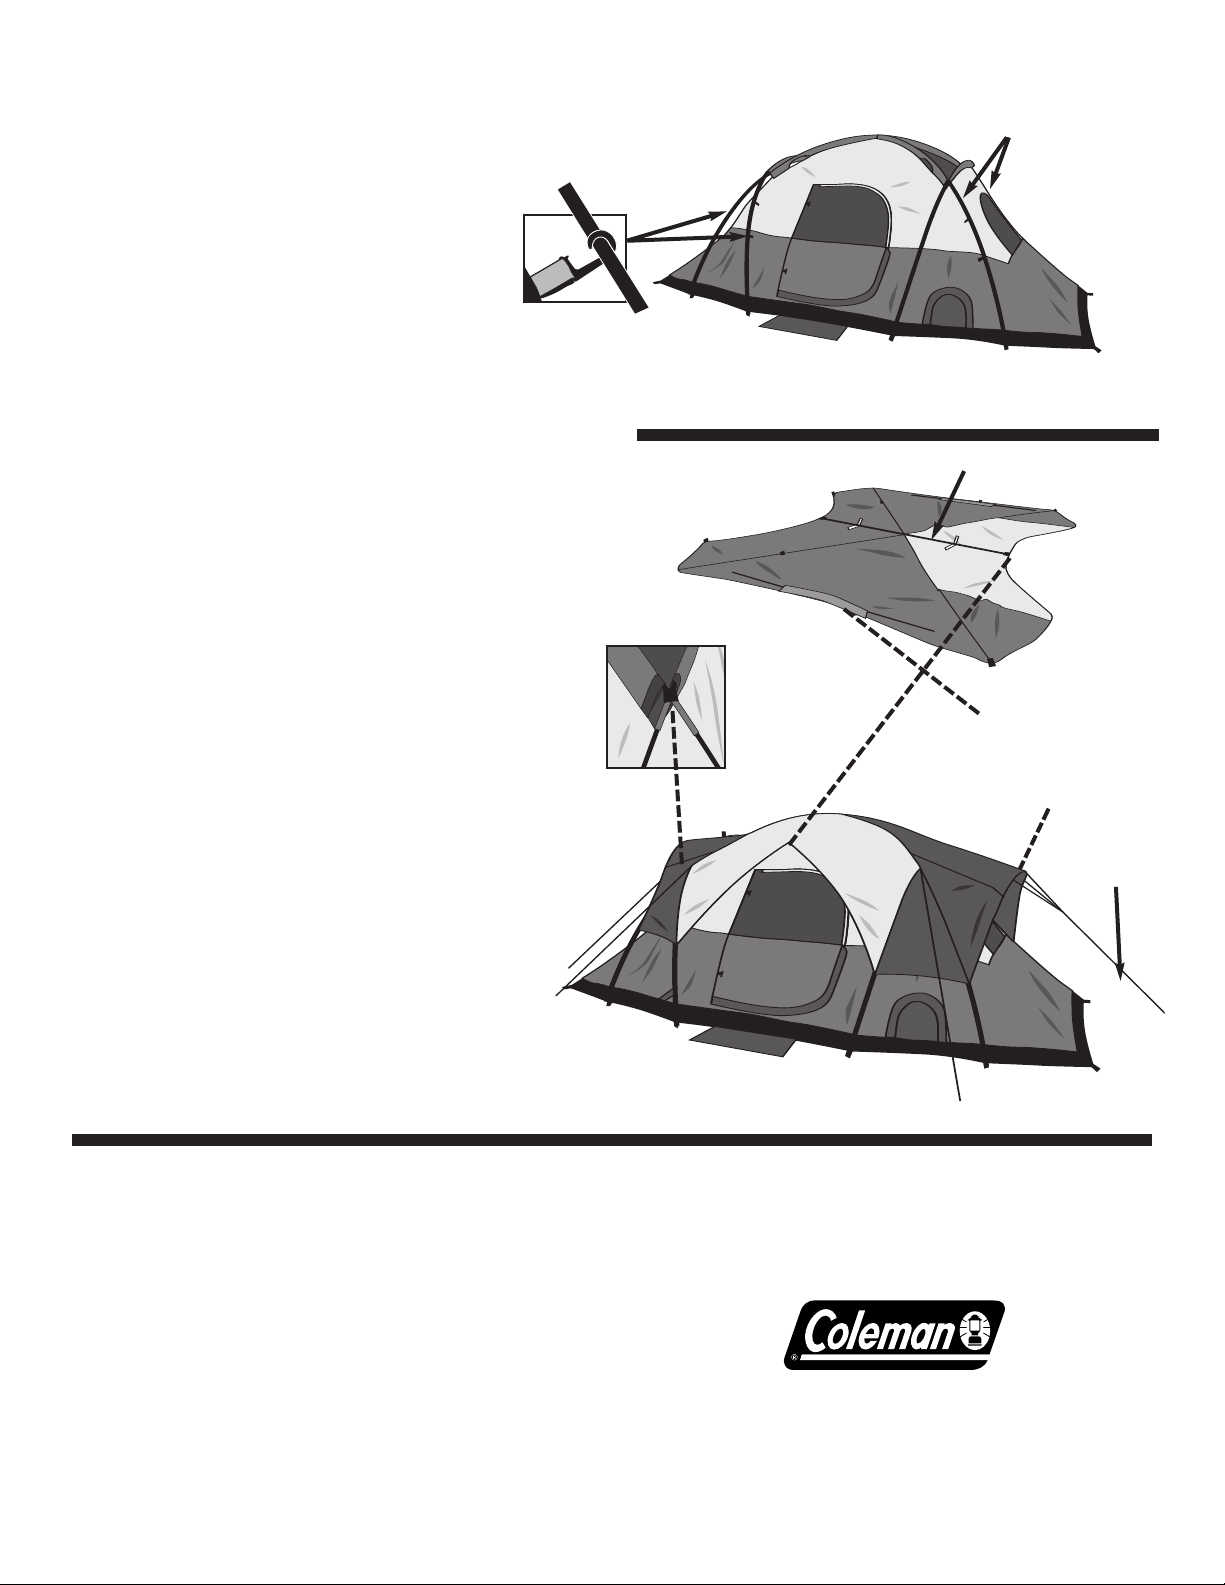
4ill. 5 Tente montée, sans son double toit.
Notez l’emplacement des pinces au bord de la tente.
ill. 6
Pinces de
l’armature
ill. 7
Envers du
double toit
Œillets pour les mâts
latéraux du double toit
Partie avant du
double toit
Mât principal du double toit
IMPORTÉE PAR
SUNBEAM CORPORATION (CANADA) LIMITED
DBA JARDEN CONSUMER SOLUTIONS
20B Hereford Street, Brampton (Ontario) L6Y 0M1
1 800 387-6161 • www.colemancanada.ca
FABRIQUÉE EN CHINE
IMPRIMÉ EN CHINE Rév. 11/07
Renseignements essentiels
• Sous certaines conditions (par temps froid ou humide, par exemple)
de la condensation se forme sur les surfaces intérieures de la tente. Cette
condensation est causée par la vapeur d’eau provenant de la respiration,
de la transpiration ou de vêtements mouillés, laissés dans la tente. Il ne
s’agit ABSOLUMENT PAS d’humidité ayant pénétré la toile. Vous pouvez la
minimiser en gardant les vêtements mouillés hors de la tente et en assurant
une bonne ventilation en tout temps.
• Ne rangez jamais la tente, même temporairement, sans la faire totalement
sécher et sans brosser la terre qui y adhère. Ne roulez jamais les piquets ou
les mâts à l’intérieur de la tente, utilisez des sacs de rangement distincts.
• POUR LES DÉTERRER, TIREZ SUR LES PIQUETS MÊMES –
NE TIREZ JAMAIS SUR LA TOILE OU SUR LES GANSES.
• NE RANGEZ JAMAIS LES MÂTS EMBOÎTÉS, DÉBOÎTEZ-LES.
• Ne laissez pas la tente montée pendant des semaines et des semaines
car le rayonnement ultraviolet risquerait de sérieusement abîmer le tissu et
de le décolorer.
AVERTISSEMENT:  LOIGNEZ LE TISSU DE CETTE TENTE DES
FLAMMES ET DE TOUTE SOURCE DE CHALEUR. Cette tente
est conforme  la norme dinflammabilit CPAI-84. Le tissu
brler
a sil est laiss en contact continu avec une source de
flamme. Appliquer toute substance trangre sur le tissu peut
neutraliser les proprits de rsistance aux flammes.
ill. 9 Tente complètement montée,
avec son double toit.
Hauban
Fixez le double toit
– Enclenchez les sections
solidarisées du mât principal
du double toit.
– Placez les bouts du mât principal du double
toit dans les poches renforcées des bords
envers opposés du double toit (ill. 7 et 8).
– Fixez le mât du double toit à l’envers du
double toit, avec les attaches fournies (ill. 8).
– Enfilez les deux mâts latéraux du double toit
dans les passants prévus à cet effet des
côtés du double toit (ill. 7)
– Étalez le double toit sur l’armature de la
tente, les mâts étant dessous. Le mât
principal du double toit doit faire saillie
au-dessus de la porte d’entrée et
au-dessus de la fenêtre arrière.
– Attachez les quatre brides élastiques
pourvues d’un crochet en «S» (aux
coins du double toit) aux bagues des
bouts des mâts (ill. 9).
– Immobilisez le double toit avec les
attaches fournies sur la face envers
du double toit (ill. 8).
– Insérez les bouts des mâts latéraux du
double toit dans les œillets, de part et
d’autre des fenêtres latérales (ill. 9).
– Attachez et ancrez les haubans comme
il se doit (ill. 9).
Attachez les pinces à
l’armature
– Fixez les pinces à l’armature (ill. 5 et 6).
– Ancrez les ganses de piquet
restantes.
Enfilez le mât latéral
du double toit dans le
passant de l’envers
du double toit.
ill. 8 Fixez le
double toit à la
tente avec les
attaches
velcro
3
4illus. 5 Assembled tent without rainfly.
Note the frame clips located on edge of tent.
illus. 6
Frame clips
illus. 7
Underside of
Rainfly
Grommets for
side rainfly poles
Front of Rainfly
Rainfly Main Pole
IMPORTED BY
SUNBEAM CORPORATION (CANADA) LIMITED,
DBA JARDEN CONSUMER SOLUTIONS.
20B Hereford Street, Brampton, Ontario L6Y 0M1
1-800-387-6161 • www.colemancanada.ca
MADE IN CHINA
PRINTED IN CHINA Rev. 11/07
Things You Should Know
• Under certain conditions (cold weather, high humidity, etc.)
condensation will form on the inside surfaces of your tent. Condensation is
caused by water vapor from your breath, perspiration, or any wet clothing
inside your tent. It is NOT LEAKAGE through the tent fabric. It can be
minimized by removing wet clothing from your tent and by providing good
ventilation through the tent.
• Never store tent, even for a short period of time, without drying it
thoroughly and brushing off caked dirt. Do not pack stakes or poles inside
your tent. Use a separate storage bag.
• STAKES SHOULD BE REMOVED BY PULLING ON THE STAKE ITSELF.
NEVER PULL ON THE TENT FABRIC OR TENT STAKE LOOP TO
REMOVE STAKE.
• TENT POLES SHOULD NOT BE LEFT TELESCOPED
TOGETHER DURING STORAGE.
• Do not leave your tent set-up for weeks at a time, be aware that exposure
to the ultraviolet rays of the sun can seriously damage material and/or cause
it to become discolored.
WARNING: KEEP ALL FLAME AND HEAT SOURCES
AWAY FROM THIS TENT FABRIC. This tent meets the
flammability requirements of CPAI-84. The fabric will burn
if left in continuous contact with any flame source. The
application of any foreign substance to the tent fabric may
render the flame-resistant properties ineffective.
illus. 9 Completed tent with rainfly.
Guyline
Attach Rainfly
– Assemble rainfly pole by
interlocking shock-corded pole.
– Insert main rainfly pole into reinforced
pockets located at the center edges of the
underside of rainfly. (illus. 7), (illus. 8)
– Attach rainfly pole to the underside of
rainfly with the pole ties. (illus. 8)
– Insert the two rainfly side poles through
the pole sleeves at the sides of the
rainfly. (illus. 7)
– Drape rainfly over tent frame, pole side
down. Main rainfly pole should point out
over door and rear window.
– Connect the four elastic loops
with “S” hooks, (found at the
rainfly corners) to rings at end of poles
(illus. 9)
– Secure rainfly with attachments
located on underside of fly. (illus. 8)
– Insert the tips of the side rainfly poles
into the grommets on either side of the
side windows.(illus. 9)
– Attach and stake out the tent with
guylines. (illus. 9)
Attach Frame Clips
– Attach frame clips to frame poles. (illus. 5, 6)
– Stake out all additional loops.
Insert Side Rainfly
pole through pole
sleeve on underside
of rainfly.
illus. 8
Attach rainfly to
tent with velcro
attachments

Other Coleman Tent manuals

Coleman 2000015111 Manual

Coleman

Coleman 2000015111 Manual

Coleman Outsider 13 x 11 User manual

Coleman

Coleman Outsider 13 x 11 User manual

Coleman Monotana 9279B147 User manual

Coleman

Coleman Monotana 9279B147 User manual

Coleman 2000010319 Manual

Coleman

Coleman 2000010319 Manual

Coleman Cimmaron 9260A107 User manual

Coleman

Coleman Cimmaron 9260A107 User manual

Coleman 2000008916 User manual

Coleman

Coleman 2000008916 User manual

Coleman Elks Bay Instant Hex 8P User manual

Coleman

Coleman Elks Bay Instant Hex 8P User manual

Coleman CRESCENT RIM 9'x9' User manual

Coleman

Coleman CRESCENT RIM 9'x9' User manual

Coleman CHALET 9 CV Manual

Coleman

Coleman CHALET 9 CV Manual

Coleman MONTANA 8 TENT User manual

Coleman

Coleman MONTANA 8 TENT User manual

Coleman 2000010195 Manual

Coleman

Coleman 2000010195 Manual

Coleman Pegasus 9161-171C User manual

Coleman

Coleman Pegasus 9161-171C User manual

Coleman Sundome 2000000136 User manual

Coleman

Coleman Sundome 2000000136 User manual

Coleman 2000004411 Manual

Coleman

Coleman 2000004411 Manual

Coleman Phad X3TM User manual

Coleman

Coleman Phad X3TM User manual

Coleman Phad X2 2000000456 User manual

Coleman

Coleman Phad X2 2000000456 User manual

Coleman bristol 3 User manual

Coleman

Coleman bristol 3 User manual

Coleman STITCHLINE 2000004415 Manual

Coleman

Coleman STITCHLINE 2000004415 Manual

Coleman Montana Big Sky 9278B247 User manual

Coleman

Coleman Montana Big Sky 9278B247 User manual

Coleman 9271H133 User manual

Coleman

Coleman 9271H133 User manual

Coleman cadence 9860-707 User manual

Coleman

Coleman cadence 9860-707 User manual

Coleman Tent 2000000436 User manual

Coleman

Coleman Tent 2000000436 User manual

Coleman WEATHERMASTER 2000001596 Manual

Coleman

Coleman WEATHERMASTER 2000001596 Manual

Coleman Instant Shelter Manual

Coleman

Coleman Instant Shelter Manual

Popular Tent manuals by other brands

UK Tents Professional Prime 3m Series Assembly instructions

UK Tents

UK Tents Professional Prime 3m Series Assembly instructions

Eureka Tetragon 1210 Assembly instructions

Eureka

Eureka Tetragon 1210 Assembly instructions

Vango BRAVO Pitching instructions

Vango

Vango BRAVO Pitching instructions

Boutique Camping OXFORD BELL TENT instruction manual

Boutique Camping

Boutique Camping OXFORD BELL TENT instruction manual

Kiwi Camping Kakapo 8 Pitching instructions

Kiwi Camping

Kiwi Camping Kakapo 8 Pitching instructions

Zolia 43992 Assembly

Zolia

Zolia 43992 Assembly

Schou Outfit 624119 instruction manual

Schou

Schou Outfit 624119 instruction manual

Skandika Pitea Van Setup instructions

Skandika

Skandika Pitea Van Setup instructions

Ohenry Productions Premium 15x50 quick start guide

Ohenry Productions

Ohenry Productions Premium 15x50 quick start guide

TEDS TEDPoP instruction manual

TEDS

TEDS TEDPoP instruction manual

Crivit 292637 Assembly and Safety Advice

Crivit

Crivit 292637 Assembly and Safety Advice

GigaTent Dual Identity SHT007 owner's manual

GigaTent

GigaTent Dual Identity SHT007 owner's manual

Homelux DCY190 Original instructions

Homelux

Homelux DCY190 Original instructions

Bresser NATIONAL GEOGRAPHIC 91-29000 operating instructions

Bresser

Bresser NATIONAL GEOGRAPHIC 91-29000 operating instructions

Astonica Leisure Terrace 50104101 instruction manual

Astonica

Astonica Leisure Terrace 50104101 instruction manual

Khyam Nimbus Mini Pitching & Striking Instructions

Khyam

Khyam Nimbus Mini Pitching & Striking Instructions

KROFTMAN T1220 Assembly manual

KROFTMAN

KROFTMAN T1220 Assembly manual

Rowlinson Garden Products SS352C quick guide

Rowlinson Garden Products

Rowlinson Garden Products SS352C quick guide

manuals.online logo
manuals.online logoBrands
  • About & Mission
  • Contact us
  • Privacy Policy
  • Terms and Conditions

Copyright 2025 Manuals.Online. All Rights Reserved.