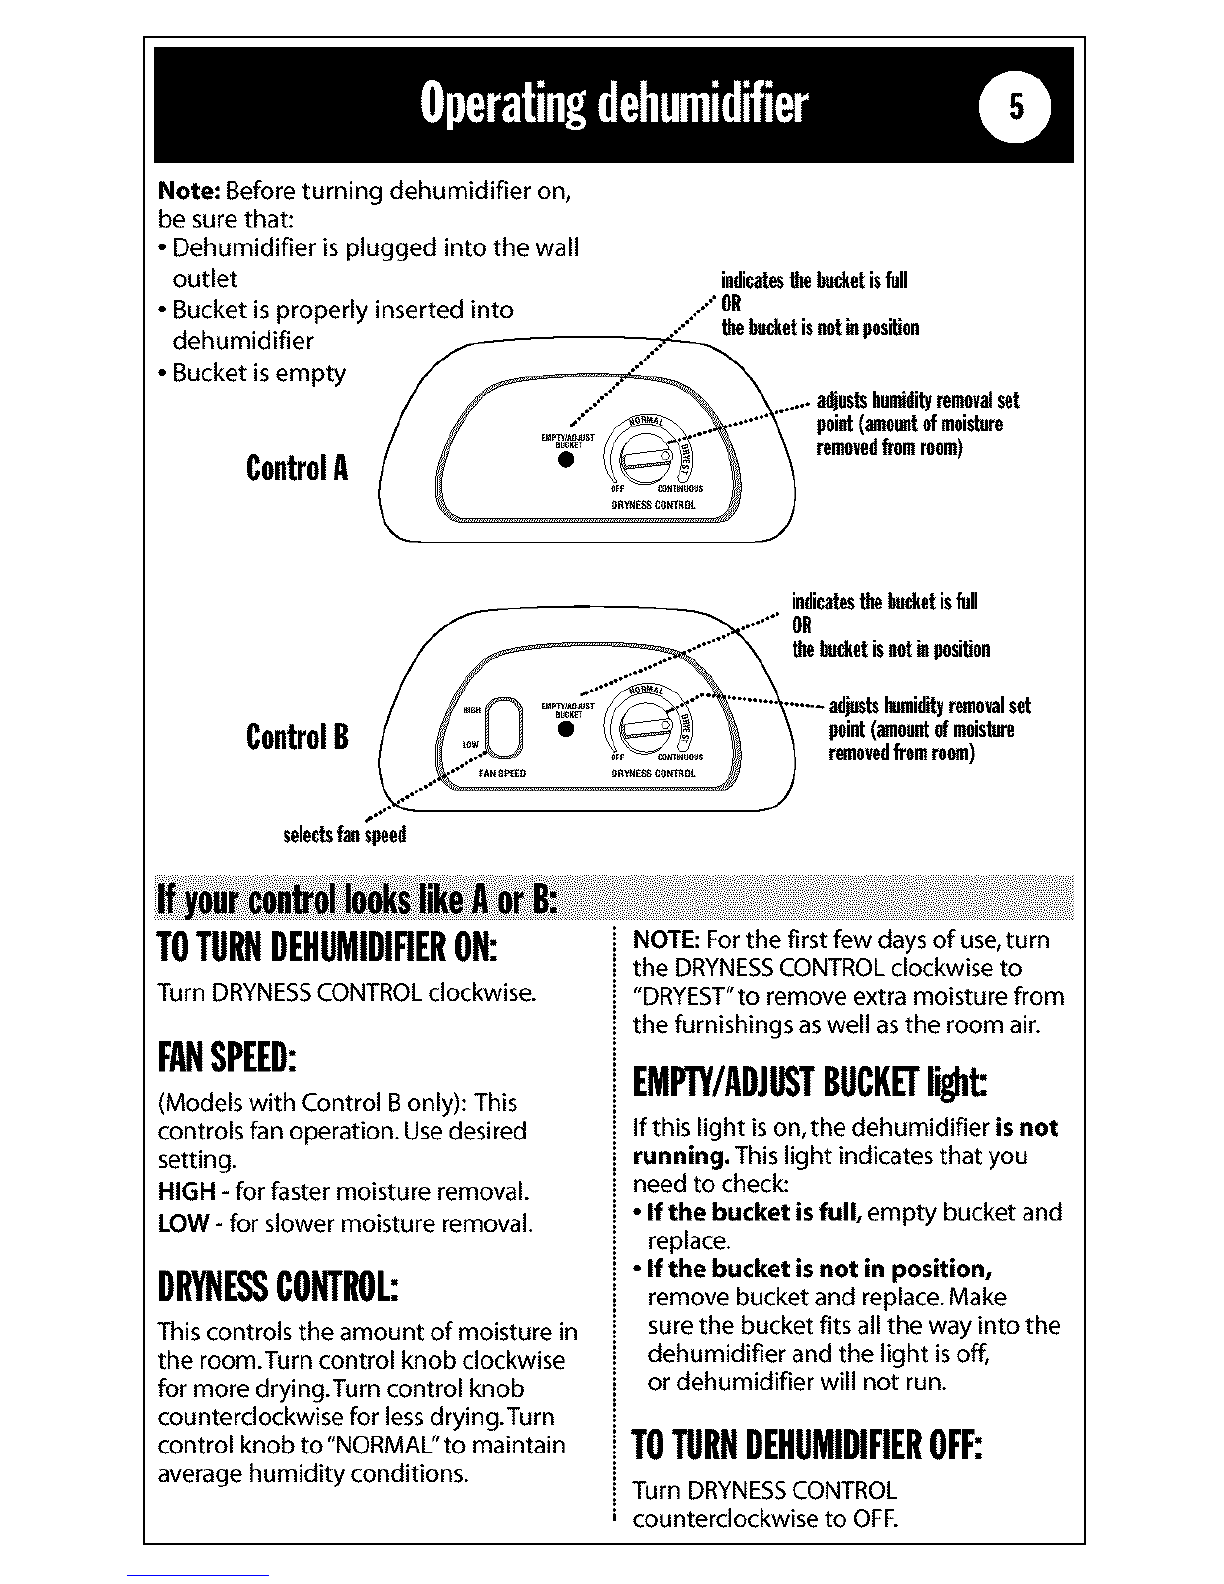
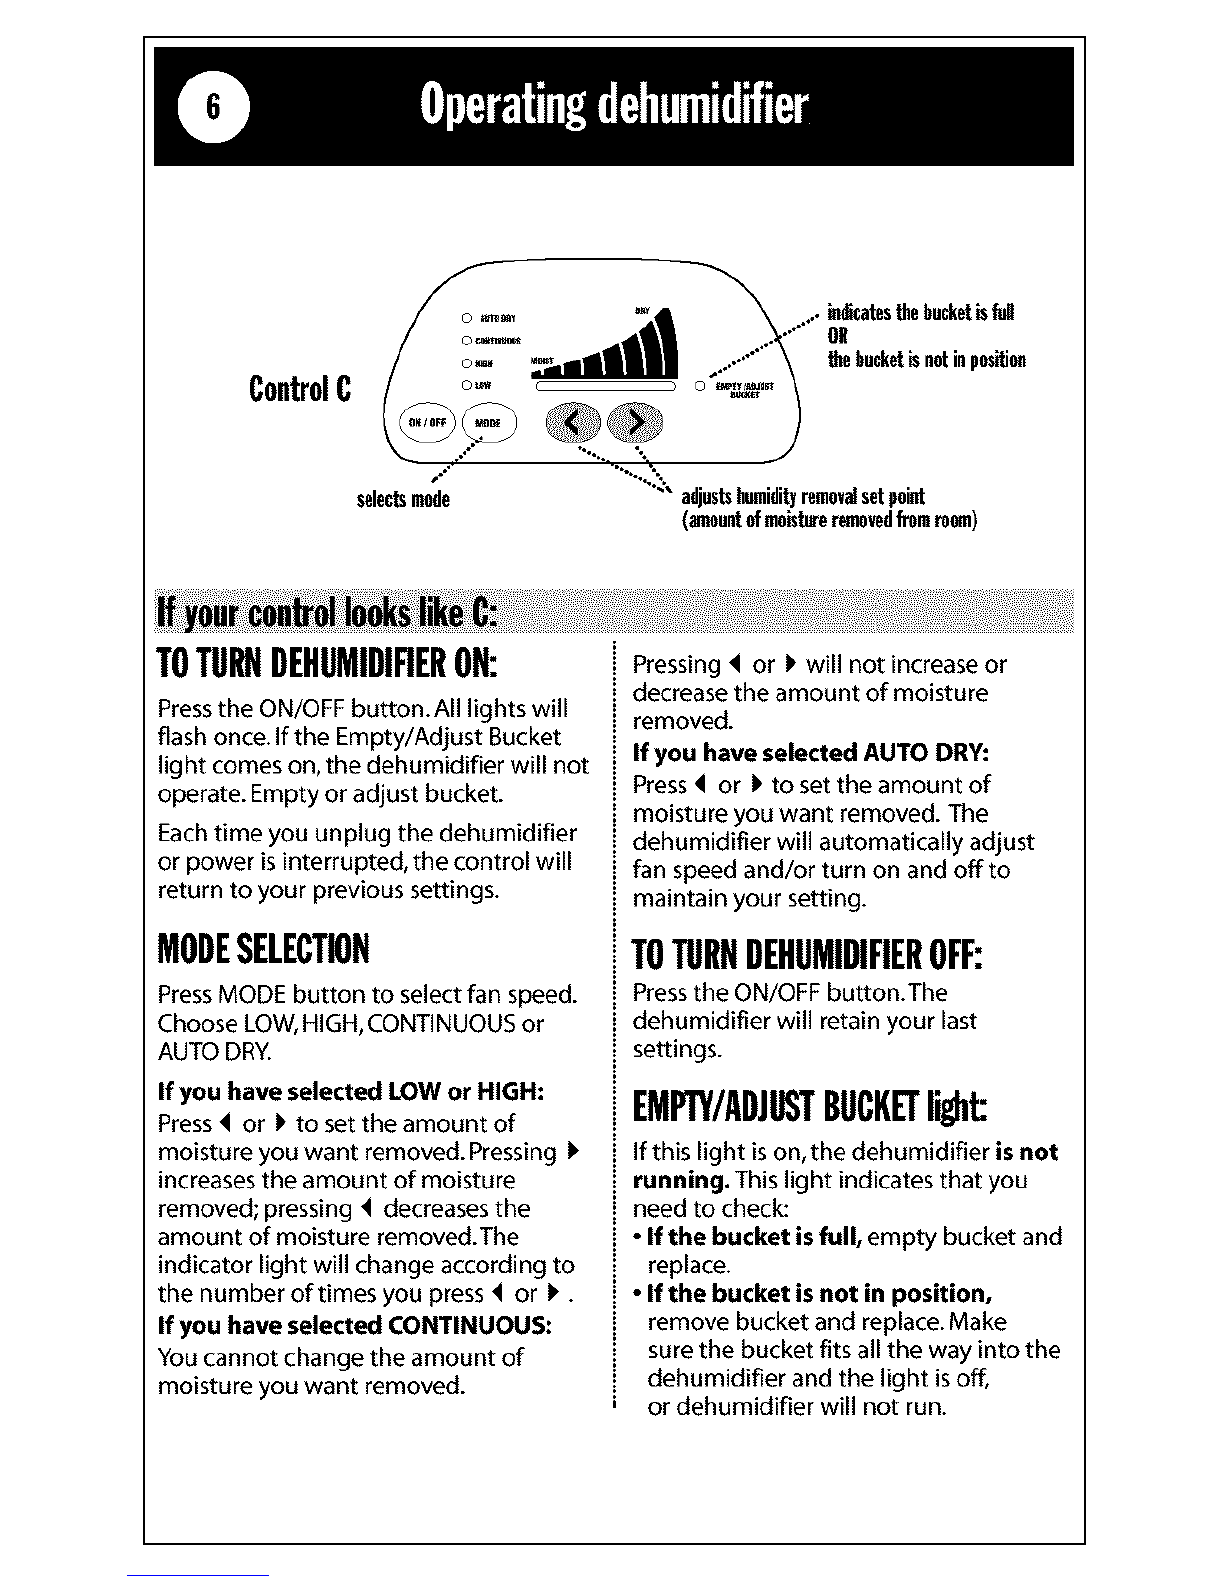
Comfortaire DH600K0 User manual

Dehumidifier
Use&CareGuide
q
Contents
Safetyinformation..................................
ElectTicalrequirements............................... .3
Installingdehumidifier............................... .4
Operatingdehumidifier............................. .5-6
Removingandemptyingwaterbucket..................... 7
Waterlevelfloatandautomaticshutoff................... .8
Caringforyourdehumidifier............................ 9
Ifyouneedassistanceorservice...................... 10-11
Part No. 1185020 Rev.A

Your safety and the safety of others
are very important•
We have provided many important safety messages in this manual and on
your appliance. Always read and obey all safety messages.
l_ his is the safety alert symbol.This symbol alerts you to potential hazards that can kilt or hurt you
and others.
Atl safety messages will follow the safety alert symbol and either the word
"DANGER" or '"WARNING." These words mean:
You can be killed or seriously injured if you don't immediately follow
instructions.
You can be killed or seriously injured if you don't follow instructions.
Atl safety messages will tell you what the potential hazard is, tell you how to
reduce the chance of injury, and tell you what can happen if the instructions
are not followed.
IMPORTANT SAFETY INSTRUCTIONS
WARNING --To reduce the risk of fire, electrical shock, injury or
sickness when using your dehumidifier, follow these basic precautions:
• Plug into a grounded 3 prong
outlet. • Unplug dehumidifier before
servicing.
• Do not remove ground prong.
• Do not use an adapter.
• Do not drink water collected in the
water bucket.
• Do not use an extension cord.
-- SAVE THESE INSTRUCTIONS --
It is your responsibility to:
• Install the dehumidifier according to the Installation Instructions.
• Connect the dehumidifier only to the proper kind of outlet, with the correct
electrical supply and ground. See "Electrical requirements;' page 3.

Electrical Shock Hazard
Plug into a grounded 3 prong
outlet.
Do not remove ground prong.
Do not use an adapter.
Do not use an extension cord.
Failure to follow these
instructions can result in death,
fire, or electrical shock.
A 115-volt (103.5 min., 126.5 max.),
60-Hz, AC-only, 15- or 20-ampere fused
and properly grounded electrical
supply is required. A time-delay fuse or
time-delay circuit breaker is
recommended. Use a separate circuit to
connect only the dehumidifier.
Groundinginstruclions:
3,,_ongground-type
o_tlet ".,.,........
3-pr0ng
groundplug
........__d _I I_\/_,,,j_/'_e_;'°li_\/
%
powersupplycord
For your personal safety, this
dehumidifier must be grounded.This
dehumidifier is equipped with a power
supply cord having a 3-prong ground
plug.
To minimize possible shock hazard, the
cord must be plugged into a mating
3-prong ground-type outlet, grounded
in accordance with local codes and
ordinances. If a mating outlet is not
available, it is the personal
responsibility and obligation of the
customer to have the properly
grounded outlet installed by a qualified
electrician.

Good air circulation is needed
for best performance--allow
at least 12-18 inches (30.5 -
45.7 cm) of air space on all
sides of the dehumidifier.
]2.-18"_
(30.5-4-5.7cm)
Keep all outside doors,
windows and other
openings closed when
operating dehumidifier.
Humid outdoor air will
increase dehumidifier
workload.
(30.5-45.7cm)
Install dehumidifier on a level floor strong enough to support the
dehumidifier with a full bucket of water.

Note: Before turning dehumidifier on,
be sure that:
• Dehumidifier is plugged into the wall
outlet
• Bucket is properly inserted into
dehumidifier
• Bucket is empty
ControlA
indicatesthebudletisfull
..."OR
.."" thebudletisnotinposiUon
adjustshumidityremovalset
point(amouatofmoisture
removedfromroom)
indicatestheburlierisfull
........ OR
/J _//_-,_-_"" _'_.-.---_lNtsI_idityrmoovalset
ControlB /E_H I •/C_) _ \ palnt(..o_t_moist_o
I 9 )fromremo)
selectsfanspeed
TOTURNDEHUMIDIFIERON:
Turn DRYNESSCONTROL clockwise.
FANSPEED:
(Models with Control B only): This
controls fan operation. Use desired
setting.
HIGH - for faster moisture removal.
LOW - for slower moisture removal.
DRYNESSCONTROL:
This controls the amount of moisture in
the room.Turn control knob clockwise
for more drying.Turn control knob
counterclockwise for less drying.Turn
control knob to "NORMAL"to maintain
average humidity conditions.
NOTE: For the first few days of use, turn
the DRYNESSCONTROL clockwise to
"DRYEST"to remove extra moisture from
the furnishings aswell as the room air.
EMPTY/ADJUSTBUCKETlight:
Ifthis light is on, the dehumidifier is not
running. This light indicates that you
need to check:
• If the bucket is full, empty bucket and
replace.
• If the bucket is not in position,
remove bucket and replace. Make
sure the bucket fits all the way into the
dehumidifier and the light is off,
or dehumidifier will not run.
TOTURNDEHUMIDIFIEROFF:
Turn DRYNESSCONTROL
counterclockwise to OFF.

ControlC
.. _ates _ebucketis
OR
_ebucketisnotinpo_,3tion
J
selectsmode "" adjustshumidityremovalsetpoint
(_nour_ofmois_eremovedfTomroom)
TOTURNDEHUMIDIFIERON:
Pressthe ON/OFFbutton. All lightswill
flash once. If the Empty/Adjust Bucket
light comeson, the dehumidifier will not
operate. Empty or adjust bucket.
Each time you unplug the dehumidifier
or power is interrupted, the control will
return to your previous settings.
MODESELECTION
Press MODE button to select fan speed.
Choose LOW,HIGH, CONTINUOUS or
AUTO DRY.
If you have selected LOW or HIGH:
Press 4or I, to set the amount of
moisture you want removed. Pressing !_
increases the amount of moisture
removed; pressing 4decreases the
amount of moisture removed.The
indicator light will change according to
the number of times you press 4or I,.
If you have selected CONTINUOUS:
You cannot change the amount of
moisture you want removed.
Pressing 4or !_will not increase or
decrease the amount of moisture
removed.
If you have selected AUTO DRY:
Press 4or I, to set the amount of
moisture you want removed. The
dehumidifier will automatically adjust
fan speed andlor turn on and offto
maintain your setting.
TOTURNDEHUMIDIFIEROFF:
Pressthe ON/OFF button.The
dehumidifier will retain your last
settings.
EMPTY/ADJUSTBUCKETlight
Ifthis light is on, the dehumidifier is not
running. This light indicates that you
need to check
• If the bucket is full, empty bucket and
replace.
• If the bucket is not in position,
remove bucket and replace. Make
sure the bucket fits all the way into the
dehumidifier and the light is off,
or dehumidifier will not run.

Sickness Hazard
Do not drink water collected in
water bucket.
Doing so can result in sickness.
1. Useboth side handles to lift bucket.
Pull bucket forward and remove.
2.Carry bucket to a large sink or tub.
3. Pour water through opening into a
sinkor tub.
4. Replace bucket completely and
check that EMPTY/ADJUST BUCKET
light is off.
Drainhoseconneclionmethod:
(to drainwaterfrombucketcontinuously)
1. If your dehumidifier does not have
a drain hose connector cover, go to
Step 2.
If your dehumidifier has a drain
hose connector cover, use a flat-
blade screwdriver to remove cover
from drain connector.Turn cover
counterclockwise. Discard cover. It
cannot be reused. Go to Step 2.
•DO NOt
•"" damage
outside or
connection
will leak.
/
center of drain hose connector
2. Drill out only the center of the drain
hose connector. Use a minimum I/4"
drill bit.
3. Attach a garden hose to drain hose
connector.The garden hose should
not be longer than 8 feet (2.4 m). Run
other end of garden hose into a floor
drain. Check that the hose lies fiat
and in the drain.
Tousethebucketwithoutthegardenhose:
Use a garden hose cap to seal the drain
hose connector.

Alldehumidifiershaveautomatic
shutoffandawaterlevelfloat.Some
dehumidifiersfeatureanadjustable
WaterLevelFloat.Thebucketmustbe
properlyalignedfortheWaterLevel
Floattowork.
Formodelswithnon-adjustable
WaterLevelFloat
The Water Level Float will shut offthe
dehumidifier automatically.
Formodelswithadjustable
WaterLevelFloat:
You can set the adjustable Water Level
Float at the "high" or "low" position. Both
settings will turn off the dehumidifier
automatically.
"High" setting: Water Level Float is
preset to the "high" position--left side
of opening.The dehumidifier will shut
off automatically when bucket is 3/4
full.
"Low" setting: Slide Water Level Float to
"low" position--right side of opening
-- to make the bucket lighter to carry.
The dehumidifier will shut off
automatically when bucket is I/2 full.

Youmaycleantheexteriorofyourproduct:
Generalcleaningand
maintenance
I. Dust the front grille and side panels
with a soft brush or the dusting
attachment of your vacuum.
2. If cabinet paint chips, you can touch
up the paint with a good grade
enamel paint to prevent rust.
Waterbucketcleaning
Every few weeks, rinse the inside
of the water bucket with_?_
a mild detergent _/ _\
topreventgro_hl_l _
of mold, mildew / _ _'_
and bacteria.
Haveanauthorizedservicercleanandservicetheinteriorcoils
ofyourproductannually.

If youneedserviceorcallwithaquestion,havethisinformationready:
Model number
Serial number
Purchase date
Phone number
Store
Model and serial numbers are located on the wall behind the water bucket.
1.Beforecallingfor
assistance...
Performance problems often result
from little things you can find and fix
yourself without tools of any kind.
Dehumidifier will not run:
•Is unit plugged into a live circuit with
proper voltage?
• Is unit turned on?
• Is water bucket installed properly?
• Does water bucket need emptying?
• Has a house fuse blown or circuit
breaker tripped?
Unit runs but does not dehumidify:
• Is unit in defrost cycle? (Provided on
some models.)
Normal operating sounds:
When your dehumidifier is operating
normally, you will hear sounds such as:
• Compressor sounds--the compressor
can be loud.This is normal.
•"Clicking"sounds--can be heard when
the unit or compressor turns off and
on, and when the Automatic Shutoff
Switch is working.
• Air movement from the fan.
Normal operating conditions:
• Unit will put out heat.
2.Ifyouneedassistancein
theU.S.A....
Call your local dealer or the Whirlpool
Customer Interaction Center toll-free
at 1-800-253-I 301. When requesting
assistance, please provide model
number, serial number, date of
purchase, and acomplete description
of the problem.This information is
needed to better respond to your
request.
If you need further assistance, you can
write to:
Whirlpool Corporation
Customer Interaction Center
553 Benson Road
Benton Harbor, M149022-2692
Please include a daytime phone
number in your correspondence.

3.Ifyouneedassistanceor
serviceinCanada...
Contact the dealer from whom you
purchased your appliance, or call the
Consumer Assistance Centre toll free,
8:30 a.m. - 6:00 p.m. (EST),
at 1-800-461-5681.
OR
Contact your nearest direct service
branch or authorized servicing outlet
to service your appliance. (See list
below.)
NOTE:When asking for help or
service:
Pleaseprovide a detailed description
of the problem, your appliance's
complete model and serial numbers,
and the purchase date.This
information will help us respond
properly to your request.
Direct service branches:
BRITISH
COLUMBIA 1-800-665-6788
ALBERTA 1-800-661-6291
ONTARIO
Ottawa area 1-800-267-3456
(except 807 area code)
Outsidethe Ottawaarea 1-800-807-6777
MANITOBA,
SASKATCHEWAN
and807 area codein
ONTARIO 1-800-665-1683
QUEBEC Montreal
(except South Shore) 1-800-361-3032
SouthShoreMontreal 1-800-361-0950
QuebecCity 1-800-361-1523
Sherbrooke 1-800-567-6966
ATLANTIC
PROVINCES 1-800-565-1598
If you need further assistance, you can
write to:
Consumer Relations Department
Inglis Limited
1901 Minnesota Court
Mississauga, Ontario LSN 3A7
Pleaseinclude a daytime phone
number in your correspondence.

Part No. 1185020 Rew A 01/02
@2002 All rights reserved Printed in U.S.A.

deusoy
cuidadodel
deshumidificador
Contenido
Informaci6ndeseguridad............................. 2
Requisitosel_ctricos................................. 3
C6moinstalareldeshumidificador....................... 4
C6mooperareldeshumidificador...................... 4-6
C6mosacaryvaciarelbaldedeagua .................... 7
Flotadordeniveldelaguaydesconexi6nautom,_tica.......... 8
Cuidadodesudeshumidificador........................ 9
Sinecesitaayudaoserviciot_cnico................... 10-11
Parte No. 1185020 Rev.A

Su seguridad y la seguridad de los
demds es muy importante.
Hemos incluido muchos mensajes importantes de seguridad en este
manual yen su etectrodom6stico. Lea y obedezca siempre todos los
mensajes de seguridad.
1_ ste es et simbolo de advertencia de seguridad.
Este simbolo le llama la atenci6n sobre peligros potenciales que
pueden ocasionar la muerte o una lesi6n a usted y a los demos.
Todos los mensajes de seguridad iran a continuaci6n det simbolo de
advertencia de seguridad y de la palabra "PELIGRO" o "ADVERTENCIA".
Estas palabras significan:
Si no sigue las instrucciones de inmediato, usted puede morir o sufrir una
lesibn grave.
Si no sigue las instrucciones, usted puede morir o sufrir una lesi6n grave.
Todos los mensajes de seguridad le dir_n et peligro potencial, le dir_n
c6mo reducir las posibilidades de sufrir una lesi6n y Io que puede suceder
si no se siguen las instrucciones.
INSTRUCCIONES IMPORTANTES DE SEGURIDAD
ADVERTENCIA - Para reducir el riesgo de incendio, descarga
eldctrica, lesibn o enfermedad al usar su deshumidificador, siga
estas precauciones b_sicas:
•EnchSfelo en un contacto de
pared de conexi6n a tierra con
tres terminales.
•No quite la terminal para conexi6n
atierra.
•No use adaptador.
• No use cable alargador.
• Desenchufe el deshumidificador
antes de darle mantenimiento o
servicio.
• No tome et agua acumulada en et
balde.
-- GUARDE ESTAS INSTRUCCIONES --
Es su responsabilidad:
• Instalar el deshumidificador de acuerdo con las instrucciones de instalaci6n.
• Enchufar el deshumidificador 5nicamente en el tipo de contacto de pared
adecuado, con la alimentaci6n electrica y la conexi6n a tierra correctas. Vea
"Requisitos etectricos" en la p_gina 3.

Peligro de descarga el6ctrica
EnchQfelo en un contacto de
}ared de conexibn a tierra con
tres terminales.
No quite la terminal para
conexibn a tierra.
No use adaptador.
No use cable alargador.
No seguir estas instrucciones
}uede ocasionar la muerte, un
incendio o descarga el6ctrica.
Se requiere una alimentacidn el_ctrica
de 115 volt. (103.5 min, 126.5 mfix),60
HZ, s61o CA, o 20 amperes, con fusibles
y debidamente conectada a tierra. Se
recomienda emplear un a fusible de
retardo o interruptor de circuito
retardador. Use un circuito separado
s61o para el deshumidificador.
Instruccionesdeconexi6n
atierra:
contactodeparedde€oae_na_rra
contresterminales
enchufe_lar
concogexi_
a_erra-
r,_ledealimntaciGn
Para su seguridad personal, este
deshumidificador debe estar conectado
a tierra. Este deshumidificador est_
equipado con un cable de alimentaci6n
con un enchufe tripolar con conexiOn a
tierra.
Para reducir al minimo el peligro de una
descarga el_ctrica, el cable debe
enchufarse en un contacto de pared
con tres terminales, del mismo tipo,
conectado a tierra de acuerdo con
todos los reglamentos y normas locales.
Si no se dispone de un contacto de
pared del mismo tipo, es
responsabilidad personal y obligaci6n
del cliente hacer que un electricista
calificado instale un contacto de pared
del mismo tipo, conectado a tierra
correctamente.

Paramejorrendimiento,se
necesitaunabuena
circulaci6ndeaire--dejepor
Iomenos12-18pulgadas
(30.5-45.7cm)deespacio
paraelairealrededordel
deshumidificador.
(30.5-4S,7cm)
Cuando est_ usando el
deshumidificador,
mantenga cerradas
todas las puertas y
ventanas que dan al
exterior, y otras
aberturas. El aire
h_medo del exterior
aumentar_ la carga de
trabajo del
deshumidificador.
-._12-18" (30,5-45.7¢m)
Instale el deshumidificador en un piso a nivel Io suficientemente fuerte como
para soportar el deshumidificador con el balde de agua lleno.
Nora: antes de encender el
deshumidificador, asegurese de que:
• El deshumidificador est_ conectado
en el tomacorriente mural
• El balde est_ debidamente insertado
en el deshumidificador
• El balde est_ vacio.
ControlA
Indicaqueelbaldeest_Ileno
,,,'0
,..." queelbaldeaoest_biencolocade
eliminaci6ndeleJmedad(la
carded deImmededqeese
eliminadela h_bitaci_)
Indicaqueelbaldeest_Ileno
• ,,÷•"" 0
/J_J_" _'_--...- IlegulaelpLmtodeajustede
ControlB /H • \
_le=ionalalelodd_ideve_la_i_n

PARAENCENDEREL
DESHUMIDIFICADOR:
Gire el DRYNESSCONTROL(CONTROL
DESEQUEDAD)en la direcci6n de las
manecillas del reloj.
VELOCIDADDEVENTILACION:
(S61o para modelos con Control B): esto
controla el funcionamiento del
ventilador. Use la posici6n que desee.
HIGH -para eliminar la humedad mas
r_pidamente.
LOW- para eliminar la humedad mas
lentamente.
DRYNESSCONTROL
(CONTROLDESEQUEDAD):
Esto controla la cantidad de humedad
en la habitaci6n. Gire la perilla de
control en la direcci6n de las manecillas
del reloj para mayor sequedad.Gire la
perilla de control en direcci6n contraria
a las manecillas del reloj para menor
sequedad. Gire la perilla de control
hasta "NORMAL" para mantener
condiciones de humedad media.
NOTA:para los primeros dias de uso,
gire el DRYNESSCONTROL(CONTROL
DESEQUEDAD)en la direcci6n de las
manecillas del reloj hasta"DRYEST"(M_s
seco) para eliminar humedad adicional
en los muebles asicomo en el ambiente
de la habitaciOn.
LuzdeEMPTY/ADJUSTBUCKET(luz
deVACIE/AJUSTEELBALDE):
Siesta luz est_ encendida, el deshumi-
dificador no est_ funcionando. Esta
luz indica que usted tiene que verificar
si el balde est_ lleno o si no est_ bien
colocado:
• Si el balde est_i lleno, vacie el balde y
vuelva a colocarlo.
•Si el balde no est_ bien colocado,
quite el balde y vuelva a colocarlo.
Aseg_rese de insertar el balde
completamente dentro del
deshumidificador y que la luz est_
apagada, oel deshumidificador no
funcionar&
PARAAPAGAREL
DESHUMIDIFICADOR:
Gire el DRYNESSCONTROL (CONTROL
DE SEQUEDAD) en la direcci6n de las
manecillas del reloj, para APAGARLO.

ControlC
iIleno
queelbaltic.o est_hie.colocado
Selecci0naelm0d0 ...._Reguiaelpuntode_te deeliminaciGndehumedad
(laca_daddehumedad(leesee_inadelahabitac_n
PARAENCENDEREL
DESHUMIDIFICADOR:
Optima el bot6n de ON/OFF
(Encendido/Apagado). Si se enciende la
luz de EMPTY/ADJUST BUCKET (luz de
VAC[EIAJUSTE ELBALDE), el
deshumidificador no funcionar&Vacie o
ajuste el balde.
Siempre que usted desconecte el
deshumidificador o se interrumpa el
suministro de energia el_ctrica, el
control volver_ a su posiciOn anterior.
SELECCIONDEMODO
Optima el botbn de MODE (Modo) para
seleccionar la velocidad de ventilaciOn.
Seleccione LOW (Baja), HIGH (Alta),
CONTINUOUS (Continua) o AUTO DRY
(Secado autom_tico).
Si usted ha seleccionado LOW o HIGH:
Optima 4o !_ para fijar la cantidad de
humedad que usted desea eliminar.
Oprimir !_aumenta la cantidad de
humedad eliminada; oprimir 4
disminuye la cantidad de humedad que
se va a eliminar. La luz del indicador
cambiar_ seg_n el numero de veces
que usted optima 4o !_.
Si usted ha seleccionado
CONTINUOUS:
Usted no puede cambiar la cantidad de
humedad que desea eliminar.
Oprimir 4o !_no aumentar_ ni bajar_
lacantidad de humedad eliminada.
Si usted ha seleccionado AUTO DRY:
Oprima 4o !_para fijar la cantidad de
humedad que usted desea eliminar. El
deshumidificador ajustar_
automaticamente la velocidad de
ventilaciOn y/o se encender_ y apagara
autom_ticamente para mantener la
posici6n que usted seleccion6.
PAPAAPAGAREL
DESHUMIDIFICADOR:
Oprima el botOn de ON/OFF (Encendido
IApagado). Eldeshumidificador
mantendr_ sus ultimos ajustes.
LuzdeEMPTY/ADJUSTBUCKET
(luzdeVACiE/AJUSTEELPALDE):
Si esta luz est_ encendida, el
deshumidificador no esta_funcionando.
Esta luz indica que usted tiene que
verificar si el balde est_ Ileno o si no est_
bien colocado:
•Si el balde est_ neno, vacie el balde y
vuelva a colocarlo.
•Si el balde no esta_bien colocado,
quite el balde y vuelva a colocarlo.
Asegurese de insertar el balde
completamente dentro del
deshumidificador y que la luz est_
apagada, o el deshumidificador no
funcionar_.

Peligro para la salud
No beba el agua acumulada en el
balde de agua.
No seguir esta instruccibn puede
perjudicar su salud.
M todoparasacaryvolvera
vaciarelbalde:
1. Levante el balde utilizando las dos
agarraderas laterales.Tire del balde
hacia usted, para sacarlo.Vaya al
Paso 2.
2. Lleve al balde a un sumidero o tina
grande.
3. Vierta agua por el orificio en un
sumidero o tina.
4.Vuelva a colocar el balde comple-
tamente y verifique que la luz de
VAC|E/AJUSTE EL BALDE est_
apagada.
M tododeconexi6ndela
mangueradedesagiie:
(parasacaraguadelbaidec0ntJnuamente.)
_tapa del ¢onector
/"_11_. de la manguera de
L _" desagtle (no en
_slos modelos)
1. Si su deshumidificador no tiene una
tapa del conector de la manguera
de desagiJe, vaya al Paso 2.
Si su deshumidiflcaclor tiene una
tapa del conector de la manguera de
desagiJe, use un destomillador de
hoja plana para quitar la tapa del
conector de desag0e.Gire la tapa en el
sentido contrario al de las manecillas
del reloj. Deseche la tapa. No puede
usarse de nuevo.Vaya al Paso 2.
2. Perfore unicamente el centro del
conector de la manguera de desag0e.
Use una broca de I/4" como minimo.
3. Coloque una manguera de patio en
el conector de la manguera de
desagLie. La manguera no debe tener
una longitud mayor de 8 pies (2.4 m).
Haga pasar el otro extremo de la
manguera de patio por un desagLie
de piso.Verifique que la manguera
est_ plana yen el desagOe.
Parausarelbaldesinlaman@eradepatio:
Use un casquete de manguera de patio
para seller el conector de la manguera
de desagOe.

Todoslosdeshumidificadorestienen
mecanismodedesconexi6nautom_tica
yflotadordeniveldelagua.Algunos
deshumidificadorestienenunFlotador
deNiveldelAguaajustable.Elbalde
tienequeestardebidamentealineado
paraquefuncioneelFlotadordeNivel
delAgua.
ParamodelosconFlotadorde
NiveldelAguanoajustable:
El Flotador de Nivel del Agua apagar_
autom_ticamente el deshumidificador.
ParamodelosconFlotadorde
NiveldelAguaajustable:
Usted puede poner el Flotador de Nivel
del Agua en lasposiciones de"high"
(alto) o"Iow" (bajo). Ambas posiciones
apagar_n autom_ticamente el
deshumidificador.
La posici6n "High": el Flotador de Nivel
del Agua est_ preseleccionado en la
posici6n de"high';al lado izquierdo de
la abertura. El deshumidificador se
apagar_ autom_ticamente cuando el
balde est_ 3/4 lleno.
La posici6n "Low": deslice el Flotador de
Nivel del Agua a la posici6n de"low'_al
lado derecho de la abertura, para que el
balde est_ m_s liviano. El
deshumidificador se apagar_
autom_ticamente cuando el balde est_
I/2 lleno.
This manual suits for next models
16
Table of contents
Languages:
Other Comfortaire Dehumidifier manuals

Comfortaire
Comfortaire BHD-301-J User manual

Comfortaire
Comfortaire 23-11-2243N-003 User manual

Comfortaire
Comfortaire BHD-22B User manual

Comfortaire
Comfortaire BHDP-951-H Series User manual

Comfortaire
Comfortaire R-410A User manual

Comfortaire
Comfortaire BHDP-701-J User manual

Comfortaire
Comfortaire DH40J0 User manual

Comfortaire
Comfortaire DH25J2 User manual

Comfortaire
Comfortaire DH400K0 User manual