COMFORTPOOL CP-80022 User manual

SOLAR PANEL
Installatie- & gebruikershandleiding
SOLAR PANEL
Installation & Operation Manual
SOLAR PANEL
Installations- & Benutzerhandbuch
CP - 80022

2
Inhoud
VEILIGHEIDSVOORSCHRIFTEN..............................................................................................................................................................3
1. ALGEMENE INFORMATIE...............................................................................................................................................................4
2. INSTALLATIE.......................................................................................................................................................................................5
3. WINTERKLAAR MAKEN......................................................................................................................................................................9
4. PROBLEEMOPLOSSING...................................................................................................................................................................10
5. ONDERDELEN ...............................................................................................................................................................................11
6. GARANTIE..........................................................................................................................................................................................12
Bedankt voor uw aankoop van het Comfortpool Solar Panel. Het solar panel is ontworpen en gefabriceerd
volgens onze hoogste normen voor betrouwbaarheid, duurzaamheid, gebruiksgemak en veiligheid. Volg de
instructies uit de handleiding op en u zult jarenlang kunnen genieten van een verwarmd zwembad.
Om zoveel mogelijk van de warmte die gegenereerd wordt door het solar panel te behouden raden wij aan om
‘s nachts, of wanneer u het zwembad niet gebruikt, uw zwembad af te dekken met een Comfortpool Solar Cover.
www.comfortpool.com

3
Veiligheidsvoorschriften
Waarschuwing!
Lees de handleiding zorgvuldig door vóór de montage en het gebruik van het solar panel, en volg alle
instructies op. Bewaar deze handleiding voor toekomstig gebruik. Het niet opvolgen van de
veiligheidsvoorschriften kan leiden tot schade aan het product, ernstige verwondingen bij u of anderen,
of de dood tot gevolg hebben.
Installeer het SolarPanel zodanig dat het niet mogelijk is voor kinderen omvia het paneelin het zwembad
te klimmen.
Het Solar Panel is bedoeld voor installatie op de grond, naast uw zwembad en filterpomp. Installatie op
het dak of elke andere verhoging is op eigen risico. Een defect veroorzaakt door montage op elke andere
ondergrond dan de grond valt dan ook niet onder de garantie.
Let op!
- Dit is geen SPEELGOED. Laat kinderen niet alleen in de buurt van dit product. Kinderen mogen dit
product nooit bedienen.
- Stap, zit of leun niet op het solar panel.
- Het solar panel moet op een harde, vlakke ondergrond worden geïnstalleerd.
- Aanbevolen wordt om het solar panel te installeren op een plek die minstens 6 uur zonlicht per dag
ontvangt.
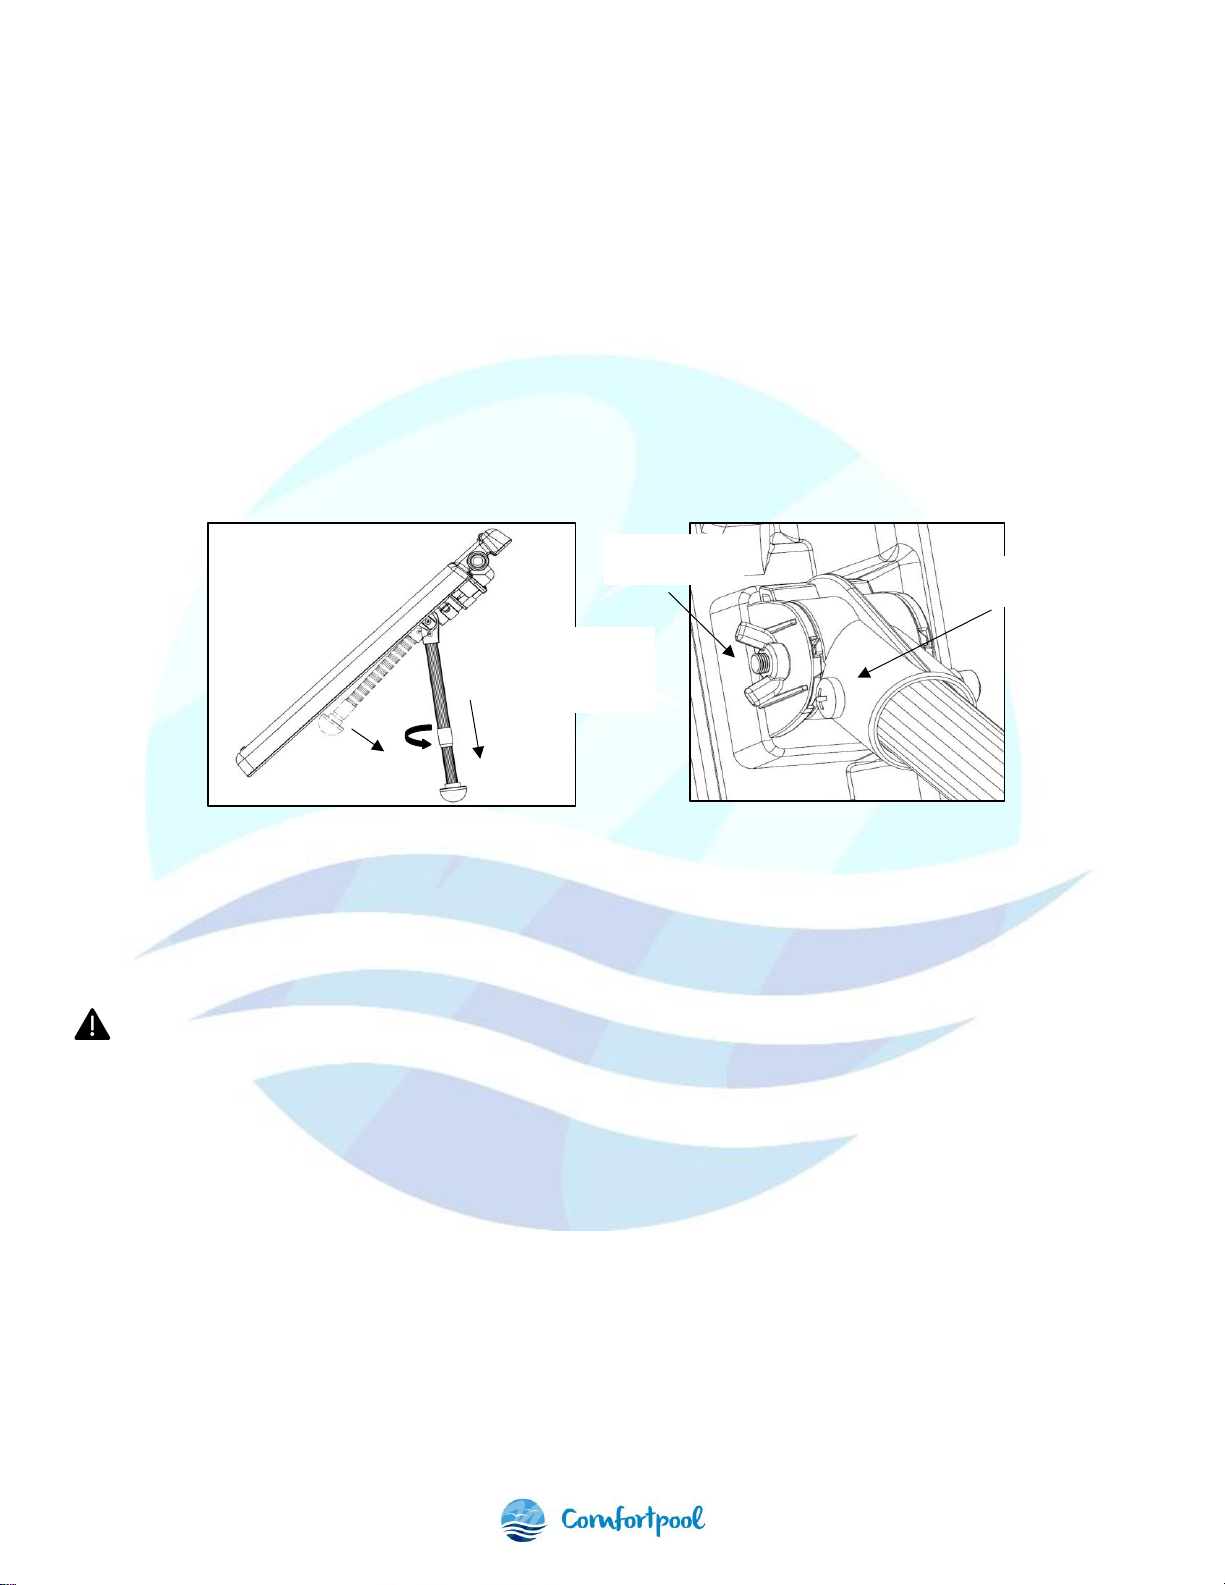
- Plaats de aluminium voetjes dusdanig dat het oppervlak van het paneel naar de zon is gericht.
- Schakel de filterpomp uit wanneer u bezig bent met de installatie, reiniging of onderhoud van het solar
panel.
- Wanneer u de schroefdraadverbindingen van uw zwembad, filterpomp of solar panel losmaakt zorg er
dan voor dat de filterslangen zijn gesloten of geblokkeerd, om het weglopen van water te voorkomen.
- Probeer alle aansluitslangen zoveel mogelijk recht te leggen, om te voorkomen dat de slang knikt of
ernstig gebogen wordt.
- Zorg ervoor dat alle slangen stevig zijn aangesloten. Als de slang lekt, controleer dan of alle onderdelen
met O-ringen zijn aangesloten en vastgedraaid.
Bovenstaande veiligheidsinstructies vormen geen volledige lijst van alle mogelijke risico’s en verwondingen.
Eigenaars en gebruikers van het solar panel dienen deze met voorzichtigheid en gezond verstand te gebruiken.

4
1. Algemene informatie
Het solar panel is een zwembad-zonneverwarmingsapparaat dat op het zwembadfiltratiesysteem wordt
aangesloten. Het solar paneel verwarmt het zwembadwater door zonlicht te absorberen. Raadpleeg de
onderstaande afbeelding voor de stroomrichting van het zwembadwater tijdens het gebruik. Belangrijk: de
waterdruk van het filtersysteem moet via de vierwegklep worden verlaagd om lekkage in het solar panel of
schade door te hoge waterdruk te voorkomen.
Zwembad
Vierwegklep
Wateruitlaat
Waterinlaat
Solar panel
Filterpomp
A
B
C
D
Uitsnede van de vierwegklep
Poort A - water vanuit de filterpomp
Poort D –verbinding met het zwembad
Poort C - water vanuit het solar panel
Poort B - water naar het solar panel
C–hier zit een ingebouwde stop
A–Deelt de waterstroom vanuit Ain tweeën,
een deel terug naar het zwembad, een deel
naar B(het solar panel).

5
Technische specificaties
- Capaciteit paneel: ± 5 liter
- Maximale waterdruk: 2 bar
- Aansluiting: Ø 32 mm en Ø 38 mm
- Instelbaar bereik steunpoten: 40 –60 cm tot de grond
- Afmeting verpakking: 795 x 130 x 795 mm
2. Installatie
We raden aan om teflon tape rondom het schroefdraad aan de uiteinden van koppelstukken en
slangadapters te wikkelen.
1. Haal het solar panel en de accessoires uit de verpakking.
2. Plaats de afdichtingsring aan beide uiteinden van de waterin- en uitlaat van het solar panel, sluit
vervolgens de twee Ø 38 mm slangen aan, plaats de roestvrij stalen slangklemmen en draai deze vast
met een schroevendraaier.
Afdichtingsring

6
3. Schakel de stroomtoevoer naar de filterpomp uit, sluit de zwembadinlaat af en sluit de afsluithendel op
de filterpomp om ervoor te zorgen dat er geen water naar buiten stroomt wanneer u de slang loskoppelt
van het zwembad.
4. Verwijder de originele zwembadslang uit de terugstroom naar het zwembad, en verwijder daar alle
fittingen en aansluitonderdelen.
5. Schroef het koppelstuk met schroefdraad aan beide uiteinden op de zwembadinlaat (de terugstroom
naar het zwembad) en sluit dan poort D van de vierwegklep aan op het koppelstuk. Gebruik teflon tape
om de schroefdraadaanslutingen om waterlekkage te voorkomen.
Opmerkingen: De poort van de vierwegklep heeft zowel een interne als externe schroefdraad, kies de
verbindingsmethode die bij past bij jouw huidige zwembadopstelling. Voor een INTEX-slang kunt u de
externe schroefdraadverbinding gebruiken. Voor een standaard Ø 32 mm of Ø 38 mm zwembadslang
gebruikt u de interne schroefdraadverbinding.
Sluit de zwembadinlaat af met een stop
Sluit de afsluithendel op de filterpomp
Ontkoppel de zwembadslang
Verwijder alle fittingen en aansluitingen

7
6. Steek de uitlaatpijp erin en draai deze vast op de ingebouwde stop van poort C. Meet de huidige maat
van de wateruitlaat (5 cm wordt aangeraden).
7. Zaag de uitlaatpijp af op de juiste lengte, gebruik pvc-lijm om deze vast te lijmen aan het elleboogstuk.
8. Schroef de vierwegklep erop wanneer de lijm droog is. Let op: het elleboogstuk moet omlaag wijzen.
Schroefdraadverbinding voor INTEX-slang
Poort D
Ingebouwde stop van poort C, tegenover poort D
Voor Ø 32 mm slang
Voor Ø 38 mm slang
Koppelstuk met schroefdraad aan beide uiteinden
Aanbevolen afstand 5 cm
Zaag af op juiste lengte
Breng hier pvc-lijm aan

8
9. Sluit de slang van de filterpomp (de slang die bij stap 4 is losgekoppeld) aan op poort A van de
vierwegklep. Sluit de waterinlaat van het solar panel aan op poort B van de vierwegklep, en de
wateruitlaat van het solar panel op poort C. Gebruik roestvrijstalen slangklemmen om deze
verbindingen vast te maken.
10. Verwijder de stop van de waterinlaat van het zwembad en open de afsluithendel van de filterpomp.
Controleer of het water vrijuit door alle leidingen stroomt.
11. Start de filterpomp zodat het water begint te circuleren en controleer of het zowel in het solar panel
stroomt als terug naar het zwembad. Het water dat in het solar panel stroomt, stroomt via de
wateruitlaat van het solar panel via de vierwegklep weer terug naar het zwembad.
Verwijder de stop
Open de afsluithendel
van de filterpomp
Poort A - sluit aan op
de filterpomp
Poort B - sluit aan op de
waterinlaat van het solar
panel
Poort C - sluit aan op
de wateruitlaat van het
solar panel

9
12. Wanneer het solar panel volledig ontlucht is (er komen geen bubbels meer uit de waterinlaat van het
zwembad, aangeraden wordt 5 minuten lang te checken of dit inderdaad het geval is) zet u het solar
panel rechtop en opent u de aluminium steunpoten tot in de tweede sleuf. Houd het uiteinde van de
aluminium buis vast, draai deze tegen de klok in, trek de aluminium buis uit tot de gewenste lengte,
draai de buis met de klok mee om te vergrendelen. Stel de juiste positie in van de poten en draai
tenslotte de vleugelmoer vast om de steunpoot vast te zetten.
Opmerking: om de aluminium steunpoot in te klappen draait u eerst de vleugelmoer los. Forceer de poot niet
door deze zomaar terug te duwen.
3. Winterklaar maken
Laat uw solar panel volledig leeglopen om deze winterklaar te maken. Vorstschade valt niet onder
de garantie. U moet, net als bij uw andere zwembadapparatuur, al het water uit het solar panel en
alle bijbehorende aansluitingen laten lopen.
Wij adviseren om het solar panel en alle bijbehorende onderdelen op een warme, droge plek op te bergen.
Stel de aluminium
poten af op de juiste
hoogte en positie
Insteken in de
tweede sleuf
Draai de vleugel-
moer vast

10
4. Probleemoplossing
Problemen
Mogelijkheden / oplossingen
Solar panel lijkt het zwembad niet te verwarmen
- Controleer of het water door het solar panel
stroomt door de stroming bij de inlaat van het
zwembad te checken.
- Kijk naar het weer, is het bewolkt of
regenachtig geweest?
- Gebruik ’s nachts een solar cover op het
zwembad om warmteverlies te voorkomen.
- U heeft misschien qua zwembadinhoud een
tweede solar panel nodig.
Water uit het solar panel stroomt niet terug naar het
zwembad
- Controleer of alle aansluitingen goed vast
zitten.
- Controleer of alle lucht uit het paneel is.
- Schakel de filterpomp uit, verwijder de
zwembadslang van de wateruitlaat van het
solar panel. Zodra daar een regelmatige
waterstroom uitkomt sluit u de
zwembadslang weer aan.
Er blijven bubbels uit de zwembadinlaat komen
- Controleer de aansluitingen op lekken
- Controleer de stroomsnelheid
- Controleer de buizen op lekken of
verstoppingen
Solar panel lekt
- Controleer of de aansluitingen en
slangklemmen allemaal stevig vast zitten en
niet kapot zijn.

11
5. Onderdelen
Nr.
Onderdeel nr.
Omschrijving
Aantal
1
47060615
Solar paneel
1
2
647060675000
Aluminium steunpoot
2
3
5224007000
Schroef
2
4
5759042000
Vleugelmoer
2
5
47060603
Bevestigingsgesp
2
6
5212032000
Platte tapschroef
4
7
49220903
Ø 38 mm zwembadslang
2
8
5021004000
Ø 38 mm rvs-slangklemmen
4
9
5432026080
Afdichtingsring
2
10
5432076080
Afdichtingspakking
2
11
5322065000
Transparante plaat
1
12
5315029000
Aluminium randstrip
2
13
48961502
Pakking
4
14
5212048000
Bolle tapschroef
4
15
647060674000
Vierwegklep
1

12
6. Garantie
Hartelijk dank voor de aanschaf van ons Solar Panel. Wij garanderen dat alle onderdelen vrij zijn van
fabricagefouten in materiaal en afwerking voor een periode van 2 jaar vanaf de aankoopdatum.
Deze garantie beperkt zich tot de eerste koper en is niet overdraagbaar. De aansprakelijkheid van Comfortpool
zal nooit de reparatie of vervanging van defecte onderdelen te boven gaan, en zal geen kosten omvatten voor
arbeid om een defect onderdeel te verwijderen en opnieuw te installeren, noch het transport van en naar de
fabriek of leverancier, noch enig ander materiaal dat nodig is voor het uitvoeren van een eventuele reparatie.
Deze garantie geldt niet voor defecten of storingen als gevolg van onderstaande:
1. Het incorrect installeren, gebruiken of onderhouden van het product, zoals beschreven staat in de
“Installatie- & gebruikershandleiding” die geleverd is bij dit product.
2. Het vakmanschap van elke installateur van dit product.
3. Misbruik, aanpassingen, ongevallen, brand, overstroming, blikseminslag, knaagdieren, ongedierte,
insecten, nalatigheid of overmacht.
4. Vuil, vallende bladeren, bevriezing of andere omstandigheden die onvoldoende watercirculatie
veroorzaken.
5. Het gebruik van niet-geautoriseerde onderdelen of accessoires bij dit product.
Beperkte aansprakelijkheid
Dit is de enige garantie die uitgegeven is door Comfortpool. Comfortpool verleent geen andere garantie of
voorwaarden, hetzij schriftelijk of mondeling, en wijst uitdrukkelijk alle garanties en voorwaarden af die niet in
deze garantieverklaring zijn opgenomen. Wij sluiten alle aansprakelijkheid uit voor indirecte, incidentele, gevolg-
of punitieve schade voorhet schenden van een expliciete of impliciete garantie. Deze garantie geeftu specifieke
wettelijke rechten, welke kunnen verschillen per land.
www.comfortpool.com
© 2020 Comfortpool. Alle rechten voorbehouden. Niets van dit document mag worden vermenigvuldigd of doorgegeven in welke
vorm of op welke wijze dan ook, zij het elektronisch, mechanisch, op fotokopie, openomen of op enige andere wijze, zonder de
voorafgaande schriftelijke toestemming van Comfortpool.

13
Contents
SAFETY WARNINGS ..............................................................................................................................................................................14
1. GENERAL INFORMATION.................................................................................................................................................................15
2. INSTALLATION..................................................................................................................................................................................16
3. WINTERIZATION................................................................................................................................................................................20
4. TROUBLESHOOTING........................................................................................................................................................................21
5. PARTS.................................................................................................................................................................................................22
6. WARRANTY .......................................................................................................................................................................................23
Thank you for purchasing a Comfortpool Solar Panel. The solar panel has been engineered and manufactured
according to our highest standards for dependability, durability, ease of operation and safety. Follow the
instructions in this manual and the solar panel will heat your pool for many years to come.
To retain as much of the heat generated by the solar panel, we advise you to cover your pool at night, or when
it is not being used, with a Comfortpool Solar Cover.
www.comfortpool.com

14
Safety warnings
Warning!
Please read this manual carefully before installing and using the solar panel and follow all
instructions. Keep this manual for future use. Failure to follow the safety instructions may result
in damage to the product, serious injuries to you and others, or death.
Position the solar panel so that it does not provide an access for children into the swimming pool.
The solar panel is intended for installation on the ground, next to your pool and filter pump.
Installation on a roof or any other structure is at your own risk. A defect caused by installation on
the roof or any other structure is therefore not covered by warranty.
Caution!
- This is not a TOY. Do not leave children alone and unsupervised around the solar panel. Children are
not allowed to operate this product.
- Do not walk, sit, or lean on the solar panel.
- The solar heater should be installed on a hard, level ground.
- It is recommended that the installation site receives at least 6 hours of direct sunlight per day.
- Adjust the aluminum feet to tilt the surface of the product toward the sun.
- Make sure the pump is switched off before installing, cleaning, or maintaining the solar panel.
- When loosening any threaded connections on your filter, pump, or pool, be sure that the filter hoses are
closed or blocked to prevent water flow.
- Please try to keep all the connection hoses straight to ensure that the hose does not become severely
kinked or bent.
- Make sure all hoses are tightly connected. If the hose leaks, check to make sure all parts with O-rings
are connected and tightened.
Above warnings and cautions are not intended to incorporate all possible instances for risks and/or severe
injuries. Owners and users of the solar panel should always exercise caution and common sense when utilizing
the product.

15
1. General information
The solar heating panel is a pool solar heating device to be connected to the pool filtration system. The solar
heating panel heats the pool water by absorbing sunlight. Please refer to the below image for the water flow
direction while in use. Important: The solar heater must depressurize the water pressure in the filter system
through the four-way valve to avoid system leakage or damage caused by high pressure.
Pool
Four-way valve
Outlet
Inlet
Solar heater
Pool filtration system
A
B
C
D
Uitsnede van de vierwegklep
Port A - water from filtration system
Port D –connect to pool
Port C - water from heater
Port B - water to heater
C–there is a build-in plug
A–Divides water flow from port Ainto two, one part
to the pool and another to port B (the solar panel).

16
Technical specifications
- Capacity panel: ± 5 liter
- Max. working pressure: 2 bar
- Connection port size: 1-1/4” and 1-1/2”
- Adjustable range for aluminum supporting feet: 40 –60 cm to the ground
- Carton size: 795 x 130 x 795 cm
2. Installation
We advise you to wrap Teflon tape on the ends of all threaded headers and pipe adapters.
1. Remove the solar heating panel and its accessories from the box.
2. Install the sealing ferrule on both ends of the inlet and outlet of the solar heater, then connect the two 1-
1/2-inch hoses, put on the stainless-steel clamp, tighten with a screwdriver.
Sealing ferrule

17
3. Turn off the power supply for the swimming pool filtration system, stop the backflow end of the pool with
a plug, and close the valve of the filtration system to ensure that no water flows out when disconnecting
the hose from the backflow end of the pool.
4. Disconnect the flexible hose from the backflow end, and remove all the fitting and unions there
5. Screw the union with threads on both ends into the backflow port and then connect Port D of the four-
way valve to union with threads on both ends. Teflon tape should be used to prevent water leakage.
Remarks: The port of the four-way valve has both internal and external threads, choose the connection method
according to the actual situation. If yours is INTEX hose, you can use external thread connection. If it is a
commonly used 1-1/4 inch or 1-1/2 inch hose, use the internal thread.
Close the backflow end of the pool with plug
Close the valve of the filtration system
Disconnect the flexible hose
Remove all fittings and unions

18
6. Insert the outlet pipe, screw to build-in plug of Port C, measure the actual size of the backflow, 5CM is
suggested.
7. Cut the outlet pipe to a proper length, use PVC glue to connect to matching elbow.
8. When glue is dry, screw to 4-way valve. Note: the elbow should face downwards
Threads for Intex hose
Port D
Build-in plug of port C, port D is in its opposite position
For 1-1/4” hose
For 1-1/2” hose
Union with threads on both ends
Suggested distance 5 cm
Cut to proper length
Apply PVC glue here

19
9. Connect the hose of the filtration system (hose disconnected from step 6) to Port A of the 4-way valve
and connect the inlet pipe of the solar heater to port B of the 4way valve, then connect the outlet pipe of
the solar heater to port C of the 4way valve, all use stainless steel clamps to tighten.
10. Remove the plug from the backflow of the pool, turn on the valve for the filtration system, and make
sure water flow is freely in all the piping.
11. Plug in the power supply, start the pump, the water begins to circulate, and enter the pool and solar
heater, respectively. The water entering the solar heater passes through the outlet pipe of the four-way
valve and returns to the pool.
12. When the air in the solar heater is completely discharged (no more bubbles appear in the outlet of the
four-way valve, it is recommended to leave it for more than 5 minutes), put the solar heater is vertically,
open the aluminum supporting feet to the 2nd slot. Hold the end of the small aluminum tube with your
hand, turn it counterclockwise, then pull the aluminum tube out to the appropriate length, turn
clockwise, lock the aluminum tube, adjust to the appropriate position, and finally tighten the wing nut to
fix the aluminum foot assembly.
Note: To retract the aluminum feet, first loosen the wing nut and do not force the foot back.
Remove the plug
Open the valve of the
filtration system
Port A –connect to
filtration system
Port B –connect to inlet
pipe of the solar heater
Port C –connect to
outlet pipi of the solar
heater

20
3. Winterization
The solar panel must be drained for winterization. Freeze damage is not covered under warranty.
You must drain the solar panel just like you drain the rest of your pool equipment.
It is always best to store your solar heater inside a warm, dry place for winter storage.
Adjust the aluminum
feet to the
appropriate position
Insert to 2nd slot
Tighten the
wing nut
Table of contents
Languages:
Other COMFORTPOOL Solar Panel manuals
Popular Solar Panel manuals by other brands

Renogy
Renogy E-flex 14W quick start guide

STIEBEL ELTRON
STIEBEL ELTRON TEGREON 235 P Operation and installation

Luxor
Luxor eco line 72/180-190W installation instructions

EcoFlow
EcoFlow 110W user manual

Trunsun Solar
Trunsun Solar TSMxxx-72 series installation manual

Adventure Kings
Adventure Kings 10W user manual

Vaillant
Vaillant auroTHERM VFK 145 H installation manual

FNX Solar
FNX Solar Solarix 60 quick start guide

Unical
Unical SOLECO 160 2.5 Installation, Use and Servicing Instructions

ACOPOWER
ACOPOWER HY-SPKP-400W40A user manual

UNIRAC
UNIRAC SolarMount 224 installation manual

ELECAENTA
ELECAENTA Uranus-200 user manual