Kit Bottone per Gastrostomia Compat®Buddy (Sonda di Gastrostomia a basso profilo). Leggere attentamente tutte le istruzioni
prima dell’uso! DESCRIZIONE: Il Bottone per Gastrostomia Compat®Buddy consente la somministrazione di nutrizione enterale, acqua e
farmaci, direttamente nello stomaco e la decompressione gastrica. Sono disponibili diametri da 12 a 24 Fr. Per ogni diametro sono disponibili
tutte le lunghezze indicate nella Tabella 2. Nel suo paese, la disponibilità del prodotto può essere differente. Per ulteriori dettagli, contatti il rappresentante
Compat®. Il diametro e la lunghezza di ogni Bottone per Gastrostomia Compat®Buddy sono indicati chiaramente sulla fascetta di ogni dispositivo e
sull’etichetta della confezione. AVVERTENZE: Il Bottone per Gastrostomia Compat®Buddy è stato progettato per l'uso in uno stoma ben formato. Il
dispositivo viene fornito sterile e monouso. Ispezionare che i contenuti del kit non siano danneggiati. Se sono danneggiati, non usare il prodotto.
INDICAZIONI PER L’USO: Il Bottone per Gastrostomia Compat®Buddy è indicato per l’uso con pazienti che richiedono alimentazione enterale a lungo
termine, che non tollerano l’alimentazione orale, che sono a basso rischio di aspirazione, che richiedono decompressione gastrica e/o farmaci direttamente
nello stomaco. CONTROINDICAZIONI: Le controindicazioni per il posizionamento di un Bottone per Gastrostomia Compat®Buddy includono, ma non
limitandosi a queste: mancanza di aderenza dello stomaco alla parete addominale, infezione, mancanza di uno stoma ben formato, presenza di tratti con fistole
multiple, incertezza sullo spessore della parete addominale.
ATTENZIONE:
-Contattare un operatore sanitario o un medico per spiegazioni sulle controindicazioni, sulla cura e sull’uso del Bottone per Gastrostomia Compat®Buddy.
- Il Bottone per Gastrostomia Compat®Buddy è destinato all’alimentazione enterale, non per uso endovenoso.
- Il Bottone per Gastrostomia Compat®Buddy è esclusivamente monouso. Non riutilizzarlo, riprocessarlo o sterilizzarlo di nuovo. Un secondo uso può
causare un rischio d’infezione e/o comprometterne l’affidabilità funzionale. Non utilizzare se la confezione è aperta o danneggiata.
- Verificare la data di scadenza. Non utilizzare dopo tale data.
- Non scalfire, tagliare, strappare, forare o danneggiare il dispositivo in alcun modo.
- Un singolo Bottone per Gastrostomia Compat®
Buddy può rimanere in uno stoma già formato per oltre 30 giorni, a meno che la sonda si sposti o si
ostruisca. In questi casi, il paziente deve contattare immediatamente il medico.
- La durata del Bottone per Gastrostomia Compat®Buddy varia in base a diversi fattori tra cui, ma non limitandosi a questi: volume dell'acqua all'interno
del pallone, pH gastrico e manutanzione della sonda.
- Tenere sempre a portata di mano un ricambio del Bottone per Gastrostomia Compat®Buddy o una sonda per alimentazione da gastrostomia. Non togliere
il dispositivo fino a quando non è disponibile un ricambio del Bottone per Gastrostomia Compat®Buddy, per evitare che lo stoma si richiuda.
- Il set di estensione deve essere utilizzato per un singolo paziente.
- Seguire sempre i protocolli e le procedure locali per l’uso, il posizionamento, la rimozione e la cura del Bottone per Gastrostomia Compat
®
Buddy e degli
accessori.
AVVERTENZA: Il posizionamento deve essere eseguito da un medico o sotto la sua direzione. Le misure (Fr e lunghezza) devono essere prescritte dal medico.
SOSTITUZIONE DELLA SONDA:
1. Selezionare la misura del Bottone per Gastrostomia Compat®Buddy in base al diametro French (Fr) e alla lunghezza (cm) del bottone precedente o come
prescritto dal medico. Una corretta misura evita la fuoriuscita gastrica e l'irritazione cutanea.
2. Lavarsi sempre le mani prima di maneggiare il dispositivo o i suoi componenti.
3. Prima di utilizzare il dispositivo, verificare che non sia danneggiato.
4. Verificare l'assenza di perdite dal pallone, in conformità alle procedure preferite dal medico. Un metodo consiste nel riempire il pallone con il volume di
acqua suggerito (Tabella 1). Il pallone gonfiato deve avere una forma simmetrica. Non spremere il pallone gonfio. Dopo il controllo, sgonfiare il pallone. Usare
solo siringhe Luer (figura 1). AVVERTENZA: Non superare il volume massimo di riempimento.
5. Pulire la pelle intorno allo stoma.
6. Togliere dallo stoma la sonda di gastrostomia esistente, secondo le istruzioni originali del produttore.
7. Inserire interamente il mandrino (figura 1) nell'accesso per l'alimentazione. (L’uso del mandrino è opzionale; fornisce rigidità alla sonda). Notare che il
mandrino non deve superare l’estremità distale del bottone.
8. Lubrificare l’estremità della sonda con un lubrificante a base acquosa. Non usare mai olio o vaselina.
9. Inserire delicatamente la sonda nello stomaco attraverso lo stoma, fino a quando tutto il pallone non avrà attraversato interamente il tratto e il corpo del
Bottone per Gastrostomia Compat®Buddy non avrà raggiunto la pelle del paziente.
10. Togliere il mandrino (se usato in fase 7).
ATTENZIONE: Se il connettore non è collegato e fissato in modo appropriato, può verificarsi una perdita.
SOMMINISTRAZIONE DELL’ALIMENTAZIONE:
ATTENZIONE: Usare sempre un Set di estensione per somministrare alimentazione e/o farmaci. Non somministrare mai fluidi direttamente dentro
l'accesso per alimentazione o dentro l’accesso per gonfiaggio del bottone.
1. Si può usare il Set di estensione con Siringhe ENFit®(Figura 1), o con set di somministrazione per alimentazione a gravità e pompa di alimentazione.
2. Collegare il Set di estensione (come spiegato sopra) al set della pompa di somministrazione o alla siringa. Verificare che il morsetto bianco del Set di
estensione sia aperto. Se il morsetto è chiuso, assicurarsi di aprirlo. Iniziare l’alimentazione.
3. Dopo aver finito, sciacquare il Bottone per Gastrostomia Compat®Buddy attraverso il Set di estensione, con acqua, fino a che la sonda è pulita.
4. Staccare il Set di estensione (come spiegato sopra) e chiudere il tappo all'accesso per alimentazione .
5. Lavare il Set di estensione con acqua calda saponata, sciacquare e asciugare bene.
DECOMPRESSIONE GASTRICA:
Collegare il Set di estensione (come spiegato sopra) e lasciar uscire l’aria intrappolata. ATTENZIONE: Il Set di estensione deve essere collegato per
aprire la valvola. Aprire in qualunque altro modo, può danneggiare seriamente la valvola.
SOMMINISTRAZIONE DI MEDICINALI:
AVVERTENZA: Consultare un medico prima di somministrare farmaci tramite il Bottone per Gastrostomia Compat®Buddy.
- Non mescolare mai la nutrizione e i farmaci.
- Non somministrare mai medicinali direttamente dentro l'accesso per alimentazione o l’accesso per gonfiaggio del bottone.
- Se è possibile, somministrare farmaci liquidi, per evitare ostruzioni.
- Se un certo farmaci è disponibile solo in forma di pastiglie, prima di somministrare, consultare il medico.
- Dopo aver somministrato il farmaco con la siringa ENFit®, sciacquare bene il Set di estensione con la quantità d’acqua prescritta.
ATTENZIONE:
- Non usare un Bottone per Gastrostomia Compat®Buddy per somministrare farmaci oleosi, medicine sublinguali o orali, compresse o capsule a
rilascio ritardato. Non schiacciare mai farmaci gastroresistenti, perché ciò può causare una somministrazione non appropriata della medicina.
CURA E MANUTENZIONE:
- Il Bottone per Gastrostomia Compat®Buddy deve essere sostituito periodicamente, o secondo le indicazioni del medico.
- Mantenere lo stoma sempre pulito e asciutto. Pulire spesso il sito dello stoma con sapone non aggressivo e acqua calda. Se ci sono segni
d’infezione, irritazione o granulazione, consultare immediatamente un medico.
- Dopo l’uso, sciacquare la sonda con 10-20 ml di acqua per gli adulti e con 5-10 ml per i bambini
- Controllare il volume di acqua nel pallone a intervalli regolari, in conformità alle procedure preferite dal medico. Per fare ciò, collegare la siringa
Luer all’accesso per gonfiaggio del bottone (figura 3) ed estrarre tutta l’acqua, lasciando il bottone al suo posto. Se c’è meno liquido del volume
indicato in origine, aggiungere altra acqua, fino a raggiungere il volume indicato (tabella 1) e rigonfiare il pallone.
- Dopo ogni uso, lavare il Set di estensione con acqua calda e sciacquarlo bene. L’immediato lavaggio e risciacquo aiuta a evitare che la nutrizione
si secchi e si incrosti. Lasciare asciugare all’aria il Set di estensione.
- I Set di estensione possono essere utilizzati per 7 giorni, a meno che la sonda non si otturi. La cura e la manutenzione appropriata, come sopra
descritto, aiuteranno a prolungare l'uso.
Nestlé Portugal, Unipessoal, Lda.
Rua Alexandre Herculano, 8
2799-554 Linda-a-Velha
Portugal
Nestlé Sverige AB
Nestlé Health Science
250 07 Helsingborg
Sweden
Kundservice: 020-780020
Nestlé Singapore (Pte) Ltd.
15A Changi Business Park
Central 1,
05-02/03 Eightrium
@ Changi Business Park,
486035 Singapore
Telephone: +65 6836 7000
Nestlé Slovensko s.r.o.
Košovská cesta 11
971 27 Prievidza
Slovenská republika
Tel. 0800 135 135
Nestlé Polska S.A.
ul. Domaniewska 32
02-672 Warszawa
Poland
A/S Nestlé Norge
Nestlé Health Science
Postboks 683, Skøyen
0214 Oslo
Norway
Telefon: 67 81 74 00
Nestlé Middle East FZE
Inside UAE and KSA
800 8-971971 (free line)
Other countries +9714-8100 000
P.O. BOX 17327
JEBEL ALI FREE ZONE
DUBAI – UNITED ARAB EMIRATES
Num. Verde: 800-434434
Nestlé Nederland b.v.
Vestiging Oosterhout,
Hoevestein 36G
4903 SC Oosterhout
Netherlands
Tel: 0800-637 85 34
Nestlé Italiana S.p.A.
Via del Mulino n. 6
20090 Assago (MI)
Italy
Num. Verde: 800-434434
Nestlé Österreich GmbH
Nestlé Health Science
Wiedner Gürtel 9,
A-1100 Wien
Austria
SA Nestlé Belgilux NV
Rue de Birminghamstraat 221
Bruxelles 1070 Brussel
Belgium
Nestlé Brasil Ltda
Av. Das Nações Unidas, 17007
Várzea de Baixo
São Paulo – SP
CEP: 04730-090
Tel.: 0800 770 2461
Nestlé Suisse S.A.
Nestlé Health Science
Entre-Deux-Villes, P.O. Box 352
1800 Vevey
Switzerland
Infoline: 0848 000 303
Nestlé Cesko s.r.o.
Mezi Vodami 2035/31
14 320 Praha 4
Ceská republika
Tel.: 800 135 135
Nestlé España, S.A.
Carrer Clara Campoamor, nº 2.
08950 Esplugues de Llobregat
Barcelona
Spain
Nestlé Health Science
(Deutschland) GmbH
60523 Frankfurt
Germany
Nestlé Danmark A/S
Nestlé Health Science
Arne Jacobsens Allé 7
DK-2300 København S
Tlf. 3546 0167
Suomen Nestlé Oy
Nestlé Health Science
PL 50, 02151 Espoo
Finland
Puh: 010 3951 466
Nestlé Health Science France
7, Boulevard Pierre Carle
77186 Noisiel
France
Nestlé Hong Kong Ltd.
18 Wang Lok Street,
Yuen Long Industrial Estate,
Yuen Long, N.T., Hong Kong
Taille
Description du bouton et du connecteur
Connecteur
Dent de connexion
Port
d’alimentation
Port de
gonflage
Sonde
Ballonnet
Bouchon
Lanière
Anneau de
raccordement
Repère radio-opaque
Taille du bouton et volume du ballonnet
Volume du
ballonnet
(ml)
Encoche
Tableau
Compat®Buddy Kit pour bouton de gastrostomie (sonde de nutrition de gastrostomie à ballonnet). Lire attentivement les
instructions avantutilisation ! DESCRIPTION : Le bouton de gastrostomieCompat®Buddy estdestinéàl’administrationde nutriments,
d’eau et de médicaments directement dans l’estomac et/ou à la décompression gastrique. Les tailles disponibles sont 12-24Fr. Chaque
taille existe dans les longueurs indiquées dans le tableau 2. La disponibilité des produits peut varier selon le pays. Contactez votre représentant
Compat®pour plus d’informations. La taille et la longueur du bouton de gastrostomie Compat®Buddy sont clairement indiquées sur la sangle du produit
et sur l'étiquette de l’emballage. ATTENTION : Le bouton de gastrostomie Compat®Buddy est conçu pour être utilisé dans un trajet de
gastrostomie bien constitué. Le dispositif est fourni stérile et à usage unique. Vérifier le contenu de l’emballage. Ne pas utiliser s’il est endommagé.
INDICATIONS : Le bouton de gastrostomie Compat®Buddy est indiqué pour les patients qui ont besoin d’une alimentation entérale à long terme, qui
ne tolèrent pas l’alimentation par voie orale, qui présentent un faible risque d'aspiration, qui ont besoin d’une décompression gastrique et / ou de
médicaments directement dans l’estomac. CONTRE - INDICATIONS : Les contre - indications à la pose d'un bouton de gastrostomie Compat®Buddy
incluent, sans toutefois s’y limiter, le manque d'adhérence de l'estomac à la paroi abdominale, les infections, l’absence d’un trajet de gastrostomie bien
constitué, la présence de voies fistuleuses, l'incertitude quant à l'épaisseur de la paroi abdominale.
AVERTISSEMENT :
- Contacter un professionnel de la santé ou un médecin pour obtenir des explications sur les avertissements, l’entretien et l'utilisation du bouton de
gastrostomie Compat®Buddy.
- Pour utilisation par voie entérale uniquement. Ne pas utiliser par voie intraveineuse.
- Le bouton de gastrostomie Compat®Buddy est à usage unique. Ne pas réutiliser, reconditionner ou restériliser. Toute réutilisation peut entraîner un
risque d'infection et / ou compromettre l’intégrité du dispositif. Ne pas utiliser si l'emballage est ouvert ou détérioré.
- Vérifier la date d'expiration. Ne pas utiliser après cette date.
- Ne pas entailler, couper, déchirer, perforer ou endommager le dispositif.
- Le bouton de gastrostomie Compat®Buddy peut rester dans un trajet de gastrostomie bien constitué pendant plus de 30 jours, sauf si le bouton
ressort ou est obstrué. Dans ce cas, le patient doit immédiatement contacter le médecin.
- La durée de vie du bouton de gastrostomie Compat®Buddy peut varier en fonction de plusieurs facteurs, notamment, mais sans s'y limiter, le volume
d'eau dans le ballonnet, le pH gastrique et l’entretien de la sonde.
- Toujours garder à disposition un bouton de gastrostomie Compat®Buddy de remplacement ou une sonde de gastrostomie. Ne pas enlever le bouton
tant qu’un bouton de gastrostomie Compat®Buddy ou une sonde n’est pas disponible, afin d'éviter la fermeture de la stomie.
- Le prolongateur est destiné à un seul patient.
- Toujours suivre les protocoles et procédures locales pour l’utilisation, la pose, le retrait et l'entretien du bouton de gastrostomie Compat®Buddy et
de ses accessoires.
ATTENTION : la pose doit être effectuée par ou sous la direction du médecin. La taille (charrière (Fr) et longueur) est prescrite par le médecin.
REMPLACEMENT DE LA SONDE :
1. Sélectionner la taille du bouton de gastrostomie Compat®Buddy en fonction de la taille en charrière (Fr) et de la longueur (cm) du bouton précédent
ou selon la prescription médicale. Une taille adaptée permet de réduire le risque de fuites gastriques et d’irritation de la peau.
2. Toujours se laver les mains avant de manipuler le dispositif ou ses composants.
3. Vérifier l’intégrité fonctionnelle du dispositif avant de l'utiliser.
4. Vérifier l’étanchéité du ballonnet conformément aux recommandations du médecin. Une méthode consiste à remplir le ballonnet avec le volume
d'eau recommandé (tableau 1). Le ballonnet gonflé doit être symétrique. Ne pas comprimer le ballonnet gonflé. Après vérification, dégonfler le
ballonnet. Utiliser uniquement des seringues à embout Luer (Figure 1). ATTENTION : Ne pas dépasser le volume de remplissage maximum.
5. Nettoyer la peau autour de la stomie.
6. Enlever la sonde de gastrostomie en place selon les instructions du fabricant.
7. Insérer le stylet (Figure 1) dans le port d'alimentation. (L'utilisation d'un stylet est facultative, le stylet permet de rigidifier la sonde). Le stylet ne
doit pas dépasser l’extrémité distale du bouton.
8. Lubrifier l'extrémité de la sonde avec un lubrifiant à base d'eau. Ne jamais utiliser d'huile ni de produits dérivés du pétrole.
9. Guider doucement la sonde au travers de la stomie dans l'estomac jusqu'à ce que le ballonnet passe entièrement à travers le tractus et que le
corps du bouton de gastrostomie Compat®Buddy atteigne la peau du patient.
10.
Retirer le stylet (s'il a été utilisé à l'étape 7).
11. Maintenir le bouton en place et gonfler le ballonnet avec le volume d’eau approprié (Tableau 1). Utiliser la seringue à embout Luer 10 ml. Ne pas utiliser d'air.
12. Tirer doucement sur le bouton de gastrostomie Compat®Buddy jusqu'à ce que le ballonnet remonte contre la paroi de l’estomac. Une tension
excessive doit être évitée car elle peut provoquer une nécrose des tissus. Vérifier tout signe de fuite gastrique.
13. Nettoyer le site de la stomie avec une compresse de gaze et retirer l’excédent de lubrifiant le cas échéant.
CONFIRMATION DE LA POSITION :
1. Avant d’utiliser la sonde, vérifier sa position conformément aux recommandations du médecin. Une méthode consiste à aspirer le contenu
gastrique. Connecter le prolongateur au bouton de gastrostomie Compat®Buddy (comme indiqué ci-dessous) et connecter la seringue ENFit®au port
d'alimentation du prolongateur.
2. Aspirer le contenu gastrique. La présence de contenu gastrique dans la seringue confirme la position correcte du bouton de gastrostomie Compat®
Buddy dans l'estomac.
3. Utiliser la seringue ENFit®pour rincer avec 10 ml d'eau. Vérifier l’absence de fuite autour de la stomie. En cas de fuite, vérifier le gonflage adéquat
du ballonnet et la taille, la longueur et la position. La position peut être confirmée par radiographie. Le bouton de gastrostomie Compat®Buddy
comporte un repère radio-opaque blanc sur le tube (Figure 3). ATTENTION : Ne pas utiliser de produit de contraste dans le ballonnet.
4. Utiliser une compresse de gaze pour nettoyer le site de la stomie si nécessaire.
CONNEXION DU PROLONGATEUR :
1. Inspecter les prolongateurs pour s’assurer qu’ils ne sont pas endommagés. Ne pas les utiliser s’ils sont endommagés ou obstrués.
2. Si des prolongateurs autres que ceux fournis dans le kit sont employés, comme par exemple les prolongateurs Compat®Buddy, suivre les
instructions d'utilisation du fabricant.
3. Ouvrez le bouchon du port d’alimentation.
4. Insérer le connecteur du prolongateur dans le bouton de gastrostomie Compat®Buddy en alignant la dent de connexion du prolongateur (Figure
3) à l’encoche de l'anneau de raccordement. Aligner le repère noir du prolongateur avec le repère noir sur le port de gonflage. Appuyer délicatement
sur le connecteur et tourner de 3/4 de tour (270°) dans le sens des aiguilles d'une montre pour verrouiller le connecteur jusqu’à sentir une légère
résistance. ATTENTION : Ne pas dépasser le point d'arrêt car cela pourrait endommager la dent de connexion.
5. Pour enlever le prolongateur, tourner délicatement le connecteur dans le sens inverse des aiguilles d'une montre jusqu'à ce que le repère noir du
prolongateur soit aligné avec le repère noir sur le port de gonflage et que la dent de connexion puisse sortir de l’encoche. Enlever le prolongateur et
fermer le bouchon du port d’alimentation.
AVERTISSEMENT : Si le prolongateur n’est pas connecté et verrouillé correctement, une fuite peut se produire.
ADMINISTRATION DE LIQUIDES :
AVERTISSEMENT : Toujours utiliser un prolongateur pour administrer des nutriments, de l’eau et / ou des médicaments. Ne jamais administrer de
liquides directement dans le port d'alimentation du bouton ou dans le port de gonflage.
1. Le prolongateur peut être utilisé avec des seringues ENFit®(Figure 1) ou avec des tubulures d’administration par pompe ou par gravité.
2. Connecter le prolongateur (comme indiqué ci - dessus) à la seringue ou à la tubulure d’administration. Vérifier que le clamp blanc du prolongateur est
ouvert. Si le clamp est fermé, veiller à l'ouvrir. Commencer l’administration.
3. Lorsque l’administration est terminée, rincer avec de l’eau le bouton de gastrostomie Compat®Buddy au travers du prolongateur jusqu’à ce que le tube
soit clair.
4. Déconnecter le prolongateur (comme indiqué ci-dessus) et fermer le bouchon du port d’alimentation.
5. Laver le prolongateur à l'eau chaude savonneuse, rincer et sécher soigneusement.
DÉCOMPRESSION GASTRIQUE : Connecter le prolongateur (comme indiqué ci-dessus) et laisser l'air retenu s’échapper. AVERTISSEMENT :
le prolongateur doit être connecté pour ouvrir la valve. L'ouverture par tout autre moyen peut sérieusement endommager la valve.
ADMINISTRATION DE MÉDICAMENTS :
ATTENTION : Consulter un médecin avant d'administrer des médicaments par le bouton de gastrostomie Compat®Buddy.
- Ne jamais mélanger l’alimentation et les médicaments.
- Ne jamais administrer de médicaments directement dans le port d'alimentation du bouton ou dans le port de gonflage.
- Administrer de préférence des médicaments liquides pour éviter les obstructions.
- Si un médicament n'est disponible que sous forme de comprimés, consulter le médecin avant l’administration.
- Après l’administration de médicaments avec la seringue ENFit®, rincer le prolongateur avec la quantité prescrite d'eau.
AVERTISSEMENTS :
- Ne pas utiliser un bouton de gastrostomie Compat®Buddy pour administrer des médicaments huileux, sublinguaux ou buccaux, ni des comprimés ou
des capsules à libération prolongée. Ne jamais écraser un comprimé gastro-résistant, ce qui pourrait entraîner une administration inappropriée du
médicament.
ENTRETIEN ET SOINS :
- Le Bouton de gastrostomie Compat®Buddy doit être remplacé périodiquement ou selon les instructions du médecin.
- Garder la stomie propre et sèche en permanence. Nettoyer fréquemment le site de la stomie à l'eau chaude et au savon. En cas de signes d'infection,
d'irritation ou de granulations, consulter un médecin.
- Après chaque utilisation, rincer la sonde avec 10-20 ml d'eau pour les adultes et 5-10 ml pour les enfants.
- Vérifier régulièrement le volume d'eau dans le ballonnet selon les recommandations du médecin. Pour cela, connecter la seringue à embout Luer au port
de gonflage (Figure 3) et aspirer l'eau, tout en maintenant le bouton en place. S'il y a moins de liquide que le volume indiqué initialement, ajouter de l’eau
pour atteindre le volume indiqué (tableau 1) et regonfler le ballonnet.
- Après chaque utilisation, laver le prolongateur à l'eau chaude et rincer-le soigneusement. Un rinçage rapide permet d'éviter que le mélange nutritif ne
sèche et reste incrusté. Laisser le prolongateur sécher à l'air libre.
- Les prolongateurs peuvent être utilisés jusqu'à 7 jours sauf en cas d’obstruction. Un entretien approprié, comme indiqué ci-dessus, permet de prolonger
l'utilisation au maximum.
VAROVANIE: Ak podávač nie je správne pripojený a zaistený, môže dôjsť k úniku tekutín.
PODÁVANIE VÝŽIVY:
VAROVANIE: Na podávanie výživy a/alebo liekov vždy používajte predlžovaciu súpravu. Nikdy žiadne tekutiny nepodávajte priamo do
podávacieho portu gombíka alebo do inflačného portu.
1. Predlžovaciu súpravu je možné používať spolu so striekačkami ENFit®(Obrázok 1), alebo s gravitačnými setmi, či enterálnou pumpou.
2. Pripojte predlžovaciu súpravu (podľa pokynov uvedených vyššie) k pumpe na podávanie výživy alebo k striekačke. Skontrolujte, či je biela svorka
predlžovacej súpravy otvorená. Ak je svorka zatvorená, otvorte ju. Začnite podávať výživu.
3. Po skončení vypláchnite Gastrostómický výživový gombík Compat® Buddy cez predlžovaciu súpravu vodou, až kým trubica nezostane čistá.
4. Odpojte predlžovaciu súpravu (podľa pokynov uvedených vyššie) a zatvorte uzáver podávacieho portu.
5. Predlžovaciu súpravu umyte teplou mydlovou vodou, opláchnite a dôkladne osušte.
ŽALÚDOČNÁ DEKOMPRESIA:
Pripojte predlžovaciu súpravu (podľa pokynov uvedených vyššie) a nechajte uniknúť uvoľnený vzduch. VAROVANIE: Pred otvorením ventilu
musí byť predlžovacia súprava pripojená. Akýkoľvek iný spôsob otvorenia môže ventil vážne poškodiť.
PODÁVANIE LIEKOV:
UPOZORNENIE: Pred podaním liekov cez Gastrostómický výživový gombík Compat®Buddy, sa poraďte s lekárom.
- Nikdy nemiešajte výživu s liekmi.
- Nikdy nepodávajte lieky priamo cez podávací port alebo inflačný port výživového gombíka.
- Ak je to možné, vždy podávajte lieky v tekutom stave, zabránite tak upchávaniu.
- Ak je určitý liek dostupný iba vo forme tabliet, poraďte sa pred jeho podaním s lekárom.
- Po podaní liekov pomocou striekačky ENFit®, dôkladne vypláchnite predlžovaciu súpravu predpísaným množstvom vody.
VAROVANIA:
- Gastrostómický výživový gombík Compat®Buddy, nikdy nepoužívajte na podávanie liekov obsahujúcich oleje, sublingválnych alebo bukálnych
liekov, tabliet alebo kapsúl s predĺženým uvoľňovaním. Nikdy nedrťte enterosolventné lieky, mohlo by to viesť k nesprávnemu podaniu lieku.
STAROSTLIVOSŤ A ÚDRŽBA:
- Gastrostómický výživový gombík Compat®Buddy je potrebné vymieňať pravidelne, prípadne podľa pokynov lekára.
- Stómu je nevyhnutné udržiavať neustále čistú a suchú. Miesto stómie často jemne čistite mydlom a teplou vodou. V prípade akýchkoľvek príznakov
infekcie, podráždenia alebo granulácie, sa okamžite poraďte s lekárom.
- Po každom použití trubicu vypláchnite 10-20 ml vody v prípade dospelých a 5-10 ml u detí.
- Pravidelne kontrolujte objem vody v balóniku podľa postupov preferovaných vašim lekárom. Napríklad, pripojte striekačku so zakončením Slip k
inflačnému portu (Obrázok 3) a odoberte všetku vodu. Výživovú trubicu pritom nechajte na mieste. Ak je objem tekutiny menší ako pôvodne uvedený
objem, pridajte viac vody, aby ste dosiahli uvedený objem (Tabuľka 1) a znovu ňou nafúknite balónik.
- Po každom použití predlžovaciu súpravu umyte a dôkladne opláchnite teplou vodou. Okamžité vypláchovanie a oplachovanie pomáha zabrániť
zasúšaniu a inkrustácii výživy v zariadení. Predlžovaciu súpravu nechajte vyschnúť na vzduchu.
- Predlžovacie súpravy je možné používať až 7 dní, za predpokladu, že trubica nieje zanesená. Primeraná starostlivosť a údržba, tak ako je to opísané
vyššie, pomáhajú dosiahnuť maximálne využitie súpravy.
WARNUNG: Wenn die Zuführung nicht richtig angeschlossen und verriegelt ist, kann es zu Leckage kommen.
ERNÄHRUNGSVERABREICHUNG:
WARNUNG: Verwenden Sie immer ein Verlängerungsset, um Ernährung und/oder Medikamente zu verabreichen. Verabreichen Sie niemals
Flüssigkeiten direkt in die Zufuhröffnung oder Befüllanschluss der Button-Sonde.
1. Das Verlängerungsset kann mit ENFit®Spritzen (Abbildung 1) oder mit Systemen die Ernährung mittels Schwerkraft oder über Ernährungspum-
pen verabreichen verwendet werden.
2. Schließen Sie das Verlängerungsset (wie oben beschrieben) an das Pumpen Verabreichungs-System oder die Spritze an. Stellen Sie sicher, dass
die weiße Klemme des Verlängerungssets geöffnet ist. Falls die Klemme geschlossen ist, öffnen Sie diese. Starten Sie die Verabreichung.
3. Nach Abschluss spülen Sie die Compat®Buddy Button-Sonde durch das Verlängerungsset mit Wasser, bis der Schlauch sauber ist.
4. Trennen Sie das Verlängerungsset (wie oben beschrieben) und schließen Sie die Kappe der Zufuhröffnung.
5. Waschen Sie das Verlängerungsset mit warmem Seifenwasser, spülen Sie es aus und trocknen Sie es gründlich ab.
MAGENDEKOMPRESSION: Schließen Sie das Verlängerungsset (wie oben beschrieben) an und lassen Sie die zurückgehaltene Luft ab.
WARNUNG: Das Verlängerungsset muss angeschlossen sein, um das Ventil zu öffnen. Das Öffnen auf andere Weise kann das Ventil ernsthaft beschädigen.
VERABREICHUNG VON MEDIKAMENTEN:
VORSICHT: Konsultieren Sie einen Arzt, bevor Sie Medikamente über die Compat®Buddy Button-Sonde verabreichen.
- Sie sollten niemals Ernährung und Medikamente mischen.
- Verabreichen Sie niemals Medikamente direkt in die Zufuhröffnung oder den Befüllanschluss der Button-Sonde.
- Verabreichen Sie nach Möglichkeit flüssige Medikamente, um Verstopfungen zu vermeiden.
- Wenn ein bestimmtes Medikament nur in Tablettenform erhältlich ist, konsultieren Sie vor der Verabreichung Ihren Arzt.
- Nach der Verabreichung von Medikamenten sollte das Verlängerungsset mit der ENFit®-Spritze gründlich mit der vorgeschriebenen Menge von
Wasser gespült werden.
WARNUNGEN:
- Verwenden Sie die Compat®Buddy Button-Sonde nicht um ölige Arzneimittel, sublinguale oder bukkale Arzneimittel, Tabletten oder Kapseln mit
verzögerter Freisetzung zu verabreichen. Zerdrücken Sie niemals magensaftresistente Medikamente, da dies zu einer unsachgemäßen Arzneimittelverab-
reichung führen kann.
PFLEGE UND WARTUNG:
- Die Compat®Buddy Button-Sonde sollte regelmäßig oder gemäß den Anweisungen des Arztes ausgetauscht werden.
- Halten Sie das Stoma immer sauber und trocken. Reinigen Sie die Stomastelle häufig mit milder Seife und warmen Wasser. Wenn es Anzeichen
einer Infektion, Reizung oder Granulation gibt, sollten Sie sofort einen Arzt konsultieren.
- Spülen Sie die Sonde nach jedem Gebrauch mit Wasser: 10-20 ml für Erwachsene und 5-10 ml für Kinder.
- Überprüfen Sie in regelmäßigen Abständen das Wasservolumen im Ballon gemäß den von Ihrem Arzt bevorzugten Verfahren. Befestigen Sie dazu
die Slip-Tip-Spritze an der Entlüftungsöffnung (Abbildung 3) und ziehen Sie das gesamte Wasser ab, während die Ernährungssonde an Ort und Stelle
bleibt. Wenn weniger Flüssigkeit als das ursprünglich angegebene Volumen vorhanden ist, fügen Sie mehr Wasser hinzu, um das angegebene Volumen
zu erreichen (Tabelle 1), und befüllen Sie den Ballon erneut.
- Waschen Sie das Verlängerungsset nach jedem Gebrauch mit warmen Wasser und spülen Sie es gründlich aus. Schnelles Waschen und Spülen
verhindert die Formel von austrocknen und verkrusten. Lassen Sie das Verlängerungsset an der Luft trocknen.
- Verlängerungssets können bis zu 7 Tage lang verwendet werden, sofern der Schlauch nicht verstopft ist. Eine angemessene Pflege und Wartung,
wie oben beschrieben, trägt dazu bei, eine maximale Nutzung zu ermöglichen.
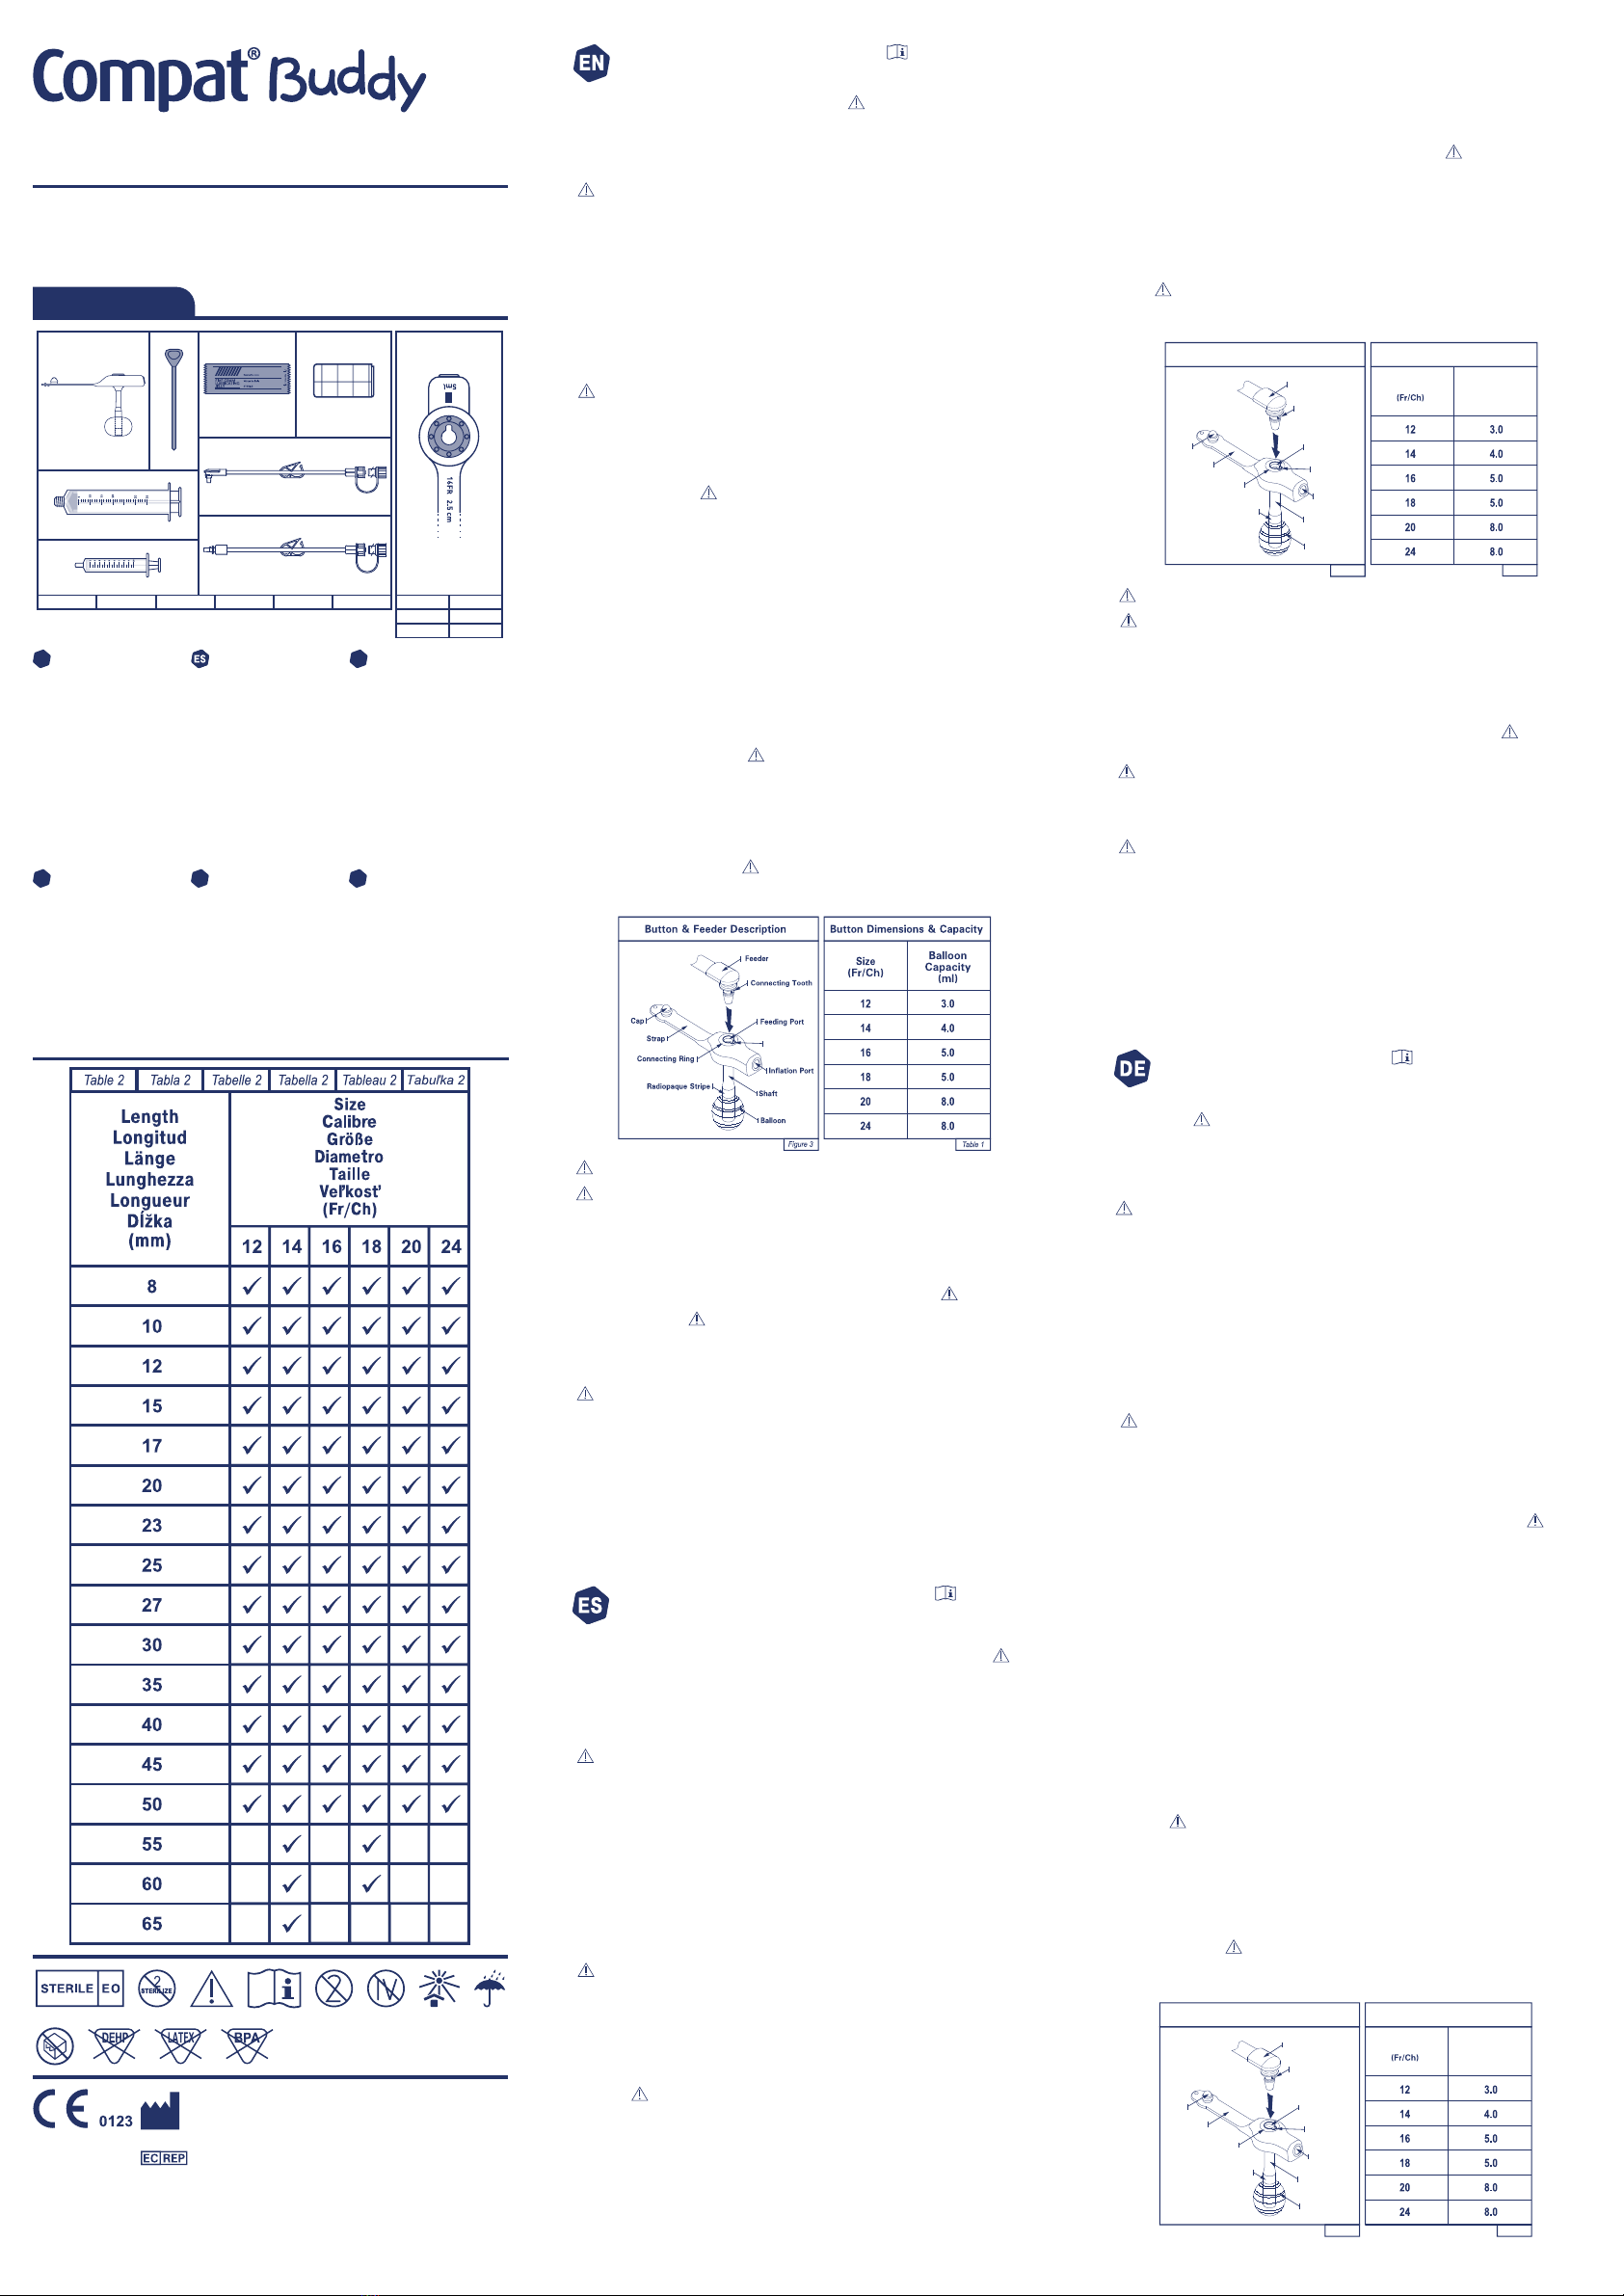
11. Tenendo fermo il dispositivo, gonfiare il pallone con il volume d’acqua raccomandato (Tabella 1). Utilizzare la siringa Luer da 10 ml. Non usare aria.
12. Estrarre delicatamente il Bottone per Gastrostomia Compat®Buddy finchè il pallone non aderisce alla parete dello stomaco. Evitare una tensione
eccessiva perché potrebbe causare necrosi dei tessuti. Verificare se ci siano segni di fuoriuscita gastrica.
13. Usare la garza per pulire il sito dello stoma e per rimuovere il lubrificante in eccesso.
CONFERMA DEL POSIZIONAMENTO:
1. Prima di utilizzare la sonda per l’alimentazione, confermare il suo posizionamento in conformità alle procedure preferite dal medico. Un metodo consiste
nell’aspirare il contenuto gastrico. Con il Set di estensione connesso (come spiegato di seguito) al Bottone per Gastrostomia Compat®Buddy, collegare la
siringa ENFit®alla porta del Set di Estensione.
2.
Aspirare il contenuto gastrico. La presenza di contenuto gastrico nella siringa conferma il corretto posizionamento del Bottone per Gastrostomia Compat
®
Buddy nello stomaco.
3.
Utilizzare la siringa ENFit
®
per sciacquare con 10 ml di acqua. Controllare se ci sono perdite attorno allo stoma. Se ci sono perdite, riconfermare il giusto gonfiaggio
del pallone e verificare il diametro Fr, la lunghezza e il posizionamento dello stoma. Si può confermare il corretto posizionamento tramite radiografia. Il Bottone per
Gastrostomia Compat
®
Buddy ha una striscia radiopaca bianca sulla sonda (figura 3). AVVERTENZA: Non usare mezzi di contrasto dentro il pallone.
4. Se necessario, usare altra garza per pulire il sito dello stoma.
COLLEGAMENTO DEL SET DI ESTENSIONE:
1. Controllare se i Set hanno subito danni. Non usare set danneggiati o otturati.
2.
Se si usano Set di estensione diversi da quelli forniti nel kit, come ad esempio i Set di estensione Compat
®
Buddy, essi devono essere utilizzati in conformità alle
istruzioni del produttore.
3. Aprire il tappo dell’accesso per l’alimentazione.
4. Inserire il Set di estensione nel Bottone per Gastrostomia Compat®Buddy, allineando la linea nera della sonda di alimentazione con la linea nera
dell'accesso per gonfiaggio. Premere delicatamente il connettore e girarlo in senso orario per ¾ di giro (270 gradi) al fine di fissarlo, fino a quando si sente
una lieve resistenza. AVVERTENZA: Non girare oltre il punto di bloccaggio, perché si potrebbe danneggiare il dente di collegamento.
5. Per rimuovere il Set di estensione, girare delicatamente il connettore in senso antiorario, fino a che la linea nera sul connettore si allinea con la linea nera dell'accesso
per il gonfiaggio, e si può staccare il dente di collegamento tramite la scanalatura. Togliere il Set di estensione e chiudere il tappo dell'accesso per alimentazione.
Diametro
Figura 3 Tabella 1
Descrizione del Bottone e del Connettore
Connettore
Dente di
Collegamento
Accesso per
alimentazione
Accesso per
gonfiaggio
Stelo
Pallone
Tappo
Fascetta
Anello di Collegamento
Striscia Radiopaca
Diametro del Bottone e Capacità del Pallone
Capacità
del Pallone
(ml)
Scanalatura
Veľkosť
Tabuľka 1
Popis gombíka a podávača
Podávač
Spojovací zúbok
Podávací port
Inflačný port
Kanálik
Balónik
Uzáver
Štítok
Spojovací krúžok
Nepriepustný prúžok
Veľkosť gombíka a kapacita balónika
Kapacita balónika
(ml)
Drážka
Obrázok 3
SK
9. Trubicu jemne preveďte cez stómu do žalúdka, až kým celý balónik neprejde traktom a telo Gastrostómického výživového gombíka Compat®Buddy
nedosiahne pokožku pacienta.
10. Odstráňte ihlu (v prípade, že ste ju v bode 7 použili).
11. Počas toho, ako zariadenie držíte, nafúknite balónik pomocou predpísaného množstva vody (Tabuľka 1). Použite pritom 10ml striekačku so
zakončením Luer Slip. Nenafukujte balónik vzduchom.
12. Jemne potiahnite Gastrostómický výživový gombík Compat®Buddy, až kým balónik neprilne k stene žalúdka. Vyhnite sa nadmernému napätiu,
ktoré by mohlo spôsobiť nekrózu tkaniva. Skontrolujte, či nedochádza k úniku žalúdočnej tekutiny.
13. Na očistenie miesta stómie a odstránenie akéhokoľvek prebytočného lubrikantu použite gázu.
KONTROLA UMIESTNENIA:
1. Pred použitím skontrolujte umiestnenie výživovej trubice podľa preferovaných postupov vášho lekára. Jednou zo zaužívaných metód je nasávanie
obsahu žalúdka. Po pripojení predlžovacej súpravy (pokyny viď nižšie) ku Gastrostómickému výživovému gombíku Compat®Buddy, pripojte striekačku
ENFit®k podávaciemu portu predlžovacej súpravy.
2. Nasajte obsah žalúdka. Prítomnosť obsahu žalúdka v injekčnej striekačke potvrdzuje správne umiestnenie Gastrostómického výživového gombíka
Compat®Buddy v žalúdku.
3. Vypláchnite striekačkou ENFit®za použitia 10ml vody. Skontrolujte, či nedochádza k úniku tekutín v okolí stómie. V prípade zistenia netesnosti,
skontrolujte správne nafúknutie balónika, preverte francúzsku veľkosť, dĺžku stómy a umiestnenie. Správne umiestnenie je možné potvrdiť i
rádiograficky. Trubica Gastrostómického výživového gombíka Compat®Buddy obsahuje biely prúžok nepriepustný pre žiarenie (Obrázok 3).
UPOZORNENIE: Balónik nenapúšťajte kontrastnými látkami.
4. V prípade potreby očistite miesto stómie pomocou dodatočnej gázy.
PRIPOJENIE PREDLŽOVACEJ SÚPRAVY:
1. Skontrolujte, či predlžovacia súprava nie je poškodená. Ak je súprava poškodená alebo upchatá nepoužívajte ju.
2. V prípade, že sa rozhodnete použiť predlžovaciu súpravu, ktorá nie je súčasťou tejto sady, pripojte ju podľa návodu na použitie jej výrobcu.
3. Otvorte uzáver podávacieho portu.
4. Zasuňte predlžovaciu súpravu do Gastrostómického výživového gombíka Compat®Buddy zarovnaním spojovacieho zúbku podávača (Obrázok 3)
s drážkou spojovacieho krúžku na podávacom porte. Zarovnajte čiernu čiarku na podávači s čiernou čiarkou na inflačnom porte. Podávač jemne zatlačte
a otočte v smere hodinových ručičiek ¾ otáčkou (270 stupňov). Keď pocítite mierny odpor, podávač je zaistený na mieste. UPOZORNENIE:
Dbajte na to, aby ste podávač nepretočili, mohlo by to poškodiť spojovací zúbok.
5. Pre odstránenie predlžovacej súpravy jemne zatočte proti smeru hodinových ručičiek tak, aby sa čierna čiarka na podávači zarovnala s čiernou čiarkou
na inflačnom porte. Spojovací zúbok sa tak uvoľní z drážky spojovacieho krúžku. Odstráňte predlžovaciu súpravu a zatvorte uzáver podávacieho portu.
Gastrostómický výživový gombík Compat®Buddy (nízkoprofilová gastrostómická výživová trubica). Pred použitím si
pozorne prečítajte všetky uvedené pokyny! POPIS: Gastrostómická súprava Compat®Buddy umožňuje podávanie enterálnej výživy,
vody a liekov priamo do žalúdka a/alebo žalúdočnú dekompresiu. Výživový gombík je dostupný vo veľkostiach 12-24Fr. Každá z Fr veľkostí
je dostupná vo všetkých dĺžkach uvedených v tabuľke 2. Dostupnosť uvedených produktov može byť pre vašu krajinu odlišná. Viac informácii vám
poskytne zástupca spoločnosti Compat®vo vašej krajine. Veľkosť a dĺžka každého Gastrostómického výživového gombíka Compat®Buddy je zreteľne
uvedená na štítku každého zariadenia ako aj na obale súpravy. UPOZORNENIE: Gastrostómický výživový gombík Compat®Buddy je určený na
disktrétne zabezpečenie klinickej výživy po úspešnom prevedení gastrostómie. Toto zariadenie je dodávané v sterilnom stave a je určené na jednorazové
použitie. Pred použitím skontrolujte, či obsah súpravy nie je poškodený. Ak je výrobok poškodený, nepoužívajte ho.
INDIKÁCIE NA POUŽITIE: Gastrostómický výživový gombík Compat®Buddy je indikovaný na použitie u pacientov, ktorí vyžadujú dlhodobú klinickú
výživu, nie sú schopní tolerovať podávanie výživy ústami, je u nich nízke riziko aspirácie, prípadne vyžadujú dekompresiu žalúdka a/alebo podávanie
liekov priamo do žalúdka. KONTRAINDIKÁCIE: Kontraindikácie pre použitie Gastrostómického výživového gombíka Compat®Buddy zahŕňajú, nie sú
však obmedzené na, nedostatok priľnavosti žalúdka k brušnej stene, infekcie, nedostatok úspešne prevedenej gastrostómie, prítomnosť viacerých
fistuóznych pasáží a neistotu s ohľadom na hrúbku brušnej steny.
VAROVANIE:
- Vaše otázky ohľahom upozornení, starostlivosti a použitia Gastrostómického výživového gombíka Compat®Buddy vám rád zodpovie váš zdravotník
alebo lekár.
- Gastrostómický výživový gombík Compat®Buddy je určený na enterálnu výživu a nie na intravenózne použitie.
-
Gastrostómický výživový gombík Compat
®
Buddy je určený na jednorazové použitie. Nepoužívajte ho opakovanie, neupravujte ani nesterilizujte ho.
Opätovné použitie môže vyvolať riziko infekcie a/alebo narušiť funkčnú spoľahlivosť zariadenia. Produkt nepoužívajte, ak je jeho obal otvorený alebo poškodený.
- Skontrolujte dátum expirácie. Po uplynutí tohto dátumu výrobok nepoužívajte.
- Zariadenie chráňte pred poškriabaním, porezaním, potrhaním, prepichnutím alebo iným poškodením.
- Každý Gastrostómický výživový gombík Compat®Buddy je možné pri úspešne prevedenej garstrostómii používať po dobu 30 dní, za predpokladu,
že výživová trubica nebola uvoľnená alebo upchatá. V takom prípade by mal pacient okamžite kontaktovať svojho lekára.
- Doba používania Gastrostómického výživového gombíka Compat®Buddy sa môže líšiť v závislosti od rôznych faktorov, vrátane objemu naplnenej
vody v balóne, pH žalúdka, starostlivosti o výživovú trubicu, atď.
- Vždy majte k dispozícii náhradný Gastrostómický výživový gombík Compat®Buddy alebo náhradnú gastrostómickú výživovú trubicu. Zariadenie
neodstraňujte, ak nemáte k dispozícii náhradný Gastrostómický výživový gombík Compat®Buddy, keďže pri nedostatku výmenného zariadenia môže
dôsť k uzavretiu stómie.
- Predlžovacia súprava je určená na jednorazové použitie u jedného pacienta.
- Vždy dodržiavajte vaše miestne platné protokoly a postupy pre používanie, umiestnenie, odstránenie a starostlivosť o Gastrostómický výživový
gombík Compat®Buddy a jeho príslušenstvo.
UPOZORNENIE: Umiestnenie by mal vykonať lekár alebo by malo byt riadené lekárom. Veľkosti (Fr a dĺžka) musia byť predpísané lekárom.
VÝMENA TRUBICE:
1. Zvoľte veľkosť Gastrostómického výživového gombíka Compat®Buddy podľa francúzskej (Fr) veľkosti a dĺžky (cm) predchádzajúceho výživového
gombíka, alebo podľa predpisu vášho lekára. Správna veľkosť gombíka pomáha zabrániť úniku žalúdočnej tekutiny a podráždeniu pokožky.
2. Pred manipuláciou so zariadením alebo jeho časťami si vždy dôkladne umyte ruky.
3. Pred použitím skontrolujte, či zariadenie nie je poškodené.
4. Skontrolujte, či balónik dostatočne tesní. Použite postupy preferované vašim lekárom. Jednou z často používaných metód je naplnenie balónika
odporúčaným objemom vody (Tabuľka 1).
Nafúknutý balónik by mal byť symetrický. Nafúknutý balónik nestláčajte. Po skontrolovaní balónik vypustite. Používajte výhradne injekčné striekačky so
zakončením Luer Slip (Obrázok 1).
UPOZORNENIE: Neprekračujte maximálny objem naplnenia.
5. Očistite pokožku okolo stómie.
6. Odstráňte existujúcu gastrostómickú trubicu zo stómie podľa pokynov jej výrobcu.
7. Zasuňte ihlu (Obrázok 1) úplne do podávacieho portu (použitie ihly nie je nevyhnutné; ihla zabezpečuje stabilitu kanálika). Dajte pozor, aby ihla
nepresahovala do distálnej špičky gombíka.
8. Špičku trubice namažte lubrikantom na vodnej báze. Nikdy nepoužívajte olej alebo vazelínu.