Connevans fmGenie B44FDIVINS User manual

fmGenie Diversity Soundfield
Installation Instructions
B44FDIVINS – fmGenie Diversity Soundfield Installation Instructions V1.3 1
Check contents of kit, you should have the following:
a) fmGenie Transmitter
& twiddling stick
c) Collarworn
microphone
d) Hip pouch
b) fmGenie Diversity
Receiver/amplifier with two aerials
and wall fixings
e) Charging lead for
fmGenie
transmitter
f) 2 pairs of speakers (3 pairs for a
6 speaker system!)
j) Pair of batteries for
fmGenie transmitter
k) Instruction sheets:
Soundfield fmGenie Diversity Courtesy Card
fmGenie Diversity Receiver/ Amp control &
feature card
Wall & door stickers
Mounting instructions
fmGenie system booklet
This installation instruction booklet
g) 100m reel of speaker cable (we know this is too much cable, but
100m reels are the cheapest form of supply)
h) 1 bag of speaker cable clips (using a cabling
staple gun is preferable if you have one)

2. Deciding the easiest cabling run for the speakers.
Take advantage of existing features such as any wooden picture rails or perhaps notice
boards (it is much easier to fit cable clips to wood than plaster). If you have a false
ceiling the cable can be run above it. Sometimes using a piece of plastic mini trunking
for any difficult runs is a good solution.
Speaker wiring
Speaker wiring – one cable run down
each side of the classroom wiring 2
(or 3) speakers in parallel. It is
important to maintain the correct
polarity when connecting the cable so
we suggest connecting the black trace
wire to the black terminal(!) (Each
speaker is 4 Ohms thus for 4 speakers
we now have 2 Ohms on each cable).
The fmGenie Diversity has 4 terminals
– red, black, black, red. Connect the
two cable runs, one to the left pair and
one to the right pair, again maintaining
correct polarity ie black trace wire to
the black terminals.
(The terminals are wired internally to
connect the two cable runs in series
making the load on the amplifier 4
Ohms. The actual amplifier
connections are the 2nd and 4th
terminal as viewed from below, which
you would need to know if you wanted
to test the amplifier with just one
speaker)
The cable is white with a black stripe
along one wire. The white only wire
should always be connected to the red
terminals and the black stripe wire
always to the black terminal.
fmGenie Diversity Soundfield
B44FDIVINS – fmGenie Diversity Soundfield Installation Instructions V1.3 3
Four speaker wiring
Six speaker wiring
red black
red black black
red black
red black red black
red black red black
red
red black
red black black
red black
red black red black
red
fmGenie Diversity Soundfield
2B44FDIVINS – fmGenie Diversity Soundfield Installation Instructions V1.3
An overview of the installation steps are:
1) Decide where the speakers are to be fitted
2) Decide the easiest cabling run for the speakers – which may not be the shortest.
3) Decide where to mount the fmGenie Diversity Receiver/amplifier
4) Install the system
5) Setting up and testing the system
6) Demonstrate and set the volume level for the user.
Charge batteries now if possible
Rechargeable batteries require charging before use, so if you have
a standard plug-in AA or fmGenie twin tail charger, we suggest that
you start charging the transmitter batteries now whilst the system is
being fitted.
Even just an hour or so will give enough charge to test the system.
A proper charge can be given when the setting up or demonstration
has finished.
If you don't have a suitable charger you will need to use the inbuilt fmGenie Diversity
charger, but naturally you cannot start charging until the system has been fully installed.
A pair of AA alkaline batteries can be used (or borrowed) for testing if necessary – but
do not try charging them!
1. Deciding where to fit the speakers
Firstly please do not think home hi-fi and put the
speakers in the corners, at waist level and point them to
the centre of the room – this is the worst possible thing
to do!
Placing loudspeakers for a classroom soundield is more
like deciding how best to light a room using 4 small
lamps. If you think light you will not go far wrong,
i.e. fitted above head height (2 to 2.5 metre high)
each over a 1/4 of the room pointing down on the area
to be covered.
The positioning of speakers is often predecided by
physical objects such as windows. You have to fit 4 (or
6) speakers so adapt your ‘lighting’ plan to give the best
pattern for the students – perhaps avoiding the window,
an unused end of a classroom or a teachers desk.
window
Speaker position allowing for a window

fmGenie Diversity Soundfield
B44FDIVINS – fmGenie Diversity Soundfield Installation Instructions V1.3 5
The display on the
transmitter shows which
channel is selected.
5. Setting up and testing the system
fmGenie transmitter information
General instructions for using the fmGenie transmitter are included in the Tutor
courtesy card.
Set to LR if MLx or cochlear implant processors are being used with a personal fm
system in the classroom.
For further information on the fmGenie transmitter,
please refer to the fmGenie Information &
Instruction Booklet.
fmGenie
‘twiddling
stick’ adjustment
tool – for changing
channel settings or
adjusting Diversity mute
level.
Factory settings:
UP, DOWN, DOWN, UP
Factory settings
UP, UP, DOWN, DOWN
To change the default channel
reselect using the tool supplied
tens units
Normal
MLx or cochlear implant
processors if necessary
Tx underflash switch settings
Tx rear battery compartment switch settings
4B44FDIVINS – fmGenie Diversity Soundfield Installation Instructions V1.3
3. Deciding where to mount the fmGenie Diversity
Receiver/amplifier
This is usually best done by discussing the options with the
school staff. Make sure that there is adequate access to
open the door and operate the controls!
The two aerials must be used fully extended in a 60° ‘V’
shape preferably ‘flat’ to where the teacher will normally
stand – away from metal racking, pipes, metal building
frames etc. otherwise the quality of radio reception will be
reduced.
It should not be necessary to adjust the controls during a
lesson so the fmGenie Diversity unit does not actually need
to be beside the teacher although it is a good idea to mount it near to where a TV or
smart board projector might be used. Mounting the unit away from little fingers is also a
good idea(!) and of course do not forget that you also need a 13A mains socket to
power the system.
4. Install the system
fmGenie Diversity Wall Mounting
There is an separate A3 sheet which has a template and
guidance for mounting the fmGenie Diversity wall unit.
Connecting the speaker wiring
1 Pass the two speaker cables from behind the unit through the rubber grommet
with the mains cable, around the right hand corner of the unit and through the
speaker cable clamp. See the photograph below.
2 Prepare the speaker cable ends.
3 Place each speaker cable pair into the
appropriate connector, observing the correct
polarity.
4 Lay the speaker cables on top of each other
and tighten the cable clamp.
Lower trunking
Upper trunking
Speaker cables
come from behind
the unit, through the
cable clamp to the
connectors
fmGenie Diversity Soundfield

fmGenie Diversity Soundfield
B44FDIVINS – fmGenie Diversity Soundfield Installation Instructions V1.3 7
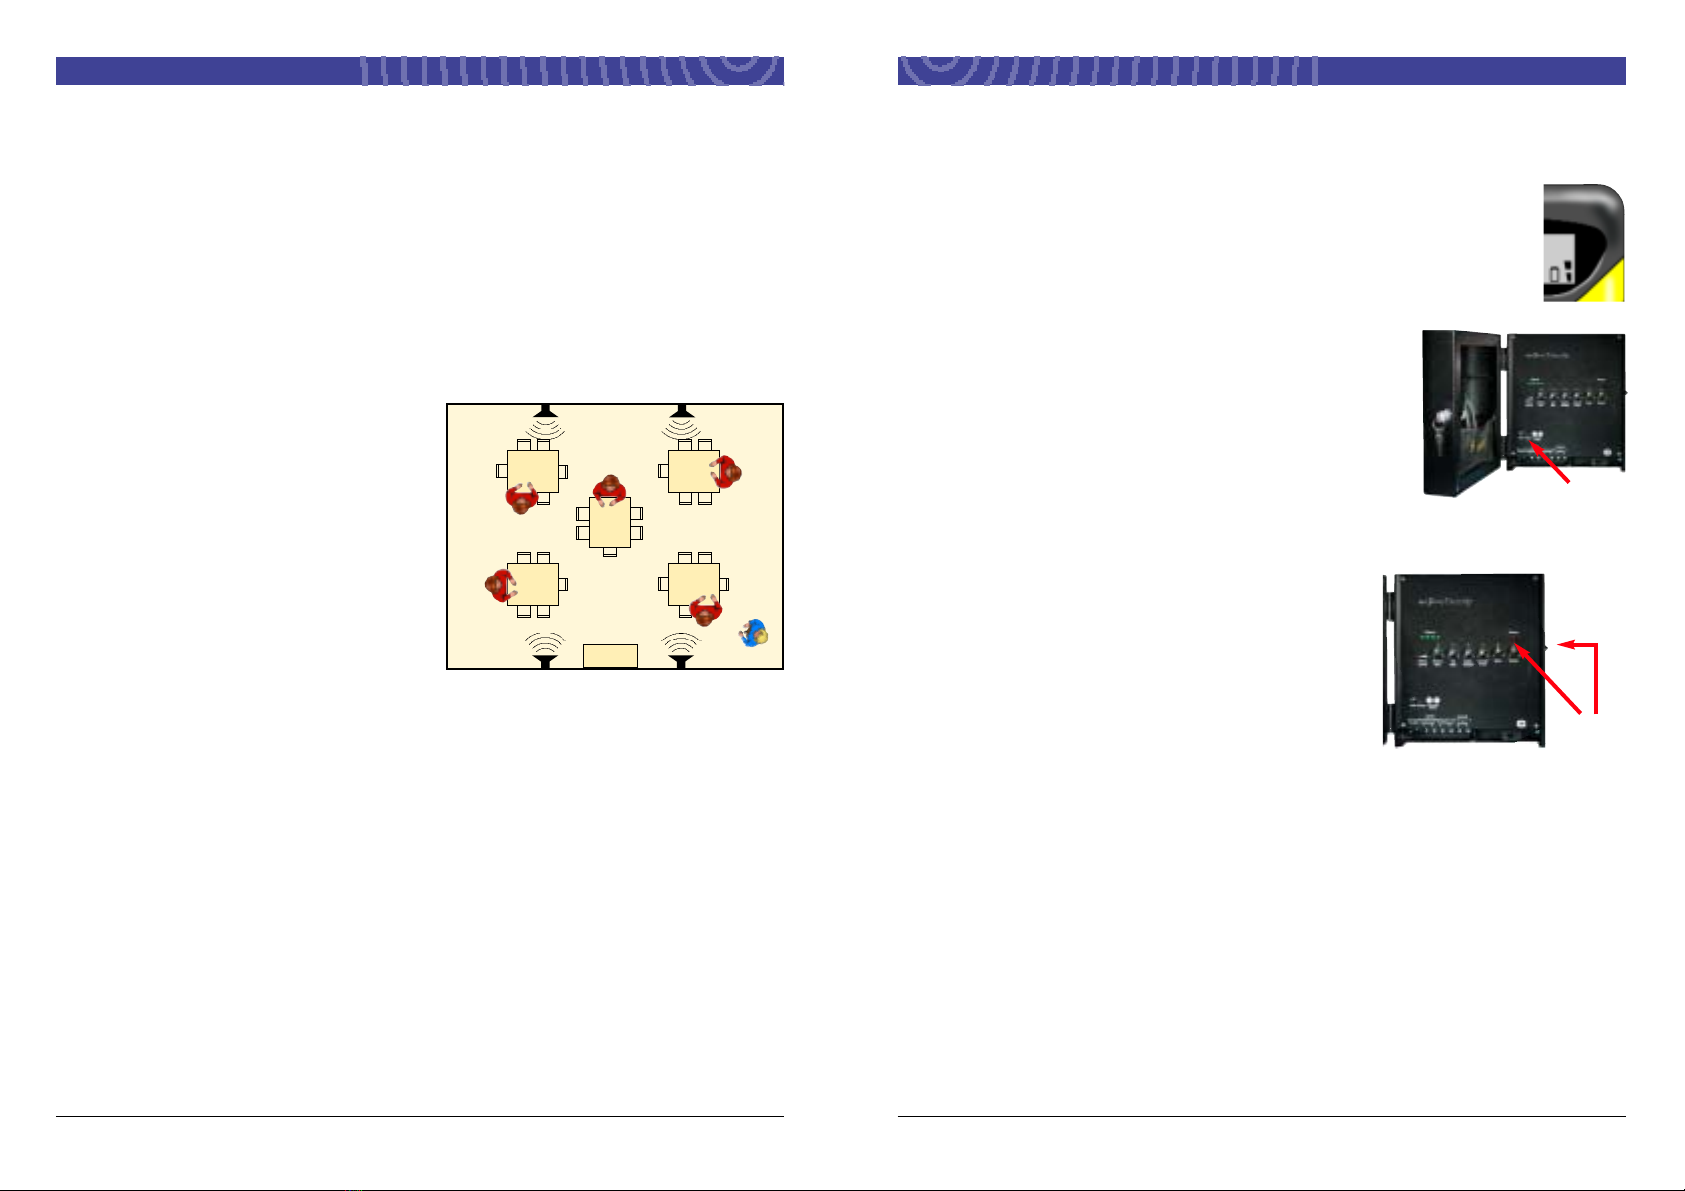
Check the transmitter
Plug the microphone into the fmGenie transmitter and switch on by
holding the power button down until the display appears. Check
that the four green signal bars on the fmGenie Diversity receiver
light up. Hold the microphone at about 25mm from the mouth and
talk whilst increasing the 'Radio Mic' volume on the Diversity until
you can hear it clearly without causing feedback whistling.
Make sure that the transmitter aerial (the microphone cable) is
substantially vertical and fully extended by wearing the transmitter
in the hip pouch supplied or simply clipping it to your belt. Walk
around the room whilst talking. There should be no important places where the sound
cuts out. Walk around again whilst staying silent. There should be no important places
where the sound goes very noisy. If either of these instances occurs, check for the
presence of large metallic objects in the vicinity. Consider moving them, adjusting the
position of one or both aerials on the Diversity, re-siting the Diversity or alternatively,
increase the fmGenie transmitter power setting to 'LR'.
6 Demonstrate and set the volume level for the user
It is important that the soundfield is set up properly. We have found that most users
tend to set the system too loud. This is unnecessary and undesirable. The golden rule
is "if the user of the transmitter can hear themselves clearly from the speakers, then
the volume is too loud". It is difficult for the person talking to judge the level of their own
amplified voice.
There are two ways to set up a soundfield properly; one uses a sound level meter and
the other relies on the subjective judgement of another person. Both methods require
two people with the class teacher preferably being the one doing the talking.
Setting the correct volume level
zWear the collarworn or headset microphone as shown.
zWalk to the point in the room furthest away from
the Diversity and invite a colleague to join you.
zMute the transmitter by pressing the
STAR button momentarily.
zTalk in a normal voice to your colleague while
they stand about 1 metre away from you.
zAsk your colleague to remember the
average sound level reading by either....
a) Using a sound level meter or
b) Remembering the sound level by ear
....and then get them to walk over to the Diversity receiver.
Signal bars
100-150mm
fmGenie Diversity Soundfield
6B44FDIVINS – fmGenie Diversity Soundfield Installation Instructions V1.3
Choosing the channel
You may use any radio channel between 38 and 69. Any number lower
than 38 defaults to channel 38 and any number higher than 69 defaults
to channel 69 on the Diversity receiver. All radio receiving apparatus
can suffer from interference. Channels 38 to 44 inclusive are reserved
for the use of radio hearing aids (personal fm systems) so these are
least likely to suffer from interference. When choosing channels for
each room, try to ensure that there is always a separation of at least
two channels between adjacent rooms. Don't forget that adjacent
rooms includes rooms above and below too! The channel number on the fmGenie
transmitter and the Diversity receiver are dialled up as 'tens' and 'units' in the same way
on both products. Refer to the relevant product instructions for further information.
Avoiding interference
Set the ‘Mute level’ control on the Diversity receiver fully anti-clockwise
using the fmGenie tool or a small screwdriver.
With the receiver powered up, but leaving the transmitter turned
OFF, increase the 'Radio Mic' volume to check whether there is
any local interference on the channel you have selected. If not,
reduce the volume to about half-way and proceed to checking
the transmitter. If there is interference, change the channel until
you find one that is clear. Keep in mind the minimum two
channel separation between adjacent rooms. If you are unable
to find a clear channel, then find the channel with the least interference and adjust the
'Mute Level' clockwise until the interference is muted.
Setting the Diversity receiver amplifier aerials
Make sure that the two aerials on the top of the wall mounted
Diversity receiver are fully extended and angled upwards at about
60 degrees to each other, but in line with the wall. They should be
left permanently in these positions, pinned to the wall with cable
clips if necessary. The aerials are not designed for daily movement.
Checking the operation of the Diversity amplifier and
speaker system
The easiest way to check the system is to connect a portable
radio, cassette or CD player into one of the auxiliary inputs
(numbered 1 to 4). Adjust the appropriate volume to a suitable
level and walk around the room, checking for a reasonably
constant sound level and lack of distortion or buzzing from any
particular speaker. Buzzing or distortion from a particular
speaker may indicate a faulty speaker or loose mount.
60°
Collarworn microphones
25-50mm
Head/earworn microphones

fmGenie Diversity Soundfield
B44FDIVINS – fmGenie Diversity Soundfield Installation Instructions V1.3 9
fmGenie Transmitter Battery Charging:
Normal charging routine.
Check the status of the battery bars on the fmGenie transmitter before
switching it off.
If the unit shows two bars or less, put it on charge overnight. (Whilst an
fmGenie will run for about 40 hours on a single charge, there is no need to
risk the inconvenience of running out of power).
The basic procedure
1 Turn off fmGenie Transmitter
2 Connect charging lead from fmGenie transmitter to
Diversity receiver amplifier.
3 Put transmitter and microphone into door pocket and
lock door to set automatic timer.
4. Go home!
Additional information on charging an fmGenie Transmitter.
When the fmGenie transmitter starts to take a charge, the
Diversity amplifier will switch off and enter charge mode.
Charge mode is indicated by flashing red indicators.
Charging will continue when the door of the fmGenie
Diversity is locked.
When the fmGenie Diversity is locked it will automatically
switch itself off about ten seconds after charging has
finished or after a fault has developed that reduces the
current taken from the charger.
A charge cycle takes either four or ten hours, depending on the residual charge in the
fmGenie transmitter batteries.
Under normal circumstances, the charge cycle terminates automatically and the
fmGenie Diversity will switch itself off (assuming the door is locked). When the door is
opened the next time, the fmGenie Diversity will switch on and the fmGenie transmitter
will show the word "no". This means that it needs no further charge and is ready for
use. When the charging plug is removed from the transmitter the display will go blank.
Store the charger plug in the door, safely away from any metal object and use the
transmitter as normal.
Charging is normally required once or twice a week, depending on use.
If the mains power is interrupted during charging when the door is locked, then
charging cannot continue on restoration of the power supply since the unit will have
Charging
indicators
Charging
socket
fmGenie Diversity Soundfield
8B44FDIVINS – fmGenie Diversity Soundfield Installation Instructions V1.3
zUn-mute the transmitter by pressing the STAR button again.
zAsk your colleague to increase the 'Radio Mic' volume control on the Diversity
receiver, whilst you continue to talk in the same normal voice as before, until
either....
a) the sound level shown by the meter at where they are standing is the same
average value as when he/she was one metre in front of you.
b) until he/she judges the sound level at where they are standing to be about the
same as when he/she was one metre in front of you
zHe/she may now adjust the tone controls if necessary to optimise vocal clarity.
zNow ask your colleague to walk around the room listening to make sure that your
voice is clear all around the room.
Job done! Don't be tempted to increase the
volume much further as teachers tend to
raise their voices in an active classroom
situation!
Once the installation has been carried out,
please do not underestimate the importance
of ensuring that the teacher has the
opportunity to experience listening to
another person using the system. There are
two reasons for this: firstly so that they
become impressed at the natural sound and
secondly it is hard for anyone to listen
objectively to their own voice. It is also an
excellent opportunity to ‘play’ at using the system with a colleague, allowing the teacher
to gain confidence with their own ‘performance’.
Leaving the fmGenie Diversity in a ready state for the user
If the transmitter batteries were not fully charged before testing and setting up the
system, remove one of them from the transmitter for 15 seconds and replace. Do NOT
turn the transmitter on. Plug the charger lead from the Diversity into the transmitter
charger socket. The Diversity should enter charge mode within a couple of seconds,
shown by the flashing red indicators and the transmitter should show the top two
battery bars scrolling. Place the transmitter, complete with microphone into the door of
the Diversity and lock the door. The system will automatically switch off when charging
is done – as long as you don’t forget to leave the mains switch on! If you have any
difficulty, refer to the individual operating guides.

fmGenie Diversity Soundfield
B44FDIVINS – fmGenie Diversity Soundfield Installation Instructions V1.3 11
Do not allow the door to swing open – either use it shut or fully open,
to reduce the probability of someone hitting their head on it.
The unit will become warm during normal use.
The inside front panel will become hot when the system is producing continuous loud
sound.
Open the door if the unit is to be used for extended periods (i.e. more than ten minutes)
with loud or continuous sound such as music or if the ambient temperature is above
30°C.
Do not block the ventilation holes at the bottom and top of the unit.
Do not allow the tip of the charger lead to touch any metallic object, including the
casework of the fmGenie Diversity. Store the charger plug safely in the insulated door
pouch when not in use or remove from the front panel socket.
The charger in the fmGenie Diversity is designed only to charge fmGenie units
containing Ni-MH batteries of 1300mAh capacity. Do not attempt to charge other
devices, battery types or use for other purposes.
Do not attempt to charge units containing non-rechargeable batteries.
Do not expose the fmGenie Diversity to rain or moisture.
The fmGenie Diversity unit MUST be earthed.
For continued protection, replace the fuse only with the same type and rating i.e.
Antisurge T315mA.
Hazardous voltages exist inside the fmGenie Diversity unit.
No user serviceable parts inside.
Refer servicing to authorised representatives of Connevans Limited.
Remove the mains plug from the wall socket before undertaking any servicing
operations.
The fmGenie Diversity is manufactured by:
Connevans Limited
54 Albert Road North, Reigate, Surrey RH2 9YR
Cautions:
!
fmGenie Diversity Soundfield
10 B44FDIVINS – fmGenie Diversity Soundfield Installation Instructions V1.3
switched itself off. In this eventuality, the fmGenie transmitter will indicate the total
number of charge hours that have completed. For further information, refer to the
fmGenie instruction manual.
Cutting short the charge cycle
If you wish to cut short the charge cycle, the charging plug may simply be removed
from the fmGenie transmitter.
This will cause two things to happen:
1) The fmGenie Diversity receiver amplifier will return to normal amplifier 'on' mode
after about 10 seconds (indicated by the red power lights going solid)
2) The transmitter display will show the approximate hours spent on charge
e.g. "1H". Press and hold the star button to clear the display.
Notes:
a) When topping up battery charge the rough ratio is 1 hour charge should give
5 hours use.
b) Because the transmitter and its batteries have been ‘fooled’ into thinking they are
charged it will be necessary to remove one battery for 15 seconds (to force the 'new
battery' charge mode) before attempting to charge again.
FINAL NOTE: Probably the most useful bit of advice that we can give to a user is to
get involved with setting up and understanding their equipment from the beginning.
Adjusting tone & volume controls should not be regarded as a 'black magic' art only for
a technician. It is not unknown for our customer services team to receive a phone call
asking for permission to turn the volume up or down!
Understanding how the equipment works is important as it will prove very expensive to
request a technician service visit every time somebody turns a volume to zero or the
cleaner unplugs the mains lead!

fmGenie Diversity Soundfield
12 B44FDIVINS – fmGenie Diversity Soundfield Installation Instructions V1.3
Trouble shooting:
If the fmGenie Diversity does not operate as expected check the following:
Symptom Probable Cause
No red indicator light Unit unplugged, switched off or fuse blown
Red indicators solid but no
sound
Volume control too low, transmitter not on or muted, speaker
cable disconnected
Red indicators flashing and no
sound Unit in charge mode
No green 'Signal' indicators Transmitter unit not functioning or on different channel setting
to receiver. Transmitter microphone (aerial) not plugged in
Distorted sound only when
transmitter is very close to the
Diversity receiver
Transmitter on different channel setting to receiver
Feedback whistling all the time
or when the user of the
transmitter speaks
'Radio mic' volume too high. Headworn microphone too far
away from user's mouth.
Sound too bright or boomy Adjust the tone controls to suit the acoustics of the room and
speakers
Sound distorted
Reduce the volume of the appropriate channel. The system is
only intended for speech and music in an average size
classroom up giving up to about 90dB SPL.
Interference present when the
transmitter is switched off
Another distant transmitter on the same channel, another
close by transmitter on a nearby channel or a nearby
electrical system such as a computer, fire alarm system or
mobile telephone. Locate and change the frequency of the
offending transmitter or increase the 'Mute Level' control until
the interference disappears or change the fmGenie Diversity
system to another channel.
Wooshing sound or signal drop
out as the user of the
transmitter moves around the
room
Diversity receiver has been positioned near some metal such
as a cupboard, filing cabinet, steel building structure (RSJ) or
a metal lined plasterboard partition. Receiver aerial broken,
not connected or not extended properly at 60°. Microphone
wire on transmitter not extended in recommended fashion.
Transmitter faulty. If the system has suffered from this since
installation, switch the transmitter to the 'LR' setting.
Table of contents
Other Connevans Hearing Aid manuals

Connevans
Connevans TV 2510NL User manual

Connevans
Connevans FmGenie Parts list manual

Connevans
Connevans FmGenie User manual

Connevans
Connevans Phonak Roger Pen User manual

Connevans
Connevans ZoomLink+ Parts list manual

Connevans
Connevans FmGenie User manual

Connevans
Connevans Phonak Roger EasyPen User manual

Connevans
Connevans Roger EasyBen User manual

Connevans
Connevans CRM-220 User manual

Connevans
Connevans Roger Pen Parts list manual