manuals.online logo
Brands
  1. Home
  2. •
  3. Brands
  4. •
  5. Connevans
  6. •
  7. Hearing Aid
  8. •
  9. Connevans FmGenie User manual

Connevans FmGenie User manual

fmGenie Neck Loop Fastrack Guide Version 2.5
fmGenie Fast Track Guide
for use with neck loops
1
T
The fmGenie uses standard size AA batteries. Rechargeable batteries are the
recommended option and, once fitted, are charged ʻin situʼ ‒ just like a mobile
phone.
Rechargeable batteries ‒ nickel metal hydride (NiMH)
New rechargeable batteries require charging before use.
1 To fit the batteries, slide open the battery cover
and insert as shown. The technique is a
combination of ʻsqueeze, thumb and wiggleʼ
‒ you wonʼt break it and the firm fit stops the
battery cover accidentally falling off.
2 Do NOT turn on the fmGenie.
3 Plug the twin tail charger into the socket marked ʻChgʼ
and turn on charger ‒ rolling battery bars should be
visible on the right of the status display.
4 The equipment will be given an initial 4 hour charge
‒ enough for a few daysʼ use.
5 When the display goes blank, fmGenie is ready for use.
After this initial charge, your fmGenie will automatically take either a
full or top up charge as required.
Alkaline batteries
The fmGenie can also be used with alkaline AA batteries ‒
which can be useful in an emergency ‒ you could even borrow
some from your TV remote controls!
The performance is the same whatever type of AA battery is used.
This
Fast Track Guide
takes you through the basic steps required to get your
fmGenie working with an inductive neck loop.
Part 1 Batteries
Page 55 ‒ User Guide (3rd Edition)
Version 2.5 fmGenie Neck Loop Fastrack Guide fmGenie Neck Loop Fastrack Guide Version 2.5 32
fm
G
enie
fm
G
enie
fm
G
enie
fm
G
enie
1 Connect an aerial or lapel microphone into the
fmGenie transmitter external microphone
socket (Ext mic).
Part 2a Turning on
3 Check that both units are showing
the same channel number.
If they are not, you will need to match
the channels.
...or
with a lapel
mic
Either with
an aerial to use
the internal
mic ...
2 Turn on both the transmitter and receiver by pressing and holding the
ON/OFF button until the display turns on and the alert indicator flashes
once.
It is time rather than
pressure which turns
on an fmGenie ‒ to
prevent accidental
switching on/off.
2 Give the fmGenie transmitter to a colleague and ask them to walk to
the other side of the room while talking normally into the microphone at
150mm (the length of a biro) from the mouth.
3 Plug the test headphones into the
fmGenie receiver audio output socket
(Audio out).
4 Using the test headphones, listen to
the fmGenie receiver and adjusting
the Tx volume to a comfortable level.
Part 2b Using test headphones
to check the fmGenie system
Hearing aid users setting up an fmGenie for themselves should skip this
section and move on to Part 3.
1 Check that ʻHIʼ audio output is selected on the
receiver by checking the display.
If is not shown, you will need to refer to page
9 and set ʻHIʼ rather than ʻLOʼ .
Assuming you are able to hear your colleague talking, well done
‒ you are halfway to a fully working system. The next step is to get the hearing
aid(s) working with the fmGenie receiver.
Page 95 ‒ User Guide (3rd Edition)
Pages 48 and 90 ‒ User Guide (3rd Edition)
fm
G
enie
fm
G
enie
fm
G
enie
fm
G
enie
54 fmGenie Neck Loop Fastrack Guide Version 2.5Version 2.5 fmGenie Neck Loop Fastrack Guide
1 Ensure that the ʻTx volʼ volume is at minimum.
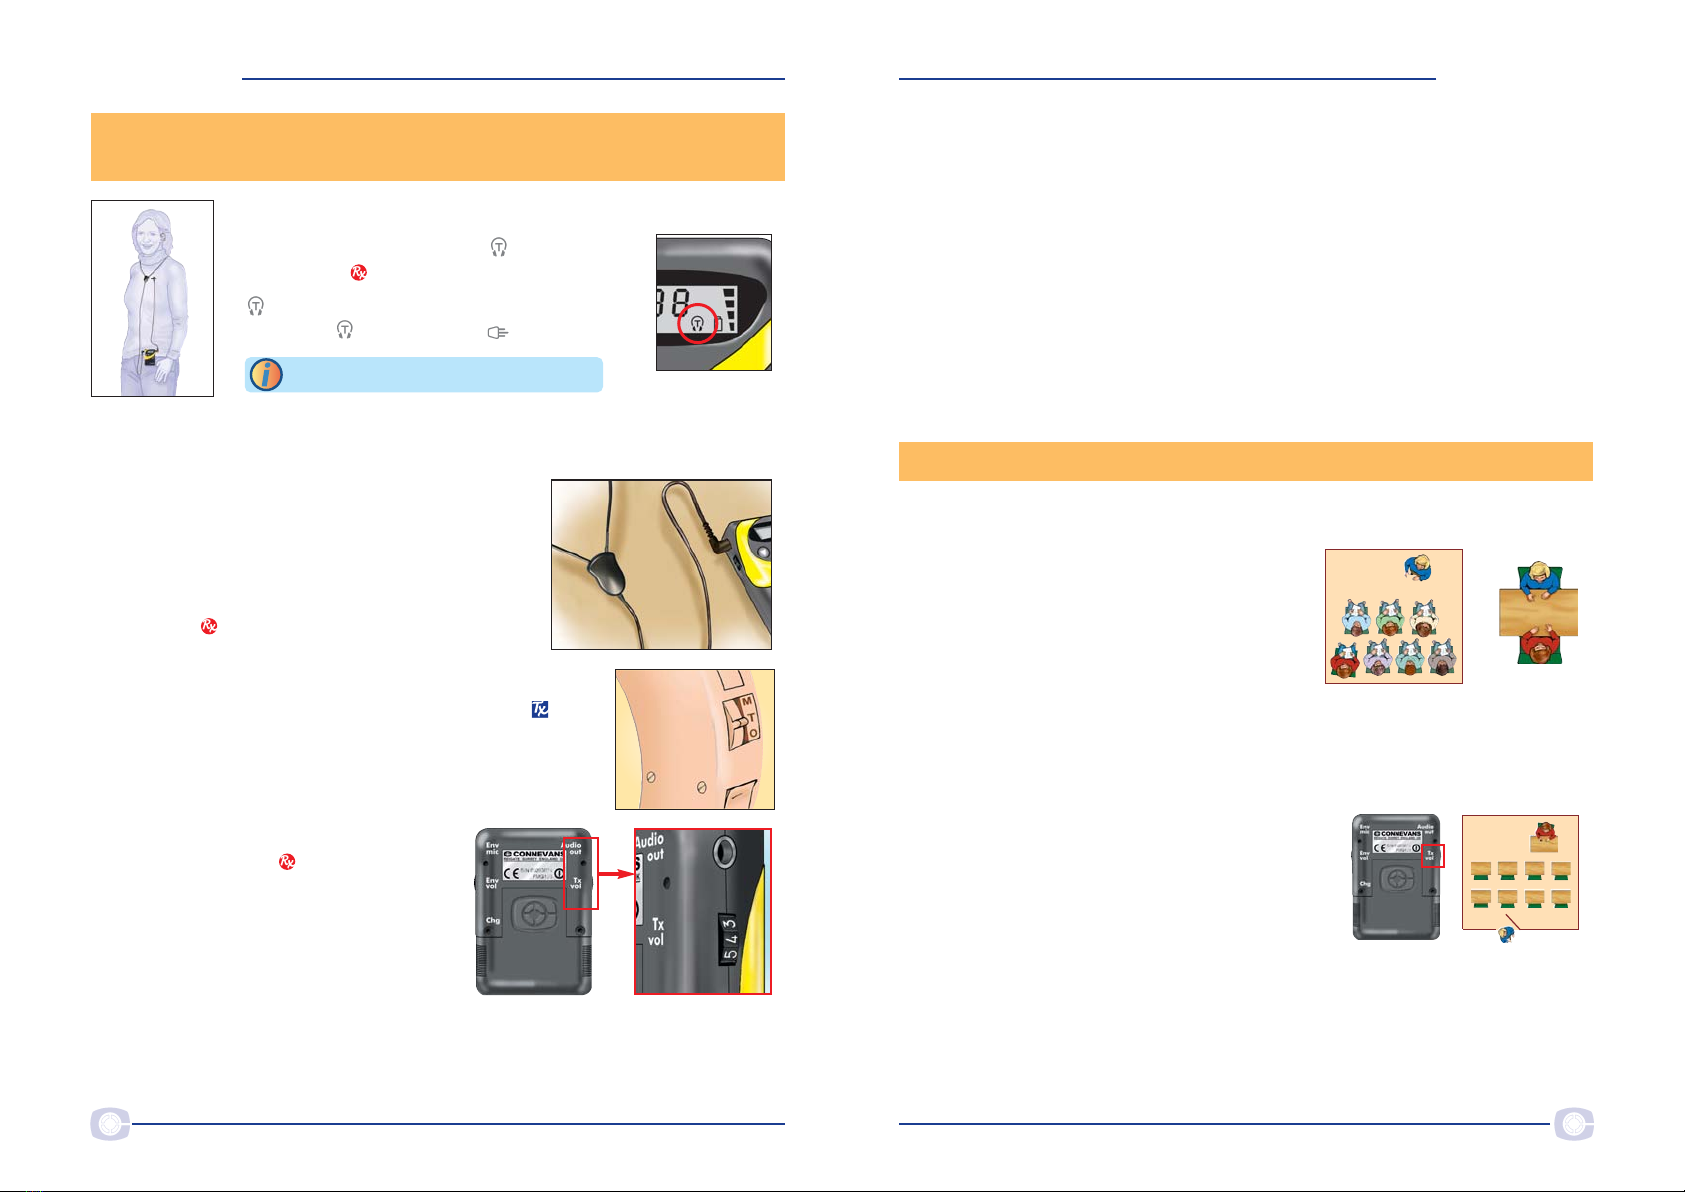
2 Check that ʻHIʼ audio output is selected on
the receiver by checking the display.
If is not shown, you will need to refer to page
9 and set ʻHIʼ rather than ʻLOʼ .
3 The hearing aid user should listen at armʼs length to somebody talking to
establish the level of sound from the hearing aid alone ‒ page 5 explains
why we do this.
4 Plug in a neck loop.
5 Make sure that both fmGenie units are turned
on.
6 The hearing aid wearer should take the
receiver and place the neck loop around their
neck. They should then turn their hearing aid(s)
to the ʻTʼ position.
7 The helper should take the fmGenie transmitter and
walk to the other side of the room while talking
normally into the microphone at 150mm (the length of
a biro) from the mouth.
8 The hearing aid user should be able
to hear the helper through the
fmGenie receiver by adjusting the
Tx volume up to a comfortable level.
Congratulations, itʼs as simple as that!
Part 3 ‒ Using an fmGenie receiver with an inductive neckloop
and hearing aid on ʻTʼ
Part 4 ‒ Setting the volume
In an ideal world, setting volume controls would be done with the help of an
audiologist, however it is also possible for a good listener to set their own listening
preference.
Very simply, the sound heard at a distance
through the fmGenie should be similar to, or
slightly louder than, the sound heard from the
hearing aid on its own at close range in a
quiet room.
Volume controls The volume can be set by a comparison method.
1 Initially establish a satisfactory listening level with the hearing aid(s) alone, at
armʼs length from somebody talking to you.
2 Turn on the fmGenie system, give the transmitter to your helper and ask them
to walk away whilst talking.
3 You should now listen to the hearing aids but
this time through the fmGenie receiver
without changing the hearing aid volume
controls.
Adjust the transmitter volume control (Tx vol)
to match, or be slightly louder than, the
original listening level through the hearing aid alone.
Tone controls Setting the tone controls is straightforward but rarely need
adjusting at this stage. See page 97 of the User Guide (3rd Ed).
=
If nothing is heard with the hearing aid, a hearing helper could listen using a pair of
test headphones. If the helper can hear with the headphones then any problem
must lie with either the hearing aid or the neck loop.
The hearing aid ʻTʼ position can be roughly checked by moving the hearing aid
near to a mains transformer (e.g. any plug-in power supply) when you should hear
a buzz or hum. The neck loop can be checked by exchanging it for a spare one.
In order to hear your own voice, or voices nearby, you may need to connect an
environmental microphone to the fmGenie receiver, see page 45 of the User Guide
(3rd Ed).
Page 95 ‒ User Guide (3rd Edition)
fm
G
enie
fm
G
enie
fm
G
enie
fm
G
enie
76 fmGenie Neck Loop Fastrack Guide Version 2.5Version 2.5 fmGenie Neck Loop Fastrack Guide
Putting an fmGenie system together
Please refer to the Instruction Booklet for full information, however the following illustrations
will give you a quick guide to ʻwhat goes whereʼ.
Using fmGenie
Transmitter with
integral microphone
fmGenie
Transmitter
Part No. FMG110
Sound input
fmGenie aerial
supplied with
transmitter,
fits into external
microphone
socket (Ext Mic)
Lapel microphone
Black stub microphone
head
Part No. FMG211
Lapel clip for black
stub mic head
Part No. FMG212
fmGenie stub
microphone lead
Part No. FMG21M600
The microphone pack (Part no. FMG213M)
contains 3 items; a microphone head, lead and
lapel clip.
The microphone head plugs
directly into the lead with
a push on fitting.
Using fmGenie
Transmitter
with lapel
microphone
Sound input
fmGenie
Transmitter
with lapel mic
Tx
with
pouch
Tx
with
neck
pouch
External audio equipment
plugs in here ‒ see below
Using an fmGenie
Transmitter with
conference
microphone
Wearing the fmGenie transmitter Connecting an fmGenie
transmitter to a TV
Connecting an fmGenie Tx or Rx to
external equipment
An fmGenie can be directly connected to a
TV SCART socket
fmGenie transmitter stereo
input adaptor
Part No. FMG81
A transmitter input adaptor allows you to
connect an fmGenie Tx (or Rx) to other
equipment such as hi-fi or computer
Tx and conference microphone in
centre of table
Conference mic plugged into receiver,
presenter wearing transmitter
2.5mm plug
into ʻExt micʼ
Tx with
pouch &
modular
waist
harness
Tx
with
hip
pouch
3.5mm
stereo
plug
into
ʻAux inʼ
TV SCART
socket
SCART plug to phono sockets
Part Nos MXA121BA and MXT114H
Page 34 ‒ User Guide
(3rd Edition) Page 34 ‒ User Guide
(3rd Edition)
Page 30 ‒ User Guide
(3rd Edition)
Pages 22-25‒ User Guide (3rd Ed.) and
Connevans Catalogue ‒ section 1
Pages 69-70 ‒ User Guide
(3rd Edition)Pages 66-68 ‒ User Guide (3rd Ed.) and
Connevans Catalogue sections 1 & 11
Pack of stereo audio leads
Part No. FMG81PK
fm
G
enie
fm
G
enie
fm
G
enie
fm
G
enie
98 fmGenie Neck Loop Fastrack Guide Version 2.5Version 2.5 fmGenie Neck Loop Fastrack Guide
Rx with childʼs
body harness
Rx with
bum bag Rx with hip
pouch
Rx with belt
pouch on
wearerʼs own
belt
Wearing the fmGenie Receiver
Rx with belt
pouch & modular
waist harness
Using fmGenie Receiver with neck loops
Rx with neck
loop plus
lapel
microphone
Hi-output fmGenie
plastic neck loop
with 600mm lead
Part Nos. FMG45
Tips for maintaining radio system reliability
Don't scrunch or
wind up your leads
when not in use ‒
they will break
more quickly.
Save time by not unplugging leads
more often than
really necessary,
leave them
connected ‒ this
helps reliability
too.
Don't remove shoes
by pulling on the
leads ‒ unclip the
shoe itself.
Listening test kit Listening stick test kit for fmGenie
Part no: FMG711
Headphones can be
used to listen to the
receiver output
Stetoclip is used to listen to
the hearing aid either
through the earmould or
direct to earhook.
Daily testing should cover the overall
system and include the
hearing aids, shoes and
leads. It is not necessary
to change the
HI/LO switch in the
battery
compartment
during routine
testing.
fmGenie test
headphones
Part No.
FMG7410
max release
Stetoclip listener and
variable attenuator
Part No.
22880F
Variable attenuator has a
roller wheel to allow hearing
aids to be listened to at a
comfortable level.
Pages 59-61 ‒ User Guide (3rd Edition) and Connevans Catalogue
‒ section 1 fmGenie & section 6 for separate items and spares
Page 45 ‒ User Guide
(3rd Edition)
Pages 22-25 ‒ User Guide (3rd Edition) and
Connevans Catalogue ‒ section 1 fmGenie
fm
G
enie
fm
G
enie
fm
G
enie
fm
G
enie
1110 fmGenie Neck Loop Fastrack Guide Version 2.5Version 2.5 fmGenie Neck Loop Fastrack Guide
The fmGenie default settings can be easily changed ‒ the 3rd
edition of the fmGenie User Guide & Reference Manual has a lot of
improved and clearer information including clear diagrams for
activating or changing fmGenie features. Turn off fmGenie when
making changes to settings.
Connevans tip: we advise using the bent out end of a paperclip to change switch
settings; we can sell you a magnifying glass too, if you need one!
SR ‒ Normal
LR ‒ for MLxS or cochlear implant
processors if necessary
Default channel setting ‒ Tx & Rx
fmGenie user facility settings
Tx & Rx underflash
default switch settings
UP, UP, DOWN, DOWN
To change the resident channel
reselect using the tool supplied
tens units
Tx rear battery compartment switch settings‒Default UP, UP, DOWN, UP
Tx underflash switch settings ‒Default UP, UP, DOWN, DOWN
Normally the default channel should be set as the users own channel, matching the default channel
on the receiver. We also advise that the transmitter channel should be left fixed ‒ it is the receiver
channel which usually needs to be changeable.
Be relaxed about changing channel, if an invalid channel is chosen by mistake the
display will show an ʻE1ʼ error
message to alert you.
Connevans tip: The initial channel change period ‒ shown by a flashing ‒ can be truncated by a
short press of the ON/OFF button.
Rx underflash switch settings
Rx rear battery compartment switch settings
To enable the channel changing facility
on the Rx, move switch 3 UP.
To minimise ʻfiddlingʼ, channel changing on a receiver is
only available for the first minute after turning on ‒
indicated by a flashing .
To enable the manual hearing aid microphone muting facility on
the Rx, move switch 4 UP ‒ please note that this feature may not
operate with some digital hearing aids.
In use, a press of the Rx button mutes the hearing aid microphone and
another press makes it live.
Default user
settings UP,
UP, DOWN,
DOWN
ʻCANCELʼ, ʻTHʼ and ʻMLʼ
controls ‒ default settings
Default settings
UP, UP, DOWN, UP
treble and bass tone
controls inoperative
with CANCEL
selected
LO
Direct input
HI
Headphones, neck
loop or cochlear
implant
Channel settings: page 84 and Error messages: page 98
‒ User Guide (3rd Edition))
Receiver settings: pages 91-97 ‒ User Guide (3rd Edition)
Transmitter settings: pages 85-90
‒ User Guide (3rd Edition)
fm
G
enie
fm
G
enie
Version 2.5 Feb 2012 ‒ FMG14FNL fmGenie Neck Loop Fastrack Guide
Bridge House, 1 Nutfield Road, Merstham, Surrey RH1 3EB
Telephone 01737 247571 Minicom 01737 644016 Fax 01737 223475
Email [email protected]
Information website: www.connevans.com
Online shopping: www.DeafEquipment.com
Connevans Limited
Euro channel frequencies
From January 2004, all new radio aid equipment had to be supplied on the new
50KHz Euro channel frequencies.
ALL fmGenies ever made are able to use these frequencies, but from January 2004
all new fmGenies are supplied factory set to the new Euro frequency channels.
Older fmGenies can be reset to the new channels by
setting the under flash switches 1 & 2 to UP/UP as
shown.
If new fmGenies are being used in conjunction with other
radio aid systems which cannot be changed over to the
new frequencies, then the fmGenies should be reset to
the ʻtraditionalʼ frequencies.
To change to the ʻtraditionalʼ frequency channels, set
switches 1 & 2 to DOWN/DOWN.
It is important that you only use one set of channel frequencies on any site.
For more information see www.connevans.com/fmGenie
Under flash
switches 1 and 2
‒ settings are the
same for both Tx
& Rx.
www.DeafEquipment.co.uk ‒ Order Spares online!
Ordering online is so quick and easy ‒ youʼd be mad
not to! The products on the website are arranged in the
same categories as in this catalogue, plus there is an
excellent ʻSearch the siteʼ facility.
Order online to enjoy Exclusive Special Offers and
Shipping Discounts ‒ as well as low shipping & order
processing, email notification of order status plus online
parcel tracking.
To help you choose the right product, you will find links to product sheets/instructions
and for some products there are also video or audio clips.
Same working day despatch as standard for in-stock online orders up till 1.15pm.
Local authority account customers who would like to order electronically via the internet
should please contact [email protected].

Other manuals for FmGenie

7

Other Connevans Hearing Aid manuals

Connevans Roger Pen Parts list manual

Connevans

Connevans Roger Pen Parts list manual

Connevans TV 2510NL User manual

Connevans

Connevans TV 2510NL User manual

Connevans Phonak Roger EasyPen User manual

Connevans

Connevans Phonak Roger EasyPen User manual

Connevans Roger EasyBen User manual

Connevans

Connevans Roger EasyBen User manual

Connevans Phonak Roger Pen User manual

Connevans

Connevans Phonak Roger Pen User manual

Connevans Roger Pen Parts list manual

Connevans

Connevans Roger Pen Parts list manual

Connevans 220 LITE User manual

Connevans

Connevans 220 LITE User manual

Connevans ZoomLink+ Parts list manual

Connevans

Connevans ZoomLink+ Parts list manual

Connevans CRM-220 User manual

Connevans

Connevans CRM-220 User manual

Connevans Roger X Parts list manual

Connevans

Connevans Roger X Parts list manual

Connevans FmGenie Parts list manual

Connevans

Connevans FmGenie Parts list manual

Connevans FmGenie User manual

Connevans

Connevans FmGenie User manual

Connevans fmGenie B44FDIVINS User manual

Connevans

Connevans fmGenie B44FDIVINS User manual

Popular Hearing Aid manuals by other brands

Audina VNVE 4 instruction manual

Audina

Audina VNVE 4 instruction manual

Starkey Hearing Technologies RIC 10 Operation manual

Starkey Hearing Technologies

Starkey Hearing Technologies RIC 10 Operation manual

Lexie Lumen user manual

Lexie

Lexie Lumen user manual

Widex EVOKE ERB0 User instructions

Widex

Widex EVOKE ERB0 User instructions

Univox P-CTC user guide

Univox

Univox P-CTC user guide

Widex Bravissimo BV-9X User instructions

Widex

Widex Bravissimo BV-9X User instructions

signia Motion S primax user guide

signia

signia Motion S primax user guide

SportEar Micro Blast open ear instruction manual

SportEar

SportEar Micro Blast open ear instruction manual

Siemens Motion Custom user guide

Siemens

Siemens Motion Custom user guide

Siemens Octiv Custom+ user guide

Siemens

Siemens Octiv Custom+ user guide

Unitron uTV 3 Guide

Unitron

Unitron uTV 3 Guide

NHS Xceed SP Instruction Manual for Patients

NHS

NHS Xceed SP Instruction Manual for Patients

Beltone CIC Instructions for use

Beltone

Beltone CIC Instructions for use

Phonak SoundPilot2 user guide

Phonak

Phonak SoundPilot2 user guide

Siemens ePen user guide

Siemens

Siemens ePen user guide

Cochlear Baha Attract System user manual

Cochlear

Cochlear Baha Attract System user manual

Phonak Q90 user guide

Phonak

Phonak Q90 user guide

Bernafon Viron Series Instructions for use

Bernafon

Bernafon Viron Series Instructions for use

manuals.online logo
manuals.online logoBrands
  • About & Mission
  • Contact us
  • Privacy Policy
  • Terms and Conditions

Copyright 2025 Manuals.Online. All Rights Reserved.