Connex LUMEN CP104 User manual

INSTRUCTION MANUAL
Please read and retain these instructions for future reference.
CP104
LUMEN
PC Projector With Wi-Fi Connecvity
TM
TA-2021/1930
APPROVED

2
HIGHLIGHTS
• 4000 Lumens
• Up to 170” Screen projecon
• 2 x USB / 2 x HDMI / 3.5mm / AV
• Excellent Picture Quality
• Built-in Speakers
• Universal Compability
• Lumen projector
• HDMI Cable
• Power Supply
• AV 3-in-1 Cable
• Remote Control
• 1x Support base
• Projecon System
• Projector Resoluon
• Brightness
• Image Flip
• Projecon
• Focusing Method
• Contrast Rao
• Aspect Rao
• Lamps Type
• Projecon Size
• Keystone
• Noise
• Working Voltage
• Input Ports
• Machine size
: 4.41 inch LCD Technology
: 1920 x 1080, support 720P/1080P
: 4000 Lumens
: 360 degree ip
: Forward / Back Projecon / Drop
: Manual
: 2,500 : 1
: 16 : 9 and 4 : 3
: LED 110W, 50 000 hours life
: 30 - 170 inch
: 20 degrees physical correcon
: <45 dB
: 110-240V / 50-60Hz
: USB x 2/HDMI 2.0 x 2/ Composite AV /3.5mm
Headphone jack
:260 x 210 x 102 mm
PACKAGE CONTENTS
SPECIFICATIONS

3
IDENTIFYING PARTS
1. AV Input
2. Headphone Output (3.5mm)
3. HDMI 1 Input
4. HDMI 2 Input
5. USB 2.0 Input x2
6. Analog TV Tuner
(Oponal Funcon)
7. IR Receiver
8. Venlaon Inlet
9. Speaker
10. Venlaon Outlet
Remote
• Front View

4
OPERATING INSTRUCTIONS
GETTING STARTED
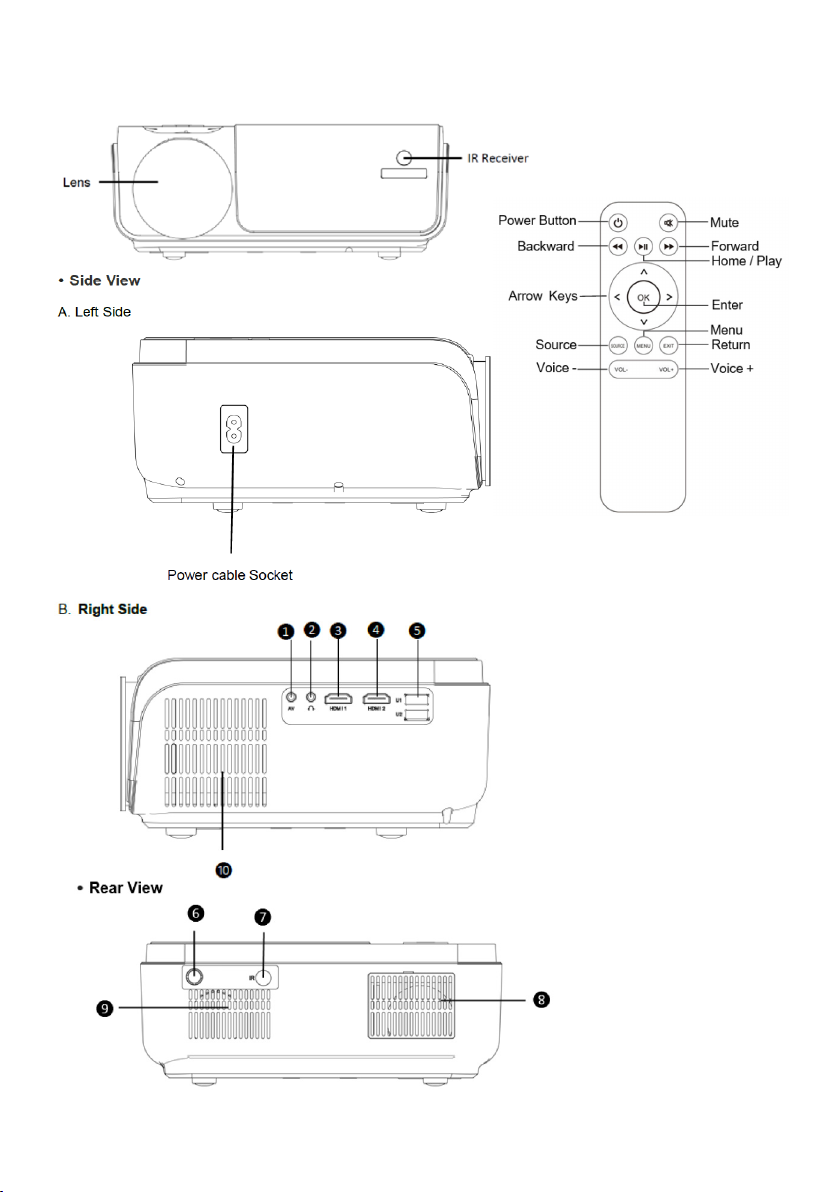
Connect the power cord to the power input slot located on the side of the projector,
and then plug the cord into the plug outlet. The LED Indicator will light up red when
power is connected to projector.
SWITCHING ON / OFF
To switch on the Lumen, press the power buon on the Projector or the
remote. The Projector will play a boot sequence on its screen. To switch o the
Lumen, press the power buon on the Projector or the remote.
STANDALONE STREAMING
The projector can be used as a standalone device to share content from a variety
of devices with a wired HDMI connecon or wireless connecon or from USB ash
drive.
Note: The projector is now in standby mode.
KEYSTONE CORRECTION / LENS FOCUS
Use the Keystone Correcon turn dial to adjust the angle of the Projector, and the
lens focus turn dial to adjust image focus to make picture clear.
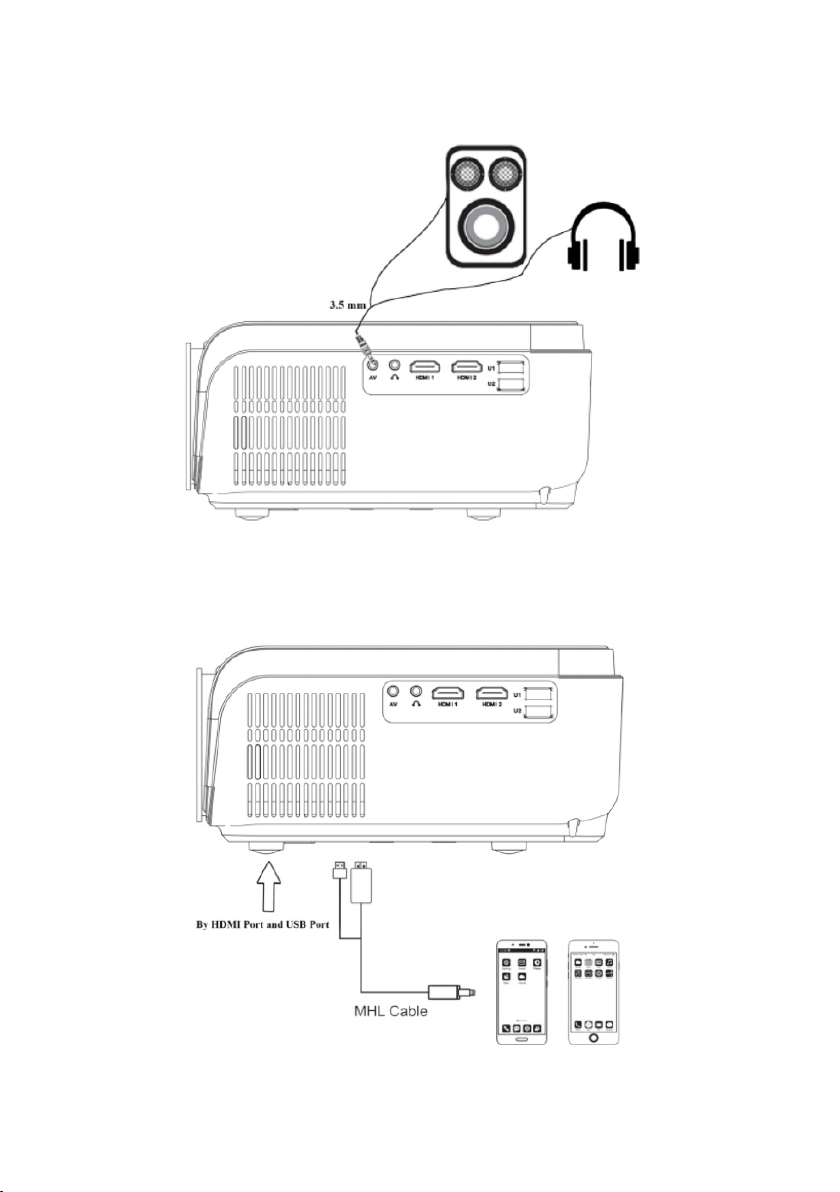
MULTIMEDIA CONNECTION
To connect to the USB drive or SD card select the media source “USB” then navigate
to the le type that you want (movie, photo, music or text). Select the le you would
like to view by pressing the play / pause buon on the remote of the OK buon on
the projector.
AV VIDEO CONNECTION
Connect the 3-in-1 Cable (included) to the Video Input on the back of the projector.
Navigate to the AV Media Source and press either the OK Buon on the Remote
Control or the OK Buon on the Projector.
HDMI CONNECTION
Connect an HDMI cable to the HDMI Input on the back of the projector. Navigate
to the HDMI media source and press either the OK Buon on the Remote Control
or the OK Buon on the Projector.

5
AUDIO OUT CONNECTION
User can connect the projector to an external speaker or headphones via
headphone jack.
MHL FUNCTION
Only for MHL compable devices

MHL FUNCTION
Only for MHL compable devices
6

WI-FI CONNECTION
1. PROJECTOR OPERATION
Press “source” on the remote. Select “Screen Mirroring”, then press “OK” to enter.
iOS iOS 7 and above, iPhone4+,iPad2+,iPad4+
Android Android 4.2 and above, and has 1GB storage at least.
7

8
2. Wireless display
2.1 For iOS device.
2.1.1 Find your iOS device’s WiFi seng, search and connect to the device SSID,
which is shown on the top center of projecon image. (For example “Device:
RKcast-2918FC”, Default password “PIN 12345678”)
2.1.2 Enter the “Control Center” - click “AirPlay” icon, nd the device name, which
shown on the projecon image, click it to connect and ensure the “Mirroring”
or “wireless mirroring” is open.
2.2 For Android device.
2.2.1 Open sengs and choose “Miracast”.
2.2.2 Turn on the Mira cast funcon on your android phone, and search the
projector’s SSID (RKcast-2918FC) then click to connect.

9
3. Screen mirroring - Wired connecon: (using an original lightning cable.)
3.1 For iOS device.
3.1.1 Connect your iOS device via USB port.
3.1.1 When using this funcon for the rst me, a window pops up on your iOS
device (see below picture), click “Trust” and input the correct password.

10
3.2 For Android device
3.2.1 Android phone open sengs – system (Picture 1), and nd ”About phone”
(Picture 2).
3.2.2 Click 7 mes on version number, “Developer mode” will pop up. Then go
back to system, click “Developer opons”.

10
SAFETY PRECAUTIONS
• Never use your projector near water or in areas where it can come into contact
with water. Never handle the projector if it was dropped in water or any other
liquid. If the product comes into contact with water while switched o, but sll
plugged in it is a safety hazard.
• Always make sure your hands are dry before touching the plug or power
connecons.
• Do not operate the product with a damaged cord or plug, or aer it
malfuncons, has been dropped, or damaged in any manner.
• The Lumen is intended for personal use only. Commercial use invalidates the
warranty and the supplier cannot be held responsible for injury or damage
caused when using the device for any other purpose than that which it was
intended for.
• This projector is not intended for use by children, or persons with reduced
physical, sensory or mental capabilies, or lack of experience and knowledge,
unless they have been given supervision or instrucon concerning use of the
device by a person responsible for their safety. Extreme cauon must be
exercised.
3.2.3 Open “USB debugging” (picture 1), it will pop up a window “Allow USB
debugging”. Tap “OK” (picture 2) and wait for 5 seconds, screen mirroring will
start automacally

• Before Cleaning: Ensure that your Lumen projector is not plugged into any
device or power source before cleaning or maintaining it.
• Cleaning: Wipe down the surface of your Lumen using a so, slightly damp
cloth. To clean the lens, use a dry microber cloth and gently wipe
unl it is clean.
• Do not use any harsh or abrasive cleaning chemicals or materials on your Lumen
as doing so may damage or scratch the surface nish or the lens.
• Do not expose your Lumen to direct sunlight or high temperatures for extended
periods of me.
• Do not store in temperatures over 60° C.
• Children should be supervised to ensure that they do not play with the projector.
Packaging must never be le within reach of children, as it is potenally
dangerous.
• Do not cover the vents of the projector as this may lead to excessive heang of
the Lumen’s components.
• Always leave a minimum distance of 10 cm around the unit to ensure
sucient venlaon.
CLEANING & CARE INSTRUCTIONS
ENVIRONMENTALLY FRIENDLY DISPOSAL
Do not dispose of electrical appliances as unsorted municipal waste,
use separate collecon facilies. Contact your local government
for informaon regarding the collecon systems available. If
electrical appliances are disposed of in landlls or dumps, hazardous
substances can leak into the groundwater and get into the food chain, damaging
your health and well-being.
11

This Lumen Series Projector comes with a standard 12 limited month warranty
against manufacturing defects and faults. Should your Lumen projector be unboxed
with any faulty parts, poor nishing or visible damage, or fail to perform due to
a manufacturing defect or poor workmanship, please return it with your proof of
purchase (ll slip or invoice) to the store of purchase for an exchange, or repair,
depending on the store’s returns policy.
This warranty commences from the date of purchase.
Kindly retain your proof of purchase as well as the packaging for your warranty
period.
NOTE:
The warranty does not apply to a product that:
a.) Has failed due to excessive wear and tear beyond what is
considered to be reasonable.
b.) Has been misused or neglected.
c.) Has been damaged accidentally or by Force Majeure including re
and ooding.
d.) Has been used or operated contrary to operang or maintenance
instrucons outlined in this manual.
The Store of Purchase / Seller cannot accept any returned products that have not
been returned in accordance to this warranty or which does not follow their own
Returns Policy. Please refer to the Store of Purchase / Sellers Returns Policy for
details.
Should you require any further assistance or have any quesons on your warranty,
please contact the store of purchase.
WARRANTY
12
All product and company names are trademarks™ or registered® trademarks
of their respecve holders. Use of them does not imply any aliaon with or
endorsement by them.
The terms HDMI and HDMI High-Denion Mulmedia Interface, and the HDMI
logo are trademarks or registered trademarks of HDMI Licensing LLC in the United
States and other countries.
DISCLAIMER
Table of contents
Other Connex Projector manuals