CONQUEST S20 User manual

Conquest Communication Equipment Co. Ltd
Conquest Smartphone S20
Manual instruction
2022

CONTENT
General Information...................................................................................................................................................................1
1 Description and operation.................................................................................................................................................. 1
1.1 Purpose and scope.................................................................................................................................................. 1
1.2 Device.........................................................................................................................................................................2
1.3 Specifications............................................................................................................................................................ 2
2 Getting started and working with smartphones.............................................................................................................. 3
How to Insert the Nano-SIM Card...................................................................................................................................3
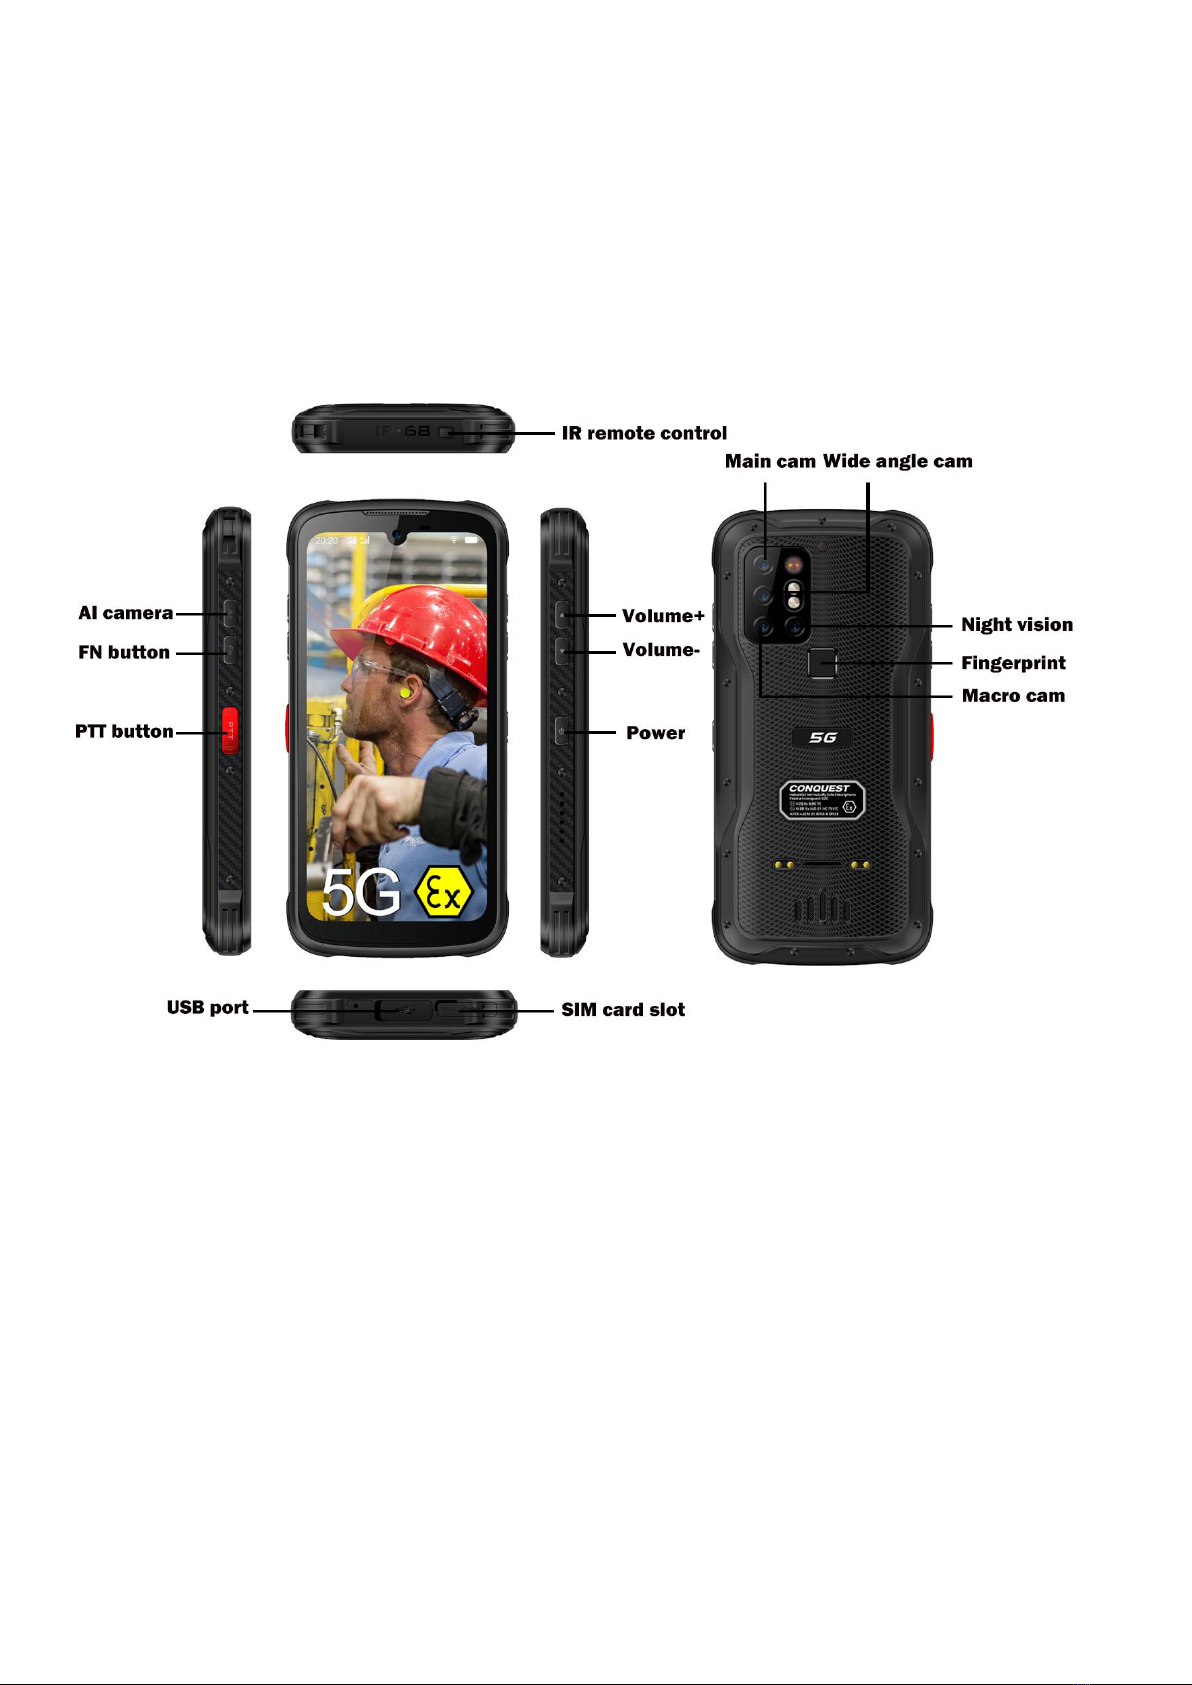
Display and control means............................................................................................................................................... 4
Switch on, Setting up the phone......................................................................................................................................4
Adding an Application Icon to Home Screen.................................................................................................................5
Creating a Folder on the Home Screen......................................................................................................................... 5
Moving an Icon/Folder from the Home Screen.............................................................................................................5
Removing an Icon/Folder from the Home Screen........................................................................................................5
Home Screen Indicators................................................................................................................................................... 5
Phone Operations Without SIM Card............................................................................................................................. 6
Changing the Wall paper.................................................................................................................................................. 7
Taking a Screenshot..........................................................................................................................................................7
Keypad Functions.............................................................................................................................................................. 7
Language and Input Settings........................................................................................................................................... 7
Spell Checker Settings......................................................................................................................................................7
Personal Dictionary Settings............................................................................................................................................8
Text -to-speech Output Settings......................................................................................................................................8
Display Settings..................................................................................................................................................................8
Power Saving Settings...................................................................................................................................................... 8
Quick Settings.....................................................................................................................................................................9
Force Stopping an Application.........................................................................................................................................9
Connecting a PC Using USB Connection......................................................................................................................9
Viewing Device Details......................................................................................................................................................9
Managing Memory Utilized by Applications...................................................................................................................9
Optimizing Memory Usage............................................................................................................................................. 10
Using Flashlight................................................................................................................................................................10
Connecting to Wi-Fi Network......................................................................................................................................... 10
Adding a New Network....................................................................................................................................................10
Editing a Network............................................................................................................................................................. 10
Forgetting a Network....................................................................................................................................................... 11
Connecting to Bluetooth Devices.................................................................................................................................. 11
Pairing a Bluetooth Device............................................................................................................................................. 11
Editing Bluetooth Device Settings.................................................................................................................................11
Optimizing Data Usage................................................................................................................................................... 11
Activating Aeroplane Mode............................................................................................................................................ 12
Setting Up Tethering & portable hotspot......................................................................................................................12
Setting Up Wi-Fi Hotspot................................................................................................................................................ 12
Activating Bluetooth Tethering.......................................................................................................................................12

Setting Up VPN Connection...........................................................................................................................................12
Connecting to a VPN Network.......................................................................................................................................13
Editing VPN Network Details......................................................................................................................................... 13
Deleting a VPN Network................................................................................................................................................. 13
Managing Mobile Network..............................................................................................................................................13
Locking your Screen........................................................................................................................................................13
Location Access............................................................................................................................................................... 14
Backup and Restore Data.............................................................................................................................................. 14
Backup your data............................................................................................................................................................. 14
Managing Accounts......................................................................................................................................................... 14
Adding an Account...........................................................................................................................................................14
Deleting an Account........................................................................................................................................................ 14
Syncing Your Account.....................................................................................................................................................15
Configure Auto-Sync for all Apps.................................................................................................................................. 15
Configure Google Account Sync Settings................................................................................................................... 15
Sync a Google Account Manually................................................................................................................................. 15
To access the contacts................................................................................................................................................... 15
Add a New Contact..........................................................................................................................................................15
Blocking Incoming Calls..................................................................................................................................................16
3 How to use Night-vision Camera.....................................................................................................................................16
3.1 To take an night vision picture:............................................................................................................................... 16
3.2 To record an night vision video:..............................................................................................................................16
4 Guarantee, Warranty, Attention.......................................................................................................................................17

1
General Information
This Operation Manual is a manual for the operation and maintenance of the CONQUEST S20
5G ATEX Smartphone (hereinafter referred to as a smartphone) and contains a description of the
principle of technical characteristics and other information necessary to ensure the use of technical
capabilities, as well as sections for correct operation.
The smartphone is designed to run programs developed by the consumer, as well as to
communicate with wireless communication systems in an explosive atmosphere; the smartphone is
equipped with the function of creating photos and videos, radio interfaces for voice and information
transmission.
The manufacturer guarantees the normal operation of the smartphone only if the requirements
of this document are met.
Only persons who have read this user manual are allowed to operate and maintain the S20
smartphone. Before using or maintaining your smartphone, make sure you have read and
understood the contents of this manual completely. This condition is indispensable for the safe
operation and normal functioning of the smartphone.
1 Description and operation
1.1 Purpose and scope
The smartphone is designed to run the software installed by the user, photo and video

2
recording, data transfer (software results, photo and video content).
The smartphone has explosion protection marking II 2G Ex ib IIC T5 for Gas and Vapor,
II 2D Ex ibD 21 IIC T95℃Db for Dust and in accordance with ATEX 2014/34/EU. by order of ECM
dated December 19, 2021 and the Operation Manual can be used in workings of Oil and gas,
Chemical Industry,Fire Safety, coal mines hazardous for gas (methane) and coal dust, as well as in
explosive zones of class 0,1 and 2 categories ia, ib and ic and temperature classes T1, T2, T3,T4
and T5 in accordance with the explosion protection marking.
1.2 Device
Structurally, the smartphone consists of a body with a display located on it, controls (buttons),
connectors and a cover for the microSD compartment and SIM-cards.
A general view of the smartphone from the side of the screen is shown in Fig. 1.
On the front side there are: 6.3 "screen; Answer button and reject button, control buttons,
Fingerprint recognition, front camera. The screen is equipped with a capacitive touchscreen display
with multi-touch function. The control buttons are located on the side surfaces of the smartphone
and are designed to be operated with gloves.
Figure 1 - View of the smartphone from the side of the screen
1.3 Specifications
Dimensions, weight, power supply and power consumption of the smartphone.
Overall dimensions, weight, power supply and power consumption are shown in table 1.

3
Table 1
Overall dimensions
(LxWxH),mm
Weight, kg
Power supply
Power
consumption, VA
170х81.6х18.4
0.38
from a built-in intrinsically safe power
supply with a voltage of direct current
from 4.4 V with a capacity of 8000 mAh
1
Operating conditions
Smartphone operating conditions are shown in table 2
Table 2
Description of characteristics
Meaning
units of
measurement
Ambient temperature range
from -20 to + 70
°С
Atmospheric pressure range
from 84 to 106.7
kPa
Relative humidity range
from 15 to 98
% (at +25 °С)
Brief description of technical characteristics
A brief description of the technical characteristics of the smartphone is presented in table 3.
Table 3
Parameter
Meaning
Ed.
Dust and moisture protection
IP 68
-
Average assigned service life since commissioning
operation, not less
5
Years
What Is In the Box ?
(1) CONQUEST S20 phone
(2) Type-C cable
(3) Magnetic cable charger
(4) Dock charger
(5) AC adapter
(6) Quick Start Manual
2 Getting started and working with smartphones
How to Insert the Nano-SIM Card

4
(1)Pull out the Sim card slot from the S20 bottom beside the charging port.
(2)Insert the Sim card and push it back into the slot.
Display and control means
CONQUEST S20 controls
Switch on, Setting up the phone.
-Switching On
Press and hold the Power ON/OFF key located in the in the left hand side for 2 seconds to Power
ON the phone. When the phone is switched on, it tries to register with the network. After successful
registration, the names of the service providers are displayed.

5
-Setting Up Your Phone
To setup your phone follow the instructions on the setup wizard.
-Need for a Google Account
Signing into Google account helps user to access personalized offerings via Google Mobile
Services (e.g. e-mail, calendar, drive, contacts). It also provides multiple security and management
services for your device and Google services.
Adding an Application Icon to Home Screen
1. Go to home screen and drag it up to view the Applications screen.
2. Swipe up or down to locate the application for which you require a shortcut on the home screen.
3. Touch and hold the application icon and drag it to the home screen.
4. To open an app, folder, or widget, touch its icon.
5. To view other Home screens, swipe the current home screen to left or right.
Creating a Folder on the Home Screen
Folders helps you to keep the icons in an organized fashion. To create folders,
1. Touch and hold an icon on the home screen or Applications.
2. Drag and postion it on another icon that you want to be included in the same folder.
3. Tap the folder. Both the icons are grouped together in an unnamed folder.
4. Tap the name area and give a suitable name.
Moving an Icon/Folder from the Home Screen
1. Tap and hold the application icon and drag it to the new location.
2. To move it to another panel, drag it to the side of the screen.
Removing an Icon/Folder from the Home Screen
1. Tap and hold the application icon. A Remove icon is displayed on the top of the home screen.
2. Drag the icon and position it on the Remove icon till it turns red.
3. Drop the icon and it is deleted from the home screen.
Home Screen Indicators
The icons displayed at the top of the screen provides information about the status of the device.
Details such as date and time, battery charge status, and data service and Wi-Fi connectivity are
displayed when the phone is in standby mode. Other indicators such as airplane mode, alarm and
call forward are displayed, if the feature is activated.
Icons
Des
Battery level indicator
Battery charging in progress

6
No signal
Signal strength
No SIM card
4G LTE Network connected
Roaming
EDGE network connected
Wi-Fi connected
Call in progress
Missed call
New SMS or MMS
New E mail
Alarm activated
Silent mode activated
Vibration mode activated
Flight mode activated
Synced with the associated account such
as Google
Screenshot captured
cription
Phone Operations Without SIM Card
You can perform the following operations without inserting a SIM card in your phone.
Make emergency calls.
View and modify all settings except Data usage and mobile network related settings.
Activate and share files through Bluetooth.

7
Activate and access the Internet, and all your synced accounts using Wi-Fi connectivity.
Access your phonebook, files, and applications.
View and modify your profile settings.
Changing the Wall Paper
You can set an image or a photo stored in your phone as your home screen wall paper. To change
the wall paper:
1. Tap and hold on the Home screen. Choose Wall papers option.
2. Select from one of the following Wall paper collections
Photos: Includes photos captured using the phone camera, screen capture, downloaded and
the photos synced from google account.
Wallpapers: Includes images that are pre-bundled with the phone.
Live wallpapers: Includes live wall paper if any downloaded from playstore or other sources
Taking a Screenshot
You can take the screenshot of the current screen and it is stored in your phone’s gallery. To take a
screenshot:
-Ensure that the image to be captured is displayed in the current screen.
-Press Power and Volume down button simultaneously. The screnshot is captured and stored in
the gallery. A screenshot captured icon is also displayed in the home screen top bar.
Keypad Functions
The following table displays the various keys and the corresponding functions they perform:
Keypad key Operations
Home - moves the current working application to the recent applications
list/background.
Recents - displays the recently accessed applications.
Press this key to go back to the previous screen. You can press till you
reach the Home screen.
Language and Input Settings
You can set the phone’s language to any language or Russian preferred language.
1. From the Home or All Apps screen, tap Settings
2. Scroll down and tap Languages & input, located under System settings.
3. Go to Languages and select any language from the list as your preferred language.
4. If the required language is not available, tap Add a Language, select the language from the
language list. The language pack is downloaded and added.
5. Tap and hold on the language and drag it to the top of the list to select as preferred language.
6. To delete a language from the list, tap Options and tap Remove.
7. Click on the checkbox to select the languages need to be remove and tap Delete. All the menu
items and user feedback messages are displayed in the set language.
Spell Checker Settings

8
Enable Spell checker, to verify and change the spellings when you type your text message or mail.
Personal Dictionary Settings
The default keyboard input language is English(US)- Phone keypad.
Text-to-speech Output Settings
The Speech engine is set to Text-to-speech.To change the Google Text-to-speech engine
settings and install new language packs. Tap Settings ( ) provided in the Text-to-speech
output menu next to the engine (Google Text-to-Speech).
Tap Language, to view the language set for speech
output.
Tap Speech rate, to set speed at which text is to be
spoken.
Tap Pitch to set the voice pitch.
Tap Play to verify the set speech rate.
Select Google > Search Assistant & Voice > Search Language to change the voice search
language. You can search anything on Google, send message or can use for navigation using
voice command in your own set language.
Display Settings
1. From the Home or All Apps screen, tap Settings ( ).
2. Scroll down and tap Display.
3. Set one of the following options to configure your phone’s display:
-Brightness level: Set the brightness of the phone display. It is recommended to set to Adaptive
brightness so that the display brightness is adjusted automatically based on the brightness of the
Managing Phone Settings surroundings. This also optimizes the battery power consumed.
- Wallpaper: Set the wallpaper for your home screen. You can select from one of the following
wallpaper collections:
Live wallpapers: Includes live wall paper if any downloaded from playstore or other sources
Photos: Includes photos captured using the phone camera, screen capture, downloaded and
the photos synced from Google account.
Wallpapers: Includes images that are pre bundled with the phone.
- Sleep: Set the sleep time so that the backlight turns off after specified time of phone inactivity.
This setting will also help you to optimize battery power.
-Font size: Set the font size of the text displayed in the screen.
-Ambient display: Activates the screen from sleep mode, when there is a new notification.
Power Saving Settings
Viewing Battery Life
To view the battery life when all the apps are running,
1. From the Home or All Apps screen, tap Settings.
2. Scroll down and tap Battery.
3. The battery life and list of running applications is displayed.
4. You can also view and modify the following power management options:
-Battery saver - Turn ON/OFF battery saver automatically

9
-Battery percentage - Display battery percentage in the status bar
Quick Settings
Quick settings helps to access the most frequently used settings from the status bar.
Drag down the status bar to access the Quick Settings. Tap to view the complete list of
settings present in the quick settings.
To add or remove a setting to/from the quick settings, tap Edit ( ).
Force Stopping an Application
1. From the Home or All Apps screen, tap Settings.
2. Scroll down and tap Apps & notifications. The recently used application list is displayed.
3. Tap See all apps to view all the applications.
4. Tap the application to be force stopped.
5. Tap Force stop to stop an application.
Connecting a PC Using USB Connection
When the phone is connected to the computer via an CONQUEST certified USB cable, Charging
this device via USB message is displayed in the Notification bar. Drag down the notification bar and
tap the option Charging this device via USB, then the following options are displayed:
USB Controlled by:
-Connected device
-This device
Use USB for:
-File transfer
-USB tethering
-MIDI
-PTP
-No data transfer
Viewing Device Details
To view the device details such as system update status, model number, Android version, Kernel
and baseband versions, From the Home or All Apps screen, tap Settings.Scroll down and tap
About Phone located under System settings.
Managing Memory Utilized by Applications
The Apps screen allows you to optimize memory usage for all the applications. To view these
settings:
1. From the Home or All Apps screen tap Settings.
2. Scroll down and tap Apps and notifications. The
following tabs are displayed:
- Recently opened apps - displays the list of recently opened applications.
-Notifications - view and edit the notification display settings and also enable/disable notifications
for various applications.

10
-Default apps - displays the default apps to be started when the phone is powered ON.
-App permissions - displays the list of apps with specific permissions granted for accessing
camera, contacts, calendar, call logs, locations, messaging and other system applications.
-Emergency alerts - enable/disable notifications about emergency broadcast messages
categorized as AMBER alerts, extreme alerts, severe alerts, area update broadcasts. You can also
set the vibrate mode and alert reminder sound for emergency alerts.
-Special app access - enable/disable restricted access to system features such as battery
optimization, device admin apps and do not disturb access to applications.
Optimizing Memory Usage
You can optimize your phone’s memory by performing
the following tasks:
(1)Uninstall apps that are not required.
(2)Delete unwanted files that are downloaded or created.
(3)Transfer files that would be required later to your computer.
(4)Delete offline content on Google Play and stream it via a Wi-Fi or mobile network.
Using Flashlight
Two ways to control the flashlight.
(1)From All Apps screen tap CONQUEST TOOL BOX, tap Flashlight, tap the Flashlight icon to
turn On & OFF.
(2)Roll down the quick button page, tap Flashlight
Connecting to Wi-Fi Network
Wi-Fi is a wireless network technology that can provide Internet access at distance up to 100 Feet,
depending on the Wi-Fi router and surroundings, when you connect your mobile device to the
wireless router.
You can access Internet when you connect your CONQUEST S20 to a Wi-Fi network. To connect
your phone to a Wi-Fi network,
1. From the Home or All Apps screen, tap Settings.
2. Enable Wi-Fi, located under Network & Internet settings.
3. Tap Wi-Fi. A list of Wi-Fi routers present within your phone’s accessible range are displayed.
4. Tap your preferred network. Enter the password (if it is a secured network) and tap Connect.
Adding a New Network
To add a new Wi-Fi network
1. In the Wi-Fi settings screen, scroll down and tap Add Network button.
2. Enter the following details:
Network name: The wireless network SSID.
Security: Set the security type to None, WEP, WPA/WPA2 PSK, 802.1x EAP.
3. Enable Advanced Settings to set the Proxy details and IP settings.
Editing a Network
1. Tap and hold your preferred network.
2. Select Modify Network. The network setting details such as Password, Show Password and
Advanced options are displayed are displayed.

11
3. Tap Save to save the settings or Cancel to exit to the previous screen.
Forgetting a Network
1. Tap on your preferred network (previously connected network).
2. Select Forget Network. The selected network is removed from the list.
Connecting to Bluetooth Devices
Bluetooth is short-range wireless communication technology used to communicate between the
devices over a distance of about 8 meters.
You can perform the following tasks using Bluetooth paired devices.
-Transfer media files and contacts between mobile devices connected using Bluetooth.
-Access Internet through a Bluetooth device.
-Use Bluetooth headphones for playing media file
Pairing a Bluetooth Device
To activate Bluetooth and pair your CONQUEST S20 phone with other Bluetooth devices:
1. From the Home or All Apps screen, tap Settings.
2. Enable Bluetooth, located under Connected devices settings. A list of accessible Bluetooth
devices are displayed. Ensure that Bluetooth is activated in the other device too.
3. Tap Pair new device to search and add other Bluetooth enabled devices. A list of accessible
Bluetooth devices are displayed. Ensure that Bluetooth is activated in the other device too.
4. Tap Settings next to the specific paired device to connect the Bluetooth device to access your
phone’s contacts, call history and also provide Internet access.
5. Enable Media Audio to connect the Bluetooth device for listening to media files.
This option is displayed only when a Bluetooth headset/Carkit is connected.
6. Confirm the pass key in the other device and tap Pair in your phone.
7. The device is displayed in the Paired device list.
Editing Bluetooth Device Settings
1. Tap Settings icon located next to the preferred paired Bluetooth device.
2. Enter a new name to change the display name of the device and tap OK.
3. Enable Media Audio to connect the Bluetooth device for listening to media files.
4. Enable Internet access to use the paired Bluetooth device to access the Internet.
5. Tap Forget to remove the device from your paired list.
Optimizing Data Usage
Data usage refers to the amount of data used by your phone during internet access. The data
usage charges are dependent on the plan provided by your service provider. To monitor your data
usage, adjust your data usage settings.
1. From the Home or All Apps screen, tap Settings.
2. Tap Data Usage, located under Network & Internet settings.
3. Tap App data Usage and set data usage warning limit.
4. Enable Data saver to allow unrestricted Internet access only to those applications to which
Unrestricted data usage permission are enabled.
5. Enable Mobile Data to access Internet using your mobile network.
6. Tap Data usage to set the mobile data usage limits.

12
7. Tap Data warning & limit.
8. Enable Set data warning to preset your data usage limit and to set an alert before reaching
the preset limit.
9. Enter the Data warning limit.
10.Enable Set data limit. Mobile data access is disconnected automatically as soon as you
reach this limit. You cannot access the Internet and related phone features do not work. You
receive a notification once you reach the set data usage limit.
11.Enter the data limit.
Activating Aeroplane Mode
When your phone is set in airplane mode, network Connectivity or mobile data connectivity gets
disabled. But you can access your media files and other features that do not require mobile data
connectivity.
You can activate aeroplane mode from Quick settings. You can also activate using the following
steps, if it is not not available in the quick settings.’To activate airplane mode,
-From the Home or All Apps screen, tap Settings.
-Enable Airplane mode located under Network &
Internet settings.
Setting Up Tethering & Portable Hotspot
Using tethering and portable hotspot, you can share your device’s Internet connection with a
computer or with other devices.
To activate USB tethering, Tap Hotspot and tethering located under Network & Internet settings.
Enable USB tethering.
Setting Up Wi-Fi Hotspot
When you setup your phone as a Wi-Fi hotsopt you can connect other devices to this phone
through Wi-Fi and access Internet.
-Tap Hotspot and tethering located under Network & Internet settings.
-Tap Wi-Fi Hotspot and enable it.
-Enter Hotspot name, Security and Password and tap OK.
Activating Bluetooth Tethering
When you activate Bluetooth tethering, you can share your phone’s Internet connection with other
Bluetooth paired devices.
1. Tap Hotspot and tethering located under Network & Internet settings.
2. Enable Bluetooth tethering.
Setting Up VPN Connection
Using a Virtual private network (VPN) connection, you can access websites and other resources
within a secured local network, even when you are outside that network. To setup a VPN
connection:
1. From the Home or All Applications screen, tap Settings.
2. Tap VPN located under Network & Internet settings.
3. Tap Add network icon (+). Edit VPN profile screen is displayed.
4. Enter the following details:
-VPN profile: VPN connection name.

13
-Type: Select the connection type.
-Server address: Address of the secure server for connection.
-PPP encryption (MPPE): Enable to perform a secure point-to-point encryption between your
device and the VPN server.
-Select Show advanced options to enter DNS server details.
-Tap Save to save the changes
Connecting to a VPN Network
1. Tap the required VPN name from the list of VPN networks configured.
2. Enter the required credentials.
3. Tap Connect.
4. When the phone is connected to the VPN network, the icon is displayed in notification bar.
Editing VPN Network Details
1. Touch and hold the required VPN profile to be edited, from the list of VPN networks configured.
2. Tap Edit profile.
3. Modify the required information.
4. Tap Save to save the changes.
Deleting a VPN Network
To delete a VPN profile from the VPN screen,
-Tap Settings of the VPN profile to be deleted.
-Tap Forget to delete profile.
Managing Mobile Network
You can view and modify your mobile service provider settings. To view and modify your mobile
network settings:
1. From the Home or All Apps screen, tap Settings ( ).
2. Tap Mobile network located under Networks & Internet settings.
3. Enable Mobile data to access the Internet using your mobile network.
4. Enable Roaming to have network connectivity when you are in a roaming network.
5. Set Data usage limit.
6. Select the preferred Network type. You can set it to either 2G only,3Gonly, 4G only, 2G/3G only,
3G/4Gonly, 2G/3G/4G,5G.
7. Tap Network to to choose network operator.
8. Tap Access Point Names to view, add and edit the network access points. Tap Add network
icon (+) to add a new access point.
Locking Your Screen
1. From the Home or All Apps screen tap Settings.
2. Tap Security & location.
3. Enable and modfiy required security settings.
4. Tap Screen lock and select one of the following options to configure phone:
-None: Disables the phone lock.
-Swipe: When the phone is locked slide to your right or left or long press * key to unlock the
phone.

14
-Pattern: When enables, enter a pattern connecting atleast 4 dots. When the phone is locked,
unlock it with the pattern.
-PIN: When enabled, enter you own PIN value. When the phone is locked, unlock it using the PIN.
-Password: When enabled, enter a password having atleast 4 characters. When the phone is
locked, unlock it with the password.
Location Access
If you enable Google Location Service™, you can let your device access GPS, Wi-Fi networks, and
mobile networks to estimate your location.
1. From the Home or All Apps screen, tap Settings.
2. Tap Location located under Security & location settings. Enable and modify required security
settings.
3. Enable Location.
Backup and Restore Data
You can backup your phone data to one or more of your Google Accounts using Android backup
services.
If you need to replace your device or erase its data, you can restore your data for any accounts that
were previously backed up.
Backup Your Data
1. From the Home or All Apps screen, tap Settings.
2. Tap Backup located under Google settings.
3. Tap Back up to Google drive.
If you do not have a backup account on your device, you can touch Backup account to add an
account.
Managing Accounts
You can link an existing Google Account to your phone to organize and access your personal
information from any computer or mobile device.
Adding an Account
1. From the Home or All Apps screen, tap Settings.
2. Tap Add Account under Accounts.
3. Select the type of account. You can create a Corporate account or an IMAP account.
4. Complete the on-screen instructions.
5. The account is displayed under one of the following list:
-Google Accounts shown under Settings > Google.
-Other accounts shown under Settings > Accounts.
Deleting an Account
You can remove any account and all the information associated with it from your device, including
e-mail, contacts, settings, and other data backed up in that account.
1. To remove a Google Account, Settings on home page > Accounts - Google > Select the
account to be deleted.

15
2. Tap Remove account.
To remove any other type of account, tap Settings - Accounts > account-name and tap the
suitable Remove option.
Syncing Your Account
To view and modify the sync settings for Google Accounts,
1. From the Home or All Apps screen, tap Settings ( ).
2. Tap Accounts.
3. Tap Google Account.
Configure Auto-Sync for all Apps
To enable auto-sync for all apps that are linked with your account,
1. To control auto-sync for all apps that use it, open Settings ( ) > Accounts > Check or uncheck
Auto-sync data.
If this option is not checked, you can only sync the data manually. You can also sync manually to
collect messages, e-mail, and other recent information. If auto-sync is disabled. it extends your
phone’s battery life. But it prevents your from receiving notifications when updates occur.
Configure Google Account Sync Settings
To modify a single Google Account’s sync settings:
1. Go to Settings ( ) > Accounts > Google.
2. Tap the account whose sync settings has to be changed.
3. If your account is set to auto-sync, you can check or uncheck items as needed. If auto-sync is off
which is located under Settings > Accounts > Automatically sync data, tap to disable. Tap
Google account > Account sync > touch an item to manually sync its data.
Sync a Google Account Manually
Go to Settings ( ) - Accounts > Google > Account Sync > Options > Sync.
You can use the phonebook to maintain your contacts.
It enable you to perform call,SMS, mms etc.
To Access the Contacts
From Home or All Apps screen, tap Contacts ( ).
The contacts saved in the phonebook are displayed.
Add a New Contact
To add a new contact, From Home or All Apps screen, tap Contacts > Add new contact (+).
Enter the contact details and Save, to save the contact.
You can also enter a number using the dial pad and tap Create a new contact to add a new
contact, or Add to a contact to update existing contact details.

16
Blocking Incoming Calls
The Call blocking options helps you to block incoming calls and SMS messages from blocked
numbers.
To block incoming calls from certain numbers, tap Call blocking > Add a number.
Enter the phone number to be blocked and tap Block.
3 How to use Night-vision Camera
3.1 To take an night vision picture:
Open the camera APP, select the Night Vision function under the mode function bar and click the
photography button.
Normal mode Night vision
3.2 To record an night vision video:
Open the camera APP, select right corner’s button and choose Night Video.

17
4 Guarantee, Warranty, Attention
The manufacturer guarantees the compliance of smartphones with the requirements of
technical specifications, provided that the consumer observes the conditions of transportation,
storage and operation.
The warranty period is set for 12 months from the date of sale of the smartphone to the
consumer, the warranty period for the battery is 6 months. During the warranty period, the
manufacturer undertakes to assist in the operation of the smartphone, to eliminate the detected
malfunctions, provided that the consumer observes the conditions of transportation, storage and
operation. Warranty and post-warranty repairs of the smartphone are carried out by the
manufacturer. Warranty service may be refused in the following cases:
• presence on the product of traces of outside interference or attempts at unauthorized
repair, as well as in the case of repairs made by persons and organizations that are not authorized
service centers;
• presence of damage caused by the ingress of foreign substances, objects, liquids, dust,
insects into the goods;
• presence of external and internal electrical and mechanical damage (including, but not
limited to, jammed contacts, cracks, impact marks, chips, burnouts, etc.) that can affect the
performance of the product;
• if the product that has traces of repair or opening does not have a mark on the repair
carried out in the warranty card / warranty obligation, or there are no documents confirming the
repair or opening;
Unauthorized access to the inside of the smartphone case may result in the loss of the
manufacturer's right to warranty service.
ATTENTION! DURING OPERATION, THE SMARTPHONE SHOULD BE PROTECTED
FROM SHOCK OR DROP.
Table of contents
Other CONQUEST Cell Phone manuals