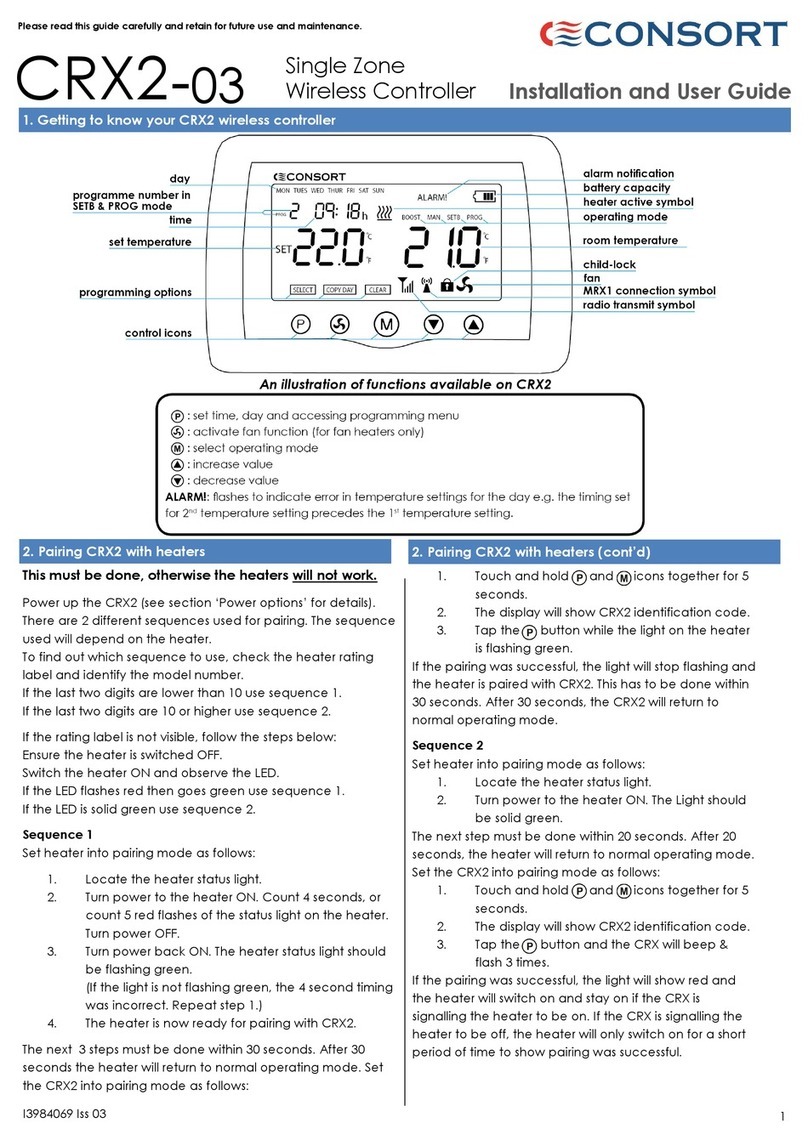
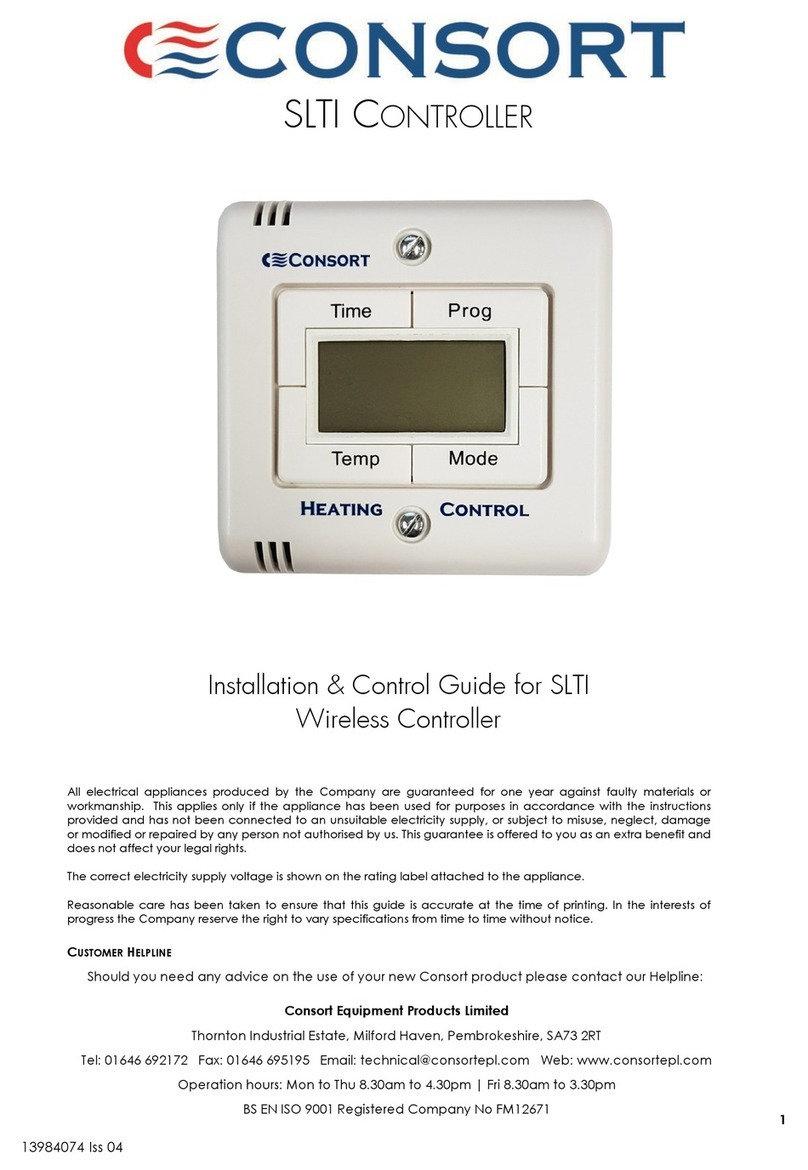
Consort SLPBWIFI Use and maintenance manual

1
Installation & Control Guide for SLPBWIFI
Wireless Controller
All electrical appliances produced by the Company are guaranteed for one year against faulty materials or
workmanship. This applies only if the appliance has been used for purposes in accordance with the instructions
provided and has not been connected to an unsuitable electricity supply, or subject to misuse, neglect, damage
or modified or repaired by any person not authorized by us. This guarantee is offered to you as an extra benefit and
does not affect your legal rights.
The correct electricity supply voltage is shown on the rating label attached to the appliance.
Reasonable care has been taken to ensure that this guide is accurate at the time of printing. In the interest of
progress the Company reserve the right to vary specifications from time to time without notice.
SLPBWIFI CONTROLLER
13984154 Iss 01
CUSTOMER HELPLINE
Should you need any advice on the use of your new Consort product, please contact our Helpline:
Consort Equipment Products Limited
Thornton Industrial Estate, Milford Haven, Pembrokeshire, SA73 2RT
Tel: 01646 692172 Email: [email protected] Web: www.consortepl.com
Operation hours: Mon to Thu 8.30am to 4.30pm | Fri 8.30am to 3.30pm
BS EN ISO 9001 Registered Company No FM12671

2
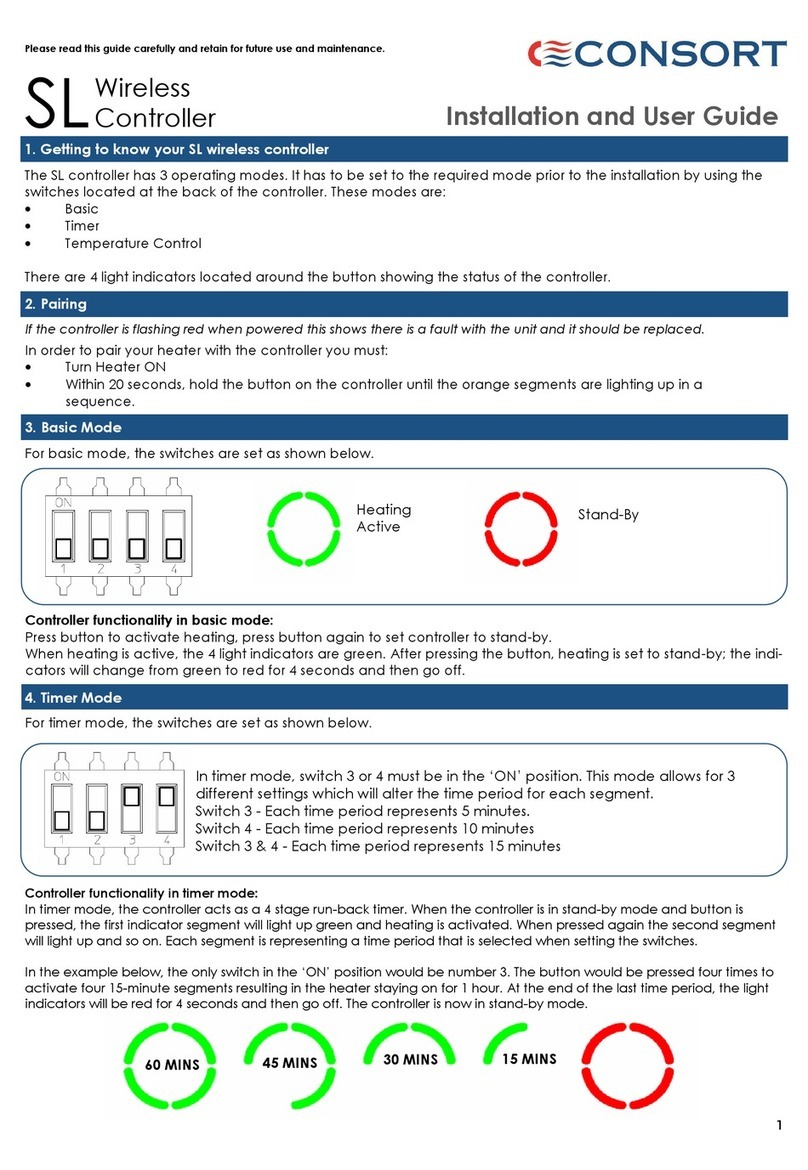
SLPBWIFI Wireless
Controller
The SLPB controller can control multiple heaters within its RF range. All heaters have to be installed in the same
room as a SLPBWIFI. The RF range can be extended if necessary, see product code SLEXT.
When used without WIFI, the controller will only have basic on/off functionality.
When connected to WIFI, the controller offers 4 operating modes. The required mode can only be selected
via the Consort Connect app.
Operating modes:
· Manual
· Frost protection
· Boost
· Automatic timer
There are 4 light indicators around the button showing status of the controller. These indicators can show one
of four options listed below.
There is also a blue indicator light located in the bottom left corner of the controller. This will be flashing during
connecting to the WIFI, and be solid when connected.
Please read this guide carefully and retain for future use and maintenance.
Installation and User Guide
1. Getting to know your SL wireless controller
WARNINGS
· Do NOT handle the appliance with wet hands.
· Do NOT use the appliance in workshops or rooms with high dust
exposure.
· Do NOT cover or restrict any aperture.
· Do NOT use the appliance if damaged.
· Do NOT leave the appliance unattended where young children
are present.
· Ensure that nothing is pushed into any aperture of this controller.
· Operating temperature range -10 to +40ºC.
Heating Active - All four segments are solid green, heaters are producing heat.
Heating active in BOOST mode - All four segments are slow flashing green, heaters are producing
heat.
Connecting to APP / WIFI - When the blue and green lights are rapidly flashing, the controller is in
registering to WIFI and APP. This happens when the button is held within 10 seconds of powering the
controller. Refer to section ‘Pairing to the Consort Connect app’ for more details.
Standby mode - After the heating is switched off, either double pushing the button, using the APP or
because the target temperature has been reached, the LED segments change to red. After 5 sec-
onds, the segments will switch off completely. The heating is off.
Pairing with heaters - When the yellow light is rapidly flashing, the controller is pairing with heaters.
This happens when the button is held after the controller has been powered for 30 seconds. Refer to
section ‘pairing with heaters’ for more details.
Open window detection active - All four segments are slow flashing yellow, heaters aren’t produc-
ing heat.

3
3. Pairing with heaters
In order to pair controller with heaters:
· Ensure the controller is powered and has been
powered for more than 10 seconds.
· Power up the heater.
· Within 20 seconds, press and hold the button on the
controller until the segments flash yellow.
Alternatively select ‘Send pairing signal’ in the app
settings menu.
· After the pairing is finished, the light segments will
change to green.
· If the pairing was successful, the heater should emit
heat. It can take up to 4 seconds.
· Depending on the operating mode, the appliance
may switch off after 4 seconds.
· The heater is now ready to be used.
Before connecting to WIFI and APP:
After the pairing with the heaters has been complet-
ed (see paragraph 3 for more details) The push but-
ton can be used to activate and deactivate heat-
ing. Push button briefly to activate heating, push
again to deactivate heating. Temperature control
isn’t available.
After connecting to WIFI and APP:
After the pairing with the heaters, the WIFI and APP
have been completed. (see paragraph 3 & 4 for
more details) The function of the push button now
changes. The push button can be now used to tog-
gle between the BOOST MODE and mode selected
by the APP. Press the button briefly to set controller to
BOOST mode. Double press the button to return to
the previous mode.
The BOOST mode is time limited to 15 minutes. After
15 minutes, the heating will revert to the previous op-
erating mode set on the APP.
4. Pairing to the Consort Connect app
The controller is only compatible
with a 2.4GHz WIFI network.
All internet routers support the 2.4GHz band, as it is
an older standard and has maximum device com-
patibility. Routers also support 5GHz WIFI and are of-
ten set up to hide which frequency band is being
used, combine both bands into a single network
name, and assign the band automatically. A mobile
phone could be automatically connected to the
5GHz network, and this will cause pairing issues.
Routers usually have a setting that gives each band
to have a different network name, which is configu-
rable through the router’s web interface. This allows
the phone to unambiguously select the 2.4GHz net-
work. For full pairing instructions, see section 9.
Before pairing the App must be installed on your
smart phone. The app is compatible with IOS and
2. Using the push button Android Smartphones. Go to the app store or play
store and search :
Consort Connect
When the app asks for the WIFI make sure that the
WIFI network and password are entered correctly –
the app usually selects the right network, but you
need to enter the password. Until you successfully
pair a device to a network it does not remember the
password, and if the password is entered incorrectly
it doesn’t specifically tell you that this is the problem.
Pairing the heater to the Consort Connect app.
1. Ensure the smartphone or tablet is connected
to 2.4GHz WIFI network and the Bluetooth is
enabled.
2. Within 10 seconds after powering the control-
ler, press and hold the button until the green
lights start flashing.
3. The Blue indicator should also be flashing.
4. Select the + symbol in the top right corner of
the Consort Connect app
5. Select “Heater (BLE)”
6. The app will ask you to confirm the indicator is
blinking rapidly.
7. If the blue indicator is flashing rapidly, tick the
box and click ‘Next’.
8. The app should show that one device has
been found. Select the + symbol next to this
device.
9. Enter the WIFI password on the app.
10. The heater will begin to pair to the app. This
can take up to 60 seconds.
11. Once pairing is successful, the + symbol will be
replaced with a tick.
12. Select ‘Next’ and the app should display
‘Added successfully’. The controller is now
paired and ready to be used with the app.
A solid blue light on the controller means the con-
troller is connected to the internet.
When you open the Consort Connect app, select
the product you would like to control. This will bring
you to the main control page where you can
change the operating mode and temperature. The
dial in the middle of the screen is used to adjust the
temperature. The icons on the top of the screen
are used to change the operating mode.
5. How to control the product using the app

4
8. Boost mode
Boost mode can be used to provide a boost of heat
for a short period of time. When the button on the
controller is pressed, boost mode is triggered for 15
minutes. Once the boost timer has expired, the con-
troller will return to its previous operating mode.
9. Automatic mode
The Consort Connect app has a 7 day automatic
timer. This can be set to switch the heater on/off au-
tomatically at certain times of day. Each day has 24
heating periods, each period must be set to a re-
quired temperature.
The timer has an automatic ‘preheat period’ which
turns the heater on from 5-30 minutes before the au-
tomatic program begins. This time period can be set
in the basic settings menu.
Information on how to set the automatic program
can be found in the ‘Setting the automatic timer’
section.
To access the basic settings menu, select the
settings icon from the main control page. In the
settings menu, select the title ‘basic’ to access
the basic menu. In this menu, you can view the
wattage of the heater, adjust the temperature
calibration and toggle open window detection,
the occupancy sensor and self learning mode
on/off. An SL pairing signal can also be sent
from this menu. More information on this can be
found in the section titled ‘Pairing your SL heat-
er’. There is also an option to disable all indica-
tor lights on the controller. After pressing the but-
ton the controller will briefly show the status by
enabling the light indicators for period of 4 sec-
onds. The light indicators will be automatically
enabled after activating WIFI pairing.
12. Basic settings menu
Ensuring you don’t waste energy on heating the
outside world, the controller is equipped with
optional open / closed window detection. The
controller recognises sudden drops in temperature
when a window or a door is opened and turns the
heating off to save energy. When the window is
closed, the heater will automatically detect a
temperature rise, and switch itself back on. Once
enabled in the Consort Connect settings menu, the
open window detection is fully automatic and does
not require any human intervention to be activated.
Setting-up Open Window Detection
The system has been factory set to default time and
temperature values. If necessary, all values can be
adjusted. When the heating is on, open window
detection sensor will automatically switch the heater
off when it detects a fall in temperature of 2°C in less
than 10 minutes. If a temperature rise of 2°C in less
than 5 minutes is detected, the heater will switch
itself back on. These parameters can be changed in
the Consort Connect App. When viewing the heater
settings in the app, select the ‘open window
detection’ menu.
14. Open Window Detection
13. Naming the product in the Consort Connect app
Once the controller is linked with the app, it is given
a generic name and the icon associated with it is a
heater. These can both be changed.
To do this, when the controller menu is open (this is
the menu you can control the product with) select
the icon in the top right corner of the screen.
Next, select the icon again. From this page, you
can change the name of the controller and import
an image to represent your product.
Selecting the icon will load the Energy con-
sumption screen how much power heaters connect-
ed to SLPBWIFI used in the previous 24 hour period, 7
day period, 4 week period and the last year.
The energy usage values are approximate. They are
based on recording time the heaters are producing
heat. The mains voltage and actual heater wattage
aren’t taking to account when calculating values.
The temperature reading has been factory cali-
brated but if for any reason it needs adjusting
(better accuracy required, to suit different posi-
tion in the room etc.) the reading can be recali-
brated in 0.5 degrees steps via the Consort Con-
nect App. The calibration can be done +/- 2ºC
of the original value.
11. Temperature Calibration
10. Energy Consumption
The temperature control feature will effectively main-
tain the set room temperature. The target tempera-
ture can be set using the Consort Connect app. The
range is 4ºC - 35ºC. Once the room temperature
reaches the set temperature, the indicators will
change from green to red for 4 seconds before
switching off completely. When the room tempera-
ture drops, heating will became active and the indi-
cators will change to green.
6. Manual mode
7. Frost protection
Frost protection mode works the same way as man-
ual mode, maintaining a target temperature from
4ºC - 15ºC. These two modes can be used together,
by selecting manual mode at a higher temperature
when heat is required and then selecting frost pro-
tection at a lower temperature when no heat is re-
quired.
5
This mode allows the SLPBWIFI to monitor occupancy
patterns and predict when people are likely to use
the room. Once a pattern is detected, the SLPBWIFI
will add the pattern to the automatic timer. The
learning mode will only switch the heater on
automatically if the product is left in auto mode.
Occupancy sensor data is recorded in a week
period. Time is divided into hour segments. Any
occupancy detected during the hour counts as an
‘occupied’ segment in the data. There are 2
different learning mode options available, 2 weeks
and 3 weeks. The default mode is the 3 week
learning period. In this operating mode, if there are
readings of occupancy at the same time and day 3
weeks in a row, then a pattern is detected and
added to the automatic timer. In 2 week mode, only
2 consecutive weeks are required. The parameters
can be viewed and changed via the app. To do this,
enter the settings menu and select the title ‘self-
learning programme’.
After the self-learning function is
enabled, the heater will start
overwriting the existing time
schedules immediately. It is recommended to leave
the heaters in manual mode with occupancy sensor
enabled for the period of 2 or 3 weeks to allow the
time schedules to be recognised by the heaters.
18. Self-learning function
The Consort Connect app has a 7 day automatic
timer. This can be set to switch the heater on/off au-
tomatically at certain times of day.
Each day has 24 time periods, one period for each
hour of the day. To set up your program, you must
select the required temperature for each time peri-
od
To access the program page, select the icon.
Tapping an hour slot will turn it grey and bring up 2
options. These are ‘Delete’ and ‘Settings’. Tapping
‘delete’ will default the temperature for that slot to
4°C . Tapping ‘settings’ will allow a temperature be-
tween 4°C and 35°C to be selected.
Multiple hour slots can be selected simultaneously
provided they are for the same day and they are in
sequence. For example, if the program needed to
be 22°C from 9am-5pm on Monday you would need
to follow the steps below.
1. Select the box after 09:00 Monday (the box will
turn grey)
2. Scroll down and select the box before 17:00
on Monday. All boxes from 09:00 up to 17:00
will turn grey.
3. Select the option ‘settings’ which appears next
to the grey boxes.
4. Select a temperature of 22°C.
5. Tap ‘Done’
6. All boxes between 09:00 and 17:00 will be set
to 22°C and the heater will maintain this tem-
perature during these times.
Repeat these steps for all time periods so that the
heater runs as required.
15. Automatic timer
The automatic program which is explained previous-
ly is only capable of switching the heating on/off in
one hour increments, I.e. the heating could not be
switched on at 10:30am, it would need to be either
10am or 11am.
The Smart automation feature which is also part of
the app can offer a solution to this. It allows an un-
limited number of programs to be set on every day
of the week.
To use it, follow the steps listed below.
1. Open the Consort Connect app and select
the ’Smart’ option on the bottom of the
screen.
2. Select the ‘+’ symbol located in the top right of
the screen.
3. Select the option ‘Schedule’
4. Select ’Repeat’ and choose the days which
the program is required to run on.
5. Select an execution time. This is the time the
program will be triggered.
16. Smart automation
6. Select ‘Next’.
7. Select ‘Run the device’ and choose the de-
vice the program will control.
8. Select ‘Mode’ and then choose the operating
mode the heater will switch to.
9. Select ‘Name’ to name the operation
(optional).
10. Select ‘Save’.
Repeat these steps for all automations required. A
single time period would require two automations,
one to switch the heater on, and one to switch the
heater off.
You can activate/deactivate each individual auto-
mation without deleting it. To do this, from the main
app screen select the ‘Smart’ option and use the
toggle icon.
If automation function is used, the con-
troller must set to FROST mode and auto-
mation set to switch to MANUAL mode.
17. Group control
The APP can be set for group control where it is pos-
sible to control multiple heaters/controllers at once.
To set it up, open the app, select a heater you want
in the group and press the edit icon in the top right
hand corner. Select create group and follow the
instructions on the screen.

6
In order to detect presence in the room, SLPBWIFI
has a built in microwave sensor. For the occupancy
detection to work correctly it is necessary to find the
right settings for the sensor. This will minimise errone-
ous triggering.
All settings can be changed using the Consort Con-
nect app. This can be done under the title
‘Occupancy Sensor’ in the settings menu.
There are 3 values which can be changed. These
are the sensitivity, responsiveness and the occupan-
cy timeout.
The value for sensitivity adjusts the point at which a
disturbance counts toward the decision to trigger
the heater. It is adjustable from 0 to 9 which adjusts
the sensitivity. 0 is minimum sensitivity, 9 is maximum
sensitivity. Setting sensitivity to the minimum setting
(zero) disables the sensor.
The value for responsiveness is used to consider sev-
eral readings before triggering occupancy. This val-
ue is also adjustable from 0 to 9, the higher it is set
the less sensor readings are required to trigger occu-
pancy. 0 is minimum responsiveness, 9 is maximum
responsiveness.
The occupancy timeout is the length of time the
heater stays on for without movement being trig-
gered.
How does the microwave sensor work?
The occupancy sensor works differently depending
on what operating mode is manually selected.
When in MANUAL mode, the microwave sensor will
switch the heater into FROST mode automatically
when the occupancy timeout is reached. The app
display will then show ’Auto off’. When this is shown,
the heater will switch back to manual mode auto-
matically once movement is detected.
When in automatic mode, the heating will automati-
cally switch off when the occupancy timeout is
reached. It will then switch back on when move-
ment is detected. The preheat function is unaffect-
ed by this and operates as normal.
18. Built-in Occupancy Sensor
The lock feature allows locking 2 different aspects
of the controller using a pin number. It is possible
either lock the controller completely so that it
cannot be tampered with, or only lock the WIFI
pairing. Locking the WIFI pairing prevents people
from pairing the heater to their smartphones unless
they have the pin.
These settings can be implemented under the title
‘Lock’ in the settings menu.
To disable lock from the controller, hold down the
button until it begins flashing green. The controller
will begin a sequence of flashes. It will flash green,
then flash red, then flash green and then flash red
again. Each of these flashing sequences represent
a different digit in the pin number. The number of
times you press the button during each flashing
sequence is entered as the number for that digit.
For example, if your pin number was set as 1234,
the following sequence would unlock the
controller.
1. Hold down the controller button
2. Controller will flash green, press the button
once during this sequence
3. Controller will flash red. Press the button twice
during this sequence.
4. Controller will flash green. Press the button
three times during this sequence.
5. Controller will flash red. Press the button four
times during this sequence.
This will result in the pin ‘1234’ being entered,
unlocking the controller. The controller will not lock
again until manually done via the Consort Connect
app.
NOTE: Once this pin has been confirmed, the lock
cannot be removed without knowing the correct
pin number.
The pin is NOT recoverable.
19. Pin Lock feature

7
Before choosing position in the
room check that WIFI signal is pre-
sent in the area. The controller re-
quires a good internet connection.
The SLPBWIFI controller must be fixed to the wall
installed ideally in a plastic surface or recessed
back box. Avoid areas with draught or direct
sun. Do not position the controller above or
close to the heaters or other heat sources.
Damp areas or areas where SLPBWIFI can be
mechanically damaged should also be avoid-
ed. Avoid installing the controller in areas
where there are metal objects between the
heater and the controller. This will reduce the RF
range. Also installing the controller in a metal
back box will affect the RF range. The RF range
in ideal conditions can be up to 20m however
this can be reduced when the signal is passing
through the walls or other objects. The range
can be also affected where the controller is
mounted close to power cables, motors or
equipment producing a strong electromagnetic
field. If the temperature control feature is used it
is necessary to use one controller for each room
or zone.
20. Choosing a position in a room
The controller is designed to fit onto most single
gang back boxes. When a metal box is used this
must be earthed. The controller is powered by 230
- 240VAC 50Hz. The power consumption is less
than 1W. The maximum size wire that can be
used is 1mm2, this can be twin and earth or stand-
ard flex . Do not overtighten the connector
screws. Take care not to damage the compo-
nents when connecting the cables.
WARNING, the controller is not
compatible with single gang metal
back box with 4 fixing lugs.
Electrical installation should be carried out by a
competent installer in accordance with the latest
edition of the IEE Wiring Regulations, (BS.7671),
and any relevant Local Authority Bye-Laws.
This heater must be permanently connected to
the electricity supply via a double pole switch
having 3mm gap on each pole. There are no ex-
ceptions.
A switched Fused Connection unit to BS.1363. Part
4 is a recommended mains supply connection
accessory to ensure compliance with safety re-
quirements applicable to fixed-wiring installation.
21. Installation
22. Connection to the Main Supply
/
1
-9$&

8
Declaration Of Conformity
In accordance with UK Government Guidance.
WE HEREBY CERTIFY THAT THE APPLIANCES DETAILED HEREON HAVE BEEN
INSPECTED AND TESTED, AND CONFORM TO THE REQUIREMENTS OF THE
FOLLOWING UK STATUTORY INSTRUMENTS WHERE APPLICABLE:
Electrical Equipment (Safety) Regulations 2016 SI. 2016 1101
Electromagnetic Compatibility Regulations 2016 SI. 2016 No. 1091
Radio Equipment Regulations 2017 SI. 2017 No. 1206
The Restriction of use of Certain Hazardous Substances. SI. 2012 No. 3032
Transposed standards used:
· EN50663:2017
· EN60730-2-9:2010
· EN60730-1:2011
· ETSI EN300 220-1 V3.1.1 (2017-02)
· ETSI EN300 220-2 V3.2.1 (2018-06)
· ETSI EN301 489-1 V2.2.2 (2019)
· ETSI EN301 489-3 V2.1.1 (2019)
PART NUMBER AND DESCRIPTION OF APPLIANCE: SLPBWIFI
NAME OF RESPONSIBLE PERSON: A C REYNOLDS
POSITION: QUALITY ENGINEERING
DATE: 22/01/22
CONSORT EQUIPMENT PRODUCTS LTD.
THORNTON INDUSTRIAL ESTATE, MILFORD HAVEN, PEMBROKESHIRE, SA73 2RT. UK
TEL: +44 1646 692172 E-MAIL: TECHNICAL@CONSORTEPL.COM
WWW.CONSORTEPL.COM
Other Consort Controllers manuals

Consort
Consort CRX1 User manual

Consort
Consort MRX1 User manual

Consort
Consort CRXLC User manual

Consort
Consort CRX2-03 User manual

Consort
Consort SLTI Use and maintenance manual

Consort
Consort CRXSL-05 User manual

Consort
Consort HRXSL Use and maintenance manual

Consort
Consort SLVTB Use and maintenance manual

Consort
Consort SLPIR Use and maintenance manual

Consort
Consort SL User manual