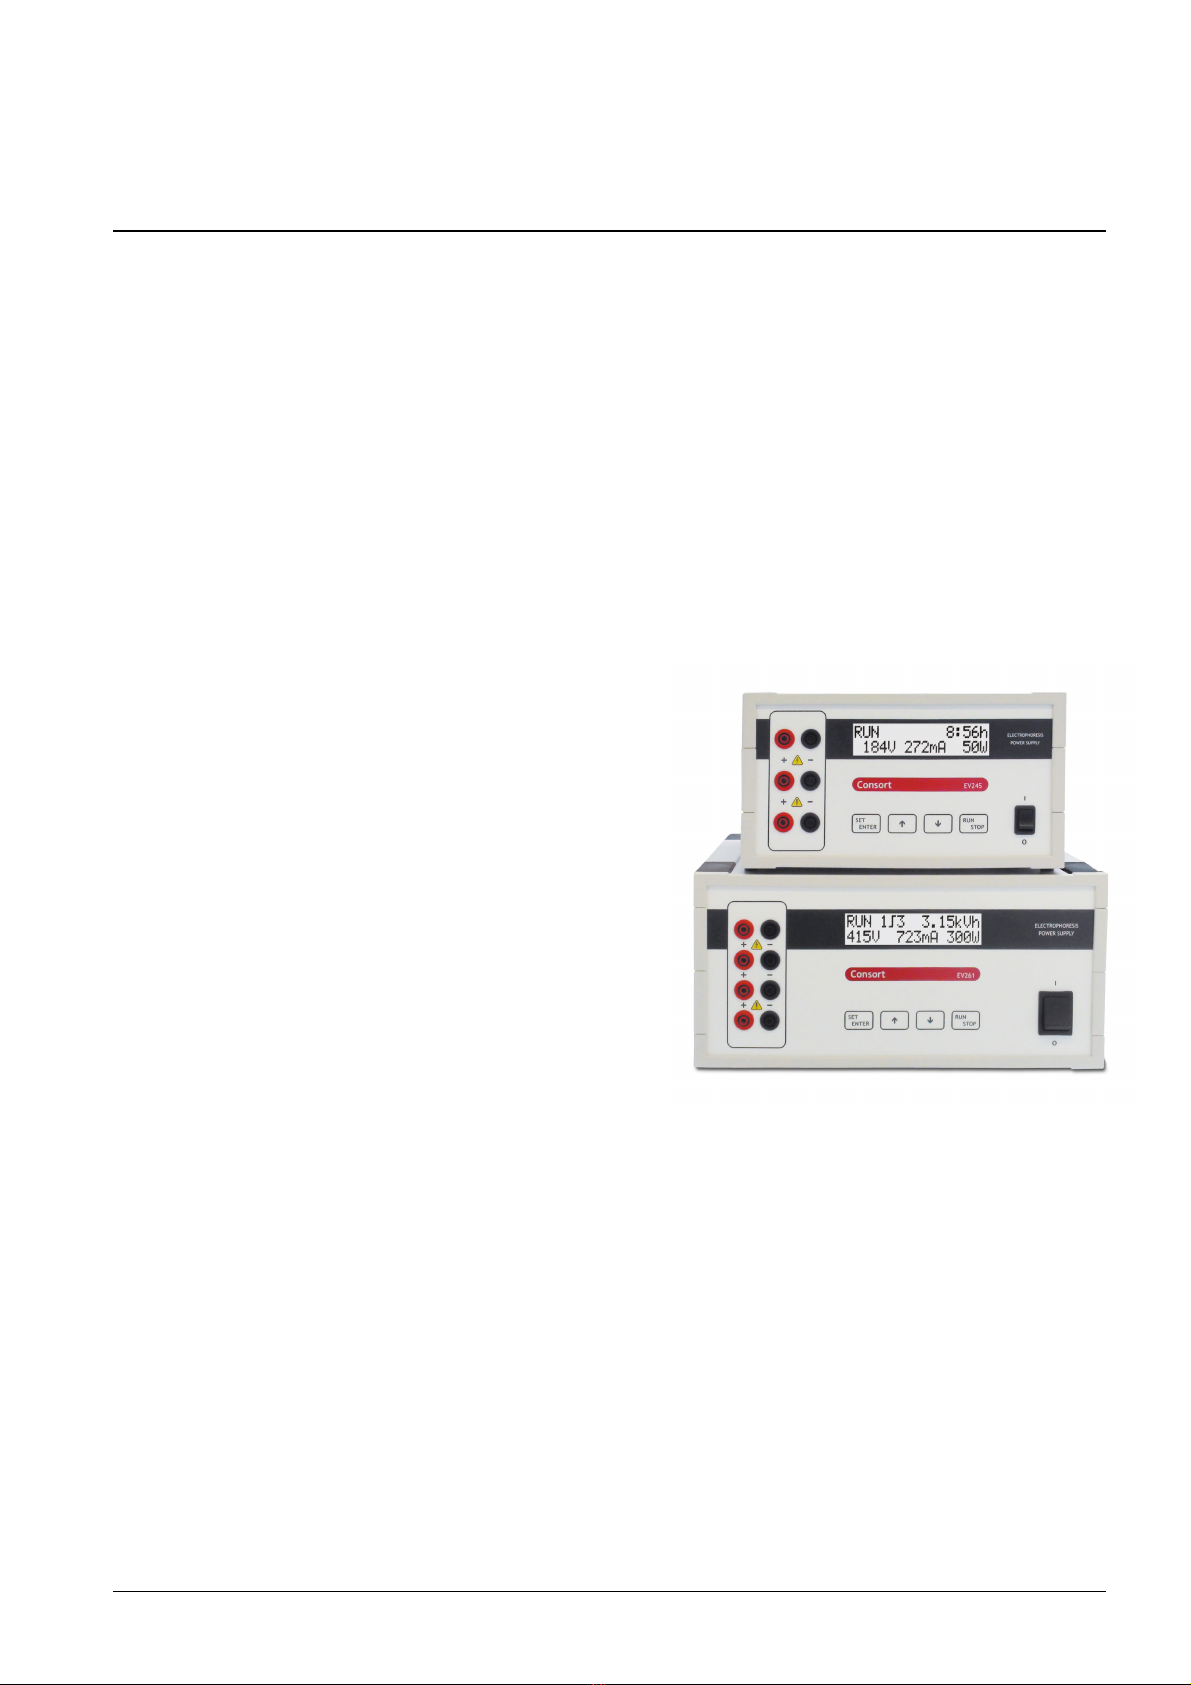
Consort EV202 User manual


Consort
MANUAL
HANDLEIDING
MODE D’EMPLOI
ANLEITUNG
EV202
EV215
EV231
EV232
EV233
EV245
EV261
EV262
EV265
December 2012


Inde
General informations.....................................................................................1
Very important.............................................................................................2
Set-up.......................................................................................................3
Method programming.....................................................................................
Manual programming.....................................................................................5
Temporarily changing parameters......................................................................5
Data-logging................................................................................................6
Alarms.......................................................................................................6
Algemene informatie.....................................................................................7
Zeer belangrijk............................................................................................8
Instellen....................................................................................................9
Methode programmatie.................................................................................10
Manuele programmatie.................................................................................11
Tijdelijk parameters wijzigen.........................................................................11
Gegevens opslaan........................................................................................12
Alarmen...................................................................................................12
Informations générales.................................................................................13
Très important...........................................................................................1
Configurer.................................................................................................15
Programmation méthode...............................................................................16
Programmation manuelle...............................................................................17
Changer temporairement les paramètres............................................................17
Enregistrer des données................................................................................18
Alarmes....................................................................................................18
Allgemeine Informationen..............................................................................19
Sehr wichtig..............................................................................................20
Einstellen.................................................................................................21
Methode Programmierung..............................................................................22
Manuelle Programmierung..............................................................................23
Zeitlich Parameter ändern.............................................................................23
Daten speichern..........................................................................................2
Alarme.....................................................................................................2
Frequently Asked Questions............................................................................25
EV2xx Calibration........................................................................................26
Specifications............................................................................................27

General informations
Introduction
This instrument is manufactured with the latest technology and needs no
particular maintenance. Consort certifies that this instrument was thoroughly
inspected and tested at the factory prior to shipment and found to meet all
requirements defined by contract under which it is furnished. However,
dimensions and other physical characteristics may differ.
The normal operating temperature should be between 0° and 0°C. Never use the
instrument in a room with high humidity (>95 %) or at very low temperatures
(condensation water!).
Manufacturer
Consort bvba
Parklaan 36 Tel (+32)(1 ) 1 12 79
B2300 Turnhout Fax (+32)(1 ) 2 91 79
Belgium E-mail: [email protected]
Warranty
This instrument (excluding all accessories) is warranted against defective material
and workmanship for a period of thirty-six (36) months from the date of shipment
ex factory. Consort will repair all defective equipment returned to it during the
warranty period without charge, provided the equipment has been used under
normal laboratory conditions and in accordance with the operating limitations and
maintenance procedures in this instruction manual and when not having been
subject to accident, alteration, misuse or abuse. A return authorisation must be
obtained from Consort before returning any product for warranty repair on a
freight prepaid basis!
Consort is not liable for consequential damages arising out of the use or handling
of its products.
Servicing
In the event of this instrument being returned for servicing, the owner is
requested NOT to send the following items unless they are suspect:
Manual
Cables
Accessories
If serious malfunctioning occurs, stop using the unit immediately and consult your
local Consort dealer.
Keyboard
éê= Button for entering a value or for selecting a function.
SET/ENTER = Button for programming the desired parameters.
RUN/STOP = Button to start or stop an experiment.
1

Very important
This electrophoresis power supply is a high technology instrument available in
several versions. As it is capable of giving dangerous voltage levels by which high
power is involved, we suggest that you take a few moments to read this manual
thoroughly. Although this instrument is equipped with all necessary safety
features against abuse and other accidental failures, caution should be exercised
when working with high voltage equipment.
1. Avoid to touch the outlets with any conducting object and make sure there
is a second person present for your safety in case of any severe electric
shock.
2. Never touch any part of the assembly (power supply, leads or tank) before
having switched off.
3. Never manipulate with wet hands.
4. Do not ground any of the outputs or the buffer in the tank.
5. Connect the outlets only to an insulated electrophoresis tank with safety
cover.
6. Never make any other connections, such as e.g. putting several power
supplies in series or in parallel.
7. In order to prevent electric shock, never open the back plate nor remove the
cover.
8. Do not expose the unit to rain or any other liquid.
9. Do not spill liquid or insert metal objects inside the unit.Take care so that
the power supply is not dropped to avoid damaging the cabinet which defeats
safeguards or injuring yourself.
10. If the unit has been dropped or the cabinet has been damaged, unplug it and
have it checked by an authorised service technician to restore the safeguards.
11. The fact that the unit operates satisfactorily does not imply that the unit is
properly earthed or that it is completely safe. If in any doubt about the
effective earthing of the unit, contact a qualified electrician.
12. Never block the ventilation holes or place the unit in any enclosure unless
proper ventilation is provided.
13. Never place the unit near or over a radiator, heat register or stove.
14. Avoid locations where the instrument is exposed directly to the sun light.
2

Set-up
---- STAND-BY ----
SET-UP
1. Select SET-UP and press SET.
2. Select LANGUAGE and press SET.
3. Select the desired language and press SET.
4. Select CONTRAST and press SET.
5. Adjust the contrast of the display and press SET.
6. Select ALARM and press SET.
7. Decide whether or not the output voltage should shut down at a too
low output current and press SET.
8. Select POWER FAIL and press SET.
9. Decide whether or not the instrument should proceed with the
experiment for the remaining time after a power failure and press
SET.
10. Select PASSWORD and press SET.
11. A private code can be programmed to avoid undesired set-up of the
instrument. The user can then only run or stop the experiment.
Select [YES] or [NO] and press SET to enter your secret sequence of 5
keys. Repeat your code.
12. Select STAND-BY and press SET to return.
• Select INFO and press SET to see general information about the
electrophoresis power supply.
---- SET-UP ----
LANGUAGE
CHOOSE LANGUAGE:
ENGLISH
---- SET-UP ----
CONTRAST
---- SET-UP ----
ALARM
CURRENT<1mA
ALARM: YES
---- SET-UP ----
POWER FAIL
POWER FAIL
DETECTION: YES
PASSWORD
ENABLE: YES
ENTER PASSWORD
*****
REPEAT
*****
---- SET-UP ----
STAND-BY
---- SET-UP ----
INFO
3

Method programming
Method programming permits to store up to 9 different methods, each
with 9 steps, of frequently used parameters in the non-volatile memory
for future recall. Each step is able to recall a next one, providing a
flexible multiple step function for special techniques. The method mode
also permits to program a linear voltage gradient for any step provided
the limiting current or power is not attained. Parameters can be changed
temporarily without interrupting the run.
1. Verify if the instrument is switched off.
2. Connect the electrophoresis tank to the instrument.
3. Switch the instrument on. If the timer is still running after switching
on, the power supply will automatically proceed with the experiment
for the remaining time. Press STOP (within 10 seconds) if you want
to go in stand-by during the run. The parameters can then be
changed eventually. Press RUN to proceed with the experiment or
press SET, during 2 seconds, to go in stand-by again.
4. Select the METHOD mode and press SET.
5. Select the desired method and press SET.
6. Select the desired step and press SET.
7. Decide whether or not a voltage gradient has to be performed and
press SET.
8. Enter the desired voltage limit and press SET (= the voltage end
point in case of a gradient step).
9. Enter the desired current limit and press SET (this limit is
automatically set to maximum and cannot be changed in case of a
gradient step).
10. Enter the desired power limit and press SET (this limit is
automatically set to maximum and cannot be changed in case of a
gradient step).
11. Enter the desired time-units (h of kVh) and press SET.
12. Enter the desired time and press SET.
13. Decide if the experiment should automatically proceed with a next
step (resuming from point 6) or stop after this step. Enter the
desired procedure and press SET.
14. Press RUN to start the experiment.
• At any time, you can return in the stand-by mode by holding SET pressed
during 2 seconds.
• At any time, you can avoid programming unnecessary parameters. o do so,
simply press RUN instead of SET after entering the last relevant value and
the instrument will immediately start the experiment keeping the other
parameters to their previous values.
• o ensure that the desired parameter is kept constant, we suggest to pre-
set all other parameters to maximum.
• A blinking unit of the controlling parameter appears when the regulation is
complete.
• he timer will always count down.
TIMER ACTIVE!
STOP NOW? 10s
---- STAND-BY ----
METHOD
ENTER 1∫1
METHOD: 1
ENTER 1∫1
STEP: 1
ENTER 1∫1
GRADIENT: NO
ENTER 1∫1
VOLTAGE: 00V
ENTER 1∫1
CURRENT: 500mA
ENTER 1∫1
POWER: 50W
ENTER 1∫1
TIME UNIT: h
ENTER 1∫1
TIME: 99:59h
ENTER 1∫1
END METHOD: YES
RUN 1∫1 99:59h
00V 500mA 50W

Manual programming
TIMER ACTIVE!
STOP NOW? 10s
Manual programming permits to set voltage, current, power and time
limits for a simple routine electrophoresis run. Parameters can be
changed temporarily without interrupting the run.
1. Verify if the instrument is switched off.
2. Connect the electrophoresis tank to the instrument.
3. Switch the instrument on. If the timer is still running after switching
on, the power supply will automatically proceed with the experiment
for the remaining time. Press STOP (within 10 seconds) if you want
to go in stand-by during the run. The parameters can then be
changed eventually. Press RUN to proceed with the experiment or
press SET, during 2 seconds, to go in stand-by again.
4. Select the MANUAL mode and press SET.
5. Enter the desired voltage limit and press SET.
6. Enter the desired current limit and press SET.
7. Enter the desired power limit and press SET.
8. Enter the desired time-units (hours or kilovolthours) and press SET.
9. Enter the desired time and press SET (pre-set to [--:--] if no timing is
required).
10. Press RUN to start the experiment.
• At any time, you can return in the stand-by mode by holding SET pressed during 2
seconds.
• At any time, you can avoid programming unnecessary parameters. o do so, simply
press RUN instead of SET after entering the last relevant value and the instrument
will immediately start the experiment keeping the other parameters to their
previous values.
• o ensure that the desired parameter is kept constant, we suggest to pre-
set all other parameters to maximum.
• A blinking unit of the controlling parameter appears when the regulation is
complete.
• he timer will always count down. However, when no time limit has been
programmed it will count up.
---- STAND-BY ----
MANUAL
ENTER
VOLTAGE: 00V
ENTER
CURRENT: 500mA
ENTER
POWER: 50W
ENTER
TIME UNIT: h
ENTER
TIME: 99:59h
RUN 99:59h
00V 500mA 50W
Temporarily hanging parameters
SET 1∫1 99:59h
00V 500mA 50W
Only the parameters of the running step can be changed. A gradient step
can never be changed.
1. Press SET to change temporarily the parameters without interrupting
the run.
2. Change the actual voltage limit and press SET.
3. Change the actual current limit and press SET.
4. Change the actual power limit, and press SET.
5. Change the actual time and press SET.
6. The power supply will now continue the run.
• emporarily changed parameters are not been kept in memory!
• he instrument will automatically return to the run mode when no button
has been pressed during 10 seconds.
SET 1∫1 99:59h
00V 500mA 50W
SET 1∫1 99:59h
00V 500mA 50W
SET 1∫1 99:59h
00V 500mA 50W
5

Data-logging
1. Select SET-UP and press SET.
2. Select DATA and press SET.
3. Select DURATION and press SET.
4. Select the desired time for the data-logging and press SET.
5. Select LOG and press SET.
6. Decide whether or not all data (voltage, current, power, time) during
the next experiments should be logged and press SET.
7. Select SET-UP and press SET to return.
• Starting a new experiment will erase the previous data in memory.
• Stored data can be transferred to a computer via the RS232 output using
free available software (www.consort.be).
• At any time, you can return in the stand-by mode by holding SET pressed
during 2 seconds.
---- STAND-BY ----
SET-UP
---- SET-UP ----
DATA
----- DATA -----
DURATION
LOG DATA
FOR: 10h
----- DATA -----
LOG
LOG
DATA: YES
----- DATA -----
SET-UP
Alarms
GROUND LEAKAGE
A dangerous ground leakage is present (check thoroughly the complete
assembly). Your power supply is NOT defective! See Frequently Asked
Questions at the end of this manual.
SHORT-CIRCUIT
Connected tank is short-circuited or has a very low resistance (check
thoroughly the complete assembly). Your power supply is NOT defective!
See Frequently Asked Questions at the end of this manual.
OVERLOAD
Connected tank has a too low resistance (check specifications). Your
power supply is NOT defective! See Frequently Asked Questions at the
end of this manual.
CURRENT<1mA
The output current is lower than 1 mA (switch the alarm off in the SET-
UP menu). Your power supply is NOT defective! See Frequently Asked
Questions at the end of this manual.
CALL SERVICE
Failure in the electronics. See Support on www.consort.be.
• You could also try a general RESE : switch the instrument on while holding
SET pressed. Attention! All stored programs and data will be erased!
*** ERROR ***
GROUND LEAKAGE
*** ERROR ***
SHORT-CIRCUIT
*** ERROR ***
OVERLOAD
*** ERROR ***
CURRENT<1mA
*** ERROR ***
CALL SERVICE
6

Algemene informatie
Inleiding
Dit toestel is gebouwd volgens de modernste technologie en hoeft niet speciaal te
worden onderhouden. Consort bevestigt dat dit toestel grondig werd nagekeken
en getest alvorens te worden verstuurd, en beantwoordt aan alle vereisten van
het aankoopkontrakt. Er kunnen echter wel afwijkingen optreden in de
afmetingen en andere fysische eigenschappen. De normale werktemperatuur
moet tussen 0° en 0°C liggen. Gebruik het toestel nooit in een ruimte met hoge
vochtigheidsgraad (>95 %) of bij zeer lage temperaturen (condenswater!).
Fabrikant
Consort bvba
Parklaan 36 Tel (+32)(1 ) 1 12 79
B2300 Turnhout Fax (+32)(1 ) 2 91 79
Belgium E-mail: [email protected]
Waarborg
Dit toestel (uitgezonderd alle toebehoren) is gewaarborgd tegen defect materiaal
of constructiefouten voor een periode van zesendertig (36) maanden vanaf de
verzenddatum af fabriek. Consort zal elk toestel gratis herstellen, binnen de
waarborgperiode, voor zover het werd gebruikt onder normale laboratorium
omstandigheden volgens de werkvoorschriften en onderhoudsprocedures uit deze
gebruiksaanwijzing en wanneer de oorzaak van het defect niet een ongeluk, een
aanpassing, verkeerd gebruik of misbruik is. Er moet eerst een toelating van
Consort verkregen worden vooraleer eender welk toestel franco terug te sturen
voor herstelling onder waarborg!
Consort kan niet aansprakelijk worden gesteld voor eventuele schadelijke
gevolgen van het gebruik of behandeling van zijn producten.
Onderhoud
Mocht dit toestel worden teruggestuurd voor onderhoud, gelieve volgende
toebehoren NIET mee te sturen, tenzij ze verdacht zijn:
Handleiding
Kabels
oebehoren
In geval van ernstige storing, stop onmiddellijk het gebruik van het toestel en
raadpleeg uw plaatselijke Consort verdeler.
Toetsenbord
éê= Toetsen voor het instellen van een waarde of voor het kiezen van
een functie.
SET/ENTER = Toets om de gewenste parameters te programmeren.
RUN/STOP = Toets om het experiment te starten of te stoppen.
7

Zeer belangrijk
Deze elektroforesevoeding maakt gebruik van de modernste technieken en is
verkrijgbaar in verschillende versies. Omdat het gevaarlijk hoge spanningen kan
geven met een hoog vermogen, is het zeer belangrijk om deze handleiding eerst
grondig door te nemen. Niettegenstaande dit toestel voldoende beveiligd is tegen
verkeerd gebruik en mogelijke accidentele fouten, moet toch ten zeerste worden
opgepast wanneer met hoge spanningen wordt gewerkt.
1. Vermijd om de uitgangen met gelijk welk geleidend voorwerp aan te raken
en zorg er steeds voor dat een tweede persoon aanwezig is om voor uw
veiligheid te zorgen in geval van een ernstige elektrische schok.
2. Raak geen enkel deel van de opstelling (voeding, kabels of tank) aan zonder
eerst het toestel uitgeschakeld te hebben.
3. Werk nooit met natte handen.
4. Verbind nooit één van de uitgangen of de buffer in de tank met de aarde.
5. Verbind de uitgangen enkel met een goed geïsoleerde elektroforesekamer
met veiligheidsdeksel.
6. Maak nooit andere verbindingen, zoals b.v. verschillende voedingen in serie of
in parallel schakelen.
7. Om mogelijke elektrische schokken te vermijden, de achterwand of het
deksel nooit verwijderen.
8. Stel het toestel niet bloot aan regen of enige andere vloeistof.
9. Mors geen vloeistoffen of steek geen metalen voorwerpen in het toestel.
10. Draag er zorg voor om de voeding niet te laten vallen zodat ze niet
beschadigd wordt, de veiligheidsvoorzieningen onklaar worden of Uzelf
gekwetst wordt.
11. Indien men het toestel heeft laten vallen of de kast beschadigd werd, het
netsnoer verwijderen en het toestel door een erkend technicus laten nakijken
op zijn veiligheid.
12. Het feit dat het toestel naar wens werkt betekent niet dat het voldoende
geaard is of dat het volledig veilig is. Bij elke twijfel hieromtrent een
bevoegd elektricien raadplegen.
13. De verluchtingsgaten nooit dicht maken of het toestel in een kast plaatsen
zonder voldoende ventilatie.
14. Plaats het toestel nooit nabij of op een radiator, kachel of
verwarmingselement.
15. Vermijd plaatsen waar het toestel aan direct zonlicht wordt blootgesteld.
8

Instellen
---- STAND-BY ----
INSTELLEN
1. Kies INSTELLEN en druk op SET.---
2. Kies TAAL en druk op SET.
3. Kies de gewenste taal en druk op SET.
4. Kies CONTRAST en druk op SET.
5. Stel het contrast van de aflezing in en druk op SET.
6. Kies ALARM en druk op SET.
7. Beslis of de uitgangsspanning al of niet moet wegvallen bij een te
lage uitgangsstroom en druk op SET.
8. Kies STROOMVERLIES en druk op SET.
9. Beslis of het toestel al of niet automatisch moet verder gaan met het
experiment voor de nog overblijvende tijd in geval van stroomverlies
en druk op SET.
10. Kies PASWOORD en druk op SET.
11. Om een ongewenste instelling van het toestel te vrijwaren, kan men
een paswoord programmeren. De gebruiker kan dan enkel nog
beginnen of stoppen met een experiment. Kies [JA] of [NEE] en druk
op SET om uw geheime volgorde van 5 toetsen in te geven. Herhaal
de ingave,
12. Kies STAND-BY en druk op SET om terug te keren.
• Kies INFO en druk op SET om algemene informatie over de elektroforese voeding te
zien.
---- INSTELLEN ----
TAAL
TAAL KIEZEN:
NEDERLANDS
---- INSTELLEN ----
CONTRAST
---- INSTELLEN ----
ALARM
STROOM<1mA
ALARM: JA
---- INSTELLEN ----
STROOMVERLIES
STROOMVERLIES
DETECTIE: JA
PASWOORD
GEBRUIKEN: JA
INGAVE PASWOORD
*****
HERHALEN
*****
---- INSTELLEN ----
STAND-BY
---- INSTELLEN ----
INFO
9

Methode programmatie
Met de methode programmatie kunnen tot 9 verschillende methoden,
elk met 9 stappen, van veel gebruikte parameters in het geheugen
opgeslagen worden voor later gebruik. Elke stap kan een volgende
oproepen voor speciale technieken met meervoudige stapfunctie. Voor
elke stap kan ook een lineaire spanningsgradiënt geprogrammeerd
worden indien de stroom- en vermogens-limieten niet overschreden
worden. De parameters van de lopende stap kunnen tijdelijk gewijzigd
worden zonder het experiment te onderbreken.
1. Ga na of het toestel wel degelijk uitgeschakeld is.
2. Verbind de elektroforesekamer met het toestel.
3. Schakel het toestel aan. Indien, na aanschakelen, de tijdsklok nog
steeds loopt zal de voeding automatisch verder gaan met het
experiment voor de nog overblijvende tijd. Druk binnen de 10
seconden op STOP om het experiment te onderbreken (‘stand-by’).
Nu kunnen eventueel de parameters gewijzigd worden. Druk op RUN
om verder te gaan met het experiment of druk gedurende 2
seconden op SET om terug naar ‘stand-by’ te keren.
4. Kies METHODE en druk op SET.
5. Kies de gewenste methode en druk op SET.
6. Kies de gewenste stap en druk op SET.
7. Beslis of al of niet een spanningsgradiënt moet uitgevoerd worden en
druk op SET.
8. Geef de gewenste spanningslimiet in en druk op SET (= eindspanning
in geval van een gradiënt).
9. Geef de gewenste stroomlimiet in en druk op SET (deze limiet wordt
automatisch op maximum gezet in geval van een gradiënt).
10. Geef de gewenste vermogenslimiet in en druk op SET (deze limiet
wordt automatisch op maximum gezet in geval van een gradiënt).
11. Kies de gewenste tijdseenheden (h of kVh) en druk op SET.
12. Geef de gewenste tijd in en druk op SET.
13. Beslis of het experiment automatisch met een volgende reeks
parameters moet voortgaan (ga terug naar punt 6) of moet beëindigd
worden na deze stap. Kies het gewenste verloop en druk op SET.
14. Druk op RUN om het experiment te beginnen.
• Men kan steeds terug in de stand-by mode komen door gedurende 2
seconden te blijven drukken op SET.
• Men kan steeds uit de programmatieprocedure springen om het ingeven van
onnodige parameters te vermijden. Druk op RUN i.p.v. op SET na ingave van
de laatste gewenste waarde en het toestel begint onmiddellijk het
experiment met alle andere parameters op hun voorgaande waarde.
• Om een bepaalde parameter constant te houden stelt men best alle andere
parameters op maximum in.
• Een knipperende eenheid van de constante parameter verschijnt nadat de
regeling volledig is.
• De tijdsklok telt steeds af.
TIMER ACTIEF!
NU STOPPEN? 10s
---- STAND-BY ----
METHODE
INGEVEN
METHODE: 1
INGEVEN 1∫1
STAP: 1
INGEVEN 1∫1
GRADIENT: NEE
INGEVEN 1∫1
SPANNING: 00V
INGEVEN 1∫1
STROOM: 500mA
INGEVEN 1∫1
VERMOGEN: 50W
INGEVEN 1∫1
TIJDEENHEID: h
INGEVEN 1∫1
KLOK: 99:59h
INGEVEN 1∫1
EINDE METH.: JA
RUN 1∫1 99:59h
00V 500mA 50W
10

Manuele programmatie
TIMER ACTIEF!
NU STOPPEN? 10s
Met de manuele programmatie kunnen spanning, stroom, vermogen en
tijd ingesteld worden voor een eenvoudige routine elektroforese. De
parameters kunnen tijdelijk gewijzigd worden zonder het experiment te
onderbreken.
1. Ga na of het toestel wel degelijk uitgeschakeld is.
2. Verbind de elektroforesekamer met het toestel.
3. Schakel het toestel aan. Indien, na aanschakelen, de tijdsklok nog
steeds loopt zal de voeding automatisch verder gaan met het
experiment voor de nog overblijvende tijd. Druk binnen de 10
seconden op STOP om het experiment te onderbreken (‘stand-by’).
Nu kunnen eventueel de parameters gewijzigd worden. Druk op RUN
om verder te gaan met het experiment of druk gedurende 2
seconden op SET om terug naar ‘stand-by’ te keren.
4. Kies MANUEEL en druk op SET.
5. Geef de gewenste spanningslimiet in en druk op SET.
6. Geef de gewenste stroomlimiet in en druk op SET.
7. Geef de gewenste vermogenslimiet in en druk op SET.
8. Kies de gewenste tijdseenheden (h of kVh) en druk op SET.
9. Geef de gewenste tijd in en druk op SET. Stel in op [--:--], wanneer
geen tijdsfunktie gewenst is.
10. Druk op RUN om het experiment te beginnen.
• Men kan steeds terug in de stand-by mode komen door gedurende 2 seconden te
blijven drukken op SET.
• Men kan steeds uit de programmatieprocedure springen om het ingeven van onnodige
parameters te vermijden. Druk op RUN i.p.v. op SET na ingave van de laatste
gewenste waarde en het toestel begint onmiddellijk het experiment met alle andere
parameters op hun voorgaande waarde.
• Om een bepaalde parameter constant te houden stelt men best alle andere
parameters op maximum in.
• Een knipperende eenheid van de constante parameter verschijnt nadat de
regeling volledig is.
• De tijdsklok telt steeds af tenzij geen tijdfunctie ingesteld is.
---- STAND-BY ----
MANUEEL
INGEVEN
SPANNING: 00V
INGEVEN
STROOM: 500mA
INGEVEN
VERMOGEN: 50W
INGEVEN
TIJDEENHEID: h
INGEVEN
KLOK: 99:59h
RUN 99:59h
00V 500mA 50W
Tijdelijk parameters wijzigen
SET 1∫1 99:59h
00V 500mA 50W
Enkel parameters van de lopende stap kunnen gewijzigd worden. Een
gradiënt stap kan nooit gewijzigd worden.
1. Druk op SET om de parameters tijdelijk te wijzigen zonder het
experiment te onderbreken.
2. Wijzig de actuele spanningslimiet en druk op SET.
3. Wijzig de actuele stroomlimiet en druk op SET.
4. Wijzig de actuele vermogenslimiet en druk op SET.
5. Wijzig de actuele tijd en druk op SET.
6. De voeding gaat nu verder met het experiment.
• ijdelijk gewijzigde parameters worden niet in het geheugen bewaard!
• Het toestel gaat automatisch verder met het experiment indien gedurende
10 seconden geen enkele toets gedrukt werd.
SET 1∫1 99:59h
00V 500mA 50W
SET 1∫1 99:59h
00V 500mA 50W
SET 1∫1 99:59
00V 500mA 50W
11

Gegevens opslaan
1. Kies INSTELLEN en druk op SET.
2. Kies DATA en druk op SET.
3. Kies TIJDSDUUR en druk op SET.
4. Kies de gewenste tijdsduur voor de data-opslag en druk op SET.
5. Kies OPSLAAN en druk op SET.
6. Beslis of alle gegevens (spanning, stroom, vermogen, tijd) gedurende
de volgende experimenten al of niet moeten opgeslagen worden en
druk op SET.
7. Kies INSTELLEN en druk op SET om terug te keren.
• De vorige gegevens worden in het geheugen gewist bij het opstarten van
een nieuw experiment.
• De opgeslagen gegevens kunnen naar een computer verzonden worden via
de RS232 uitgang. Gratis software is hiervoor verkrijgbaar
(www.consort.be).
• Men kan steeds terug in de stand-by mode komen door gedurende 2
seconden te blijven drukken op SET.
---- STAND-BY ----
INSTELLEN
---- INSTELLEN ----
DATA
----- DATA -----
TIJDSDUUR
DATA OPSLAAN
GEDURENDE: 10h
----- DATA -----
OPSLAAN
DATA
OPSLAAN: JA
----- DATA -----
INSTELLEN
Alarmen
AARDLEK
Een gevaarlijke aardlekstroom is aanwezig (controleer grondig de gehele
opzet). De hoogspanningsbron is NIET defect! Zie Frequently Asked
Questions op het einde van deze handleiding.
KORTSLUITING
De aangesloten elektroforesekamer is kortgesloten of heeft een zeer
kleine weerstand (controleer grondig de gehele opzet). De
hoogspanningsbron is NIET defect! Zie Frequently Asked Questions op
het einde van deze handleiding.
OVERBELASTING
De aangesloten elektroforesekamer heeft een te kleine weerstand
(controleer grondig de gehele opzet). De hoogspanningsbron is NIET
defect! Zie Frequently Asked Questions op het einde van deze
handleiding.
STROOM<1mA
De uitgangstroom is kleiner dan 1 mA (schakel het alarm uit in de SET-UP
menu). De hoogspanningsbron is NIET defect! Zie Frequently Asked
Questions op het einde van deze handleiding.
SERVICE VEREIST
Fout in de elektronica. Zie Support op www.consort.be.
• Men kan ook trachten een algemene RESE uit te voeren: SET ingedrukt
houden en het toestel aanschakelen. Opgelet! Alle opgeslagen programma's
en gegevens worden gewist!
*** FOUT ***
AARDLEK
*** FOUT ***
KORTSLUITING
*** FOUT ***
OVERBELASTING
*** FOUT ***
STROOM<1mA
*** FOUT ***
SERVICE VEREIST
12

Informations générales
Préface
Cet appareil est construit selon les dernières technologies et ne nécessite aucun
entretien particulier. Consort certifie que cet appareil a été contrôlé et vérifié
sévèrement à l'usine avant livraison afin de convenir aux exigences définies par le
contrat d'achat. Néanmoins, il peut y avoir des différences dans les dimensions ou
autres caractéristiques physiques.
La température d'utilisation normale doit être entre 0° et 0°C. N'utilisez jamais
l'appareil dans un lieu humide (>95 %) ou à une température très basse
(condensation d'eau!).
Fabricant
Consort bvba
Parklaan 36 Tel (+32)(1 ) 1 12 79
B2300 Turnhout Fax (+32)(1 ) 2 91 79
Belgium E-mail: [email protected]
Garantie
Cet appareil (sauf tous les accessoires) est garanti pendant trente-six (36) mois, à
partir de la date d'expédition départ usine, contre toute faute du matériel et
main d’œuvre. Consort réparera gratuitement chaque appareil défectueux, qui
lui est retourné, à condition que l'appareil a été utilisé dans des conditions
normales de laboratoire selon les limitations opérationnelles et les procédés
d'entretien de ce mode d'emploi et que le défaut n'est pas dû à un accident, une
adaptation, un mal-traitement ou un abus. Avant de retourner, aux frais de
l'utilisateur, tout appareil pour réparation sous garantie, il faut d'abord obtenir
l'approbation de Consort!
Consort décline toute responsabilité pour des dommages éventuels causés par
l'usage ou la manipulation de ses produits.
Service
En cas de retour de cet appareil pour service après vente, NE PAS renvoyer les
accessoires suivants, sauf s'ils sont suspects:
Mode d'emploi
Câbles
Accessoires
En cas de mauvais fonctionnement sérieux, arrêtez d'utiliser l'appareil
immédiatement et consultez votre agent Consort local.
Le clavier
éê= Boutons pour rentrer manuellement une valeur ou pour choisir une
fonction.
SET/ENTER = Bouton pour programmer les paramètre désirés.
RUN/STOP = Bouton pour démarrer ou arrêter l'expérience.
13

Très important
Ce générateur d'électrophorèse à haute performance est livré en plusieurs
versions différentes. De très hautes tensions pouvant être fournies, il est
important de lire le mode d'emploi à fond avant la mise en service. Bien que cet
appareil soit équipé de toutes les dispositions nécessaires pour garantir la
sécurité de l'utilisateur en cas de manipulations incorrectes ou autres fautes
accidentelles, il faut néanmoins prendre les précautions nécessaires pour le
travail avec des équipements à haute tension.
1. Évitez de toucher les sorties avec n'importe quel objet métallique et
garantissez vous de la présence d'une seconde personne pour votre sécurité
en cas d'un choc électrique sévère.
2. Ne jamais toucher n'importe quel partie de l'ensemble (générateur, câbles ou
cuve) avant d'avoir vérifié que l'appareil est éteint.
3. Ne faites aucune manipulation avec des mains mouillées.
4. Ne jamais relier les sorties du générateur ou le tampon de la cuve à la
terre.
5. Raccordez les sorties uniquement à une cuve d'électrophorèse équipée d'un
couvercle de sécurité.
6. Ne faites jamais d'autres connexions, comme p.e. mettre plusieurs
générateurs en série ou en parallèle.
7. Afin de prévenir tout risque de choc électrique, ne jamais démonter vous
même le panneau inférieur ou ouvrir le couvercle.
8. Conservez l'appareil à l'abri de tout liquide et n'introduisez jamais d'objet
métallique ou de liquide à l'intérieur.
9. Prenez soin de ne pas laisser tomber l'appareil, ce qui risque de l'endommager
et de vous blesser.
10. Si l'appareil est tombé, ou si le boîtier a été endommagé, contactez un
service technique autorisé afin de contrôler les dispositions de sécurité.
11. Un fonctionnement satisfaisant de l'appareil n'implique pas forcément que le
raccordement à la terre est réalisé, et ne garantit pas la sécurité de
l'installation. En cas de doute, veuillez contacter un électricien qualifié.
12. Veillez à ne pas boucher les orifices de ventilation.
13. Ne disposez jamais l'appareil dans un coffret de rangement dépourvu
d'orifices d'aération appropriés.
14. Ne disposez jamais l'appareil à la proximité de ou sur un chauffage, un
réchaud, etc...
15. Évitez de disposer en un lieu directement exposé aux rayons solaires.
1

Configurer
---- STAND-BY ----
CONFIGURER
1. Choisissez CONFIGURER et appuyez sur SET.
2. Choisissez LANGAGE et appuyez sur SET.
3. Choisissez le langage désiré et appuyez sur SET.
4. Choisissez CONTRASTE et appuyez sur SET.
5. Ajustez le contraste de l'affichage et appuyez sur SET.
6. Choisissez ALARME et appuyez sur SET.
7. Décidez si la tension doit être coupée en cas d'un courant trop bas et
appuyez sur SET.
8. Choisissez PERTE DE COURANT et appuyez sur SET.
9. Décidez si le générateur doit poursuivre automatiquement
l’expérience pour le temps qui reste, si la minuterie n’a pas encore
fini, et appuyez sur SET.
10. Choisissez MOT DE PASSE et appuyez sur SET.
11. Afin de protéger la configuration de l'appareil, un code personnel
peut être programmé. Alors l'utilisateur ne pourra que démarrer ou
arêtter une expérience. Choisissez [OUI] ou [NON]et appuyez sur SET
pour entrer votre séquence secrète de 5 touches.
12. Choisissez STAND-BY et appuyez sur SET pour retourner.
• Choisissez INFO et retourner en appuyez sur SET pour voir des informations
générales sur le générateur d'électrophorèse.
---- CONFIGURER ----
LANGAGE
CHOISIR LANGAGE:
FRANCAIS
---- SET-UP ----
CONTRASTE
---- CONFIGURER ----
ALARME
COURANT<1mA
ALARME: OUI
---- CONFIGURER ----
PERTE DE COURANT
PERTE DE COURANT
DETECTION: OUI
---- CONFIGURER ----
STAND-BY
MOT DE PASSE
ACTIVER: OUI
ENTREZ MOT DE P.
*****
REPETEZ
*****
---- CONFIGURER ----
INFO
15

Programmation méthode
La programmation méthode permet de sauvegarder 9 méthodes
différentes, chaque avec 9 pas, de paramètres dans la mémoire non
volatile. Chaque pas peut enchaîner un suivant pour des migrations
complexes ou multiples utilisations. Le mode méthode permet aussi de
programmer un gradient de tension tant que les consignes du courant et
puissance ne sont pas atteints. Les paramètres peuvent être changés
temporairement sans interrompre l'expérience.
1. Vérifiez si l’instrument est éteint.
2. Branchez les cuves d’électrophorèse à l’appareil.
3. Allumez l’appareil. Âpres avoir allumé le générateur l'expérience se
poursuit automatiquement pour le temps qui reste, si la minuterie
n’a pas encore fini. Appuyez sur STOP (dans les 10 secondes) pour
interrompre l'expérience (‘stand-by’). Maintenant on peut changer
éventuellement les consignes. Appuyez sur RUN pour poursuivre
l’expérience ou appuyez sur SET, pendant 2 secondes, pour
retourner en ‘stand-by’.
4. Choisissez METHODE et appuyez sur SET.
5. Choisissez la méthode désirée et appuyez sur SET.
6. Choisissez le pas désiré et appuyez sur SET.
7. Décidez si un gradient de tension doit être parcourue et appuyez sur
SET.
8. Entrez la consigne pour la tension et appuyez sur SET (= la tension
finale en cas de gradient).
9. Entrez la consigne pour le courant et appuyez sur SET (cette valeur
est mise automatiquement au maximum en cas de gradient).
10. Entrez la consigne pour la puissance et appuyez sur SET (cette valeur
est mise automatiquement au maximum en cas de gradient).
11. Choisissez les unités de temps (h ou kVh) et appuyez sur SET.
12. Entrez le temps désiré et appuyez sur SET.
13. Décidez si l’expérience doit se poursuivre automatiquement avec un
pas suivant (continuez à partir du point 6) ou s'arrêter ici. Choisissez
le déroulement désiré et appuyez sur SET.
14. Appuyez sur RUN pour commencer l’expérience.
• On peut toujours retourner en stand-by en appuyant sur SET pendant 2
secondes.
• Si vous désirez éviter d'entrer des paramètres inutiles, appuyez sur RUN au
lieu de SET après avoir corrigé la dernière valeur nécessaire et l’expérience
démarre immédiatement en gardant tous les paramètres non utilisés à leur
valeur précédente.
• Afin de tenir un paramètre constant pendant l’expérience, il faut
programmer tous les autres paramètres au maximum.
• Les témoins du passage automatique en mode constant (unités clignotantes)
ne s'allument que si l'un des paramètres reste constant et si la régulation
est complète.
• La minuterie décompte toujours.
MINUTEUR ACTIF!
ARRETER? 10s
---- STAND-BY ----
METHODE
ENTREZ 1∫1
METHODE: 1
ENTREZ 1∫1
PAS: 1
ENTREZ 1∫1
GRADIENT: NON
ENTREZ 1∫1
TENSION: 00V
ENTREZ 1∫1
COURANT: 500mA
ENTREZ 1∫1
PUISSANCE: 50W
ENTREZ 1∫1
UNITE TEMPS: h
ENTREZ 1∫1
DUREE: 99:59h
ENTREZ 1∫1
FIN METHODE: OUI
RUN 1∫1 99:59h
00V 500mA 50W
16
Other manuals for EV202
1
This manual suits for next models
8
Table of contents
Languages:
Popular Portable Generator manuals by other brands

Full Boar
Full Boar FBT-3000 instruction manual

Olympus
Olympus ESG-410 Instructions for use

Parkside
Parkside PISE 3400 A1 Operating and Safety Instructions, Translation of Original Operating Manual

Kohler
Kohler 4EOZ installation instructions

Coleman
Coleman Powermate PM0543002 Insert

ayerbe
ayerbe Energen PRO manual