Contec Bartell Super Screed User manual

SUPER SCREED
Rüttelbohle
Screed
Betriebsanleitung (Originalausgabe)
Instruction manual (Original edition)

Bedienungsanleitung / Manual SUPER SCREED - 2 -
© CONTEC
®
2016
CONTEC Maschinenbau & Entwicklungstechnik GmbH
Hauptstrasse 146, 57518 Alsdorf (Sieg) / Germany
Tel: +49 (0) 2741 9344-0 Fax: +49 (0) 2741 9344-29
Inhaltsverzeichnis / Index
1. Anwendungsbereich der Maschine / Machine applications ...3
2. Technische Daten / Technical data ...3
3. Sicherheitsregeln / Safety precautions ...4
4. Sicherheitsregeln während des Betriebs / Operating safety precautions ...5
5. Persönliche Schutzvorkehrungen / Personal protective equipment ...6
6. Wartung und Säubern / Maintenance and cleaning ...7
7. Inbetriebnahme / Operation ...8

Bedienungsanleitung / Manual SUPER SCREED - 3 -
© CONTEC
®
2016
CONTEC Maschinenbau & Entwicklungstechnik GmbH
Hauptstrasse 146, 57518 Alsdorf (Sieg) / Germany
Tel: +49 (0) 2741 9344-0 Fax: +49 (0) 2741 9344-29
1 Anwendungsbereich der
Maschine 1 Machine applications
Rüttelbohle für das höhengenaue Abziehen
und Verdichten von Betonen.
Screed for achieving a height accuracy and
compaction of green concrete surfaces.
2 Technische Daten
2 Technical data
Motor Honda
Leistung 5.5 PS
Gewicht kg
Arbeitsbreite 1.2 – 24 m
Schalleistungspegel L
ahv
*
Dauerschallpegel Leq *
beim Bediener
Vibration am Griff
<9.0 aw
Engine Type Honda
Power 5.5 hp
Weight kg
Working Width 1.2 – 24 m
Average acoustic power L
ahv
*
Average acoustic pressure Leq *
Acoustic pressure on operator Leq *
Vibration value on the handle
7.0 aw
* Messwerte / Data: According to 2000/14/EC

Bedienungsanleitung / Manual SUPER SCREED - 4 -
© CONTEC
®
2016
CONTEC Maschinenbau & Entwicklungstechnik GmbH
Hauptstrasse 146, 57518 Alsdorf (Sieg) / Germany
Tel: +49 (0) 2741 9344-0 Fax: +49 (0) 2741 9344-29
3 Sicherheitsregeln 3 Safety precautions
EXPLOSIONS-
GEFAHR
Arbeiten Sie niemals in einer
explosiven Atmosphäre, neben
explosionsfähigem Material oder in
nicht belüfteten Räumen, in den die
Abgase nicht entweichen können.
DANGER
EXPLOSION HAZARD
Never operate the machine in an
explosive atmosphere, near
combustible materials, or where
ventilation does not clear exhaust
fumes.
ACHTUNG VERBREN-
NUNGSGEFAHR
Berühren Sie niemals den Motor
oder Auspuff während er läuft oder
kurz nach dem Stopp. Es können
schwere Verbrennungen auftreten.
WARNING
BURN HAZARD
Never come into contact with the
engine or muffler when engine is
operating or shortly after it is turned
off. Serious burns may occur.
VORSICHT
ROTIERENDE TEILE
Berühren Sie niemals rotierende
Teile mit Händen oder Füßen.
Verletzungsgefahr.
CAUTION
ROTATING HAZARD
Never place hands or feet inside
safety guard rings. Serious injury
will result from contact with
rotating blades.
VORSICHT
QUETSCHGEFAHR
Stellen Sie vor der Inbetriebnahme
sicher, dass alle Sicherheits-
einrichtungen an ihrem Platz sind
und funktionieren.
CAUTION
MOVING PARTS
Before starting the machine, ensure
that all guards and safety devices
are in place and functioning
properly.
ACHTUNG
BEDIENUNGSANLEITU
NG LESEN
Lesen und verstehen Sie die
Bedienungsanleitung vor
Inbetriebnahme. Nichtbeachten der
Anleitung kann schwere
Verletzungen oder den Tod zur Folge
haben.
ATTENTION
READ OWNER’S
MANUAL
Read and understand owner’s
manual before using this machine.
Failure to follow operating
instructions could result in serious
injury or death.

Bedienungsanleitung / Manual SUPER SCREED - 5 -
© CONTEC
®
2016
CONTEC Maschinenbau & Entwicklungstechnik GmbH
Hauptstrasse 146, 57518 Alsdorf (Sieg) / Germany
Tel: +49 (0) 2741 9344-0 Fax: +49 (0) 2741 9344-29
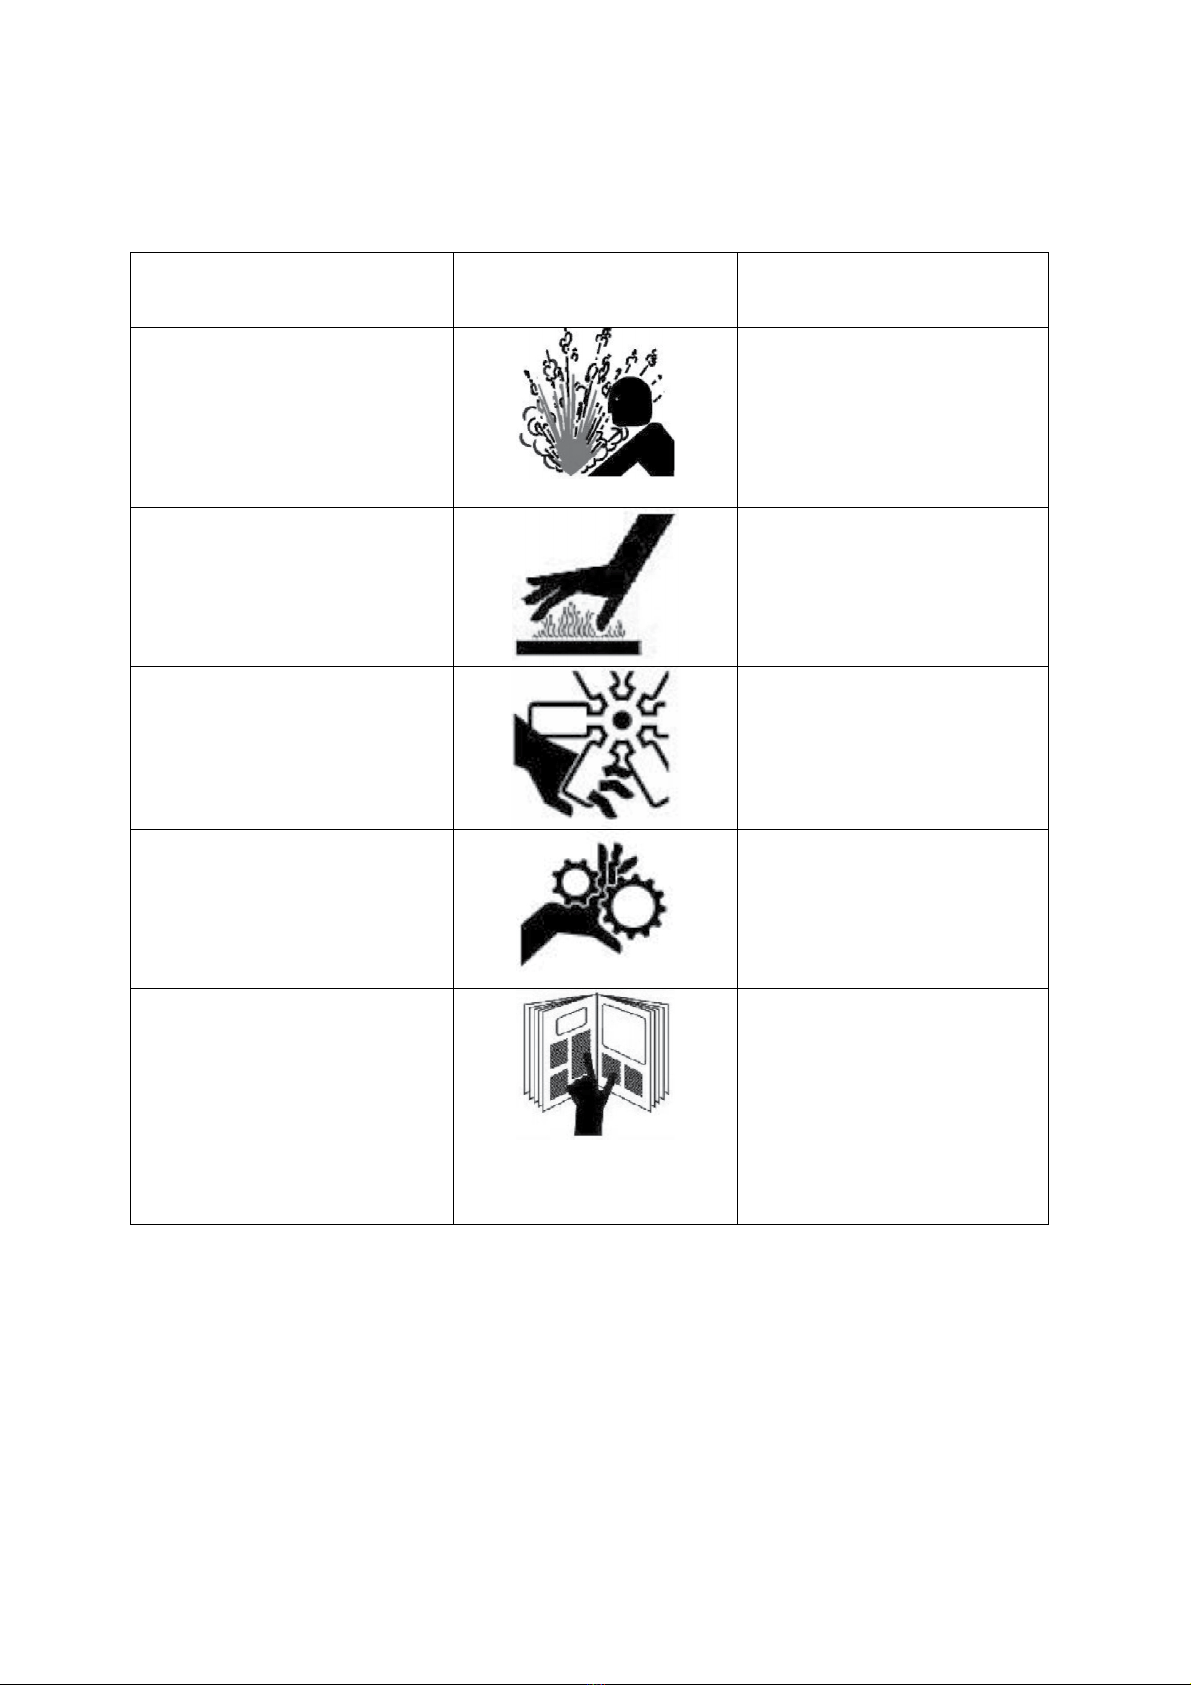
4 Sicherheitsregeln während des
Betriebs 4 Operating safety precautions
•
Vor Inbetriebnahme Bedienungsanleitung lesen.
•Halten Sie alle Schutzeinrichtungen in gutem
Zustand und an ihrem Platz.
•Halten Sie mit Händen, Füßen und Kleidung
Abstand zur Vibrationswelle, Riemen und
Kupplung.
•Halten Sie mit Händen, Füßen und Kleidung
Abstand von der Kabeltrommel und den
riemengetriebenen Hydraulikteilen der
Antriebsversion.
•Überprüfen Sie täglich die Schrauben der
Verbindungen der Vibrationswellen. Ggf.
austauschen.
•Setzen Sie sich niemals auf die Bohle.
•Die Bohle ist zum Abziehen von Beton
konstruiert, nicht zum Verteilen. Überschüssiger
Beton muss regelmäßig entfernt werden. Die
Köpfe der Schrauben entlang der Bohlenblätter
sollten immer sichtbar bleiben, ansonsten kann
die Bohle beschädigt werden.
•Der Motor sollte nur bei Vorwärtsbewegung der
Bohle laufen. Lassen Sie den Motor nie länger als
2 Minuten ohne Last laufen. Eine Beschädigung
der Kupplung wäre die Folge.
•Betreiben Sie niemals die Rüttelbohle,
angetrieben durch einen Verbrennungsmotor, in
schlecht belüfteten Räumen. Stellen Sie die
Belüftung sicher, um das Inhalieren von
Auspuffgasen zu vermeiden.
•Vermeiden Sie den Kontakt mit Elektrokabeln
oder Zündkerzen bei laufendem Motor.
Elektroschock.
•Überprüfen Sie den Tank und Benzinleitungen
auf Lecks bevor der Motor eingeschaltet wird.
•Tragen Sie Schutzkleidung beim Betrieb der
Bohle. Sicherheitsschuhe, Sicherheitsbrille,
Ohrschutz, Sicherheitshandschuhe und
Staubmaske werden dringend empfohlen.
•Tragen Sie Schutzhandschuhe und Schutzbrille
beim Befüllen des Tanks.
•Sorgen Sie für ausreichende Belüftung beim
Füllen des Tanks, damit gefährliche Gas
vermieden werden.
•Lassen Sie den Motor vor dem Befüllen des
Tanks abkühlen.
•Befüllen Sie den Tank nie in der Nähe von
brennenden Zigaretten, Schweißarbeiten etc.
•Vibrationen am Griff während des Betriebs sind
normal. Treffen Sie weitere vibrationsmindernde
Vorkehrungen. wie spezielle Handschuhe, falls
die Baustelle dieses vorschreibt.
•Vermeiden Sie immer Hautkontakt mit
Frischbeton.
•
Before operating this equipment, read all of the
manuals provided.
•Keep all guards and covers in good repair and
installed in the proper places.
•Keep hands, feet and loose clothing away from
the screed shaft, drive belt, and engine clutch.
•Keep hands, feet and loose clothing away from
the cable drums and the drive belt area of the
hydraulic self-propelled units.
•Check the shaft connections each day to make
sure that the bolts are secure. Replace any bolts
that look worn!
•Do not sit on the screed as this could cause
deflection or possibly damage the unit.
•The screed is designed to finish off concrete NOT
to grade it! Keep excess concrete away from the
screed blades during the placing operation.
Excessive amounts of concrete could cause
deflection or damage to the screed. Concrete
should be low enough so that the top of the bolts
along the screed blades can be seen.
•Engine should be shut down whenever forward
movement of the screed is stopped. Do not allow
the engine to idle for more than 2 minutes as
damage to the clutch may occur.
•Do not use the Morrison Super-screed, fitted with
a gasoline engine, indoors or in poorly ventilated
areas. Ensure there is sufficient ventilation to
avoid inhaling exhaust gasses, as they may be
harmful.
•Avoid touching the electrical cables or spark plug
cap while the engine is running to avoid electric
shock.
•Check the fuel tank and lines for leaks before
starting engine.
•Wear appropriate personal protective equipment
while operating the Morrison Super-screed.
Protective footwear, safety glasses, hearing
protection, padded gloves, and a dust mask are
highly recommended.
•Wear work gloves and safety glasses while
refueling the Morrison Super-screed.
•Ensure sufficient ventilation during refueling to
avoid a build-up of dangerous fumes.
•Refuel the Morrison Super-screed only after the
engine has cooled after use.
•Avoid smoking or open ignition sources such as
furnaces, welders or torches during refueling.
•Some vibration in the control handles during
operation is normal. Take appropriate measures
dictated by your workplace regulations to
minimize health effects of vibration exposure.
•Always avoid skin contact with fresh concrete.

Bedienungsanleitung / Manual SUPER SCREED - 6 -
© CONTEC
®
2016
CONTEC Maschinenbau & Entwicklungstechnik GmbH
Hauptstrasse 146, 57518 Alsdorf (Sieg) / Germany
Tel: +49 (0) 2741 9344-0 Fax: +49 (0) 2741 9344-29
5 Persönliche Schutzvorkehrungen /
5 Personal Protective Equipment (PPE)
Gehörschutz
Tragen Sie Ohrenstöpsel oder
einen Gehörschutz
Hearing Protection
Wear earplugs or ear muffs to
protect hearing from potentially
damaging noise levels
Augenschutz
Tragen Sie eine Schutzbrille, um
Ihre Augen vor Staub und
umherfliegenden Objekten zu
schützen
Eye Protection
Wear eye protection to protect
eyes from blowing dust,
splattering concrete, and other
foreign objects
Sicherheitsschuhe
Tragen Sie Sicherheitsschuhe,
um Ihre Füsse vor herabfallenden
Objekten, Quetschungen und
Schnitten zu schützen
Safety Footwear
Wear safety footwear to protect
feet from falling objects,
compression and punctures or
cuts from surrounding and below
Handschuhe
Tragen Sie Handschuhe, um Ihre
Haut vor Irritationen durch
Frischbeton oder Verletzungen
zu schützen
Hand Protection
Protect exposed skin surfaces
when working with fresh
concrete to avoid skin irritation
or chemical burns

Bedienungsanleitung / Manual SUPER SCREED - 7 -
© CONTEC
®
2016
CONTEC Maschinenbau & Entwicklungstechnik GmbH
Hauptstrasse 146, 57518 Alsdorf (Sieg) / Germany
Tel: +49 (0) 2741 9344-0 Fax: +49 (0) 2741 9344-29
6 Wartung und Säubern
6 Maintenance and cleaning
Vibrationsbohlen arbeiten naturgemäß unter
schweren Bedingungen. Eine sorgfältige Wartung
der Maschinen erhöht deren Einsatzdauer. Folgen
Sie daher den w.u. stehenden Wartungsregeln.
•Verwenden Sie nur von CONTEC gelieferte
Originalteile für Reparaturen. Ansonsten droht
das Erlöschen des Garantieanspruchs.
•Beachten Sie die Anleitung des Motorherstellers
beim Warten und Reinigen des Motors.
•Entfernen Sie täglich Beton, Staub und sonstige
Ablagerungen vom Blatt und Rahmenteilen. Bei
Nichtbeachten droht der Ausfall und
Leistungsverlust der Patsche.
•Das Blatt und der untere Maschinenteil können
mit Hilfe eines Hochdruckreinigers gereinigt
werden.
•Vermeiden Sie allerdings Spritzwasser am
Motor und Schalter.
•Reinigen Sie den Lüftungsstutzen des Motors
mit einem feuchten Lappen. Schmutz und
Betonreste vermindern die Kühlung des Motors
und können zum Ausfall führen.
•Überprüfen Sie die Rüttelbohle nach jedem
Einsatz auf Verschleiß und Schäden.
•Lagern Sie die das Gerät in einem sauberem,
trockenem und staubfreiem Raum.
Due to the nature and environment of use, the SUPER
SCREED is exposed to severe operating conditions.
Some general maintenance guidelines will extend the
useful life of your trowel.
•Always use genuine Bartell Morrison replacement
parts; use of foreign parts may void your warranty
and result in injury or damage to property.
•Refer to your engine manual for details of engine
cleaning, maintenance, and your engine’s
warranty coverage.
•Clean concrete, dust, and residue from the blade
and base unit daily. Failure to do so will result in
decreased performance and premature failure.
•The blade and lower base unit (i.e. below the
engine) can be cleaned with a water sprayer.
•Avoid getting water inside the engine housing or
into the on/off switch on the handle.
•Clean the engine ventilation openings using a
brush or damp cloth. Dirt, grease, or concrete
entering the ventilation openings will reduce
engine cooling, leading to premature engine wear
and failure. Refer to your engine manual for more
information.
•Inspect the Morrison Super-screed at the end of
each working day for signs of wear or damage.
•Store the Morrison Super-screed in a clean, dry,
and dust free place.

Bedienungsanleitung / Manual SUPER SCREED - 8 -
© CONTEC
®
2016
CONTEC Maschinenbau & Entwicklungstechnik GmbH
Hauptstrasse 146, 57518 Alsdorf (Sieg) / Germany
Tel: +49 (0) 2741 9344-0 Fax: +49 (0) 2741 9344-29
7 Zusammenbau und
Inbetriebnahme
7 Assembly and Operation
Auf den nächsten Seiten finden Sie eine Anleitung
für den Zusammenbau und die Bedienung der
Rüttelbohle. Folgen Sie der Anleitung sorgfältig um
Schaden an der Maschine und Leib und Leben
vorzubeugen!
Enfernen Sie das Verpackungsmaterial. Bei jedem
Segment befindet sich eine Tasche mit Einzelteilen.
Bringen Sie die Tasche an einen sicheren Ort.
Segmente werden immer auf der linken Seite der
Basiseinheit angebracht, beginnend mit der längsten,
endend mit der kürzesten. Die einzige Ausnahme
bildet die rechte Hydraulikeinheit für den Vorschub.
Drehen Sie die Kontermutter auf die obige
Gewindestange des rechten Segments.
Nehmen Sie sich die Langmutter mit Links- und
Rechtsgewinde zur Hand. Drehen Sie die Langmutter
ein bis eineinhalb Umdrehungen auf die
Gewindestange des rechten Segments.
Bringen Sie das anzubauende Segment in fluchtende
Position mit dem ersten Segment, so dass Sie die
Langmutter auf die Gewindestange des neuen
Segments drehen können. Beim Drehen ziehen sich
die zwei Segmente zueinander.
Bringen Sie die unteren Verbindungslöcher in
Übereinstimmung.
Bringen Sie die Schrauben mit einer Scheibe am
Kopf und einer Sicherungsscheibe an der Mutter an.
In the next few pages you will find the proper
procedures for assembly and operation of your
screed. Please read and follow these instructions
carefully to avoid damage to the screed or possible
injury due to improper assembly procedures!
Begin assembly of the screed sections by removing
the packing material. Remove the hardware bag
attached to each section carefully so that you do not
lose any of the hardware inside. NOTE: Sections
connect to the left-hand end of the base unit, as you
face the screed, starting with the longest section and
proceeding to the shortest one. The only exception
will be that the right-hand self-propelled unit will
bolt to the right-hand end of the base section.
Locate the 3/4" jam nut and install it onto the right -
hand threaded rod at the top of the screed.
The turnbuckle is the long octagon shaped piece with
a left-hand thread at one end and a right-hand thread
at the opposite end. Place it on the same right-hand
threaded rod as the jam nut, turning it only about one
to one and one half turns.
Position the section so that the turnbuckle is aligned
with the threaded rod at the top of the section you are
joining it with. As the turn-buckle is turned it will
begin to draw the two sections together.
Bring the connecting holes into alignment with each
other. A drift pin may be helpful here to align the
holes for the bolts.

Bedienungsanleitung / Manual SUPER SCREED - 9 -
© CONTEC
®
2016
CONTEC Maschinenbau & Entwicklungstechnik GmbH
Hauptstrasse 146, 57518 Alsdorf (Sieg) / Germany
Tel: +49 (0) 2741 9344-0 Fax: +49 (0) 2741 9344-29
Ziehen Sie alle vier Schrauben fest.
Verbinden Sie die Wellen mit den gelieferten Teilen.
Bei der Installation des hydraulischen Vorschubs
muss die Riemenscheibe auf der Welle mit der auf
der Pumpe fluchten. Falls dies nicht der Fall ist, lösen
Sie die Schrauben der Riemenscheibe auf der Welle
und verschieben Sie diese bis sie mit der Scheibe auf
der Pumpe fluchtet.
Stellen Sie sicher, dass sich der Wellenkeil komplett
unter der Riemenscheibe befindet, bevor Sie die
Schrauben anziehen.
BOHLE AUSRICHTEN
Nachdem alle Segmente der Rüttelbohle verschraubt
sind, setzen Sie beide Enden auf ein Kantholz oder
auf die Schalungsschienen.
Befestigen Sie ein Seil im Abstand von 2 bis 3 cm zu
den Glättprofilen und ziehen Sie es so stramm wie
möglich. Das Seil darf die Bohle nicht berühren und
muss frei beweglich sein.
Das Ziel ist es, die Glättprofile am Seil auszurichten.
Install the bolts with a flat washer from the outside of
the blades, and a lock washer on the inside. After
installing all four of the bolts, tighten them securely.
Align the shafts and connect them using the hardware
supplied.
When installing the self-propelled units, check the
alignment of the shaft pulley to the pump pulley. If
alignment is necessary, loosen the set screw, using
the Allen wrench provided, and slide the shaft pulley
so that it aligns with the pump pulley.
Make sure that the key in the pulley is under the
pulley completely before tightening the set screw.
ADJUSTING SCREED
Once the length of screed you need is assembled,
place a 2"x4" under each end, or set the screed onto
the forms you are using.
Fasten a string to the form and draw it as tightly as
possible about 1” off the back of the screed. Make
sure than the string is not in contact with the screed,
or any other object that could cause a variance.
Use a guide placed beneath the blades to determine

Bedienungsanleitung / Manual SUPER SCREED - 10 -
© CONTEC
®
2016
CONTEC Maschinenbau & Entwicklungstechnik GmbH
Hauptstrasse 146, 57518 Alsdorf (Sieg) / Germany
Tel: +49 (0) 2741 9344-0 Fax: +49 (0) 2741 9344-29
Das Ausrichten erfolgt durch Drehen der
Langmuttern zw. den oberen Profilen der Bohle.
Beginnen Sie das Ausrichten an den Seiten und
arbeiten Sie sich in die Mitte vor. Danach müssen die
Kontermuttern angezogen werden. Der Vorgang
muss mehrfach wiederholt werden, bevor die Bohle
gerade ist.
Zum Schluss müssen alle Kontermuttern fest
angezogen werden, um eine Verstellung während des
Betriebs zu verhindern.
Die Bohle kann Beton auch mit unterschiedlichen
Winkeln einbauen. Verdrehen Sie die Langmutter an
der Stelle, an der der Winkel verwirklicht werden
soll. Die Winkeländerung sollte nicht mehr als 2 cm
pro Meter Auswirkung haben. Nehmen Sie ggf. ein
Lineal zur Hilfe.
ACHTUNG: Kontermuttern wieder anziehen.
Beim Arbeiten mit hydraulischem Vorschub müssen
Sie die Trommelkupplung in horizontale Position
bringen, um das Seil abrollen zu können. Ziehen Sie
das Seil im 90° Winkel zur Bohle heraus und
befestigen Sie den Haken an einem Pfahl oder einer
entsprechend sicheren Verankerung. Drehen Sie die
Kupplung wieder in die Ausgangsposition.
Die Vorschubgeschwindigkeit kann am Nadelventil
unter dem Hydrauliköltank eingestellt werden. Im
Uhrzeigersinn erhöht, gegen den Uhrzeigersinn
vermindert die Geschwindigkeit.
INSTALLATION DER HANDWINDE
Im Folgenden wird die Installation der Handwinden
beschrieben.
where adjustment is needed. Begin adjusting the
turnbuckles along the top of the screed to align the
screed with the string. Adjust the screed from the
outside sections and work toward the center. Tighten
jam nuts. NOTE: This will probably take several
times to get a perfectly flat machine.
After adjustments are made tighten jam nut securely
so that vibration from the screed does not loosen it
allowing movement during placing of concrete.
The screed can place concrete in an invert situation of
up to 1/4” per foot. Simply locate a turnbuckle where
you need the invert and use a ruler and string line to
give you the proper measurement.
CAUTION: Remember to tighten the jam nut.
The screed can be used to place concrete in a
crowned situation of up to 1/4” per foot, such as
street paving. Simply follow the same procedure as in
the precious illustration. CAUTION: Remember to
tighten the jam nut securely after making
adjustments.
To operate the self-propelled units, rotate the drum
clutch to a horizontal position to disengage it from
the drum. Pull the cable out and attach the hook to a
stake or other secure object, in line with the cable
drum. Return clutch to the original position.
The speed of travel can be adjusted by turning the
needle valve located near the hydraulic tank.
Clockwise rotation will increase travel speed, and
counterclockwise rotation will decrease travel speed.
INSTALLING HAND WINCH ASSEMBLY
The following instructions will provide complete
information for installing the hand winch assembly.

Bedienungsanleitung / Manual SUPER SCREED - 11 -
© CONTEC
®
2016
CONTEC Maschinenbau & Entwicklungstechnik GmbH
Hauptstrasse 146, 57518 Alsdorf (Sieg) / Germany
Tel: +49 (0) 2741 9344-0 Fax: +49 (0) 2741 9344-29
Entfernen Sie die zwei letzten Schrauben der Kappe
am linken und rechten Ende der Bohle.
Stecken Sie das Windenunterteil über die Kappe und
befestigen Sie dieses mit den mitgelieferten, längeren
Schrauben.
Entfernen Sie die beiden Schrauben (siehe Bild) am
vorderen Glättprofil.
Befestigen Sie den Seilrollenhalter mit den
gelieferten, längeren Schrauben am Profil.
Entfernen Sie am rückseitigen Glättprofil die
Schraube der Lagerhalterung. (sieh Bild)
Mitgeliefert wurde eine kurze und eine lange Strebe.
Schrauben Sie diese am gedrehten Ende der langen
Strebe zusammen.
Schrauben Sie die Strebe an das rückseitige
Glättprofil und den Haltewinkel.
Schieben Sie die Kurbel auf die Welle und sichern
Sie dies mit der Sicherungsmutter. Damit ist die
Installation komplett.
INSTALLATION DES ENDGIEBELS
Begin installation by removing the last two bolts
from the front and rear at one end of the camber top
from the section of screed that you will be using.
Place the winch, crank lever out, onto the camber top.
Replace the bolts with the longer ones supplied.
On the front blade of the screed, remove the bolts
from the angle brace and the cast bearing housing and
install the cable pulley bracket, as shown.
Connect the block pulley bracket to the front blade of
the screed. Replace the bolts with the longer ones
supplied.
On the rear blade of the screed, remove the bolt from
the cast bearing housing nearest the end of the screed.
In the package there is a long brace and a short one.
These two bolt together at the twisted end of the long
one.
Bolt the brace to the rear of the screed blade and the
angle bracket using hardware provided.
Place the crank handle onto the rod and tighten
securely using the locking nut provided. The
installation is now complete!
INSTALLING END ADAPTOR ASSEMBLY

Bedienungsanleitung / Manual SUPER SCREED - 12 -
© CONTEC
®
2016
CONTEC Maschinenbau & Entwicklungstechnik GmbH
Hauptstrasse 146, 57518 Alsdorf (Sieg) / Germany
Tel: +49 (0) 2741 9344-0 Fax: +49 (0) 2741 9344-29
Beginnen Sie die Montage mit dem Aufschrauben der
Kontermutter auf die Gewindestangen am jeweiligen
Ende der Bohle. Die Gewindestangen haben Rechts-
oder Linksgewinde, je nachdem auf welcher Seite Sie
sich befinden. Beide Arten der Kontermuttern sind
im Lieferumfang.
Schieben Sie die U-Halterung wie abgebildet auf das
Ende der Bohle.
Verschrauben Sie die Unterteile mit den
Glättprofilen.
Befestigen Sie mit der zweiten Kontermutter das
Oberteil an der Gewindestange. Überprüfen Sie die
vertikale Ausrichtung bevor Sie die Kontermuttern
anziehen.
Schieben Sie die Griffgummis auf das Griffrohr.
Verschrauben Sie die Griffe mit den
Griffhalterungen.
Verschrauben Sie die Gleitkufe auf gewünschter
Höhe mit dem Endgiebel.
Starten des Motors – WARME UMGEBUNG:
Öffnen Sie den Benzinhahn. Stellen Sie den Gashebel
Begin installation of the end adaptor assembly by
placing the proper jam nut onto the threaded rod at
the end of the screed. The threaded rod will be left
hand or right-hand threads, depending on which end
of the screed you are working. Both types of nuts are
provided in the kit.
Slip the upright into position on the threaded rod and
the upright angles on the inside of the screed blades.
Bolt the upright angles into position using the holes
nearest the end of the screed blades.
Place a second jam nut on the outer side of the
upright. Check to be certain that the upright is
vertical before tightening the jam nuts.
Install the rubber grips onto the end adaptor handles,
make certain that the grip section is turned properly.
Position the handle into the brackets and bolt
securely.
The last step in the end adaptor installation is to
position the skid plate at the height that is needed and
bolt into position.
Starting Procedure - WARM TEMPERATURES:
Open fuel valve on gas tank. Set throttle lever to

Bedienungsanleitung / Manual SUPER SCREED - 13 -
© CONTEC
®
2016
CONTEC Maschinenbau & Entwicklungstechnik GmbH
Hauptstrasse 146, 57518 Alsdorf (Sieg) / Germany
Tel: +49 (0) 2741 9344-0 Fax: +49 (0) 2741 9344-29
in die „Fast“ Position. Stellen Sie den Kaltstarthebel
in die „Closed“ Position. Starten Sie den Motor.
Bringen Sie den Kaltstarthebel langsam in die
„Open“ oder „Run“ Position. Schieben Sie den
Gashebel auf Maximum. (3600 U/min).
Starten des Motors – KALTE UMGEBUNG:
Wie oben aber mit längerer Warmlaufphase (3 bis 5
Minuten). Bei kaltem Wetter dauert es länger, bis das
Motoröl auf Betriebstemperatur ist.
Motor abschalten:
1. Nehmen Sie Gas weg und warten Sie einige
Sekunden.
2. Schalten Sie den Motor ab.
“Fast” idle position, set choke to closed position, start
engine. Open choke slightly to prevent flooding.
Move to “Open” or “Run” position when engine is
warm, increase throttle to maximum operation
position (3600 rpm).
Starting Procedures- COLD TEMPERATURES:
Follow same procedure as above but allow for a
longer warm up period 3-5 min. (In cold weather oil
is much heavier to move. Extra time is required to
heat the oil.)
Stopping Procedure:
1. Throttle engine down.
2. Depress or turn off stop switch.
Table of contents
Other Contec Construction Equipment manuals
Popular Construction Equipment manuals by other brands

Ashland Earthmovers
Ashland Earthmovers I-155-TS2 parts manual

RGC
RGC HS2000 instructions

Patron
Patron RP 504 Operator's manual

Atlas Copco
Atlas Copco HB Series Safety and operating instructions

Central Machinery
Central Machinery 62518 Owner's manual & safety instructions

Manitowoc
Manitowoc MLC300 Operator's manual

HYVA
HYVA Amco Veba 816N WARNING, OPERATING AND MAINTENANCE MANUAL

Protech Machinery
Protech Machinery P240T Operation manual

MetalTech
MetalTech I-CIS04 OPERATIONAL SAFETY AND ASSEMBLY INSTRUCTIONS

Milwaukee
Milwaukee MXF PSC Original instructions

Graco
Graco 231-133 B Instructions-parts list

HYVA
HYVA Amco Veba 825 WARNING, OPERATING AND MAINTENANCE MANUAL