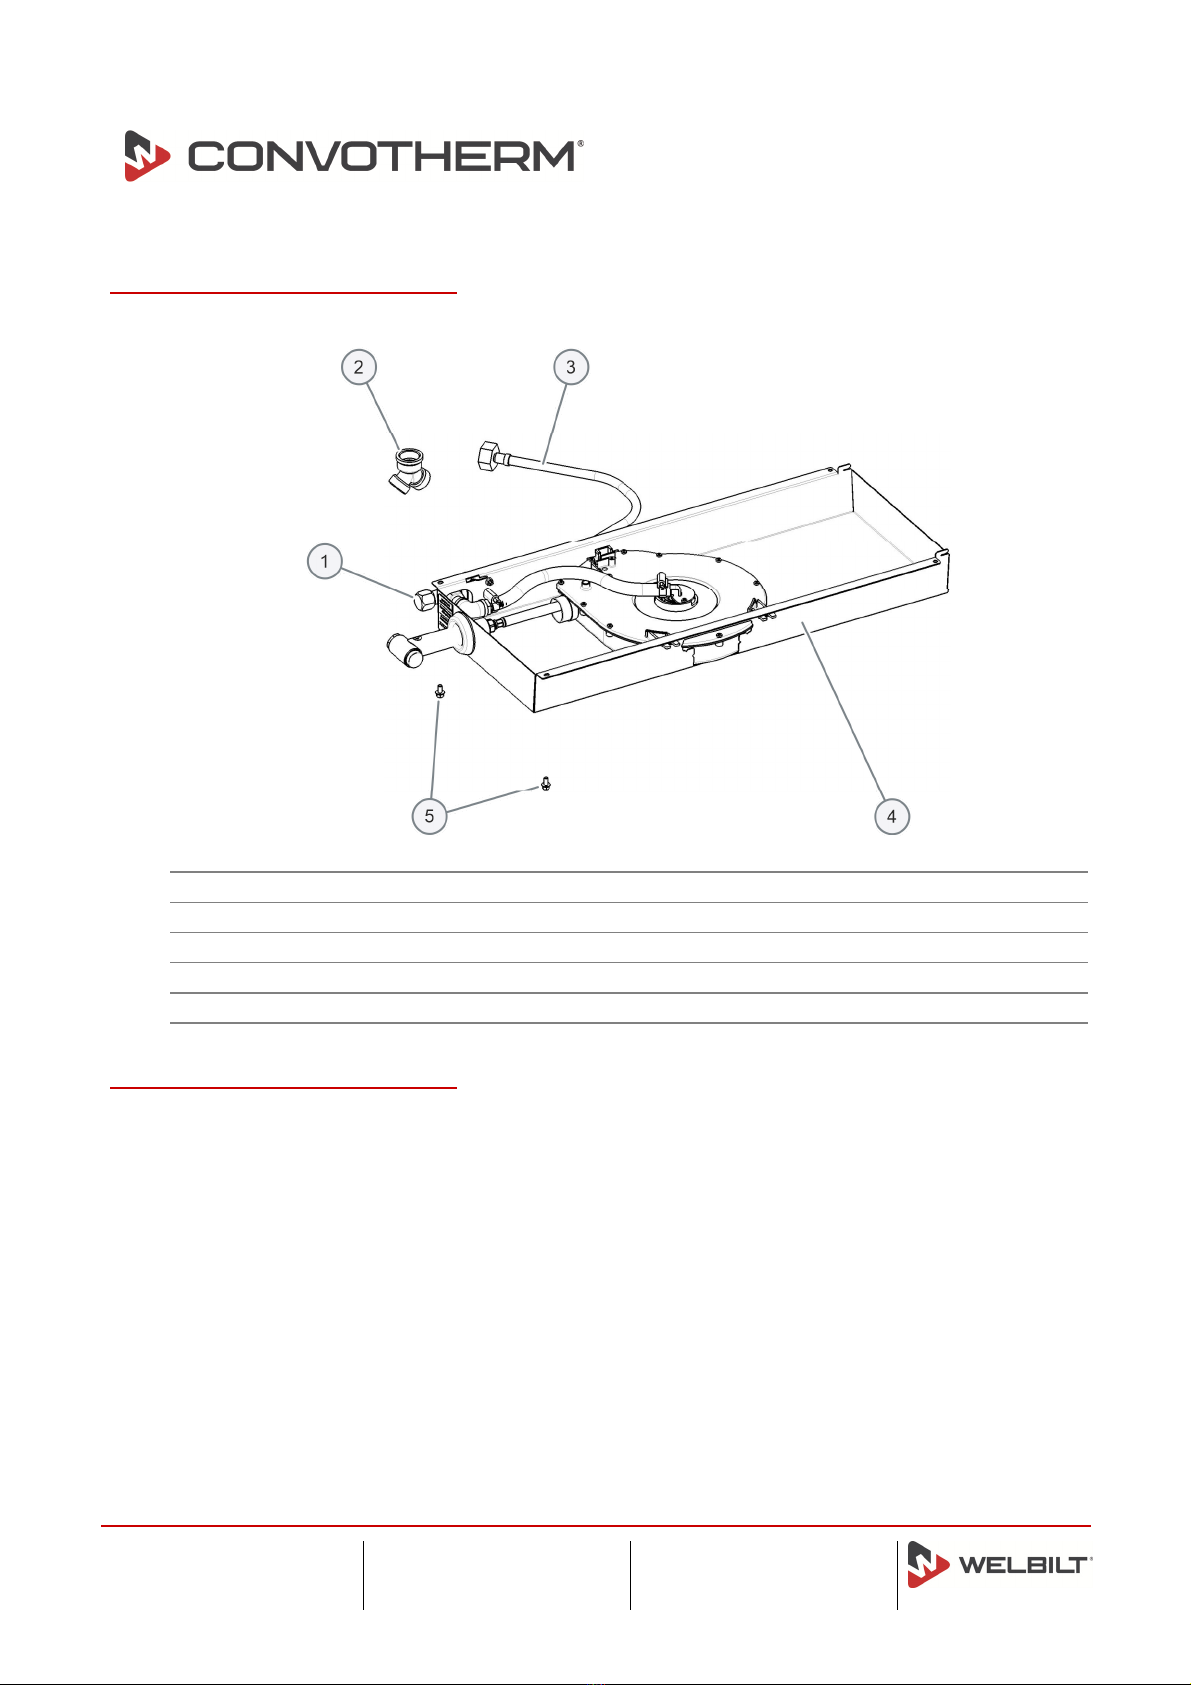
Convotherm Maxx User manual

Montageanleitung
Rollhandbrause
Convotherm maxx
Convotherm Elektrogeräte GmbH
Talstraße 35, 82436 Eglfing, Germany
T +49(0)88 47 67-0
F +49(0)88 47 414
www.convotherm.com
1/6
Art.Nr. / Part no 6267981_00 version deu, eng 10/20 Änderungen vorbehalten! changes excepted!
© 2020 Welbilt soweit ncht anders angegeben. Alle Rechte vorbehalten. / © 2020 Welbilt except where explicitly stated otherwise. All rights reserved.
Montageanleitung – Rollhandbrause Cronvotherm maxx
Allgemeines
Diese Anleitung richtet sich ausschließlich an einen geschulten Installateur und an einen autorisier-
ten Kundendienst.
Informieren Sie den Kunden über wichtige funktions- und sicherheitsrelevante Punkte.
Bestimmungsgemäße Verwendung
Die Rollhandbrause für Convotherm maxx darf nur entsprechend der nachfolgend beschriebenen
Verwendung benutzt werden:
Die Rollhandbrause für Convotherm maxx ist ausschließlich dafür konzipiert und gebaut, um die
Kombidämpfer Cmx 6.10 oder Cmx 10.10 mit einer Rollhandbrause auszustatten.
Verwendungseinschränkung
FolgendeVerwendungseinschränkung ist zu beachten:
Die Rollhandbrause Convotherm maxx darf nur in einem Kombidämpfer Cmx 6.10 oder Cmx 10.10
montiert werden.
Weitere erforderliche Anleitungen
Diese Anleitung ist eine Ergänzung zur Bedienungs- und Installationsanleitung für das Stapelkit mini,
zum Bedienungs- und Installationshandbuch und zur Servicedokumentation Ihres Geräts und darf nur
zusammen mit diesen eingesetzt werden. Die technischen Daten, den Verwendungszweck, Aufbau
und Funktion sowie Informationen zur Sicherheit und zu den Gefahren im Küchen- und Installations-
umfeld entnehmen Sie bitte den Handbüchern.
Scharfkantige Blechteile
Gefahr einer Schnittverletzung durch scharfkantige Blechteile
Arbeiten mit oder hinter scharfkantigen Blechteilen kann zu Schnittverletzungen an den Händen
führen.
Lassen Sie Vorsicht walten.
Tragen Sie die persönliche Schutzausrüstung.
Benötigtes Werkzeug
Gabelschlüssel oder Ratsche (SW8)

Montageanleitung
Rollhandbrause
Convotherm maxx
Convotherm Elektrogeräte GmbH
Talstraße 35, 82436 Eglfing, Germany
T +49(0)88 47 67-0
F +49(0)88 47 414
www.convotherm.com
2/6
Art.Nr. / Part no 6267981_00 version deu, eng 10/20 Änderungen vorbehalten! changes excepted!
© 2020 Welbilt soweit ncht anders angegeben. Alle Rechte vorbehalten. / © 2020 Welbilt except where explicitly stated otherwise. All rights reserved.
Teile der Rollhandbrause
Die folgende Abbildung zeigt den Aufbau und die Teile der Rollhandbrause Convotherm maxx:
Pos. Bezeichnung Menge
1 Eckventil 1/2x1/2"r 1
2 Doppelschlauchanschluss 3/4" chrom 1
3 Wasseranschlussschlauch G1/2"-G3/4" 700mm 1
4 Gehäuse Rollhandbrause mit 2 Montagehaken im hinteren Teil 1
5 Sperrzahnschraube M5x10 A2 2
Voraussetzungen
Kontrollieren Sie, ob folgende Voraussetzungen erfüllt sind:
Das Gerät wurde von der Stromversorgung getrennt.
Das Gerät wurde von der Wasserversorgung getrennt.
Das Gerät ist kalt.
Die Teile der Rollhandbrause Convotherm maxx sind ausgepackt und die Vollständigkeit des In-
halts wurde überprüft.
Die Schutzfolien der Rollhandbrause Convotherm maxx wurden entfernt.

Montageanleitung
Rollhandbrause
Convotherm maxx
Convotherm Elektrogeräte GmbH
Talstraße 35, 82436 Eglfing, Germany
T +49(0)88 47 67-0
F +49(0)88 47 414
www.convotherm.com
3/6
Art.Nr. / Part no 6267981_00 version deu, eng 10/20 Änderungen vorbehalten! changes excepted!
© 2020 Welbilt soweit ncht anders angegeben. Alle Rechte vorbehalten. / © 2020 Welbilt except where explicitly stated otherwise. All rights reserved.
Rollhandbrause Convotherm maxx montieren
1.
Brechen Sie vor der Montage der Rollhandbrause die perforier-
te Öffnung am Geräteboden heraus.
2.
Haken Sie den hinteren Teil des Gehäuses der Rollhandbrause
in die beiden Öffnungen im Geräteboden ein.
3.
Befestigen Sie das Gehäuse der Rollhandbrause mit den
beiden beiliegenden Sperrzahnschrauben M5x10 A2 am Gerä-
teboden.
Hinweis: Das Eckventil muss bei unbeaufsichtigtem Betrieb
und nach Gebrauch der Rollhandbrause immer geschlossen
sein.
4. Schließen Sie die Rollhandbrause an der Wasserversorgung
an.
5.
Stellen Sie Wasserversorgung, Abwasserentsorgung und
Stromversorgung wieder her und überprüfen Sie alle Ver-
schraubungen auf Wasserdichtigkeit.
6. Nehmen Sie das Gerät in Betrieb und führen Sie einen Funkti-
onstest durch.

Installation instructions
Recoil hand shower
Convotherm maxx
Convotherm Elektrogeräte GmbH
Talstraße 35, 82436 Eglfing, Germany
T +49(0)88 47 67-0
F +49(0)88 47 414
www.convotherm.com
4/6
Art.Nr. / Part no 6267981_00 version deu, eng 10/20 Änderungen vorbehalten! changes excepted!
© 2020 Welbilt soweit nicht anders angegeben. Alle Rechte vorbehalten. / © 2018 Welbilt except where explicitly stated otherwise. All rights reserved.
Installation instructions – Recoil hand shower Convotherm maxx
General information
These instructions are intended solely for a qualified installation engineer and an authorized cus-
tomer service engineer.
Inform the customer of important points relating to operation and safety.
Intended use
The recoil hand shower for the Convotherm maxx must be employed only for the intended use speci-
fied below:
The recoil hand shower for the Convotherm maxx is designed and built exclusively for the purpose
of equipping the Cmx 6.10 or Cmx 10.10 combi ovens with a recoil hand shower.
Restrictions on use
The following restriction on use must be observed:
The recoil hand shower for the Convotherm maxx must only be installed in a Cmx 6.10 or Cmx 10.10
combi oven.
Additional necessary instructions
These instructions are a supplement to the user manual and installation instructions for the mini stack-
ing kit, to the user manual and installation instructions and the servicing documentation for your appli-
ance and must only be used in conjunction with these documents. Please refer to the manuals for
technical data, the intended use, design and operation as well as safety information concerning haz-
ards in the kitchen and installation environment.
Sharp-edged sheet-metal parts
Risk of cuts from sharp-edged sheet-metal parts
Working with or behind sharp-edged sheet-metal parts may result in cuts to hands.
Exercise caution.
Wear personal protective equipment.
Tools required
8 mm open-ended spanner or ratchet spanner

Installation instructions
Recoil hand shower
Convotherm maxx
Convotherm Elektrogeräte GmbH
Talstraße 35, 82436 Eglfing, Germany
T +49(0)88 47 67-0
F +49(0)88 47 414
www.convotherm.com
5/6
Art.Nr. / Part no 6267981_00 version deu, eng 10/20 Änderungen vorbehalten! changes excepted!
© 2020 Welbilt soweit nicht anders angegeben. Alle Rechte vorbehalten. / © 2018 Welbilt except where explicitly stated otherwise. All rights reserved.
Parts of the recoil hand shower
The following figure shows the construction and parts of the Convotherm maxx recoil hand shower:
Item Name Quantity
1 Angle valve 1/2x1/2"r 1
2 Double hose connector 3/4” chrome 1
3 Water connection hose G1/2"-G3/4" 700 mm 1
4 Recoil hand shower housing with 2 mounting hooks in the rear section 1
5 Self-locking screw M5x10 A2 2
Requirements
Check that the following requirements have been met:
The appliance has been disconnected from the power supply.
The appliance has been disconnected from the water supply.
The appliance is cool.
The parts of the Convotherm maxx recoil hand shower have been removed from the packaging and
the contents checked for completeness.
The protective films on the Convotherm maxx recoil hand shower have been removed.

Installation instructions
Recoil hand shower
Convotherm maxx
Convotherm Elektrogeräte GmbH
Talstraße 35, 82436 Eglfing, Germany
T +49(0)88 47 67-0
F +49(0)88 47 414
www.convotherm.com
6/6
Art.Nr. / Part no 6267981_00 version deu, eng 10/20 Änderungen vorbehalten! changes excepted!
© 2020 Welbilt soweit nicht anders angegeben. Alle Rechte vorbehalten. / © 2018 Welbilt except where explicitly stated otherwise. All rights reserved.
Installing the Convotherm maxx recoil hand shower
1.
Before installing the recoil hand shower, break out the perforat-
ed opening in the bottom of the appliance.
2.
Hook the rear section of the recoil hand shower housing into
the two openings in the bottom of the appliance.
3.
Secure the recoil hand shower housing to the bottom of the
appliance with the two M5x10 A2 self-locking screws included
in delivery.
Please note: The angle valve must always be closed during
unattended operation and after use of the recoil hand shower.
4. Connect the recoil hand shower to the water supply.
5.
Reconnect the water supply, wastewater disposal system and
the power supply and check all screw connections for water-
tightness.
6. Put the appliance back into service and run a functional test.
Table of contents
Languages:
Popular Bathroom Fixture manuals by other brands

Hans Grohe
Hans Grohe Montreux 16320 Series Instructions for use/assembly instructions

Glacier bay
Glacier bay ARAGON HD67090W-6B10H Installation and care guide

Glacier bay
Glacier bay HD67140W-6101 Installation and care guide

Hans Grohe
Hans Grohe Croma Classic 100 28539 Series Assembly

OVE
OVE PASADENA PA0603400 installation manual

KEUCO
KEUCO Edition 400 21533 171351 Instructions for use