Cooper Notification Wheelock Eluxa ELSTC-B User manual

INSTALLATION INSTRUCTIONS
WHEELOCK ELUXA STROBE,
WITH PRE
-WIRE/PRE-TEST
CEILING MOUNT (
BLUE LENS)
273 Branchport Ave.
Long Branch, N.J. 07740
(800) 631-
2148
Eaton.com/Lifesafetynotification
PN P85756-002D Copyright 2022 Cooper Wheelock, Inc. dba Cooper Notification Page 1
aUse this product according to this instruction manual. Please keep this instruction manual for future reference.
GENERAL:
The Wheelock Eluxa ELSTC-B multi-candela strobes are designed for easy installation with a pre-wire capable mounting plate. All models
are for 24V operation. ELSTC-B is designed for ceiling mounting only.
The Wheelock Eluxa Series meets NFPA 2016 20 millisecond light pulse duration code requirements. In addition, the Wheelock Eluxa and
LED3 product lines have been UL/ULC listed as compatible with all Fire Alarm Control Panels (FACP) and accessories that have been
determined to be compatible with Wheelock model RSS Strobe based products including the RSS, CH, E, EH, ET,ST, HS, MT, S8, SA,
STH and Z Series. The maximum number of Eluxa devices per NAC is determined by dividing the maximum current rating of the FACP
NAC by the total current rating of one Eluxa device, with a maximum of 105 Eluxa (or LED3) devices per NAC. Refer to FACP installation
instructions for more detail. The Wheelock Eluxa Series and Exceder LED3 Series strobes may be installed in the same notification zone
and field of view with any RSS Strobe based product.
Wheelock Eluxa Strobes can provide a non-synchronized strobe appliance when connected directly to a Fire Alarm Control Panel (FACP),
or provide a synchronized strobe appliance when used in conjunction with an FACP that incorporates the Cooper Wheelock sync protocol,
a Dual Sync Module (DSM), or the Wheelock Power Supply.
CAUTION: Do not change factory applied finishes. “DO NOT PAINT”.
ATTENTION: Ne pas modifiez les finitions appliquées en usine. “NE PAS PEINTURER”
IMPORTANT: PLEASE READ THESE INSTRUCTIONS CAREFULLY. FAILURE TO COMPLY WITH ANY OF THE FOLLOWING
INSTRUCTIONS COULD RESULT IN IMPROPER APPLICATION, INSTALLATION AND/OR OPERATION OF THESE PRODUCTS IN
AN EMERGENCY SITUATION, WHICH COULD RESULT IN PROPERTY DAMAGE AND SERIOUS INJURY OR DEATH TO YOU
AND/OR OTHERS.
SPECIFICATIONS:
Table 1: Specifications
Models ELSTC-B (Strobe with Blue Lens)
Agency UL1638, UL1971, CAN/ULC-S526-16
Input Voltage
DC or FWR, 24V Regulated. 16 to 33V (All models)
Strobe Candela 5, 12, 30, 40, 50, 65cd (field selectable)
NAC Characteristics Max. line resistance: 35Ω
Environmental
Indoor Use
Only. 0°C
-
50°C (32°F
-
122°F) 93% R.H.
*UL1638 is an on axis rating where the following applies: effective candela rating per UL1971.
Table 2: ELSTC-B Strobe Current Ratings (AMPS)
Regulated 24DC (16-33VDC) Regulated 24FWR (16-33VRMS)
Candela Setting 5cd 12cd 30cd 40cd 50cd 65cd
DC
0.022
0.030
0.060
0.086
0.125
0.185
FWR
0.036
0.050
0.092
0.142
0.196
0.274
When calculating the total strobe current: Use Table 2 to determine the highest value of “RMS Current” for an individual appliance, then
multiply these values by the total number of appliances; be sure to add the currents for any other appliances powered by the same source
and include any required safety factors.
Make sure that the total RMS current required required by all appliances that are connected to the system’s PRIMARY and SECONDARY
power sources, NAC circuits, DSM Sync Modules or Cooper Wheelock Power Supplies does not exceed the power sources’ rated capacity
or the current ratings of any fuses on the circuits to which these appliances are wired.
Check the minimum and maximum output of the power supply and standby battery, and subtract the voltage drop from the circuit wiring
resistance to determine the applied voltage to the appliance.
WIRING DIAGRAMS:
Figure 1: ELSTC-B
+
-
FROM PRECEDING APPLIANCE
FACP, POWER SUPPLY
OR SYNC MODULE
TO NEXT
OR E.O.L.R.
APPLIANCE
+
-
*Refer to Dual Sync Module instruction sheets DSM (P83177) or Wheelock’s Power Supplies for additional information.
Figure 2:
1. This model has in-out wiring terminals that accept #12 to #18 American Wire Gauge (AWG) wires
at each screw terminal. Strip leads 3/8 inches and connect to screw terminals.
2. Break all in-out wire runs on supervised circuits to assure integrity of circuit supervision as shown
in Figure 2. The polarity shown in the wiring diagrams is for operation of the appliances. The polarity
is reversed by the FACP during supervision.
NOTES:
1. Strobe settings will determine the current draw of the product.
2. The strobe will produce 1 flash per second over the "Regulated Voltage" range.
3. Strobe is not designed to be used on coded systems in which the applied voltage is cycled on and off.
4. The maximum number of Eluxa (or LED3) strobes on a single notification appliance circuit shall not exceed 105.
5. Blue strobes are not to be used as a Visual Public Mode alarm notification appliance.
6. These appliances are UL Listed as “Regulated”. They are intended to be used with FACPs whose notification circuits are UL Listed
as “Regulated.” Refer to the FACP instructions or the Wheelock Strobe Compatibility Data Sheet (P85328) for special application
and strobe synchronization compatibility.
7. These appliances were tested to the regulated voltage limits of 16.0-33.0 Volts. Do not apply voltage outside of this range. Check
the minimum and maximum output of the power supply and standby battery and subtract the voltage drop from the circuit wiring
resistance to determine the applied voltage to the strobes. The max wire impedance between strobes shall not exceed 35 ohms.
8. Make sure that the total RMS current required by all appliances that are connected to the system’s primary and secondary power
sources, notification appliance circuits, DSM sync modules, or Cooper Wheelock power supplies does not exceed the power sources
rated capacity or the current ratings of any fuses on the circuits to which these appliances are wired.
9. The effect of shipping and storage temperatures shall not adversely affect the performance of the appliance when it is stored in the
original cartons and not subjected to misuse or abuse.

PN P85756-002D Page 2
SETTINGS: To set candela, slide the selector switch to the desired setting. See Figure 3.
Figure 3: Settings (Set from rear)
Factory Setting is 5cd.
Figure 4: Strobe Light Distribution
Strobe device has only one mounting orientation. LED light element should be oriented toward the floor
NFPA 72/ANSI 117.1 provide means for determining equivalent illumination using fewer, higher intensity strobes within the same area.
Figure 5: Grille Removal ** Figure 6: Surface BackBox LSPKBB-C
(1)PRESSIN
(2)PULL
INSERT SCREW DRIVER INTO SLOT,
(1) PUSH IN TO RELEASE SNAP, AND
(2) PULL TO REMOVE THE GRILLE
BREAK OFF TABS
FOR 3/4" CONDUIT
METAL STRAP
SUFACE
BACKBOX
WOOD
SCREWS (2)
INSERT
MOUNTING
TABS (2)
** Grille removal: 1) Insert Screwdriver into slot, and push to release snap. 2) Remove the grille.
Check the installation instructions of the manufacturers of other equipment used in the system for any guidelines or restrictions on wiring
and/or locating Notification Appliance Circuits (NAC) and notification appliances. Some system communication circuits and/or audio circuits,
for example, may require special precautions to assure immunity from electrical noise (e.g. audio crosstalk).
This equipment has been tested and found to comply with the limits for a Class A digital device, pursuant to part 15 of the FCC Rules.
These limits are designed to provide reasonable protection against harmful interference when the equipment is operated in a commercial
environment. This equipment generates, uses, and can radiate radio frequency energy and, if not installed and used in accordance with
the instruction manual, may cause harmful interference to radio communications. Operation of this equipment in a residential area is likely
to cause harmful interference in which case the user will be required to correct the interference at his own expense.
This Class A digital apparatus meets all requirements of the Canadian Interference-Causing Equipment Regulations. Cet appareil
numérique de la classe A respecte toutes les exigences du Réglement sur le matériel brouilleur du Canada.
MOUNTING OPTIONS:
The following figures (A thru C) show the maximum number of field wires (conductors) that can enter the backbox used with each mounting
option. If these limits are exceeded, there may be insufficient space in the backbox to accommodate the field wires and stresses from the
wires could damage the product.
Check that the installed product will have sufficient clearance and wiring room prior to installing backboxes and conduit, especially if
sheathed multiconductor cable or 3/4" conduit fittings are used.
Figure A: Flush Mount (4”SQ Box) Figure B: Surface Mount (LSPKBB-C)
(2)#8-32 SCREW
#8 THREAD CUTTING SCREW (2)
Maximum Number of Conductors
AWG #18 #16 #14 #12
4 4 4 4
Maximum Number of Conductors
AWG #18 #16 #14 #12
4 4 4 4
Figure C: Flush Mount (Octal box)
Figure D: Flush Mount (SG box)
(2)#8-32 SCREW
(2)#6-32 SCREW
Maximum Number of Conductors
AWG #18 #16 #14 #12
4 4 4 4
Maximum Number of Conductors
AWG #18 #16 #14 #12
4 4 4 4
All installations shall be in accordance with:
1) In the United States, the National Electrical Code, NFPA 70, and the National Fire Alarm and Signaling Code, NFPA 72.
2) In Canada, CSA C22.1, Canadian Electrical Code, Part I, Safety Standard for Electrical Installations, Section 32; and the Canadian
Standard for the Installation of Fire Alarm Systems - CAN/ULC-S524.
MOUNTING PROCEDURES:
1. Select a mounting option and install the backbox. Conduit entrances to the backbox should be selected to provide sufficient wiring
clearance for the installed product. Do not pass additional wires (used for other than the signaling appliance) through the backbox.
Such additional wires could result in insufficient wiring space for the signaling appliance.
2. Install the Mounting Plate on the backbox. Use 8-32 screws for 4” SQ or Octal; 6-32 screws for SG; or hi-lo screws for LSPKBB.
3. Pre-Wire: Connect field wires to terminals on mounting plate (reference Figure 1 and 2). Use care and proper techniques to position
the field wires in the backbox so that they use minimum space and produce minimum stress on the product. This is especially
important for stiff, heavy gauge wires and wires with thick insulation or sheathing. When terminating field wires, do not use more
lead length than required. Excess lead length could result in insufficient wiring space for the signaling appliance.
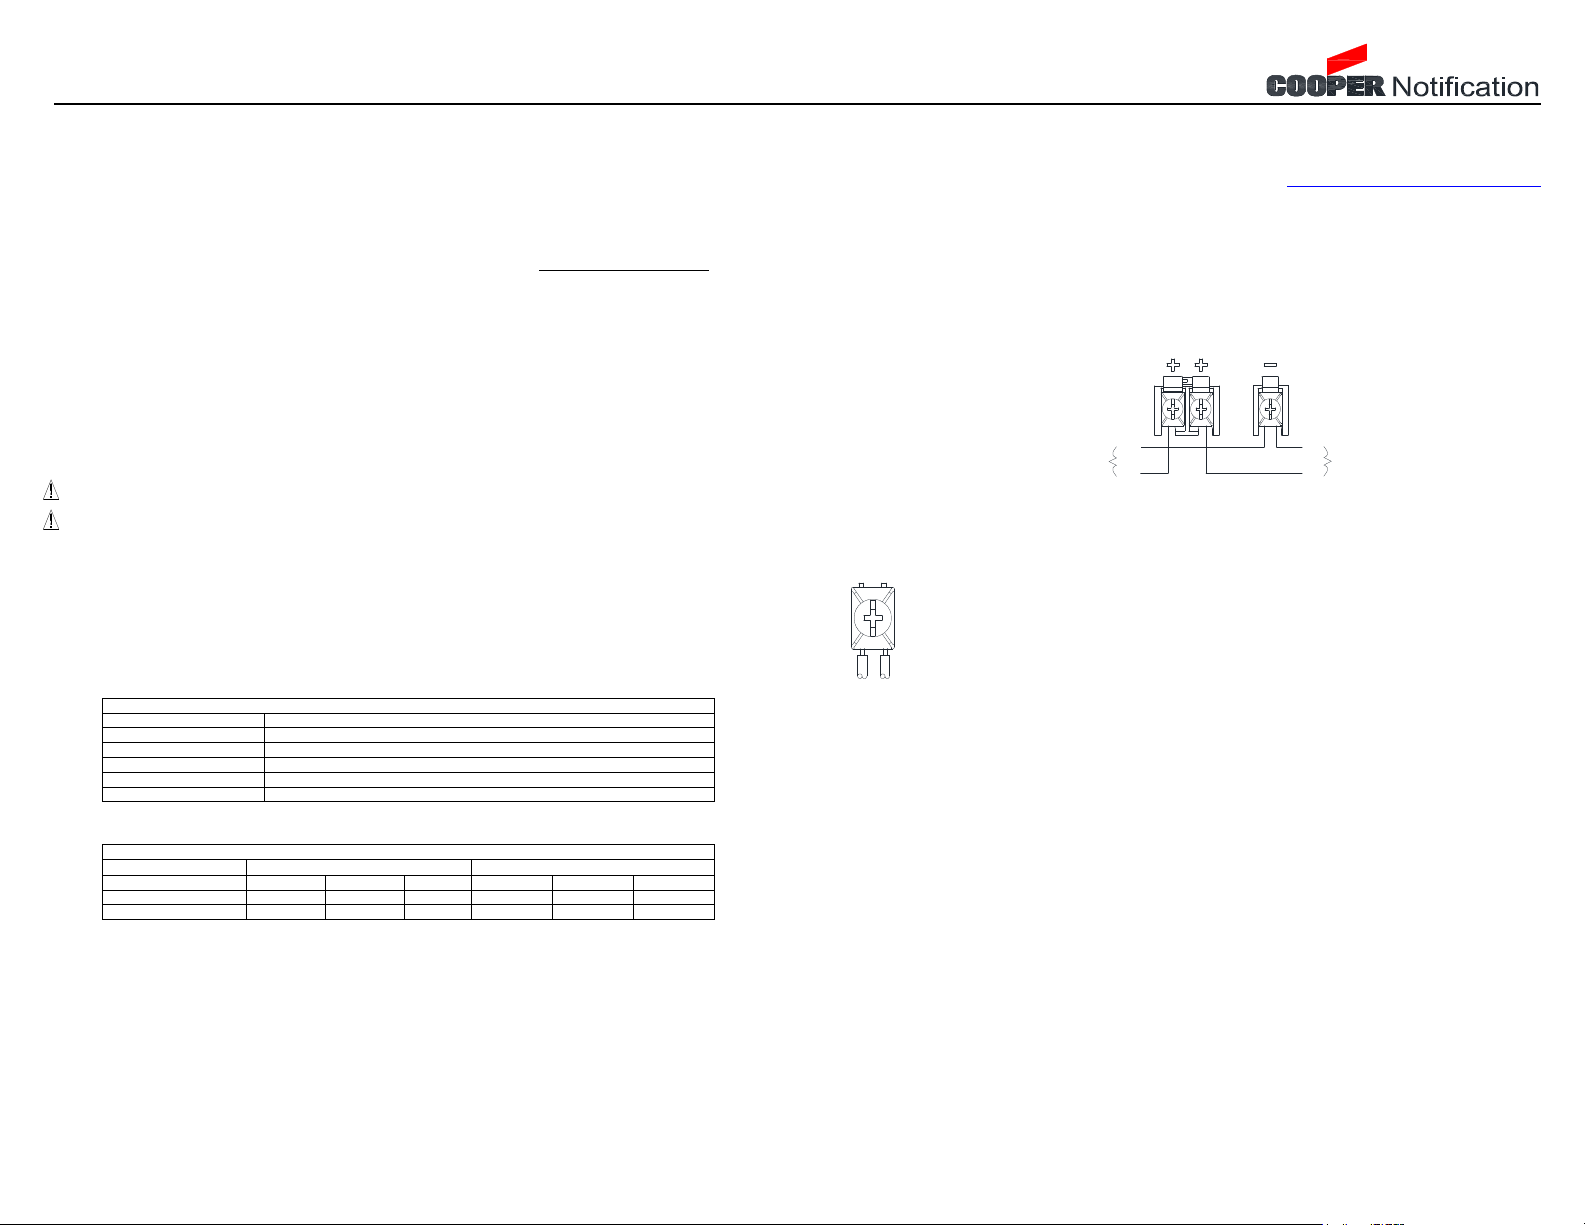
4. Pre-Test: Mounting Plate contains a SHUNT between adjacent “+” terminals to facilitate testing before device is attached.
Note: Shunt will open permanently when device is installed on mounting plate.
5. Verify appliance settings are correct for your application. Settings are shown in Fig. 3. Factory settings is 5cd.
6. Place the appliance over the mounting plate. Engage TOP hook on mounting plate, then secure with screw at the bottom. Use care
to prevent damage when driving the screw.
7. Align cover to the ELSTC-B appliance with strobe opening over LED lens. Then, snap the cover in place.
8. To remove the appliance, insert a small flat-bladed screwdriver into the bottom opening ½” as shown in Figure 5. Then remove grille.
9. Accessories: ELUXA Surface back box. LSPKBB-CR (Red); LSPKBB-CW (White).
Important: Do not fully back out terminal screws. Do not over tighten screws or terminals. Excessive torque may affect
operation. When using power tools, ensure the torque is set to the lowest setting available.
NOTE: Final acceptance is subject to Authorities Having Jurisdiction.
Any material extrapolated from this document or from Cooper Wheelock manuals or other documents describing the product for use in
promotional or advertising claims, or for any other use,including description of the product’s application, operation, installation and testing
is used at the sole risk of the user and Cooper Wheelock will not have any liability for such use. IN NO CASE WILL SELLER’S LIABILITY
EXCEED THE PURCHASE PRICE PAID FOR A PRODUCT.
8/22
Other Cooper Notification Fire Alarm manuals

Cooper Notification
Cooper Notification Wheelock MPS Series User manual

Cooper Notification
Cooper Notification ST-C User manual

Cooper Notification
Cooper Notification RSS-24MCC User manual

Cooper Notification
Cooper Notification HS4 Series User manual

Cooper Notification
Cooper Notification E60H-24MCCH User manual

Cooper Notification
Cooper Notification ET70-24MCCH Series User manual

Cooper Notification
Cooper Notification Eluxa ELCH User manual

Cooper Notification
Cooper Notification RSSR-2415C User manual

Cooper Notification
Cooper Notification E70-24MCC Series User manual

Cooper Notification
Cooper Notification E70-24MCW Series User manual