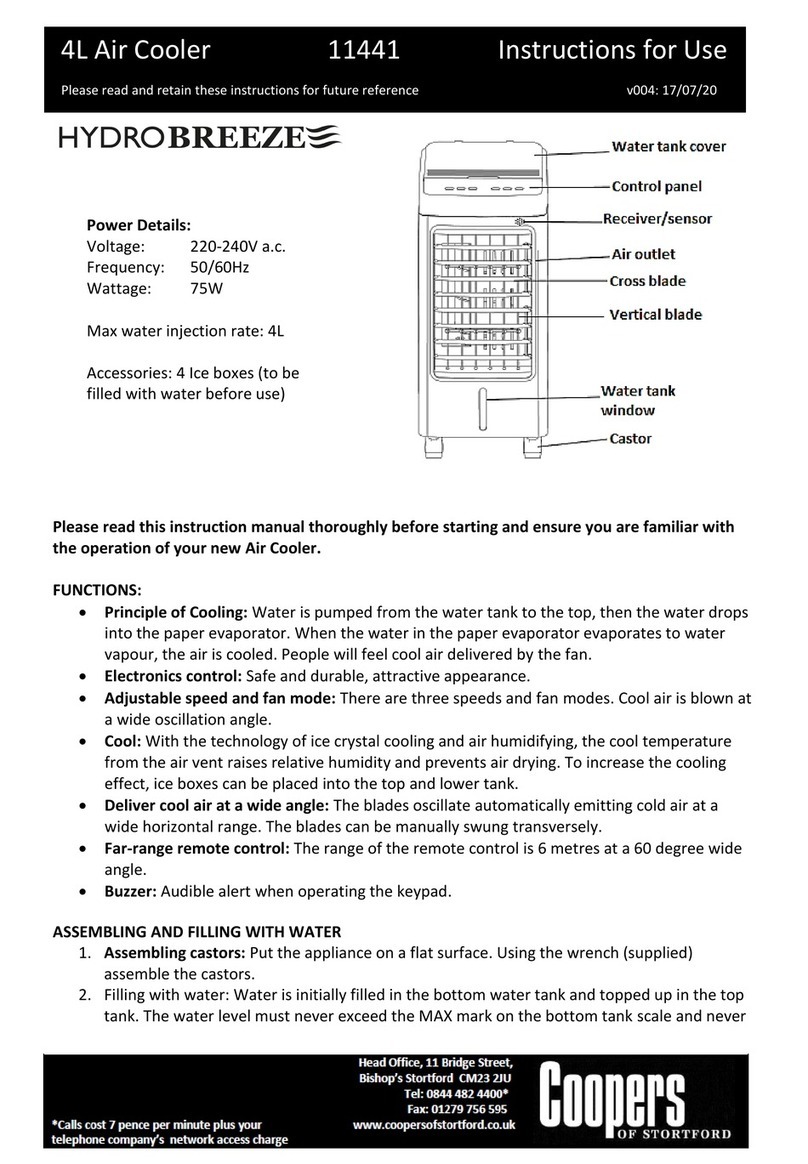
Coopers of Stortford HydroBreeze 11441 User manual

4L Air Cooler
11441
Instructions for Use
Please read and retain these instructions for future reference
v002:18/06/19
Please read this instruction manual thoroughly before starting and ensure you are familiar with
the operation of your new Air Cooler.
FUNCTIONS
•Principle of Cooling: Water is pumped from the water tank to the top, then the water drops into the
paper evaporator. When the water in the paper evaporator evaporates, the air is cooled. People will
feel cool air delivered by the fan.
•Electronics control: Safe and durable, attractive appearance.
•Adjustable speed and fan mode: There are three speeds and fan modes. Cool air is blown at a wide
oscillation angle.
•Cool: With the technology of ice crystal cooling and air humidifying, the cool temperature from the
air vent raises relative humidity and prevents air drying. To increase the cooling effect, ice boxes can
be placed into the top and lower tank.
•eliver cool air at a wide angle: The blades oscillate automatically emitting cold air at a wide
hori ontal range. The blades can be manually swung transversely.
•Far-range remote control: The range of the remote control is 6 metres at a 60 degree wide angle.
•Buzzer: Audible alert when operating the keypad.
ASSEMBLING AN FILLING WITH WATER
1. Assembling castors: Put the appliance on a flat surface. Using the spanner (supplied) assemble the
castors.
2. Filling with water: Pull out the bottom water tank by 1/3 and add clean water (Fig 1)
Attention:
a) Check the level of water in the bottom water tank before adding water.(Fig 2)
Power Details:
Voltage: 220-240V a.c.
Frequency: 50/60Hz
Wattage: 65W
Max water in ection rate: 4L
Room si e capacity: up to 8m
2
Noise level: 53-57dB

4L Air Cooler
11441
Instructions for Use
Please read and retain these instructions for future reference
v002:18/06/19
b) The level of water should not exceed the “MAX” mark on the scale at any time. When
humidifying, the total level of water should not be below the “MIN” scale.
c) Put ice cubes or fro en ice box into the top or bottom water tank if you want to lower the
temperature further. The total level of the bottom water tank should never exceed “MAX” mark
on the scale.
d) IMPORTANT: When adding water to the top tank (Fig 3): Please add water slowly. Ensure the
level of water in the bottom tank does not exceed the “MAX” scale of the bottom water tank.
OPERATION
•ON/OFF on the back of the unit: Locate this key. Press ON to set cooler to stand-by mode.
•POWER on control panel : Press this key to turn on the appliance, press again to shut it down .
•SPEE : Press this key after starting the appliance. Settings are LOW-MEDIUM-HIGH-LOW in sequence.
•COOL: Press this key to start the cooling system. To cancel the function press key again.
IMPORTANT: Please be sure there is enough water in the water tank before pressing this key.
•TIME: Press this key to set timer from 0.5 to 7.5 hours options in 0.5 hours steps. The cooler will switch
off when the timer is finished.
•SWING : Press this key to change the direction of the air flow. The swing icon will show on the screen
when the function is activated. Press the button again to stop the oscillation. The vertical direction of air
flow can be adjusted manually by directing the outlet louvres up and down.
•WIN TYPE(strength of air flow): Press this key to choose normal wind, natural wind and sleeping wind
in sequence. Normal wind does not have an indicator light, natural wind and sleeping wind have.
Operation icons are shown on the control panel.
Fig 1
Fig 2
Fig 3

4L Air Cooler
11441
Instructions for Use
Please read and retain these instructions for future reference
v002:18/06/19
REMOTE CONTROL
Fit CR2025 3V batteries. The 6 function keys on the
remote control are the same as on the control
panel. Point the remote control at the
receiver/sensor.
USING THE ICE BOX
The ice box is designed to keep the air cool. It can absorb heat and cool the ambient temperature.
Put the ice box into the free er to make sure that the contents are fro en.
Open the water tank door and put the fro en ice box into the water tank.
There are two ice boxes for using in turn. The ice boxes can be used in the bottom or top water tank.
Ice boxes need to be filled with water which will turn into a jelly and put in the free er.
Keep away from children.
CAUTION
•Do not operate the appliance with wet hands, in order to avoid damage.
•The level of water tank should not exceed “MAX” scale at any time, when humidifying, the total level
of water tank should not be under “MIN” scale.
•After adding water to the water tank, do not tilt or knock over the air cooler when moving it. If you
want to move it, please push slowly from the side, in order to avoid spilling.
•Do not turn over the appliance. If it is toppled over and there is water in the body, you should unplug
the power supply first. Then have it checked by a qualified technician.
•Do not cover the air vent.
•Do not knock or shake the body when using, otherwise it may cause it to stop automatically.
•Do not let the water in the water tank go stale. Renew the water in the water tank frequently.
•The fan is suitable for temperate climates only.
•Should it become necessary to move the unit after the water has been added, roll it gently to the
required position and apply the castor brackets.

4L Air Cooler
11441
Instructions for Use
Please read and retain these instructions for future reference
v002:18/06/19
•The power cord is with “Y” type connection and it must be changed by professional technicians if
necessary.
WARNINGS AN SAFETY INSTRUCTIONS:
WHEN USING ELECTRICAL APPLIANCES, BASIC SAFETY PRECAUTIONS SHOULD ALWAYS BE FOLLOWED:
•READ ALL INSTRUCTIONS BEFORE USE.
•FOR DOMESTIC INDOOR USE ONLY.
•DO NOT USE OUTDOORS OR FOR COMMERCIAL USE.
•BEFORE USE, CHECK THOROUGHLY FOR ANY DEFECTS AND DO NOT USE IF DEFECTS ARE FOUND.
TAKE CARE NOT TO DROP THE APPLIANCE AS HEAVY IMPACTS MAY CAUSE INTERNAL DAMAGE.
•BEFORE CONNECTING THE APPLIANCE, CHECK IF THE VOLTAGE INDICATED ON THE BOTTOM OF THE
APPLIANCE IS IN ACCORDANCE WITH THE MAINS VOLTAGE IN YOUR HOME.
•CHECK THE APPLIANCE AND POWER CABLE CAREFULLY FOR DAMAGE BEFORE EACH USE.
•THIS APPLIANCE CAN BE USED BY CHILDREN AGED FROM 8 YEARS AND ABOVE AND PERSONS WITH
REDUCED PHYSICAL, SENSORY OR MENTAL CAPABILITIES OR LACK OF EXPERIENCE AND KNOWLEDGE
IF THEY HAVE BEEN GIVEN SUPERVISION OR INSTRUCTION CONCERNING USE OF THE APPLIANCE IN
A SAFE WAY AND UNDERSTAND THE HAZARDS INVOLVED. CHILDREN SHALL NOT PLAY WITH THE
APPLIANCE. CLEANING AND USER MAINTENANCE SHALL NOT BE MADE BY CHILDREN WITHOUT
SUPERVISION.
•CHILDREN OF LESS THAN 3 YEARS SHOULD BE KEPT AWAY UNLESS CONTINUOUSLY SUPERVISED.
•THE USE OF ANY ACCESSORY ATTACHMENTS NOT RECOMMENDED BY COOPERS OF STORTFORD
MAY CAUSE INJURIES AND INVALIDATE ANY WARRANTY YOU MAY HAVE.
•DO NOT LET THE POWER CABLE HANG OVER THE EDGE OF A TABLE OR COUNTER, OR TOUCH HOT
SURFACES.
•DO NOT PLACE ON OR NEAR HEAT SOURCES.
•USE ON A LEVEL, STABLE SURFACE.
•DO NOT COVER THE ITEM IN ANY WAY WHEN IN USE AS THIS MAY CAUSE OVERHEATING.
•DO NOT USE THIS APPLIANCE FOR ANY OTHER USE THAN THE INTENDED USE IT IS DESIGNED FOR.
•ENSURE THERE IS SUFFICIENT DISTANCE BETWEEN THIS APPLIANCE AND OTHER ITEMS ON THE
WORK SURFACE OR WORK STATION, OR SUFFICIENT DISTANCE BETWEEN THE APPLIANCE AND THE
CONFINES OF THE AREA IN WHICH IT IS SITUATED. WE RECOMMEND A MINIMUM CLEARANCE
AROUND ALL FACES OF AT LEAST 10CM.
•DO NOT PLACE UNDER OR NEAR FLAMMABLE MATERIALS SUCH AS CURTAINS, DRAPERIES, SHELVES,
LOOSE WALL PAPER, ETC.
•TO PROTECT AGAINST ELECTRIC SHOCK, DO NOT IMMERSE POWER CABLE, PLUG OR APPLIANCE, IN
WATER OR ANY OTHER LIQUID.
•UNPLUG FROM OUTLET WHEN NOT IN USE AND BEFORE CLEANING.
•DO NOT OPERATE ANY APPLIANCE WITH A DAMAGED POWER CABLE OR PLUG OR AFTER THE
APPLIANCE MALFUNCTIONS, OR HAS BEEN DAMAGED IN ANY MANNER. WE RECOMMEND THAT THE
POWER CABLE IS NOT KINKED OR STORED IN A TWISTED MANNER, AND THAT YOU REGULARLY
CHECK ITS CONDITION.
•ANY REPAIRS MUST BE CONDUCTED BY A QUALIFIED ELECTRICIAN OR ELECTRICAL SERVICE AGENT.
CARE AN CLEANING INSTRUCTIONS
WARNING: Ensure that the fan is switched off from the mains supply before removing the air filter screen.
The air filter screen and wetted pad are located at the rear grille of the unit. Undo the screws at the rear and
push down the 2 clips to release the screen.

4L Air Cooler
11441
Instructions for Use
Please read and retain these instructions for future reference
v002:18/06/19
Clean the air filter screen (Fig 4)
1. Unplug from supply, pull the handle of the air filter screen and remove it from the appliance. Clean the
air filter screen with a neutral detergent and banister brush, then clean it with clear water. Finally,
reinstall filter in the appliance.
2. Clean the wetted pad (Fig 5)
3. Unplug from power supply, take down the air filter screen, then draw the wetted pad from the support.
Clean the wetted pad with neutral detergent and banister brush, then clean it with clear water. Finally,
reinstall in the appliance.
4. Attention: the wetted pad must be installed hori ontally, in order to avoid leaking.
5. Clean the water tank (Fig 6). The water tanks are not removable. To clean pull out bottom tank by 1/3
and wipe with a clean cloth. Top tank can also be wiped with a clean cloth.
6. Unplug from power supply, open the door, take out the water tanks, clean it with neutral detergent, and
wash it with clear water, then reinstall in the appliance.
7. Clean the shell
8. Clean with neutral detergent and soft cloth.
9. Attention: cut off the power supply when cleaning the appliance. Ensure the control panel is dry.
Fig 4 Fig 5 Fig 6
Water should be drained from the water tanks and fresh water refilled at least once a week.
The air filter and pad should be cleaned at least every two months.
The power cord should be coiled and stored away from the floor for protection.

4L Air Cooler
11441
Instructions for Use
Please read and retain these instructions for future reference
v002:18/06/19
Troubleshooting
Malfunction
C
ause
s
S
olution
N
o
function
1.
Power off or poor
connection.
2. “ON” key on the control
panel not pressed.
1.
Plug
in
the power cord
and make sure it
connects well.
2. Press the “ON” key on
the control panel.
P
oor
performance
1.
A
ir filter screen
blocked
with dust.
2. Air inlet blocked with
foreign objects.
1.
Clean the
air filter
screen.
2. Remove blockages from
air inlet.
PLUG WIRING (UK & IRELAN )
This appliance is fitted with a BS 1363 13-amp plug. If you have to replace the fuse, only those that are ASTA
or BSI approved to BS1362 and with a rated current of 13-amps should be used. If there is a fuse cover fitted,
this cover must be re-fitted after changing the fuse. If the fuse cover is lost or damaged the plug must not be
used. Spare fuse holders and fuses are available from electrical outlets. If the socket outlets in your home or
office are not suitable for this product’s plug, the plug must be removed and disposed of safely. Attempts to
insert the plug into the wrong socket is likely to cause electric ha ard. A replacement plug should be wired
according to the following instructions:
The cable
A mains electricity cable contains two or three inner wires. Each has a core of copper and an outer layer of
flexible plastic. This product is earthed; the wires in the plug are colour coded in the following way:
BLUE
NEUTRAL
BROWN LIVE
GREEN & YELLOW EARTH
The diagram shows the key features of a correctly
wired three-pin mains plug.
ISPOSAL
•Dispose of all packaging, paper, cartons and plastic, plastic
bags in accordance with your local recycling regulations.
•At the end of the product’s lifespan please dispose of it at
an authorised household WEEE waste recycling centre.

8
L Air Cooler
11442
Instructions for Use
Please read and retain these instructions for future reference
v001: 05/06/19
Power Details: 220-240V
75W
50/60Hz
Max water injection rate: 8L
Room size ca acity: u to 12 m
2
Noise level: 57-60 dB
Please read this instruction manual thoroughly before starting and ensure you are familiar with the
operation of your new Air Cooler.
FUNCT ONS
•Principle of Cooling: Water is um ed from the water tank to the to , then the water dro s into
the a er eva orator. When the water in the a er eva orator eva orates, the air is cooled.
Peo le will feel cool air delivered by the fan.
•Electronics control: Safe and durable, attractive a earance.
•Adjustable speed and fan mode: There are three s eeds and fan modes. Cool air is blown at a wide
oscillation angle.
•Cool: With the technology of ice crystal cooling and air humidifying, the cool tem erature from the
air vent raises relative humidity and revents air drying. To increase the cooling effect, ice boxes
can be laced into the to and lower tank.
•Deliver cool air at a wide angle: The blades oscillate automatically emitting cold air at a wide
horizontal range. The blades can be manually swung transversely.
•Far-range remote control: The range of the remote control is 6 metres at a 60 degree wide angle.
•Buzzer: Audible alert when o erating the key ad.
ASSEMBL NG AND F LL NG W TH WATER
1. Assembling castors: Put the a liance on a flat surface. Using the s anner (su lied) assemble the
castors.

8
L Air Cooler
11442
Instructions for Use
Please read and retain these instructions for future reference
v001: 05/06/19
2. Filling with water: Pull out the bottom water tank by 1/3 and add clean water (Fig 1)
Attention:
a) Check the level of water in the bottom water tank before adding water.(Fig 2)
b) The level of water should not exceed the “MAX” mark on the scale at any time. When
humidifying, the total level of water should not be below the “MIN” scale.
c) Put ice cubes or frozen ice box into the to or bottom water tank if you want to lower the
tem erature further. The total level of the bottom water tank should never exceed “MAX”
mark on the scale.
d) IMPORTANT: When adding water to the to tank (Fig 3): Please add water slowly. Ensure the
level of water in the bottom tank does not exceed the “MAX” scale of the bottom water tank.
OPERAT ON
•ON/OFF on the back of the unit: Locate this key. Press ON to set cooler to stand-by mode.
•POWER on control panel : Press this key to turn on the a liance, ress again to shut it down .
•SPEED: Press this key after starting the a liance. Settings are LOW-MEDIUM-HIGH-LOW in sequence.
•COOL: Press this key to start the cooling system. To cancel the function ress key again.
MPORTANT: Please be sure there is enough water in the water tank before ressing this key.
•T ME: Press this key to set timer from 0.5 to 7.5 hours o tions in 0.5 hours ste s. The cooler will switch
off when the timer is finished.
•SW NG : Press this key to change the direction of the air flow. The swing icon will show on the screen
when the function is activated. Press the button again to sto the oscillation. The vertical direction of
air flow can be adjusted manually by directing the outlet louvres u and down.
•W ND TYPE(strength of air flow): Press this key to choose normal wind, natural wind and slee ing wind
in sequence. Normal wind does not have an indicator light, natural wind and slee ing wind have.
O eration icons are shown on the control anel.
Fig 1
Fig 2
Fig 3

8
L Air Cooler
11442
Instructions for Use
Please read and retain these instructions for future reference
v001: 05/06/19
REMOTE CONTROL
Fit CR2025 3V batteries. The 6 function keys on the
remote control are the same as on the control
anel. Point the remote control at the
receiver/sensor.
US NG THE CE BOX
The ice box is designed to kee the air cool. It can absorb heat and cool the ambient tem erature.
Put the ice box into the freezer to make sure that the contents are frozen.
O en the water tank door and ut the frozen ice box into the water tank.
There are two ice boxes for using in turn. The ice boxes can be used in the bottom or to water tank.
Ice boxes need to be filled with water which will turn into a jelly and ut in the freezer.
Kee away from children.
CAUT ON
•Do not o erate the a liance with wet hands, in order to avoid damage.
•The level of water tank should not exceed “MAX” scale at any time, when humidifying, the total
level of water tank should not be under “MIN” scale.
•After adding water to the water tank, do not tilt or knock over the air cooler when moving it. If you
want to move it, lease ush slowly from the side, in order to avoid s illing.
•Do not turn over the a liance. If it is to led over and there is water in the body, you should
un lug the ower su ly first. Then have it checked by a qualified technician.
•Do not cover the air vent.
•Do not knock or shake the body when using, otherwise it may cause it to sto automatically.
•Do not let the water in the water tank go stale. Renew the water in the water tank frequently.
•The fan is suitable for tem erate climates only.

8
L Air Cooler
11442
Instructions for Use
Please read and retain these instructions for future reference
v001: 05/06/19
•Should it become necessary to move the unit after the water has been added, roll it gently to the
required osition and a ly the castor brackets.
•The ower cord is with “Y” ty e connection and it must be changed by rofessional technicians if
necessary.
WARN NGS AND SAFETY NSTRUCT ONS:
WHEN USING ELECTRICAL APPLIANCES, BASIC SAFETY PRECAUTIONS SHOULD ALWAYS BE FOLLOWED:
•READ ALL INSTRUCTIONS BEFORE USE.
•FOR DOMESTIC INDOOR USE ONLY.
•DO NOT USE OUTDOORS OR FOR COMMERCIAL USE.
•BEFORE USE, CHECK THOROUGHLY FOR ANY DEFECTS AND DO NOT USE IF DEFECTS ARE FOUND.
TAKE CARE NOT TO DROP THE APPLIANCE AS HEAVY IMPACTS MAY CAUSE INTERNAL DAMAGE.
•BEFORE CONNECTING THE APPLIANCE, CHECK IF THE VOLTAGE INDICATED ON THE BOTTOM OF
THE APPLIANCE IS IN ACCORDANCE WITH THE MAINS VOLTAGE IN YOUR HOME.
•CHECK THE APPLIANCE AND POWER CABLE CAREFULLY FOR DAMAGE BEFORE EACH USE.
•THIS APPLIANCE CAN BE USED BY CHILDREN AGED FROM 8 YEARS AND ABOVE AND PERSONS WITH
REDUCED PHYSICAL, SENSORY OR MENTAL CAPABILITIES OR LACK OF EXPERIENCE AND
KNOWLEDGE IF THEY HAVE BEEN GIVEN SUPERVISION OR INSTRUCTION CONCERNING USE OF THE
APPLIANCE IN A SAFE WAY AND UNDERSTAND THE HAZARDS INVOLVED. CHILDREN SHALL NOT
PLAY WITH THE APPLIANCE. CLEANING AND USER MAINTENANCE SHALL NOT BE MADE BY
CHILDREN WITHOUT SUPERVISION.
•CHILDREN OF LESS THAN 3 YEARS SHOULD BE KEPT AWAY UNLESS CONTINUOUSLY SUPERVISED.
•THE USE OF ANY ACCESSORY ATTACHMENTS NOT RECOMMENDED BY COOPERS OF STORTFORD
MAY CAUSE INJURIES AND INVALIDATE ANY WARRANTY YOU MAY HAVE.
•DO NOT LET THE POWER CABLE HANG OVER THE EDGE OF A TABLE OR COUNTER, OR TOUCH HOT
SURFACES.
•DO NOT PLACE ON OR NEAR HEAT SOURCES.
•USE ON A LEVEL, STABLE SURFACE.
•DO NOT COVER THE ITEM IN ANY WAY WHEN IN USE AS THIS MAY CAUSE OVERHEATING.
•DO NOT USE THIS APPLIANCE FOR ANY OTHER USE THAN THE INTENDED USE IT IS DESIGNED FOR.
•ENSURE THERE IS SUFFICIENT DISTANCE BETWEEN THIS APPLIANCE AND OTHER ITEMS ON THE
WORK SURFACE OR WORK STATION, OR SUFFICIENT DISTANCE BETWEEN THE APPLIANCE AND THE
CONFINES OF THE AREA IN WHICH IT IS SITUATED. WE RECOMMEND A MINIMUM CLEARANCE
AROUND ALL FACES OF AT LEAST 10CM.
•DO NOT PLACE UNDER OR NEAR FLAMMABLE MATERIALS SUCH AS CURTAINS, DRAPERIES,
SHELVES, LOOSE WALL PAPER, ETC.
•TO PROTECT AGAINST ELECTRIC SHOCK, DO NOT IMMERSE POWER CABLE, PLUG OR APPLIANCE, IN
WATER OR ANY OTHER LIQUID.
•UNPLUG FROM OUTLET WHEN NOT IN USE AND BEFORE CLEANING.
•DO NOT OPERATE ANY APPLIANCE WITH A DAMAGED POWER CABLE OR PLUG OR AFTER THE
APPLIANCE MALFUNCTIONS, OR HAS BEEN DAMAGED IN ANY MANNER. WE RECOMMEND THAT
THE POWER CABLE IS NOT KINKED OR STORED IN A TWISTED MANNER, AND THAT YOU REGULARLY
CHECK ITS CONDITION.
•ANY REPAIRS MUST BE CONDUCTED BY A QUALIFIED ELECTRICIAN OR ELECTRICAL SERVICE AGENT.
CARE AND CLEAN NG NSTRUCT ONS
WARNING: Ensure that the fan is switched off from the mains su ly before removing the air filter screen.

8
L Air Cooler
11442
Instructions for Use
Please read and retain these instructions for future reference
v001: 05/06/19
The air filter screen and wetted ad are located at the rear grille of the unit. Undo the screws at the rear
and ush down the 2 cli s to release the screen.
Clean the air filter screen (Fig 4)
1. Un lug from su ly, ull the handle of the air filter screen and remove it from the a liance. Clean the
air filter screen with a neutral detergent and banister brush, then clean it with clear water. Finally,
reinstall filter in the a liance.
2. Clean the wetted ad (Fig 5)
3. Un lug from ower su ly, take down the air filter screen, then draw the wetted ad from the su ort.
Clean the wetted ad with neutral detergent and banister brush, then clean it with clear water. Finally,
reinstall in the a liance.
4. Attention: the wetted ad must be installed horizontally, in order to avoid leaking.
5. Clean the water tank (Fig 6). The water tanks are not removable. To clean ull out bottom tank by 1/3
and wi e with a clean cloth. To tank can also be wi ed with a clean cloth.
6. Un lug from ower su ly, o en the door, take out the water tanks, clean it with neutral detergent,
and wash it with clear water, then reinstall in the a liance.
7. Clean the shell
8. Clean with neutral detergent and soft cloth.
9. Attention: cut off the ower su ly when cleaning the a liance. Ensure the control anel is dry.
Fig 4 Fig 5 Fig 6
Water should be drained from the water tanks and fresh water refilled at least once a week.
The air filter and ad should be cleaned at least every two months.
The ower cord should be coiled and stored away from the floor for rotection.

8
L Air Cooler
11442
Instructions for Use
Please read and retain these instructions for future reference
v001: 05/06/19
Troubleshooting
Malfunction
C
ause
s
S
olution
N
o
function
1.
Power off or oor
connection.
2. “ON” key on the control
anel not ressed.
1.
Plug
in
the ower cord
and make sure it
connects well.
2. Press the “ON” key on
the control anel.
P
oor
erformance
1.
A
ir filter screen
blocked
with dust.
2. Air inlet blocked with
foreign objects.
1.
Clean the
air filter
screen.
2. Remove blockages from
air inlet.
PLUG W R NG (UK & RELAND)
This a liance is fitted with a BS 1363 13-am lug. If you have to re lace the fuse, only those that are
ASTA or BSI a roved to BS1362 and with a rated current of 13-am s should be used. If there is a fuse
cover fitted, this cover must be re-fitted after changing the fuse. If the fuse cover is lost or damaged the
lug must not be used. S are fuse holders and fuses are available from electrical outlets. If the socket
outlets in your home or office are not suitable for this roduct’s lug, the lug must be removed and
dis osed of safely. Attem ts to insert the lug into the wrong socket is likely to cause electric hazard. A
re lacement lug should be wired according to the following instructions:
The cable
A mains electricity cable contains two or three inner wires. Each has a core of co er and an outer layer of
flexible lastic. This roduct is earthed; the wires in the lug are colour coded in the following way:
BLUE
N
EUTRAL
BROWN LIVE
GREEN & YELLOW EARTH
The diagram shows the key features of a correctly
wired three- in mains lug.
D SPOSAL
•Dis ose of all ackaging, a er, cartons and lastic, lastic
bags in accordance with your local recycling regulations.
•At the end of the roduct’s lifes an lease dis ose of it at
an authorised household WEEE waste recycling centre.
Other manuals for HydroBreeze 11441
1
Table of contents
Other Coopers of Stortford Air Conditioner manuals
Popular Air Conditioner manuals by other brands

Daikin
Daikin EWLD120MBYNN Installation instruction

Daikin
Daikin Super Multi NX 3MKS50E3V1B Service manual

Samsung
Samsung AS U Series User & installation manual

Gree
Gree Ultra Heat GMV-VQ72W/A-F owner's manual

Panasonic
Panasonic S-20LM3HPQ Installation and operation manual

Daikin
Daikin RKS22MVLT Removal Procedure