Coretec Trainer 1000 SE User manual

SE
Supplementary user manual
-ONLY FOR USE IN CONJUNCTION WITH THE TRAINER 1000 USER MANUAL-
V 1.0 GBR

PAGE 2 OF 10 USER MANUAL TRAINER 1000
MANUFACTURER AND CUSTOMER SERVICE:
CORETEC-SERVICE GMBH
ROBERT-BOSCH-STR. 4B
35440 LINDEN
GERMANY
PHONE: +49-6403-60984-0
FAX: +49-6403-60984-44
HOMEPAGE: WWW.TRAINER1000.COM
IMPORTANT INFORMATION
This device is not suitable for use on humans.
It is designed for training purposes only and must be kept separate from fully operative defibrillators
and ECGs.
Responsibility regarding provision of information
Customers are responsible for ensuring that the relevant people within their organisation are provided with access
to the information and the general safety instructions and warnings provided in this manual.
Use and purpose
The Trainer 1000 is a simulation and training device for realistic Advanced Life Support training on a defibrillator
(AED) and providing treatment to patients on the basis of an ECG diagnosis. Due to the similarity of its design and
operating elements, the Trainer 1000 is particularly suitable for training and instructing people in the use of the
Lifepak® 1000 series defibrillators.
The Trainer 1000 does not deliver energy through adhesive electrodes, which means that it does not pose a risk to
less-experienced trainees. At the same time, the Trainer 1000 can be used to simulate changes in a patient’s
condition by using the AED Trainer’s IR remote control and to intervene if the Trainer is used incorrectly.
The Trainer 1000’s ECG function does not provide any information on the actual heart rhythm of patients
connected to it. The rhythms indicated by the device are provided only in order to train people to make a quick
initial diagnosis based on the ECG.

PAGE 3 OF 10
PHONE: +49-6403-60984-0
FAX: +49-6403-60984-44
HOMEPAGE: WWW.TRAINER1000.COM
TABLE OF CONTENTS
Important information on manual defibrillation .............................................................................................................. 3
Important information on performing ECGs with the Trainer 1000................................................................................. 3
Remote control buttons.................................................................................................................................................... 4
Operating modes .............................................................................................................................................................. 6
Operation .......................................................................................................................................................................... 7
Attaching the electrodes to the mannequin..................................................................................................................... 9
Attaching the ECG lead to the mannequin ................................................................................................................... 9
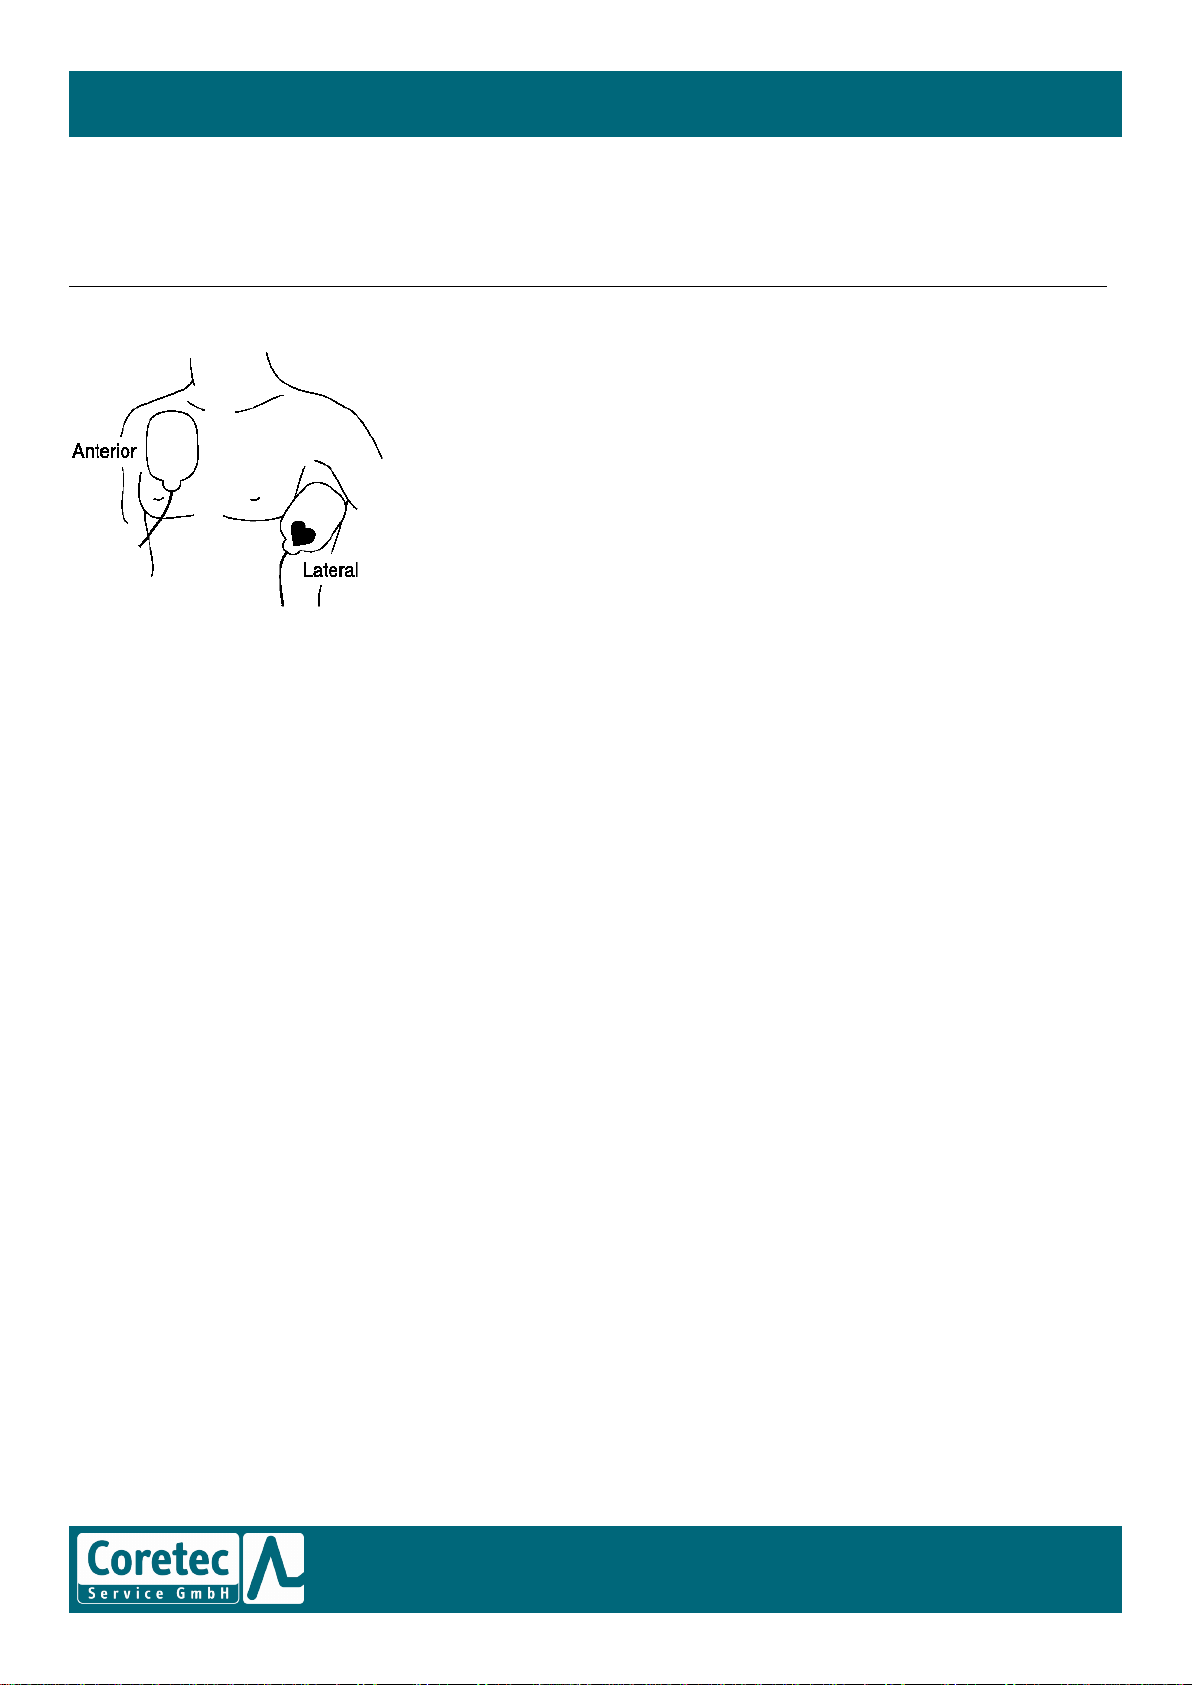
Attaching the training defibrillation electrodes.......................................................................................................... 10
IMPORTANT INFORMATION ON MANUAL DEFIBRILLATION
Manual defibrillation is a proven and effective method for treating hyperdynamic heart failure. In manual
defibrillation, first-aiders decide whether or not to defibrillate on the basis of ECGs and independently of the
automatic analysis preformed by the defibrillator. Manual defibrillation furthermore involves independently
choosing the strength of and moment at which shocks are delivered.
This flexibility in the use of the defibrillator’s functions enables users to time the defibrillation with the
performance of other additional treatment measures, such as, e.g. administering medication, managing airways
and similar, in accordance with the special requirements presented by each individual treatment case.
Manual defibrillation must only be performed by persons trained in ECG diagnosis. Medical personnel that is not
expressly and legally authorised to perform electrotherapy in the country of application are advised to consult the
head of their department before use.
IMPORTANT INFORMATION ON PERFORMING ECGS WITH THE TRAINER 1000
The LIFEPACK 1000 SE’s monitoring function is designed to monitor the heart’s electrical activity through a stable
limb lead II cable. The lead and the amplitude setting cannot be changed. The Trainer 1000 is designed to
simulate this function and does so by infinitely replaying an ECG recording that is stored inside the Trainer. Using
the remote control, the Trainer 1000 enables instructors to select the heart rhythm to be displayed and thus adapt
it to the simulated patient’s condition and any treatments that might already have been administrated.
The monitoring function is not designed for the diagnosis of cardiac arrhythmia or to verify death. The ECG
recording shown on the Trainer 1000 is intended only to help users choose suitable treatment measures, to assess
a patient’s state, and to monitor fully conscious patients and those whose consciousness is impaired.
INFORMATION ON USING THE TRAINER 1000 FOR TRAINING PURPOSES
The Trainer 1000 is designed only for training people in the use a defibrillator on adults and children over the age
of 8, weighing more than 25 kg, and using standard training electrodes (black connector).
This ensures that trainees are taught which electrodes to use on which patients right from the outset of their
training.

PAGE 4 OF 10 USER MANUAL
REMOTE CONTROL BUTTONS
Button
AED-mode button function
Manual-mode and monitoring-mode button
function
VES
VT Salve
SVES
For switching between On and Off for MOTION
ARTEFACT. This function is only available during
analysis.
Pressing this button once in ECG mode will bring
up a recording of a singular ventricular
extrasystole on the display. Pressing this button
after having pressed a function button will bring
up either a self-terminating ventricular
tachycardia or a supraventricular extrasystole on
the display.
For switching between On and Off for fitting the
training electrode to the mannequin. This
function is only available when the training
electrodes are connected to the AED Trainer.
This button indicates to the device that the
monitoring electrodes have been attached and
makes it start showing a heart rhythm.
NSR
SBrady
STachy
Pressing this button will cause all shock
decisions to be changed to NO SHOCK
ADVISED. This function can only be used if
either the messages PRESS FOR ANALYSIS or
ANALYSIS IN PROGRESS, STEP BACK! are being
displayed.
Pressing this button will bring up a normal sinus
rhythm, a sinus bradycardia with approx. 40
beats per minute or a sinus tachycardia with
approx. 180 beats per minute.
AVB 1°
Wenckeb.
Mobitz
No function
Pressing this button will make the device
simulate a first-degree AV block, a Wenckebach
type 2° AV block and a Mobitz type 2° AV block.
VVI
Exit-Block
VAV
Pressing this button once will activate a service
alert, and will cause the message CALL
CUSTOMER SERVICE to be displayed. To cancel,
In ECG mode, this button will bring up various
pacemaker rhythms: A single-chamber
pacemaker, an exit block and a dual chamber

PAGE 5 OF 10
PHONE: +49-6403-60984-0
FAX: +49-6403-60984-44
HOMEPAGE: WWW.TRAINER1000.COM
turn off the AED Trainer. Press button again.
pacemaker.
VF
VT HF 180
TdP
This button is not active. It is only used on
Trainers with ECG mode.
In ECG mode, this button will bring up ventricular
fibrillation, ventricular tachycardia with a heart
rate of 180/minute or torsade de pointes on the
display.
No function
Pressing this button before selecting a rhythm
ensures that the rhythm will only be changed
after defibrillation. (Only in manual mode)
Bigemin.
AVB 3:1
AF
Press at any time to stop any of the Trainer
1000’s functions. Press again to make the
Trainer 1000 continue its operation from the
point it was previously stopped at. Press Fl , F2,
F3, F4, F5 or C1 for changing the shock protocol
while the Trainer 1000 is set to PAUSE. Press
PAUSE again to verify the change and to turn
off the AED Trainer.
Pressing this button will bring up a bigeminus, a
3:1 AV block or atrail fibrillation on the display.
To change to ECG mode
Pressing this button will make the Trainer 1000
only use the signals from the connected lead for
monitoring.
Pressing this button will make the device switch
to ECG mode
No function
Pressing this button will enable you to activate
the heart rhythms shown in red. To do so, press
this button first and then the required rhythm
button.
No function
Pressing this button will enable you to activate
the heart rhythms shown in green. To do so,
press this button first and then the required
rhythm button.
HI inf
Digitalis
VT HF 110
Pressing this button once will active the warning
LOW BATTERY. Press again to deactivate
warning.
Pressing this button will bring up an ST-elevation
or a non-ST myocardial infraction rhythm. It can
also be used to simulate a VT with a heart rate of
approx. 120/minute.
AVB 3°
Agonal
Asystol
No function
This button will bring up a third degree AV block,
an agonal rhythm (electro-mechanical
dissociation) or an asystole.

PAGE 6 OF 10 USER MANUAL
OPERATING MODES
Functions
The Trainer 1000 SE features the same functions as the Trainer 1000:
AED mode (with activatable and de-activatable paddle discharge indicator)
Manual mode (with paddle discharge indicator)
However, the Trainer 1000 SE also features an
ECG monitoring mode (requires Upgrade Kit, 3-lead ECG cable, only in monitoring mode)
which can be used to display a range of ready-installed ECG rhythm recordings on the display and to match the
rhythm shown on the display to the simulated patient’s condition using the remote control.
AED MODE
As with real automated external defibrillators, the evaluates the selected ECG rhythms and issues
specific instructions when it identifies a shockable rhythm. The delivery of shocks (defibrillation) to the simulated
patient requires the active involvement of the person operating the defibrillator.
MANUAL MODE
This mode allows expert users to decide on administering defibrillation shocks on the basis of the ECG analysis
derived through the electrodes. Instructors can chose the ECG recording to be shown on the display to provide
advanced training in the use of additional and drug-based treatment. The heart rhythm can be changed at any
time in manual mode. If the Trainer 1000 is configured in such a way that the analysis function can be used in
manual mode, users will also be able to use the AHA and ILCOR treatment -recommendations-based computer-
assisted decision-making aid regarding whether or not to defibrillate.
ECG MONITORING MODE
In ECG mode, the electrical activity of a patient’s heart can be monitored using conventional ECG electrodes that
are attached using snap fasteners. The readout provided on the screen represents the consolidated data from lead
II. The instructor can select one of the rhythm recordings stored on the system by remote control and adjust the
recording to the simulated patient condition. The device does not give voice prompts. If the device identifies a
heart rhythm that potentially calls for defibrillation, it will prompt the user to check the patient and to change to
the defibrillation electrodes.

PAGE 7 OF 10
PHONE: +49-6403-60984-0
FAX: +49-6403-60984-44
HOMEPAGE: WWW.TRAINER1000.COM
OPERATION
The Trainer 1000 can be switched to ECG mode from both AED and manual mode. To do so, proceed as follows:
If the training electrodes are connected, remove them
-by pressing the electrode connection button, 1st row, centre, on the remote control (taking the
electrodes off the patient)
- disconnecting the training electrode connector on the Trainer
The ECG cable now needs to be connected and this action confirmed by pressing the ECG cable button (3rd
row, right). This will make the device switch to ECG mode. The following message will be briefly shown:
“Connect ECG lead”
If you want a different heart rhythm from the previous or pre-set one, this can be changed now by remote
control before an ECG is shown.
Connect the 3-lead cable to the mannequin (see the section ”Attaching the ECG lead to the mannequin”)
and confirm this action by pressing the “Connect electrode” button on the remote control (1st row, centre).
The ECG will now be shown.
On the remote control, ECGs can be selected as follows:
Black ECGs: Press button
Red ECGs: Press the red button first and then the ECG button
Blue ECGs: Press the blue button first and then the ECG button
To exit ECG mode, simply reverse these steps.
If the rhythm shown by the ECG is shockable, the Trainer 1000 will prompt you to connect defibrillation electrodes
and to exit ECG mode.
On exiting ECG mode, the Trainer will switch back to the mode it was previously in.
I.e. either:
Manual mode
In manual mode –as in ECG mode –ECGs can be selected using the remote control. This only applies to
Trainers who have been upgraded to ECG mode. This means that there will not be any scenarios. In
manual mode, it is also possible to switch from the ECG rhythm to administering shocks with the remote
control. (Left button in 3rd row, also see section on the remote control)
Or
AED mode
In these devices, AED mode works in exactly the same way as in Trainers without ECG mode, with the
exception that the scenario might be adjusted.
Since the ECG needs to stay the same when exiting ECG mode, it might be necessary to change the
scenario accordingly. This adjustment must be performed in accordance with the following schema (next
page):

PAGE 8 OF 10 USER MANUAL
Selected
under Setup
or using the
remote control
Shock sequence
ECG sequence
Applied scenario
Based on shockable
rhythm
Based on non-shockable
rhythm
Fix 1
SSSSK
FFFFSr
Fix1
Fix2
Fix2
KKKK
AAAA
Fix1
Fix2
Fix3
SSKKKK
FFAASrSr
Fix3
Fix5
Fix4
SSKSSK
FFAFFSr
Fix4
Fix5
Fix5
KSKSS
AFSrFF
Fix4
Fix5
Customer
XXXXX (S orr K)
(F oder A)
Customer/ Fix4
Customer/ Fix5
S: Shock advised
K: No Shock
Advised
Sr: Sinus rhythm
F: Fibrillation
A: Asystole

PAGE 9 OF 10
PHONE: +49-6403-60984-0
FAX: +49-6403-60984-44
HOMEPAGE: WWW.TRAINER1000.COM
ATTACHING THE ELECTRODES TO THE MANNEQUIN
Attaching the ECG lead to the mannequin
First, switch to ECG mode (see Operation section)
The illustration shows the standard way of attaching the 3-lead ECG cable.
The designations of the ECG leads leading to the patient can vary, but are generally as follows:
AHA designations
IEC designations
Electrode position
RA
R
Right arm
LA
L
Left arm
LL
F
Left leg
If your mannequin does not have any connections for the ECG cable, you can use conventional adhesive ECG
electrodes. In this case, we recommend using Ag/AgCl solid gel adhesive electrodes and to leave them on the
mannequin for continued use, as constantly removing and re-attaching them can over time damage the plastic
skin.

PAGE 10 OF 10 USER MANUAL
Attaching the training defibrillation electrodes
The illustration below shows where to position the training electrodes on the mannequin.
Figure: Attaching the training electrodes to the mannequin
The instructor must press the ELECTRODES button on the remote control to signal to the device that the training
electrodes have been attached to the mannequin. This will cause the device to automatically start running the
selected scenario with the relevant settings.
This training scenario will only start if the connector of the training electrodes has been properly inserted into the
socket on the AED Trainer and the instructor has verified that the electrodes have been correctly attached via the
remote control.
If, while using the AED Trainer:
- the training electrodes are removed from the device, it will display the message CONNECT ELECTRODES
- the training electrodes, on the other hand, come off the mannequin, it will not display this message (CONNECT
ELECTRODES).
This message function must be turned on/off by the instructor by pressing the electrode button on the remote
control.
Please note:
Never use defibrillator electrodes intended for use on patients. The Trainer 1000 will not recognise these
electrodes and they can potentially damage the outer skin of the mannequin or leave behind stubborn residues.
Table of contents
Popular Test Equipment manuals by other brands

Sensidyne
Sensidyne Gilian 800565 Series instruction manual

Overmax
Overmax ad02 user manual

Kenwood
Kenwood CS-1065 instruction manual

PCB Piezotronics
PCB Piezotronics 498A-0063 Installation and operating manual

Anritsu
Anritsu MT1000A Network Master Pro Operation manual

Heathkit
Heathkit IG-18 Assembly manual