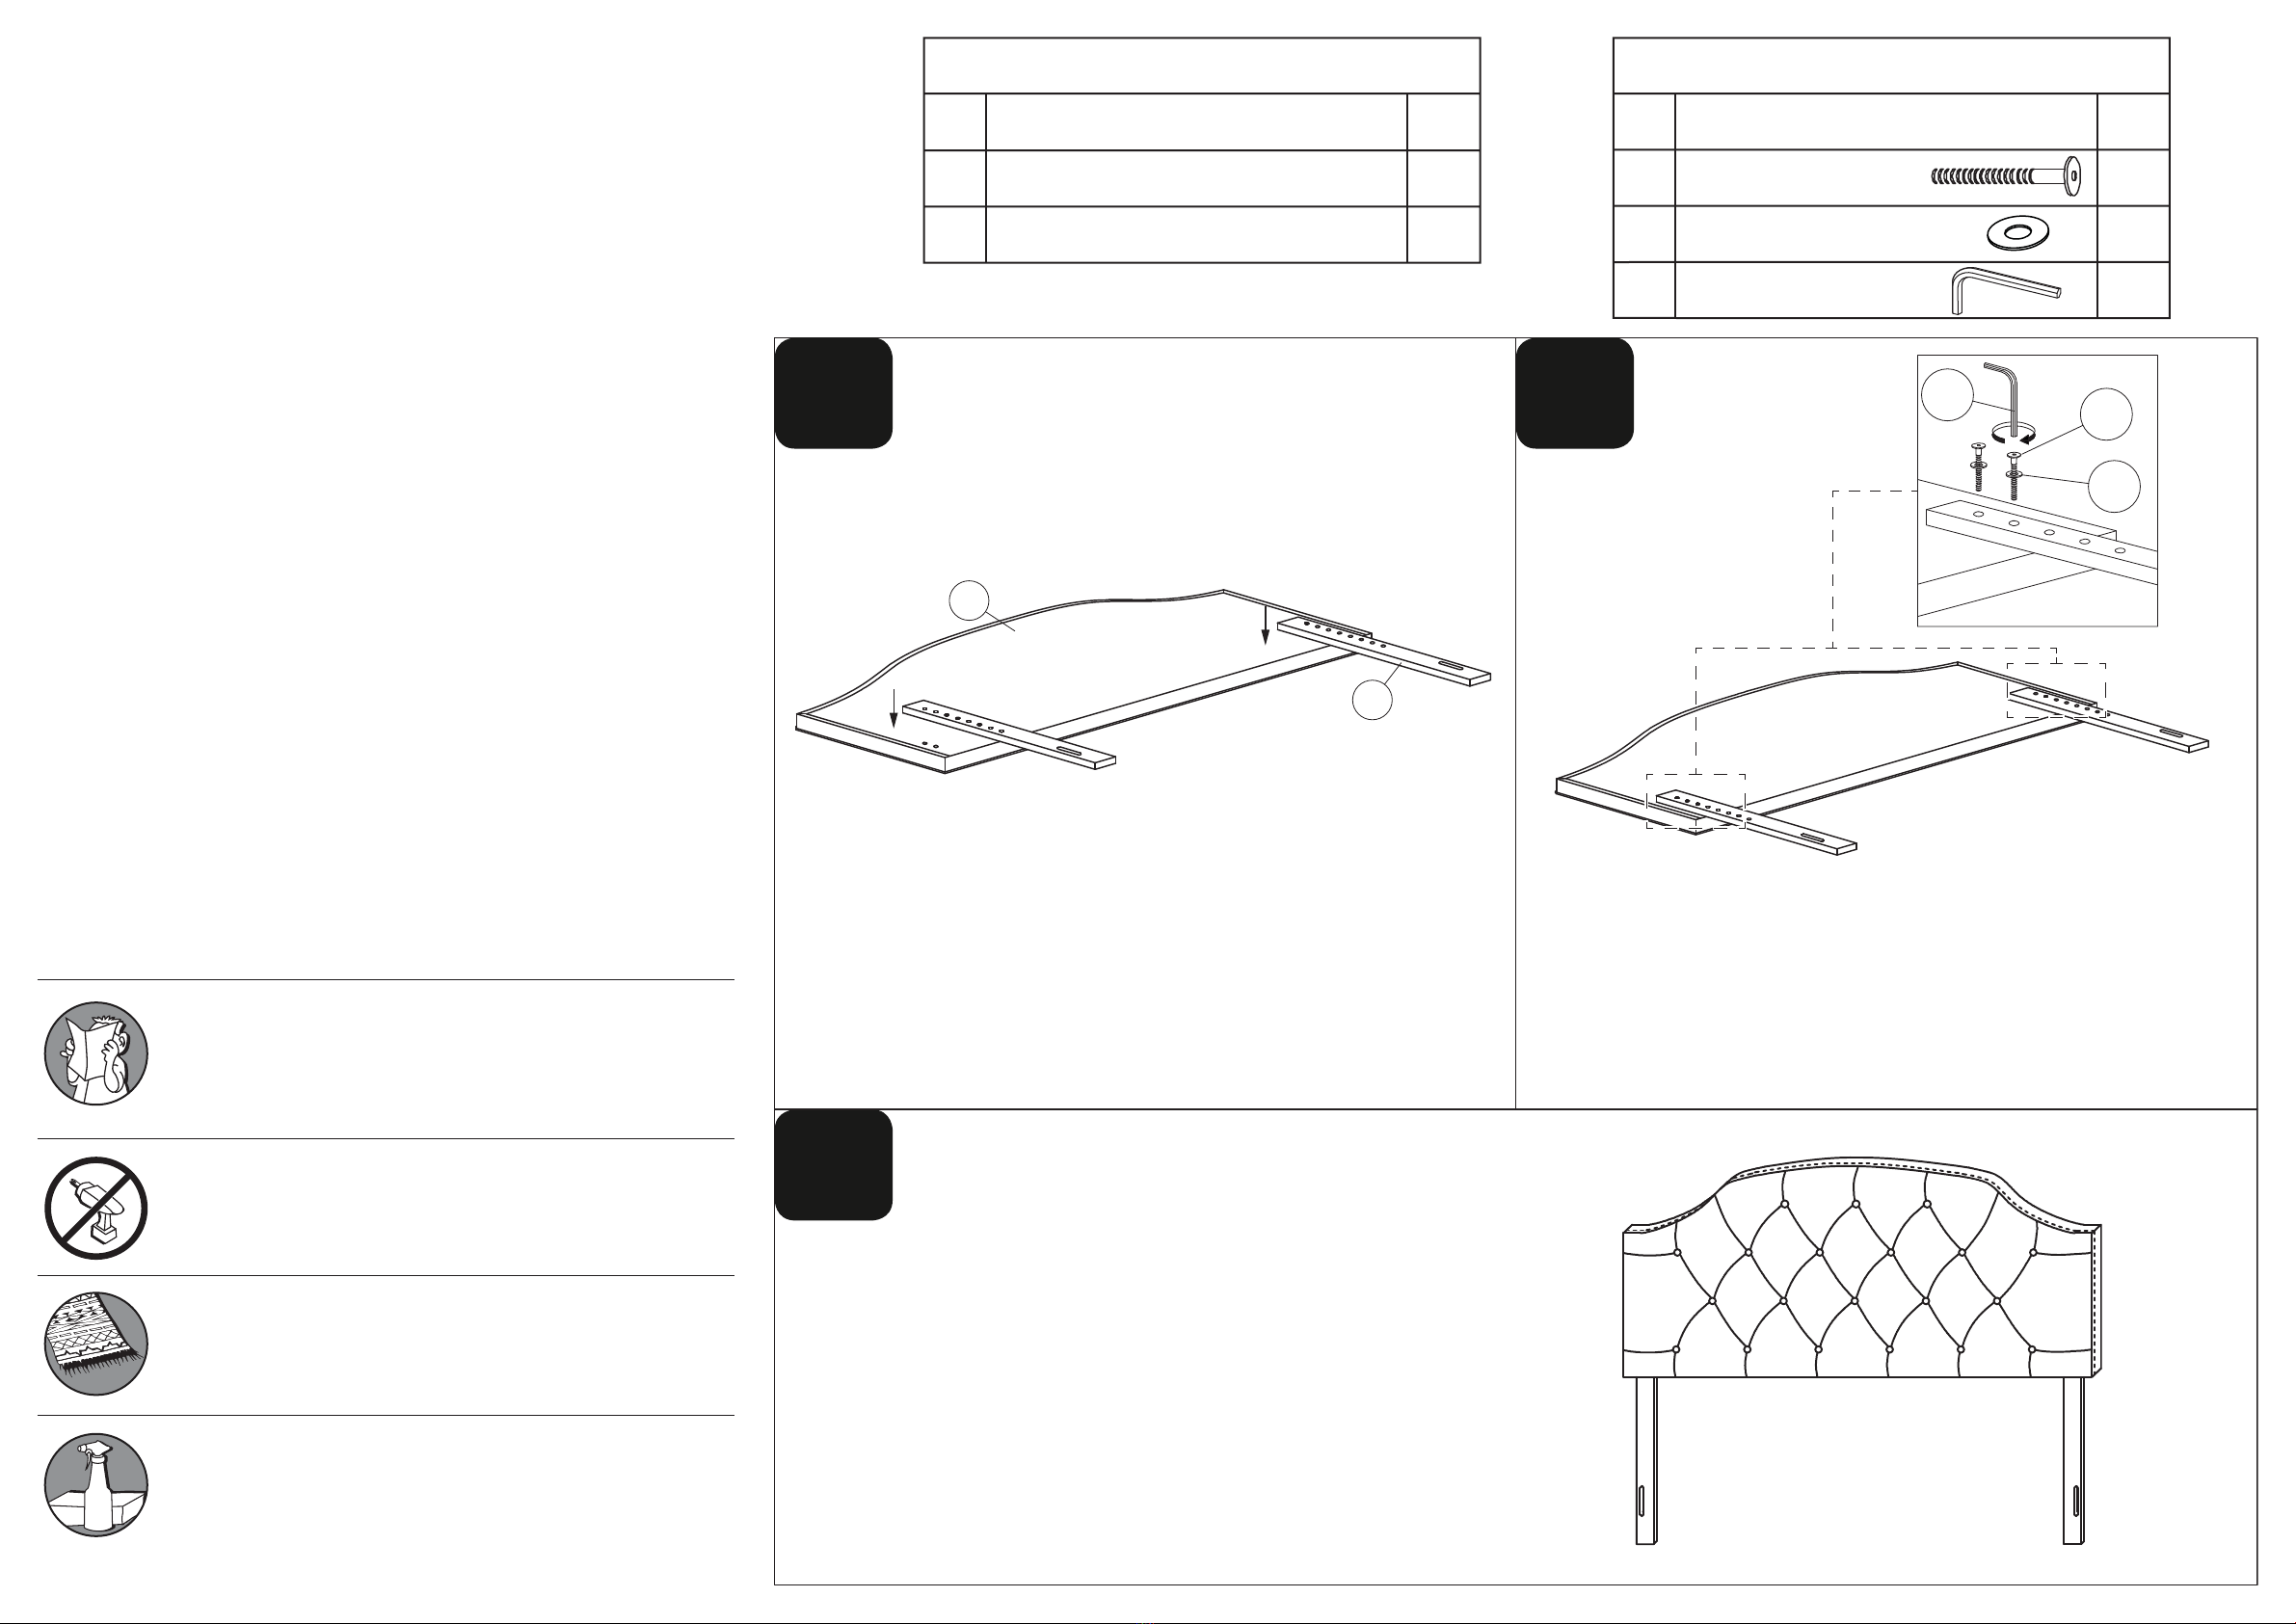
manuals.online logo
Brands
  1. Home
  2. •
  3. Brands
  4. •
  5. CorLiving
  6. •
  7. Indoor Furnishing
  8. •
  9. CorLiving BBT-113-S User manual

CorLiving BBT-113-S User manual

This manual suits for next models

3

Other CorLiving Indoor Furnishing manuals

CorLiving TBR-300-B User manual

CorLiving

CorLiving TBR-300-B User manual

CorLiving WHR-500-O User manual

CorLiving

CorLiving WHR-500-O User manual

CorLiving TLK-802-B User manual

CorLiving

CorLiving TLK-802-B User manual

CorLiving WHR-400-O User manual

CorLiving

CorLiving WHR-400-O User manual

CorLiving BAF-410-B User manual

CorLiving

CorLiving BAF-410-B User manual

CorLiving BMG-370-B User manual

CorLiving

CorLiving BMG-370-B User manual

CorLiving LFF-300-D User manual

CorLiving

CorLiving LFF-300-D User manual

CorLiving FS-3580 User manual

CorLiving

CorLiving FS-3580 User manual

CorLiving WLM-100-G User manual

CorLiving

CorLiving WLM-100-G User manual

CorLiving WHR-300-O User manual

CorLiving

CorLiving WHR-300-O User manual

CorLiving DPU-604-B User manual

CorLiving

CorLiving DPU-604-B User manual

CorLiving PCS-506-K User manual

CorLiving

CorLiving PCS-506-K User manual

CorLiving DPU-101-B User manual

CorLiving

CorLiving DPU-101-B User manual

CorLiving DJS-479-C User manual

CorLiving

CorLiving DJS-479-C User manual

CorLiving BAF-310-B User manual

CorLiving

CorLiving BAF-310-B User manual

CorLiving WLM-110-G User manual

CorLiving

CorLiving WLM-110-G User manual

CorLiving DPU-904-B User manual

CorLiving

CorLiving DPU-904-B User manual

CorLiving FS-3480 User manual

CorLiving

CorLiving FS-3480 User manual

CorLiving DWP-390-T User manual

CorLiving

CorLiving DWP-390-T User manual

CorLiving LDH-101-B User manual

CorLiving

CorLiving LDH-101-B User manual

CorLiving LOF-308-O User manual

CorLiving

CorLiving LOF-308-O User manual

CorLiving DPU-601-B User manual

CorLiving

CorLiving DPU-601-B User manual

CorLiving BMG-270-B User manual

CorLiving

CorLiving BMG-270-B User manual

CorLiving THW-750-B User manual

CorLiving

CorLiving THW-750-B User manual

Popular Indoor Furnishing manuals by other brands

Regency LWMS3015 Assembly instructions

Regency

Regency LWMS3015 Assembly instructions

Furniture of America CM7751C Assembly instructions

Furniture of America

Furniture of America CM7751C Assembly instructions

Safavieh Furniture Estella CNS5731 manual

Safavieh Furniture

Safavieh Furniture Estella CNS5731 manual

PLACES OF STYLE Ovalfuss Assembly instruction

PLACES OF STYLE

PLACES OF STYLE Ovalfuss Assembly instruction

Trasman 1138 Bo1 Assembly manual

Trasman

Trasman 1138 Bo1 Assembly manual

Costway JV10856 manual

Costway

Costway JV10856 manual

moss DESIGN Caisson Credenza Assembly instructions

moss DESIGN

moss DESIGN Caisson Credenza Assembly instructions

Aquaglide FULL DECK 15.0 owner's manual

Aquaglide

Aquaglide FULL DECK 15.0 owner's manual

AREBOS AR-HE-SW30 user manual

AREBOS

AREBOS AR-HE-SW30 user manual

Till-Hilft Fulda 87005.330 Assembly instructions

Till-Hilft

Till-Hilft Fulda 87005.330 Assembly instructions

Twoey Outside 2010 quick start guide

Twoey Outside

Twoey Outside 2010 quick start guide

Hettich Easys 200 operating instructions

Hettich

Hettich Easys 200 operating instructions

The bedboss RELAX 404 Series owner's manual

The bedboss

The bedboss RELAX 404 Series owner's manual

Oeseder Möbelindustrie Bern 991 720 Assembly instructions

Oeseder Möbelindustrie

Oeseder Möbelindustrie Bern 991 720 Assembly instructions

Costway HW68469 user manual

Costway

Costway HW68469 user manual

Next ALIX A27743 Assembly instructions

Next

Next ALIX A27743 Assembly instructions

BROSA Hans Assembly guide

BROSA

BROSA Hans Assembly guide

Prodigg MINIKA PBA015T-FUR installation manual

Prodigg

Prodigg MINIKA PBA015T-FUR installation manual

manuals.online logo
manuals.online logoBrands
  • About & Mission
  • Contact us
  • Privacy Policy
  • Terms and Conditions

Copyright 2025 Manuals.Online. All Rights Reserved.

Warranty Information
For warranty information please visit www.corliving.com.
Informations sur la garantie
Pour obtenir des informations sur la garantie, veuillez consulter www.corliving.com.
1
-
800
-
424
-
6710
or email: [email protected]
IF YOU NEED HELP WITH ASSEMBLY OR HAVE ANY PROBLEM
CALL
STOP!
DO NOT RETURN
THIS ITEM TO STORE
If outside pst standard business hours, please
leave a message and our CSR staff will return
your call by the next business day.
1
-
800
-
424
-
6710
[email protected]
Si vous avez besoin d’aide pour
l’assemblage ou si vous éprouvez des
difficultés, veuillez téléphoner au
ou envoyer un courriel à
En-dehors des heures de bureau HNP,
veuillez laisser un message et un représentant
du service à la clientèle retournera votre appel
au cours du prochain jour ouvrable.
ARRÊTEZ!
Ne Pas Retourner Cet
Article Au Magasin
1
-
800
-
424
-
6710
[email protected]
Si usted necesita ayuda con
asamblea o tiene cualquier problema
LLAMADA
ou e-mail
Si fuera pst horario comercial estándar,
por favor? Dejar un mensaje y nuestro
personal RSE le devolverá la llamada
el día hábil siguiente.
¡ALTO!
No volver este
artículo a la tienda
Run #: 16067
BBT-113-S / BBT-114-S
BBT-115-S / BBT-116-S
A
B
Protect finishes by placing furniture pieces on a soft carpeted surface during
assembly.
Protégez la finition en plaçant les pièces du meuble sur un tapis doux pendant
l’assemblage.
Do not place very hot/cold objects on top of any surface.Always use a coaster
or mat. Never leave liquids on the surface: Clean immediately with a mild soap
and a damp cloth. Never use scouring powder based cleanser.
Ne placez pas très chaud/froid d’objets sur une surface. Utilisez toujours un
coaster ou de tapis. Ne jamais laisser liquides sur la surface Nettoyer
immédiatement avec un savon doux et d’un chiffon humide.
Do not use power tools to assemble this product!
N’utilisez pas d’outils pour assembler ce produit!
Read this assembly manual carefully, and verify that you have all the parts
listed before you begin. Keep your assembly manual for future reference.
Lisez ce manuel de montage soigneusement. Soyez sûr que vous avez toutes
les pièces d’équipment avant de commencer. Gardez ce manuel de montage
pour futur référence.
Read instructions carefully. See furniture and hardware part list on
the right for guidance.
Have all parts ready before assembly. Place all wooden furniture
parts on a clean and flat soft surface to prevent scratching.
Before you start, here are some words of caution:
1. Do not FULLY - TIGHTEN nuts and bolts until all nuts and
bolts are partially tightened.
2. Do not FULLY - TIGHTEN nuts and bolts to avoid causing
damage to the threading.
3. Keep all hardware parts out of reach of children.
NOTE : THE LISTAND QUANTITY SHOWNARE FOR 1 UNIT ASSEMBLY.
Lisez attentivement les instructions. Voir la liste des pièces de
mobilier et de matériel à droite pour obtenir des conseils.
Ayez toutes les pièces prêtes avant l'assemblage. Placez toutes
les pièces de meubles en bois sur une surface propre et plane
pour éviter les rayures.
Avant de commencer, voici quelques mots de prudence:
1. Ne pas complètement - Serrer les écrous et les boulons
jusqu'à ce que tous les écrous et boulons soient partiellement
serrés.
2. Ne pas complètement - SERRER les écrous et les boulons
pour ne pas endommager le filetage.
3. Gardez toutes les pièces de matériel hors de portée des
enfants.
REMARQUE: LA LISTE ET LAQUANTITÉ INDIQUÉES SONT POUR
L’ASSEMBLAGE DE 1 UNITÉ.
Hex key
Clés hexagonales
Washer
Machine à laver
1 2
Finshed
Fini
Item
A
B
Part List / Liste des pièces
Description
Headboard / Tête de lit
Support post / Poste de support
Qty.
1
2
Item
1
Hardware list / Liste de matériel
Description
JCBB BOLT M8 x 60mm
Align pre-drilled support stand holes over the pre-drilled headboard
holes according to your desired headboard height.
Alignez les trous de support pré-percés sur les trous de tête pré-
percés en fonction de la hauteur de votre tête de lit souhaitée.
Your headboard assembly is complete.
Note: Hardware may loosen over time. Periodically check
that all connections are tight.
Votre assemblage de tête de lit est terminé.
Remarque: le matériel peut se desserrer avec le temps.
Vérifiez périodiquement que toutes les connexions sont
serrées.
Secure each support stand by using 2x JCBB Bolt [1] and 2x M8 Flat
Washer [2].
Tighten with supplied hex key [3].
Repeat the same procedure to secure the other side.
Fixez chaque support en utilisant 2 boulons JCBB [1] et 2 rondelles
plates M8 [2].
Serrer avec la clé hexagonale fournie [3].
Répétez la même procédure pour sécuriser l'autre côté.
Qty.
4
2
3
M8
M5
4
1
2
1
3