Coros LINX User manual

Quick Start Guide

COROS™ LINX Smart Cycling Helmet
PAGE 1
List of Contents
Smart Helmet, Smart Remote and Mount, Micro-USB Charging Cable,
Emergency Identification Card, COROS™ Helmet Bag, Reflective Decal
Polycarbonate shell
Power button
Expanded polystyrene
Strap
Tri-glide splitters
Buckle
O-Ring
Padding
MIC
Over ear bone
conduction headset

PAGE 2
Bone Conduction Speaker. The integrated open ear Bone Conduction
Speaker enables you to enjoy music safely. With ears completely open
to ambient sounds while riding, you will be able to maintain situational
awareness.
Smart Communication. Allows you to communicate with your family or
friends through your cell phone on the go.
Voice Navigation. Leads you along recommended routes. You won’t
need to continue checking a navigation screen, which can be dangerous.
Music Player. Bluetooth connection is integrated with the mobile app.
Emergency Alert System. When the helmet experiences an impact,
it will send an alert to your emergency contact.

PAGE 3
How to Wear Your Helmet
Warning: Please do not wear an improperly sized helmet even
after adjusting its fastening system.
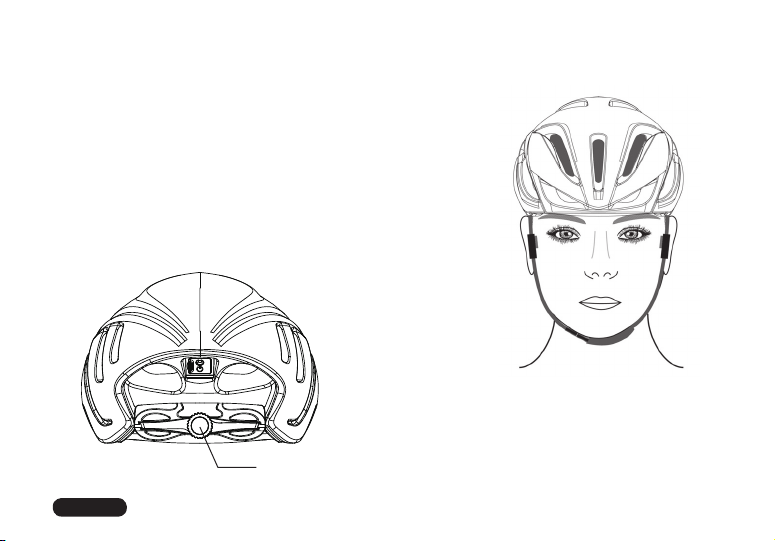
Put the helmet on your head as shown in Fig.1. Slide the
tri-glide splitters just below your earlobes. Next, adjust the
location of the buckle to provide even tension between
your neck and head. Finally, adjust the knob on the
regulator for proper integration.
• Fig.1 shows the correct way to wear the helmet.
Always wear the helmet with the strap and buckle
fastened, and with the strap pulled tight and
positioned back against the throat. The leading edge of
the helmet should land just above the eyebrows.
• Fig. 2 illustrates the incorrect position for the helmet.
Failure to wear the helmet properly may cause
discomfort to the rider or even cause the helmet to
shift or fall off during an accident.
Fig. 1. Correct
Fig. 2. Incorrect

PAGE 4
•The tri-glide splitter as shown in Fig. 3 is
a key component for orientating the hel-
met. Adjust the tri-glide splitters on each
side of the helmet so that the left strap
and right strap come together just under
the earlobes.
How to Wear Your Helmet, cont.
Tri-glide
splitters
O Ring-
Fig. 3.
Fig. 4.
• Fig. 4 shows how the chin strap also plays
an important part role in orientating the
helmet. Adjust the length of the strap
and the location of the buckle to create
a comfortable, yet firm tightness around
your chin and head.

•The COROS™ helmet is equipped with an adjust-
able fit system which helps stabilize the helmet
when worn in the correct position while riding.
Fig. 5 shows where to locate the adjustable
knob. Turn the knob clockwise to tighten and
counter-clockwise to loosen.
How to Wear Your Helmet, cont.
Fig. 5.
• Fig. 6 shows how the helmet will look
from the front when adjusted correctly.
Fig. 6.
Control knob
PAGE 5

How to Operate Smart Functions
Charging
Please fully charge up your LINX helmet before using. To charge the helmet, open the
Micro USB protective cover, located at the back of helmet. Next, plug the data line into
the Micro USB interface, as shown in Fig. 7.
Turning On/Off
To turn the helmet ON, hold the Power button
for 3 seconds until you hear the word “pairing”.
To turn the helmet OFF, hold the Power button
for 3 seconds until the LED
indicator light turns off.
PAGE 6
Fig. 7.

Pairing
1. See www.coros.com for compatible IOS and Andriod
devices.
2. To pair your helmet to your phone, first power on the
helmet. On your phone, turn Bluetooth “On”. To enter
the Bluetooth Pairing interface, find OTHER DEVICES,
and select “COROS™ Helmets”. (See Fig. 8)
3. Download the COROS™ Helmet APP. (see Fig. 9).
Fig. 9.
Fig. 8.
CorosHelmet Go
Option 1: Search and Download > Option 2:
Scan Quick Response Code >
In the App Store,search and find
“Coros Helmet”. Download and
save it directly to your phone.
Android IOS- Apple
PAGE 7

4. To connect to COROS™ smart devices, launch the COROS™ Helmet App. Select
corresponding smart devices under the Device List. (see Fig. 10)
Connecting the Controller Remote
1. Pairing: Tap on Smart Remote under Device to enter the Pair interface
(see Fig. 11). Click the “Match” button (see Fig. 12) and then press and hold
any key on the Smart Remote until the “Successfully Paired” message appears.
Fig. 10. Fig. 11. Fig. 12.
PAGE 8

2. Mounting: Your package contains the Smart Remote, plus the remote holder
and 2 rubber rings. Find a spot on your bicycle handlebar to mount the holder,
near your right or left hand (Fig. 14, Picture 1). Position the first rubber ring at one
corner of the holder and stretch the ring diagonally to catch on the opposite
corner as shown in Picture 2. Attach the second rubber ring to the other two
corners. Picture 3 shows the holder installed correctly, with the Smart Remote
placed into position. Note: the orientation of the Smart Remote is flexible based
upon the rider’s preference.
Fig. 14.
.3erutciP.2erutciP.1erutciP
PAGE 9

Quick press for music play or pause.
Quick press for volume up and down.
Quick press to advance to next music track.
Quick press to answer phone calls or to hang up.
Quick press one of these buttons to mute incoming phone call.
Quick press to start Walkie Talkie. A second Quick press will send the message
(accessory sold separately).
LED Status Indicators
Low Battery: red light flashing slowly
Charging: solid red light
Full Charged: solid green light
Bluetooth Pairing Mode: green light flashing slowly
Smart Remote Functions
PAGE 10

Specifications
klat/yalpsruoh+01emiTyalPcisuM
BSUorciMecafretniegrahC
A6.0/V5CDtupnIlacirtcelE
sruoh5.1yletamixorppAemiTgnigrahC
syad081otpUemitybdnatS
Bluetooth Operational Distance Up to 10 meters (33 feet)
PSH,PCRVA,PPS,PFH,PD2A,ELBelfiorPhtooteulB
2*W5.0tuptuOrekaepS
Bd3±58emuloVrekaepS
bD3±24-ytivitisneSciM
PAGE 11

Troubleshooting of Electronic Functions
1. Unable to power on helmet
Try charging the helmet from 1 to 2 hours.
2. After power on, the helmet automatically powers off after a short
period of use.
Perform a “hard reset” by pressing the power button for a period of 10 seconds.
3. No response for remote pair and operation.
After several failed attempts to pair the helmet, please contact COROS™ Support
at www.coros.com
For complete troubleshooting information, please visit www.coros.com
PAGE 12

Limited Warranty
PAGE 13
COROS™ warrants the original purchaser of this product that the product is free of defects
in material and workmanship for a period of one year(US & CA)/two years(EU) from the
original date of purchase. This warranty does not apply to defects of physical damage
resulting from neglect, abuse, improper repair, use, or fi t, alterations, or any use
unintended by the manufacturer. COROS™ does not warranty any helmet damaged due
to heat or contact with solvents. This warranty is in lieu of all other agreements and
warranties, general or special, express or implied and no representative or person is
authorized to assume liability on behalf of COROS™ in connection with the sale or use of
this product. This warranty program covers all parts of your COROS™ product and applies
to all types of defects or failure, except for loss. If your COROS™ helmet is found to be
defective in materials or workmanship within one year(US & CA)/two years(EU) from the
date of purchase, COROS™ or the country distributor will at its sole option either repair or
replace the helmet free of charge.

Certifications
Model: COROS™ Linx
C.P.S.C.16 CFR Part 1203
United States Federal Safety Standard for Bicycle Helmets
(Consumer Product Safety Commission)
CE, EN1078 (Europe Safety Standard)
FCC ID: YNGHA002-0001
FCC Part 15B,Part 15C
CE R&TTE Directive 1999/5/EC
PAGE 14

General Safety, Use and Care
This manual covers important information with respect to safety, operation and
maintenance of the helmet, please read it carefully before initial use.
1. No helmet can protect its user from all unforeseeable accidents, including those
involving bicycle-to-motor vehicle collisions. The COROS™ helmet is designed to
protect the head and cannot guard against cervical, spine or other body injuries that
may result from an accident.
2. The helmet is designed to be retained by a trap under the lower jaw. It is not
intended for motorsport, moped or other uses.
3. To be effective, the helmet must fit properly and be worn correctly. Securely fasten
retention system as shown on page 3-5. Grasp the helmet and try to rotate it to front
and rear. A correctly fitted helmet should be comfortable and should not move forward
to obscure vision or rearward to expose the forehead.
4. No attachments should be made to the helmet except those recommended by the
helmet manufacturer.
5. The helmet is designed to absorb shock by partial destruction of the shell and liner.
This damage may not be visible. Therefore, if subjected to a severe blow, the helmet
should be destroyed and replaced even if it appears undamaged.
PAGE 15

6. The helmet may be damaged and rendered ineffective by petroleum and petroleum
products, cleaning agents, paints, adhesives, etc., without the damage being visible to
the user.
7. A helmethas a limited lifespan and should bereplaced when it shows obvious signs of wear.
8. This helmet should not be used by children while climbing or doing other activities
where there is a risk of hanging or strangulation should the child become trapped
Please keep the helmet out of reach from children under five.
9. Please exercise care and good judgment whenever you ride. Comply with all traffic
laws and regulations and do your part to avoid accidents of any kind.
10. Do not modify or remove any original components of your helmet, other than as
recommended by COROS™. Doing so will void all COROS™ warranties.
11. Keep your helmet charged with the USB charging adapter.
12. Please mount the Smart Remote into the holder before each use.
13. The product can be upgraded online through the COROS™ Application. Do not termi-
nate power or force the helmet to turn off in the course of upgrading; this could lead
to booting failures.
14. The COROS™ helmet is waterproof.
PAGE 16

Maintenance
Clean the helmet with mild soapy water. Avoid use of specific solvents such as
ammonia, bleach, paints, abrasives or hydrocarbons which may damage the helmet and
cause it to fail to protect the head in the accident.
Storage
1. Keep the helmet far away from high temperatures over 65.5C or 149.9F, as it may
cause damage to the helmet. Do not place the helmet into dark colored vehicles or
store it in tightly sealed containers or bags where high heat can accumulate and cause
damage to the helmet. Do not use the helmet if it has been deformed by heat.
2. Make sure the helmet is clean and dry after each use. Store the helmet in a dry and
ventilated location.
PAGE 17

Contact
COROS™ Wearables Inc.
3310 Noble Pond Way, Suite 207 Woodbridge, VA 22193
For updated product and mobile app information, please visit www.coros.com
PAGE 18

www.coros.com
Table of contents
Other Coros Motorcycle Accessories manuals
Popular Motorcycle Accessories manuals by other brands

R&G
R&G FI0023BK Fitting instructions

hepco & becker
hepco & becker 650.784 0101 Assembling instructions

Datatool
Datatool S4 user guide

Custom Dynamics
Custom Dynamics ProBEAM Dynamic Strips installation instructions

MOTORader
MOTORader 4R user guide

hepco & becker
hepco & becker 7003534 00 01 quick start guide