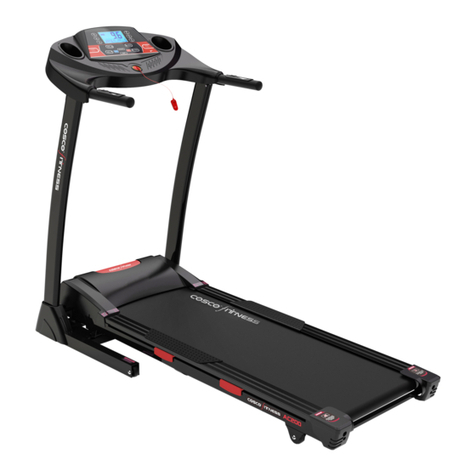
Cosco Fitness AC300 User manual

Please read all precautions and instructions in this
manual before in detail before usin
g
this equipment.
Owner Manual For
Motorized treadmill
AC300

2
When using this product, basic precautions should always be followed, including the following:
Please read the instruction carefully before starting to use this product.
Danger – To reduce the risk of electric shock:
1. Always unplug this product from the electrical outlet immediately after using and before cleaning.
Warning – To reduce the risk of burns, fire, electric shock, or physical injury:
1. The product should never be left unattended while plugged in. Unplug the product from the outlet
when not in use.
2. Close supervision is necessary when this product is used by or near children, invalids, or disabled
persons.
3. Be sure to use the product only for its intended use as described in this manual. Do not use any
attachment not recommended by the manufacturer in order to avoid any danger or accidents.
4. Never operate the product if it has a damaged cord or plug, if it is not working properly, if it has been
damaged, or dropped into water. Please return the product to the service center of seller for
examination and repair.
5. Do not carry this product by the supply cord or use the cord as a handle.
6. Keep the cord away from hot surfaces or ground.
7. Never operate the product with the air vents blocked. Keep the air vents free of lint, hair, etc.
8. Never drop or insert any objects into any openings.
9. Do not use or operate outdoors.
10. Do not operate where aerosol (spray) products are being used or where oxygen is thin.
11. Before turning the product power off, turn all controls to the off position then remove the plug from
the outlet.
12. Connect the product to a properly grounded outlet only.
13. If the treadmill is foldable, when user finishes using the treadmill, the elevation needs to be back to
original position.
14. When user is using the treadmill, it can not be folded at the same time.
15. Keep a safety space of 2000mm x 1000mm away from the treadmill.
16. This machine is only intended for household use.
17. For the treadmill with folding function and electric elevation, be sure that the elevation is 0 before
folding (To avoid interference of the components).
18. Stop using the treadmill if you feel faint, dizzy, or short of breath.
19. Wear appropriate exercise clothes when using the treadmill. Do not wear loose clothes that could
become caught in the treadmill. Athletic support clothes are recommended for both men and
women. Always wear athletic shoes. Never use the treadmill with bare feet, wearing only stockings,
or in sandals.
SAFETY CAUTIONS

3
GROUNDING INSTRUCTIONS
The products must be grounded first. If malfunction or breakdown occurs, grounding will provide a path
of least resistance for electric current to reduce the risk of electric shock.
The product is equipped with a cord having an equipment-grounding conductor and a grounding plug.
The plug must be plugged into an appropriate outlet that is properly installed and grounded in
accordance with all local codes and ordinances.
Danger – Improper connection of the equipment-grounding conductor can result in a risk of electric
shock. Check with a qualified electrician or serviceman if you are in doubt as to whether the products
are properly grounded. Do not modify the plug provided with the product – if it will not fit the outlet,
have a proper outlet install by a qualified electrician.
The products is for use on nominal 220-240 volt and has a grounding plug that looks like the plug
illustrated in the figure . Make sure that the product is connected to an outlet having the same
configuration as the plug.
There is no need to use any adapter for this product.
Figure
Grounding methods
GROUNDED OUTLET

4
OPEN THE BOX YOU CAN FIND THE ALL PARTS AS BELOW.
ASSEMBLY INSTRUCTIONS
GROUNDED PIN

5
5#Allen wrench 5mm 1pcs ; 6# Allen wrench 6mm 1pcs ;
Cross open end wrench 13, 14, 15 1pcs
No. NAME SPEC Q’TY No. Name SPEC Q’TY
1 Base 1 2 Console 1
12 Hexagon bolt with
semicircular head M8*45 2 13 Hexagon bolt with
semicircular head M8*40 2
15 Hexagon bolt with
semicircular head M8*20 4 31
Internal serrated washer Φ8 8
33 Lock nut M8 2 61 Security lock 1
76 Silicone oil bottle 1 82 MP3 cable 1
83 Allen wrench 5# 1 84 Allen wrench 6# 1
85 Cross open end wrench 13 14 15 1

6
Note: Do not insert power until installation is complete.
Step 1
:
Step 2:
ASSEMBLY INSTRUCTIONS
Take out the console (2) and then the
treadmill base (1) from the carton and
place on a level flat surface. Please
always use the aid of a second person
when removing the treadmill from the
carton
Put the treadmill on the ground, use pull pin fixing
the running deck, then use the Allen
Wrench(83) to lock Hexagon Socket Button Head
Bolt(12), Washer(31), Hexagon Socket Button
Head Bolt(15) into uprights and base,not locked
temporarily.
1
2

7
Step 3:
Step 4:
2 persons cooperate to lift the console and connect the
communication lines, and then use Allen Wrench (83) to
pre-lock the semi-circular head hexagonal bolt (13), the
washer (31) and the semi-circular head hexagonal bolt
(15) to the uprights and console frames, but not locked
temporarily.

8
Step 5:
NOTE: For your safety and comfort, please check if all screws are fastened.
See Left figure,
Please hold ‘B’, use your foot to kick the gas
spring,and press down a moment, the machine
will automatically drop down.
See Left figure,
Please raise base at the top of arrow (A),until
hearing the sound from gas spring.

9
1. Operation Guide
FUNCTION KEY: START, STOP, PROGRAM, MODE, SPEED+/- quick key, INCLINE+/- quick key,volume
+/- key.
A “PROGRAM” key: Select program and FAT while the machine is in status of stop.
B “MODE” key:Select TIME / DISTANCE / CALORIES mode.
C “START”key: When machine is stopped or paused,press this key,it will be working.
OPERATION GUIDE

10
D “STOP”key: When machine is running,press this key,it will be stopped.
E “SPEED+/ -”key:When machine is running,press these keys to adjust speed and parameter.
F “INCLINE+/-”key: When machine is running,press these keys to adjust incline and parameter.
G Quick speed key:When machine is running,press quick speed key“5”“10”“15”,it will be matched
to corresponding values.
H Quick incline key:When machine is running,press quick incline key“5”“10”“15”,it will be matched
to corresponding values.
I Volume +/- key:When the music is playing,press these keys to adjust volume.
2. Emergency stop key function﹕
When the motor is working,take off the emergency stop key,the console will stop,and not allow
starting.
3. Pulse function:
When the machine is connected to power,both hands grasp the pulse sensors on the handrails.In
order to receive accurate heartbeat value, please stand on the running platform,and grasp the pulse
sensors no less than 30 seconds.Measure range:50—200 beats per minute.
This data is for reference only and cannot be used for medical purpose.
4. Numerical display range:
BEGIN
VALUE
SET
STARTING
VALUE
SETING RANGE SHOWING RANGE
PROGRAM
TIME(MIN:SEC.) 0:00 30:00 5:00~99:00 0:00~99:59
SPEED(KM/H) 0.0 1.0 1.0~18.0 0.0-18.0
INCLINE % 0.0 0 0~15% 0-15%
DISTANCE(KM) 0.0 1.0 0.5~99.9 0.0-99.9
CALORIE(KCAL) 0 50 10-999 0-999

11
MODE TIME(MIN:SEC) 0:00 15:00 5:00~99:00 0:00~99:59
5.
PRESET PROGRAM CHART:
Each program divided running time into 20 intervals; the speed on each interval has been preset in the factory.
TIME
PROG.
Time set/20 intervals = running duration
1 2 3 4 5 6 7 8 9 10 11 12 13 14 15 16 17 18 19 20
P01 SPEED 2 3 3 4 5 3 4 5 5 3 4 5 4 4 4 2 3 3 5 3
INCLINE 1 1 2 2 2 3 3 3 2 2 1 2 2 1 1 3 3 2 2 2
P02 SPEED 2 4 4 5 6 4 6 6 6 4 5 6 4 4 4 2 2 5 4 2
INCLINE 1 2 2 2 2 3 3 2 2 2 2 2 3 3 3 4 4 3 2 2
P03 SPEED 2 4 4 6 6 4 7 7 7 4 7 7 4 4 4 2 4 5 3 2
INCLINE 2 3 3 2 2 3 3 3 2 2 2 2 4 4 4 6 6 3 2 2
P04 SPEED 3 5 5 6 7 7 5 7 7 8 8 5 9 5 5 6 6 4 4 3
INCLINE 2 3 3 2 2 3 3 3 2 2 2 2 4 4 4 6 6 3 2 2
P05 SPEED 2 4 4 5 6 7 7 5 6 7 8 8 5 4 3 3 6 5 4 2
INCLINE 3 3 3 4 4 5 5 5 4 4 4 4 5 5 3 3 3 2 2 2
P06 SPEED 2 4 4 4 5 6 8 8 6 7 8 8 6 4 4 2 5 4 3 2
INCLINE 3 5 5 5 4 4 4 3 3 3 3 4 4 4 3 3 3 4 3 2
P07 SPEED 2 3 3 3 4 5 3 4 5 3 4 5 3 3 3 6 6 5 3 3
INCLINE 4 4 4 4 3 3 6 6 6 7 7 8 8 9 9 6 6 5 4 4
P08 SPEED 2 3 3 6 7 7 4 6 7 4 6 7 4 4 4 2 3 4 4 2
INCLINE 4 5 5 5 6 6 6 7 8 9 9 9 10 10 10 12 12 8 6 3
P09 SPEED 2 4 4 7 7 4 7 8 4 8 9 9 4 4 4 5 6 3 3 2
INCLINE 5 5 5 6 6 6 4 4 6 6 5 5 8 8 9 9 9 7 4 2
P10 SPEED 2 4 5 6 7 5 4 6 8 8 6 6 5 4 4 2 4 4 3 3

12
INCLINE 5 6 6 6 7 5 8 8 4 4 4 5 5 8 8 10 10 8 6 3
P11 SPEED 2 5 8 10 7 7 10 10 7 7 10 10 5 5 9 9 5 5 4 3
INCLINE 4 5 3 2 6 6 2 2 2 2 2 4 5 6 3 2 5 5 2 0
P12 SPEED 3 4 9 9 5 9 5 8 5 9 7 5 5 7 9 9 5 7 6 3
INCLINE 1 2 3 2 3 5 5 0 0 2 3 5 7 3 3 5 6 5 3 3
P13 SPEED 3 6 7 5 9 9 7 5 5 7 9 5 8 5 9 5 9 9 4 3
INCLINE 3 3 5 6 5 3 3 7 5 3 2 0 0 5 5 3 2 3 2 1
P14 SPEED 2 2 4 5 6 5 4 3 2 1 2 3 4 5 6 5 4 3 2 1
INCLINE 4 4 4 4 3 3 6 6 6 7 7 8 8 9 9 6 6 5 4 4
P15 SPEED 2 4 6 8 6 6 4 4 2 2 2 4 6 8 6 6 4 4 2 2
INCLINE 3 3 3 4 4 5 5 5 4 4 4 4 5 5 3 3 3 2 2 2
P16 SPEED 2 4 6 8 10 8 6 4 2 2 2 4 6 8 6 6 4 4 2 2
INCLINE 5 5 5 6 6 6 4 4 6 6 5 5 8 8 9 9 9 7 4 1
P17 SPEED 2 2 6 6 8 10 6 6 2 2 2 2 6 6 8 10 6 6 2 2
INCLINE 4 5 5 5 6 6 6 7 8 9 9 9 10 10 10 12 12 8 6 3
P18 SPEED 2 3 4 5 2 3 4 5 3 2 2 3 4 5 2 3 4 5 3 2
INCLINE 4 4 4 4 3 3 6 6 6 7 7 8 8 9 9 6 6 5 3 2
P19 SPEED 2 4 6 2 4 6 2 4 6 2 2 4 6 2 4 6 2 4 6 2
INCLINE 3 5 5 5 4 4 4 3 3 3 3 4 4 4 3 3 3 4 3 2
P20 SPEED 1 3 4 5 6 5 4 3 2 1 1 3 4 5 6 5 4 3 2 1
INCLINE 3 3 3 4 4 5 5 5 4 4 4 4 5 5 5 3 2 3 2 1
P21 SPEED 4 5 4 4 4 2 3 3 5 3 2 3 3 4 5 3 4 5 5 3
INCLINE 1 2 2 1 1 3 3 2 2 2 1 1 2 2 2 3 3 3 2 2
P22 SPEED 5 6 4 4 4 2 2 5 4 2 2 4 4 5 6 4 6 6 6 4
INCLINE 2 2 3 3 3 4 4 3 2 2 1 2 2 2 2 3 3 2 2 2
P23 SPEED 2 4 4 4 4 2 4 5 3 2 2 4 4 6 6 4 7 7 7 4
INCLINE 2 2 4 4 4 6 6 3 2 2 2 3 3 2 2 3 3 3 2 2
P24 SPEED 3 5 9 5 5 6 6 4 4 3 3 5 5 6 7 7 5 7 7 8

13
INCLINE 2 2 4 4 4 6 6 3 2 2 2 3 3 2 2 3 3 3 2 2
P25 SPEED 3 4 5 4 3 3 6 5 4 2 2 4 4 5 6 7 7 5 6 7
INCLINE 4 4 5 5 3 3 3 2 2 2 3 3 3 4 4 5 5 5 4 4
P26 SPEED 1 3 6 4 4 2 5 4 3 2 2 4 4 4 5 6 8 8 6 7
INCLINE 3 4 4 4 3 3 3 4 3 2 3 5 5 5 4 4 4 3 3 3
P27 SPEED 4 5 3 3 3 6 6 5 3 3 2 3 3 3 4 5 3 4 5 3
INCLINE 2 4 8 9 9 6 6 5 4 4 4 4 4 4 3 3 6 6 6 7
P28 SPEED 1 3 4 4 4 2 3 4 4 2 2 3 3 6 7 7 4 6 7 4
INCLINE 3 2 2 4 3 2 2 4 6 3 4 5 5 5 6 6 6 7 8 9
P29 SPEED 2 5 5 5 4 5 6 3 3 2 2 4 4 7 7 4 7 8 4 8
INCLINE 5 5 8 8 9 9 9 7 4 2 5 5 5 6 6 6 4 4 6 6
P30 SPEED 6 6 5 4 4 2 4 4 3 3 2 4 5 6 7 5 4 6 8 8
INCLINE 4 5 5 8 8 10 10 8 6 3 5 6 6 6 7 5 8 8 4 4
P31 SPEED 4 2 4 4 3 4 5 5 4 3 2 5 8 10 7 7 10 10 7 7
INCLINE 2 4 5 6 3 2 5 5 2 0 4 5 3 2 6 6 2 2 2 2
P32 SPEED 5 5 2 2 4 5 5 7 6 3 3 4 9 9 5 9 5 8 5 9
INCLINE 3 5 7 3 3 5 6 5 3 3 1 2 3 2 3 5 5 0 0 2
P33 SPEED 2 3 2 1 3 2 9 9 4 3 3 6 7 5 9 9 7 5 5 7
INCLINE 2 0 0 5 5 3 2 3 2 1 3 3 5 6 5 3 3 7 5 3
P34 SPEED 2 3 4 5 6 5 4 3 2 1 2 2 4 5 9 9 4 4 4 5
INCLINE 4 2 2 4 2 6 6 5 4 4 4 4 4 4 3 3 6 6 6 7
P35 SPEED 2 4 6 8 6 6 4 4 2 2 2 4 6 8 6 6 4 4 2 2
INCLINE 4 4 5 5 3 3 3 2 2 2 3 3 3 4 4 5 5 5 4 4
P36 SPEED 2 4 6 8 6 6 4 4 2 2 2 4 6 8 10 8 6 4 2 2
INCLINE 5 5 8 8 9 9 9 7 4 1 5 5 5 6 6 6 4 4 6 6
P37 SPEED 2 2 6 6 8 10 6 6 2 2 2 2 6 6 8 10 6 6 2 2
INCLINE 4 2 2 6 8 10 12 8 6 3 4 5 5 5 6 6 6 7 8 9
P38 SPEED 2 3 4 5 2 3 4 5 3 2 2 3 4 5 2 3 4 5 3 2

14
INCLINE 7 8 8 9 9 6 6 5 3 2 4 4 4 4 3 3 6 6 6 7
P39 SPEED 2 4 6 2 4 6 2 4 6 2 2 4 6 2 4 6 2 4 6 2
INCLINE 3 4 4 4 3 3 3 4 3 2 3 5 5 5 4 4 4 3 3 3
P40 SPEED 1 3 4 5 6 5 4 3 2 1 1 3 4 5 6 5 4 3 2 1
INCLINE 4 4 5 5 3 3 3 2 2 2 3 3 3 4 4 5 5 5 4 4
P41 SPEED 3 4 5 5 3 4 5 4 4 4 2 3 3 4 5 2 3 3 5 3
INCLINE 3 3 3 2 2 1 2 2 1 1 1 1 2 2 2 3 3 2 2 2
P42 SPEED 4 6 6 6 4 5 6 4 4 4 2 4 4 5 6 2 2 5 4 2
INCLINE 3 3 2 2 2 2 2 3 3 3 1 2 2 2 2 4 4 3 2 2
P43 SPEED 4 7 7 7 4 7 7 4 4 4 2 4 4 6 6 2 4 5 3 2
INCLINE 3 3 3 2 2 2 2 4 4 4 2 3 3 2 2 6 6 3 2 2
P44 SPEED 7 5 7 7 8 8 5 9 5 5 3 5 5 6 7 6 6 4 4 3
INCLINE 3 3 3 2 2 2 2 4 4 4 2 3 3 2 2 6 6 3 2 2
P45 SPEED 7 7 5 6 7 8 8 5 4 3 2 4 4 5 6 3 6 5 4 2
INCLINE 5 5 5 4 4 4 4 5 5 3 3 3 3 4 4 3 3 2 2 2
P46 SPEED 6 8 8 6 7 8 8 6 4 4 2 4 4 4 5 2 5 4 3 2
INCLINE 4 4 3 3 3 3 4 4 4 3 3 5 5 5 4 3 3 4 3 2
P47 SPEED 5 3 4 5 3 4 5 3 3 3 2 3 3 3 4 6 6 5 3 3
INCLINE 3 6 6 6 7 7 8 8 9 9 4 4 4 4 3 6 6 5 4 4
P48 SPEED 7 4 6 7 4 6 7 4 4 4 2 3 3 6 7 2 3 4 4 2
INCLINE 6 6 7 8 9 9 9 10 10 10 4 5 5 5 6 12 12 8 6 3
P49 SPEED 4 7 8 4 8 9 9 4 4 4 2 4 4 7 7 5 6 3 3 2
INCLINE 6 4 4 6 6 5 5 8 8 9 5 5 5 6 6 9 9 7 4 2
P50 SPEED 5 4 6 8 8 6 6 5 4 4 2 4 5 6 7 2 4 4 3 3
INCLINE 5 8 8 4 4 4 5 5 8 8 5 6 6 6 7 10 10 8 6 3
6. CUSTOMIZED PROGRAMS OPERATION
The user can set programs according to their own needs. There are 5 user-setting programs: U1, U2, U3, U4, U5.

15
A. Customized program setting:
Press “PROG” button in standby status to choose U1, U2, U3, U4, or U5,
and the “TIME” window will flash to display the
preset time. Press the SPEED+/- button to set the desired time, then press the “MODE” button to confirm and then
you can set the program parameters, then set the first time interval, press the +/- button or Quick SPEED button to set
the speed/incline. Press the “MODE” button to complete the setting of the first time interval, and enter the setting of the
second time interval, follow same operation, and then do the same until all the 20 time intervals are set. After the setting
is completed, the data will be saved permanently until the next time you reset it. This data will not be lost due to power
outages.
B. Selection and start up of customized programs:
Press the“PROG” button in the standby status to choose a program among U1, U2, U3, U4, U5, and set the running
time then you can press the “START” button to start running.
7. Body fat test - FAT:
Body mass index (FAT) is a measure of a person's height and weight, not the proportion of the body. FAT is suitable
for any male and female, together with other health indicators to provide people with the basis for weight adjustment.
1) When the treadmill is stopped, press the program key to select the body fat test program and enter the body fat
test.
2) Press the MODE button to set the gender, age, height and weight respectively. After setting, press the MODE
button to test the result.At this moment, please put your hands on the handrail sensors, and the body Fat value
will be displayed within 8 seconds.
Input parameter display and setting range:
Parameter
category Default value Setting range Remark
SEX(F1)1(MAN)1—2 1=MAN 2=WOMAN
AGE(F2)25 years old 10—99 years
HEIGHT(F3)170 CM 100—200 CM
WEIGHT(F4)70KG 20—150KG

16
RESULT(F5)AS BELOW
Special note: This data is only used as a workout reference and cannot be used as
medical data.
Using Asian standards as a reference, fat test results:
FAT ≤19 -- Underweight
19<FAT ≤25 -- Normalweight
25<FAT ≤29 -- Over weight
FAT≥30 -- Obesity
8. Error code and trouble-shooting:
Error Code Error Description Trouble-shooting
E1
A. Signal wire is abnormal Check signal wire is fully well inserted.Replace it
if damaged.
B. Console PCB is abnormal Change console PCB
C. Motor is abnormal Change Controller
E2 A. Controller is abnormal Change Controller
E3
A. Photoelectric sensor is not installed
correctly Check and reconnect
B. Photoelectric sensor is defective Replace the photoelectric sensor
C. Poor connection between photoelectric
sensor and controller Check and reconnect
E4 Incline review Incline resumes normal after reviewing
E5
A. Running belt friction is too big Adding lubricant oil
B. Damaged controller Replace the controller
C. Motor damage Replace the motor
E6 Motor cable and motor failure Replace the motor
MAINTENANCE

17
Warning: be sure to unplug the electric treadmill before cleaning or maintaining the product.
Cleaning: comprehensive cleaning will extend the life of the electric treadmill.
Remove dust regularly to keep parts clean. Be sure to clean the exposed areas on both sides of the running belt,
which will reduce the accumulation of impurities under the running belt. Make sure your running shoes are clean
and don't wear out the running board and belt by carrying foreign bodies under the running belt. The surface of
the running belt must be swabbed with a wet soapy cloth. Be careful not to splash water on the electrical
components and under the running belt.
Warning: be sure to unplug the power supply of the electric treadmill before moving the motor cover. Open the
motor cover at least once a year to clean the motor dust belt and special lubricating oil for electric running
The running board and running belt of this electric treadmill have been pre-lubricated. The friction force between
the running belt and the running plate has a great impact on the service life and performance of the electric
treadmill, so it is necessary to apply lubricating oil regularly.
We suggest that the board be inspected regularly. If the surface is damaged, please contact our customer service
center.
We suggest lubricating the running belt and running board
of the electric treadmill according to the following
schedule:
Lightweight users (use less than 3 hours per week) once a
year;
Middleweight users (3-5 hours per week) once every 6
months;
Heavy users (over 5 hours per week) once every 3
months.

18
BELT ADJUSTMENT:
1. To better maintain your electric treadmill and extend the machine life, it is recommended that you
continue to use it for 2 hours Turn off the power and let the machine rest for 10 minutes before using.
2. If the running belt is too loose, it may slip when running. If too tight, too tight may reduce the motor
performance And make roller, running belt wear and tear aggravate. When the running belt is loose and tight,
you can lift the running belt from both sides with your hands The step plate is about 50-75mm.
Place the treadmill on a level surface.
Run the electric treadmill at a speed of about 6-8 km/h and
observe the deviation of the running belt.
If the running belt is tilted to the right, remove the safety lock and
power switch, rotate the adjusting bolt on the right side clockwise
1/4 turn, insert the power switch and safety lock to make the
running machine run, and observe the deviation of the running
belt. Repeat until the running belt is centered. Figure A.
If the running belt is tilted to the left, remove the safety lock and
power switch, rotate the adjusting bolt on the left side clockwise
1/4 turn, insert the power switch and safety lock to make the
running machine run, and observe the deviation of the running
belt. Repeat until the running belt is centered. Figure B
Running belt in the above adjustment or use after a period of time
will gradually relax, need to adjust.
Remove the safety lock and power switch, and rotate the adjusting
bolts on both sides clockwise 1/4 turn. Insert the power switch and
A
B
C

19
EXPLODED DRAWING

20
Table of contents
Other Cosco Fitness Treadmill manuals

Cosco Fitness
Cosco Fitness SX-3366 User manual

Cosco Fitness
Cosco Fitness AC200 User manual

Cosco Fitness
Cosco Fitness AC1100 User manual

Cosco Fitness
Cosco Fitness CMTM-4610A2 User manual

Cosco Fitness
Cosco Fitness AC550 User manual

Cosco Fitness
Cosco Fitness SX-1122 User manual

Cosco Fitness
Cosco Fitness CMTM-4111A2 User manual

Cosco Fitness
Cosco Fitness AC700 User manual

Cosco Fitness
Cosco Fitness SX-3030 User manual

Cosco Fitness
Cosco Fitness AC600 User manual