Cosco Fitness AC700 User manual

TREADMILL MANUAL
AC700

- 2 -
Thanks for buying our Fitness equipment,
Do some warm-up exercise before use, you’ll get twice the result with half the effort. Such as follows:
extend the neck up and down
twist the waist left and right
level push forwards upright straighten one's back

- 3 -
left and right poise exercise up and down extend exercise
thigh extend exercise calf extend exercise
SAFETY GUIDELINES:
Before beginning any exercise program, you should consult with your doctor. It is recommended that you
undergo a complete physical examination. Please follow the instructions:
1. Assemble and operate the treadmill on a solid, level surface
2. Keep the area behind the treadmill clear
3. The treadmill running mat will not stop immediately if any object becomes caught in the mat or rollers-IN
EMERGENCY: Pull the safety key cord to remove safety key
4. Always check the treadmill before using it
5. Make sure all parts are assembled, nuts and bolts are tightened
6. Do not use the treadmill if the unit is disassembled in any way
7. When connecting the power cord, plug the power cord into a grounded circuit. No other appliance

- 4 -
should be on the same circuit. Do not run the power cord underneath your treadmill. Do not operate the
treadmill with a damaged or frayed power cord.
8. Keep hands away from moving parts
9. Please note that there is a weight limitation for this product. If your weight more than 140kgs. It is not
recommended that you use this product. Serious injury may occur if the user weight exceeds the limit
shown here. This product is not intended to support users whose weight exceeds this limit.
10. This equipment is for home use only. Never allow more than one person on the treadmill at a time.
11. Wear appropriate exercise clothing when using the treadmill. Do not wear loose clothing that could become
caught in the treadmill. Athletic support clothes are recommended for both men and women.Always wear
athletic shoes. Never use the treadmill with bare feet, wearing only stockings, or in sandals. Do not wear
shoes with leather soles or high heels. Tie all long hair back
12. Do not rock the unit from side to side
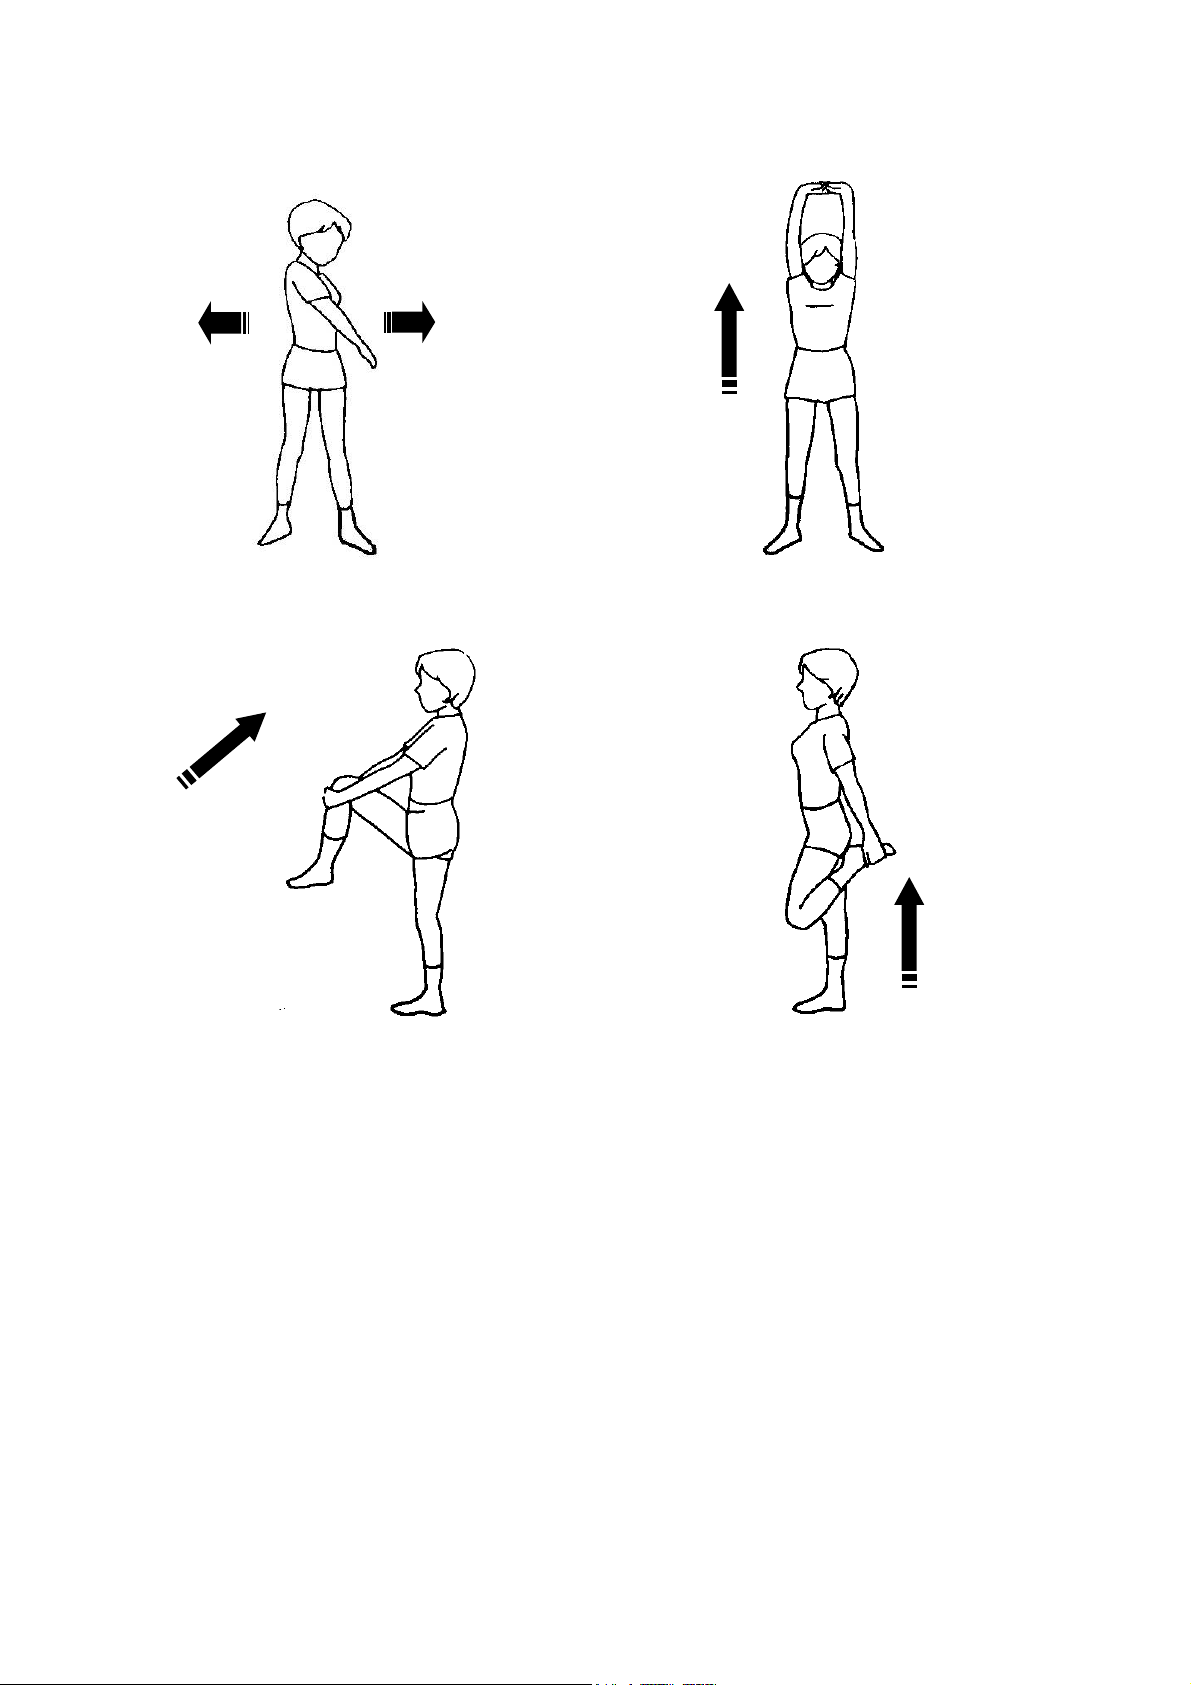
13. Don’t continuously use this equipment over an hour.
14. Care should be taken when mounting and dismounting the unit
15. Do not place any liquids on any part of the treadmill
16. To prevent shock, keep all electric components, such as the motor cord and switch away from water.
17. Do not use any accessories that are not specifically recommended by the manufacturer, these might cause
injuries or cause the unit to fail
18. Work within your recommended exercise level, do NOT work to exhaustion
19. If you feel any pain or abnormal systems STOP YOUR WORKOUT IMMEDIATELY and consult your
physician immediately
20. Turn off the treadmill while adjusting or working near the rear roller.
21. Keep one side of the magnetic safe key CLIPPING your clothes during exercising to avoid danger
happening.
22. Incorrect or excessive training may lead injures.
23. This equipment is not suitable for therapeutic purposes.
24. Don’t open this equipment cover to avoid damage usually.
25. Ensure the load place is level and free space at least 1m around for safe operation.
26. This equipment is not a toy. Please keep unsupervised children away from the equipment during
use and when equipment is unattended.

- 5 -
EXPLORE DRAWING

- 6 -
PART LIST
PART NO PART NAME Q'TY
1 Front roller of fly wheel 1
2 Running belt 1
3 Rear roller 1
4 Running deck 1
5 Side rail 2
6 Running deck fixed cushion 4
7 Rubber cushion 2
8 Motor belt 1
9 Motor 1
10 Motor cover 1
11 Motor frame 1
12 Inverter 1
13 Incline motor 1
14 Power wire 1
15 Square tube plug 2
16 Power wire cushion 1
17 Fuse group 1
18 Power key 1
19 Running platform 1
20 Motor belly pan 1
21 Idler wheel of running platform 2
22 End cap 2
23 Running platform idler wheel cover 2
24 Incline frame 1
25 Incline frame shaft sleeve 2
26 Connect sheath of base frame 2
27 Ø50 Idler wheel 2
28 Damper 1
29 Base frame 1
30 Base frame rubber cushion 4
31 Base frame move wheel 2
32 Upright protective cover 2
33 Right upright 1
34 Left upright 1
35 Computer belly pan 1
36 Down cover of right handlebar 1

- 7 -
37 Down cover of left handlebar 1
38 Up cover of left handlebar 1
39 Up cover of right handlebar 1
40 Foam 1
41 Pulse handlebar 2
42 Computer frame 1
43 Pulse handlebar tube 1
44 Computer main cover 1
45 Panel board 1
46 Window board 1
47 Safety key 1
48 M8*50mm Allen head bolt 1
49 Ø8 Washer 18
50 M8*85mm Allen head bolt 2
51 M8*65mm Allen head bolt 4
52 ST4.2*15 Screw 8
53 Side rail cushion 8
54 ST4.5*16 Screw 14
55 ST4.2*10 Screw 4
56 M10*50mm Allen head bolt 1
57 Ø13 plastic washer 2
58 M10 Nylon nut 2
59 M10*60mm Allen head bolt 1
60 M8*70mm Allen head bolt 1
61 M8 Nylon nut 13
62 M8*20mm Allen head bolt 4
63 Ø8 Spring washer 8
64 M8*25mm Allen head bolt 4
65 M8*40mm Allen head bolt 2
66 ST4.2*15 Screw 42
67 ST4.2*20 Screw 2
68 M8*25 Nut 2
69 Ø16 Plastic washer 2
70 M8*60mm Allen head bolt 2
71 M8*45mm Allen head bolt 1
72 M8*45mm Allen head bolt 2
73 M8*50mm Allen head bolt 4
74 M8*20mm Allen head bolt 4

- 8 -
75 M10*20mm Allen head bolt 6
76 Ø10 Washer 6
77 Ø10 Arc washer 2
78 M8*15mm Allen head bolt 8
79 ST2.0*6 Screw 38
80 ST4.2*25 Screw 2
81 ST2.9*8 Screw 8
82 M6*15 Bolt 4
83 Cross brace 1
HARDWARE COMPARISON CHART
For your convenience, we have identified the hardware used in the assembly of this product. The
chart below is provided to help you to identify items that may be unfamiliar to you.
NO. DESCRIPTION Q'TY
66 ST4.2*15 Screw 6
75 M10*20mm Allen head bolt 8
76 Ø10 Washer 6
77 Ø10 Arc washer 2
78 M8*15mm Allen head bolt 8
A 5mm SOCKET HEAD WRENCH 1
B 6mm SOCKET HEAD WRENCH 1
C SCREWDRIVER 1
D LUBRICANT 1

- 9 -
ASSEMBLING INSTRUCTIONS
WARNING: Please put on all the screws, washers and bolts then tighten them.
STEP1:
1: First connect the control
wire
2: Then fix the uprights on the
base frame with M10*20mm
Allen head bolt75, Ø10 Washer
76, Ø10 Arc Washer 77
3: Fix cross brace onto
uprights with M10*20mm Allen
head bolt75 and Ø10 Washer
76
$%&'

- 10 -
ATTENTION: Be careful when you connect the two console-controller wires. There are pins
inside connector, the pins must be straight, and otherwise it will cause problems.
STEP2:
Fix computer onto upright with
M8*15mm Allen head bolt78
STEP3:
Fix upright protective cover with
ST4.2*15 Screw66

- 11 -
STEP4: Folding illustration:
COMPUTER OPERATION
Panel layout
To unfold the treadmill:
Folding illustration:
To drop down treadmill:
1. Strike the damper. (as
shown by the arrow on left
side).
2. Hold on to the top end
covers and pull down the
treadmill slowly on the
ground.
To fold up the treadmill:
Both hands hold on the bottom end
covers (arrows show in the left and
right side) and lift up the treadmill.

- 12 -
The Operation
The required main power is 220~240VAC.
◆KEY PRESS & FUNCTION
START/STOP: in waiting mode, press this key to start treadmill; press this key during running to
stop treadmill
MODE: select time countdown, distance countdown, calories countdown, select fixed program P1、
P2、P3、P4、P5、P6、P7、P8、P9、P10、P11、P12、P13、P14、P15、P16、P17、P18、
P19、P20、P21、P22、P23,U1、U2、U3、U4、U5 and HRC1、HRC2
BODY FAT: to test body fat value
ENTER: confirm the selected item value in USER program
SPEED+: adjust speed value, increase the selected items (speed, time, distance, calories) value
SPEED-: adjust speed value, decrease the selected items (speed, time, distance, calories) value
SHORT CUT KEY OF SPEED: to select speed value quickly (6、12、18)
INCLINE+: adjust incline value
INCLINE-: adjust incline value
SHORT CUT KEY OF INCLINE: to select incline value quickly (3、9、15)

- 13 -
¾AUDIO: AUDIO on/off
◆PROGRAM MODE
¾TIME COUNTDOWN MODE
· Press MODE key to select time countdown mode, time window flash and display “30:00”,
range is 5-60 minutes, press SPEED+/SPEED-key to select time value.
· Press START key to start treadmill, treadmill will run at the lowest speed, press speed+/-
key to select speed value. Time window display countdown, treadmill will stop to run when
time window display “0:00”
¾DISTANCE COUNTDOWN MODE
· Press MODE key to select distance countdown mode, distance window flash and display
“5.0”, range is 0.8-42.2 km, press SPEED+/SPEED-key to select distance value.
· Press START key to start treadmill, treadmill will run at the lowest speed, press speed+/-
key to select speed value. Distance window display countdown, treadmill will stop to run
when distance window display “0”
¾CALORIE COUNTDOWN MODE
· Press MODE key to select calories countdown mode, calories window flash and display
“200”, range is 50-950 calories, press SPEED+/SPEED-key to select calories value.
· Press START key to start treadmill, treadmill will run at the lowest speed, press speed+/-
key to select speed value. Calories window display countdown, treadmill will stop to run
when calories window display “0”
¾FIXED PROGRAM MODE
· Press MODE key to select fixed program, time window flash and display “30:00”, range is
5-60 minutes, press SPEED+/- key to select time value, press ENTER key to confirm time
value
· Press START key to start treadmill, treadmill will run at the speed set in fixed program, time
window display countdown. Treadmill will stop when time window display “0:00”
· During running, press SPEED+/- key to change the current program segment value
· Program table
1 2 3 4 5 6 7 8 9 10 11 12 13 14 15 16 17 18 19 20
1 SPEED 1 1 2 2 3 3 4 4 5 5 5 5 4 4 3 3 2 2 1 1
INCLINE 0 2 2 2 3 3 2 2 2 2 2 2 3 3 2 2 2 2 1 0
2 SPEED 2 3 4 5 6 7 8 9 10 11 11 10 9 8 7 6 5 4 3 2
INCLINE 1 1 1 2 2 2 3 3 3 3 3 3 3 3 2 2 2 1 1 1
3 SPEED 3 5 7 9 7 5 3 5 7 9 9 7 5 3 5 7 9 7 5 3
INCLINE 2 3 4 3 2 2 1 1 4 4 5 5 4 4 3 3 2 2 1 1
4 SPEED 4 4 6 6 8 8 10 10 12 12 12 12 10 10 8 8 6 6 4 4
INCLINE 6 6 5 5 4 4 3 3 2 2 2 2 3 3 4 4 3 3 2 2
5 SPEED 1 2 3 4 5 6 7 8 9 10 10 9 8 7 6 5 4 3 2 1
INCLINE 0 1 0 1 0 2 0 2 0 3 0 3 2 2 2 2 1 1 1 1

- 14 -
6 SPEED 3 4 4 6 8 8 9 12 12 10 10 12 12 8 7 6 5 4 3 2
INCLINE 0 2 3 3 2 2 3 5 5 5 3 3 3 2 2 2 1 1 1 0
7 SPEED 5 5 5 10 10 10 10 8 8 8 10 10 10 10 5 5 4 3 2 1
INCLINE 5 5 5 1 1 1 1 3 3 3 1 1 1 1 5 5 4 3 2 0
8 SPEED 3 6 9 12 12 12 9 6 3 3 3 3 6 9 12 12 12 9 6 2
INCLINE 0 2 3 1 1 1 3 2 5 5 5 5 3 1 1 1 1 1 0 1
9 SPEED 1 1.
5
2 3 3.
5
3 4.
5
56.
5
7.
5
876786.
5
5 3.
5
21
INCLINE 1 3 5 6 8 9 8 7 6 6 7 8 6 6 5 4 3 2 2 1
10 SPEED 1 2 3.
5
5 6.
5
76421123.
5
56.
5
7 6 4 2 1
INCLINE 1 2 3 4 5 7 9 10 11 12 12 11 10 9 7 5 4 3 2 1
11 SPEED 1 2 3.
5
4 5 6.
5
7.
5
8.
5
9.
5
89.
5
8.
5
7.
5
6.
5
5 4 3.
5
24.
2
1
INCLINE 1 2 5 6 8 6 5 3 2 2 3 5 6 8 10 8 6 5 2 1
12 SPEED 1 1.
5
2 2.
5
3 3.
5
44.
5
55.
5
66.
5
77.
5
8 8.
5
9 5.
5
21
INCLINE 1 2 2 3 3 4 5 5 6 6 6 7 8 8 9 10 9 6 3 1
13 SPEED 1 2 3 3 4 4 5 5 6 6 6 6 5 5 4 4 3 3 2 1
INCLINE 0 2 2 2 3 3 2 2 2 2 2 2 3 3 2 2 2 2 1 0
14 SPEED 2 4 5 6 7 8 9 10 10 11 11 10 10 9 8 7 6 5 4 2
INCLINE 1 1 2 2 3 3 2 2 2 2 2 2 2 3 3 2 2 1 1 1
15 SPEED 2 4 6 8 6 4 2 4 6 8 8 6 4 2 4 6 8 6 4 2
INCLINE 2 3 4 3 2 2 1 1 4 4 5 5 4 4 3 3 2 2 1 1
16 SPEED 3 3 5 5 7 8 9 9 11 11 11 11 9 9 7 6 5 5 3 3
INCLINE 6 6 5 5 4 4 3 3 2 2 2 2 3 3 4 4 3 3 2 2
17 SPEED 2 3 4 5 6 7 8 9 10 11 11 10 9 8 7 6 5 4 3 2
INCLINE 0 1 0 1 0 2 0 2 0 3 0 3 2 2 2 2 1 1 1 1
18 SPEED 1 2 2 4 5 5 8 10 10 10 10 10 10 8 5 5 4 2 2 1
INCLINE 0 2 3 3 2 2 3 5 5 5 3 3 3 2 2 2 1 1 1 0
19 SPEED 4 4 9 4 9 4 9 4 9 4 9 4 9 4 9 4 9 4 2 1
INCLINE 0 0 0 0 0 00 0 0 0 0 0 0 0 0 0 0 0 0 0 0
20 SPEED 3 6 9 12 12 12 9 6 3 3 3 3 6 9 12 12 12 9 6 2
INCLINE 0 0 0 0 0 0 0 0 0 0 0 0 0 0 0 0 0 0 0 0
21 SPEED 5 5 5 5 5 5 5 5 5 5 5 5 5 5 5 5 5 5 5 5
INCLINE 1 2 2 3 3 4 5 5 6 6 6 7 8 8 9 10 9 6 3 1
22 SPEED 8 8 8 8 8 8 8 8 8 8 8 8 8 8 8 8 8 8 8 8
INCLINE 1 2 3 4 5 7 9 7 9 7 9 7 9 7 9 5 4 3 2 1

- 15 -
¾USER
· Press MODE key to select USER PROGRAM, time window flash and display “30:00”, range
is 5-60 minutes
· Press SPEED+/- key to select time value, press ENTER key to confirm and into the first
segment program setting, press SPEED+/- key to change speed value, press INCLINE+/-
key to change incline value, press ENTER key to confirm and into the next segment
program setting. the setting is the same as that above.
· When finish setting, press START key to start treadmill. Treadmill will stop when time
countdown to 0
· During running, press SPEED key to change the current program segment value
¾PULSE PROGRAM
· Press MODE key to select pulse program, the time window flash and display “30:00”, range
is 5-60 minutes
· Press speed+/-key to select time value, press ENTER key to confirm and into age value
setting. Time window display “AGE”, distance window display age, pulse window display the
target pulse value. Press SPEED+/- key to select age value, the target pulse value will be
changed according to the change of age
· When finish setting, press START key to start treadmill. During running, when the actual
pulse value is less than target pulse value, speed will increase 0.3, speed increase 3 times,
incline only increase once; when the actual pulse value is more than target pulse value,
speed decrease 0.3, speed decrease 3 times, incline only decrease once. Make compare
each 15seconds. When time countdown to 0, treadmill will stop run.
· Pulse program target pulse calculation form:
Target pulse H1= (220-age)*0.65
Target pulse H2= (220-age)*0.8
¾BODY FAT
· In waiting mode, press BODY FAT key into BODY FAT mode, pulse window display “bdf”,
time window display “gend”, distance window flash and display “sex”, press
speed+/speed-key to select sex(FE: female, Ma: male)
· Press ENTER key once, time window display “age”, distance window flash and display age,
press speed+/- key to select value
· Press ENTER key two times, time window display “high”, distance window flash and display
high, press SPEED +/- key to select value
· Press ENTER key three times, time window display “wei”, distance window flash and
display weight, press SPEED +/- key to select value
23 SPEED 1 1.
5
3 3 3 3 4 4 4 4 5 5 5 5 4 4 4 4 3 1
INCLINE 1 3 5 6 8 9 8 7 6 6 7 8 6 6 5 4 3 2 2 1

- 16 -
· Make hands hold pulse value, the pulse window display body fat value
◆ HEARTBEAT TEST
¾Hands hold handlebar pulse, pulse window display the corresponding pulse value
· Before exercise, feet stand on the side rail, hands hold pulse sensor lightly, pulse window
display pulse value in 20seconds later
· After exercise, feet stand on the side rail, hands hold pulse sensor lightly, pulse window
display pulse value in 20seconds later
NOTE: in order to get accurate data, please do not test during exercise
◆ Error Message
ERROR CODE
1: ER1: Display board didn’t receive signal in 30seconds
2: ER3: over voltage
3: ER4: over current
4: ER5: over load
5: ER6: motor not connect
6: ER7: control board didn’t receive signal
7: SAFE: safety protection
MAINTENANCE
Proper maintenance is very important to ensure your treadmill is always in top working condition.
Improper maintenance could cause damage or shorten the life of your treadmill and exceed the
LIMITED WARRANTY coverage.
1. Important: Never use abrasives or solvents to clean the treadmill. To prevent damage to the
computer, keep liquids away and keep it out of direct sunlight.
2. Inspect and tighten all parts of the treadmill regularly. Replace any worn parts immediately
CLEANING:
Routine cleaning of your treadmill will extend the product’s life.
1. Warning: To prevent electrical shock, be sure the power to the treadmill is OFF and the power cord is
unplugged from the wall electrical outlet before attempting any cleaning or maintenance.
2. Important: Never use abrasives or solvents to clean the treadmill. To prevent damage to the computer, keep
liquids away and keep it out of direct sunlight.
3. After each workout: Wipe off the console and other treadmill surfaces with a clean, water dampened soft
cloth to remove excess perspiration
4. Weekly: Use of a treadmill mat is recommended for ease of cleaning. Dirt from your shoes contacts the belt
and eventually makes it to underneath the treadmill. Vacuum the underneath treadmill once a
week.
BELT ADJUSTMENT:
Belt adjustment and tension performs two functions: adjustment for tension and centering. The running
belt has been adjusted properly at the factory. However transportation, uneven flooring or other

- 17 -
unpredicted reasons could cause the belt to shift off center resulting in the belt rubbing with the plastic side
rail or end caps and possibly causing damage. To adjust the belt back to it proper position please follows
the directions below:
1. Walking belt has shifted to the left:
First unplug the power cord from the surge protector. Using the hex key provided, turn the left rear
roller adjustment bolt 1/4 turn in the clockwise direction. Plug the power cord back into the surge
protector and run the treadmill at 2.5 mph. You should see the belt start to correct itself, moving back
towards the center. Repeat the above procedure until the walking belt is centered. It may be necessary
to set walking belt tension once you have completed this procedure if the belt feels like it is slipping
while walking. Refer below to the “Walking belt slipping” instructions.
2. Walking belt has shifted to the right:
First unplug the power cord from the surge protector. Using the hex key provided, turn the right rear
roller adjustment bolt 1/4 turn in the clockwise direction. Plug the power cord back into the surge
protector and run the treadmill at 2.5 mph. You should see the belt start to correct itself, moving back
towards the center. Repeat the above procedure until the walking belt is centered. It may be necessary
to set walking belt tension once you have completed this procedure if the belt feels like it is slipping
while walking. Refer below to the “Walking belt slipping” instructions.
3. Walking belt is slipping:
First unplug the power cord from the surge protector. Using the hex key provided, turn both the left and
right rear roller adjustment bolts the same distance, usually a 1/4 turn in the clockwise direction. Plug
the power cord back into the surge protector and run the treadmill at 2.5 mph. You should now walk on
the belt to determine if the belt is still slipping. Repeat the above procedure until the walking belt is not
slipping. The tension should be just tight enough not to slip.
WARNING! Do not over tighten rollers! This will cause premature roller bearing failure!
Right and leftAllen bolts are located at the rear of the treadmill.
DECK LUBRICATION:
The walking belt has been pre-lubricated at the factory. However, it is recommended that the walking board be
checked periodically for lubrication to ensure optimal treadmill performance.
Every 3 months of operation lift the sides of the walking belt and feel the top surface of the walking board as far
as you can reach. If you feel signs of silicone, no further lubrication is required. If it feels dry to the touch, follow
the instructions below.

- 18 -
Please use Lube ‘N Walk, or a non petroleum based silicone such as “Napa 8300” (available at most stores).
TO APPLY LUBRICANT TO THE WALKING BELT
1 Position the walking belt so that the seam is located on top and in center of the walking board.
2 Insert the spray nozzle into the spray head of the lubricant can.
3 While lifting the side of the walking belt, position the spray nozzle between the walking belt and the board
approxinateluy6” from the front of the treadmill. Apply the silicone spray to the walking board, moving from
the front of the treadmill to the rear. Repeat this on the other side of the belt. Spray approximately 4
seconds on each side.
4 Allow the silicone to “set” for 1 minute before using the treadmill.
REMARK: When the treadmill is over load by any case, for the using safety
the fuse will be broken and the power will be cut off . Change a
new fuse and start again.
Table of contents
Other Cosco Fitness Treadmill manuals

Cosco Fitness
Cosco Fitness AC550 User manual

Cosco Fitness
Cosco Fitness SX-3030 User manual

Cosco Fitness
Cosco Fitness AC600 User manual

Cosco Fitness
Cosco Fitness SX-2277 User manual

Cosco Fitness
Cosco Fitness SX-1122 User manual

Cosco Fitness
Cosco Fitness CMTM-4111A2 User manual

Cosco Fitness
Cosco Fitness FX-55 User manual

Cosco Fitness
Cosco Fitness SX-3366 User manual

Cosco Fitness
Cosco Fitness AC200 User manual

Cosco Fitness
Cosco Fitness CMTM-4610A2 User manual