cosihome CH-D-02 User manual

INSTRUCTION MANUAL
MODEL CH-D-02
25L Dehumidifier
IMPORTANT INSTRUCTIONS - RETAIN FOR FUTURE USE
HHii..
LLOO..
FFUULLLL
DDEEFF..

2 of 12 | English English | 3 of 12
25L DEHUMIDIFIER
MODEL CH-D-02
SAFETY INSTRUCTIONS
―
―
PLEASE READ AND SAVE THESE IMPORTANT
SAFETY INSTRUCTIONS
When using electrical appliances, basic
safety precautions should always be
followed to reduce the risk of fire, electric
shock, and injury to persons, including
the following:
WARNING: TO AVOID
THE RISK OF ELECTRICAL
SHOCK, FIRE OR INJURY TO
PEOPLE, ALWAYS TURN THE
APPLIANCE OFF, UNPLUG
THE POWER CORD FROM
THE ELECTRICAL OUTLET
AND EMPTY THE WATER
TANK BEFORE HANDLING,
CLEANING OR SERVICING
THE APPLIANCE.
• Use this appliance only
as described in this
manual. Any other use
not recommended by the
manufacturer may cause
re, electric shock, or injury
to person.
• Do not cover the
appliance whilst in use.
• Always unplug the
appliance when not in
use.
• Do not expose the
appliance to direct
sunlight, heat sources or
extreme cold.
• Keep the appliance out
of reach of children and
pets.
• Do not leave children
alone or unattended in the
area where the appliance
is in use.
• This appliance can be
used by children aged
8 years and above and
persons with reduced
physical, sensory or
mental capabilities or
lack of experience and
knowledge if they have
been given supervision or
instruction concerning the
use of the appliance in a
safe way and understand
the hazards involved.
• Children shall not play
with the appliance.
• Cleaning and user
maintenance shall not be
made by children unless
continuously supervised.
• Dispose of water held by
the appliance. This water
is not drinkable.
• When moving the
appliance, ensure it is kept
in an upright position.
• The appliance must
Thank you for choosing to purchase a product from Cosi Home. Please read the entire
manual carefully prior to first use and keep in a safe place for future reference.
CONTENTS
Safety Instructions........................................................Page 3
Specic Information Regarding R290 Gas ............ Page 5
Symbols Explained ...................................................... Page 6
Specication ..................................................................Page 7
Parts...................................................................................Page7
Control Panel................................................................. Page 8
Cleaning and Storage..................................................Page 9
Recycling and Disposal.............................................. Page 11
EN

4 of 12 | English English | 5 of 12
have a minimum 50cm
clearance around all sides.
• Never leave the appliance
unattended while in use.
Always turn the appliance
off and disconnected from
the power supply when
not in use.
• Avoid placing the power
cord in areas where it can
become a tripping hazard.
Do not place the power
cord under carpeting or
cover it with rugs, runners
or similar.
• Place the appliance on a
at, stable and dry surface
and always keep the
appliance in an upright
position. Operating the
appliance in any other
position could cause a
hazard.
• Never place anything on
top of the appliance.
• Ensure that the mains
supply (including voltage,
frequency and power)
complies with the rating
label of the appliance.
• There may be trace of
odour during the rst few
minutes of initial use. This
is normal and will quickly
disappear.
• Do not place the
appliance against a wall
or other appliances.
• Do not cover the
appliance or restrict the
air ow of the inlet or
exhaust grills whilst in use.
• Do not cover, obstruct
or push objects into the
vents and opening of
the appliance as this
may cause an electric
shock, re or damage the
appliance.
• Do not operate the
appliance with wet hands.
• Do not use this appliance
near water or in the
immediate surroundings
of a bath, shower or a
swimming pool. Never
place the appliance where
it may fall into a bathtub
or other water container.
• Do not allow water or
other liquids to run into the
interior of the appliance,
as this could create a re
and/or electrical hazard.
• Do not place the
continuous drainage
hose outside when the
temperature falls below
1oC.
• This appliance is intended
for indoor household use
and similar applications.
Do not use outdoors.
• Do not use the appliance
near petrol, paints,
ammable gases, ovens,
or other heating sources.
• The mains cable should
not hang down from
the surface on which
the appliance is placed
in order to prevent the
appliance from being
pulled down.
• To avoid a circuit overload
when using this appliance,
do not operate another
high-wattage appliance
on the same electrical
circuit.
• Always plug the appliance
directly into a wall socket.
Avoid using extension
leads where possible as
they may overheat and
cause a risk of re.
• Do not use this appliance
with an external
programmer, timer
switch or any other
device which would
switch the appliance on
automatically unless this
has already been pre-built
into the appliance by the
manufacturer.
• Do not pull on the power
cord. Never move, carry, or
hang the appliance by the
power cord.
• Do not kink or wrap the
power cord and plug
around the appliance,
as this may cause the
insulation to weaken or
split, particularly where it
enters the appliance.
• Do not operate the
appliance with the water
tank removed.
• Ensure the mains cable is
fully extended before use
and arrange it so that it
is not in contact with any
part of the appliance.
• Do not operate the
appliance with any safety
guards removed.
• Do not operate the
appliance if there are any
signs of damage to the
appliance or accessories
supplied.
• Do not attempt to repair
or adjust any electrical or
mechanical elements in
the appliance. Doing so
may be unsafe and will
void your warranty.
• Never insert ngers or
metal objects into the
vents and openings of the
appliance.
SPECIFIC INFORMATION
REGARDING R290 GAS
WARNING: THE APPLIANCE
MUST BE INSTALLED,
OPERATED AND STORED
IN A ROOM WITH A FLOOR
AREA LARGER THAN 4M2.
• This appliance contains
0.068kg (68g) of R290
refrigerant gas.
• R290 is a refrigerant gas
that complies with the
European directive on the
environment.
• Do not puncture any part

6 of 12 | English English | 7 of 12
of refrigerant circuit.
• Be aware R290 refrigerant
is odourless and does not
have the odour normally
associated with natural
gas and propane tanks.
• Do not use means to
accelerate the defrosting
process or to clean, other
than those recommended
by the manufacturer.
• The appliance must be
placed in an area without
any continuous sources
of ignition such as open
ames, gas, or electrical
appliances in operation.
• Do not puncture and do
not burn.
• If the appliance is installed,
operated or stored in a
non-ventilated area, the
room must be designed to
prevent the accumulation
of refrigerant leaks
resulting in a risk of re or
explosion due to ignition of
the refrigerant caused by
electric heaters, stoves, or
other sources of ignition.
• The appliance must be
stored in such a way as
to prevent mechanical
failure.
• Individuals who operate
or work on the refrigerant
circuit must have the
appropriate certication
issued by an accredited
organisation that
ensures competence
in handling refrigerants
according to a specic
evaluation recognised
by associations in the
industry.
• Maintenance and
repairs that require
the assistance of other
qualied personnel must
be performed under
the supervision of an
individual specied in
the use of ammable
refrigerants.
SYMBOLS EXPLAINED
―
―
SYMBOL EXPLANATION
For indoor use only.
Read instruction manual.
Equipment complies
with the applicable UK
safety requirements and
regulations.
Equipment complies
with the applicable EU
safety requirements and
directives.
WARNING: The symbol
shows that this appliance
uses a flammable
refrigerant. If the refrigerant
leaks and is exposed to an
external ignition source,
there is a risk of fire.
SPECIFICATION
―
―
• Model: CH-D-02
• Voltage: 220-240V~
• Frequency: 50Hz
• Power: 430W
• Product Dimensions: 36 x 23.3 x 58cm
• Net Weight: 12.5kg
• Gross Weight: 13.5kg
• Fuse: 250V~, 2A
PARTS
―
―
Front View
1. Control Panel
2. Air Outlet
3. Front Shell
4. Wheels
Back View
5. Handle
6. Air Inlet
7. Filter
8. Power Cable
9. Continuous Drainage
10. Water Level Gauge
11. Water Tank
CAUTION: This symbol
shows that a service
personnel should be
handling this equipment
with reference to the
installation manual.
CAUTION: This symbol
shows that information
is available such as the
operating manual or
instruction manual.
5
6
7
8
9
10
11
These images are for reference only,
please refer to your product.
If you find you’re missing any parts
from your order, please contact our
customer care team by emailing
[email protected] for fast and
friendly help.
1
2
3
4
Hi.
LO.
FULL
DEF.

8 of 12 | English English | 9 of 12
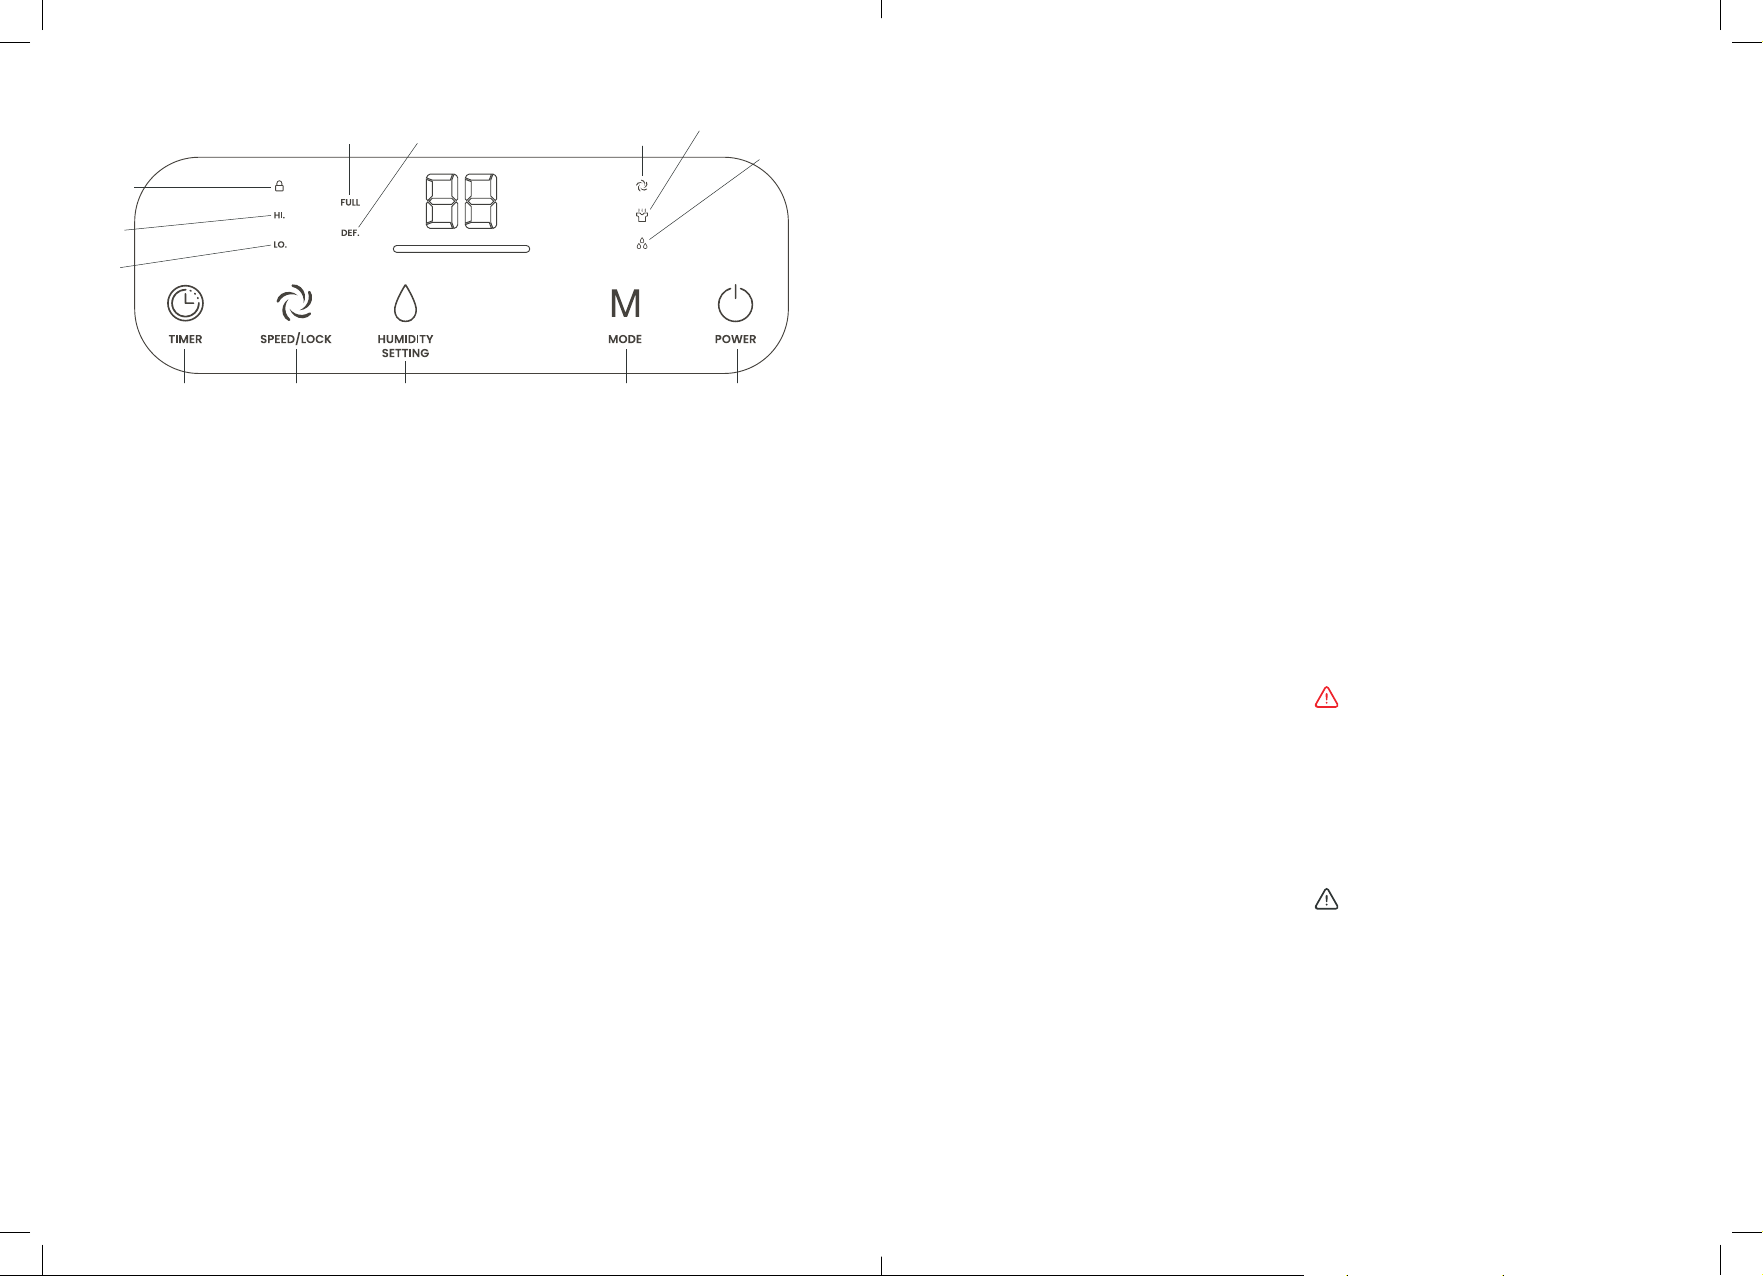
CONTROL PANEL
―
―
Turning On/Off
1. Plug in the dehumidifier. It will beep
once plugged.
2. To turn on the dehumidifier, press the
power button. The dehumidifier will
beep once and the power indicator
light will turn on.
3. To turn off the dehumidifier, press
the power button again. The power
indicator light will turn off.
Setting the Fan Speed
1. While the dehumidifier is on, press
the fan speed button repeatedly to
cycle through the fan speed options
of low and high.
2. The corresponding indicator high or
low fan speed indicator light will turn
on.
Note: The fan speed cannot be changed
in laundry mode as this mode only
operates with a high fan speed.
Setting the Child Lock
To activate the child lock, press and hold
the wind speed key for 2 seconds.To
deactivate the child lock by repeating the
same action.
Setting a Timer
Setting a turn-on timer:
1. Plug in the dehumidifier.
2. Press the timer button repeatedly to
cycle through the time options of 1 –
24 hours.
3. When you reach your desired amount
of hours, do not press anything. When
the display stops flashing, the timer
has been set.
4. The timer indicator light will be on
while the timer is in use.
5. The dehumidifier will turn on when
the set time elapses.
6. To cancel the timer, press the power
button at any point.
Setting a turn-off timer
1. Plug in and turn on the humidifier.
2. Press the timer button repeatedly
to cycle through the time options of
1-24 hours.
3. When you reach your desired amount
of hours, do not press anything. When
the display stops flashing, the timer
has been set.
4. The timer indicator light will be on
while the timer is in use.
5. The dehumidifier will turn off when
the set time elapses.
6. To cancel the timer, press the power
button at any point.
Choosing the Function
1. Plug in and turn on the dehumidifier.
2. Repeatedly press the function button
to choose from the following modes:
• Ventilation – Press this button
to activate ventilation mode.
The corresponding indicator will
illuminate. In this mode, the fan
operates without the compressor,
circulating air in the room.
• Laundry - The dehumidifier
constantly operates to help dry
clothes. The fan runs at high speed
and cannot be adjusted.
• Dehumidification - The appliance
works to achieve the desired
humidity level. Once the set humidity
level is reached, the dehumidifier
automatically stops.
Setting the Humidity
1. Plug in and turn on the dehumidifier.
2. Repeatedly press the humidity button
to select your desired humidity from
30%-80% in 5% increments.
Note: The default setting for this mode
is “30%.” The compressor will stop when
the indoor humidity is 3% lower than the
set humidity, entering a standby state
while the fan runs for 2 minutes. The
compressor starts again when the indoor
humidity rises 3% higher than the set
humidity, maintaining the indoor humidity
around the set level.
Defrosting
The dehumidifier will automatically
defrost if the compressor becomes
too cold. While defrosting, the defrost
indicator light will turn on, the compressor
will turn off and the motor will keep
working.
Setting Up Continuous Drainage
1. Remove the water tank by gently
pulling the indents on either side of
the water tank towards you.
2. Attach one end of the continuous
drainage hose to the continuous
drainage hole.
3. Place the other end of the hose into a
bucket or drain.
Note: Gravity will pull the water out of
the unit into your chosen drainage area.
Ensure the chosen area is not higher than
the unit.
Emptying the Water Tank
When the water tank is full, the indicator
light will turn on and the compressor will
turn off.
1. Unplug the dehumidifier and place it
on a flat, stable surface.
2. Remove the water tank by gently
pulling the indents on either side of
the water tank towards you.
3. Carefully empty the water tank and
replace it by slotting it back in the
appliance.
4. Press the power button to turn the
applaince back on.
Note: The water tank indicator light
will also turn on if the dehumidifier is
on, but the tank is missing or placed in
incorrectly.
CLEANING AND STORAGE
―
―
WARNING: ALWAYS
TURN THE APPLIANCE
OFF AND UNPLUG THE
POWER CORD FROM
THE ELECTRICAL OUTLET
BEFORE HANDLING OR
CLEANING IT.
CAUTION: DO NOT
ALLOW WATER OR OTHER
LIQUIDS TO RUN INTO
THE INTERIOR OF THE
APPLIANCE, AS THIS
COULD CREATE A FIRE
AND/OR ELECTRICAL
HAZARD.
Lock active
High fan
speed
Low fan
speed
Water tank full Defrost Indicator Ventilation
Laundry
Dehumidication
Timer Button Speed/Lock
Button
Humidity Button Mode Button Power Button

10 of 12 | English English | 11 of 12
CAUTION: DO NOT USE
ANY ABRASIVE CLEANERS
OR SOLVENTS, AS THIS
CAN DAMAGE THE
APPLIANCE.
• Do not attempt to
clean the appliance
in any other way than
that detailed by the
manufacturer.
Cleaning the body of the
dehumidifier:
• Turn the dehumidifier off
and unplug the power
cord.
• Clean the exterior
surface of the appliance
by wiping it with a soft,
damp cloth. Dry the
appliance with a soft,
clean cloth.
Cleaning the air filter:
Note: As the filter gets
clogged the dehumidifying
capacity of the unit is
lowered. It is important
to clean the rear air filter
every 2 weeks.
• Remove the air filter
cover by pressing the
top of the filter in the
areas marked ‘push’.
• Remove the active
carbon filter from the
dehumidifier.
• Clean the filter with a
vacuum cleaner using
the brush attachment
to remove dust from the
surface of the filter.
• Put the active carbon
filter back in the
appliance and reattach
the filter cover by
placing back in the unit
and pressing the top
of the filter in the areas
marked ‘push’.
Cleaning the water tank:
• Remove and empty
the water tank as per
the instructions in the
“Emptying the water
tank” section.
• Remove the water tank’s
lid by removing the
handle and lifting the
water tank’s lid upwards.
• Clean the water tank
with warm tap water
and mild detergent (e.g.
washing up liquid). Note:
Do not use boiling water
to clean the water tank.
• Ensure to remove any
scale or deposits that
have formed inside the
water tank.
• Wipe all surfaces dry
before placing the water
tank’s lid handle.
• Then return the water
tank to the unit.
Storage:
• To store your product, we
recommend using the
original or a similar-sized
box. Store the appliance
in a safe, clean and dry
place, away from direct
sunlight and out of
reach of children when
not in use.
• Always empty the water
tank, clean and dry the
appliance when not in
use to prevent mould.
• Empty and clean the
appliance before
storage. Clean the
appliance before next
use.
• Pull out the two clips at
the back of the unit and
wrap the cable around
the two for proper
storage.
RECYCLING AND DISPOSAL
―
―
Waste electrical and electronic products
(WEEE), batteries, accumulators, and
packaging should not be disposed of
with general household waste. This is to
prevent possible harm to the environment
and human well-being, and to help
conserve our natural resources. Most
electrical products with a plug, battery,
or cable can be recycled. Contact your
local council, household waste disposal
service, or the store where you purchased
the product for information regarding the
collection schemes in your area.
Waste Electrical and Electronic
Equipment (WEEE)
This symbol on the product and/
or packaging indicates that Waste
Electrical products (WEEE) under
Directive 2012/19/EU which governs
used electrical and electronic
appliances, should not be disposed
of with general household waste.
The Mobius Loop
This symbol indicates that the
product or packaging is capable of
being recycled.
Take-Back Scheme
Waste electrical products (WEEE) can be
sent to One Retail Group for recycling
and disposal when you purchase a new
product from One Retail Group, on a like-
for-like basis. For more information on
how to recycle this product please visit
www.cosihome.com
The end-user of electrical and electronic
products (WEEE) is responsible for
separating old batteries and lamp
bulbs before they are handed over to
a designated disposal and recycling
service. Waste batteries can also be
disposed of in collection bins, which can
be found in most local supermarkets and
household waste recycling centres.

One Retail Group, Ryland House,
24a Ryland Road, London, NW5 3EH, United Kingdom
EU Authorised Representative: Brandrep Limited,
The Black Church, St Mary’s Pl N, Dublin, D07 P4AX, Ireland
www.cosihome.com
© Copyright 2023
Table of contents
Other cosihome Dehumidifier manuals
Popular Dehumidifier manuals by other brands

Mitsubishi Electric
Mitsubishi Electric MJ-E82GH-H instruction manual

KGK
KGK 55L Use and maintenance manual

P&N Technology
P&N Technology PN-D3024D instruction manual

Mitsubishi Electric
Mitsubishi Electric MJ-101MWX-A1 instruction manual

DeLonghi
DeLonghi DEC 21 instructions

Aprilaire
Aprilaire 1830CS owner's manual