ecofort ecodry Sumo User manual

Deumidicatore d’aria
Air dehumidier
Luftentfeuchter
Déshumidicateur d’air
BTIGER
ATIGER
2
M1081-0_draft-0
BSUMO
ASUMO
3
M1081-0_draft-0

4
M1081-0_draft-0
C
EE
G
F
D
TIGER
TIGER
SUMO
H H
TIGER SUMO
5
M1081-0_draft-0

JK
L
6
M1081-0_draft-0

Note / Notes

ITALIANO
8
M1081-0_draft-0
Legenda e simboli
SNOTA IMPORTANTE: le note servono a evidenziare
delle situazioni e delle condizioni che possono facili-
tare e migliorare l’utilizzo dell’apparecchio.
!ATTENZIONE: questo avviso segnala una possibile con-
dizione di pericolo o evidenzia delle situazioni che, se non
gestite nel modo corretto, potrebbero causare danni alle
cose o alle persone. Seguire attentamente quanto scritto.
TIGER Questo simbolo viene utilizzato sulle gure e identica a
quali modelli di deumidicatore si riferisce l'immagine.
Se non viene specicato signica che la gura ha validità
generale.
TIGER Questo simbolo viene utilizzato accanto ai titoli per indi-
care che le spiegazioni che seguono si applicano solo alle
macchine indicate. Se non viene specicato signica che
l’istruzione ha validità generale.
Norme generali di sicurezza
• Leggere attentamente questo manuale prima di utilizzare il deumi-
dicatore.
• Questo manuale dev’essere conservato assieme alla macchina.
• Questo deumidicatore NON è stato progettato per essere utiliz-
zato da persone, compresi bambini, con capacità siche, sensoriali
o mentali ridotte o che mancano di esperienza e conoscenza
sucienti, a meno che non siano stati istruiti sull’utilizzo corretto
dell’apparecchiatura da una persona responsabile per la loro
incolumità.
• Tenere fuori dalla portata di bambini e animali.
• Non utilizzare questo apparecchio in luoghi dove ci sia il pericolo
di esplosioni.
• Non utilizzare questo apparecchio in aree la cui aria possa conte-
nere oli, solfuri o cloro.
• Tenere sempre libere le griglie di ingresso e di uscita dell’aria
(lasciare almeno 10 centimetri d’aria).
• Questo apparecchio deve funzionare in posizione verticale, appog-
giato sulle ruote.
• Il locale in cui viene inserito il deumidicatore deve essere chiuso.
• Non muovere l’apparecchio durante il funzionamento.
• Per spostare l’apparecchio prima spegnerlo e svuotare la vaschetta
di raccolta della condensa.
• Non inserire alcun oggetto estraneo all’interno dell’apparecchio.
• Assicurarsi che la tensione di alimentazione corrisponda a quella
indicata nei dati di targa, che l’impianto elettrico sia conforme alle
normative vigenti e adeguatamente protetto.
• Non utilizzare questo apparecchio in modo diverso da quello
descritto in questo manuale: qualsiasi altro uso è da ritenersi po-
tenzialmente pericoloso sia per la macchina che per le persone.
!ATTENZIONE: qualsiasi operazione di manutenzione sul
circuito frigorifero o sul circuito elettrico dev’essere eet-
tuata solo da personale esperto e qualicato.
Introduzione
Gli apparecchi della serie TIGER e SUMO sono dei deumidicatori
d’aria il cui scopo è di togliere l’umidità dall’ambiente. Essi sono dotati
di un circuito frigorifero ed equipaggiati con una nuova scheda elettro-
nica che gestisce tutte le funzioni come l’avvio e l’arresto automatici o il
ciclo di sbrinamento quando è necessario.
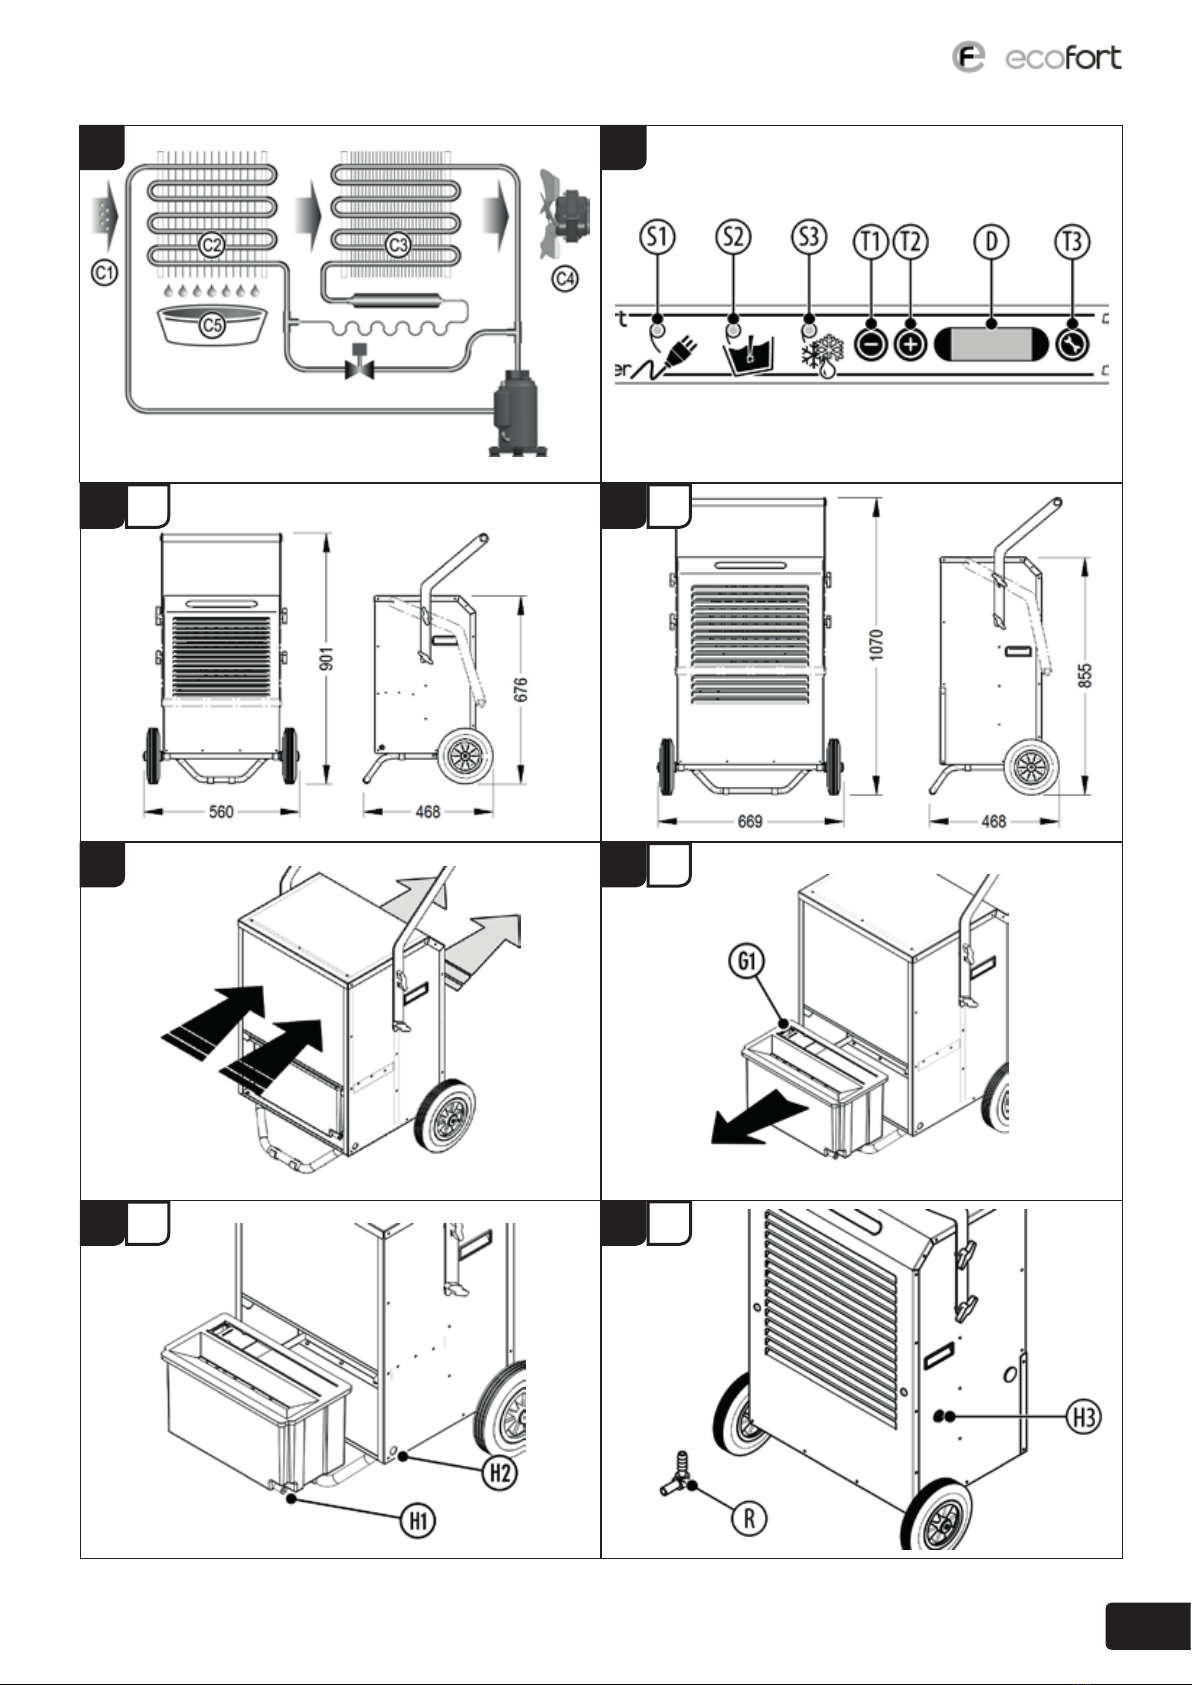
Principio di funzionamento (C)
L’aria C1, da deumidicare, viene aspirata dall’apparecchio, tramite il
ventilatore C4, e fatta passare attraverso l’evaporatore C2 del circuito
frigorifero. In questo modo la temperatura dell’aria viene abbassata ol-
tre il suo punto di rugiada e il vapore acqueo condensa in gocce d’acqua
che vengono raccolte nell’apposito serbatoio C5.
!ATTENZIONE L’acqua raccolta nel serbatoio non è pota-
bile: NON bere in nessun caso quest’acqua.
L’aria così deumidicata viene fatta passare attraverso il condensatore
C3 che ne innalza la temperatura ad un valore leggermente superiore
rispetto a quello iniziale. In questo modo la quantità di umidità con-
tenuta nell’aria ambiente viene gradualmente diminuita no al valore
desiderato.
SQuando si deumidica un ambiente si ottiene anche
un abbassamento dell’umidità nelle pareti e nel pavi-
mento della camera, nonché nei materiali in essa
contenuti.
Sbrinamento a gas caldo (C)
Quando la temperatura ambiente scende circa sotto ai 16 °C si può
formare del ghiaccio sull’evaporatore C2. Il ghiaccio dev’essere ciclica-
mente eliminato per evitare che si accumuli impedendo il passaggio
dell’aria. Nei deumidicatori della serie TIGER e SUMO il ciclo di
sbrinamento è gestito automaticamente dal controllo elettronico (vedi
più avanti). Durante tale fase viene fermato il ventilatore C4. La durata
del ciclo di sbrinamento dipende dalle condizioni ambientali e dalla
quantità di ghiaccio che si è formato sull’evaporatore C2.
Il serbatoio
TIGER
Il serbatoio di raccolta della condensa contiene il galleggiante che
ferma il deumidicatore quando è pieno: tale dispositivo rimane fun-
zionante anche con lo scarico continuo (vedi più avanti).
Svuotamento (G)
Slare il serbatoio: utilizzare lo sportellino G1 per svuotare l’acqua. Il
serbatoio dev’essere poi rimesso al suo posto.
Scarico continuo (H)
Il serbatoio è predisposto per lo scarico continuo. L’installazione è
molto semplice e, una volta terminata, non sarà più necessario svuotare
manualmente il serbatoio di raccolta della condensa. Per installare lo
scarico continuo fare come segue:
• Rimuovere il tappo H1 dal serbatoio;
• collegare un tubo Ø10 mm interno al serbatoio e farlo uscire dal
deumidicatore attraverso il foro H2 del pannello.
• Inserire il serbatoio nella sua sede accompagnando il tubo di
scarico;
!ATTENZIONE: per un corretto funzionamento il tubo
dev’essere posizionato costantemente in discesa e senza
strozzature o impedimenti di alcun tipo.
SAnche con lo scarico continuo rimane comunque
attivo il sistema a galleggiante che garantisce lo spe-
gnimento del deumidicatore qualora il serbatoio si
riempisse per un malfunzionamento dello scarico.

ITALIANO 9
M1081-0_draft-0
Scarico continuo (H)
SUMO
Il deumidicatore è dotato di serie di una pompa di scarico automatico
della condensa. La pompa ha una prevalenza di 5 metri. Applicare un
tubo di plastica Ø8 esterno direttamente al raccordo H3 sul anco del
deumidicatore oppure utilizzare il raccordo R in dotazione per colle-
gare un tubo di gomma Ø6 interno.
!ATTENZIONE: per un corretto funzionamento il tubo
dev’essere posizionato senza strozzature o impedimenti di
alcun tipo.
Il pannello di comando (D)
S1 - Spia verde linea La spia si accende quando il deumidicatore fun-
ziona, altrimenti lampeggia quando è in stato 0 (alimentato ma spento).
S2 - Spia rossa troppo pieno La spia si accende e lampeggia, assieme
alla S1, per indicare che il serbatoio è pieno, mancante, male inserito o
per segnalare un guasto.
S3 - Spia gialla sbrinamento La spia si accende quando il deumidica-
tore sta eettuando lo sbrinamento automatico.
T1 - Tasto decremento Premendo questo tasto si fa diminuire il valore
indicato nel pannello D no a 0.
T2 - Tasto incremento Premendo questo tasto si fa aumentare indicato
nel pannello D il valore no a C.
D - Display Il display visualizza lo stato di funzionamento del deumi-
dicatore secondo la tabella riportata di seguito (Tab.A).
Il valore 0 indica lo stato di SPENTO, da 1 a 9 il funzionamento è au-
tomatico ed è comandato dall’umidostato che fa accendere o spegnere
il deumidicatore a seconda che il valore dell’umidità sia superiore o
inferiore a quello della Tab.A. Il valore C indica lo stato di FUNZIO-
NAMENTO CONTINUO e il deumidicatore funziona sempre, indi-
pendentemente dal valore dell’umidità: in ogni caso eventuali allarmi
hanno sempre la priorità sulla modalità di funzionamento impostata.
T3 - Tasto funzione Questo è il tasto funzione e viene utilizzato, assie-
me agli altri, per gestire funzioni speciali della scheda come il contaore,
descritto più avanti.
Display Funzionamento
0 O
1 90 %R.H.
2 86 %R.H.
3 78 %R.H.
4 72 %R.H.
5 65 %R.H.
Display Funzionamento
6 60 %R.H.
7 52 %R.H.
8 46 %R.H.
9 40 %R.H.
C Continuo
Tab.A – Tipi di funzionamento
Accensione
Quando viene inserita la spina il display D lampeggia per 5 secondi
e indica l’ultimo stato di funzionamento del deumidicatore: passati
i 5 secondi, se il modo di funzionamento è diverso da zero, il display
smette di lampeggiare.
Spegnimento
Per spegnere il deumidicatore premere il tasto T1 no a che il valore
indicato dal display non diventa 0. In questo modo di funzionamento
lampeggia sia il display D che la spia verde S1.
Lo sbrinamento
La scheda elettronica gestisce automaticamente il ciclo di sbrinamento
che elimina ciclicamente il ghiaccio mantenendo eciente il passaggio
dell’aria attraverso lo scambiatore anche alle temperature più basse. La
fase di sbrinamento viene segnalata con l’accensione della spia gialla S3.
Guasti
Il display, oltre a visualizzare lo stato di funzionamento del deumidi-
catore, segnala anche eventuali guasti (Tab.B). Qualora si vericasse
una delle condizioni di errore di seguito descritte sarà necessario
l’intervento di personale specializzato per la loro soluzione.
Display Descrizione
ntc Sonda di temperatura rotta o staccata
und Sonda umidità rotta o staccata
Tab.B – Segnalazione errori
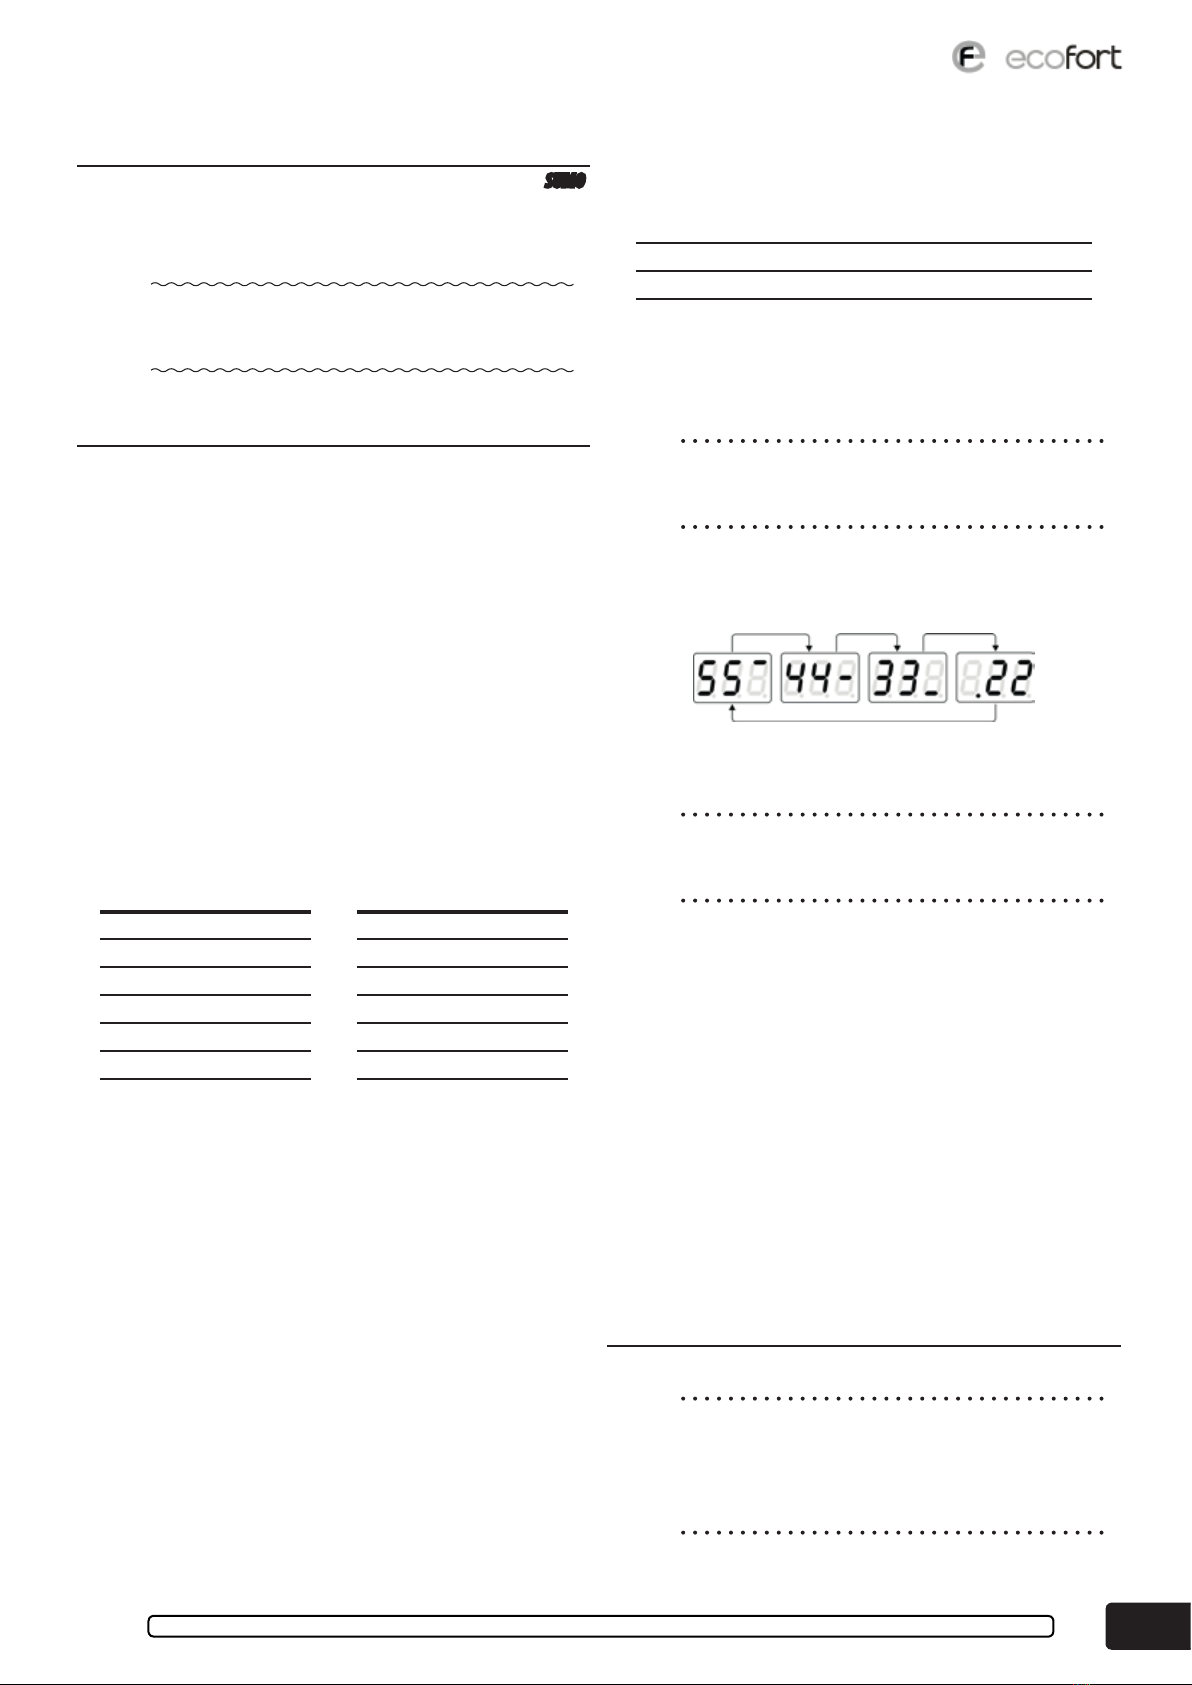
Il contaore
Il deumidicatore è dotato di due contaore, uno parziale e resettabile,
uno totale non resettabile. Il contaore può registrare no 999.999,99
ore.
SLe cifre decimali sono espresse in ore per cui 0,50
signica 30 minuti. In questo modo un’eventuale
calcolo basato sulle ore di funzionamento verrà
facilitato.
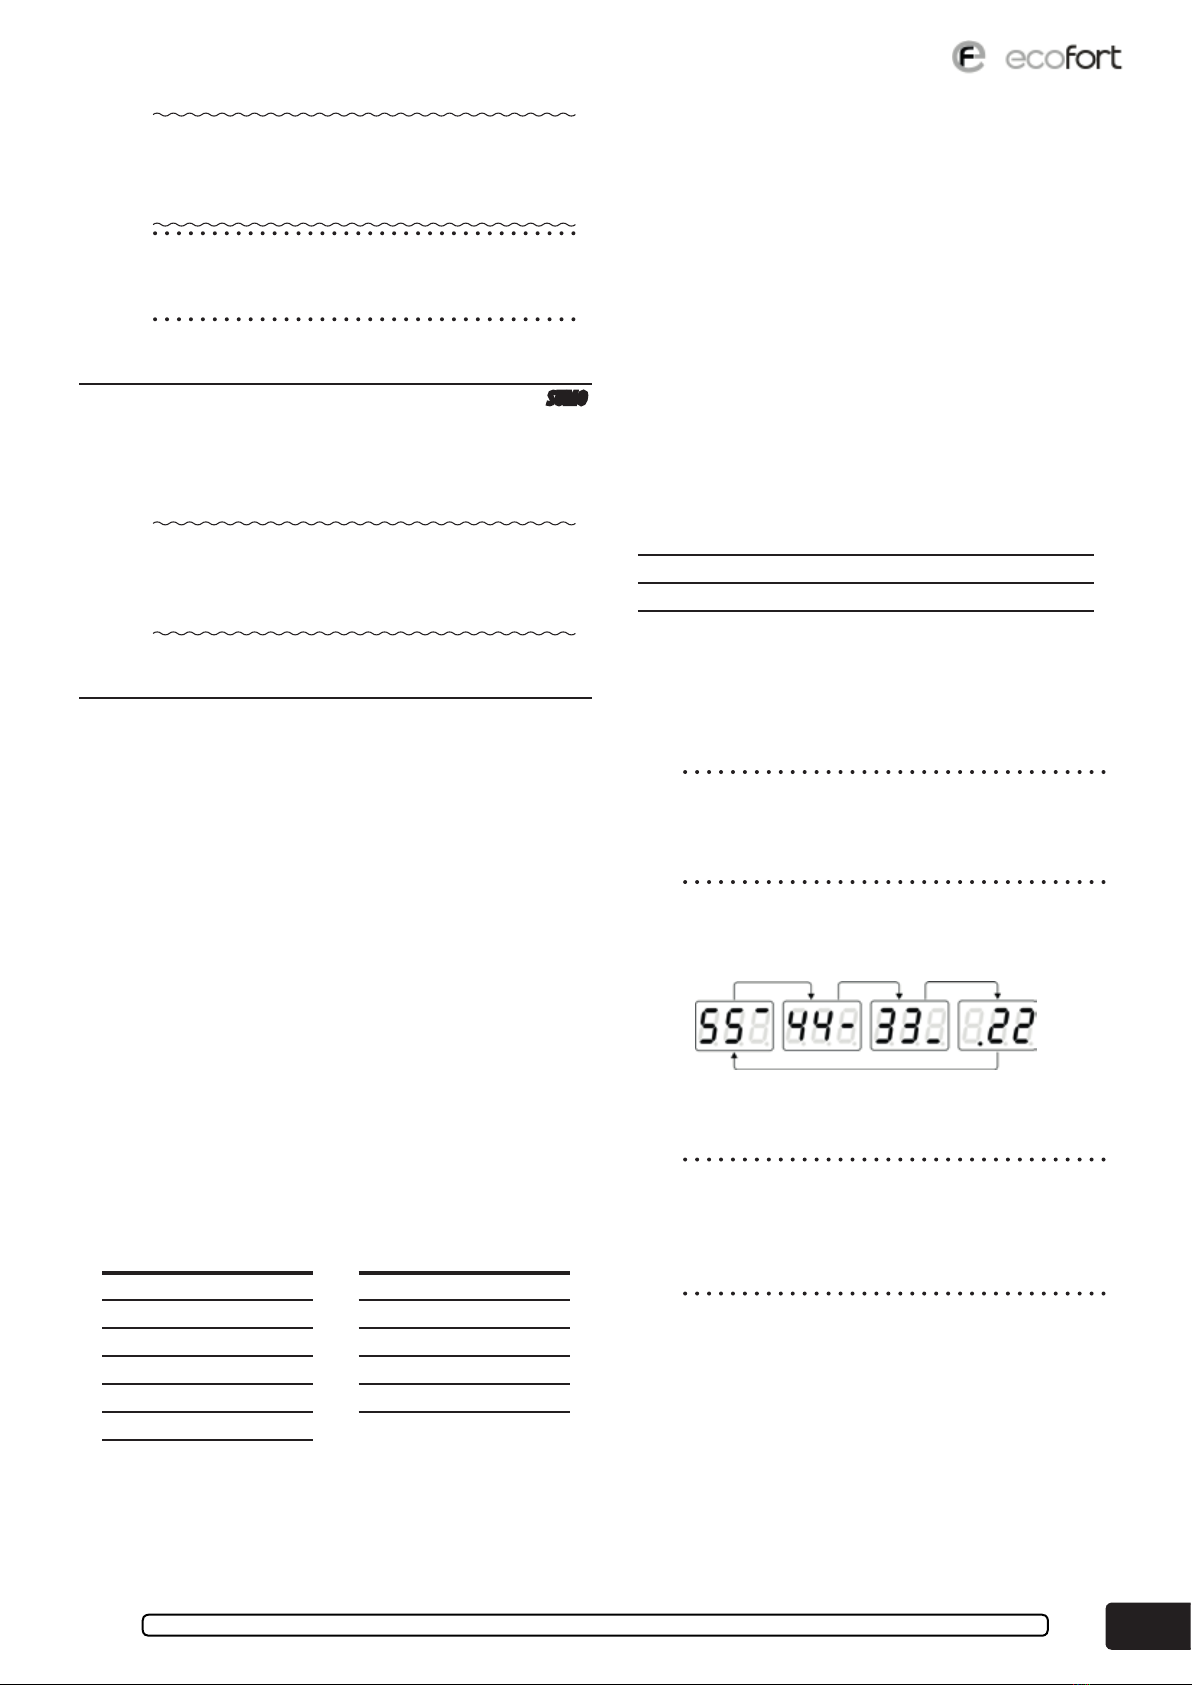
Per visualizzare le ore il display visualizzerà in sequenza due cifre alla
volta escludendo quelle non signicative: per la corretta interpretazione
delle cifre utilizzare il seguente schema dove si ipotizza di dover visua-
lizzare la cifra 554.433,22:
Fig.1 – Ciclo visualizzazione contaore
La visualizzazione durerà circa un minuto, a meno che non si prema il
tasto T3.
SIl contaore NON funziona se la macchina è in stato
0, in attesa o in errore. Quindi verranno registrate
solo le ore eettive di funzionamento.
Contaore 1, azzerabile
Per visualizzare il contaore azzerabile:
• premere T3 per circa tre secondi: il display mostrerà tre sbarrette
orizzontali che lampeggiano.
• Premere in sequenza T1 - T1 - T3.
Contaore 2, totalizzatore
Per visualizzare le ore totali di funzionamento:
• premere T3 per circa tre secondi: il display mostrerà tre sbarrette
orizzontali che lampeggiano.
• Premere in sequenza T2 - T2 - T3.
Azzeramento contaore 1
• premere T3 per circa tre secondi: il display mostrerà tre sbarrette
orizzontali che lampeggiano.
• Premere in sequenza T1 - T2 - T3 - T2 - T1.
L’azzeramento viene confermato dalla scritta .00 a display.
Il ltro dell’aria (J, K)
Il ltro dell’aria può essere facilmente smontato per la pulizia e può es-
sere pulito con l’aspirapolvere o in acqua: in quest’ultimo caso attendere
che il ltro sia asciutto prima di rimontarlo.
SEvitare di far funzionare il deumidicatore senza il
ltro dell’aria onde evitare l’accumularsi di sporco
sullo scambiatore. Pulire spesso il ltro dell’aria
soprattutto nei locali polverosi: un ltro sporco im-
pedisce il passaggio dell’aria e riduce l’ecienza del

ITALIANO
10
M1081-0_draft-0
deumidicatore.
Posizionamento (F)
Per spostare il deumidicatore farlo scorrere sul pavimento utilizzando
le apposite ruote di cui dispone. I deumidicatori della serie TIGER e
SUMO vanno semplicemente introdotti nell’ambiente da deumidicare
e messi in funzione: l’aria entra da davanti ed esce da dietro. Si consiglia
di mettere il deumidicatore nel punto più freddo del locale, dove
normalmente si accumula l’umidità, possibilmente vicino alla presa di
corrente.
Manutenzione
Il deumidicatore della serie TIGER e SUMO non richiede particolari
cure di manutenzione. E’ consigliabile spolverarlo, tenere pulite le grate
di entrata e di uscita dell’aria, vericare periodicamente il ltro dell’aria
e pulirlo se necessario. In caso di malfunzionamento o di guasto ri-
volgersi al proprio rivenditore. Il cavo di alimentazione ha un collega-
mento di tipo M; in caso di danneggiamento il cavo deve essere fatto
sostituire con uno analogo da personale esperto e qualicato.
!ATTENZIONE: Prima di eseguire qualunque tipo di in-
tervento sull’apparecchio selezionare il modo di funziona-
mento 0, attendere che si spenga: quindi staccare la spina
di alimentazione della corrente.
Immagazzinamento (L)
Le macchine della serie TIGER e SUMO sono state studiate per essere
facilmente sovrapponibili e questo permette di ridurre notevolmente
gli spazi necessari per l’immagazzinamento.
• Conservare l’apparecchio in un ambiente con temperature com-
prese tra -25°C e +55°C.
• Quando l’apparecchio è ancora imballato rispettare le indicazioni
sulla scatola.
• Non sovrapporre alla scatola altri materiali pesanti.
Prima di un lungo periodo d'inattività ...
• Spegnere la macchina, staccare la spina e svuotare il serbatoio di
raccolta della condensa (se presente);
• coprire la macchina per proteggerla dalla polvere.
Dopo un lungo periodo d'inattività ...
• Vericare che la ventola giri liberamente senza attriti;
• installare la macchina secondo quanto descritto in questo manua-
le.
Smaltimento del prodotto
Ai sensi dell’art.13 del Decreto Legislative 25 Luglio
2005, n.151 “Attuazione delle Direttive 2002/95/CE,
2002/96/CE e 2003/108/CE, relative alla riduzione
dell’uso di sostanze pericolose nelle apparecchiature
elettriche ed elettroniche, nonché allo smaltimento dei
riuti”. II simbolo del cassonetto barrato indica che il
prodotto alla ne della propria vita utile deve essere
raccolto separatamente dagli altri riuti. L’utente dovrà,
pertanto, conferire l’apparecchiatura giunta a ne vita
agli idonei centri di raccolta dierenziata dei riuti elettrici ed
elettronici, oppure riconsegnarla al rivenditore al momento dell’acqui-
sto di un nuovo prodotto di tipo equivalente, in ragione di uno a uno.
L’adeguata raccolta dierenziata per l’avvio successivo dell’apparecchia-
tura dimessa al riciclaggio, al trattamento e allo smaltimento ambien-
talmente compatibile contribuisce ad evitare possibili eetti negativi
sull’ambiente e sulla salute e favorisce il riciclo dei materiali di cui e
composto il prodotto.
Lo smaltimento abusivo del prodotto da parte dell’utente comporta
l’applicazione delle sanzioni amministrative di cui al D.lgs. n. 22/1997
(articolo 50 e seguenti del D.Lgs.n. 22/1997).
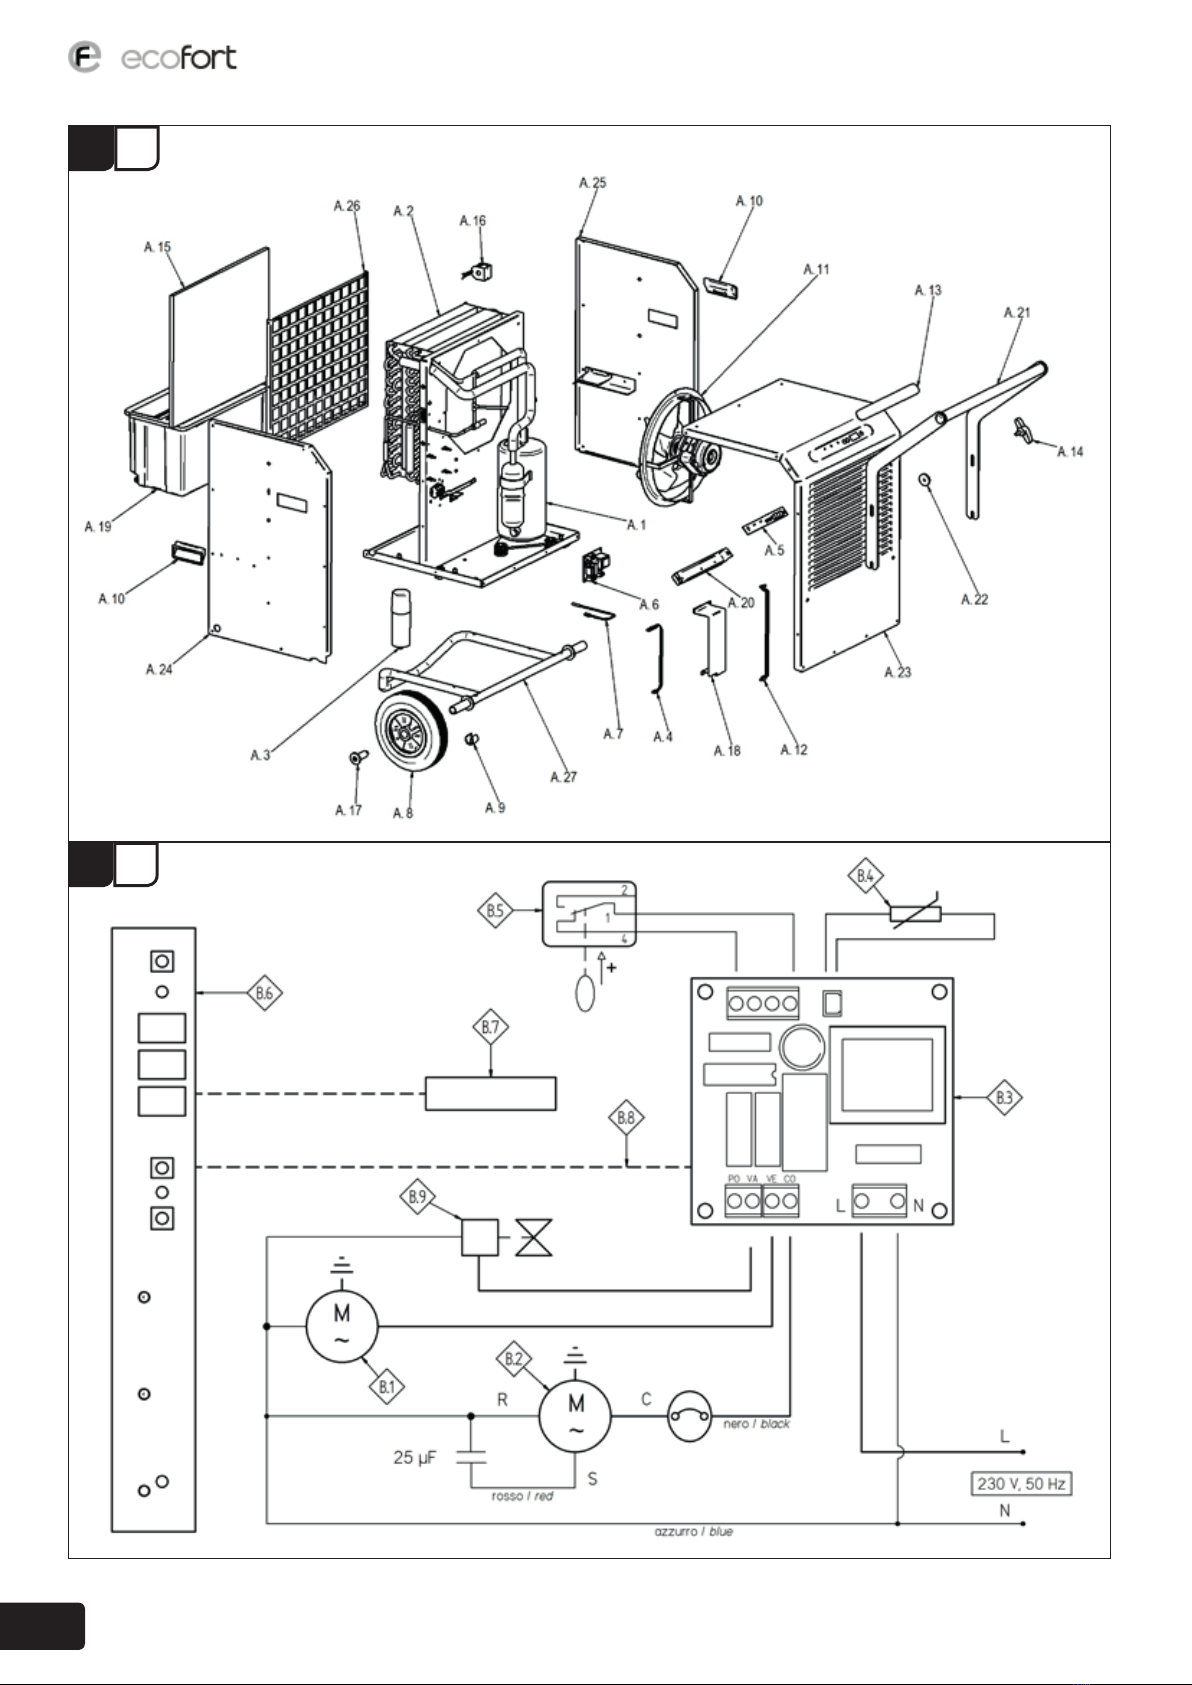
Schema elettrico (B)
Rif Descrizione Rif Descrizione
B1 Ventilatore B6 Scheda comando
B2 Compressore B7 Sonda umidità
B3 Scheda potenza B8 Cavo 10 poli
B4 Sonda temperatura B9 Elettrovalvola
B5 Microinterruttore B10 Pompa con serbatoio
Tab.C – Riferimenti schema elettrico
Dati comuni
Temperature di lavoro [°C] +2 / +32
Umidità relativa di lavoro [%U.R.] 40 / 95
Tensione di alimentazione 230V, 50 Hz
Potenza assorbita in stand-by [W] 1,2
Carica gas [g] vedi etichetta
Pressione massima [kPa] 1500
Tab.D – Dati comuni
Dati principali
Tiger Sumo
Volume indicativo trattabile [m³] 600 800
Capacità [L/24ore] * 34,5 * 48
** 51 ** 81
Portata d’aria [m³/ora] 600 850
Corrente assorbita [A] * 3,45 * 4,06
** 3,9 ** 4,74
Potenza assorbita [W] * 730 * 890
** 840 ** 1050
Tipo gas R407c R407c
Rumorosità a un metro [dBa] 61 64
Peso a secco [Kg] 38 59.7
Capacità serbatoio [L] 6 -
(*) a 25°C e 65 %U.R. (**) a 30°C e 80% U.R.
Tab.E – Dati principali

Note / Notes

Symbols
SIMPORTANT NOTE: notes will evidence conditions
and features that can make easier and better the use
of the unit.
!WARNING: every notes under this symbol will evi-
dence dangerous conditions that can cause problems
to persons and thinks if not made in the right way.
Follow carefully the description.
TIGER is symbol is used with gures to identify to which
models of dehumidiers the image refers. Figures without
symbols refer to all units.
TIGER is symbol is put near titles to indicate that the follow-
ing explanation must be applied only to certain models. If
nothing is specied the instruction has general purpose.
General safety rules
• Read the following instruction manual.
• Keep this always this manual with the dehumidier for future
reference.
• is dehumidier is NOT intended for people, children included,
with limited physical or mental capabilities or without enough
experience concerning the use of it.
• Keep it away from children and animals.
• is dehumidier SHOULD not operate in rooms where a danger
of explosion exists.
• Do NOT use this dehumidier in environments with air contain-
ing oil, sulphur or chlorine.
• Keep always the inlet and outlet air grids free (10 centimeters at
least).
• e appliance must always operate in a vertical position with the
wheels turned downwards.
• e room where the dehumidier works must be closed.
• Do NOT move the dehumidier when working.
• Before moving the dehumidier switch it o and empty the con-
densate tank.
• Do NOT put any tool inside the unit.
• Make sure that the power supply voltage corresponds to that
indicated in Tab.D, that the electrical installations comply with the
regulations in force and are properly protected.
• Do NOT use the dehumidier in dierent ways other then the
one described in this manual. Any other use must be considered
potentially dangerous.
!WARNING: any maintenance on the refrigerating
or electric circuit must be made only by experienced
and qualied sta.
Introduction
e appliances of the TIGER and SUMO series are air dehumidiers
that remove the humidity from the environment. ey are equipped
with a refrigerating circuit and the new electronic control performs all
the functions included automatic start and stop and defrosting cycle if
necessary.
Operating principle (C)
e appliance uses a fan C4 to suck up the air C1 to be dehumidied
and pass it through the refrigerator circuit evaporator C2. In this way
the temperature of the air is lowered to below its dew point and the
vapor condenses to form drops of water that are collected in the ap-
propriate tank C5.
!WARNING: e water collected inside the tank IS
NOT drinkable. Do NOT drink this water anyway.
e air thus dehumidied is passed through the condenser C3 that
raises its temperature slightly higher than the initial value. In this way
the quantity of humidity contained in the environmental air is gradu-
ally decreased until it reaches the desired value.
Se dehumidier reduces the humidity of the walls
and oor of the room, as well as of the materials
contained therein.
e defrosting cycle (C)
If the temperature goes below 16°C ice may form on the evaporator
C2. e ice must be regularly melted to avoid it reduces the air passage.
e electronic board automatically performs the defrosting cycle (see
ahead). During the defrosting cycle the fan C4 stops. e time it takes
to melt the ice changes with the humidity and temperature.
Condensate collecting tank
TIGER
Inside the tank there is the oating device that stops the dehumidi-
er when is full: this device works even with the continuous drainage
installed (see ahead).
How to empty the tank (G)
Take out the tank. Use the sliding open G1 on the top of the tank to
ow the water out. Finally put the tank back into his place.
Continuous drainage (H)
e tank is ready to t the continuous drainage. e installation is very
simple and then you will not need to empty the tank manually any-
more. To install the continuous drainage follow these instructions:
• remove the rubber stopper H1 from the tank;
• connect a rubber hose, with an internal diameter of 10 millime-
ters, to the connector on the tank and pass it through the hole H2
on the side panel;
• put the tank back into his place.
!ATTENTION: to guarantee regular drainage of the
water, make sure that the drainpipe has a slope and
is straight, without any bends or constrictions.
SWith the continuous drainage installed the oating
device inside the tank is still active and will stop the
dehumidier if a fault in the drainage occurs and the
water level inside the tank rises.
ENGLISH
12
M1081-0_draft-0
Continuous drainage (H)
SUMO
e dehumidier is tted as standard with an automatic condensate
drain pump. e pump has a prevalence of 5 meters. Apply a plastic
tube Ø 8 e.d directly to H3 on the side of the dehumidier or use the
adapter R to connect a hose Ø 6 i.d..
!ATTENTION: to guarantee regular drainage of the
water, make sure that the drainpipe is straight with-
out any bends or constrictions.
e control panel
S1 - Green light ON e green light indicates when the dehumidier is
operative, otherwise it blinks on status 0.
S2 - Red light, full tank e light blinks, together with the green one
S1, when the tank is full, missing or incorrectly positioned.
S3 - Yellow light, defrost e light switches on during the automatic
defrosting cycle.
T1 - Decrease button Pushing this button the value of the display D
will decrease down to 0 value.
T2 - Increase button Pushing this button the value of the display D
will increase up to C value.
D - Display e display shows the working state of the dehumidier
according with Tab.A.
e value 0 means OFF, from 1 to 9 means automatic functioning and
it depends from the humidistat that switches on or o the dehumidier
if the value of the relative humidity is higher or lower of the one shown
in the Tab.A. e value C means ALWAYS ON and the dehumidier
works independently from the humidity value: nevertheless any alarm
has the priority on functioning mode.
T3 - Function button is button is used together with S1 and S2 to
access special functions like the hour counter described ahead.
Display Functioning
0 O
1 90 %R.H.
2 86 %R.H.
3 78 %R.H.
4 72 %R.H.
5 65 %R.H.
Display Functioning
6 60 %R.H.
7 52 %R.H.
8 46 %R.H.
9 40 %R.H.
C Continuous
Tab.A – Functioning modes
Start up
When the plug is connected the display D blinks for 5 seconds and
shows the last functioning mode selected: then, if the functioning
mode is dierent from zero, the blinking stops.
Shutdown
To switch o the dehumidier push the button T1 until the value
displayed is 0. When zero is selected both the green light S1 and the
display D blink.
e defrosting cycle
e electronic board performs the defrosting cycle automatically to
melt the ice keeping free the air ow through the evaporator even at
lower temperatures. During the defrosting cycle the yellow light S3
switches on.
Failures
e display is used by the electronic device to show particular situ-
ations (Tab.B). If an error message is displayed please contact your
dealer for repair.
Display Description
ntc Temperature probe must be checked
und Humidity probe must be checked
Tab.B – Error messages
e hour counter
e dehumidier is tted with two hour counters, one resettable and
one not resettable. e hour counter can register up to 999.999,99
functioning hours.
Se decimal digits are in hours: so 0,50 means 30
minutes. In this way any calculation based on the
working hours is simplied.
To show all the 8 digits the electronic board will show two digits at a
time, hiding the non signicant ones: for a correct reading of the digits
see the image below where the number 554.433,22 is supposed to be
shown:
Pic.1 – Hour counter cycle
e visualization will automatically stop aer one minute or pushing
the button T3.
Se hour counter does NOT work if the dehumidier
is in functioning mode 0, stand-by or in error. Only
the eective working hours will be registered.
Hour counter 1, resettable
To show the resettable hour counter:
• push button T3 for tree seconds: the display will show tree blink-
ing horizontal lines;
• push the buttons T1 - T1 - T3 in sequence.
Hour counter 2, not resettable
o show the whole working hours:
• push button T3 for tree seconds: the display will show tree blink-
ing horizontal lines;
• push the buttons T2 - T2 - T3 in sequence.
Reset of the hour counter 1
• push button T3 for tree seconds: the display will show tree blink-
ing horizontal lines;
• push the buttons T1 - T2 - T3 - T2 - T1 in sequence;
the number .00 is displayed to conrm the reset.
e air lter (J, K)
e air can be easily removed for cleaning. It can be cleaned with a
vacuum cleaner or with water: in this case dry it before assembly.
SDo not run the dehumidier without the air lter
to avoid accumulating dust on the heat exchanger.
Keep the air lter clean, in particular when al lot of
dust is present in the air: a dirty air lter reduces the
air ow and the eciency of the dehumidier.
ENGLISH 13
M1081-0_draft-0

Positioning (F)
To move the dehumidier use the handle and run it on his wheels. e
dehumidier must be simply placed in the room to be dehumidied
and started: the air inlet is in front, the air outlet is on the back.
It is advisable to place the dehumidier in the coldest point of the
room, where normally the humidity level is higher, possibly near a
power socket.
Maintenance
e dehumidiers of the TIGER and SUMO series need no particular
maintenance. It is advisable to dust them and keep the air intake and
outlet grids clean, check the air lter periodically and clean it if neces-
sary. Contact your dealer if it should function badly or breakdown. e
power supply cable has an M type connection; in the event of damages,
the cable must be replaced with a similar one only by experienced and
qualied sta.
!ATTENTION: before doing anything on the ap-
pliance select the functioning mode 0, wait until
the unit stops then disconnect the power supply by
unplugging the machine.
Storage
e machines of the series TIGER and SUMO have been designed to
be easily stackable and this allows to considerably reduce the spaces
needed for storage.
• Keep the appliance in a room with a temperature between –25°C
and +55°C.
• When the appliance is still packed keep to the instructions on the
box.
• Do not place other heavy material on the box.
Before a long period of inactivity ...
• Disconnect the plug and empty the condensate collection tank (if
present);
• cover the machine to protect it from dust.
Aer a long period of inactivity ...
• e fan must turn freely without gripping;
• put the machine working following this manual’s instructions.
Disposal of the product
Applicable in European Union countries only. e
crossed-out rubbish bin symbol indicates that the
product must be collected separately from other waste
at the end of its useful life. e user must therefore take
the appliance at the end of its useful life to a special
centre for electrical and electronic waste collection or
hand it back to the retailer on purchasing a new
product of an equivalent type, on a one-for-one basis.
Proper segregated waste collection of old appliances
for subsequent recycling, treatment and environmentally compatible
disposal helps avoid possible negative eects on the environment and
health and favours recycling of the materials the product is made of.
Improper disposal of the product by the user entails administrative
sanctions provided for in the legislation of individual countries.
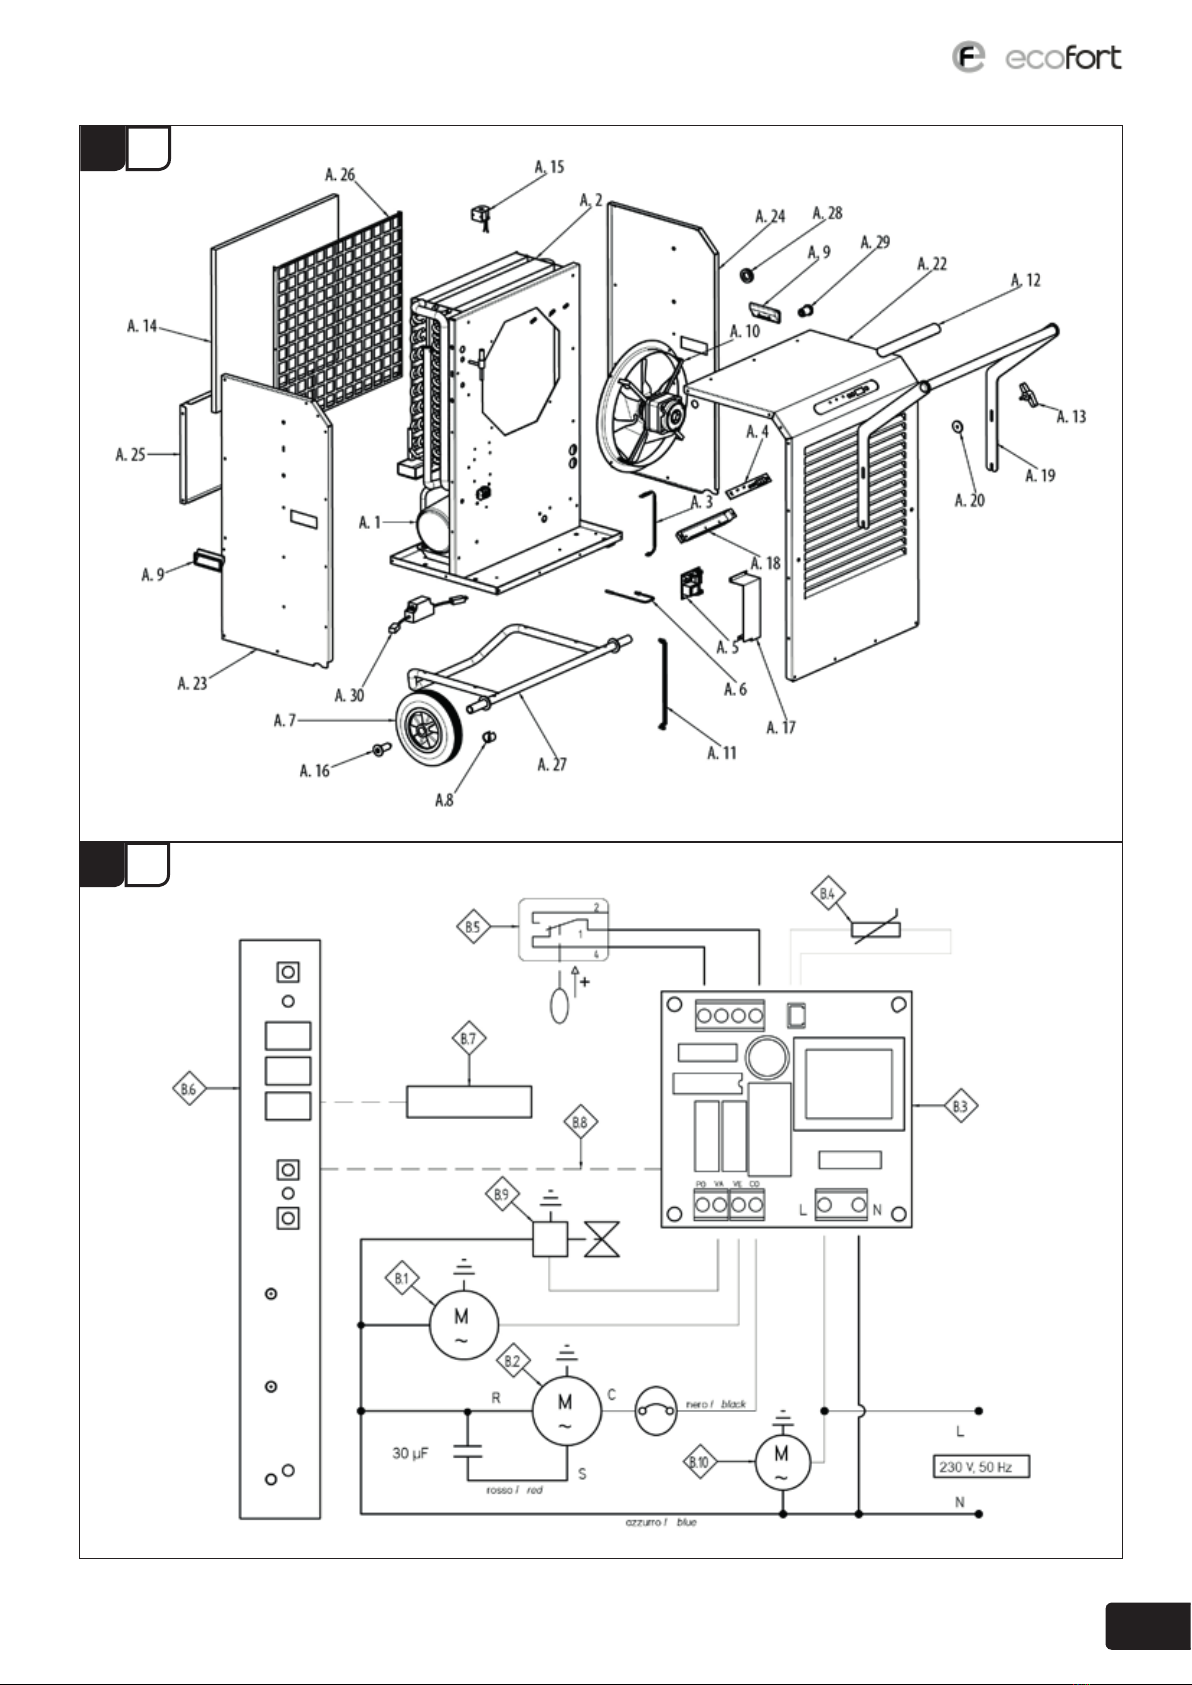
WWiring diagram (B)
Ref. Description Ref. Description
B1 Fan B6 Control board
B2 Compressor B7 Humidity probe
B3 Power board B8 Cable, 10 poles
B4 Temperature probe B9 Solenoid valve
B5 Level switch B10 Pump with tank
Tab.C – Wiring diagram
Common technical data
Working temperature [°C] +2 / +32
Working humidity [%U.R.] 40 / 95
Power supply 230V, 50 Hz
Power absorption, stand-by [W] 1,2
Refrigerating gas charge [g] See label
Max pressure [kPa] 1500
Tab.D – Common data
Technical data
Tiger Sumo
Indicative handling volume [m³] 600 800
Condensate capacity [L/24hours] * 34,5 * 48
** 51 ** 81
Air ow [m³/hour] 600 850
Current absorption [A] * 3,45 * 4,06
** 3,9 ** 4,74
Power absorption [W] * 730 * 890
** 840 ** 1050
Refrigerating gas R407c R407c
Noise level at 1 m distance [dBa] 61 64
Dry weight [Kg] 38 59.7
Water tank capacity [L] 6 -
* at 25°C and 65 %R.H. ** at 30°C and 80% R.H.
Tab.E – Technical data
ENGLISH
14
M1081-0_draft-0

Note / Notes

Legende und Symbole
SBITTE BEACHTEN: Die Hinweise weisen auf Situa-
tionen und Bedingungen hin, die den Gebrauch vom
Gerät erleichtern und verbessern können.
!ACHTUNG: Diese Warnung weist auf mögliche
Gefahren oder Situationen hin, die bei Nichtbeach-
tung der Anweisungen zu Sach- und Personenschä-
den führen können. Die Anweisungen müssen strikt
beachtet werden.
TIGER Dieses Symbol ist auf den Abbildungen zu sehen und gibt
an, auf welche Luentfeuchtermodelle sich die Abbildung
bezieht. Wenn das Symbol nicht auf der Abbildung zu sehen
ist, hat diese für alle Luentfeuchter Gültigkeit.
TIGER Dieses Symbol steht neben den Überschrien und zeigt an,
dass die folgenden Erläuterungen nur für die angegebenen
Geräte gelten. Wenn kein Symbol neben der Überschri
steht, haben die Erläuterungen für alle Geräte Gültigkeit.
Allgemeine Sicherheitsvorschrien
• Vor Gebrauch vom Luentfeuchter muss das vorliegende Handbuch
aufmerksam gelesen werden.
• Das Handbuch muss zusammen mit dem Gerät auewahrt werden.
• Der Luentfeuchter darf NICHT von Personen mit körperlichen
oder seelischen Einschränkungen benutzt werden oder von Per-
sonen, die nicht über ausreichende Erfahrungen oder Kenntnisse
verfügen, außer sie wurde von einer Person, die für ihre Unver-
sehrtheit verantwortlich ist, in den korrekten Gebrauch des Geräts
eingewiesen.
• Dies gilt auch für Kinder. Vor Kindern und Tieren sicher auewah-
ren.
• Das Gerät darf nicht an Standorten verwendet werden, an denen
Explosionsgefahr besteht.
• Das Gerät nicht an Standorten verwendet, an denen die Atmosphä-
re Öle, Sulde oder Chlor enthalten kann.
• Die Lüungsgitter an der Ansaugönung und der Ausgabeönung
müssen immer sauber sein und dürfen nicht abgedeckt werden.
(mindestens einen Abstand von 10 cm einhalten).
• Das Gerät darf nur benützt werden, wenn es aufrecht auf seinen vier
Rollen steht.
• Der Luentfeuchter darf nur in geschlossenen Räumen benützt
werden.
• Das Gerät bei Betrieb nicht bewegen.
• Um das Gerät zu verschieben oder an einen anderen Ort zu brin-
gen, das Gerät zuerst ausschalten und den Sammelbehälter vom
Kondensat leeren.
• Keine Gegenstände in das Gerät stecken.
• Sicherstellen, dass die Spannung der Stromversorgung mit dem in
Tabelle angegebenen Wert übereinstimmt und das die elektrische
Anlage den geltenden Vorschrien entspricht und auf angemessene
Weise geschützt ist.
• Das Gerät darf nur wie in diesem Handbuch beschrieben benutzt
werden. Jeder andere Gebrauch ist gefährlich und kann Sach- und
Personenschäden verursachen und ist deshalb verboten.
!ACHTUNG! Wartungseingrie am Kühlkreislauf
und an der Elektrik vom Gerät dürfen nur von qua-
liziertem und erfahrenem Fachpersonal durchge-
führt werden.
Allgemeine Informationen
Bei den Geräten der Baureihe TIGER und SUMO handelt es sich um
Luentfeuchter, die den Zweck haben, der Umgebung Feuchtigkeit zu
entziehen. Sie verfügen über einen Kühlkreislauf und eine neue elektro-
nische Karte, die alle Gerätefunktionen steuert, wie das automatischen
Ein- und Ausschalten und den Abtauzyklus, wenn dieser erforderlich ist.
Funktionsweise (C)
Die Lu (C1), die entfeuchtet werden soll, wird vom Gerät mithilfe vom
Gebläse (C4) angesaugt und durch den Verdampfer (C2) vom Kühlkreis-
lauf geleitet. Dadurch wird die Temperatur der Lu unter den Taupunkt
abgesenkt und der Wasserdampf kondensiert zu Wassertropfen, die in
dem dafür vorgesehenen Sammelbehälter (C5) aufgefangen werden.
!ACHTUNG! Das Wasser im Sammelbehälter ist
KEIN Trinkwasser. Das Wasser aus dem Sammelbe-
hälter deshalb auf keinen Fall trinken.
Die entfeuchtete Lu wird durch den Kondensator (C3) geleitet, wo
ihre Temperatur auf einen Wert erhöht wird, der leicht über der Aus-
gangstemperatur liegt. So wird die in der Umgebungslu enthaltene
Feuchtigkeit nach und nach auf den gewünschten Wert gesenkt.
SWenn ein Raum entfeuchtet wird, wird dadurch
auch die Feuchtigkeit in den Wänden und dem
Fußboden vom Raum sowie der darin enthaltenen
Materialien gesenkt.
Abtauzyklus mit heißem Gas (C)
Wenn die Temperatur unter einen Wert von ca. 16°C fällt, kann sich am
Verdampfer (C2) Eis bilden. Das Eis muss in regelmäßigen Abständen
entfernt werden, um zu verhindern, dass der Lustrom unterbrochen
wird. Bei den Geräten der Baureihe TIGER und SUMO wird der Abtau-
zyklus vollautomatisch von der elektronischen Steuerung gesteuert (siehe
unten). So lange der Abtauzyklus läu, wird das Gebläse (C4) abgeschal-
tet. Die Dauer vom Abtauzyklus hängt von den Standortbedingungen
und der Menge an Eis ab, die sich am Verdampfer (C2) gebildet hat.
Der Sammelbehälter
TIGER
Der Behälter ist mit einer Füllstandskontrolle mit Schwimmer ausgestat-
tet, die den Luentfeuchter abschaltet, wenn der Behälter voll ist. Die
Füllstandskontrolle funktioniert auch bei fest installiertem Abuss (siehe
unten).
Leeren (G)
Den Behälter herausnehmen und das Wasser durch die Önung (G1) aus
dem Behälter kippen. Dann den Behälter wieder in das Gerät einsetzen.
Endlos-Abuss (H)
Der Kondensatbehälter ist auf einen Endlos-Abuss ausgelegt. Der
Anschluss ist ganz einfach. Sobald der Anschluss durchgeführt worden
ist, ist ein Ausleeren vom Kondensatbehälter von Hand nicht mehr erfor-
derlich. Den Endlos-Abuss wie folgt installieren:
• Den Deckel (H1) abnehmen.
• Einen Schlauch Ø10 mm innen am Behälter anschließen und durch
die Önung (H2) in der Verkleidung aus dem Entfeuchter heraus-
führen.
• Den Behälter in das Gerät einsetzen und dabei auf den Abuss-
schlauch achten.
DEUTSCH
16
M1081-0_draft-0
!ACHTUNG: Damit das Gerät korrekt funktioniert,
muss der Schlauch konstant nach unten geführt
werden und darf nicht verdreht oder abgeklemmt
werden.
SDer Schwimmer bleibt in jedem Fall aktiviert und
schaltet den Entfeuchter, sollte der Behälter auf-
grund einer Störung vom Abuss volllaufen.
Endlos-Abuss (H)
SUMO
Der Luentfeuchter ist serienmäßig mit einem automatischen Konden-
satpumpe ausgestattet. Die Pumpe hat eine Prävalenz von 5 Metern.
Tragen Sie eine Kunststorohr Ø 8 Außenverkleidungen direkt an H3
auf der Seite der Luentfeuchter, oder nutzen Sie die R-Adapterkabel an
einen Schlauch Innen-Ø 6 verbinden..
!ACHTUNG: Um einen ordnungsgemäßen Betrieb
zu gewährleisten, muss das Rohr keine Einschrän-
kungen oder Behinderungen jeglicher Art platziert
werden.
Die Gerätesteuerung (D)
S1 - Grüne Kontrollleuchte Betrieb: Die Kontrollleuchte schaltet sich
ein, wenn der Entfeuchter läu, und blinkt, wenn der Entfeuchter in
Standby (0) ist (Strom ein, Entfeuchter aus).
S2 - Rote Kontrollleuchte Überlauf: Die Kontrollleuchte schaltet sich
ein und blinkt zusammen mit S1, wenn der Behälter voll ist, fehlt oder
nicht korrekt eingesetzt wurde oder wenn eine Funktionsstörung aufge-
treten ist.
S3 - Gelbe Kontrollleuchte Abtauen: Die Kontrollleuchte schaltet sich
ein, wenn der Entfeuchter einen automatischen Abtauzyklus durchführt.
T1 - Taste Verringern: Durch Drücken dieser Taste wird der Wert, der
auf dem Display D angezeigt wird, verkleinert (bis Null).
T2 - Taste Erhöhen: Durch Drücken dieser Taste wird der Wert, der auf
dem Display D angezeigt wird, erhöht (bis C).
D - Display: Auf dem Display wird der Funktionsstatus vom Entfeuchter
angezeigt (siehe Tab. B unten).
Der Wert 0 zeigt an, dass das Gerät AUS ist. 1 bis 9 zeigen an, dass das
Gerät im Automatikbetrieb läu und vom Feuchtigkeitsregler gesteuert
wird, der den Entfeuchter je nach Lufeuchtigkeit (siehe Tabelle B unten)
ein- und ausschaltet.
Der Wert C zeigt an, dass das Gerät im DAUERBETRIEB läu, unabhän-
gig von der Lufeuchtigkeit. Eventuelle Alarme haben immer Priorität
vor der eingestellten Betriebsart.
T3 - Funktionstaste: Die Funktionstaste wird zusammen mit den ande-
ren Tasten gedrückt, um Sonderfunktionen der Karte anzusteuern, wie
z.B. den Betriebsstundenzähler (siehe unten).
Display Betriebsart
0 AUS
1 90 % rel.LF
2 86 % rel.LF
3 78 % rel.LF
4 72 % rel.LF
5 65 % rel.LF
Display Betriebsart
6 60 % rel.LF
7 52 % rel.LF
8 46 % rel.LF
9 40 % rel.LF
C DAUERBETRIEB
Tab.A – Betriebsarten
Einschalten
Beim Einstecken vom Gerätestecker blinkt das Display (D) 5 Sekunden
lang und zeigt dann den letzten Funktionsstatus vom Entfeuchter an.
Wenn die Betriebsart dann nicht Null ist, hört das Display nach Ablauf
der 5 Sekunden auf zu blinken.
Ausschalten
Zum Ausschalten vom Entfeuchter die Taste (T1) drücken, bis auf dem
Display der Wert 0 angezeigt wird. Wenn die Betriebsart Null (Standby)
gewählt wird, blinken die Kontrollleuchte (S1) und das Display (D).
Abtauen
Die elektronische Karte steuert den Abtauzyklus automatisch und ent-
fernt regelmäßig das Eis, das sich am Wärmeaustauscher bildet. Dadurch
ist immer für eine optimale Luzirkulation garantiert, auch bei nied-
rigeren Temperaturen. Das Einschalten vom Abtauzyklus wird durch
Einschalten der Kontrollleuchte (S3) angezeigt.
Defekte
Auf dem Display werden neben dem Funktionsstatus vom Entfeuchter
auch eventuelle Defekte (Tabelle B) angezeigt. Sollte einer der be-
schriebenen Fehler auauchen, ist eine Reparatur durch Fachpersonal
erforderlich.
Display Beschreibung
ntc Temperatursonde defekt oder abgelöst
und Feuchtigkeitssonde defekt oder abgelöst
Tab.B – Fehlermeldungen
Der Betriebsstundenzähler
Der Luentfeuchter ist mit zwei Betriebsstundenzählern ausgestattet,
von denen einer ein rückstellbarer Teilstundenzähler ist und der andere
ein Gesamtstundenzähler, der nicht rückgestellt werden kann. Der Be-
triebsstundenzähler kann maximale 999.999,99 Stunden zählen.
SDie Kommastellen sind in Stunden angegeben. Das
heißt, dass 0,50 Stunden einer Zeit von 30 Minuten
entsprechen. Diese Anzeige erleichtert eine eventuel-
le Berechnung anhand der Betriebsstunden.
Um die Stunden anzuzeigen, werden auf dem Display nacheinander
jeweils 2 Ziern angezeigt. Es werden nur die Ziern der gezählten Stun-
den angezeigt. Das Beispiel auf der Abbildung zeigt, wie die Betriebs-
stunden angezeigt werden, in diesem Fall 554.433,22 Betriebsstunden.
Abb.1 – Zyklus Anzeige Betriebsstunden
Die Betriebsstunden werden ca. 1 Minute lang angezeigt, außer es wird
die Taste (T3) gedrückt.
SDer Betriebsstundenzähler funktioniert NICHT,
wenn das Gerät den Funktionsstatus 0 hat, in Stand-
by ist oder ein Fehler ausgelöst wurde. Das bedeutet,
dass nur die eektiven Betriebsstunden gezählt
werden.
Betriebsstundenzähler 1, rückstellbar
Um den rückstellbaren Betriebsstundenzähler anzuzeigen, wie folgt
vorgehen:
• Die Taste (T3) ca. 3 Sekunden lang drücken. Auf dem Display wer-
den drei waagrechte Striche angezeigt, die blinken.
• Nacheinander T1 - T1 - T3 drücken.
Betriebsstundenzähler 2, Gesamtstundenzähler
Um die Gesamtbetriebsstunden anzuzeigen, wie folgt vorgehen:
• Die Taste (T3) ca. 3 Sekunden lang drücken. Auf dem Display wer-
den drei waagrechte Striche angezeigt, die blinken.
• Nacheinander T2 - T2 - T3 drücken.
DEUTSCH 17
M1081-0_draft-0

Rückstellung Betriebsstundenzähler 1
• Die Taste (T3) ca. 3 Sekunden lang drücken. Auf dem Display wer-
den drei waagrechte Striche angezeigt, die blinken.
• Nacheinander T1 - T2 - T3 - T2 - T1 drücken.
Die Rückstellung wird durch die Anzeige .00 auf dem Display bestätigt.
Der Lulter (J, K)
Der Lulter kann problemlos ausgebaut und mit einem Staubsauger
sauber gemacht oder mit Wasser ausgewaschen werden. Wenn der Filter
ausgewaschen wird, darf er erst dann wieder eingesetzt werden, wenn er
ganz trocken ist.
SDen Entfeuchter nicht ohne den Lulter laufen las-
sen, das sich sonst Schmutz im Wärmeaustauscher
ansammelt. Den Lulter häug sauber machen,
vor allem an staubigen Standorten. Wenn der Filter
verschmutzt ist, behindert er den Lustrom und
reduziert die Ezienz vom Luentfeuchter.
Aufstellen (F)
Der Luentfeuchter ist mit Rollen ausgestattet und kann deshalb prob-
lemlos an den Ort gebracht werden, an dem er aufgestellt werden soll.
Die Luentfeuchter der Baureihe TIGER und SUMO werden ganz ein-
fach in den Raum gestellt, der entfeuchtet werden soll, und eingeschaltet.
Die Lu wird vorne angesaugt und tritt an der Rückseite des Geräts
wieder aus. Der Luentfeuchter sollte an der kältesten Stelle im Raum
aufgestellt werden, wo sich normalerweise die Feuchtigkeit ansammelt,
und möglichst in der Nähe einer Steckdose.
Wartung
Die Luentfeuchter der Baureihe TIGER und SUMO machen keine
besondere Wartung erforderlich. Sie sollten abgestaubt werden. Die
Lüungsgitter an der Ansaugönung und der Ausgabeönung regel-
mäßig sauber machen. Den Lulter regelmäßig kontrollieren und ggf.
sauber machen. Bei Funktionsstörungen und Defekten bitte den Händler
kontaktieren. Das Stromkabel hat einen Anschluss vom Typ M. Bei Be-
schädigung muss das Stromkabel von einem erfahrenen Elektriker durch
ein gleichwertiges Kabel ersetzt werden.
!ACHTUNG! Vor Durchführung von Eingrien gleich
welcher Art am Gerät das Gerät auf 0 schalten und
abwarten, bis sich das Gerät ausschaltet. Dann den
Stecker aus der Steckdose ziehen.
Lagerung (L)
Die Geräte der Baureihe TIGER und SUMO können problemlos gesta-
pelt werden. Dadurch wird der Platzbedarf für ihre Einlagerung deutlich
reduziert.
• Das Gerät in einem geschlossenen Raum bei einer Temperatur
zwischen -25°C und +55°C lagern.
• Wenn das Gerät noch verpackt ist, die Hinweise auf der Verpackung
beachten.
• Keine schweren Gegenstände auf den Karton stellen, in dem das
Gerät verpackt ist.
Vor einer längeren Außerbetriebnahme...
• Den Stecker aus der Steckdose ziehen und den Kondensatbehälter
ausleeren (falls vorhanden).
• Das Gerät zum Schutz vor Staub abdecken.
Nach einer längeren Außerbetriebnahme...
• Sicherstellen, dass sich das Gebläse frei und ohne Reibung dreht.
• Das Gerät wie im vorliegenden Handbuch beschrieben installieren.
Entsorgung vom Gerät
INFORMATION FÜR DIE BENUTZER - Nur für EU-Mitgliedsstaaten
Das Symbol mit der durchgestrichenen Abfalltonne bedeutet, dass
das Produkt nach seiner Aussonderung vom restlichen Müll getrennt
entsorgt werden muss. Der Benutzer muss daher das Gerät an einer
Sammelstelle für Elektro- und Elektronikgeräte oder beim Kauf eines
gleichwertigen Neugerätes beim Händler abgeben. Das angemessene
Sortieren von Abfall und nachfolgende Recyceln des aussortierten Gerä-
tes zur umweltverträglichen Entsorgung trägt zum Schutz von Umwelt
und Gesundheit bei und dient der Wiederverwertung der recyclingfähi-
gen Materialien, aus denen das Gerät besteht.
Die unsachgemäße Entsorgung des Produktes durch den Benutzer führt
zur Anwendung von Strafmaßnahmen gemäß den gesetzlichen Vorga-
ben der einzelnen Mitgliedsstaaten.
Schaltplan (B)
Bez. Beschreibung Bez. Beschreibung
B1 Gebläse B6 Steuerkarte
B2 Kompressor B7 Feuchtigkeitssonde
B3 Leistungsplatine B8 Kabel 10-polig
B4 Temperatursonde B9 Magnetventil
B5 Mikroschalter B10 Pumpe mitTank
Tab.C – Legende Schaltplan
Technische Daten Gerät
Betriebstemperatur [°C] +2 / +32
relative Luftfeuchtigkeit Gerätebetrieb [%rel.LF] 40 / 95
Stromspeisung 230V, 50 Hz
Leistungsaufnahme in Standby [W] 1,2
Kältemittelfüllung [g] siehe Aufkleber
Höchstdruck [kPa] 1500
Tab.D – Technische Daten Gerät
Technische Daten Gerätebetrieb
Tiger Sumo
Raumgröße maximal [m³] 600 800
Kondensationsleistung [l/24h] * 34,5 * 48
** 51 ** 81
Luftdurchsatz [m³/h] 600 850
Stromaufnahme [A] * 3,45 * 4,06
** 3,9 ** 4,74
Leistungsaufnahme [W] * 730 * 890
** 840 ** 1050
Kältemittel R407c R407c
Schallpegel in 1 m Abstand [dB(A)] 61 64
Leergewicht [kg] 38 59.7
Fassungsvermögen Behälter [l] 6 -
(*) bei 25°C und 65 %rel.LF (**) a 30°C e 80% U.R.
Tab.E – Technische Daten Gerätebetrieb
DEUTSCH
18
M1081-0_draft-0

Note / Notes
Légende et symboles
SNOTE IMPORTANTE: les notes servent à mettre en
évidence des situations et des conditions qui peuvent
faciliter et améliorer l’utilisation de l’appareil.
!ATTENTION: cet avertissement signale une possible
condition de danger ou met en évidence des situa-
tions qui, si non gérées de façon correcte, pourraient
causer des dommages aux choses ou aux personnes.
Suivre attentivement ce qui est écrit.
TIGER Ce symbole est utilisé sur les gures et identie à quels mo-
dèles de déshumidicateur se réfère l'image. Si cela n’est pas
spécié cela signie que la gure a une validité générale.
TIGER Ce symbole est utilisé à côté des titres pour indiquer que
les explications qui suivent s’appliquent uniquement aux
machines indiquées. Si ce n’est pas spécié cela signie que
l’instruction a une validité générale.
Règles générales de sécurité
• Lire avec attention ce manuel avant d’utiliser le déshumidicateur.
• Ce manuel est à conserver avec la machine.
• Ce déshumidicateur n’a pas été conçu pour être utilisé par des
personnes, y compris les enfants, ayant des capacités physiques,
sensorielles ou mentales diminuées ou qui manquent d’expérience
dans ce secteur ou qui ont des connaissances insusantes, à moins
d’avoir reçu des informations correctes sur l’utilisation de l’appa-
reillage par une personne responsable pour leur sécurité.
• Garder hors de la portée des animaux et des enfants.
• Ne pas utiliser cet appareil dans des endroits où existe un danger
d’explosion.
• Ne pas utiliser cet appareil dans des zones dont l’air peut contenir
des huiles, des sulfures ou du chlore.
• Ne rien mettre sur les grilles d’entrée et de sortie de l’air (laisser au
moins 10 centimètres d’air).
• Cet appareil doit fonctionner en position verticale, appuyé sur les
roues.
• La pièce dans laquelle est installé le déshumidicateur doit être
fermée.
• Ne pas remuer l’appareil pendant le fonctionnement.
• Pour déplacer l’appareil d’abord l’éteindre et vider la cuve de col-
lecte des condensats.
• Ne mettre aucun objet à l’intérieur de l’appareil.
• Contrôler si la tension d’alimentation correspond bien à celle
indiquée sur la plaque signalétique, et si l’équipement électrique
est conforme aux normes en vigueur et s’il est protégé de manière
appropriée.
• Ne pas utiliser cet appareil d’une manière diérente de celle
décrite dans ce manuel: toute autre utilisation est à considérer
potentiellement dangereuse aussi bien pour la machine que pour
les personnes.
!ATTENTION : toute opération d’entretien sur le
circuit frigorique ou sur le circuit électrique ne doit
être eectuée que par du personnel qualié.
Introduction
Les appareils de la série TIGER et SUMO sont des déshumidicateurs
d’air dont le but est d’éliminer l’humidité de la pièce. Ils sont dotés d’un
circuit frigorique et équipés d’une nouvelle carte électronique qui gère
toutes les fonctions comme la mise en marche et l’arrêt automatiques
ou le cycle de dégivrage quand il est nécessaire.
Principe de fonctionnement (C)
L’air C1, à déshumidier, est aspiré par l’appareil, au moyen du venti-
lateur C4, et passe à travers l’évaporateur C2 du circuit frigorique. De
cette façon la température de l’air est abaissée au-delà de son point de
rosée et la vapeur d’eau se condense en gouttes d’eau qui sont recueillies
dans le réservoir spécial C5.
!ATTENTION L’eau récoltée dans le réservoir n’est
pas potable: en aucun cas ne boire cette eau.
L’air ainsi déshumidié est passé à travers le condensateur C3 qui
en augmente la température à une valeur légèrement supérieure par
rapport à celle initiale. De cette façon la quantité d’humidité contenue
dans l’air ambiant est graduellement diminuée jusqu’à la valeur désirée.
SQuand on déshumidie une pièce on obtient égale-
ment un abaissement de l’humidité dans les murs
et dans le sol de la chambre, ainsi que des matériels
contenus dans celle-ci.
Dégivrage à gaz chaud (C)
Quand la température ambiante descend sous les 16 °C environ il peut
se former de la glace sur l’évaporateur C2. La glace doit être cyclique-
ment éliminée pour éviter qu’elle s’accumule empêchant le passage de
l’air. Dans les déshumidicateurs de la série TIGER et SUMO le cycle
de dégivrage est géré automatiquement par le contrôle électronique
(voir plus loin). Pendant cette phase le ventilateur C4 est arrêté. La
durée du cycle de dégivrage dépend des conditions ambiantes et de la
quantité de glace qui s’est formée sur l’évaporateur C2.
Le réservoir
TIGER
Le réservoir de collecte des condensats contient le otteur qui arrête
le déshumidicateur quand il est plein : cet dispositif reste en fonction
même avec la vidange continue (voir plus loin).
Vidange (G)
Dégager le réservoir: utiliser l’ouverture G1 pour vider l’eau. Le réser-
voir doit ensuite être remis à sa place.
Vidange continue (H)
Le réservoir est prévu pour la vidange continue. L’installation est très
simple et, une fois terminée, il ne sera plus nécessaire de vider manuel-
lement le réservoir de collecte des condensats. Pour installer la vidange
continue faire comme suit :
• Retirer le bouchon H1 du réservoir;
• Relier un tuyau Ø10 mm interne au réservoir et le faire sortir du
déshumidicateur à travers le trou H2 du panneau.
• Insérer le réservoir dans son logement en accompagnant le tuyau
de vidange;
!ATTENTION: pour un fonctionnement correct le
tuyau doit être positionné constamment en descente
et sans étranglements ou empêchement d’aucune
sorte.
SMême avec la vidange continue, le système à otteur
reste quoi qu’il en soit actif et il garantit l’extinction
du déshumidicateur si jamais le réservoir se remplit
en raison d’un dysfonctionnement de la vidange.
FRANÇAIS
20
M1081-0_draft-0
This manual suits for next models
3
Table of contents
Languages:
Other ecofort Dehumidifier manuals

ecofort
ecofort ecoQ 30L Energy Saver User manual

ecofort
ecofort ecodry 925 User manual

ecofort
ecofort ecoQ 13L Energy Saver User manual

ecofort
ecofort ecodry Series User manual

ecofort
ecofort ecoQ 20L User manual

ecofort
ecofort ecodry 425 User manual

ecofort
ecofort ecoQ 12L User manual

ecofort
ecofort ecodry 925 User manual

ecofort
ecofort ecoQ 12L User manual

ecofort
ecofort Ecodry Neptun User manual


