manuals.online logo
Brands
  1. Home
  2. •
  3. Brands
  4. •
  5. CoverCraft
  6. •
  7. Automobile Accessories
  8. •
  9. CoverCraft WeatherShield HD Quick reference guide

CoverCraft WeatherShield HD Quick reference guide

Your new WeatherShield® HD cover is manufactured with a durable solution-dyed
woven polyester outer shell, finished with a patented immersion process that uses
heat and pressure to permanently encase the fibers to shed moisture, dust, dirt, bird
droppings, tree sap and grime.This high-performance fabric helps provide
outstanding protection against most natural elements and can be used for storing
vehicles outside, and indoors as well.
If your vehicle has an outside radio antenna which will not retract flush with
the vehicle body, you will have to provide an opening in the cover. We have
included a non-corrosive plastic grommet set for the antenna opening.
1) The most accurate way to make an antenna opening is to remove the antenna
and install the cover on the vehicle, making sure it is properly aligned and
positioned. Using a sharp pencil, punch a hole through the fabric at the antenna
location. Be careful to avoid hitting the vehicle finish with the pencil. If the antenna
is not easily removed, see procedure #2.
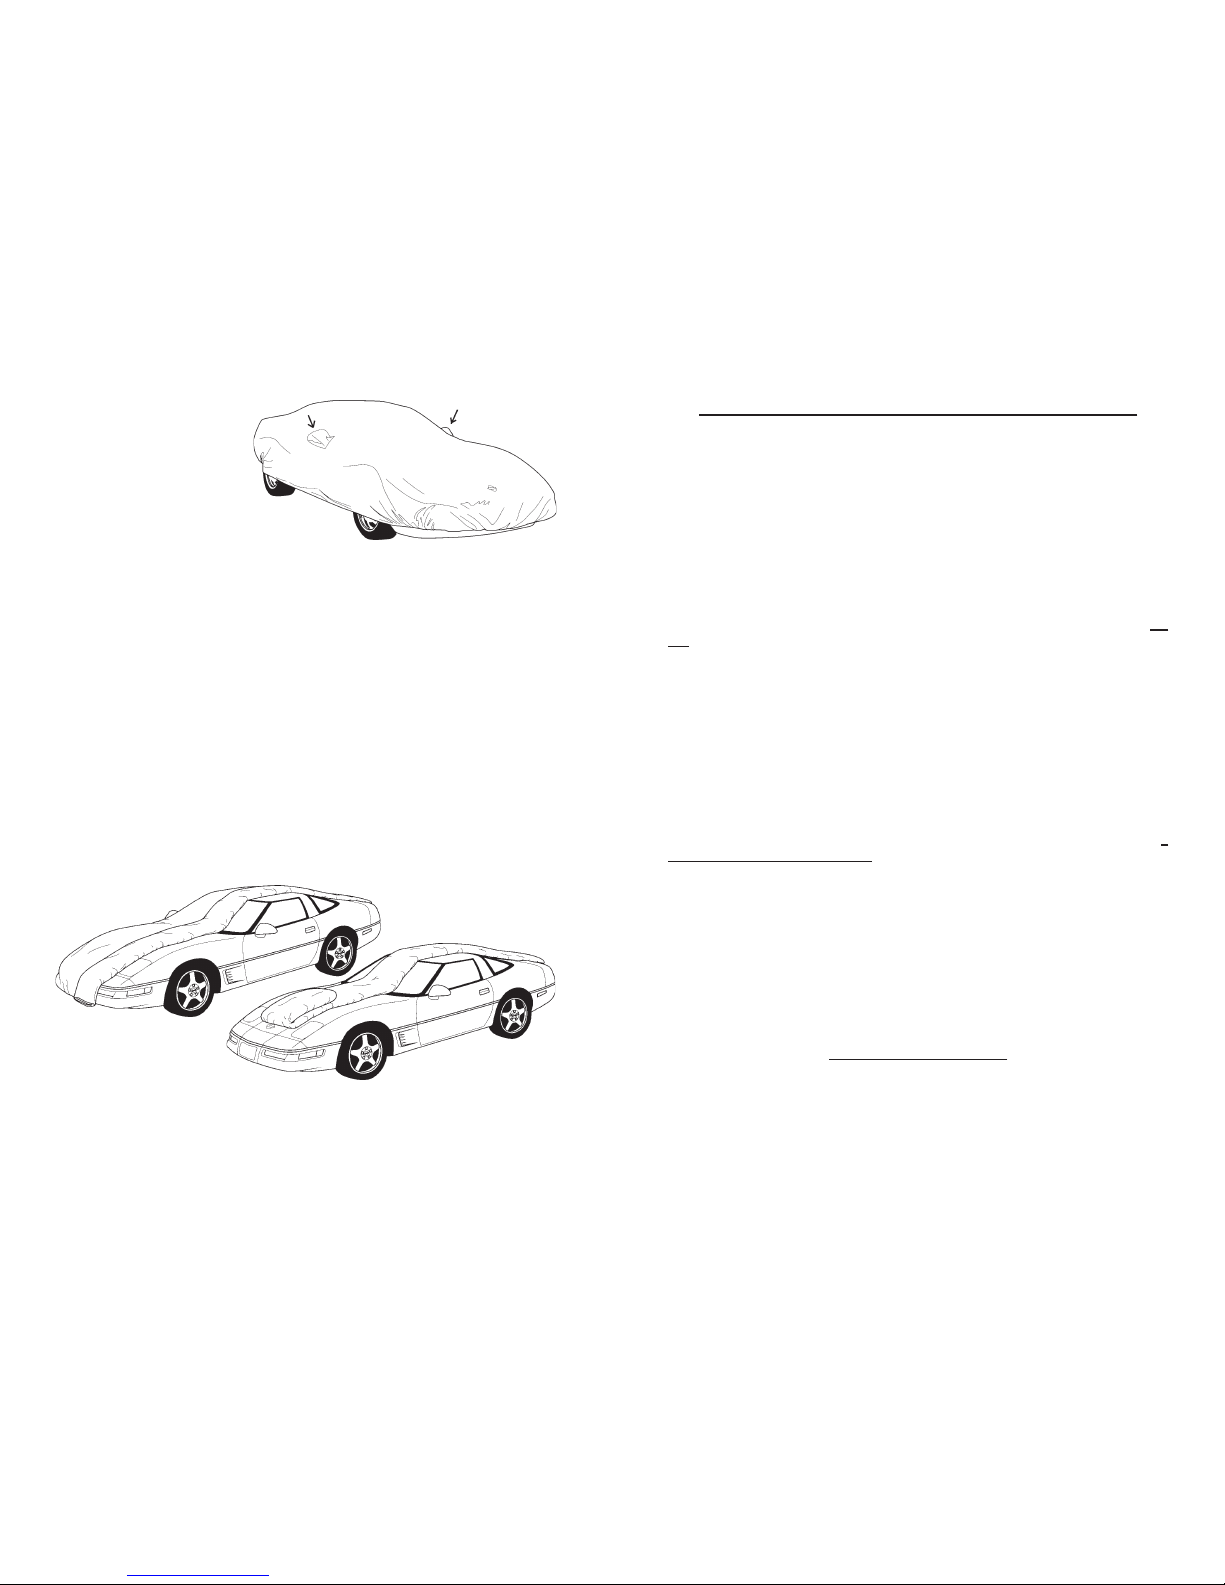
2) Place the cover on the vehicle except for the fender or body panel where the
antenna is located. For example, if the antenna is located on the front passenger
side fender, roll or fold the cover away from the antenna and cover all the remaining
area of the vehicle. (Do not attempt to place the cover over the top of the antenna.)
Center the cover, align both seams with the roof edges and be sure the cover is
pulled down evenly over the front and rear bumpers. Carefully unfold the portion
of the cover that is next to the antenna and position it next to the base of the antenna.
Recheck the overall positioning of the cover to make sure it has not moved on the
vehicle. Make sure the cover lies flat over the hood and roof areas of the vehicle.
Mark the cover with the location of the antenna base and make a hole with a sharp
pencil.
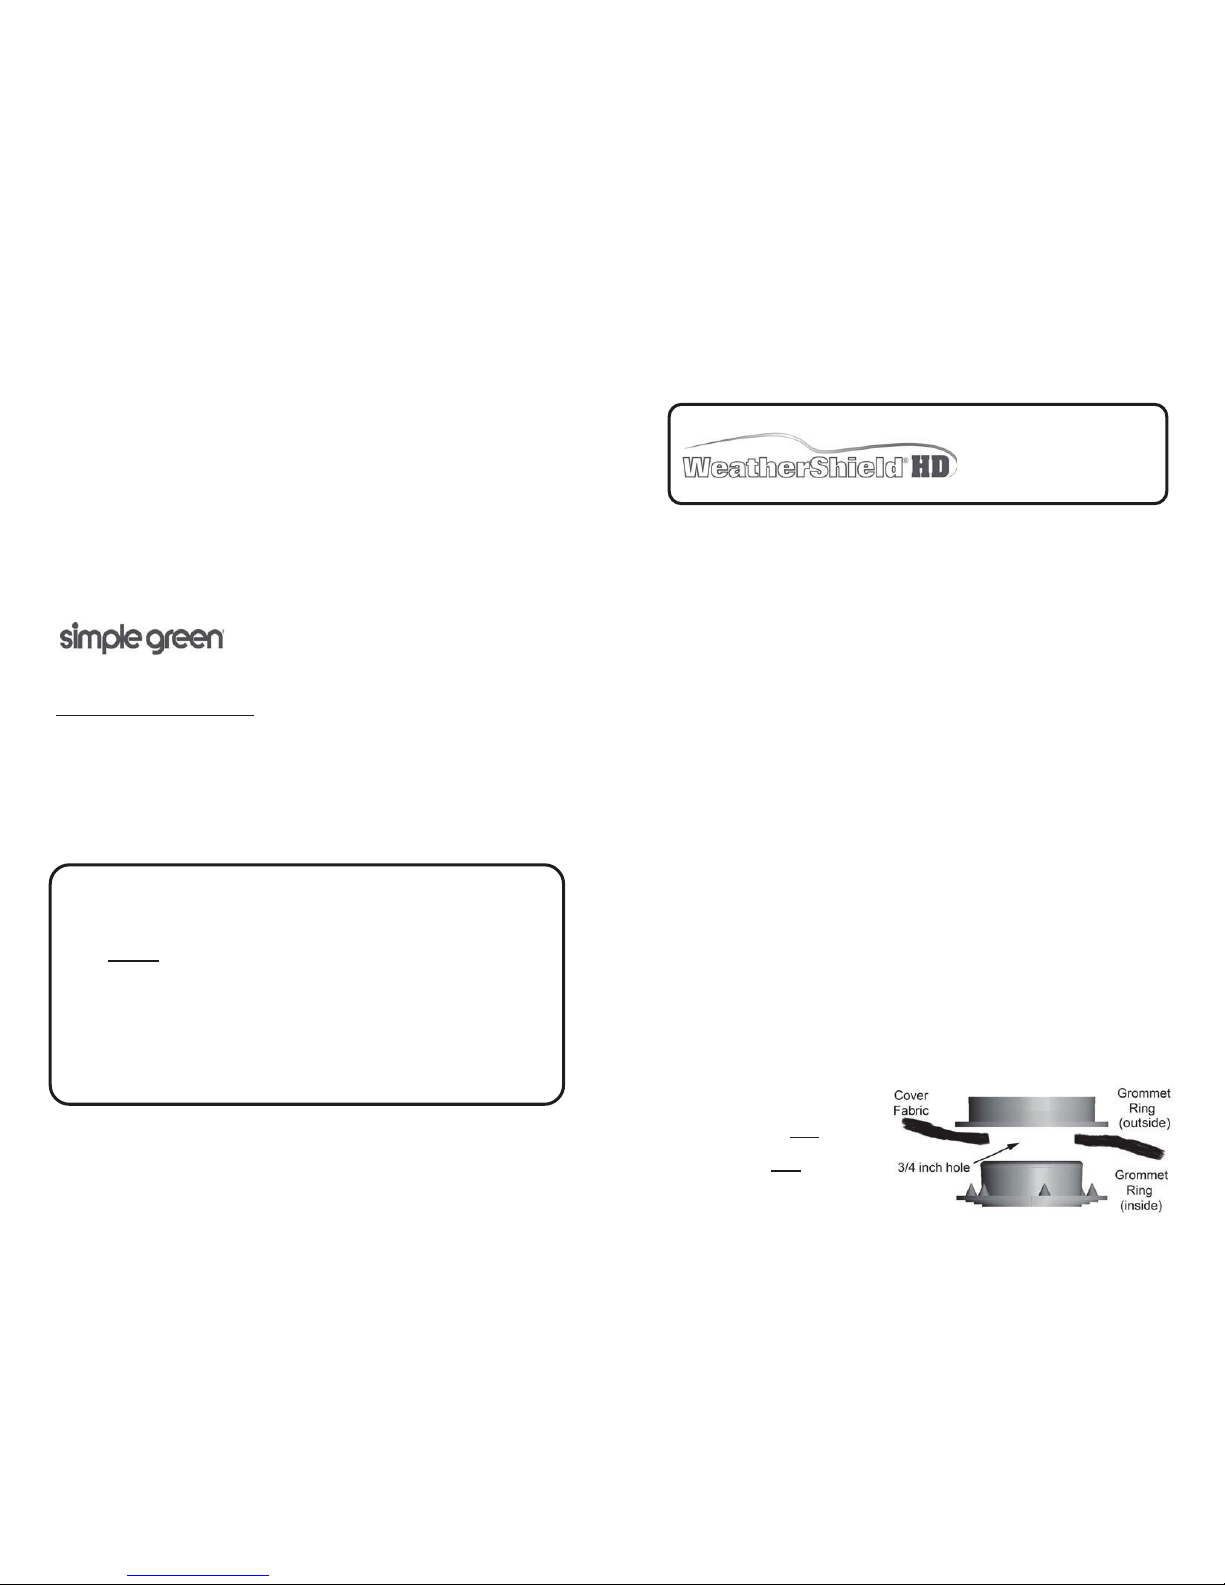
Use sharp scissors to make the hole opening 3/4 inch in diameter and install the
grommet as shown in the diagram to the right. The outside grommet ring fit is very
tight. Place the cover on a CLEAN hard surface, position the the inside grommet
through the opening you made
and then secure the outside grom-
met snap-ring in place using a
rubber mallet. Do NOTuse ex-
cessive force or the ring can be
damaged.Do NOTinstall the
grommet with the cover on the
vehicle.
Use and Care
Instructions
NOTE - Car covers are not designed for use when towing. Serious damage
can occur to the cover and the paint surface of the vehicle may also be
damaged. If you use a cover for towing you do so at your own risk.
Form # 1320455 HG (2/10)
1 - Using a large commercial washer without agitator, wash the cover using 1/4
cup of Simple Green All-Purpose Cleaner. Put the cover in the washer and
pour the cleaner in the tub after it’s filled with warm water or, for some wall
mounted commercial units pour it directly in the machine, then put in the cover
and start the machine. Use a "gentle" cycle if available.
2 - Rinse the cover twice (2X) to remove all the cleaner.
3 - Dry using low heat.
A cover may also be cleaned by turning it inside-out on the vehicle.
1 - Mix one ounce Simple Green All-Purpose Cleaner per quart of warm water.
2 - Spray or sponge onto cover.
3 - Rinse with plain water (until no suds) and allow to air dry (or use a dryer).
Simple Green is available in most world markets.
If you have any questions, contact them at 1-800-228-0709 (USA)
or visit their web-site...www.simplegreen.com
OPTIONAL LOCKING DEVICE
Your new cover is equipped with plastic (non-scratch) grommets, reinforced into the
bottom edge on both sides of the cover. A plastic-coated, steel cable with padlock
and keys is available to lock through the grommets and secure the cover to the
vehicle. Consult your dealer for availability.
An added theft deterrent is the application of large letters on the sides of the cover.
Print your name or license number on the cover to make it uninviting to a prospective
thief. (Note - see warning for use of ink and markers)
LIMITED FIVE (5) YEAR WARRANTY
WeatherShield® HD fabric covers are warranted for five (5) years from date of purchase to the
original purchaser. Save your receipt! Warranty coverage protects against defects in material
and workmanship, as well as the fabric becoming unserviceable during normal use. After
factory inspection, we will repair or replace the cover or specific panels judged to be unusable.
Warranty does not cover fading, which occurs naturally on all products used outdoors. Highly
water resistant, this fabric is not waterproof - it is breathable to allow moisture, condensation
and heat to escape from under the fabric.
To process your warranty claim, contact:
COVERWORLD
Unit 2, 37 Premier Circuit, Warana, QLD, 4575
P (61) 7 5493 1400
[email protected]
IMPORTANT - When install-
ing the cover, remember to
place it over the antenna be-
fore putting the mirror pock-
ets over the mirrors.
INSTALLATION
The front of the cover is
markedwithapatternnumber
and/or logo and the word “front” to help in positioning the cover on the vehicle. If
your cover is equipped with mirror pockets (most late-model custom-fit patterns
only), it is very important that the mirror pockets be placed over the side mirrors
before the ends of the cover are stretched over the front and rear bumpers. (see
Figure "A")
Some vehicles have very sharp bumpers, hood ornaments, moldings, etc. We
recommend that you reinforce the inside of the cover at areas exposed to severe
abrasion, using cloth-reinforced duct tape or vinyl tape which may be purchased at
hardware, plumbing or automotive stores. This will help extend the use of your
cover.
REMOVAL
Thefollowingprocedurewillmakeiteasiertoremoveandinstallthecoverwhenever
it is used.
1) Release both ends of the cover from under the bumpers.
2) Fold up both sides onto the top of the vehicle into a long pile approximately 2 feet
(60 cm) wide (see Figure "B").
3)Start at thefrontofthe vehicle andfoldthecover in threefoot(1meter) folds from
the front to the back (see Figure "C").
If you use the same procedure each time, you will find it only takes about a minute
to install or to remove the cover.
The elastic at each end of the cover will keep the cover in place under normal
conditions. Atie-down rope isalsoincluded - secure itthrough theloops sewn into
the hem under the driver and passenger doors if needed. Use care in installing the
cover on a car which has just been driven to be sure the material does not come in
contact with hot exhaust pipes.
IMPORTANT WARNINGS - PLEASE READ BEFORE USING COVER!
WARNING TO OWNERS OF REPAINTED VEHICLES: Use of a cover on any
recentlypaintedsurfacemaycausedamagetothatsurface! Ifyourvehiclehasbeen
repainted check with the painter or body shop on the specifics of how and when you
can use this cover.
WARNING FOR USE IN HIGH WIND AREAS: When using this cover in high wind
areas(andforprolongedstorage),usetheloopsandropeprovidedtosecurelypullthe
cover tight under the center of the car. This should be done even if the optional lock
andcableisbeingused. Thecoverisnotdesignedtoreplaceagarageandshouldbe
checkedforflappinginhigh winds. If wind getsunderthecoveritcancauseit to work
loose and come off the vehicle.
WARNINGFORFREEZINGWEATHER:In very rarecaseswhenaheavyrainstorm
isfollowedbyanextremetemperaturedroptobelowfreezing,itispossibleforthecover
tobecomefrozentoalayeroficecreatedbetweenthevehiclebodyandthecover. Do
notattempttoremovethecoverifthishappens. Ifitisnecessarytoremovethecover,
we recommend pouring warm water over the vehicle and slowly removing the cover,
takingcaretoinspectthesurfacesofboththecoverandthevehicleduringtheremoval
process. Stopimmediately if youencounterresistance - the icehasnot been melted
completely and you must pour more warm water over the vehicle.
PERSONALIZED MARKING INSTRUCTIONS: The application of large letters and/
or numbers on the side or front of the cover showing the vehicle's license plate or
name(s) is one of the best methods for protecting your cover against theft. If you
choose to put identification markings on your cover, please note the following:
- DO NOT use regular or spray paint!
- DO NOT use laundry markers or “permanent” type Magic markers.
- DO NOT use any type of felt-tip pen or marker.
The only type of marking paint that is acceptable for use on cover material is a
permanenttypefabric/T-shirtpaint. Thispaintisreadilyavailableinavarietyofcolors
at most fabric and art supply stores. Follow the manufacturer's instructions. Use a
single coating of the fabric paint for marking the outside of the cover with your
personalizedmarkings.
WARNING - Markers and regular paint will not adhere to the fabric and can transfer
their color onto the vehicle finish.
HAZING OF WINDOWS AND PAINT: Airborne pollutants may be deposited on the
windows or paint while a vehicle is being driven or when parked uncovered. These
depositsmaybecomesmearedandcreateahazewhenthecoverisused. Thehaze
can be wiped off with a damp cloth or washed off with water.
CLEANING INSTRUCTIONS
Car cover fabric performance can be severely affected by dirt that builds up on and
withinthematerial. It can cause the windshield andpaintto become dirty and “fogged”
aswell as create “wicking”where itactually helps pull waterthrough thefabric, nullify-
ing any water resistant properties the fabric may have had. Cleaning your cover will
help to keep your vehicle clean and to increase the service life of the cover.
NEVER...Clean a car cover in a washer with a center agitator.
NEVER...Use fabric softener.
Figure "A"
Figure "B"
Figure "C"

This manual suits for next models

1

Other CoverCraft Automobile Accessories manuals

CoverCraft Sunbrella Guide

CoverCraft

CoverCraft Sunbrella Guide

CoverCraft WeatherShield HP Quick reference guide

CoverCraft

CoverCraft WeatherShield HP Quick reference guide

CoverCraft Grommet User manual

CoverCraft

CoverCraft Grommet User manual

CoverCraft Form-Fit Quick reference guide

CoverCraft

CoverCraft Form-Fit Quick reference guide

Popular Automobile Accessories manuals by other brands

Allen Sports S102 instructions

Allen Sports

Allen Sports S102 instructions

Great day UVRS100BL Instructions for installation and use

Great day

Great day UVRS100BL Instructions for installation and use

Metra Electronics 99-9303 installation instructions

Metra Electronics

Metra Electronics 99-9303 installation instructions

Vanguard IN8377 Fitting instructions

Vanguard

Vanguard IN8377 Fitting instructions

Aries P2066 installation manual

Aries

Aries P2066 installation manual

Fiamma VENT 04328B01 Series Installation and usage instructions

Fiamma

Fiamma VENT 04328B01 Series Installation and usage instructions

Response OBD-II user manual

Response

Response OBD-II user manual

Camoplast T4S user manual

Camoplast

Camoplast T4S user manual

dirna Bergstrom Bycool Green Line Slimfit Mounting instructions

dirna Bergstrom

dirna Bergstrom Bycool Green Line Slimfit Mounting instructions

iCarsoft TPMS S2000 quick start guide

iCarsoft

iCarsoft TPMS S2000 quick start guide

CrimeStopper CS-845.RKE.II Installation and operating instructions

CrimeStopper

CrimeStopper CS-845.RKE.II Installation and operating instructions

Dakota Digital LAT-NR271 installation instructions

Dakota Digital

Dakota Digital LAT-NR271 installation instructions

mods4cars smartTOP STHFMZ2 OPERATION AND PROGRAMMING

mods4cars

mods4cars smartTOP STHFMZ2 OPERATION AND PROGRAMMING

Mont Blanc CFK18 Fitting instructions

Mont Blanc

Mont Blanc CFK18 Fitting instructions

BrandMotion ADAS-1000V3 install guide

BrandMotion

BrandMotion ADAS-1000V3 install guide

Motobilt MB5063 Assembly instructions

Motobilt

Motobilt MB5063 Assembly instructions

Thule 1169 instructions

Thule

Thule 1169 instructions

Autel MaxiIM TOYOTA 8A BLADE KEY Operation guide

Autel

Autel MaxiIM TOYOTA 8A BLADE KEY Operation guide

manuals.online logo
manuals.online logoBrands
  • About & Mission
  • Contact us
  • Privacy Policy
  • Terms and Conditions

Copyright 2025 Manuals.Online. All Rights Reserved.