Cowboy C4 User manual

C4 and C4 ST
A guide
for riders

Welcome to Cowboy. Your new bike
has arrived, and with it a new way to
move freely and mindfully through
your city. As you map your own path,
we’ll be there to power you forward,
open to the road ahead.


Contents
This guide will get your new bike ready
to ride and provide you with important
assembly, riding, safety, and maintenance
information.
Get ready
What’s in the box
The set-up
Know your bike
Connect
Pair the app
Ride
Accessories
Before every ride
Before your first ride
Bike maintenance
Wherever ‘Warning’ appears throughout these
pages, imminent potential risks to your safety
or health are discussed. Please comply with all
instructions and take appropriate preventive
measures.
9
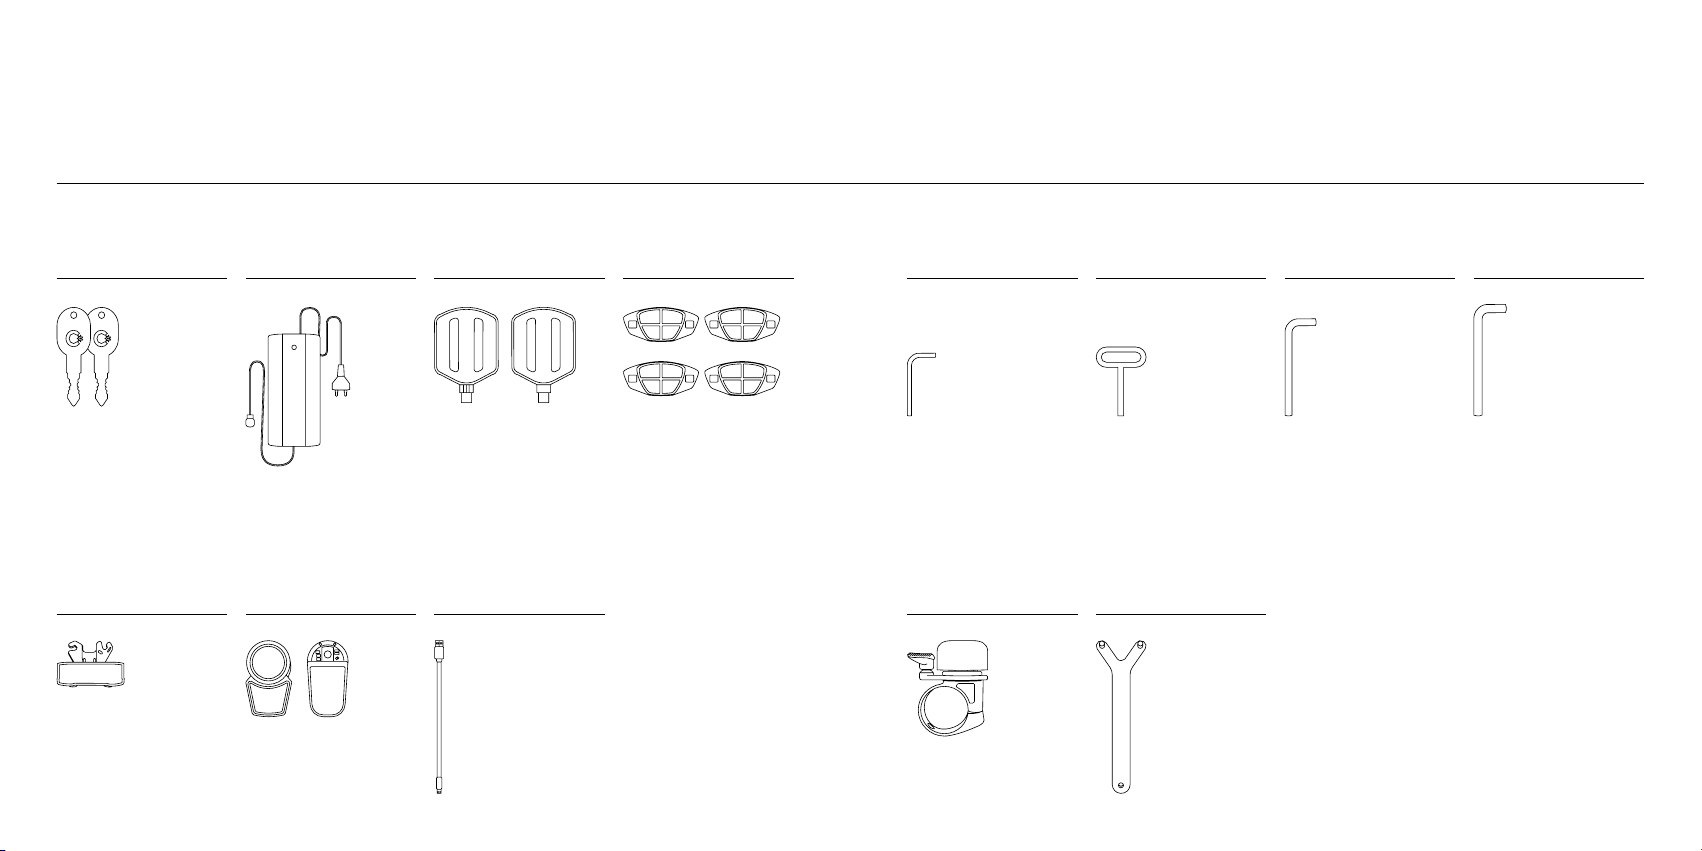
00
Battery charger
Front and rear lights
Battery keys x2
Bell
Spoke reflectors x4
USB cable
Allen key 5 Allen key 6Butterfly Allen key 4
Pin wrench
Rear reflector
What’s in the box
Pedals x2
L R
You may want or need to install the
accessory lights and reflectors to be
more visible to others. Install them
in accordance with state and local
rules for bicycle lights and reflectors.
An installation guide is available at
cowboy.com/pages/tutorials
While tightening a screw with Allen
keys 3, 5, and 6, insert the short
end for greater leverage. Do not
use power tools.
Allen key 3

11
The set-up
All the Cowboy essentials are in your
hands. Follow the instructions, and in
just a few steps you'll have your bike
put together.
C4
01
09
1112
05
10
04
C4 ST
02
03
07
08 08
06
Suitable size: 5’5” to 6’2” Suitable size: 5’4” to 6’2”
The essentials
01 Taillight
02 Removable battery
03 Fenders
04 Rear hub motor
05 Puncture-resistant tires
01 09
1112
05
10
04
02
03
0706
To assemble
Handlebar
Brakes
Pedals
Saddle
Wireless charging
06 Carbon belt drive
07 Pedals
08 Hydraulic disc brakes
09 Headlight
10 Cockpit with wireless phone charger
11 Frame
12 Adjustable saddle

1212
01
90 degrees
Handlebar
Allen key 3
01 Check
Your bike comes with the handlebar
parallel to the wheels and frame.
03 Secure
Use Allen key 3 to tighten the two
screws securely as shown. This will
keep your handlebar in place. Be sure
to insert the short end of the Allen
key for the greatest purchase when
tightening, then test it to make sure it’s
fully secure by blocking the front wheel
between your legs and trying to move
the handlebar from left to right.
02 Rotate
Turn the handlebar 90 degrees clockwise
until it’s at a right angle to the rest of
the bike.
Warning: the front brake disc marked in the
diagram must end up on the left side of the
wheel. If you see the disc brake is sitting
incorrectly on the right-hand side, turn the fork
in the counter-clockwise direction to rectify.
Front
brake disc

14
02 Brakes
Allen key 5
45 degrees
Allen key 5
01 Loosen
Loosen the screw under each brake using
Allen key 5.
02 Turn up
Turn the brake handles and grips up until
the brake handles are at a 45 degree
angle. Hold them in place.
For C4 ST, just as you can set your brake
handle position, you can also rotate the
ergonomic grip to fit your hands perfectly.
03 Tighten
Tighten the screw clockwise as shown
using Allen key 5. Make sure it’s nice
and tight.

1616
L R
03 Pedals
01 Know right from left
The right and left pedals are different.
You can tell them apart by their position
in the box and the three small grooves
on the left pedal axle only. You will also
find the stamped ‘R’ and ‘L’ on the end
of the axle.
03 Tighten up
Insert the shorter end of Allen key 6 into
the screw head on the side of the pedal
closest to the frame. Tighten as firmly
as possible.
Repeat these steps for the left pedal,
screwing counter-clockwise this time.
02 Screw in
Take the right pedal and screw it in
clockwise as far as you can by hand. It
should screw in easily. If it doesn’t, stop
right away as you may be damaging the
screw. Make sure the pedal is properly
aligned before trying again.
Allen key 6
3 grooves indicate
left pedal
18
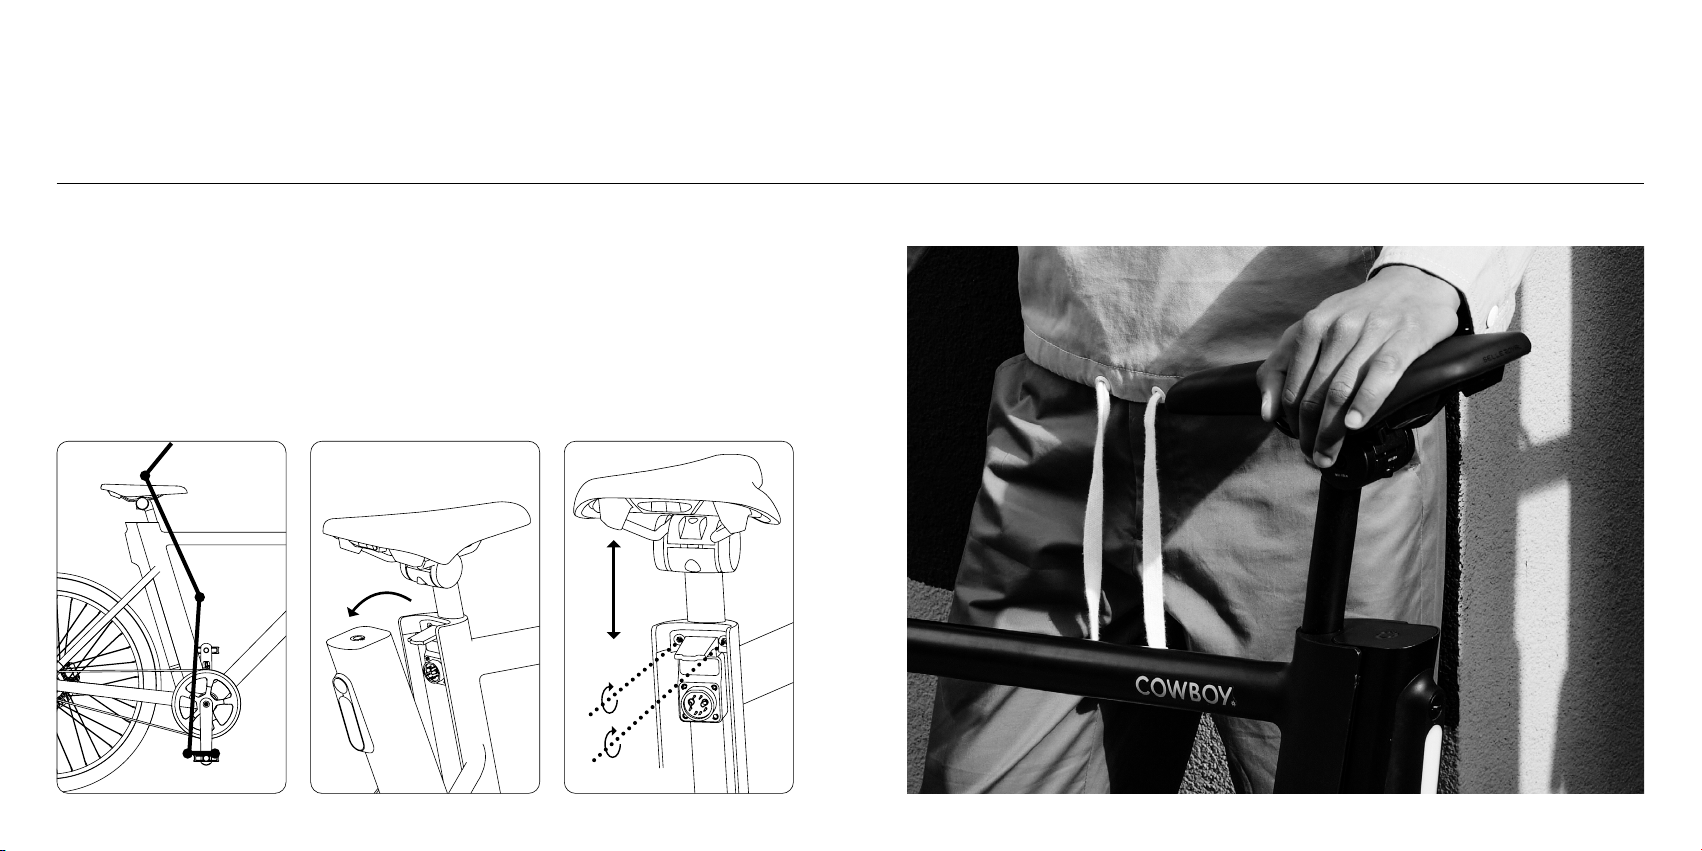
Butterfly Allen key 4
04 Saddle
01 Find the right position
Let’s work out your perfect saddle height.
Sit on the bike and move the pedal
around with your foot until it’s closest
to the ground in the 6 o’clock position.
You’ll know the seat is the right height
when your leg is just slightly bent, as
shown in the diagram.
02 Take out the battery
To change the saddle height, you’ll first
need to take out the battery using one
of the battery keys provided.
03 Adjust the height
Loosen the saddle by turning the 4mm
Butterfly Allen key in the two holes as
shown, then raise or lower the saddle to
your desired height.
Warning: do not raise the saddle higher than the
depth warning mark indicated on the seat post
as the seat-post and saddle could break. Use
the Butterfly Allen key again to secure it in place.

2020
05 Wireless
phone charging
01 Dock your phone
With the Cowboy app about to be front
and center, put the Quad Lock case on
your phone. Position your phone at 45
degrees and slot the phone over the
mount, making sure the two are aligned.
Rotate the phone so it’s upright at 0
degrees as shown. It should click right
into place. Always check your phone is
secured before you ride.
03 Undock your phone
To undock your phone, simply turn it
back through 45 degrees and remove it
from the mount. Be careful not to leave
your phone unattended on the bike as
anyone can detach it.
02 Charge up
If your phone supports wireless charging,
it will charge automatically when docked
with the bike turned on. For the best
result, enable fast charging in your
phone’s settings.
Warning: Do not keep metal objects (such as
coins and credit cards) between the phone and
the charger as you risk being burned. There is
risk of potential medical device interference.
If you have an electrical device such as a
pacemaker, consult a physician before using
wireless charging. Do not attempt to mount
anything heavier than a smartphone as the
attachment could break and result in the
damage of your device.
Incorrect position
Correct position
45
degrees
45
degrees


06 Know your bike
Safety lights
The integrated taillight flashes when
you brake to let those behind you know
you’re slowing down.
Sensors
With sensors embedded in the bike,
there’s constant dialogue with the
app and you for an informed, safe and
worry-free ride.
Motor and belt drive
250W of power to assist you up to 20mph.
No oily chain to mess with, no gears to
bother with—just one smooth ride.
Tyres
1.85-inch custom tires with a flexible
grip and a puncture protection layer.
A handy battery
Roam far and wide with up to 43 miles
(70km) range. Your battery is easily
removable and recharges to 100%
capacity in 3.5 hours.
Brakes
Hydraulic disc brakes offer total stopping
power the second you make contact.

27
01 Taillight
The integrated taillight flashes when
you brake to let those behind you
know you’re slowing down.
04 Gates carbon belt
Hassle-free maintenance and no
oily chain to deal with.
08 LED display
Eight LEDs in the cockpit display
the bike’s battery level.
05 Sensors
Sensors in the bike frame detect a fall and
alert your emergency contacts via the app.
03 Rear hub motor
250W of power to assist you up to 20mph.
Ride like you always do, but faster.
07 Headlight
Iconic Cowboy lights help
others see you on the road.
02 Removable battery
The battery has up to 43 miles of battery
autonomy depending on the road, load,
weather, and other conditions, and
weighs just 5 lbs.
Know your bike
Now that your bike’s assembled, let’s
take a look at some of the quintessential
Cowboy features. From stem to sprocket,
every detail of the Cowboy 4 is crafted to
offer an unparalleled riding experience.
06 Tires
All-rounder tires with a flexible grip
and a puncture-resistant layer.

Did you know?
Your Cowboy 4 has over 90 custom-
designed parts. Every detail adds
to the iconic Cowboy look and sets
a new performance standard. Once
you connect the app, you’ll get to
know your new bike and all that it
can do.
3030
The connected ride
From mapping the best routes to
keeping you informed of the essentials
powering your bike, the app is your key
to a smarter, more mindful ride.

33
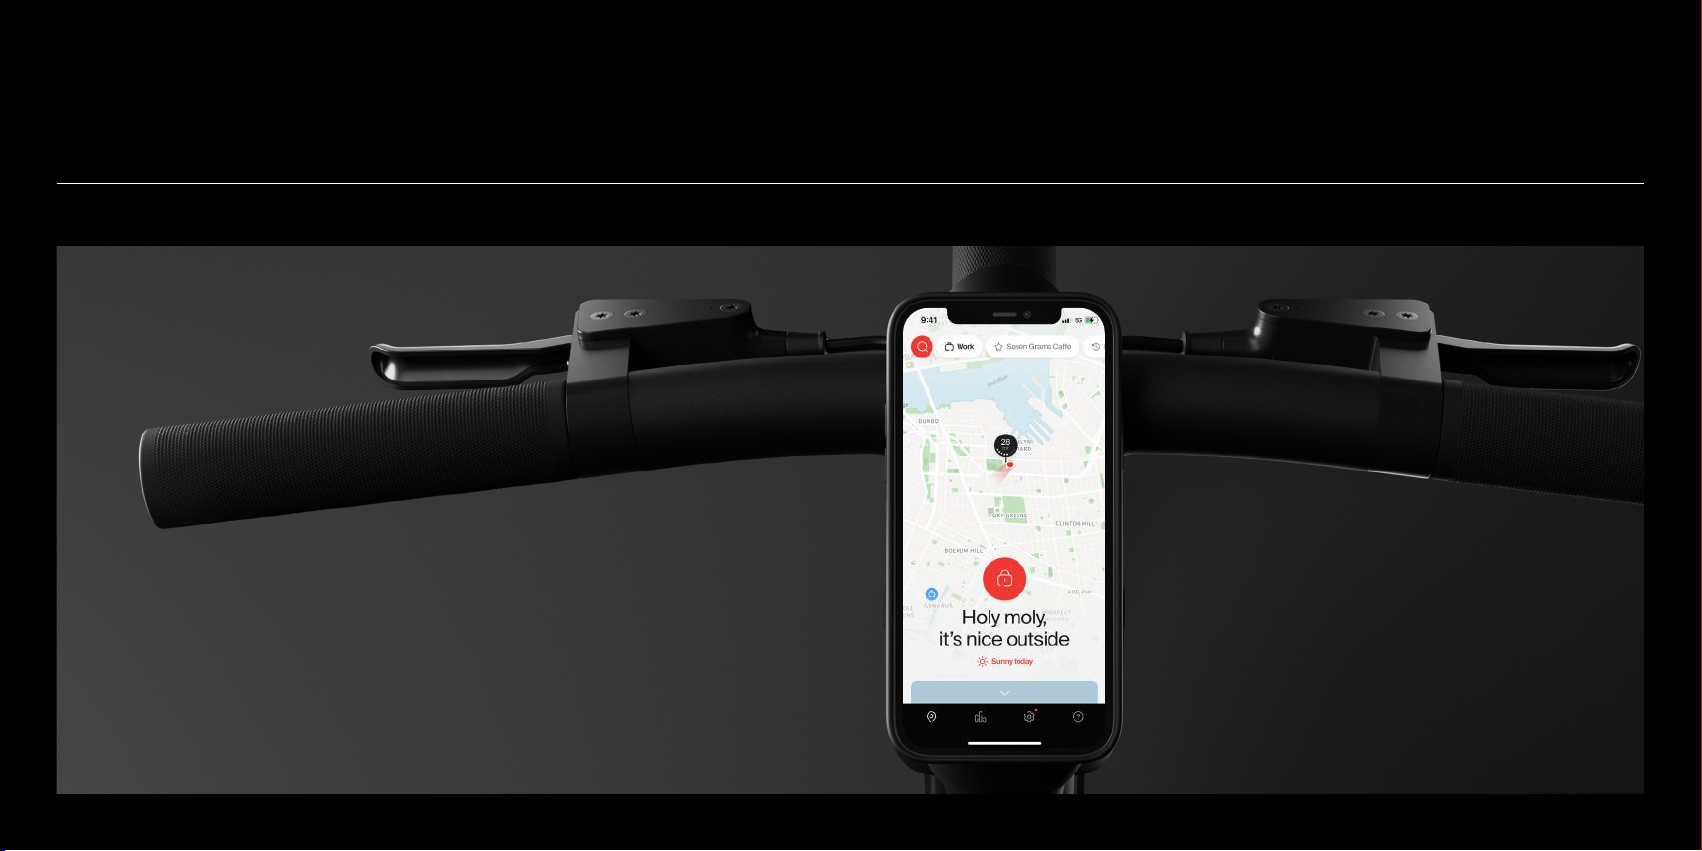
07 The app
Your road companion
The Cowboy app is your daily companion
on the road. It’s always looking ahead,
keeping a check on things like weather
conditions while having a little fun along
the way.
Trip highlights
With sensors embedded in your bike,
you can track all your activities —
moving time, speed, calories burned,
and more. You’ll even earn badges as
you unlock new milestones.
Your ride dashboard
Monitor your speed and check your stats
at a glance or choose to go deep into your
trip history.
Find my bike
With GPS tracking, see the location
of your bike anytime and track its live
position in the app.
Route planning
Beat traffic by mapping the quickest route
or find a healthier way with real-time air
quality mapping in your area.
Warning: keep your attention on the road and
your surroundings at all times. Follow regional
or state laws regarding the use of smartphones
while driving a vehicle, and only use the Cowboy
app or other apps suitable for use while
operating a vehicle.
A network of support
Connect with our support team directly
through the app, whenever you need a fix
or have any questions along your ride.
Pair the app
01 Download the iPhone or Android
Cowboy app
02 Create your Cowboy account
03 Pair your bike in the app
04 Turn on your bike and ride


36
08 Accessories
Rear rack
Your rear rack has a weight limit of 50.7
lbs. Be mindful when you are steering
and braking that a loaded rack affects
the bike's weight distribution and
stability. You may need to compensate
with the way you cycle. Make sure
you stay visible and do not mount
accessories that block the taillight.
Warning: Please see Cargo on page 40 for
safety information related to carrying cargo.
Kickstand
Simply use your foot to extend the
kickstand when you want your bike to
stand upright. Be careful of slippage
when standing the bike on a wet surface.
You have your bike and you’ve made
it your own. If you ordered any of the
Cowboy bespoke accessories, follow
the tips on the page opposite.

38
9You’re ready to ride.
But rst...
7. Remember that you will need to
brake sooner and more smoothly in
wet conditions as stopping distances
increase.
8. Adjust your total payload to stay
within the 88lb (140kg) limits of your
bike (including accessories, rider and
the cargo). Note that the rear rack has a
weight limit of 50.7 lbs (23kg).
Before every ride
1. Make sure that the battery is fully
clicked into the frame.
2. We recommend always riding with
your bike lights turned on for maximum
visibility on the road. Check that both sets
of lights are working before setting off.
3. Tires deflate during shipping and
storage. Inflate them to a pressure of
2.5 bars (36.3 psi) for heavier payload
and less for a lighter payload. We don’t
recommend a tire pressure below 1.5
bars (21.8psi) or at the max pressure of
4 bars (58 psi) as this will make your ride
less comfortable.
4. Squeeze the brakes to check they are
working perfectly.
5. Check the belt tension by pressing
firmly down in the middle of the belt
with your index finger. The deflection
of the belt should be between 0.2 and
0.4 inches. Do not lubricate the belt.
Refer to Gates™ carbon drive manual
for more info: gatescarbondrive.com/
resources/manuals-and-tech
6. Wear the correct protective gear.
Always wear a helmet and be visible on
the roads.
Before your first ride
Get informed
In many ways, riding your new bike
with pedal assistance is similar to
riding a conventional bike. You should
know the general rules of the road and
techniques for riding a bicycle safely
on the road and anywhere else you will
be riding. This includes basics such as
balancing, using hand levers for braking,
managing various road conditions, and
signaling your intentions to others. See,
for example, Kids and Bicycle Safety
(nhtsa.gov) (applicable to riders of all
ages) and other resources at Bicycle
Safety | NHTSA. If you are not familiar
with these types of skills, your local bike
shop or public safety department may
offer classes or have recommendations
for local resources.
Charge up
Charge your bike battery fully before
your first ride.
When docking your phone in the
cockpit, always use the Quad Lock
mount provided and check the phone
is securely in place. Note that wireless
charging will likely not work if you have
a metal phone case. Your bike can
interrupt wireless charging if it senses
your phone is overheating.
Take it slow
Get used to your new bike in a safe area
with minimal traffic.
When mounting your bike, make sure
not to step on the pedals before you
sit on the saddle and get a firm grip
on the handlebar and brake levers. It is
recommended to start with one pedal in
the lowest position.
To maximize braking power and avoid
squeaking noises you will need to bed
in the brakes. To do so, perform this
braking sequence at the start of your
first ride:
1. Accelerate to a moderate speed by
pedalling.
2. Brake to reduce your speed, but you
do not need to come to a full stop.
3. Repeat 30 to 40 times
Follow local regulations
Your state and possibly your local area
will have rules and regulations for bike
use and may have specific rules for
bikes with pedal assistance. Regulations
may address such things as:
• Requirements for lights and/or
additional reflectors
• Where and how you can ride your
electric bike—for example, whether it’s
permitted on public roads, multi-use
paths and sidewalks
• Requirements for the proper or routine
use of a helmet
A summary of state laws for electric and
pedal assist bikes can be found online
at State by State Electric Bike Laws |
People for Bikes. Check with your local
government for additional rules in your
area. Regulations can change so make
sure to stay up to date.
Brake with care
The bike is equipped with hydraulic disc
brakes. The left-hand lever activates the
front brake while the right-hand lever
activates the rear brake.
Many conditions affect braking, including
weight, speed, and road conditions.
Practice in a safe area first and plan
ahead as you ride.
Under wet conditions, stopping distances
may increase as braking effect is reduced.
Extra caution is required.
After heavy use, the brake discs may be
hot. Avoid touching them until they cool.
Ride safely
The Cowboy bike differs from pedal bikes
you may have had experience with as the
weight distribution is centered over the
rear wheel, where the motor sits. Bear in
mind the bike may feel rear-heavy when
loading, parking or lifting the bike.
Do not hang bags or heavy objects on
the handlebar as this may interfere
with your ability to steer accurately and
safely. Note that your bike has been
designed for a total maximum load
of 309 lbs (140kg), including the bike,
accessories, rider, and cargo.
Avoid wearing loose clothes such as
skirts and wide-legged pants. Make
sure you secure any loose straps that
can get caught in the wheels and cause
accidents. You may wish to use pant clips.
Other manuals for C4
2
This manual suits for next models
1
Table of contents
Other Cowboy Bicycle manuals


