Coxo CX235 User manual

CONTRA ANGLE
Please read this operation Manual
carefully and file for future reference.
MODEL:CX235
1:5

Thanks for purchasing our dental Contra angle!
In order to fully exert the function of this equipment, safely and
effectively use this equipment, please read this instruction carefully
before using , and please keep this manual well for reference anytime.
Under regulations'request, we have been committed to the
optimization of our product, this may cause some parts of change, when
you find the product appears some difference from description in the
manual, please contact the dealers or our after-sales center for details .
Preface
1
•Protection of liquids-normal liquids – protected equipment
•Temperatures range:-40°C--+135°C
•Relative humidity:10% to 80%,non-condensing
•Noise:≤70dB
Technical specifications

•Please read this operation manual carefully before use and file it for future
reference .
•This product is spcialized for stomatology treatment abnormal,don’t use it in
other ways.
•This product is only for doctors.
•Every time you use it,please check first.If find anything unnormal,stop using
immediately,and contact your supplier or our after-sales center for details.
•Before operating low speed handpiece,pull contra angle handpiece with
hand to make sure handpiece connect firmly and safely.
•Head can not running without insert bur,otherwise head or motor would be
damaged.
•Ensure working pressure before running,Air pressure for four bole air motor
is 0.3Mpa,for two hole air motor is 0.25Mpa.
•Don’t immerse handpiece in any chemical solvent or solution or by dry-heat
disinfection.Sterilization by autoclave at(135±2)°C&0.22MPa is sugguested.
2

Inner channel1:5
Product Composition
Inner channel contra angle speed increase 1:5
(CX235C7-1)
Push button
Optic fiber
Optic fiber
1:5
Φ1 .6
(CX235C7-2)
Push button
1:5
Φ1 .6
Optic fiber Inner channel push button contra angle Inner channel push button contra angle

Inner channel1:5
Fig.1.1
Cartridge Replacement
Technical parameters:
•Inner channel contra angle low speed handpiece ;
•Burs applicable:for CA burs Φ1.6;
•Max.speed of contra angle:200,000rpm
•Speed: speed up to 5times
•Chuck speed:push button
•Spray:4 way spray
Fig.1.2
1
2
1. Use a screwdriver to make the screw out from the tail of the contra angle and
pull out small head from outside, as shown in figure 1-1.

Inner channel1:5
1
2
Fig.1.3 Fig.1.4
Prot ectiv e Cover
Prot ectiv e Cover Cart ri dge
Fig.1.5
2. Use the unloading tool to open the rear cover, and make shaft out
from small head .as shown in figure 1-3.
3.Take the cartridge and cartridge set out ,replace the new cartridge. as
shown in figure 1-4.
4. After Replacing the new cartridge ,use the loading tool to tighten the back cover
and shaft ,You must aim for insert of the fuselage, as shown in figure 1-4, tighten
screw of the tail part
Inner channel1:5
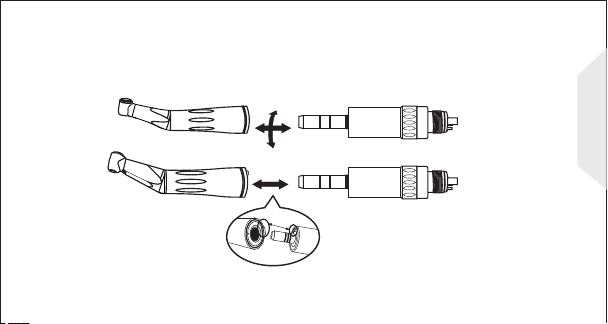
Contra angle and motor connections
1. Straightly insert the motor into the connection of contra angle, until you
hear a “cracking" sound can be.
2. Hold the bending machine and pull out the motor, it will be separated[fig.3.2].
3.Alignment the groove,contra angle can insert into the air motor[fig.3.3].
Fig.3.2
optic fiber
Optic Fiber Contra angle
Bur size:Ø2.35
Optic Fiber/LED
Inner channel Air motor
Fig.3.4
Fig.3.3
(CX235C7-1)
Fig.3.1
Contra angle with generator
(CX235-1E) Bur size:Ø2.35 Inner channel Air motor
1:5
Electric motor
Electric motor

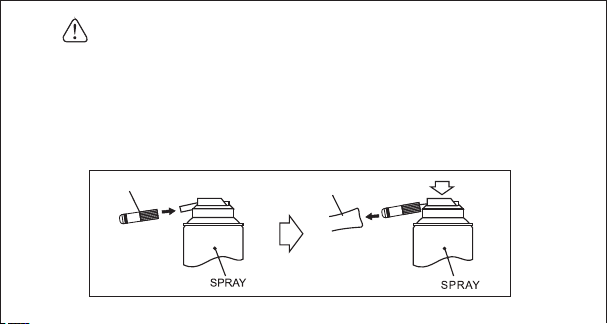
*Dismount contra handpiece from motor.
*Install E spray nozzle on the lubricant.
*Insert E spray nozzle on the back of contra handpiece to spray2-3 seconds
till the lubricant through out of head,Stop until clean lubrication comes out.
*Keep contra handpiece standing for a while,and then connect with the
motor after the lubricant inside come out.
After daily use,spray lubricant for 1 to 2 seconds by inserting lubricant
nozzle all the way into drive air tube.
If work heavily,lubrication should be implemented at noon and
afternoon’s after using everyday.
Lubricate the head,gear and inside.[Fig.16]
When lubricate the head,please open
the latch chuck.
Fig.16.3
contra hand
E spray nozzle
Fig.18
Caution
Be sure to hold the handpiece firmly to prevent the handpiece
from slipping out by the spray pressure when lubricating.
Supply lubricant until it comes out of the handpiece nose
(for approx 2 seconds)
Keep the SPRAY can upright

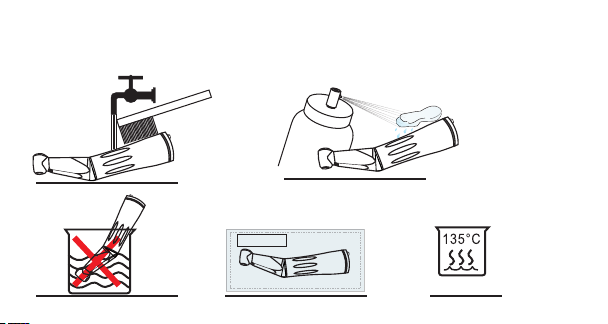
Clean-head system
1-Scrub dirt and debris from the handpiece.
2-Stop the handpiece and wipe it dry.If the dirt could not remove from the hole,
remove the cartridge and clean by brush.
Fig.17
Use only clean water to maintain the clean head system.
Cleaning -bulb
Wipe clean the Cellular optical bulb entry point with an alcohol-immersed
cotton swab.Remove all debris and oil.
Notice!

Sterilization and cleaning
-Steam autoclave is recommended.
-Sterilization requirement after using as noted below.
-Autoclave Procedure:
-Scrub dirt and debris from the handpiece,and wipe clean with alcoholic
cotton.Do not use a wire brush(Fig.18.4)
-Lubricate with SPRAY or Lubricant oil.
-Lubrication.
-Insert into an autoclave pouch.Seal the pouch.
-Autoclavable up to a max.135°C(EX.)Autoclave for 20 min. at 121°C or
15 min.at 132°C(Fig.18.2/18.3).
NOTE:After treatment or before autoclave,please do the lubrication.
STERILE
275°F
NOTE:After treatment or before autoclave,please do the lubrication.
Fig.18.4 Fig.18.5
Fig.18.7
Fig.18.6 Fig.18.8
2 9
1:5
1:5
1:5
1:5

Trouble Shooting
Trouble Possible cause Solution
Our service center can offer technical assistance to you.
Body of straight head or
contra angle rotates during
motor running
O-ring on the nose of motor
wears Change o-ring
Handpiece fail to rotate Clean and lubricate,
move it by hand
Contra angle chucking with
bur but lacth plate fail to be
fixed in the proper position.
dirt get into the handpiece

COXO grants the user a 12 months guarantee for its complete product
range,except ball bearing(3 months guarantee) from the date of invoice issued,
Maintenance over the term of guarantee will be at the customer's charge.
COXO will not be responsible for damage or injury resulting from:
----excessive use
----improper manipulation of the product,or modification to product
carried out by persons not authorizes by COXO.
----fail to follow the instruction to install,operate and maintenance
the handpiece.
----damage of chemical,electrical or electrolysis due to improper
autoclaving and storing.
----improper working pressure.
The technical specifications and dimension in these instruction are given only as a guide.
They may not be subject of any claim.
Warranty
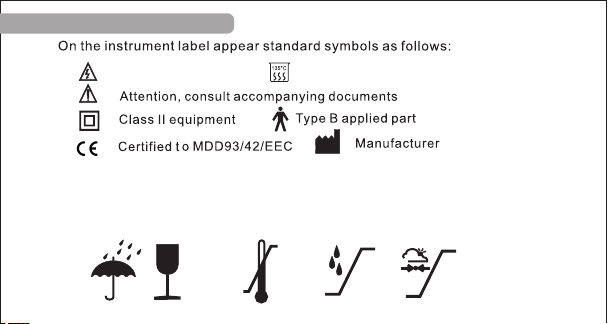
STANDARD SRMBOLS
Important notice! Autoclave
Standard Symbols
Transportation and deposited condition
Environmental temperature range:- 40°C--+50°C;Relative humidiy≤80%;
The scope of air pressure: 50 0hPa—1060hPa.
+70°C/158°F 80% 106
max.
+40°C/40°F
10%
min. kPa
50

Address:21 Wufeng Si Road,Foshan,Guangdong,China
Foshan COXO medical instrument Co.,Ltd
Wellkang Ltd.
Address:SuiteB,29 Harely Street,London W1G9QR,United Kingdom
Foshan COXO medical instrument Co.,Ltd
TEL:+ 86 757 86174018,86121615
FAX:+86 757 86125200
E-mail:coxotec@163.com
Http://www.coxotec.com
Rev.D revision Date:2015-6-30
Other manuals for CX235
2
This manual suits for next models
2
Table of contents
Other Coxo Dental Equipment manuals


