Coxo C-SMART-I User manual
C-SMART-I
*Thanks for applying the endodontic treatment instrument. For
the sake of safety and efficient use of the product, please read this manual first.
C-SMART
ENDODONTIC TREATMENT INSTRUMENT
Us e manual
Content
Ⅰ Safety caution
Ⅱ Introduction and technical parameter
Ⅲ Standard configuration
Ⅳ Structure and theory
Ⅴ Assemble
Ⅵ Function and settings
ⅰ. Mode and function
ⅱ. Program settings
ⅲ. Apex position setting
Ⅶ Use method
ⅰ.Preparation before the use
ⅱ.Operation
ⅲ.Power manage
Ⅷ
Ⅸ Troubleshooting
Ⅹ Services for product and technology
Ⅺ Transportation and storage
Ⅻ Mark illustration
Maintenance and sterilization

1
Ⅰ Safety caution
Warning: before use, please read the safety instruction carefully for
making good use of this instrument.
1. This unit must be used comply the user's guide, not for other purpose.
Please refer to the usage instruction strictly. We won't take the responsibility
for the damage caused by improper use.
2. Before using the main power, make sure the power voltage is
according with the adaptor voltage range. Improper input voltage
will damage the unit and cause danger to the operator or the patient.
3. Do not drag the wire, which connects to the endo motor emphatically. Or it
would be broken or be loosened and then affect the natural use.
4. Please use the original accessories, such as: endo motor, adaptor,
and battery. We won't take the responsibility to any problem or damage
caused by using other parts, which are not supplied by us.
5. To avoid electric shock, please do not insert any other parts into the
unit; it may cause electric shock or damage.
6. Avoid the detergent going into the unit, in case that causes the short
circuit or problem.
7. Please turn off the instrument immediately when something wrong.
It's not allowed to modify the unit at any condition. Any
disassembling or modification may cause the invalidation of the
guarantee.
8. Please use the intact standard file. Or it would cause damage to
the patient while working.
9. Prevent the instrument from environmental electromagnetic interference.
When there is a patient who is using the cardiac pacemaker, or there
is an electronic operation, please do not put the machine around.
10. Unstable voltage and being under electromagnetic environment
will interfere the normal operation.
11. When discard the accessories, please abide with the local regulation,
if necessary, contact our service centre to recover it.
2
12. This unit is just for the professional user.
Ⅱ Introduction and technical parameter
Intended use:
C-Smart Endo Motor is the supplementary root-canal treatment device, which
can assist the dentists to operate more standard root-canal in the process of
root-canal treatment l.
Features:
Colorful, wide LCD screen
Rotation speed and torque can be adjusted, with 9 memory settings.
Automatic torque reverse
Dual-frequency apex locator
9 operation modes
Automatic apex reverse and stop
Automatic slow down in apex zone
Automatic motor start and stop
High capacity Li-ion rechargeable battery and can work with
either battery or adaptor
Automatic power off and automatic memorized
Main technical parameter:
Adaptor voltage: Input 1 00-240VAC 50/60Hz
Output 10VDC/1.5A
Battery: rechargeable Li-ion battery DC7.4V
Power:5W
Current:≤500mA
Rotation speed:125-625rpm
Torque:6-52mN.m
Protection type against electrical shock: class Ⅱ
Protection against electrical shock: type B
Protection against harmful ingress of water or particular
matter: drip-proof equipment (IPX1)

4
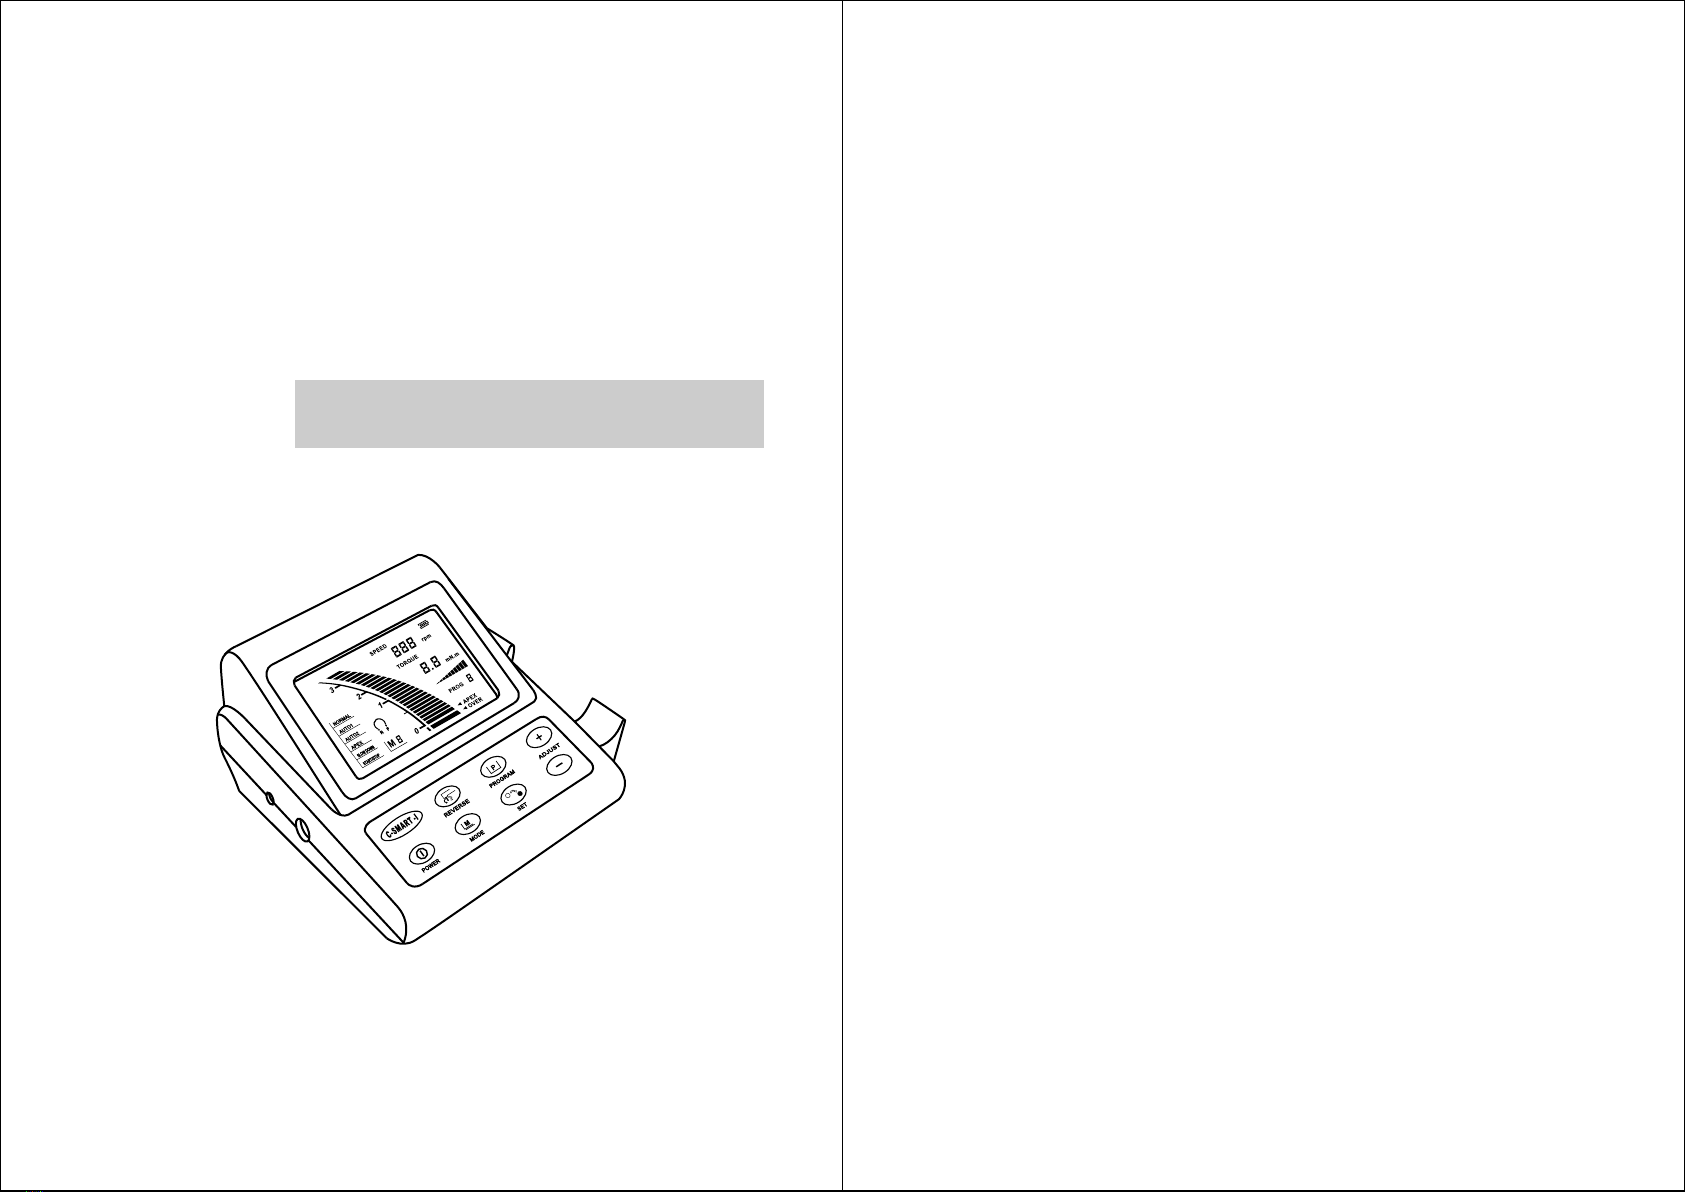
Parts:
LCD display description
Cont ra ange l(CX235- 1)
Test wire File holder
Electrode Foot switch
Motor handleAdaptor
Handle base
①.Hole for adaptor
②.Hole for foot switch
③.Hole for test wire
④.Hole for endo motor
⑤.POWER ...................................on/off button
⑥.REVERSE.................................forward/reverse button
⑦.MODE......................................mode select button
⑧.PROGRAM...............................program select button
⑨.SET...................................... ....set button
⑩.ADJUST“+”&“-”....................adjust button
3
Ⅲ Standard configuration:
2. Adaptor 1pcs
3. Motor handle 1pcs
4. Contra angle(CX235-1) 1pcs
5. Foot switch 1pcs
6. Test wire (single & dual hole) 2pcs
7. File holder 2pcs
8. Stainless electrode 4 pcs
9. Handle base 1pcs
10. Usage manual 1 pcs
Ⅳ Structure and theory
Main unit:
1. Main unit 1pcs
2
12. This unit is just for the professional user.
Ⅱ Introduction and technical parameter
Intended use:
C-Smart Endo Motor is the supplementary root-canal treatment device, which
can assist the dentists to operate more standard root-canal in the process of
root-canal treatment l.
Features:
Colorful, wide LCD screen
Rotation speed and torque can be adjusted, with 9 memory settings.
Automatic torque reverse
Dual-frequency apex locator
9 operation modes
Automatic apex reverse and stop
Automatic slow down in apex zone
Automatic motor start and stop
High capacity Li-ion rechargeable battery and can work with
either battery or adaptor
Automatic power off and automatic memorized
Main technical parameter:
Adaptor voltage: Input 1 00-240VAC 50/60Hz
Output 10VDC/1.5A
Battery: rechargeable Li-ion battery DC7.4V
Power:5W
Current:≤500mA
Rotation speed:125-625rpm
Torque:6-52mN.m
Protection type against electrical shock: class Ⅱ
Protection against electrical shock: type B
Protection against harmful ingress of water or particular
matter: drip-proof equipment (IPX1)
5
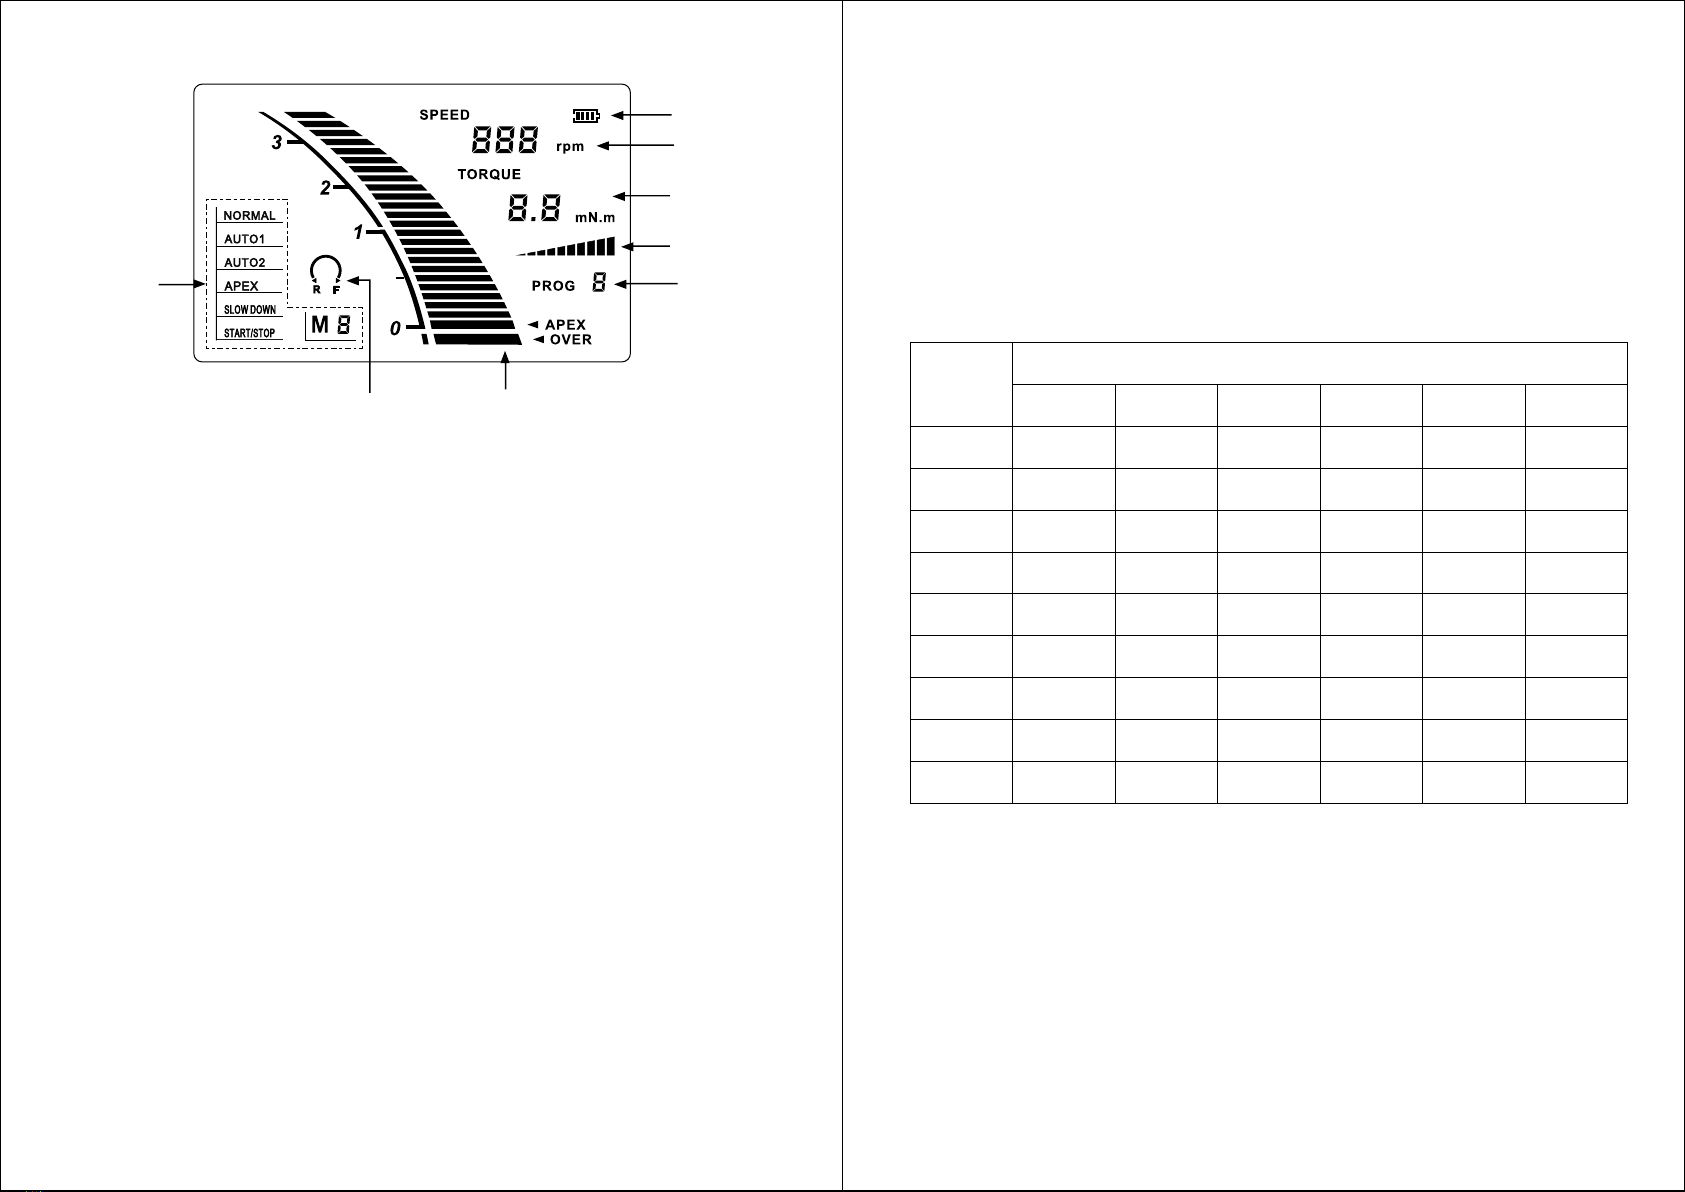
① Mode module
② Forward & reverse sign: display for forward or reverse rotation
③ Apex locator module
④ Rotation speed setting value
⑤ Torque setting value
⑥ Current torque
⑦ Program number
⑧ Battery power display
Ⅴ Assemble
1. Please put the instrument on a solid place.
Insert the foot switch connector into the hole on the main unit
2.
Insert the motor wire connector into the hode on the main unit.
3.
Connect th 1:1 contra angle to the motor and clamp the file into
4.
the contra angle. And then put the handle on the handle base.
Insert the adaptor into the hole on the main unit
5.
Notice: when the instrument is being used, please don't use the
adaptor for avoiding the electromagnetic interference.
If only use the apex locator function ( M4), please insert the test
6.
wire (dual holes) to the hole on the main unit,and connect the file hodler and
stainless electrode to test wire.
e
①
② ③
④
⑤
⑥
⑦
⑧
6
7.Use motor with apex locator function(M5-M9),please insert the test wire
(single hole) to the hole on the main unit. Connect the stainless electrode to
test wire and hang the stainless strap on the contra angle.
Ⅵ Function and settings
ⅰ. Mode and Function
Working Mode Table
This unit has 9 modes and consists of 6 function options:
NORMAL:Manually motor functions
AUTOMATIC1:automatic reverse1,When the torque goes to the setting value,
the file reverses automatically and stops automatically upon
withdrawal
AUTOMATIC2:automatic reverse2,When the torque goes to the setting value,
the file reverses automatically and starts rotating
automatically upon withdrawal
APEX:Apex locator
NO.
Function option
Normal Automatic1 Automatic2 Apex Slow down Start/stop
M1
M2
M3
M4
M5
M6
M7
M8
M9
ü
üü
ü ü
ü
ü ü
üü ü
ü
ü
ü
ü
ü
ü
ü
ü
ü
ü
üü
ü
- - - - -
- - - -
-
-
-
-
-
-
--
-
-
-
-
-
-
-
-
-
-
--
-

7
SLOW DOWN:When the file is approaching to apex, the file automatically
slows down for safer treatment
START/STOP: The file starts rotating automatically when inserted into the
canal and it stops automatically upon withdrawal
ⅱ. Program settings
Before use, the user should set the speed and torque and save the programs.
There are 9 programs can be set by the user.
Setting method:
Notice: The program only can be set in M1、M2、M3 modes
(without apex locator function)
Step1. Press SET button to enter into the setting mode, speed value flashing, then
press “ADJUST +” button or “ADJUST - ”button to set the speed,
speed range:125、250,375,500,625rpm,press SET button again,
speed value stops flashing and it's been saved;
Step2.when torque value flashing,press “ADJUST +”button or“ADJUST -”
button to set the torque value,the torque range:from 6 to52 mN.m,
press SET button,torque value stops flashing and it's been saved;
Step3. When program number flashing, press “ADJUST +” button or
“ADJUST -” button to set program number, press SET button,
program number stops flashing and it's been saved , setting is
completed。
Notice: It will quit the setting mode after 2S without any press
operation, and the numerical value, which had been set,
will be lost.
ⅲ.Apex position setting
Dentist can adjust the apex position if necessary. For example you can set the
apex position 0.5mm away to the apex hole and unit will memorize this
position automatic and endo file will automatic reverse or stop when file reaches
this position.
Set method:
Notice: Dentist can set the apex position only in M4 mode (apex
locator mode).
8
Press SET button,apex module flashing,the apex position flash last set position,
indicating having been entering into the setting mode,adjust the apex
position with pressing “ADJUST +” and “ADJUST -” button, the range
within 0.0-1.0. Press SET again to memorize the apex position,the apex module
stops flashing,setting completed.
Notice: It will quit the setting mode after 2S without any press
operation ,and the numerical value has been set will be lost.
Ⅶ Use Method
ⅰ. Preparation before the use
1. Check each component connection
2. Press POWER button, make sure the information displayed in the LCD screen
is completed
1) LCD displays last working mode.
2) LCD displays last program.
3) LCD displays apex module in M4 mode
4) Indicating the power of battery quantity, the battery is running when
it is charging
3. Press MODE button to select the working mode
4. Press PROGRAM button to select the working program
ⅱ. Operation
Notice: when the instrument is being used, please don't use the
adaptor for avoiding the electromagnetic interference.
M1:Manual motor function, file will rotate when pressing foot switch and will
stop when the torque reaches the setting torque. Release the foot
switch, the file stops.
M2:Motor with automatic reverse 1 function,press foot switch, file rotates
forward,when the torque reaches the setting torque,file reverses
automatically,and will stop when the torque is disappeared. Release
the foot switch, the file stops.
M3:Motor with automatic reverse2 function,press foot switch, file rotates
forward, when the torque reaches the setting torque,file reverses

9
automatically, and will rotate forward when the torque is disappeared.
Release the foot switch, the file stops.
Notice: when the instrument is in M4-M9, please don't use
the adaptor for it cannot get an exact value.
M4:In this mode, only apex locator functions, methods of operation are as follows:
NOTICE: it cannot get an exact value of the apex length when the
treatment is in an unstable condition. So, please insert
the file into the root-canal and take an X-ray photo to
make sure the veracity.
1. The plug of the testing wire should be completely plugged into
hole on the main unit.
* When you need to pull out the test wire, please don't pull the wire but
hold its pin and pull it out.
2. Clip the metal part of the file with the holder and hang the stainless
electrode up at any side of the patient's mouth.
3.Insert the file into the root-canal,and circumrotate the file toward the
apex of the root-canal. And then the distance between the tip of the file
and the apex of the root-canal will be displayed on the LCD screen. When
the figure on the LCD screen shows 0.5mm, please fasten the file with
the rubber vernier caliper on the reference point of the tooth crest rather
than keep up probing into the root-canal. Then measure the distance
from the bottom of rubber vernier caliper to the tip of the file.
* Root-canal length is the file distance when the LCD displays 0.5.
4. Deciding the working length of root canal
When the figure on the LCD screen shows 0.5mm, then measure the
distance from the bottom of rubber vernier caliper to the tip of the
file. Take note of this figure. So subtract 0.5-1.0mm from the above
data is the working length of root-canal.
When the file drills through the root-canal, please make the final value in
terms of the one measured in 0.5mm.
The working length of root-canal varies from each other for the reason of
different shapes of teeth and root-canal.
5. When the file reaches the position to 2.0mm away from the apex of the
root-canal, there will be a continuous alarm.
10
rotates forward, the file stops working when it reaches the setting
apex position.
M6: Apex locator & auto reverse1 motor function, press foot
switch the file rotates forward and reverses when it reaches the
setting apex position and stops without touching the root canal.
M7: Apex locator &autoreverse1 motor & slowdown function, press
foot switch the file rotates forward and automatically slows down
when approaching to apex and reverses automatically when it
reaches the setting apex position and stops without touching the
root canal.
M8: Apex locator & auto reverse1 motor& automatically start and
stop function (no need foot switch in the mode). The file starts to
rotate forward when it entering into the root canal and reverse
when it reaches the setting apex position, and stops without
touching the root canal.
M9: Apex locator & auto reverse1 motor & automatically start and
stop & slowdown (no need foot switch in the mode). The file
starts to rotate forward when it entering into the root canal and
automatically slows down when approaching to apex and reverses
automatically when it reaches the setting apex position and stops
without touching the root canal.
Reverse: Press the REVERSE button, file will reverse and you can
change the forward and reverse by press the REVERSE button.
Notice:When the torque reaches or exceeds the setting torque in
M5-M9, and no matter the root canal enlarged file
reaches the set data or not, the file would stop or
reserves automatically.
ⅲ.
1. Battery power
LCD displays the current battery power, the number of lattice shows more, and the
power is fuller. If there is no electricity the lattice will flicker,which means the
battery power is about to run out , at this status the beeper will ring per 3S, and
unit will shut down after 60S.
2. Battery recharging
M5: Apex locator and motor function, press foot switch and the file
Power manage

12
Increase the torque by
manual adjusting the
forward/reverse mode
Resistance in
root-canal is too
much
Bad condition in
root canal (M5)
File stops
automatically Change to non-apex
locator mode (M1-M3)
Restart and compare
with x-ray film
Clean the liquid and
remnant
Don't use the adaptor
for charging
The unit is in
unstable condition
Bad condition in
root canal
Electromagnetic
Interference
Inaccurate apex
value
Select
auto-forward/reverse
mode
Not in
auto-forward/reverse
mode
Decrease the torque
Preset torque is too much
File will reverse only
when the file reach the
preset apex location
File has not reached
the preset apex
(M6-M9)
File can't
reverse
automatically
The file will start when
goes into the root canal
Infuse some normal saline
Clean or change the
pin/electrode
Partial humidify oral mucosa
The file hasn't been into
the root canal
Root canal is too dry
Oral mucosa is too dry
File can't start
(M8,M9) The pin or electrode is in
bad contact
Don't use the adaptor for
charging
Change to non-apex
locator mode (M1-M3)
Auto start/stop
out of control
(M8,M9)
Electromagnetic
Interference
Increase the torque by
manual adjusting the
forward/reverse mode
Resistance in
root-canal is
too much
The file
reverses
continually
Clean the liquid and remnant
Change to non-apex locator
mode (M1-M3)
The preset apex location
is too high (M6-M9)
Bad condition in
root canal (M6-M9)
Reset the apex location
The file
reverses
continually
Bad contact in foot
switch
Check the wire and
make sure the foots
switch works well
Increase the torque by
manual adjusting the
forward/reverse mode
Resistance in
root-canal is too
much
File doesn't run
11
for 4 hours or more (The new battery requires at least 8 hours or more),
the sign will be running during the battery charging.
Notice: 1. when the instrument is connected to the adaptor, the beeper
will beep for three times, showing the connection is correct.
2. when the instruments in M4-M9, please don't charge the
battery.
3. Automatic power off
The instrument will shut down automatically when it ceases working for 3 minutes.
In that case, all display and function will stop.
Notice: When power off, the LCD will show recharging sign when
charging.
Ⅷ Maintenance and sterilization
1. If not use the unit for long time, please open the battery cover and remove
the battery, keep the instrument clean and store it somewhere dry and clean.
2. Parts like contra angle and stainless electrode, which have direct contact with
the patient, should be disinfected by autoclave each time after using.
3. The crust of the instrument and the wire should be disinfected by the ethanol.
Ⅸ Troubleshooting
If the equipment is not normal work, before call our after-sales center, please
check the table below.
To fully recharge the battery, you should connect the unit to adaptor at least
Phenomenon Reason analyses Problem shooting
Can't power on Low battery Recharge the battery

Enlarge it
Change a smaller size
Charge the battery at
least 4 hours
Replace the battery
The file
reverses
continually
The using time
of battery is
too short Battery is aged
Not fully charged
Electromagnetic
Interference
The file is too big (M6-M9)
The opening of root
canal is too small(M6-M9)
Don't use the adaptor for
charging
13
Ⅹ Services for product and technology
Our company is responsible for product-and-technology service. Our
experienced technician will offer you technical support when technical
problem occurs.
Transportation and storage
Ⅺ
Ambient temperature: - 5℃ +40℃
Relative humidity range: 10%~93%
Atmospheric pressure: 86Kpa~106Kpa
Equipment is not suitable for storage in the presence of sunlight, rain, dust,
and corrosive gasoline and volatile with poor ventilation.
Transportation is available to all common methods.
Ⅻ Mark illustration
~
IPX1
Type B equipment
Caution! Please read the instruction
Protection against ingress of liquids:drip-proof
CE marked product
Class Ⅱ equipment
Other manuals for C-SMART-I
1
Table of contents
Other Coxo Dental Equipment manuals


Popular Dental Equipment manuals by other brands

Belmont
Belmont IO 5000TA Installation and operation instructions

Schlumbohm
Schlumbohm EndoPilot Contra-Angle user manual

Renfert
Renfert lay:art instruction manual

DENTSPLY
DENTSPLY Cavitron Directions for use

Intensiv
Intensiv Ortho-Strips Opener Instructions for use and safety recommendations

Aseptico
Aseptico Command Air ADC-08CF Operation and maintenance manual


