Coxo CX235C1 User manual
Contra Angle (For Endo Motor)
Operation Manual
Model: CX235C1
CX235C4
This product is a dental endo motor accessories, used in dental treatment with endo
motor handle connection, the root canal treatment for teeth.
Please read this Operation Manual carefully before use, and file for future reference.
Warning
·Read this Operation Manual before use to fully understand the product
functions and file for future reference.
·When operating the product always consider the safety of the patient.
·Check for vibration, noise and overheating outside the patient’s oral cavity
before use. If any abnormalities are found, stop using the contra angle head
immediately and contact dealer.
·Users are responsible for the operational control, maintenance and continual
inspection of this product.
·Do not attempt to disassemble the contra angle head or tamper with the
mechanism.
·Do not connect or disconnect the contra angle head or bur until the drive
motor has completely stopped.
·Should the product function abnormally, cease operation immediately and
contact your Dealer.
·Depressing the Push Button while the contra angle head is in operation may
cause overheating, serious technical damage and possible premature contra
angle head failure. During operation avoid contact with any oral tissue that
may cause the Push Button to be depressed while the contra angle head is in
operation.
·Do not use high acid water or sterilizing solutions to wipe, immerse or clean
the product.
·The products are delivered in a non-sterile condition and must be sterilized
prior to use.
·Perform regular function and maintenance checks.
·If the product is not used for a long period check it is functioning correctly
before using on a patient.
·Don’t immerse contra angle head in any chemical solvent or solution or by
dry-heat disinfection. Sterilization by autoclave at (134℃&0.22MPa) is
suggested.
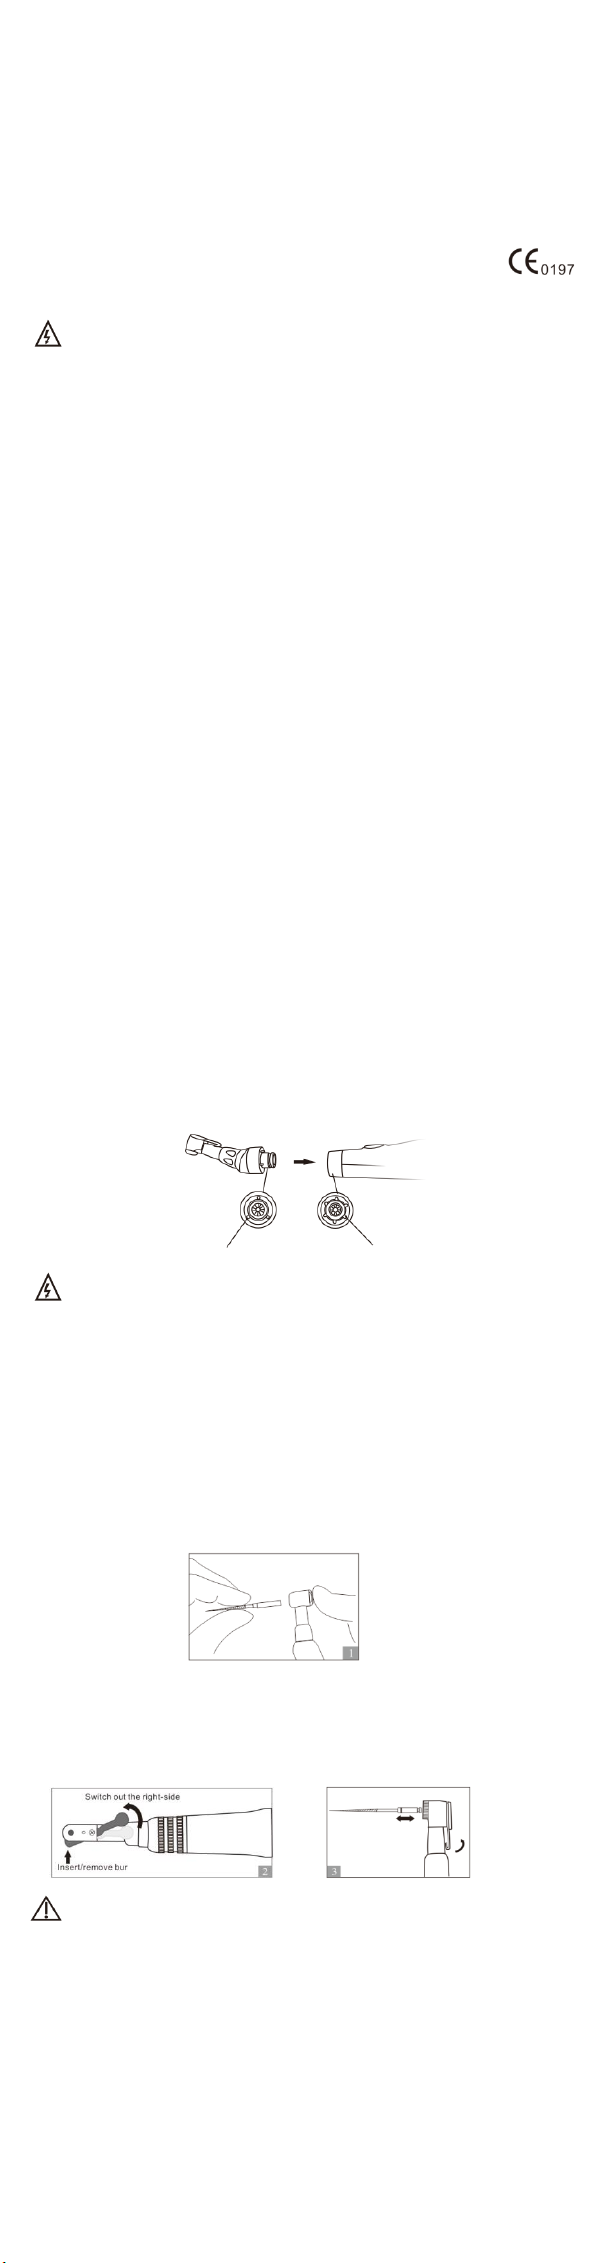
1. Connecting/Disconnecting contra angle head and Motor
1) The contra angle head could be connected with the motor handpiece at 6
adjustable head positions. align the positioning pins of the contra angle head
with the positioning slots of the motor handpiece and insert the head until
they click
2) When removing the contra angle head, pull it out axial.
locating points locating slot
Warning
·When attaching and detaching the he contra angle head, turn off the power
beforehand.
·Check that the contra angle head is securely assembled to the motor
handpiece.
2. Mounting and Removing file
2.1 Push button:
1) Insert the file into the chuck until it stops.
2) Lightly turn the file until it engages with the latch mechanism. push it
inward to click.
3) Removing the file: depress the push-button and pull out the file.(Fig.1)
2.2 Latch Chuck:
1) Open the latch chuck to the right, insert the file.
2) Be sure the handle bur part of the file line the proper part in the
cartridge then turn the latch chuck back. (Fig. 2/3)
3) When remove the file, open the latch chuck then take out the file.
Caution:
·Use the bur that meets the relevant standard diameter (CAφ2.35mm).
·When mounting and removing the file, turn off the power beforehand.
·After the file is locked in place, lightly pull out the file to make sure the file is
locked.
·Always clean the shank of the file to be installed allowing dirt to enter the
chuck could cause loss of concentricity and deterioration of chucking force.
3. Replacing the Cartridge
3.1 Push Button:
1) Loosen the coupling sleeve counterclockwise, remove the head and drive
shaft.
2) Locate the correct wrench tool on the head cap then turn the wrench
counterclockwise to loosen the cap, remove the cap.
contra angle’s
interface
Handle’s
interface
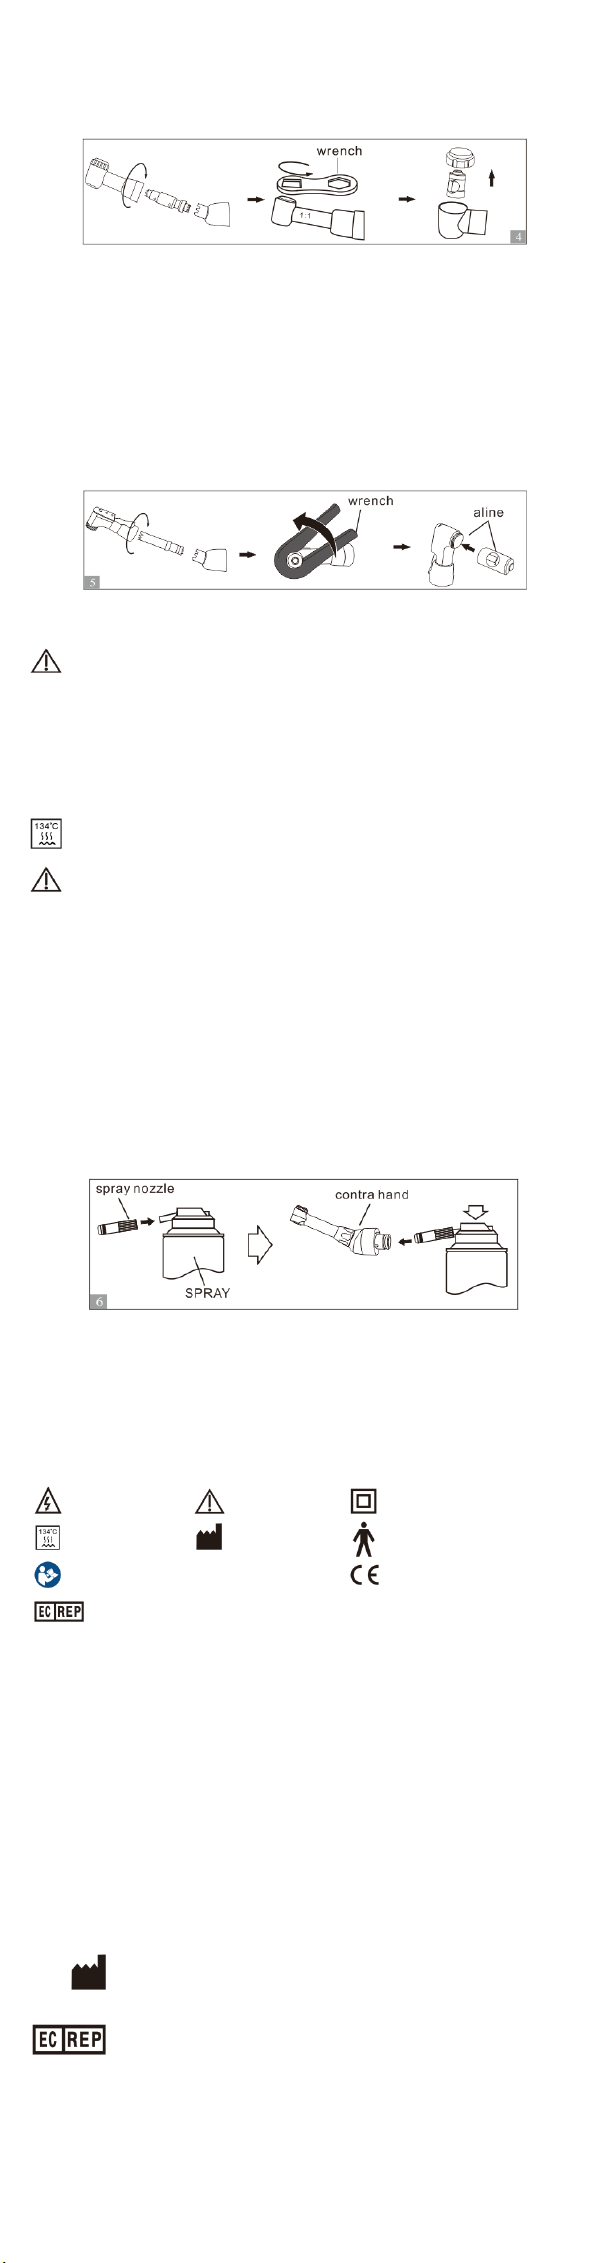
3) Insert a new cartridge into the head.
4) Completely insert the cartridge until the cartridge end face aligns with the
end face of the handpiece head. (Fig.4)
5) Tighten the head cover with the supplied wrench / screwdriver, and to
assemble the parts.
3.2 Latch Chuck:
1) Loosen the coupling sleeve counterclockwise, remove the head and
drive shaft.
2) Unscrew the head cover with the supplied wrench then turn the wrench
counterclockwise to loosen the cover, remove the cover. Remove the
cartridge.
3) Remove the head and drive shaft.
4) Insert a new cartridge into the head.
5) Completely insert the cartridge until the cartridge end face aligns with the
end face of the handpiece head. (Fig.5)
6) Tighten the head cover with the supplied wrench / screwdriver, and to
assemble the parts.
4. Maintenance
Caution:
After each use or before each calibration and autoclaving.
4.1 Cleaning
Scrub dirt and debris from the contra angle head, and wipe clean with
alcohol-immersed cotton swab or cloth. Do not use a wire brush.
4.2 Sterilization
The contra angle head can be autoclavable up to max.134℃.
Caution:
·Do not wash soak, or wipe off the handpiece within the oxidation potential
solution (strong acid, super acid solution) or sterilized solution.
·Do not autoclave the equipment which with residual chemical it may cause a
peel off the plating or exert a harmful influence to internal parts.
·Store it in a place where the handpiece is not subject to air with dust, sulfur or
salinity.
·Don’t touch the handpiece just after the autoclave, it is extremely hot.
4.3 Lubrication
1) Disconnect the handle from the motor.
2) Remove the bur from the handpiece
3) Mount the tip nozzle into the spray can port (Fig.6).
4) Insert the tip nozzle into the drive air port of the handpiece. Hold the
handpiece and spray for approximately 2-3 seconds. Apply lubricant until it
expels from the handpiece head for at least 2 seconds (Fig.6).
5. Transport and storage
Operating environment: Transportation and storage conditions:
Ambient temperature: +5℃- +40℃Ambient temperature: -10℃- +55℃
Relative humidity: 20% - 80%RH Relative humidity: ≤93%RH
Air pressure: 86kPa-106kPa Air pressure: 50kPa-106kPa
6. Standar Symbols
Warning Caution Class II equipment
Autoclave Manufacturer Type B applied part
Refer to Instruction Manual/Booklet Certified to MDD93/42/EEC
Authorized representative in the European Community
Warranty
COXO grants the user a 12 months guarantee for its complete product
range, except ball bearing (3 months guarantee) from the date of invoice issued
Maintenance over the term of guarantee will be at the customer’s charge.
COXO will not be responsible for damage or injury resulting from.
---- excessive use
---- improper manipulation of the product, or modification to product carried
out by persons not authorizes by COXO.
---- fail to follow the instruction to install, operate and maintenance the
handpiece.
---- damage of chemical, electrical or electrolysis due to improper autoclaving
and storing.
---- improper working pressure.
The technical specifications and dimension in these instruction are given only as a guide.
They may not be subject of any claim.
Foshan COXO Medical Instrument Co.,Ltd
Address: BLDG 4, District A, Guangdong New Light Source Industrial Base, South of
Luocun Avenue, Nanhai District,Foshan,528226 Guangdong, China
Well Kang Ltd
The Black Church, St. Mary’s Place, Dublin 7, D07 P4AX, Ireland
Foshan COXO medical instrument Co.,Ltd
TEL:0086-757-66692058
FAX:0086-757-81800058
Http://www.coxotec.com
VER: 1.3
REV: 2020-03-21
This manual suits for next models
1
Table of contents
Other Coxo Dental Equipment manuals


