Coxo C-SMART-I PILOT User manual

Contents
1 COXO C-SMART-I PILOT Endo
Motors
2 User Guide
3 Disclaimer
4 Safety
5 Description of the Product
6 Instrument Overview
7 Technical Specifications
8 Preparation
9 Operation
10 Documents / Resources
11 Related Posts
COXO C-SMART-I PILOT Endo Motors
COXO C-SMART-I PILOT Endo Motors User Manual
https://www.alandental.com
alandental.com
User Guide
Requirement
Read these instructions prior to first use in order to avoid misuse and prevent damage. Hazard levels
The warning and safety notes in this document must be observed to prevent personal injury and damage to the
instrument. The warnings are as follow:
Warming
In cases which – if not prevented – could lead to death or severe injury.
CAUTION:
If not heeded could lead to minor or moderate injury.
NOTE:
In cases which – if not prevented – could cause damage to the instrument.
Target Reader
This document is intended for dentists, dental clinic workers, and service agents.
Repair Service
For repairs, please contact the manufacturer or authorized dealers.
Terms and Conditions of Warranty
Within the scope of the applicable manufacturer delivery and payment conditions, the manufacturer guarantees
proper function, absence of defects in the instrument for a period of 24 months from the date of purchase. The
date of purchase should be confirmed by the salesperson.
https://www.alandental.com
alandental.com

The supplier can provide circuit diagrams, component lists, legends, calibration rules, or other materials
necessary for repair by qualified technicians and repairable instrument parts designated by the manufacturer as
required.
Disclaimer
Manufacturer will not be responsible for accidents, instrument damage, or bodily injury resulting from:
Repairs made by personnel not authorized by the manufacturer.
Any changes, modifications, or alterations of its products.
The use of any products or instruments made by other manufacturers which are not included as approved by
the manufacturer.
Maintenance or repairs using parts or components other than those specified by the manufacturer and any
alterations from original condition of the instrument.
Operating the instrument in ways other than the operating procedures described in this manual or resulting
from the safety precautions and warnings in this manual not being observed.
Workplace conditions and environment or installation conditions which do not conform to those stated in this
manual such as improper electrical power supply.
Fires, earthquakes, floods, lightning, natural disasters, or any other unforeseeable forces.
In Case of Accident
If an accident occurs, the instrument must not be used until repairs have been completed by a qualified and
trained technician authorized by the manufacturer.
User Qualifications
Intended Operator Profile
Qualification: Legally qualified person such as dentists for endodontic instrument operation (it may differs
among countries).
Education and Knowledge: It is assumed the user is thoroughly familiar with root canal measuring and
treatment including the prevention of cross contamination.
Language Understanding: English (Intended for professional use as described above).
Experience: Experienced person in operating with an endodontic instrument.
Locations of use: Dental hospital or dental clinic.Locations of use: Dental hospital or dental clinic.
Operation.Transport and Storage Environment
Operating
Temperature: +5″C to +40″C
Humidity: 20% to 80%
Atmospheric Pressure: 86kPa to106kPa
Transport and Storage
Temperature: -1 0″C to +55″C
Humidity: s 93% (without condensation)
Atmospheric Pressure: 50 kPa to 106 kPa
https://www.alandental.com
alandental.com

Disposal of Medical Instruments
In accordance with the principles, standards, and requirements of the country (region) in which A you are located.
When disposing of the old electrical instrument ensure that pollution is not produced in the process of waste
disposal.
Safety
The instructions for use are a component of the product and must be read carefully prior to use and be accessible
at all times. The instrument may only be used in accordance with the intended use; any other type of use is not
permitted.
1. Infection Hazard
Patients, users, or third parties could be infected by contaminated medical instruments.
Take suitable personal protective measures.
Follow the instructions for using the components.
Before and after each use, reprocess and sterilize the medical instrument and accessories accordingly.
Carry out the cleaning and sterilization as described in the instructions for use.
The procedure has been validated by the manufacturer.
It is essential to ensure the effectiveness of the cleaning and sterilization in the case of deviation in
procedure.
Prior to disposal, the product and accessories must be appropriately reprocessed or sterilized.
2. Explosion Hazard Area
Electrical sparks in the product can lead to explosion or fire.
Do not use product in explosive hazardous areas.
Do not operate the product in an oxygen-enriched environment.
Do not use the product near the vicinity of flammable gases.
3. Technical Condition
A damaged instrument or components could injure patients, users, and third parties. A damaged power cable
or missing protective conductor can lead to electrical shock.
Only operate instruments or components if they are undamaged on the outside.
Check the power cable before use.
Connect only to sockets with a protective contact that meet the respective national regulations.
Check the proper working order and proper condition of product and accessories before each use.
Have parts with sites of breakage or surface changes checked by authorized service personnel.
Safety checks may only be performed by trained service personnel.
4. Ingress of Liquids
Use of the product in moist or electrically conductive environments can lead to electrical shock and injury to
patients, users, and third parties.
Only use the product in dry environments.
Use the product only in environments that are not electrically conductive.
Prevent liquid from entering the openings of the product.
Do not place the product in long or narrow containers.
If any liquid is detected on the instrument, disconnect the power cable immediately and do not touch the
https://www.alandental.com
alandental.com

product.
Make sure that the surface of the product is absolutely dry before plugging the power cable back into the
socket.
After interventions on and repairs of the instrument and before re-use, have the service personnel
perform safety checks on the instrument.
5. Accessories and Combinations with Other Instrument
Use of unauthorized accessories or unauthorized modifications of the instrument could lead to injury.
Only use accessories that have been approved for combination with the product by the manufacturer.
Only use accessories that are equipped with standardized interfaces.
Do not make any modifications to the instrument unless these have been approved by the manufacturer
of the product.
6. Electromagnetic Fields
Electromagnetic fields might interfere with the functions of implanted systems (such as pacemakers). Medical
electrical instruments are subject to special precautions regarding electromagnetic compatibility and must be
installed and operated in accordance with the tables of electromagnetic compatibility. About electromagnetic
compatibility refer to 12
High-frequency communications instruments may interfere with medical electrical instruments.
Ask patients if they have a cardiac pacemaker or other system implanted before you start the treatment.
Comply with the tables of electromagnetic compatibility during installation and commissioning.
If the instrument needs to be used in the immediate vicinity of another instrument, monitor the instrument
or system for malfunctions.
7. Contra-angle
Only use the original contra-angle.
Never press the contra-angle push button when handpiece is running. It will cause the file to fall off.
Never remove the contra-angle during operation.
Only use undamaged root canal instruments, refer to 7.
Never place your fingers on the moving parts of the instrument while it is running.
Before use, check the contra-angle for any damage or loose part.
8. Root canal instruments
Never use continuous rotary instruments in reciprocating mode.
Never use reciprocating instruments in rotary mode.
Refer to the file manufacturer’s instructions to adjust the speed and torque.
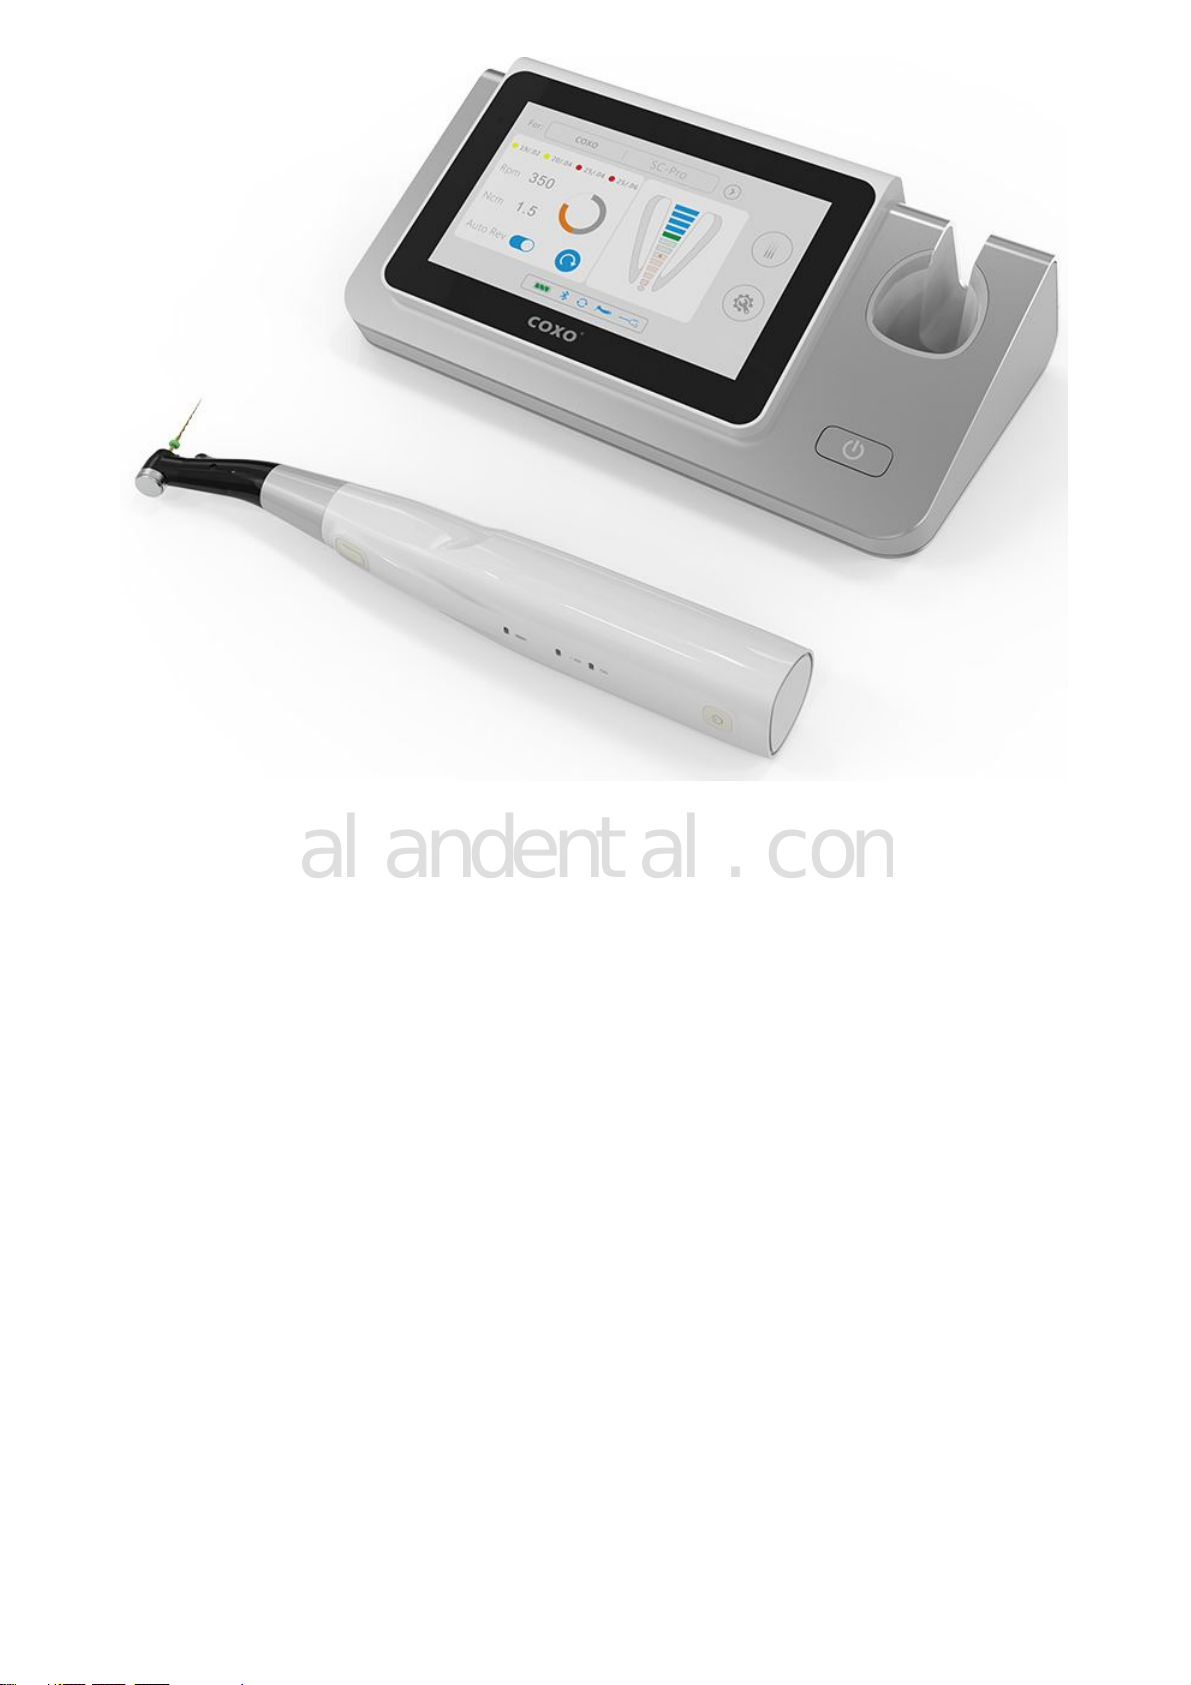
Description of the Product
Endo Motor products are mainly used in dental root canal preparation is used for each model pulpit and pulp
necrosis and various root tooth root canal treatment of important instrument.
1. Intended Use
The Endo Motors device is a endodontic treatment motorized handpiece with root canal measurement
capability. It can be used to enlarge the canals while monitoring the position of the file tip inside the canal. The
instrument must only be used in hospital environments, clinics or dental offices, by qualified practitioners.
2. Contraindications
In cases where a patient has been fitted with an implanted heart pacemaker (or other electrical
https://www.alandental.com
alandental.com
equipment) and has been cautioned against the use of small electrical appliances (such as electric
shavers, hair dryers, etc) it is recommended not to use the instrument.
Safety and ef ectiveness have not been established in pregnant women and children.
Clinical judgment needs to be applied by the end user of the device.
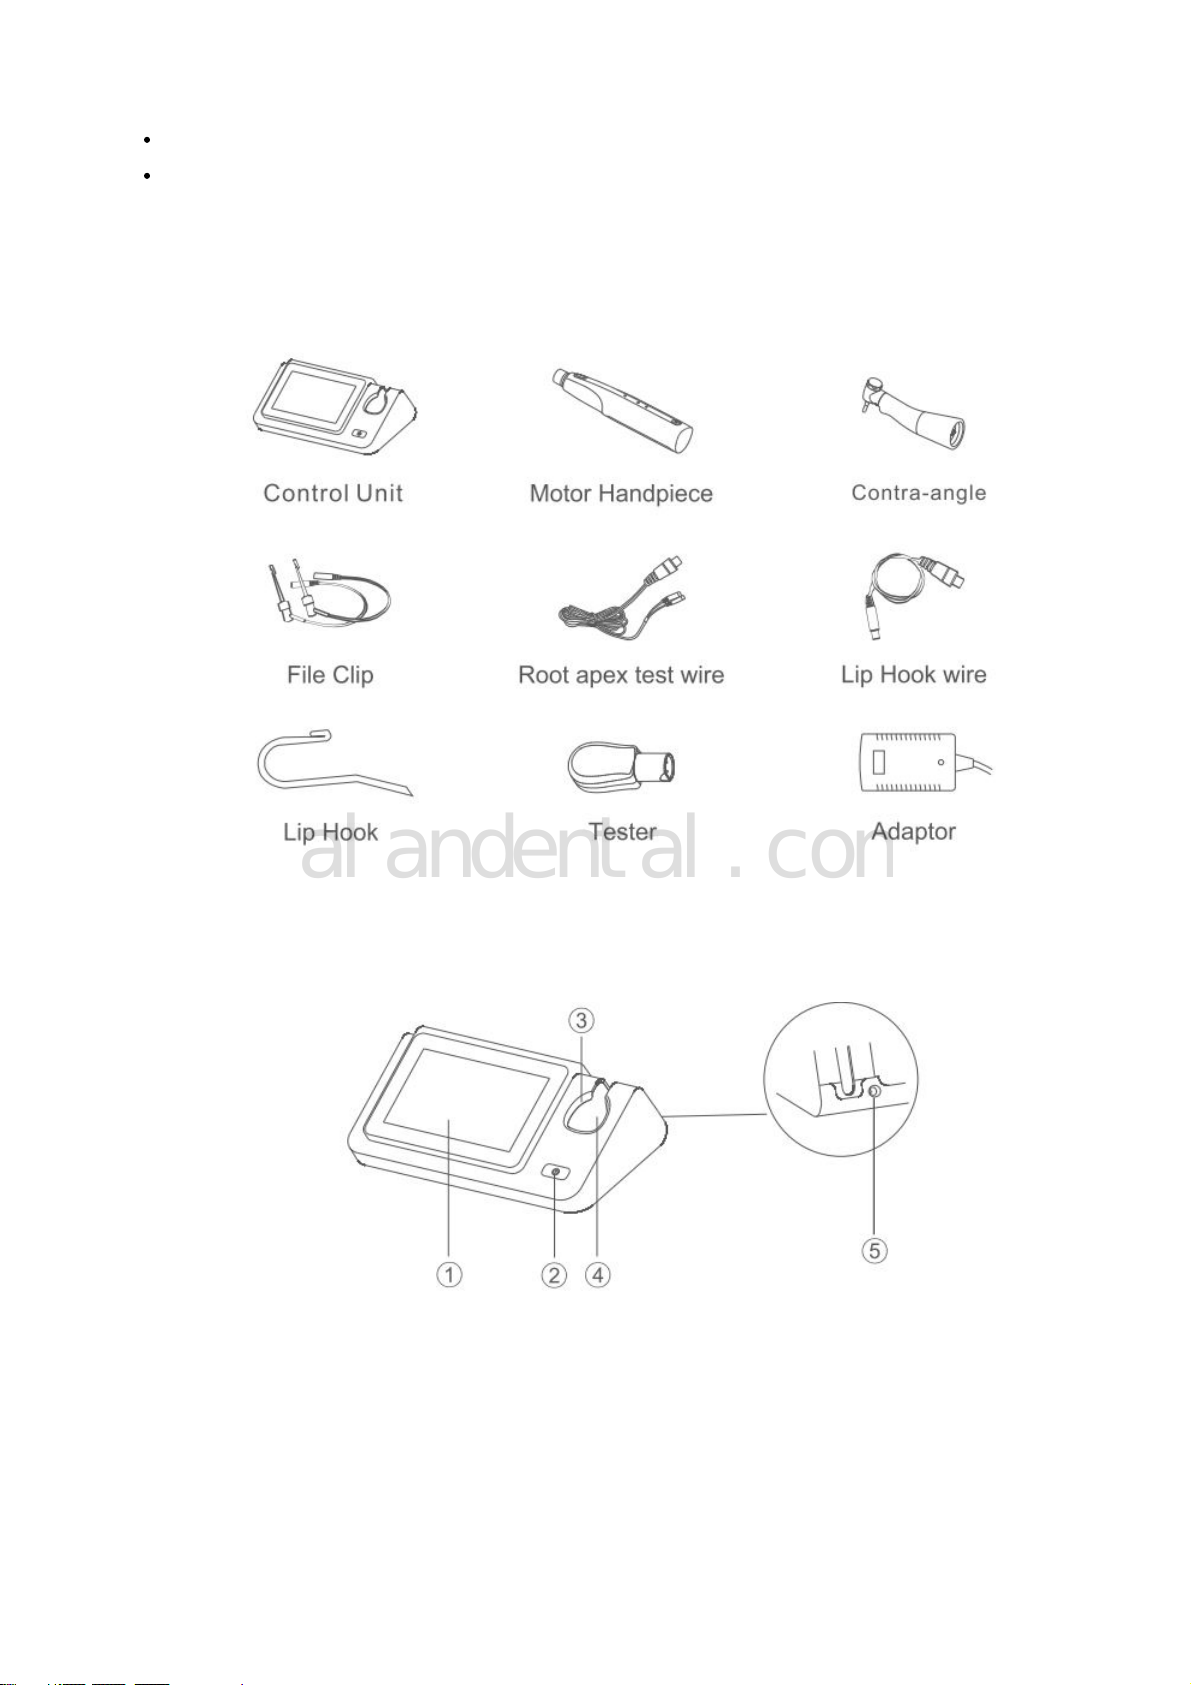
Instrument Overview
1. Components and Accessories
CAUTION:
If the accessories of this product are damaged, please purchase original accessories and replace and
use them according to the instructions.
2. Control Unit
1. Touch Screen
2. ON/OFF Button
3. Handpiece Charger
4. Power Supply Jack
Handpiece
https://www.alandental.com
alandental.com

AC adapter
Input: AC100-240V Output: DC10V 1.5A
Frequency : 50/60Hz
Control unit’s battery Lithium ion battery ( DC7.4V)
Handpiece’s battery Lithium ion battery (DC 3.7V)
LED 3.3V
Speed 150-1000rpm
Torque 0.6-3.9Ncm
Protection against Electric Shock Type B applied part
Classification of Protection against Electric S
hock Class II (adapter)
Control unit’s input power 35VA
Operation Short time
Gear ratio 1.9:1
File of contra-angle
ISO1797-1Type1 diameter:2.35mm,minmum fitting
length:11mm.overall length:max23mm,working diameter: max 2
mm
File of file clip
File of Root Apex Locators meet the ISO 3630-1 Type 1
Neckdiameter(d16): min 0.52mm, max 1.72mm Head diameter (
D): min 0.20mm, max 1.40mm Working length ( 116): 16mm
Applied part Contra-angle, File clip, Lip hook.
Measurement accuracy ±0.5mm
Degree of Protection(IEC 60529) IPX0
Preparation
First charge
Prior to first use, you need to charge the control unit and handpiece.
Put handpiece in handpiece charger.
Insert adapter and connect main power supply to charge control unit and handpiece
https://www.alandental.com
alandental.com
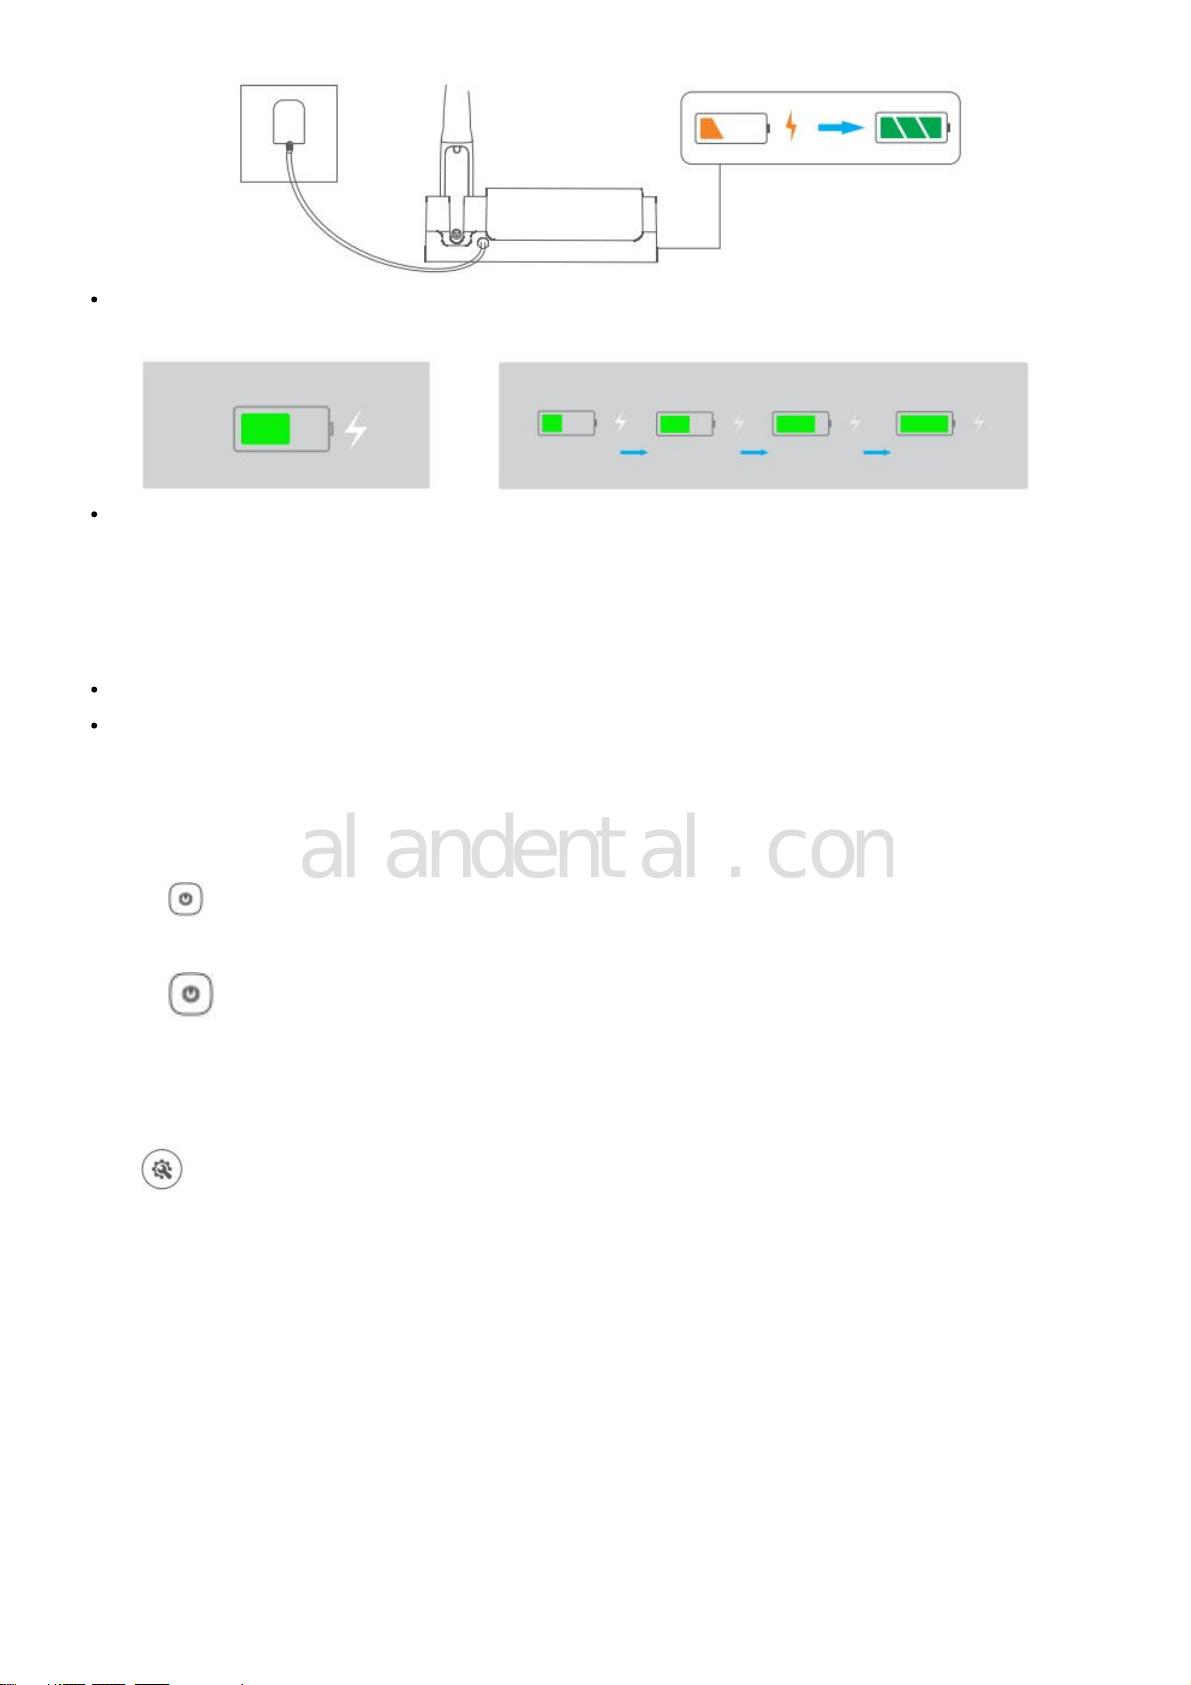
When control unit charging, the screen displays the charging symbol and status. After 1 minute of inactivity, the
symbol will disappear. You can press the ON/OFF button or touch the screen to check the charging status.
When handpiece charging, charging light (orange) on the control unit flashes and the light (green) will stay on
when fully charged.
Note:
The first charge will take more than 4 hours.
For the battery and charging, please refer to 6.
Power On/Off
1. Control Unit
Press to turn on, long press to turn off.
2. Handpiece
Press to turn on, long press to turn off
General Setting
Press to enter setup state.
https://www.alandental.com
alandental.com

NOTE:
The change will be automatically saved.
Activating Bluetooth
Connect hand piece to control unit via Bluetooth.
1. Connecting
Default Bluetooth is connected. Bluetooth will automatically connect when control unit and handpiece are
turned on.
2. Pairing
• Press to enter setup state and then press to pair Bluetooth;
https://www.alandental.com
alandental.com
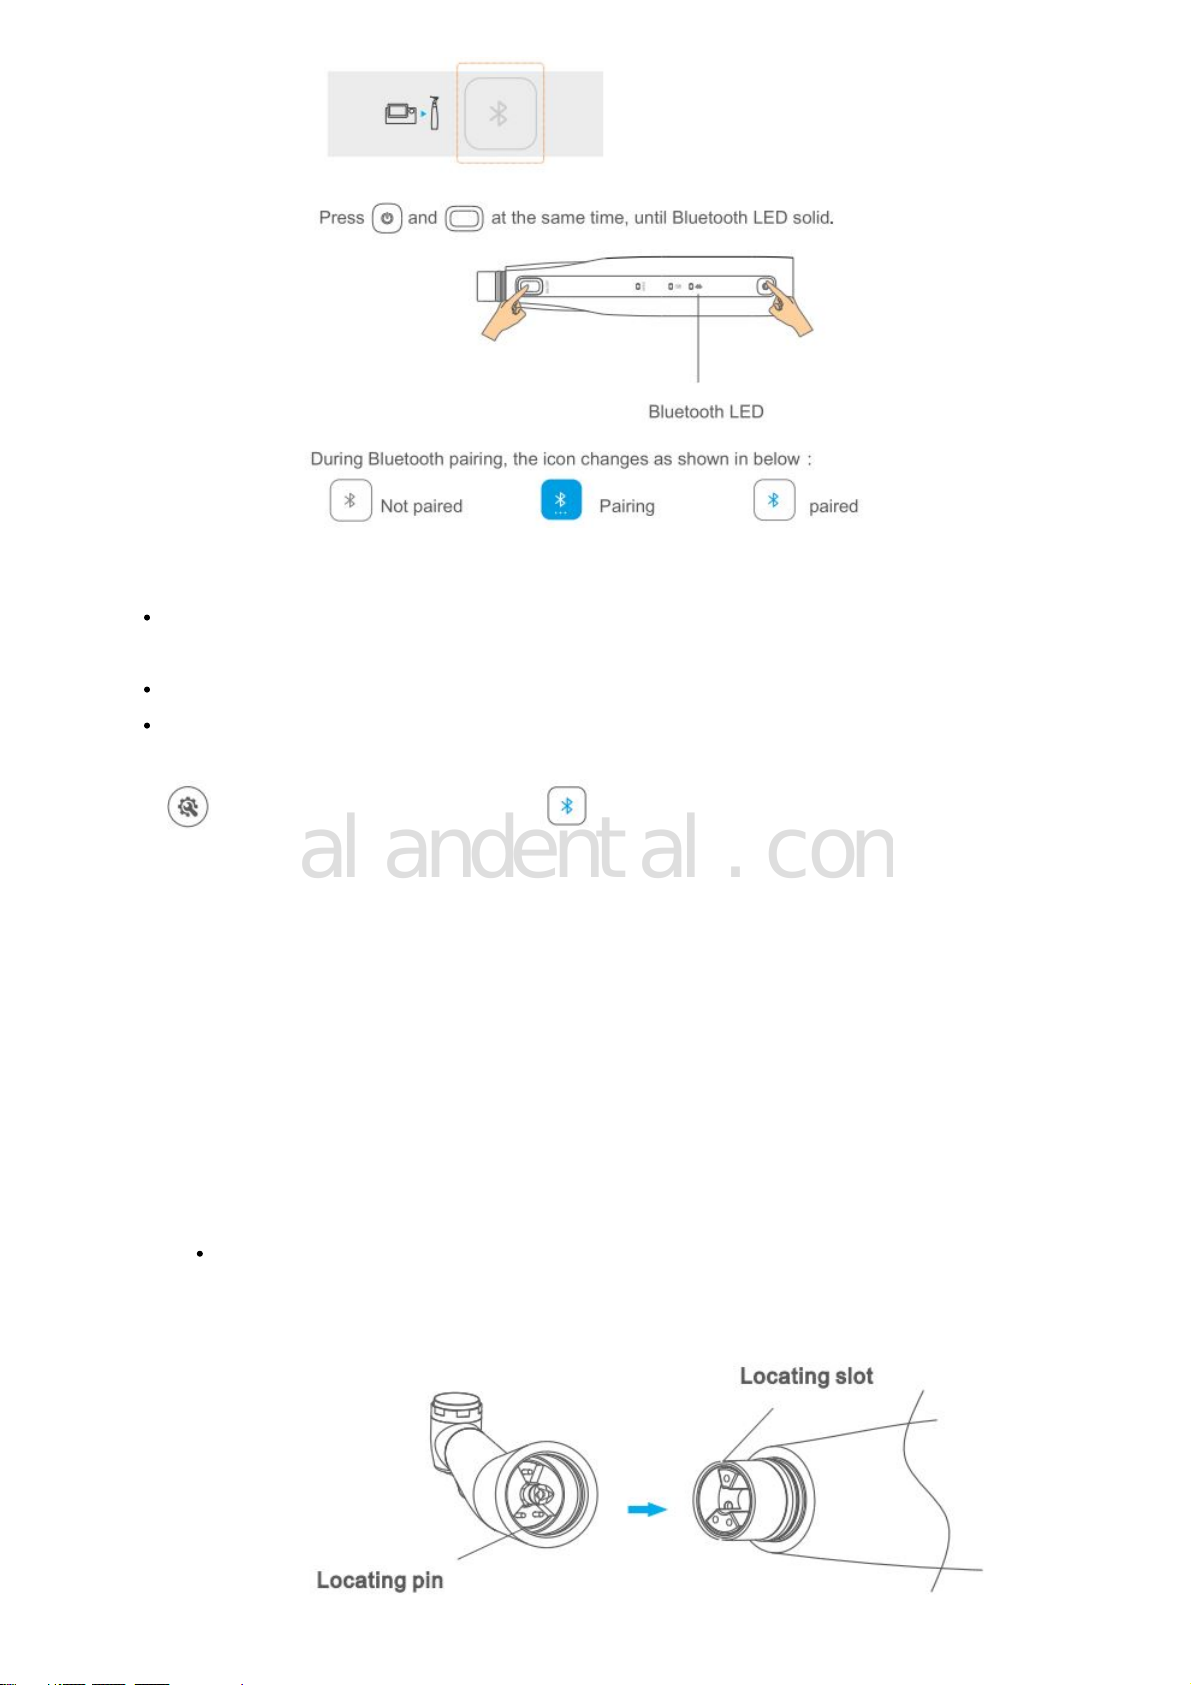
NOTE:
Priro to the Bluetooth connection, the Bluetooth indicator (blue) on the handpiece is flashing. When
paired, the indicator is on.
The Bluetooth connection will be saved automatically.
Bluetooth pairing is only required after replacing control unit or handpiece.
3. Disconnecting
Press to enter setup state and then press to prepare to disconnect;
Follow the prompt step by step.
Operation
The instrument integrates three modes namely.
Endo motor mode: root canal preparation.
Apex locator mode: root canal length measurement.
Multi-function mode: undertake root canal measurement and preparation.
1. Endo Motor Mode
If not any test wire connected to the instrument, it automatically enters Endo Motor Mode.
1. Connection Accessories
Connect contra-angle
Align and connect the locating slot and the locating pin.
Disconnecting: Pull it straight out.
https://www.alandental.com
alandental.com
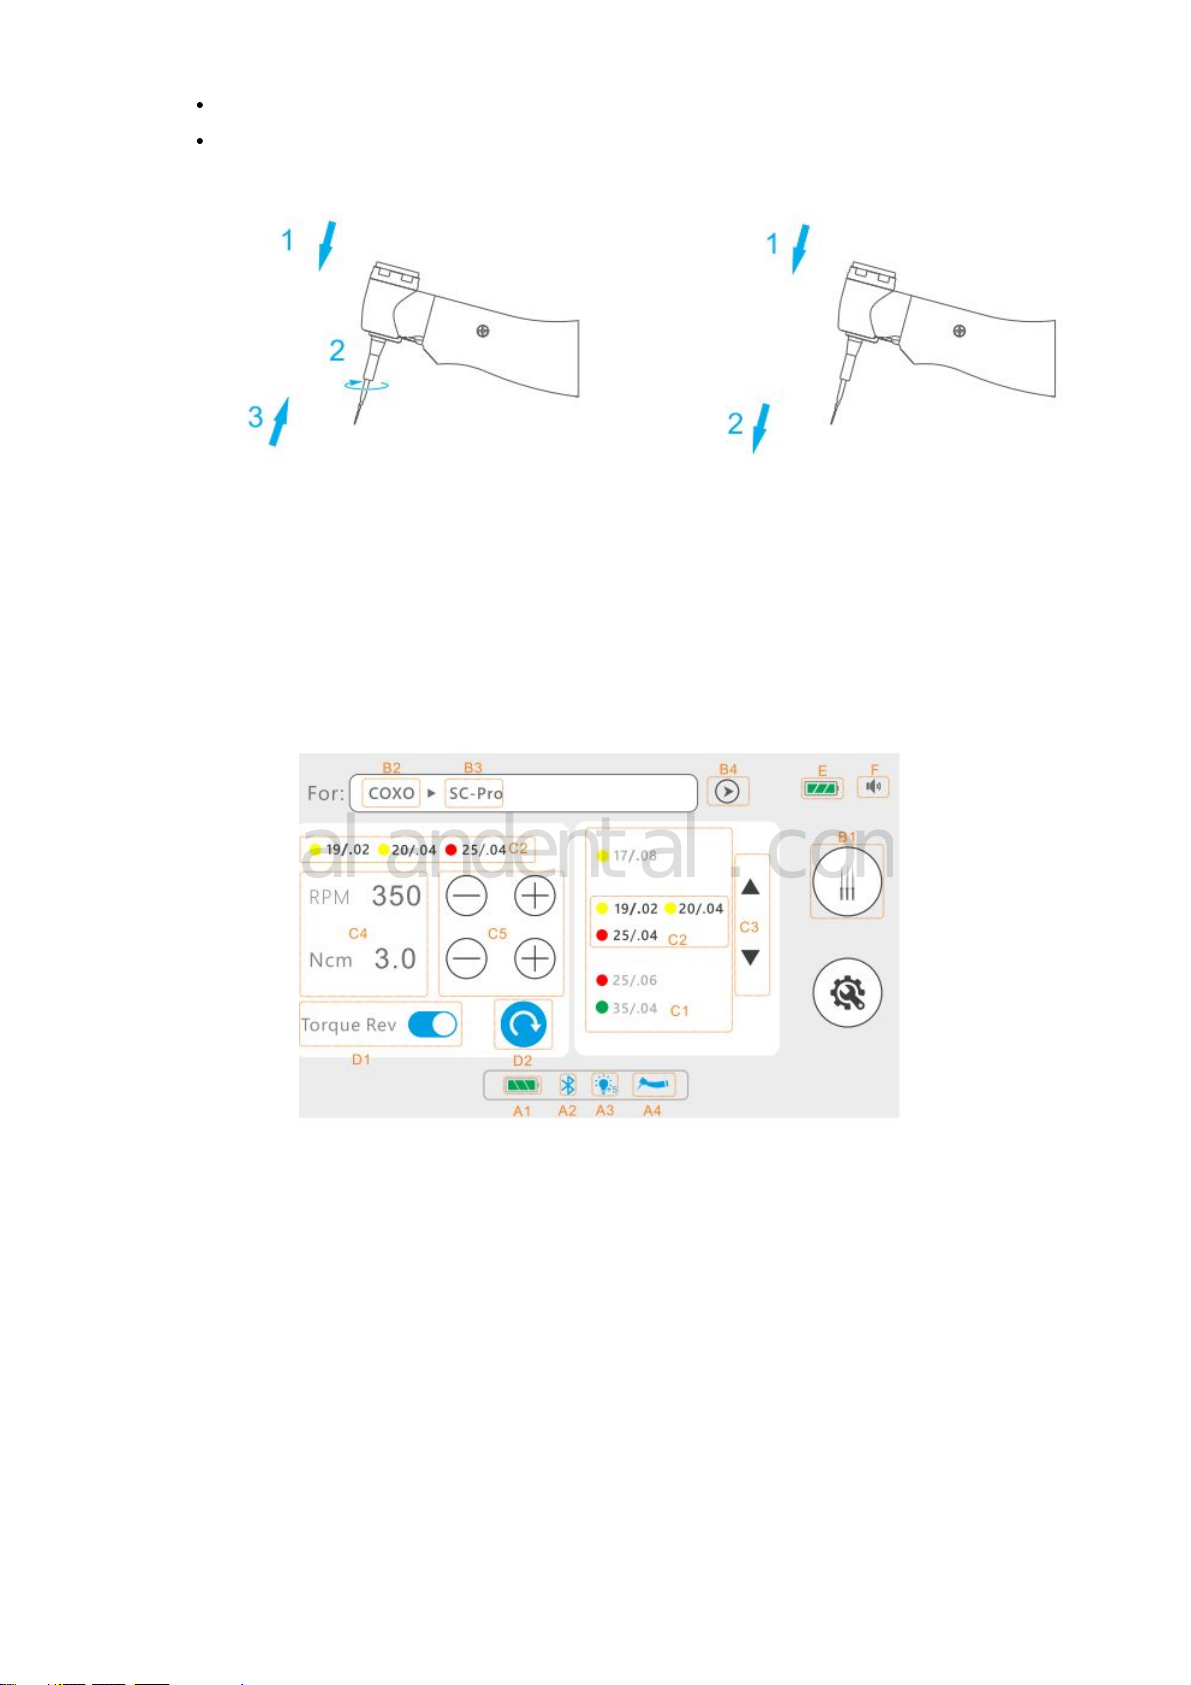
2. Connect File
Hold down the push button on the contra-angle and insert the file
Pull on the file gently to make sure it is locked.
Disconnecting: Press the push button and pull out the file.
WARNING:
• Make sure the connection is not damaged.
• Never use stretched, deformed or damaged files.
CUTION:
• Be careful when inserting and removing files to avoid injury.
• Inserting and removing files without holding the push button may damage the chuck.
• Gently drag the file to confirm that it is locked
2. Interface Overview
https://www.alandental.com
alandental.com

Table of contents
Other Coxo Dental Equipment manuals


Popular Dental Equipment manuals by other brands

Dentsply Sirona
Dentsply Sirona Midwest Stylus Plus operating instructions

Carestream
Carestream CS 1200 quick start guide

RAM PRODUCTS
RAM PRODUCTS PRIMUS 45 HANDPIECE owner's manual

BG Light
BG Light BLUEDENT XPRESS cordless Operating instructions manual

Durr Dental
Durr Dental Power Tower Silence 200 Installation and operating instructions

SDI
SDI radii xpert Instructions for use


