CPcam CP-NVR-8CH User manual

Video Recorder User Manual
2016-3

1Important Safeguards and Warnings
Electrical safety
All installation and operation should conform to your local electrical safety codes. We assume no liability or
responsibility for any fires or electrical shock caused by improper handling or installation.
Transportation security
Heavy stress, violent vibration or water splash should be avoided during transportation, storage and
installation.
Installation
Keep upright. Handle with care.
Do not apply power to the NVR before completing installation.
Do not place objects on top of the NVR
Qualified engineers needed
All examination and repair work should be done by qualified service engineers.
We are not liable for any problems caused by unauthorised modifications or attempted repair.
Environment
The NVR should be installed in a cool, dry place away from direct sunlight and inflammable or explosive
substances, etc.
This product should be transported, stored and operated in the specified environments.
Accessories
Be sure to use all the accessories available in the package.
Before installation, please open the package and check all the components are included.
Contact your local retailer if something is broken or missing in your package.
Lithium battery
Improper battery use may result in fire, explosion, or personal injury.
When replacing the battery, please make sure you use the same model.

2Declaration
Please prevail in kind. The manual is for reference only.
This manual may contain inaccurate data or printing error.
The products described in this manual may be updated at any time.
Screenshots of the manual is not in a machine and only for display.
If in doubt, obtaining a copy of the latest procedure or the additional document, please contact with the company's
after-sales department.

TABLE OF CONTENTS
1 Important Safeguards and Warnings ...................................................................................................................... 2
2 Declaration.............................................................................................................................................................. 3
3 Product Introduction............................................................................................................................................... 1
3.1Product Overview......................................................................................................................................... 1
3.2Feature.......................................................................................................................................................... 1
4 Read First ................................................................................................................................................................ 2
4.1Front Panel................................................................................................................................................... 2
4.2Remote Control............................................................................................................................................ 3
4.3The Mouse.................................................................................................................................................... 5
4.4The Input Method......................................................................................................................................... 6
4.5Icon............................................................................................................................................................... 6
4.5.1The Screen Icons................................................................................................................................... 6
4.5.2Operation Icons .................................................................................................................................... 7
5 Installation .............................................................................................................................................................. 7
5.1Unpacking Inspection................................................................................................................................... 7
5.2HDD Installation.......................................................................................................................................... 7
5.3Installation of the burner.............................................................................................................................. 8
5.4Alarm/PTZ/Control Keyboard Interface ...................................................................................................... 8
5.5POE Connection......................................................................................................................................... 10
6 Basic Operations Guide......................................................................................................................................... 10
6.1Power On and Off ...................................................................................................................................... 10
6.1.1Power On............................................................................................................................................ 10
6.1.2Power Off (Shutdown)........................................................................................................................ 11
6.1.3Restart ................................................................................................................................................ 11
6.1.4Power recovery .................................................................................................................................. 11
6.2Start-up wizard........................................................................................................................................... 11
6.3Add Device................................................................................................................................................. 13
6.3.1Channel Mode Switch ........................................................................................................................ 13
6.3.2QUICK ADD IP CAMERA...................................................................................................................... 14
6.3.3Adding Menu...................................................................................................................................... 15
6.3.4Automatically added .......................................................................................................................... 16
6.3.5Searching Added................................................................................................................................. 17
6.3.6Modify channel configuration ............................................................................................................ 17
6.3.7Configure Front Device....................................................................................................................... 17
6.3.8Delete Front Device............................................................................................................................ 20
6.3.9Others................................................................................................................................................. 20
6.4The event of configuration......................................................................................................................... 20
6.4.1Detect configuration........................................................................................................................... 20
6.4.2Intelligent analysis.............................................................................................................................. 22
6.4.3Alarm input......................................................................................................................................... 24
6.4.4Equipment Abnormal ......................................................................................................................... 26
6.5Log in/Log out............................................................................................................................................ 26
6.6Preview....................................................................................................................................................... 27

6.6.1Live Preview........................................................................................................................................ 27
6.6.2Channel Toolbar ................................................................................................................................. 28
6.6.3Right Click Menu ................................................................................................................................ 29
6.6.4Task Bar .............................................................................................................................................. 31
6.7Search......................................................................................................................................................... 33
6.7.1Search................................................................................................................................................. 33
6.7.2Event Search....................................................................................................................................... 36
6.7.3Tag Search........................................................................................................................................... 37
6.7.4Smart Serach ...................................................................................................................................... 37
6.7.5External Search................................................................................................................................... 39
6.7.6Face search......................................................................................................................................... 40
6.8Record Backup........................................................................................................................................... 40
7 local Configuration ................................................................................................................................................ 41
7.1The Introduction of the Main Menu........................................................................................................... 41
7.2INFO .......................................................................................................................................................... 42
7.2.1[System]:.......................................................................................................................................... 43
7.2.2Event................................................................................................................................................... 44
7.2.3Net Channel........................................................................................................................................ 44
7.2.4LOG..................................................................................................................................................... 46
7.3CONFIG..................................................................................................................................................... 46
7.3.1Channel Setting .................................................................................................................................. 46
7.3.2Storage ............................................................................................................................................... 48
7.3.3PTZ setting.......................................................................................................................................... 50
7.3.4Alarm.................................................................................................................................................. 51
7.3.5Channel Mode Switch ........................................................................................................................ 51
7.4Backup........................................................................................................................................................ 51
7.5Application................................................................................................................................................. 51
7.5.1DDNS .................................................................................................................................................. 52
7.5.2Email................................................................................................................................................... 53
7.5.3P2P ..................................................................................................................................................... 53
7.5.4Cloud storage ..................................................................................................................................... 54
7.5.5PUSH................................................................................................................................................... 54
7.6System setting ............................................................................................................................................ 54
7.6.1Basic setting........................................................................................................................................ 54
7.6.2Video output ...................................................................................................................................... 55
7.6.3Storage management ......................................................................................................................... 56
7.6.4ABNORMITY........................................................................................................................................ 58
7.6.5System Status ..................................................................................................................................... 58
7.6.6Maintain ............................................................................................................................................. 59
7.6.7Account .............................................................................................................................................. 61
7.6.8Network.............................................................................................................................................. 62
7.6.9RS232.................................................................................................................................................. 65
8 WEB Access ........................................................................................................................................................... 65
8.1WEB Operation.......................................................................................................................................... 65

8.1.1Network Connection .......................................................................................................................... 65
8.1.2The control installation and the user login logout ............................................................................. 66
8.1.3The Interface Of Web Operations....................................................................................................... 67
8.1.4The Real-time Monitoring .................................................................................................................. 68
8.1.5PTZ Control......................................................................................................................................... 69
8.1.6Configuration...................................................................................................................................... 70
8.1.7Search Record..................................................................................................................................... 71
8.1.8Alarm Configuration ........................................................................................................................... 72
8.1.9About.................................................................................................................................................. 72
9 Appendix ............................................................................................................................................................... 73
9.1Alarm linkage setting................................................................................................................................. 73
9.1.1Alarm Out........................................................................................................................................... 73
9.1.2Linkage Record ................................................................................................................................... 73
9.1.3Snapshot............................................................................................................................................. 74
9.1.4PTZ Linkage......................................................................................................................................... 74
9.1.5Tour .................................................................................................................................................... 74
9.1.6Show Message.................................................................................................................................... 74
9.1.7Buzzer................................................................................................................................................. 75
9.1.8Send Email.......................................................................................................................................... 75
9.1.9Server push......................................................................................................................................... 76
9.1.10 Send NetDisk............................................................................................................................ 76
9.2Port Mapping.............................................................................................................................................. 77
9.2.1UPNP Function ................................................................................................................................... 77
9.2.2Port mapping Manually...................................................................................................................... 77
9.3Voice Intercom ........................................................................................................................................... 78
9.3.1Summarize.......................................................................................................................................... 78
9.3.2Configuration...................................................................................................................................... 78
9.4HDD S.M.A.R.T ........................................................................................................................................ 78
9.5Hard disk problem...................................................................................................................................... 80
9.6HDD Capacity Calculation......................................................................................................................... 81
9.7Terms.......................................................................................................................................................... 82
9.8FAQ............................................................................................................................................................ 82

3Product Introduction
3.1Product Overview
This series DVR/NVR is a high performance network video recorder, combined with H.264 video compression,
high-capacity hard disk storage, TCP / IP transmission, embedded Linux operating system and a variety of other
advanced technologies in the electronic information industry, all those ensure that a high-quality, low bit rate
video storage characteristics, and good system stability.
This product complies with GB 20815-2006 standard video security surveillance digital video recording
promulgated by the State. At the same time, the product supports the ONVIF protocol” base on’ ONVIF ™ Core
Specification’ Version 2.2” and is compatible with the network cameras which supports ONVIF protocol.
Some of the products can enable the switching between the NVR mode and Hybrid mode “Hybrid mode supports
both analog cameras and network cameras, NVR mode only supports network cameras”. This series product
support local preview, multiple-window display, recorded file local storage, remote control and mouse shortcut
menu operation, and remote management and control function. recording, playback, monitoring, synchronization
of audio and video. Besides, the products support advanced control technology and strong network data
transmission capacity.
3.2Feature
Real-time monitoring
Have a composite video signal interface and support TV, VGAor HDMI output simultaneously.
Compression function
Use H.264 video compression standard and G.711 audio compression standard and have high definition, low code
rate of the video coding and the storage.
Recording function
Support timing, linkage alarm, motion detection, SATA hard and local hard disk , DVR data backup and network
backup.
Video playback function
Achieve searching videos by a variety of conditions, playback in local and network. Support multiple videos
playback, fast playing, slow playing and frame-by-frame playback. Video playback can display the exact time of
the incident. Provide time-line retrieving page for quick searching.
Camera control and alarm
Be controlled by the remote camera and equip many alarm input interfaces. Be connected to various types of
alarm devices. Dynamic detection, video loss, video block, multiple alarm output and scene lighting control can
be realized.
Communication Interface
Equip USB 2.0 high-speed interface or ESATA interface and allow many backup devices. Equip standard Ethernet
interface. Plug and play in a variety of network conditions,
Network functions
Support TCP / IP, UDP, RTP / RTSP, DHCP, PPPOE, DDNS, NTP P2P etc. Support real-time network monitoring,
video playback, control and management functions; built-in WEB Server, you can directly access through a

browser.
Operation Mode
Support various shortcut menu operation modes, on the front panel, remote control, mouse, etc;Support simple
and intuitive GUI。
Intelligent analysis
Support One or Two channel Intelligent Video Analysis,,such as Face detection and perimeter analysis,Intelligent
linkage pictures storage, videos, external alarm
Intelligent Search
Data can be retrieved through the intelligent analysis of data. Such as face detection data to achieve through face
image search, or by perimeter realization event video analysis data retrieval。
Channel Switch
The simulating device compatible with IP channel by the TVR channel switch.
4Read First
4.1Front Panel
No
Name
Icon
Function
1
Power
Power
Power button, press this button to boot up or shut down DVR/NVR.
2
Shift
Shift
1. In input Box, switch input methods;
2. Switch TAB;
3
Number Key
1~9
1. Number Input(in number mode);
2. English character Input(in English mode);
3. Switch channel (in 1-ch mode).
4
Input number more
than 10
+10
Enter a digital larger than 10, press two-digit number:
1. Press the tens digit;
2. Press digital switch button;
3. Press ones digit.
5
Up/Down
↑↓
1.Assistant function such as PTZ menu;
2.In monitor mode, switch between multiple-window and one-window;
3. Activate the digital input box increase or decrease the number;
4.Active pull-down menu to switch the drop-down box options;
5. Activate checkbox to change status;
6. Activate the text input box and step down carry and abdication;
7. Activate the control box to move the slider;
8. Activate display window to select the previous channel, next channel.
6
Left/Right
←-
1. Shift current activated control, and then move left and right;
2. In monitor mode, switch channel.
7
ESC
ESC
Go to previous menu, or cancel current operation.
8
Enter
ENTER
1. Confirm current operation;
2. Go to OK button;
3. Go to menu.

9
Function Key
Shortcut function with FN key.
10
Auxiliary
Fn
1. One-window monitor mode, click this button to display assistant function:
PTZ control and image color;
2. Detection areas setting(like in motion detection setup), working with Fn
and direction keys to realize setup;
3. In text mode, click it to delete the character before the caret(if there is no
shift on the front panel, it can switch input methods), press this button for
1.5sec to clear all of the characters;
4. In playback mode, switch the full screen;
5. Realize other special functions.
11
Play/Pause
▶
1. Go to SEARCH interface;
2. In PTZ channel: ZOOM+;
3. In normal playback click this button to pause playback;
4. In pause mode, click this button to resume playback.
12
Shuttle(outer ring)
In real-time monitor mode it works as left/right direction key.
13
Jog(inner dial)
In real-time monitor mode it works as up/down direction key.
4.2Remote Control
The remote control interface is shown as below:
123
4
7
Mult Add
5 6
8 9
0-/--
ABC DEF
GHI JKL MNO
PORS TUV WXYZ
,.
Record Fn
Enter/Menu Esc
■
Multiple-
window Switch
Remote
Address
Number Key
Digital
switch
Auxiliary Key
Cancel
Loop Pause
Record
Confirm/Menu
Key
Direction Keys
Previous record/
Iris-
Next
record/Iris+
Slow Play
Play/Pause
Forward
Forward 5sec
Reverse 5sec

Name
Icon
Function
Multiple-Window
Switch
Mult
Switch between multiple-window and one-window.
Remote Address
Add
Click it to input device number, so that you can control it.
Number Key
0~9
1.input numbers(in number mode)
2.input English character(in English mode)
3.switch channel(one-window mode)
Loop Pause
Pause the loop state.
Digital Switch
-/--
Enter a digital larger than 10, press two-digit number:
1. Press the tens digit;
2. Press digital switch button;
3. Press ones digit.
Record
Record
1. Start or stop record manually.
2. In PTZ interface, click this button system can go to the Preset interface.
Auxiliary Key
Fn
1. One-window monitor mode, click this button to display assistant
function: PTZ control and image color;
2. Detection areas setting(like in motion detection setup), working with Fn
and direction keys to realize setup;
3. In text mode, click it to delete the character before the caret(if there is no
shift on the front panel, it can switch input methods), press this button for
1.5sec to clear all of the characters;
4. In playback mode, switch the full screen;
5. Realize other special functions.
Confirm/Menu Key
Menu/Menu
1. Confirm current operation;
2. Go to OK button;
3. Go to menu.
ESC
ESC
Go to previous menu, or cancel current operation.
Direction Key
/
1.Assistant function such as PTZ menu;
2.In monitor mode, switch between multiple-window and one-window;
3. Activate the digital input box increase or decrease the number;
4.Active pull-down menu to switch the drop-down box options;
5. Activate checkbox to change status;
6. Activate the text input box and step down carry and abdication;
7. Activate the control box to move the slider;
8. Activate display window to select the previous channel, next channel.
/
1. Shift current activated control, and then move left and right;
2. In monitor mode, switch channel;
3.Assistant function such as PTZ menu.
Previous record/Iris-
1.In playback mode, playback the previous video;
2.In PTZ mode, Iris-.
Next record/Iris+
1.In playback mode, playback the next video;
2.In PTZ mode, Iris+.
Forward 5sec
In playback mode, forward 5sec.

Reverse 5sec
In playback mode, reverse 5sec.
Slow Play
Multiple slow play speeds or normal playback.
Forward
Various forward speeds and normal speed playback.
Stop
■
In normal playback click this button to stop playback.
Play/Pause
1. Go to SEARCH interface;
2. In PTZ channel: ZOOM+;
3. In normal playback click this button to pause playback;
4. In pause mode, click this button to resume playback.
The procedures of controlling multiple DVR by remote control:
The DVR ID default is 8. It’s no need to reset it when control one single DVR by the remote control. If you need
to control multiple DVR, do as below:
First activate the remote control: choose controlled DVR, starts successfully, aim the remote control to control the
hard disk video recorder, press the "Add" button, input device ID) between (1-999), then press ENTER to
determine can control the corresponding number of hard disk video recorder.
4.3The Mouse
In addition to front panel keys and remote control menu, the user can use a to control. Insert the mouse interface
into the USB interface.
Left Click
Left click to enter the right menu or the main interface.
Left click to access the menu option.
Perform the operations instructions of the control.
Change the state of the checkbox or dynamic detection blocks.
Pop up a drop-down list when left click.
In the state of PTZ 3D control, left drag the area to achieve regional enlarging or reducing.See details zoom effect
4.1.2 PTZ control section introduction.
Double Click
Double click to play video.
Double click to make the screen full or exit.
Right Click
Right click to pop up the right menu in the real-time monitoring screen.
Exit the current interface without saving.
Turning Wheel
Turn the mouse wheel to change the value in the digital box.
Switch the option of the combination box.
Scroll back and forth to achieve the zoom function of channels and PTZ 3D.
Mouse Move
Select controls of the current coordinates to move.
Mouse Drag
Select area to detect.
Select area to shelter.
Select zooming function of PTZ control.

4.4The Input Method
capitalization and the input of Chinese. Click the mouse to complete the input.”← “represents the backspace and
“_ “represents a space.
In the input box, you can select figures, symbols, English The input interface of English:
figures:
The input interface of Chinese:
4.5Icon
4.5.1 The Screen Icons
:The channel is recording.
:The video of the channel is lost.
:Motion detection occurs.
:The channel is in monitoring and locked status.
:Adjust the size of the logo of the local audio output.
:Allow screens to round of the Tour.

4.5.2 Operation Icons
:Not selected.
:Be selected.
:The drop - down button
:Leave the interface.
:Cancel the settings.
:Set parameters.
:Save parameters.
:Restore the factory settings.
:Apply current settings to the system.
:Copy current settings to other channels.
:Enter the configuration interface.
:Select and configure the processing operation triggered by video detection or alarm.
5Installation
5.1Unpacking Inspection
When you receive the product, check according to the packing list in the box.
5.2HDD Installation
Installation Preparation
Prepare a Cross Screwdriver.
Note: HDD quantity by each model’s specifications shall be final, HDD capacity up to 64 TB.
Steps
Remove the metal top cover by removing two screws from the sides of the cover.
Place the hard disks on a flat table and tighten the screws.
Connect the power and the data lines to the HDD.
Reinstall the metal top cover and tighten the screws.
Caution
Only use the HDD specified by the manufacturer.
The HDD will be formatted automatically during booting and it may cause data loss.
The total duration of video data saved is decided by the HDD’s capability and the DVR’s parameters (recording
setup, encoding setup). Please refer to the form in chapter 11.5.
5.3Installation of the burner
Installation Preparation
Prepare a Cross Screwdriver.
Steps
Unscrew the screw on the side of the chassis and open the case cover.
Use a screwdriver to remove the bracket fixed in middle of the disk.
Open the front panel door and remove the baffle inside.
Connect the burner data cable and the power cord.
Fix the chassis cover.
Caution
The installation of the built-in burner is only for specific DVR and affects disk space for installation and
interfaces.
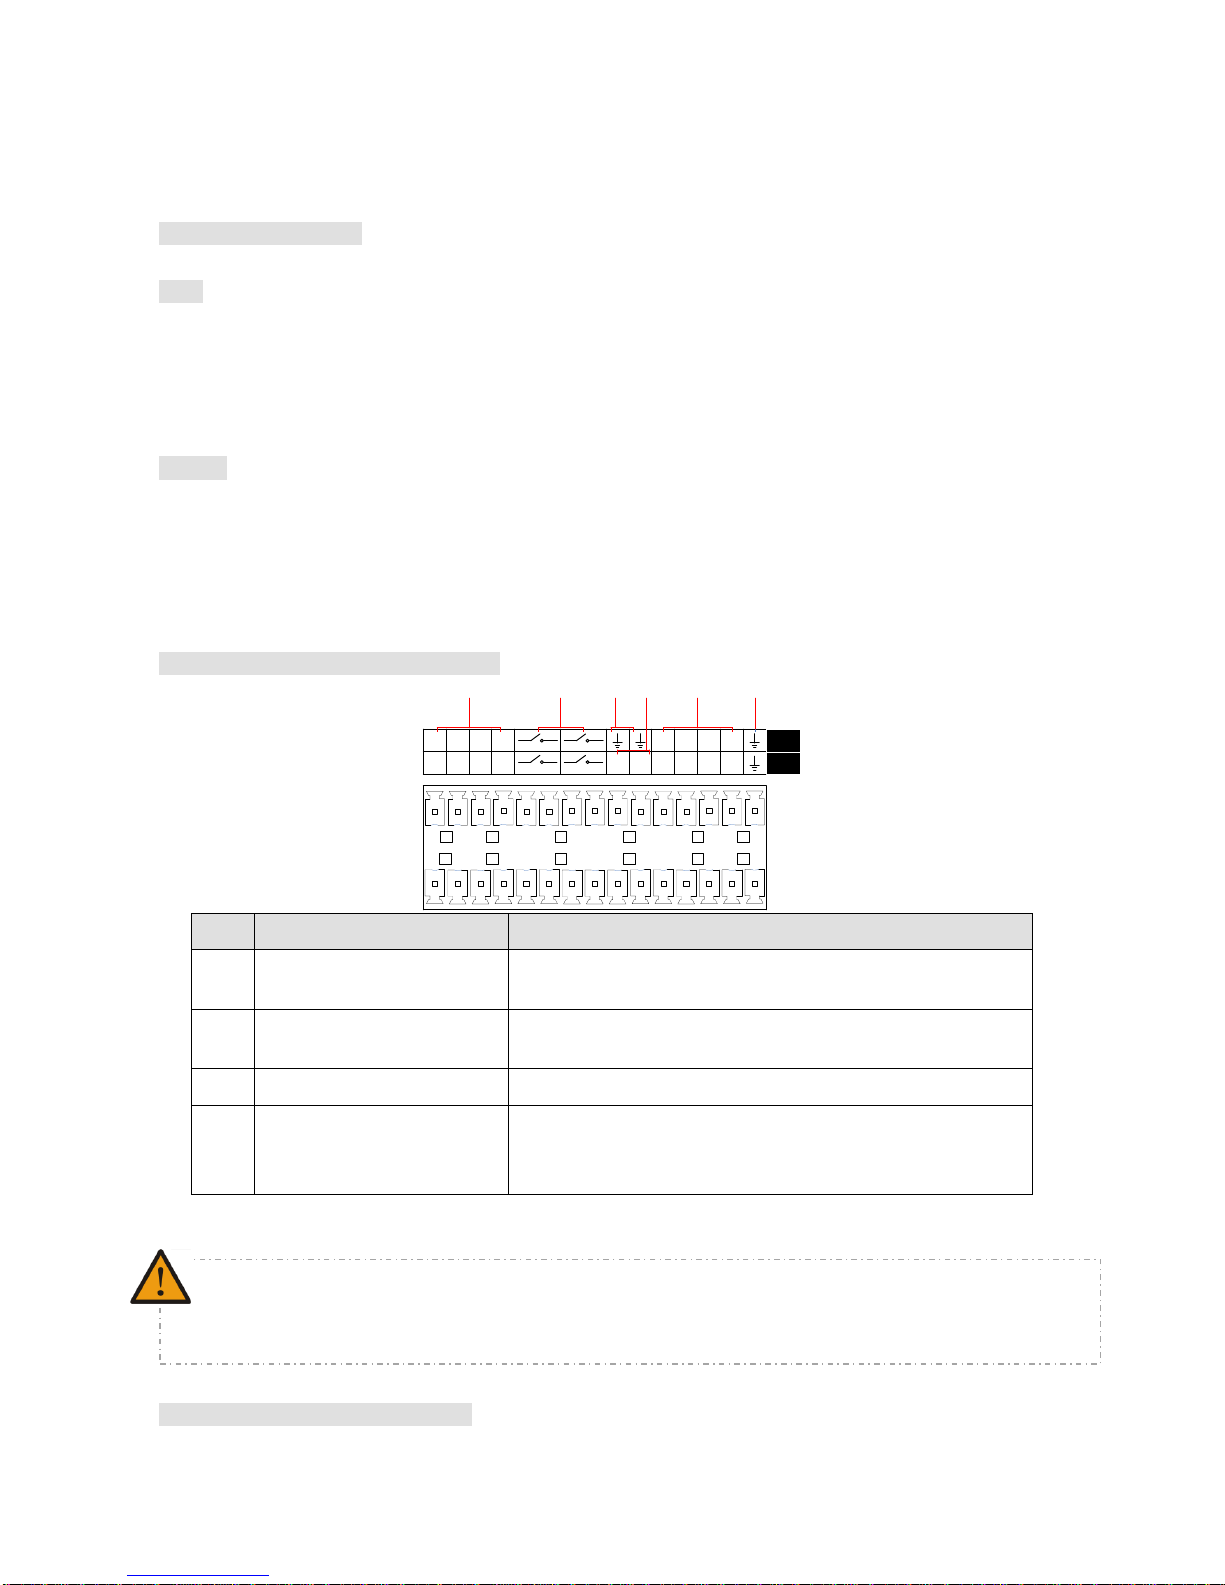
5.4Alarm/PTZ/Control Keyboard Interface
Alarm/PTZ/Control Keyboard Interface
2 4 6 8 24 10 12 14 16
1 3 5 7 13 B A 9 11 13 15
UP
DOWN
1 3 2 4 1 2
No
Name
Instructions
1
Alarm Input
Connect the positive end (+) of the alarm input device to the
alarm input port (ALARM IN 1~16)
2
GND
Connect the negative end (-) of the alarm input device to the
ground
3
Alarm Output
Connect the alarm device
4
RS-485
485 communication port. They are used to control devices such
as PTZ. Please parallel connect 120TΩ between A/B cables if
there are too many PTZ decoders
Examples of alarm input connections
Different models support different alarm input ports. Please refer to the specifications sheet for detailed
information.
Slight difference may be found on the alarm port layout.

The alarm input is the switch quantity input. If the alarm input signal is not switch quantity signal but voltage
signal, refer to the following connection:
Alarm
Input
Devices
(Power
Output)
NVR
Alarm
Switch
Signal
ALM(+)
ALM(-)
G
In
Relay
Examples of alarm output connections
When the alarm output connect with DC andAC load, please refer to the connection.
NVR
Switch
Signal
Output
G
OUT
DC
DC
Loading
G
OUT
NVR
Switch
Signal
Output
Relay
AC
AC
Loading
See details 7.2.5.
The Connection of the P/T/Z
The A, B interface of the PTZ decoder connect with A and B interfaces of the DVR’s RS-485. 120Ω resistors
should be paralleled in the remote A, B lines to reduce the distortion of the signal if a larger number of PTZs are
connected.
See details 7.2.4.
Keyboard
The A, B interface of the Keyboard connect with A and B interfaces of the DVR’s RS-485,[MAIN
MENU]-[CONFIGURATION]-[P/T/Z],Protocol choose KEYBORAD. See below.

5.5POE Connection
6Basic Operations Guide
6.1Power On and Off
6.1.1 Power On
Install the DVR/NVR correctly (as above) and then connect the power. The DVR/NVR LED should light up and
the DVR/NVR will boot automatically.
The DVR/NVR will then automatically detect any connected hardware (cameras, monitors, etc.), this process
should last about 30 Seconds. When this process has been completed the DVR/NVR will enter the multi-screen
real-time surveillance mode.
If your hard drive is not properly connected, the following message will appear on your screen.
Note
:
Please do not use any type of power supply which is different from the power supply included in this
kit.
Non-safe voltage 48V, please pay attention to electrical safety.Supply the NVR with the 12V DC power.
IP Camera should support the POE.
The theoretical distance of POE power supply should below 100 meters.

6.1.2 Power Off (Shutdown)
Right mouse click -[Main Menu]-[Shutdown]
Note: Only change or attempt to reconnect the hard disk drive after shutting down the DVR/NVR.
6.1.3 Restart
Right mouse click -[Main Menu]-[Shutdown]-[Restart system]
6.1.4 Power recovery
Reboot after an outage or forceful shutdown, DVR will save the record before outage and return to the normal
operation mode.
6.2Start-up wizard
Quickly configuration, including P2P account&password setting, network configuration, intelligent mode
selection.
Help Information
[QR code]From left to right: Web access address,Android APP address, iphoneAPP address.
[Network Connection Status]The current network status.
[P2P]P2P account&password setting.

[Start-up wizard]Tick Start-up wizard Enable.
Network configuration
[DHCP]Tick DHCP Enable.
[IP address]Enter the number or press up&down button()to change the IP address and [Subnet Mask] and
[Gateway]。
[First DNS Server]DNS server IP.
[Alternate DNS Server]DNS alternate IP.
[QR code]Scan it and shows P2P account, login with mobileAPP.
Account
[Add Users] Add a new user
[Modify User] Modify the user name, groups, rights
[Add Group] to add a user group, and configure the user group right.
[Modify Group] Modify the permissions belong to Group
[Modify Password] Modify the Login password

Intelligent mode selection
[Intelligent mode selection]Intelligent mode selection.
6.3 Add Device
If the device supports IPC, should be added to IPC first. We offer three ways . And support different protocols.
6.3.1 Channel Mode Switch
Local channels compatibily with network by the channel mode switch.
Login[main meun]-[Channel]-[Mode Switch]Enter the administration page。
1. Local channel switch network channel:
Click the start channel number,then the channel number switch the network channel(Contains the channel),

click the[ok],restart your device to complete the switch。\For example:2 channel choice network,as shown
in the figure below,the 2-4 channel have switched the network channel
2. Network channel switch local channel:
Click the end channel number,then the channel number switch the local channel(Contains the channel),click
the[ok],restart your device to complete the switch。
For example:2 channel choice local channel,as shown in the figure below,the 1-2 channel have switched the
local channel
If the preview screen appears shown as follow image:
Then the channel does not match the resolution of the camera, Please enter in the [main menu] →
[Channel] →[mode switch] to configure the correct resolution
6.3.2 QUICK ADD IP CAMERA
In preview screen, move the mouse to the network channel, it will show "+" sign, left-click to enter the following
Menu:
Table of contents
Other CPcam DVR manuals


