CPS MOTORVAC Cool Smoke MP User manual

INTRODUCTION
Congratulations! You are in possession of the most advanced and powerful
(yet simple to operate) multi-pressure diagnostic leak test machine available.
Our patented MotorVac® Cool Smoke® “no heat” technology creates a high
volume, smoke-like vapor eliminating the need for high temperature glow plugs
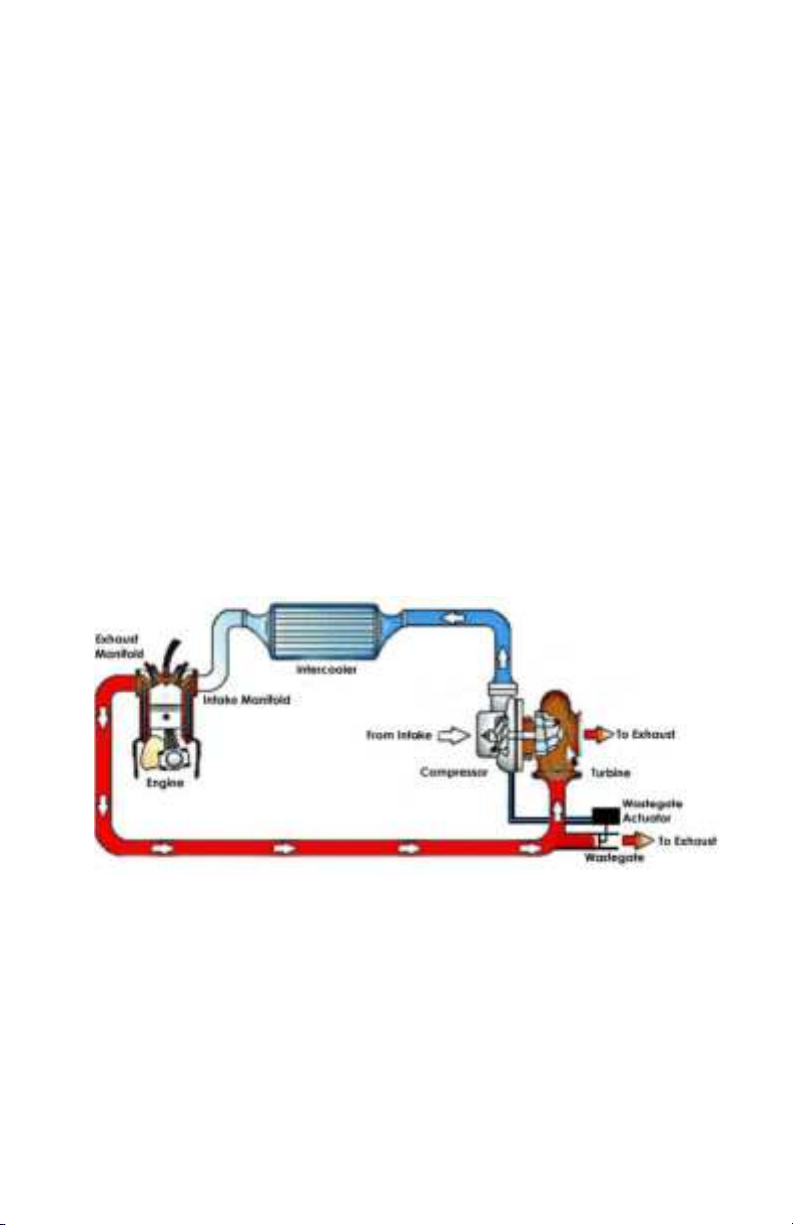
or resistance coils. The Cool Smoke® MP was specifically developed to OEM
specifications for diagnosing leaks in high pressure air systems such as turbo
chargers and charge air coolers. The Cool Smoke® MP can be used to not only
determine if there is a leak in a system and pinpoint its location, it can also
determine the actual size of the leak allowing the technician to decide whether
a repair is necessary.
The MotorVac® Cool Smoke® MP uses advanced dynamically controlled pneumatics
and microprocessor technology to determine the actual leak size throughout the
entire operational pressure range. The Cool Smoke® fluid will deposit ultraviolet
(UV) dye at the location of small leaks where it would be difficult to see smoke.
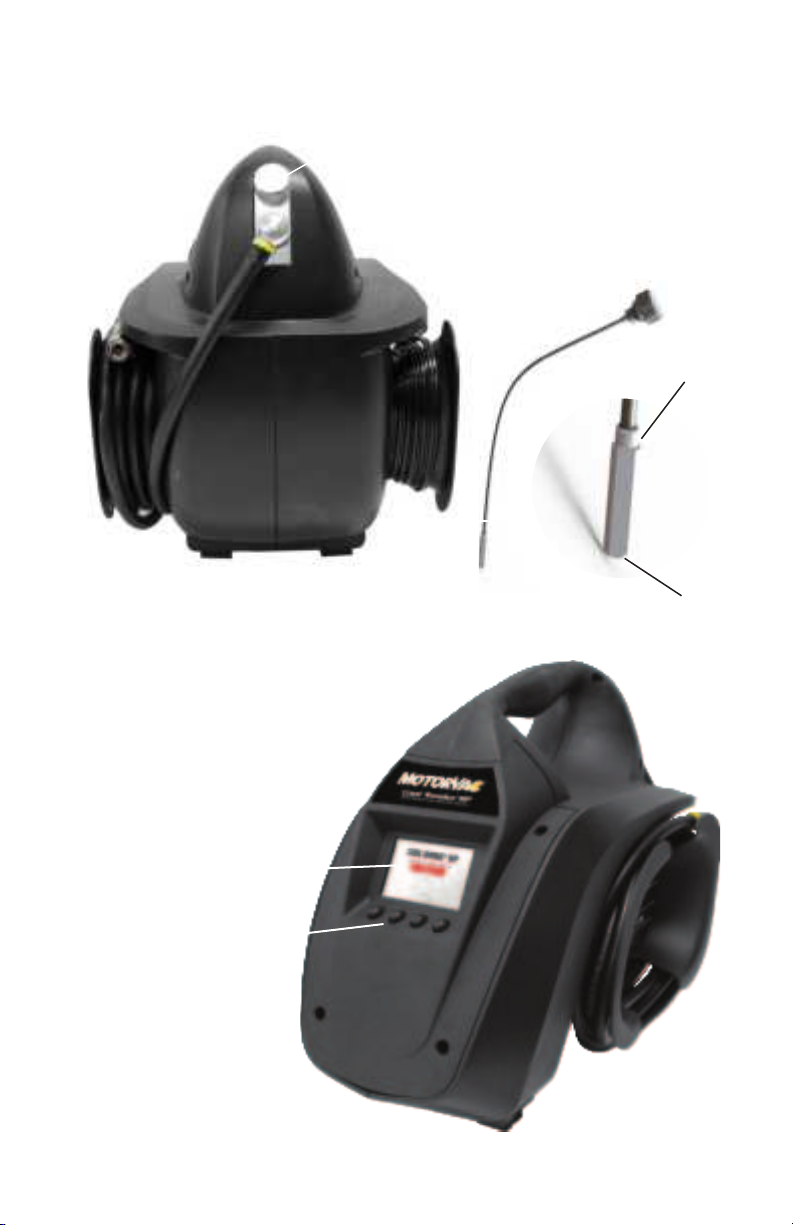
The MotorVac® Cool Smoke® MP comes with both a powerful UV light to easily
locate the UV dye deposits at leak points, as well as a powerful white light to
locate the smoke at visible leak points.
The MotorVac® Cool Smoke® Fluid is a unique solution that allows for highly visible
vapor (smoke) to carry UV dye to leak points. The UV dye will be deposited at small
leak locations where the smoke is forced out during a test. Your MotorVac Cool
Smoke MP can perform smoke or leak tests between 3-60 psi (0.2-4.1 bar) while in
MP mode and 0.5 psi (0.03 bar) while in EVAP mode. The MotorVac® Cool Smoke MP
comes prefilled with a charge of Cool Smoke® Fluid and is refillable by the end- user
when the smoke-producing solution is depleted. The smoke it produces, as well
as the UV dye, is non-toxic, solvent free and noncorrosive. The MotorVac® Cool
Smoke® MP needs no assembly and requires no maintenance.
Your MotorVac® Cool Smoke® automatically sets the critical pressure that must
be maintained during EVAP testing. You don’t need to set flow rates and you don’t
need to be concerned with ambient temperatures or barometric pressures. The
MotorVac Cool Smoke® is refillable by the end-user when the smoke-producing fluid
is depleted.
Please review this User Guide to become familiar with the Cool Smoke® MP and
all its features. Thank you for choosing the MotorVac® Cool Smoke® MP.
CPS Products Inc.

SAFETY INFORMATION & PRECAUTIONS..........................4
SYSTEM FEATURES & FUNCTIONS ...................................5
TECHNICAL SPECIFICATIONS ..........................................6
MODES OF OPERATION ...................................................7
FIRST TIME OPERATION .................................................7
INCLUDED ACCESSORIES................................................8
HP TEST SETUP..............................................................9
Intial Setup..................................................................................9
EVAP TEST SETUP ........................................................ 10
Test Setup ................................................................................. 10
Leak Verification .................................................................... 10
Finding the Leak .......................................................................11
OTHER LEAK DETECTION APPLICATIONS........................ 11
Exhaust Leaks ...........................................................................11
SETTINGS .................................................................... 12
Language ...................................................................................12
Units ............................................................................................12
Default Settings: Default Pressure .....................................13
Default Settings: Pressure Decay Timer ...........................13
Smoke/Smokeless Mode ........................................................13
SELECT MODE OF OPERATION....................................... 14
Select EVAP or HP Mode ........................................................14
Select Smokeless Mode .........................................................14
TEST PROCEDURE ........................................................ 15
Smoke Test — HP Mode...........................................................15
Smoke Test — EVAP Mode .....................................................16
Leak Test — Leak Size Test (HP)...........................................17
Leak Test — Leak Size Test (EVAP) ......................................18
Leak Test — HP & EVAP Pressure Decay Test ...................18
COOL SMOKE®HP TURBO ADAPTER KIT .......................20
APPENDIX
A: Troubleshooting & Additional Help ................................21
B: Replacement Parts ............................................................22
CONTENTS

4COOL SMOKE®MP | OWNER’S MANUAL | CPSPRODUCTS.COM
SAFETY INFORMATION & PRECAUTIONS
To prevent personal injury and / or damage to vehicle or equipment:
• Many automotive manufacturers require the use of nitrogen to be used while
testing the EVAP system. This is because a high heat source or spark could
ignite fuel vapors mixed with air. The Cool Smoke® does not use potentially
hazardous high temperature glow plugs or resistance coils to create smoke.
However, nitrogen should be used to reduce the ignition risk if other potential
ignition sources are nearby. The Cool Smoke can perform its functions using
clean and dry conventional shop air.
• Use this equipment in the manner specified by the manufacturer.
• Understand operating procedures and all safety precautions.
• Correctly connect power supply to battery and chassis ground.
• Use only Cool Smoke® Fluid in the Cool Smoke® MP. Altering the fluid, hoses,
cables, or any other replacement parts will void the warranty; may cause
machine malfunction; may cause damage to the vehicle, to property or may
cause personal injury.
• To view the dye deposit, use the included UV Light and UV enhancing safety
goggles.
• Do not use when vehicle engine is running.
• The 12V DC battery source you use to power the machine must be in good
condition and fully charged.
• Machine input pressure must be 90—150 psi (6.2—10.3 bar). Operate the machine
in an upright position.
TIP: Whenever possible allow the system to vent as far away from where the smoke
is being introduced. This will purge the air and quickly fill the system with smoke.
Once the system is filled with smoke, close the vent, and allow the system to be
pressurized.
TIP: When testing an engine’s intake or exhaust system for leaks, it is recommended
that the engine be cold. Small leaks may be sealed due to thermal expansion
WARNING: Do not overfill unit.
CAUTION: Gloves and safety goggles
must be worn at all times by users and
bystanders when performing this service.

5COOL SMOKE®MP | OWNER’S MANUAL | CPSPRODUCTS.COM
SYSTEM FEATURES & FUNCTIONS
1. COOL SMOKE FLUID
DIPSTICK: To check the
fluid level insert dipstick
until threads touch then
remove and read.
CAUTION: DO NOT OVERFILL
THE UNIT.
1
Maximum
Minimum
2. COLOR SCREEN: The advanced color LCD display
is used to navigate through all modes and
gives feedback on pressure in the system.
3. SCREEN NAVIGATION BUTTONS: Four
buttons located on the front of the
unit are used to navigate
through onscreen menus
and select service modes.
2
3

6COOL SMOKE®MP | OWNER’S MANUAL | CPSPRODUCTS.COM
SYSTEM FEATURES & FUNCTIONS (CONTINUED)
4. COMPRESSED AIR INLET:
Connect appropriate
1/4” NPT male quick
coupler to supply the
Cool Smoke® MP with
compressed air supply.
5. POWER CABLE: The
power harness with
battery clips is intended to
be connected to either
a 12 VDC or 24 VDC battery.
The unit will automatically
adjust for the voltage that
is supplied.
45
6. SERIAL NUMBER LABEL
7. SMOKE OUTPUT HOSE: The smoke output
hose is used to connect the Cool Smoke to
the system being tested in either smoke
or leak mode through the use of the
appropriate adapters. This hose
swivels at the connection to the
Cool Smoke® MP to allow for
easier use.
Dimensions
(Length/Width/
Height)
18” x 11” x 13”
46cm x 28cm x 33cm
Current Usage 1.2A
Input Pressure
Required
90—150 psi
(6.2—10.3 bar)
Output Pressure
MP: 1—60 psi
(0.1—4.1 bar)
Weight (Equipment) 10.7 LB (4.5 Kg) EVAP: 0.2—0.5 psi
(0.01—0.03 bar)
Voltage Requirement 12—24 VDC Output Volume 0—42 CFH (0—20 LPM)
Power Cord Length 10’ (3 m) Output Hose Length 8’ (2.4 m)
TECHNICAL SPECIFICATIONS
6
7

7COOL SMOKE®MP | OWNER’S MANUAL | CPSPRODUCTS.COM
MODES OF OPERATION
FIRST TIME OPERATION
The MotorVac® Cool Smoke® MP has two modes of testing:
Smoke mode: The Cool Smoke® MP will produce high density smoke-like vapor at
set pressures between 3-60 psi, for MP mode, and 0.5 psi, for EVAP mode, to quickly
pinpoint the location of a leak using both visible vapor and UV dye deposits.
Leak mode: The Cool Smoke® MP utilizes two methods to determine if the system
under test is leaking beyond OEM specifications. The machine can use either a
Pressure Decay or Leak Size/ Flow Rate Test that can determine the actual leak size
Smokeless mode: The Cool Smoke MP has this mode, where only air goes into the
system, no smoke and/or UV dye. This mode can be used as a smoke purging / air
only test.
The Cool Smoke® MP comes factory filled with Cool Smoke® Fluid and is ready
to use right out of the box. The air inlet is supplied with a female 1/4” NPT port.
Connect an appropriate coupler that mates with your compressed air supply hose.
Your Cool Smoke® MP is now ready for its first use!
Install 1/4” NPT coupler for
compressed air supply

8COOL SMOKE®MP | OWNER’S MANUAL | CPSPRODUCTS.COM
INCLUDED ACCESSORIES
Part Number Description
060-0005 SERVICE PORT ADAPTER (standard size): connects
to factory service port on most OBD-II vehicles
060-0008 SCHRADER REMOVAL / INSTALLATION TOOL: fits
both sizes of Schrader valves in vehicles with
factory OBD-II service port fittings
070-MD7697 UV FLAH LIGHT: This powerful White/Uv/Laser
light makes it easy to find smoke
WVA-003 SMOKE DIFFUSER: Allows the operator to lay
down a thick path of smoke along doors,
sunroof, windshield, and window seams so any
air disturbance, caused by exiting internal cabin
pressure, may be observed.
200-3110 CAP PLUG KIT: Used to seal the intake ducting
of the engine being tested. They may be used
to seal either the inside diameter of an opening
or flip them over and seal the opening at the
outside diameter.
WVA-001 EXHAUST CONES: Used to either introduce
smoke into the exhaust system; any system
that fits the cone’s tapered size; is used as
an exhaust plug when testing a dual exhaust
system; or exhaust plug when testing the intake
vacuum system.
040-5813 PLUG VENT
471112 YELLOW GLASSES
WVA-096 BLADDER PLUG (1) W/ THROUGH-HOLE
WVA-063 UNIVERSAL ADAPTER
WVA-129BV EVAP SAFETY BLOCK & SMOKE HOSE

9COOL SMOKE®MP | OWNER’S MANUAL | CPSPRODUCTS.COM
HP TEST SETUP
Intial Setup
1. ALL tests with the Cool Smoke® MP are performed with the engine off.
2. Connect the Cool Smoke® MP red (+) battery clip to vehicle’s positive
battery terminal; connect the black (—) battery clip to a solid ground point
as far from the battery as possible.
3. Connect shop air to the MotorVac Cool Smoke MP inlet located on the side of
the machine. Be sure supply pressure to the machine is between 90—150 psi.
4. Connect supplied adapters to the vehicle’s turbo induction system. To test
the turbo charger and intercooler (or charge air cooler) attach the adapters
to the inlet of the turbo and the outlet of the cooler.
5. Ensure you are connecting to pressurized parts of the system only. Do not
connect to the air filter box that is not intended for pressure.
6. Use leak test to determine if there is a leak in the system. See page XX for
description.
7. If there is a leak, use smoke test to pinpoint the leak location.
COOLER OUTLET

10 COOL SMOKE®MP | OWNER’S MANUAL | CPSPRODUCTS.COM
EVAP TEST SETUP
CAUTION — Many automakers require the use of a non-combustible gas such as
nitrogen to be used while testing an EVAP system. This is because a heat source or
spark could ignite fuel vapors when mixed with air. The MotorVac Cool Smoke does
not introduce a dangerous heat source. However, other sources of spark or heat
could be present in the surrounding area. The Cool Smoke can perform its functions
using conventional shop air.
Test Setup
ALL tests with the MotorVac® Cool Smoke® MP are performed with the engine off.
1. For OBD-II EVAP systems when the vehicle’s engine is turned off the vent valve
is normally open. Use a scan tool to close the EVAP System to perform any
leak tests.
2. Connect the Cool Smoke® MP’s red (+) battery clip to vehicle’s positive
battery terminal; connect the black (-) battery clip to a solid ground point
as far from the battery as possible.
3. Connect shop air to the MotorVac® Cool Smoke® MP’s inlet located at the back
of the machine. Be sure supply pressure to the machine is between 90—50 psi
(6.2—10.3 bar).
4. Verify the vehicle’s fuel level is below the base of the fuel tank neck.
5. Locate the EVAP service port indicated by its green cap. Remove the Schrader
valve from the EVAP service port using the removal tool (060-0008)
Note: The Schrader valve is a left-hand thread, turn clockwise to remove.
6. Connect the service port adapter (060-0005) to the EVAP service port. Connect
the Cool Smoke’s smoke hose to the service port adapter.
Leak Verification
TIP: A common reason for EVAP codes is a faulty or improperly installed fuel cap.
To rule out this possibility do not disturb the gas cap before performing a leak
verification test. If the vehicle fails the leak size test ensure that the fuel cap is
properly installed and redo the test. If you disturb the fuel cap before doing this test
and the system does not show a leak you will not be able to determine if there is an
intermittent leak or if the fuel cap was the problem.
• Select the LEAK TEST by pressing “select” ( ) button.

11COOL SMOKE®MP | OWNER’S MANUAL | CPSPRODUCTS.COM
EVAP TEST SETUP (CONTINUED)
OTHER LEAK DETECTION APPLICATIONS
Finding the Leak
TIP: It is best to perform all testing in calm air, so that the smoke exiting the leak
will not be blown away impairing your view of the leak.
1. Ensure all steps outlined in test setup were followed. For best performance
fully unwind the outlet hose.
2. Remove the fuel cap to allow the air out and the unit to fully fill the system with smoke.
3. Select the SMOKE TEST by pressing “select” ( ) button to begin
creating smoke. The tester has a built in 5-minute timer and will stop making
smoke when the timer expires. To stop making smoke earlier press
the “exit” ( ) button.
4. After a solid stream of smoke is observed exiting the fuel fill neck, reinstall the fuel cap.
5. Using the supplied light search the EVAP system for smoke exiting a leak.
6. UV light can be used to pinpoint leak locations. This is useful for hard to see
locations such as the top of the fuel tank or behind panels.
7. TIP: The longer smoke is allowed to exit a leak more UV dye is deposited
at the leak location.
8. Repair the leaks and perform the leak test again to verify repair and
that there are not more leaks present in the system.
Exhaust Leaks
Escaping exhaust gases can be very dangerous to the occupants of a vehicle yet
these repairs are neglected — but so easy to find with the MotorVac Cool Smoke.
1. Put the vehicle on a lift to expose the underside. With the engine turned off,
simply insert the exhaust adapter cone into the tail pipe of the vehicle being
tested. Insert the smoke supply line nozzle into the exhaust cone’s hose
opening. On dual exhaust systems ensure that each tail pipe is plugged.
2. Look for the smoke exiting wherever there is a leak.
3. Even though exhaust leaks are very easy to find with MotorVac Cool Smoke, here
are three helpful tips to make finding exhaust leaks even easier:
• It is best to test a cold exhaust system rather than a hot one because
the catalytic converter may consume some of the smoke, but more
importantly, many small exhaust leaks are only visible on a cold exhaust
system due to ‘thermal expansion’.
• Seal off the vehicle’s intake system to achieve proper system pressure in
the event both an intake and exhaust valve are open in the same cylinder
at the same time.

12 COOL SMOKE®MP | OWNER’S MANUAL | CPSPRODUCTS.COM
SETTINGS
The Cool Smoke® MP Settings page allows you to change the default setting for the
following functions: Language, Units of Measurement, Default Settings, Smoke Test
and Smokeless Test.
1. From the Home screen, use the
Next/Back buttons ( )
to navigate to “Settings.”
2. Press the “Select” button ( )
to display the Settings page.
Once in the Settings page, use the scroll
buttons ( ) to select
the desired function.
LANGUAGE
Cool Smoke® MP uses English as the default
language. To change default language:
1. Using the scroll button ( ),
select the desired default language.
2. Select the mode by pressing “select” button
( ).
UNITS
Cool Smoke® MP uses Imperial units as the
default unit of measure. To change Imperial units
to Metric units:
1. Using the scroll button ( ),
select the desired units of measure.
2. Select the mode by pressing “select” button
( ).

13COOL SMOKE®MP | OWNER’S MANUAL | CPSPRODUCTS.COM
SETTINGS (CONTINUED)
DEFAULT SETTINGS
SMOKE / SMOKELESS MODE
Default Pressure
You can select the default pressure for the Leak
test. Default values and range are as follows:
HP Mode EVAP Mode
Default: 10.0psi Default: 0.5psi
Range: 1 to 60psi Range: 0.2 to 0.5 psi
To change the default pressure, use the scroll
buttons ( ) to select the
desired pressure.
Cool Smoke® MP is set in Smoke Mode as the
default setting.
To change the default mode, use the scroll
buttons ( ) to select the Smoke
Mode or Smokeless mode.
Once selected, Smoke or Smokeless Test is
displayed on the home page.
Pressure Decay Timer
You can select the default Pressure Decay Timer
for the Leak test. Default values and range are
as follows:
HP Mode EVAP Mode
Default: 15Sec Default: 15Sec
Range: 3—30Sec Range: 3—30Sec
To change the default pressure, use the scroll
buttons ( ) to select the
desired pressure.

14 COOL SMOKE®MP | OWNER’S MANUAL | CPSPRODUCTS.COM
SELECT MODE OF OPERATION
EVAP or HP Mode
Smokeless Mode
1. Select the EVAP or MP mode by using the
Next/Back buttons ( ).
2. Select the mode by pressing “select” button
( ).
1. From Home screen, use the scroll buttons
( ) to navigate to “Settings”.
2. Press “select” button ( ) to enter
Settings.
• A WARNING screen is displayed when MP is
selected reminding the user NOT to connect to
an EVAP system. Continue by pressing
“continue” button ( ).
• If EVAP mode is selected, the Home page
will be displayed.
• From Home Page, press “return” button
( ) to go back to EVAP/MP selection page.
1. Scroll down the list to “5. SELECT: Smokeless
Test”.
2. Press “select” button ( ) to select
Smokeless mode.
Smokeless Test is displayed on the Home page.

15COOL SMOKE®MP | OWNER’S MANUAL | CPSPRODUCTS.COM
TEST PROCEDURE
Smoke Test
The purpose of a smoke test is to fill a system with pressurized smoke until the set
pressure is reached. Use the high intensity a white light to detect the smoke exiting
any leak points. The white light has a focusing feature to zoom in on the leak points
and improve visibility.
1. Select smoke test by pressing
“select” button ( ) while
smoke test icon is highlighted in red.
2. Set the test pressure by using the
scroll buttons ( )
to adjust pressure. The test pressure
should be the same or less than the
operating pressure of the system
being tested.
HP MODE
3. Follow on screen instructions and
press the ( ) button to start
pressurizing the system.
4. The screen displays the set pressure
as well as the current output pressure.
The test will automatically stop after
10 minutes.

16 COOL SMOKE®MP | OWNER’S MANUAL | CPSPRODUCTS.COM
TEST PROCEDURE (CONTINUED)
1. Select smoke test by pressing
“select” button ( ) while
smoke test icon is highlighted in red.
2. Follow on screen instructions and
press the “Start” button ( ) to
begin pressurizing the system.
EVAP MODE
3. The screen displays the set pressure
as well as the current output pressure.
The test will automatically stop after
5 minutes.

17COOL SMOKE®MP | OWNER’S MANUAL | CPSPRODUCTS.COM
TEST PROCEDURE (CONTINUED)
LEAK TEST
The purpose of a leak test is to verify if a system is leaking and after repairing the
vehicle, confirm that the leak has been fixed. The Cool Smoke® MP has two different
leak tests: Leak Size and Pressure Decay.
1. Leak Size Test (HP)
The Cool Smoke® MP has advanced electronics that are capable of determining the
size of a leak that is greater than 0.015” (0.4mm).
1. Select smoke test by pressing
“select” ( ) button while
smoke test icon is highlighted in red.
2. Set the test pressure by using the
scroll buttons ( )
to adjust pressure. The test pressure
should be the same or less than the
operating pressure of the system
being tested.
3. Follow on screen instructions and
press the ( ) button to start
pressurizing the system.
4. The screen displays the set pressure
as well as the current output pressure.
The test will automatically stop after
10 minutes.

18 COOL SMOKE®MP | OWNER’S MANUAL | CPSPRODUCTS.COM
5. Results — When the output pressure
stabilizes at the set pressure, the leak
size results page will display the leak
size and resulting flow rate from the
test.
TEST PROCEDURE (CONTINUED)
2. Leak Size Test (EVAP)
The Cool Smoke® MP has advanced electronics that are capable of determining the
size of a leak that is greater than 0.015” (0.4mm).
1. Select smoke test by pressing
“select” button ( ) while
smoke test icon is highlighted in red.
2. Follow on screen instructions and
press the ( ) button to start
pressurizing the system.
3. The machine will fill the system
with pressurized smoke until the set
pressure is reached.
4. Results — When the output pressure
stabilizes at the set pressure, the leak
size results page will display the leak
size and resulting flow rate from
the test.

19COOL SMOKE®MP | OWNER’S MANUAL | CPSPRODUCTS.COM
TEST PROCEDURE (CONTINUED)
1. To perform a pressure decay test,
begin a leak test. When the pressure
has reached the set pressure, press the
“Decay Test” button ( ).
2. Follow The decay test will start the
decay timer and show a live update on
the screen of the output pressure. The
time for the decay test can be changed
in the options me.
3. Results: When the pressure decay
test is complete the results will
be displayed. These results can be
compared with the manufacturer’s
specifications.
3. HP & EVAP Pressure Decay Test
A pressure decay test can be used for any size leak. This specification is used by
many OEM vehicle manufacturers to determine if the amount of leakage in the
turbo system is acceptable or requires repair. This test can also be applied to EVAP
systems. The correct pressure will display (0.5 psi).

20 COOL SMOKE®MP | OWNER’S MANUAL | CPSPRODUCTS.COM
ITEM NO. PART NO. DESCRIPTION QTY
1 98821846 Phazer White 5 W Light AAA 1
2 98006475 Black UV LED Light AAA S/A 1
3 068-0100 Turbo Adapter Plug 2.25” to 2.5” Assembly 2
4 068-0120 Turbo Adapter Plug 2.75” to 3” Assembly 2
5 068-0140 Turbo Adapter Plug 1.75” to 2” Assembly 2
6 068-0250 Turbo Adapter Plug Assembly 1
7 98821847 Hose Silicone 1.75” I.D. X 3.7” 2
8 98821849 Hose Silicone 2.25” I.D. X 3.7” 2
9 98821852 Hose Silicone 2.75” I.D. X 3.7” 2
10 98821854 Hose Clamp Turn Key 64-89mm 2
11 98820992 Hose Clamp Turn Key 46-70 mm 2
12 471112 UV Enhancing Safety Glasses 1
13 98821848 Hose Silicone 2” I.D. X 3.7” 2
14 98821851 Hose Silicone 2.5” I.D. X 3.7” 2
15 98821853 Hose Silicone 3” I.D. X 3.7” 2
16 98027050 Battery AAA 12
COOL SMOKE®HP TURBO ADAPTER KIT
The optional add-on accessory Cool Smoke MP Turbo Adapter Kit Part# 200-0150
includes plugs, hoses, clamps, lights and glasses.
12
34
5
6
7-9
10
11
12
13-15
16
This manual suits for next models
1
Table of contents
Other CPS Diagnostic Equipment manuals