Craftex CX101N User manual

CX101N
18” VARIABLE SPEED
WOOD & METAL BAND SAW
User Manual
Version 1.0

2
TABLE OF CONTENTS
General Safety Instructions .................................................................................... 3
Specic Safety Instructions ..................................................................................... 4
Features .................................................................................................................. 5
Physical Features .................................................................................................... 6
Setup ............................................................................................................... 7
Un-packing .............................................................................................................. 7
Proper Grounding .................................................................................................. 8
Assembly and Adjustments ............................................................................ 9
Blade Tracking ........................................................................................................ 12
Basic Controls ........................................................................................................ 13
Test Run .................................................................................................................. 13
Blade Tension . ........................................................................................................ 14
Adjusting the Blade Tension ................................................................................... 14
Guide Bearings Adjustments ................................................................................. 14
Table Stop Adjustment .......................................................................................... 15
Table Tilt Scale Calibration ..................................................................................... 16
Table Alignment ..................................................................................................... 16
Guide Post .............................................................................................................. 17
Work-Piece Inspection ........................................................................................... 17
Work-Piece Inspection (Metal) ................................................................................ 18
Blade Selection (Metal) ........................................................................................... 18
Cast Iron Wheels ..................................................................................................... 19
Coplanar Adjustment .............................................................................................. 19
Operations ..................................................................................................... 20
Ripping .................................................................................................................. 20
Cross Cutting ......................................................................................................... 20
Re-Sawing ............................................................................................................... 21
Cutting Curves ....................................................................................................... 21
Connecting to a Dust Collector ............................................................................. 21
Maintenance ................................................................................................... 22
Removing/Installing Blade ...................................................................................... 22
Blade and Table Alignments ................................................................................. 22
Tilting the Table Backward .................................................................................... 23
Table and Base ...................................................................................................... 23
V-Belts .................................................................................................................... 23
Removing/Replacing the V-Belts .......................................................................... 24
Optional Accessories .............................................................................................. 24
Parts Breakdown and List ............................................................................ 25-30
Warranty ............................................................................................................... 31

GENERAL SAFETY INSTRUCTIONS
Extreme caution should be used when operating all machinery. Know your machine, be
familiar with its operation, read through the owner’s manual and practice safe usage
procedures at all times.
ALWAYS read and understand the user
manual before operating the machine.
CONNECT your machine ONLY to the
matched and specic power source.
ALWAYS wear safety glasses respirators,
hearing protection and safety shoes, when
operating your machine.
DO NOT wear loose clothing or jewelry and
secure long hair in a net or tied back when
operating your machine.
A SAFE ENVIRONMENT is important.
Keep the area free of dust, dirt and other
debris in the immediate vicinity of your ma-
chine.
BE ALERT! DO NOT use prescription or
other drugs that may affect your ability or
judgment to safely use your machine.
DISCONNECT the power source when
changing blade and / or making
adjustments.
NEVER leave a tool unattended while it is in
operation.
NEVER reach over the table when the tool is
in operation.
ALWAYS keep blades, knives and bits sharp-
ened and properly aligned.
ALL OPERATIONS MUST BE performed
with the guards in place to ensure safety.
ALWAYS use push sticks to safely feed your
work through the machine.
ALWAYS make sure that any tools used for
adjustments are removed before operating
the machine.

4
CX101N - 18” Variable Speed Wood & Metal Band Saw
SPECIFIC SAFETY INSTRUCTIONS
WARNING
The safety instructions given above can not be complete because the environment in every shop is
different. Always consider safety rst as it applies to your individual working conditions.
CX101N is perfect for cutting various types
of wood.
ALWAYS INSPECT the blade for any cracked
or missing teeth before operating the band
saw.
ALWAYS ENSURE that the blade tension is
properly set for the type and width of blade
installed.
NEVER place your ngers or hands in the
line of cut. If you slip, your hands or ngers
may come into contact with the blade. Al-
ways use a push stick when ripping narrow
pieces.
DO NOT back the work-piece away from the
blade while cutting. Always turn off the ma-
chine if you are backing out a cut.
ALL GUARDS must be in place while operat-
ing the band saw to ensure safety.
ALWAYS FEED the stock smoothly. Do not
force or twist the work-piece while cutting.
ALWAYS ENSURE that the band saw blade
guard is no more than 1/2” above the stock.
MAKE SURE before making any adjust-
ments, the switch is in the “OFF” position
and the cord is un-plugged from the power
source.
NEVER LEAVE the band saw unattended
while it is running.
DO NOT attempt to remove jammed pieces
unless the band saw has come to a complete
stop and the power switch has been turned
to the OFF position.
NEVER TURN ON the band saw if the blade
is in contact with your workpiece.
ALWAYS ENSURE that the guide bearings
are properly set to prevent blade wander.
ALWAYS MAKE CERTAIN that the guide
bearings are properly adjusted to guide the
blade properly.
MAINTAIN AND SERVICE your band saw
regularly as instructed in the user manual.
MAKE SURE you have read and understood
all the safety instructions in the manual and
you are familiar with your band saw, before
operating the CX101N. If you fail to do so,
serious injury could occur.

CX101N - 18” Variable Speed Wood & Metal Band Saw
FEATURES
As part of the growing line of Craftex woodworking & metalworking equipment, we are
proud to offer the CX101N - 18” Variable Speed Wood & Metal Band Saw. The Craftex name
guarantees Craft Excellence. By following the instructions and procedures laid out in this user
manual, you will receive years of excellent service and satisfaction. The CX101N is a profes-
sional tool and like all power tools, proper care and safety procedures should be adhered to.
Motor ................................................... 1.5 HP, 220 V Single Phase
Switch ................................................. On/Off Paddle
Variable Speed ................................... 150-3000 FPM
Cast Iron Table Size ............................ 20” x 24
Table Tilt ............................................. 0° to 10° Left and 0° to 45° Right
Wheel .................................................. 18”
Max Blade Width ................................. 1/8”
Min Blade Width .................................. 1/4”
Maximum Cutting Height ..................... 12”
Floor to Table Height.. ......................... 37-1/2”
Cutting Capacity/Throat.. ..................... 17-1/2”
Dust Collection Ports ........................... 2 Ports@ 4”
Blade Length ...................................... 133”
Bearings .............................................. Sealed and Permanently Lubricated
Computer Balanced Cast Iron Wheels ...... .Yes
Co-Planer Adjustment ......................... Yes
Powder Coated Paint .......................... Yes
Precision Ripping Fence ..................... Yes
Quick Release Tension Adjustment .... Yes
Overall size ......................................... 39.7” x 30.7” x 76.3”
Carton Size ............................. 32.6” x 19.6” x 70.7”
Weight.. .......................... N.W 157 KGS / G.W 172 KGS
Warranty ............................................. 3 Years

6
CX101N - 18” Variable Speed Wood & Metal Band Saw
PHYSICAL FEATURES
Quick Release Blade
Tension Handle
One Piece
Construction
On/Off
Switch
Fence
Powder Coated
Paint
Base
Lower Cabinet
Lock Knob
Table
Rear
Fence Rail
Blade Guard
Blade Guide
Lock Knob
Blade Guide
Adjustment
Hand Wheel
Upper Cabinet
Lock Knob
Fence Cam
Lock Handle
Front
Fence Rail
Miter
Gauge
Digital Display
Variable Speed
Control

Figure-1 Inventory
List of Contents
O. Flat Washer 1/4”-16 1.2mm ......................... 4
P. Hex Bolt 1/4”*5/8” .................................... 4
Q. Miter Gauge Holder ..................................... 1
R. Fence Holder ................................................ 1
S. Miter Gauge .................................................. 1
T. Scale (for the front rail) .................................. 1
U. Fence Assembly ............................................ 1
V. Front Rail ....................................................... 1
W. Rear Rail ....................................................... 1
X. Front Rail Brackets ....................................... 2
Y. Rear Rail Brackets ......................................... 2
Z. Front Rail Knobs ............................................ 2
AA. Rear Rail Knobs ......................................... 2
BB. Flat Washers 3/8” ....................................... 2
CC. Knobs 3/8”-16 ............................................ 2
DD. Hex Bolts 1/4”-20x1/2” ........................................ 2
EE. Lock Washer 1/4” ...................................... 2
F F. Flat Washers 1/4” ........................... ........... 2
GG. Table Insert................................................. 1
Figure-2 Inventory
Setup
Before setting up your machine you need to
read and understand this user manual
completely.
The unpainted surfaces of this band saw are
coated with a rust preventive waxy oil and you
will want to remove this
before you begin assembly. Use a
solvent cleaner that will not damage painted
surfaces. amount of cleaner/degreaser, then let it
soak for 5-10 minutes.
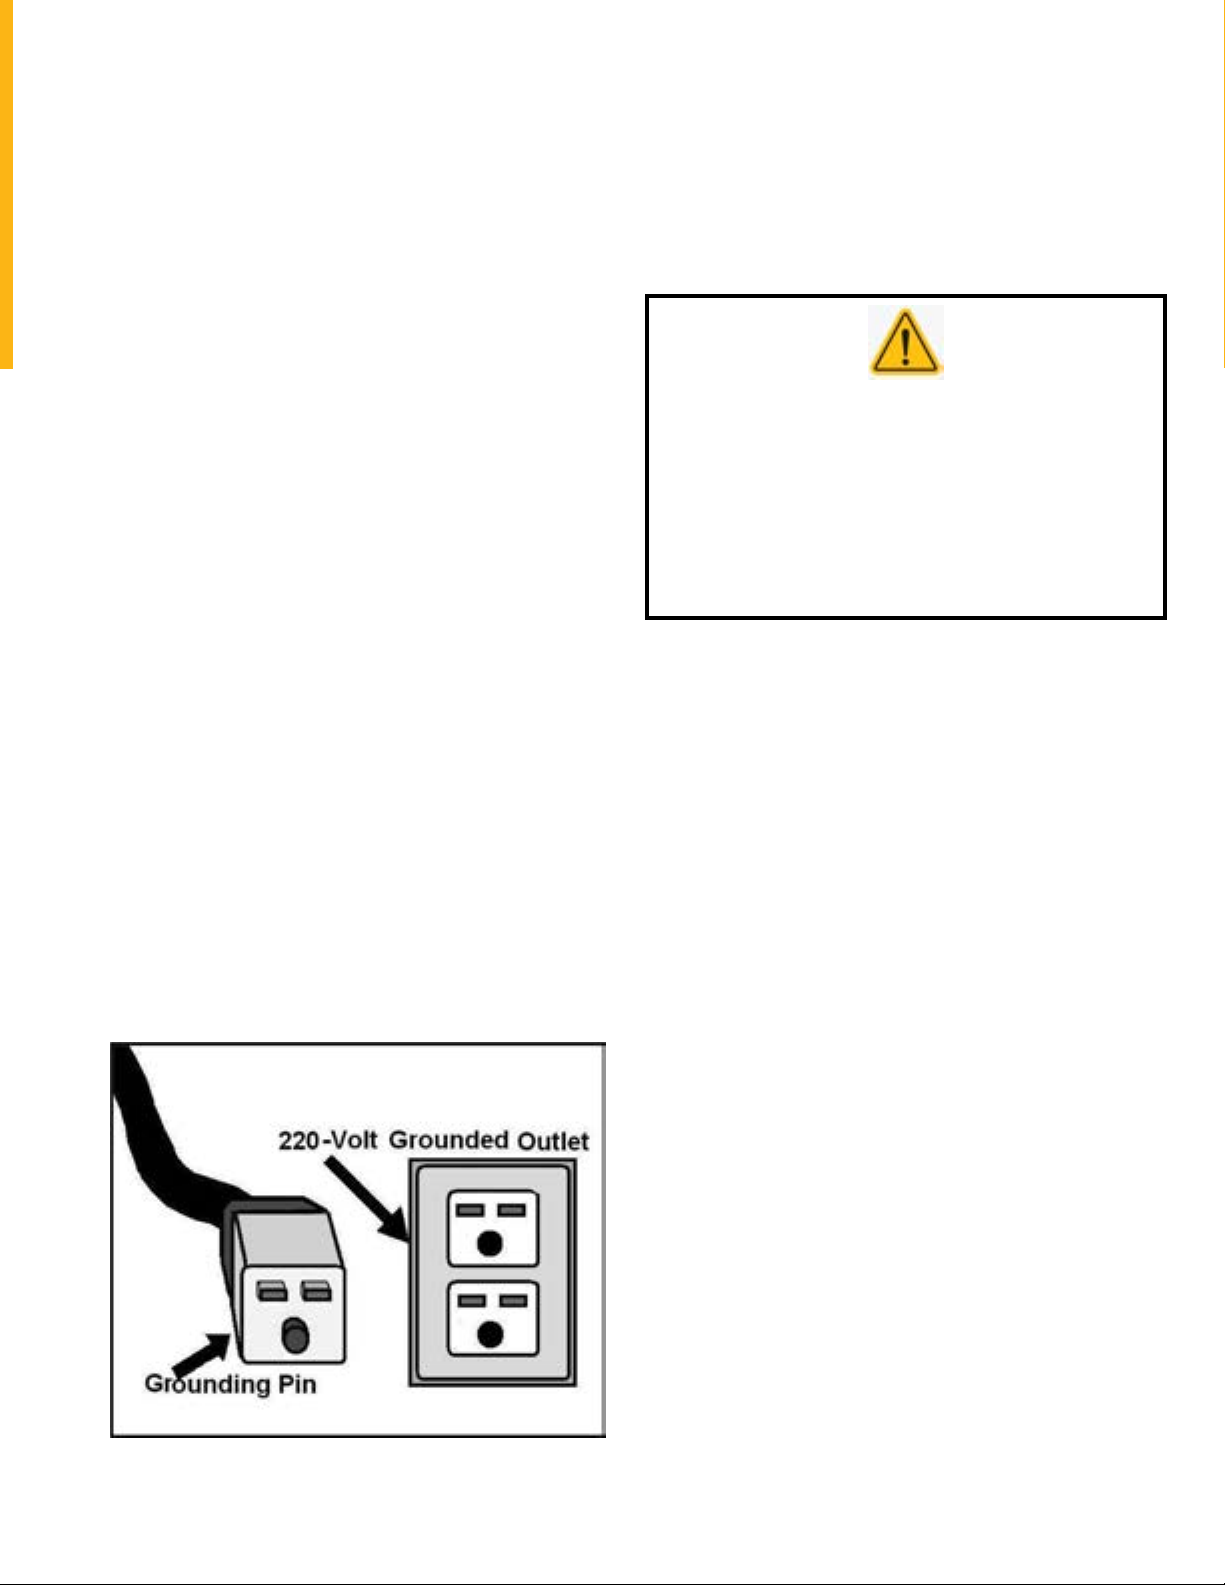
WARNING
CX108N is a heavy machine. Do not
over-exert yourself. Use a fork truck or
get the help of an assistant or a friend.
Unpacking
The machine is properly packaged in a carton
for safe transportation. When unpacking,
carefully inspect the crate and ensure that noth-
ing has been damaged during transit. Open the
crate and check that the machine is in good
condition.
The hardware (screws, washers etc) might be
shipped in a plastic bag.
After the machine has been un-packed, check
that all loose parts and
hardware are present.
List of Contents
A. Allen Keys 2, 3mm ................................... 2
B. Wrench ..................................................... 1
C. 1/4” Lock Washer .................................... 2
D. Flat Washer 5/16” .................................... 1
E. 1/4” Lock Washer .................................... 2
F. Flat Washer ............................................. 1
G. Knob Bolt 3/8-16 x 1 1/4 ........................ 1
H. Hex Bolt 5/16-18x1 .................................. 1
I. Angle Adjustment Plane ............................ 1
J. Hex Bolt 1/4-20x1/2 ................................. 2
K. Bushing .................................................... 1
L. Nylon Nut 5/16-18 ................................... 1
M. Adjustment Bar Bracket ......................... 1
N. Square Nut 5/16 ...................................... 4
HG
A
B
GG
E
K
J
C
L
MD
I
DD
CC
EE
BB
FF
F
O
P
N

8
Proper Grounding
Grounding provides a path of least
resistance for electric current to reduce the
risk of electric shock.
CX101N is equipped with a 220 single
phase motor which features a 3-conductor
cord and a 3-prong grounded plug to t a
grounded type receptacle. Make sure the
cord is plugged into a properly installed
and grounded power outlet.
To prevent electrical hazards, have a
qualied electrician ensure that the line is
properly wired.
This appliance is for use on a normal
220-volt circuit and is factory-equipped
with a specic electric cord and plug to
permit connection to a proper electric
circuit. Make sure that the appliance is
connected to an outlet having the same
conguration as the plug. If an adaptor
plug is used, it must be attached to the
metal screw of the
receptacle.
Figure-3 220-Volts Outlet for CX101N
WARNING
Improper connection of the
equipment-grounding conductor can
result in a risk of electric shock. Check with
a qualied electrician if you are in doubt
as to whether the outlet is properly
grounded.
It is strongly recommended not to use
extension cords with your CX101N. Always
try to position your machine close to the
power source so that you do not need to
use extension cords.
In case if you really nd it necessary to use
an extension cord, make sure the extension
cord does not exceed 50-feet in length and
the cord is 14-gauge to prevent motor
damage.
Your CX101N is equipped with a cord
having 3-prongs which ts a 3 prong
grounded receptacle as shown in gure-3.
Do not remove the grounding prong to t it
into a 2-pronged outlet. Always check with a
qualied electrician if you are in doubt.

Assembly
Follow the steps below to assemble your
band saw:
Take the band saw table and put it upside
down on oor and make sure that all the
table bolts shown in the gure are tight. See
gure-4
Figure-4 Table turnion bolts
Now turn the table up right, and remove the
table pin from the table slot and the table
insert (if already installed) and move the
table in position around the blade, guiding
through the table slot. See gure-5
Figure-5 Installing the table
Position the table on the base in such a way
that the bolts under the table extend through
the holes on the base. Thread the two knobs
on the bolts ( do not tighten). See gure-6
Figure-6 Knobs threaded on the bolts
Position the table on the table stop and the
base so that the table is perpendicular to the
blade. See page 15 for details.
Figure-7 Table sitting on the table stop
Install the table insert at the center of the ta-
ble and the table pin into the table slot as
shown in gure-8.

10
Figure-8 Installing table insert and
table pin
Figure-8.5 Installing the angle adjustment
brackets
Attach the Adjustment bar bracket to the
underside of the table using the 2 screws
and the washers. Secure the Angle adjust-
ment plane to the adjustment bar bracket
with the hex bolt, washer and the locking
nut.
Take the rail bracket (smaller) and attach
it to the table using cap screws provided.
See gure-9
Figure-9 Rear rail brackets attached
Now, attach the rear rail to the brackets
using the knobs provided. See gure-10.
Figure-10 Installing the rear fence rail
Take the rail brackets (larger) for the front
fence rail and attach it to the table using the
cap screws provided.
Place the front fence rail on the brackets
and insert the knobs through the hole on
each bracket and thread the T-nuts onto the
ends of the knobs a couple of turns to
tighten the fence rail in place.
See gure-11

Figure-11 Front fence rail installed
Now take the fence and pull its handle up.
Place the fence on the front fence rail and
slide it against the blade.
Use a pencil to mark the fence rail where the
fence scale indicator on the right hand side
is pointing (there is a gap just behind the
indicator plate where you can mark the rail).
This mark will indicate where to align the O”
mark when install the scale.
Now, remove the fence from the rail and in-
stall the adhesive backed scale on the front
fence rail.
Figure-12 Adhesive backed scale attached
to the front rail
Once you have attached the adhesive backed
scale to the rail, place the fence on the rail
and tighten it in place by pushing down the
handle. See gure-13
Figure-13 Fence installed on the rails
Attach the miter gauge holder and the
fence holder to the back of the saw using
screws and washers provided see gure-14
Figure-14 Miter gauge holder and fence
holder installed
Fence Holder
Miter Gauge
Holder

12
Blade Tracking
Blade tracking refers to the blade
remaining in the same position on the
upper and lower wheels. When rotating
the wheel by hand, if it moves forward
or backward on the wheel then tracking
needs to be adjusted.
Although the blade tracking of this band
saw is factory set, you should check it
again to make sure that the blade is
centered on the wheels. Blade tracking
blade can be controlled by adjusting the
blade tracking knobs.
Disconnect the machine from power and
open the upper wheel cover. Rotate the
upper wheel by hand slowly and see how
the blade rides on the wheel.
If the blade is not properly aligned and
needs to be adjusted, loosen the lock nuts
shown in gure-15 and turn the knobs.
Figure-15 Knobs and Locks Nuts
Turn the knobs clockwise:
If the blade moves towards the front edge
of the wheel. It makes the top of the wheel
to tilt back and moves the blade towards
the center.
Turn the knobs counter-clockwise:
If the blade moves towards the back edge
of the wheel. It makes the top of the wheel
to tilt to the front and moves the blade to-
wards the center.
Figure-16 Blade centered on the wheel
When you have adjusted the blade tracking,
re-tighten the lock nuts.
IMPORTANT
In very rare cases if the blade tracking is
not adjusted by tilting the upper wheel,
then you will have to make minor
adjustments to the angle of tilt of the
lower wheel. Loosen the four hex bolts
and to tilt the lower wheel to get the
proper angle of tilt and tighten the bolts
back. Remember, this adjustment is
done only if the blade tracking is
not adjusted by tilting the
upper wheel.
Figure-17 Lower wheel adjustment sleeves

Basic Controls
The basic controls of this machine are shown
in the gure below. Use the gure and read
the text to understand what the basic
controls of this band saw are.
Figure-18 Basic controls of CX101N
A. The power switch turns the power on/
off to the motor switch.
B. The motor switch start and stops the
motor and only works after the power switch
has been turned on.
C. The guide post hand wheel raises or
lowers the post guide post.
D. The blade tension/ quick release lever
increase or decreases blade tension when
rotated. Lifting the handle activates the
quick release.
IMPORTANT
Make sure you have done the tracking
adjustment and the blade is centered on
the wheels before you start the band saw
for a test run. See page-12 for details on
blade tracking.
WARNING
This machine can perform many types of
operations which are beyond the scope of
this manual and are very dangerous if
performed incorrectly. The safety
instructions given in this manual can not
be complete because the environment in
every shop is different. Always consider
safety rst as it applies to your individual
working conditions.
TEST RUN
Once you have assembled your machine
completely, it is then time for a test run to
make sure that the machine works properly
and is ready for operation.
During the test run if there is any unusual
noise coming from the machine or the
machine vibrates strangely, stop the
machine immediately and disconnect
from the power source and investigate the
source of the problem with your machine.
Refer to the trouble shooting.
READ THE MANUAL
Before starting the band saw, make sure
that you have read and understood the
manual and you are familiar with the
functions and safety features on this
machine. Failure to do so may cause
serious personal injury.

14
Blade Tension
A properly tensioned blade is very important
to get the best performance from any band
saw. If the blade is too loose there is a
possibility that the blade will slip or drift off
the line while in operation and it will be hard
to have accuracy in the line of cut. If the
blade is tensioned too tightly, it will be very
difcult to make tighter radius cuts and there
will be a greater possibility of blade
breakage.
When using a wider blade for making
straight cuts, for re-sawing or making wide
radius cuts, tighter blade tension is
recommended; while using narrower blades
for cutting shorter stock or making tighter
radius cuts, less blade tension is
recommended.
The information above is just a guideline for
you to understand to set the blade tension
according to the cut. However, understand-
ing the blade tension adjustment comes with
practice with the machine.
Look at the blade tension scale located at
the back of your band saw. The scale shows
the ideal blade tension adjustment according
to the width of the blade.
Figure-19 Quick release blade tension handle
and scale
Adjusting the Blade Tension
To adjust the blade tension, lift the blade
tension handle shown in gure-19 and turn
it. Turning the handle clockwise will increase
the tension on the blade while turning the
handle counter-clockwise will decrease the
blade tension.
IMPORTANT
All blades stretch with use, and the scale
at the back of your band saw (shown in
gure-19) is just an approximation. So, do
not rely on any adjusted measurement for
a long period of time as the blades stretch
and the tension on the blade changes.
IMPORTANT
To prolong the life of the blade and reduce
blade stretching, when the machine is not
in use for period of 24 hours or more
release the tension on the blade.
Guide Bearings Adjustment
The guide bearings (beside) and thrust
bearing (behind) the blade, support the
blade during cutting operations. Properly
adjusted support bearings play, an
important role in getting accurate cuts.
To adjust the guide bearings, turn the
machine off and disconnect the cord from
the power source and prevents the blade
from wondering, therefore producing
straight cuts.
Remove the blade guard and use a screw
driver to loosen the screws located on each
of the two guide bearings as shown in
gure-20.

Figure-20 Set Screws
Adjust the bearings so that the space
between the guide bearing and the blade
should be 0.02” which is thickness of a sheet
of paper. See gure-21
Figure-21 Distance between the guide
bearings and the blade
Now, retighten the set screws to lock the
guide bearings in place.
Loosen the lock levers shown in gure-22
and move the bearing shafts in or out so
that the guide bearings are 1/32” behind
the blade teeth and the thrust bearing,
1/64”. Once the bearings are at the correct
position behind the blade, tighten the lock
lever to lock the bearings in place.
See gure-22.
Figure-22 Distance of the bearings behind
the blade
Adjust the lower bearings in the same
manner.
Table Stop Adjustment
CX101N features a table stop which allows
the table to easily come to a 90° if the table
is tilted.
To adjust the table stop so that the table sits
at 90°, you should rst make sure the switch
is in “OFF” position and the power cord is
unplugged. Loosen the two lock knobs un-
der the table and loosen the hex nut which
locks the table stop bolt.
Now, place a square on the table as shown
in gure-23 and adjust the table stop so that
the table is at a 90° with the blade.

16
Figure-23 Adjusting the table at 90oto
the table using square
Once the table is at 90owith the blade,
tighten the hex nut and the knobs.
Table Tilt Scale Calibration
To calibrate the table tilt scale:
Make sure the table is at 900to the blade
and the blade tensioning and tracking is
properly set. (See Page 12 & page 14 for
details)
Disconnect the machine from the power
source and loosen the pointer screw shown
in gure-24. Align the tip of the pointer
with the O” mark on the tilt scale and
tighten the pointer screw.
Figure-24 Table tilt scale
Table Alignment
To make accurate cuts with your band saw,
the table should be aligned properly with
the blade.
To align the table:
Make sure the blade tension and tracking
is done correctly. Disconnect the machine
from the power source and loosen the
table trunnion bolts under the table shown
in gure-25.
Figure-25 Table trunnion bolts
Place a straightedge on the table so that the
straightedge touches the blade and is
parallel to it as shown in gure-25. Make
sure the straight-edge touches only the at
part of the blade, not the teeth.
Now, use a ruler to measure the distance
between the miter slot and the straight
edge on both sides on the table R & L. See
gure-26
Figure-26 Aligning the table with the blade
using a straight-edge

Adjust the table until the distance on both
sides of the table is equal and tighten the
table trunnion bolts.
Guide Post
The guide post assembly can be moved up
or down above the work-piece. The
movement of the guide post is controlled
with the hand wheel shown in gure-27.
Figure-27 Guide post
To make accurate cuts and to reduce the
blade slipping out of position, it is
recommended to keep the guide post no
more than 1” above the work-piece while
cutting operation.
To Adjust the Guide Post Assembly:
Make sure the switch is turned off and the
cord is disconnected from the power source.
Loosen the guide post lock knob on your
band saw shown in gure-27 and rotate the
hand-wheel to move the guide post assem-
bly up or down.
When the guide post assembly is about 1”
above the work-piece, lock the guide post in
place using the lock knob.
Work-piece Inspection (Wood)
Before cutting any wood, make sure to
inspect the work-piece for nails, staples,
small pieces of stone or metal and any other
object which might come in contact with the
blade.
If the wood contains any of these objects
and it comes in contact with the blade, the
object might y and hit the operator or
seriously damage the blade. For a safe
cutting method always inspect your
workpiece carefully before cut and wear eye
protection.
Some woods with excessive twisting or
wrapping are un-stable while cutting and are
dangerous to cut because during
operation the work-piece can move
unexpectedly which either damages the
blade or hurts the operator.
If the wood is slightly cupped, make sure the
cupped face of the wood is held against the
fence. If the bowed side of the workpiece
is held against the fence, the workpiece will
move while cutting.
WARNING
The information above is just a guideline
for you to understand how to cut a
workpiece with slight cupping. If you are
not sure and do not have any experience in
cutting cupped stock, do not cut it.
Failure to follow these instructions might
bring personal injuries to the operator or
serious damage to the blade.
Some stock with large knots can damage
the blade and wet stock will give a poor
result.

Work-Piece Inspection (Metal)
Before cutting a metal work-piece, inspect it
carefully for any defects in the material.
For thin or small metals, the work-piece
should be clamped between larger pieces to
hold the work-piece tight, when fed against
the balde.
Some small work-piecees will be damaged
if cut on the band saw; instead use; shear or
nibblers for this work.
Some round work-pieces like cables, chains
etc, which are not stable, if not supported
with a vise, should not be cut using a vertical
band saw.
Some hard metals take a longer time when
cutting. These kinds of metals need a dif-
ferent type of blade and lubrication while
cutting.
Tanks, cylinders, valves that contain gasses
or liquids can casue re, explosion or serious
personal injury and damage to the machine.
IMPORTANT
Avoid cutting tanks, cylinders and valves
that contain gasses or liquids if possible.
If you nd it really necessary to cut these
items, always vent and purge them, before
cutting.
Sometimes it is not safe to cut magnesium.
Cutting magnesium with a dull blade can
create enough friction to make the small
magnesium chips produce re. Avoid cutting
magnesium if possible.
Material
Speed FPM
(M/Min)
Material
Speed FPM
(M/Min)
Material
Speed FPM
(M/Min)
Material
Speed FPM
(M/Min)
Carbon Steel
196-354
(60) (108)
Tool Steel
203
(62)
Alloy Steel
111-321
(34) (98)
Stainless
Steel
150-203
(46) (62)
Angle Steel
180-220
(54) (67)
High Speed
Tool Steel
75-118
(25) (36)
Mold Steel
246
(75)
Gray Cast
Iron
108-225
(33) (75)
Aluminum
Alloy
220-534
(67) (163)
Hot Work
Tool Steel
203
(62)
Stainless
Steek
85
(26)
Malleable
Cast Iron
321
(98)
RECOMMENDED CUTTING SPEED
18

Cast Iron Wheels
The CX101N comes with heavy duty cast
iron wheels for added stability and overall
performance.
A coplanar shim adjustment also added for
better alignment of the wheels that allow
the blade to run as straight as possible en-
suring straight and accurate cuts.
This feature will help improve the band
saw performance with the wheels working
together instead of against each other.
The end result will give you less vibration,
more power, accuracy and less wandering.
This will be noticed most when it comes
to resawing and making straight cuts with
blades larger than 1/4”.
Coplanar Adjustment
Figure-28 and Figure-29 show the shim for
adjusting the top wheel. To move the wheel
out remove the nut and shims then remove
the wheel.
Now you can add shims to the back of the
wheels as required. Replace the wheel and
any remaining shims and the nut and tight-
en. To move the wheel in, remove the cast
iron wheel as mentioned above and remove
the shims from behind the wheel. Replace
the wheel, shims and nut and retighten.
Figure-28 Washer
Figure-29 Top wheel back shims

Operations
Before operating the band saw make sure
you have performed the following adjust-
ments:
Blade tension adjustment
Blade tracking adjustment
Guide bearings adjustment
Make sure all the guards are in place
WARNING
CX101N produces ne dust particles
during cutting operation which is very
dangerous for health. Always connect
your band saw to a dust collector.
Ripping
Cutting solid wood with the grain cutting
down the length of the work-piece is called
ripping.
Adjust the fence on the rails, according to
the width of the cut on the work-piece and
turn the hand-wheel to set the guide post
assembly 1” above the work-piece.
Now, turn the band saw ON and use a push
stick to push the work-piece against the
blade. See gure-30.
WARNING
Do not use your ngers to feed narrow
work-pieces into the blade. If you slip,
your ngers might come close the blade.
Always use a push stick.
Figure-30 Ripping on CX101N
Crosscutting
Cutting solid wood across the grain and
in plywood cutting across the width of the
work-piece is called crosscutting.
Mark the work-piece where you want to
start the cut from and make sure the miter
gauge is at 90° position on the miter slot.
Place the work-piece on the table so that
the marked point is aligned with the blade
and hold the work-piece against the miter
gauge.
Turn the band saw ON and feed the
work piece against the blade. See gure-31.
Figure-31 Crosscutting on CX101N
20
This manual suits for next models
1
Table of contents
Other Craftex Saw manuals

Craftex
Craftex CX series User manual

Craftex
Craftex CX series User manual

Craftex
Craftex CT073 User manual

Craftex
Craftex CX series User manual

Craftex
Craftex B2470 User manual

Craftex
Craftex CX207 User manual

Craftex
Craftex CX208 User manual

Craftex
Craftex CX119N User manual

Craftex
Craftex B2397 User manual

Craftex
Craftex CX110 User manual

Craftex
Craftex CT104 User manual

Craftex
Craftex CX117 User manual

Craftex
Craftex CX204 User manual

Craftex
Craftex CX205 User manual

Craftex
Craftex CX100 User manual

Craftex
Craftex CT146 User manual

Craftex
Craftex CX101 User manual

Craftex
Craftex B1012 User manual

Craftex
Craftex CX102 User manual

Craftex
Craftex CX116 User manual