Creative XP GlassRaven 4G User manual


3
Table of Contents
1. Quick Start
1.1 What’s in the box?
1.2 How to get the GlassRaven 4G Camera Ready?
1.3 How to set up the Camera?
1.4 GlassRaven 4G Default Settings in Red Letters
2. Whole View & Details of the GlassRaven 4G
2.1 Figure 1: Front View of the Camera
2.2 Figure 2: Bottom View of the Camera
2.3 Figure 3: Internal, Side and Back View of Camera
2.4 Buttons & Switches Functions
3. Introduction
3.1 Power Supply
3.2 SD Card Selection
3.3 USB Connection
3.4 ATTENTION
3.5 Key Features
4. Operation List
4.1 Photo/Video Playback
4.2 Delete Files
4.3 Format SD Card
4.4 Auto Power O
4.5 Operation Menu
5. Technical Specifications
6. Troubleshooting
7. Warranty
8. The Complete Hunter Kit
.........................................................................................6-12
.............................................................................6
...............7-8
.....................................................9-11
..................12
......................13-15
.........................................13
...................................13
............14
...........................................14-15
.....................................................................................15-19
...................................................................................15
.........................................................................16
.............................................................................17
.....................................................................................17
..............................................................................18-19
...............................................................................20-21
................................................................20
.....................................................................................20
............................................................................20
.............................................................................20
.............................................................................21
...........................................................22-30
...........................................................................31-32
..........................................................................................33-34
.........................................................35-45
TABLE OF CONTENTS

4
Introduction
Thank you for purchasing your new CREATIVE XP® GlassRaven 4G Scouting
Trail Camera which can send instant HD photos to your email address or
phone number.
We are an American family-owned business and you can contact us via
email (support@creative-xp), our website (www.creative-xp.com) or
phone (+1 646 600 8243). If you are not happy with the GlassRaven in any
way, please contact us and we will take care of it as soon as possible.
Also, you can watch our YouTube Tutorial Videos (Channel Name: CreativeXP
Hunting) if you need additional instructions on using the trail camera.
We are always happy to help!

THE AMERICAN WAY
OF ADVENTURE

1.1 What’s in the box?
6
Quick Start
1* Trail Camera
1* Tree Strap
1* USB Cable
1* Instructions Manual
1* Antenna
1* Camera Tree Mount

3. Insert an SD Memory Card
Note: We recommend 4 to 32 GB SD Memory Cards. Most of our cameras
have a bonus SD memory card already inserted into the camera so you don’t
have to worry about it.
7
Quick Start
1.2 How to Get the GlassRaven 4G Camera Ready?
1. Fix the Antenna
2. Insert 12 AA Batteries (not included)
Open the camera house and insert 12 AA batteries as the electrodes shown
inthe battery case.
Note: 12 AA Alkaline or Ni-MH (recommended). Under camera’s Main Menu ->
Other Section, please choose the “Battery Type” for better camera
performance.

8
Quick Start
4. Mount the two 4G Antennas & Insert the SimHero, AT&T or T-Mobile
Sim Card
We recommend using the SimHero data card. Most of our cameras have a
bonus SimHero card already inserted into the camera so you don’t have to
worry about it.
Note: Please make sure you activate the SimHero on my.simhero.com
BEFORE using the camera!

9
Quick Start
2. Power ON the Camera & Configure Settings
Switch to SETUP and the screen will light up. Press the “MENU” key and you
willenter the menu to view & change settings. Please press the arrow keys
fornavigation and the “OK” key to confirm settings. Use the MENU button to
goback or to switch between numbers, letters & symbols.
The camera will search for cellular signal (takes between 30sec and
2 min - depending on the signal strength), then you will see the signal bar
displayed on the top left corner of the LED screen.
Please press the arrow keys for navigation and the OK key to confirm settings.
Use the MENU button to go back or to switch between numbers, letters &
symbols.
1. Activate the SimHero Data Card
Go to https://my.simhero.com and create an account with the SimHero
REGISTRATION CODE - find it on the flyer provided with the SimHero data
card.
The SimHero comes with 40Mb, therefore you will not have to purchase
a data plan until you use the 40Mb included. If you have trouble activating
the sim card, please watch our YouTube Tutorials at “CreativeXP Hunting”
Channel.
*One 5MP photo size is 80kb if emailed.
120mb 1,500 Pictures* simHERO Camera Plan NA-PA / 1 Month ........................................... $6.99
400mb 5,000 Pictures* simHERO Camera Plan NA-PA / 1 Month .......................................$14.99
800mb 10,000 Pictures* simHERO Camera Plan NA-PA / 1 Month ......................................$17.99
1600mb 20,000 Pictures* simHERO Camera Plan NA-PA / 1 Month ..................................$29.99
800mb 10,000 Pictures* simHERO Camera Plan NA-PA / 6 Month ...................................$39.99
1600mb 20,000 Pictures* simHERO Camera Plan NA-PA / 6 Month ................................$69.99
2400mb 35,000 Pictures* simHERO Camera Plan NA-PA / 6 Month ...............................$99.99
400mb 5,000 Pictures* simHERO Camera Plan NA-PA / 12 Month ...................................$39.99
800mb 10,000 Pictures* simHERO Camera Plan NA-PA / 12 Month ..................................$59.99
1600mb 20,000 Pictures* simHERO Camera Plan NA-PA / 12 Month ...............................$79.99
2400mb 35,000 Pictures* simHERO Camera Plan NA-PA / 12 Month ............................$109.99
1.3 How to Setup the Camera?

10
Quick Start
TO RECEIVE PHOTOS UPON MOTION TRIGGERS:
Press MENU -> 4G Section -> Send To (6th option down) -> EMAIL Section
(NOT phone section) -> Insert your Email Address or Phone number (READ
TABLE BELOW) -> Save (Press “Menu” and after “OK”)
* Take a test photo by going to Camera Main Screen (out of the Main Menu) ->
Press “OK” – This process might take up to one minute based on the signal
strength. You should see “SEND SMTP” quickly after the photo has been taken.
Watch our YouTube Tutorial by searching “CREATIVEXP 3G” on YouTube.
** If you want motion activated photos, please make sure the TIMELAPSE
function is OFF (Main Menu -> PIR). When the timelapse is ON, the motion
sensor will automatically turn OFF.
Note: Please wait until the screen goes in STANDBY (turns o) to enable
the camera to work after setup.
*** Default settings are preferred. Please refer to Section 1.4 for default
settings in red letters.
To receive a photo as a Text Message to
your phone go to:
1. Main Menu -> 3G -> Send To -> EMAIL
Section (NOT Phone Section)
2. Find your phone carrier (See the table on
the right), then enter your phone number
with the following ending behind your number
To receive a photo as an Email to your e-mail
address go to:
1. Main Menu -> 3G -> Send To -> EMAIL
Section (NOT Phone Section)
2. Insert your email address
MMS Gateway DomainCarrier
Alltel
ATT&T
Boost Mobile
Cricket Wireless
Project Fi
Sprint
T-Mobile
U.S. Cellular
Verizon
Virgin Mobile
(insert 10-Digit number)@mms.cricketwireless.net
(insert 10-Digit number)@pm.sprint.com
(insert 10-Digit number)@mms.uscc.net
(insert 10-Digit number)@vmpix.com
(insert 10-Digit number)@mms.att.net
(insert 10-Digit number)@myboostmobile.com
(insert 10-Digit number)@msg.fi.google.com
(insert 10-Digit number)@tmomail.net
(insert 10-Digit number)@vzwpix.com
(insert 10-Digit number)@mms.alltelwireless.com

3. How to Connect the Camera to Network?
The GlassRaven 4G Trail Camera shows “Searching” on the screen when you
switch the power key from “OFF” to “ON”.
The SimHero data card uses the AT&T & T-Mobile cell towers. It might take up
to one minute to find a cellular signal and for the signal strength indicator to
show up on the screen.
After you have a signal on the screen while in “ON” mode and you inserted
your email/phone number as shown above, wait for 1-2 minutes until the
screen turns OFF (camera goes in STANDBY) and it’s ready to go, you will
start receiving photos when motion is detected.
* If the screen is ON, the motion detection sensor is OFF. It turns ON only
when the camera is in STANDBY (the screen is OFF).
** You can view your data usage and purchase more data by logging on to
https://my.simhero.com.
11
Quick Start
12
Quick Start
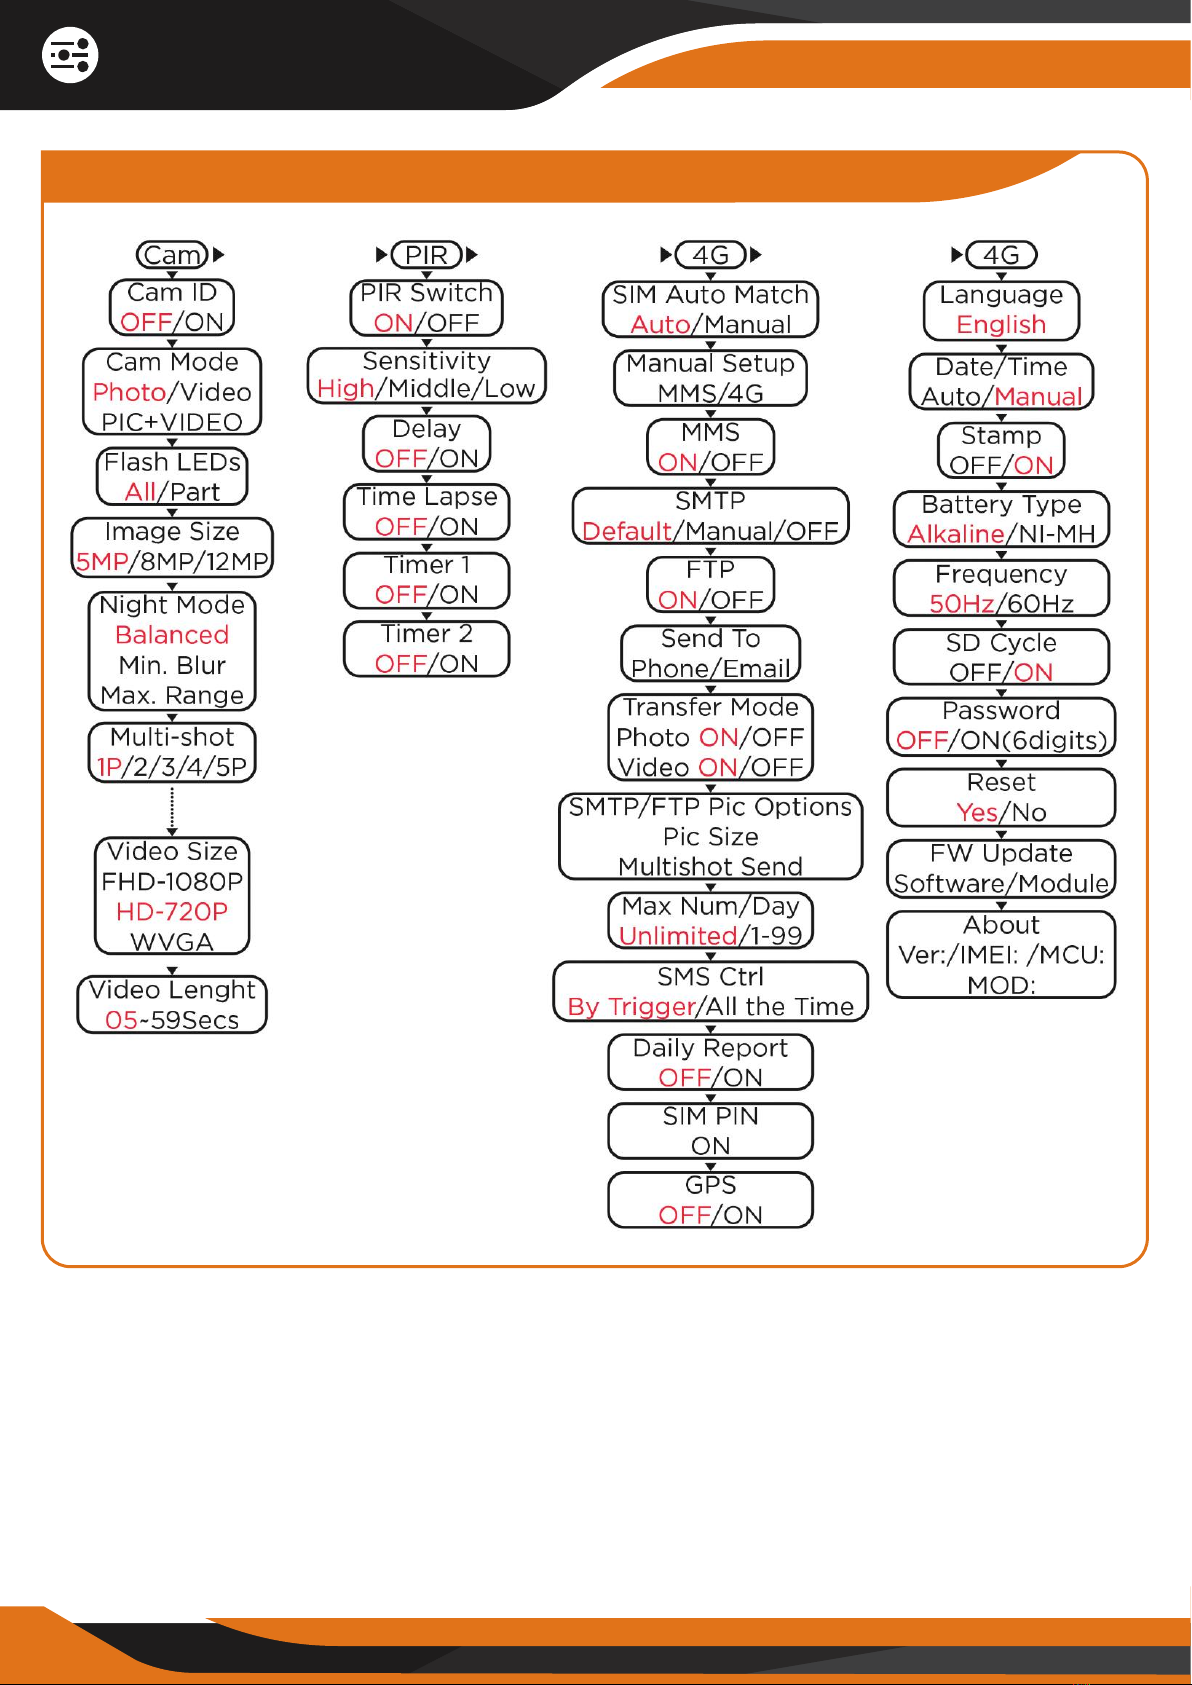
1.4 GlassRaven 4G Default Settings in Red letters
13
Whole View & Details
of the GlassRaven 4G
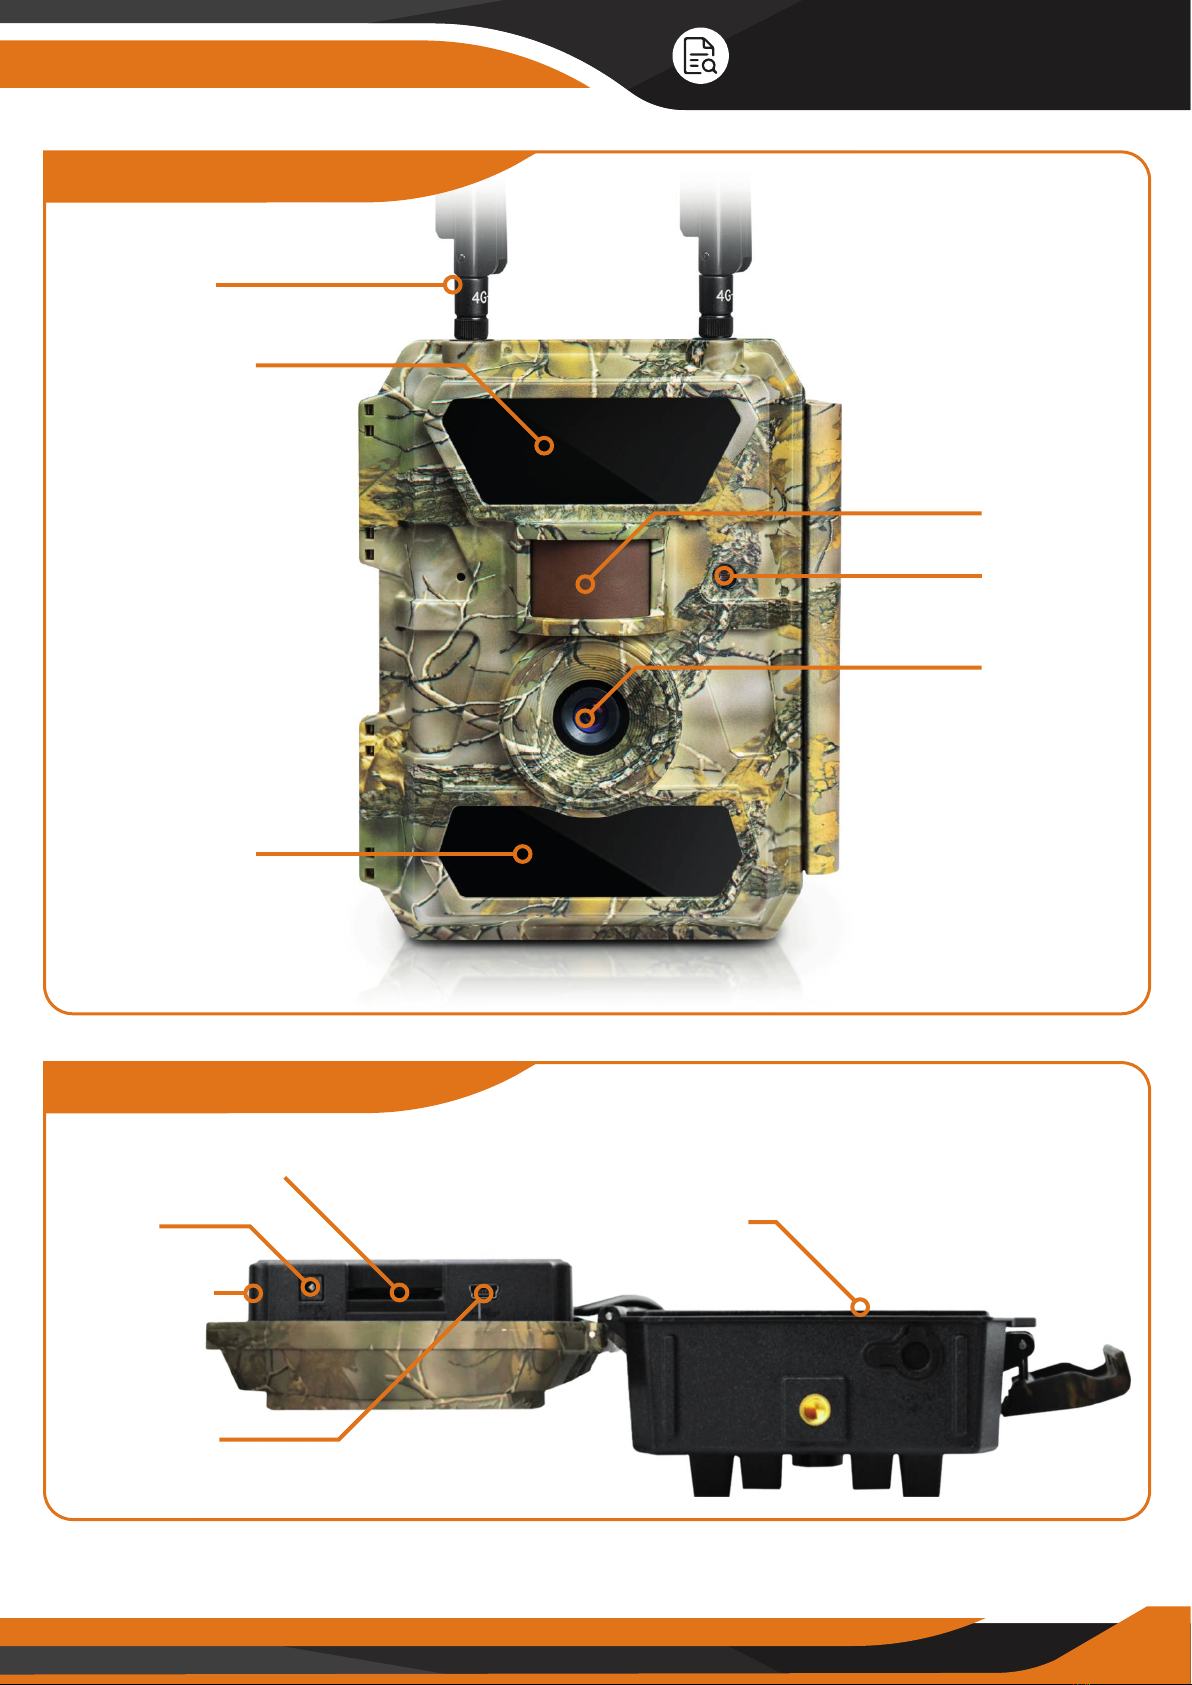
2.1 Front View
2.2 Bottom View
USB Port
Battery Slot
DC In
SIM Card
SD Card Slot
27 IR LEDs
30 IR LEDs
Antenna
PIR
Light
Lens
14
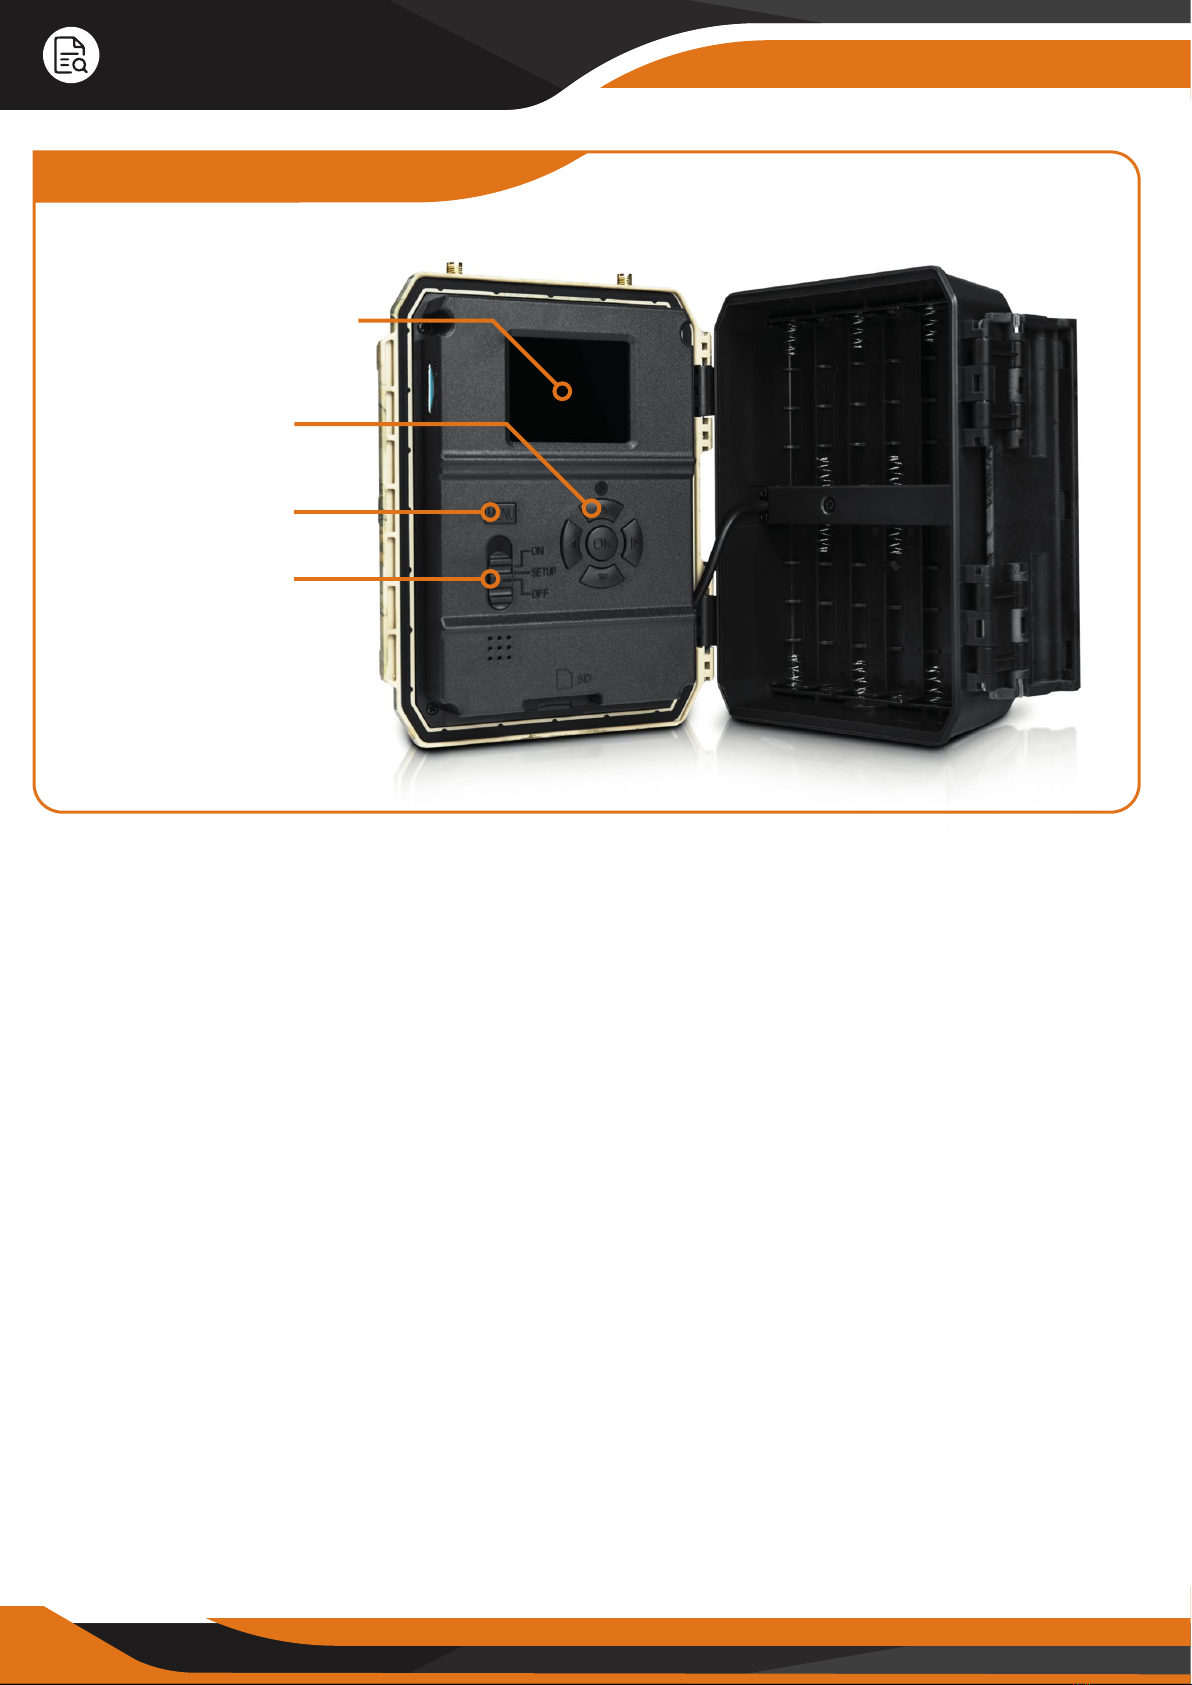
Whole View & Details
of the GlassRaven 4G
1. Front View
2.3 Internal Back View
LCD Color Screen
Navigation Buttons
OK Button
MENU Button
Power Switch

15
Introduction
3.1 Power Supply
Batteries
The camera runs on 12 AA size batteries (9-12V power supply to ensure
maximum performance) and supports both alkaline OR high-quality NiMH
rechargeable batteries. We suggest using NiMH batteries only because their
performance is much better than alkaline batteries. Please choose the battery
type you’re using in the Main Menu -> Other Section -> “Battery Type” to
reach longer operation time.
Batteries should be inserted with the position of the correct electrodes as
marked on the battery case. Wrong battery position may cause device
malfunction. Also, we strongly recommend changing the batteries when the
power icon on the camera screen or photo stamp is empty.
Note: Don’t mix batteries types! Dierent batteries to be used in the camera
may cause permanent damage which also violates warranty policy!
Due to dierent settings, dierent battery brands and quality of batteries,
we are not able to list the exact number of photos and videos that camera
can achieve. You can use the table below only to approximate the number of
photos or videos the GlassRaven Camera can take with 12 AA Alkaline
batteries and it will perform better with 12 AA rechargeable NiMH batteries.
16
Introduction
3.2 SD Card Selection
Using a memory card is required to operate the camera. When the camera is
on "ON" mode and no memory card is used, the screen displays "No card".
The SD slot of the camera has a 32 GB memory capacity. Before inserting or
removing the memory card, the camera must be turned "OFF". Failing to do
so may cause loss of or damage to the pictures/videos already recorded on
the memory card. When the SD card is full, the viewing screen shows
"Memory Full". The table below shows an approximated number of photos or
videos which can be recorded by the camera depending on the memory
card capacity.
SD Card
Capacity
5 MP 869 1631 3585
556 1041 2294
391 733 1613
00:05:27 00:10:13 00:22:28
00:03:56 00:07:23 00:16:13
00:02:04 00:03:53 00:00:31
1 GB
Photos
Videos
2 GB 4GB
8 MP
12 MP
640x480
HD
FHD
SD Card
Capacity
5 MP 7492 15307 30936
4798 9794 19795
3371 6887 13919
00:46:57 01:35:56 03:13:52
00:33:53 01:35:56 02:19:56
00:17:48 00:36:20 01:13:21
6 GB
Photos
Videos
8 GB 32GB
8 MP
12 MP
640x480
HD
FHD
CREATIVE XP Solar Panel
To improve our customers’ experience, we specially designed a Portable Solar
Panel for all our cellular trail cameras. We recommend using batteries as a
backup in case the solar panel runs out of power. The sun will not charge the
batteries, but it will charge the solar cell 1500maAH battery which increases
the operating lifetime up to one year.
*The CREATIVE XP Solar Panel plug needs a short adapter cable to connect to
the bottom of the camera. We include this adapter cable in the camera box.
You can find our EGREEN Solar Panel at www.creative-xp.com!
Power adapter - Security Surveillance Purpose
The GlassRaven Camera can also be powered by an external 12V / 2A DC
adapter. We recommend removing the AA size batteries when the power
adapter is used. Electrical power is recommended for security purposes.

17
Introduction
3.3 USB Connection
When the camera is connected via USB cable, the screen shows “MSDC”.
If you press “Menu” once, “MSDC” turns to “PC Cam”. The camera now can
be used as a PC camera. If you press “Menu” again, camera exits PC camera
mode.
3.4 ATTENTION
1. Insert the SD memory card correctly, the camera does not support SD card
hot swap. *We insert the SD card from the production in most cameras.
2. Please use high-quality AA batteries in order to prevent the battery cells
from corrosion or leaked acid.
3. Use the right adapter (12V/2A) to supply power and do not invert the
electrodes when inserting the batteries.
4. In “ON” mode, the camera will automatically go in STANDBY in 2-3 min
without keypad touching.
5. Don’t interrupt power supply during firmware upgrade. Please deliver it
back to the factory if the device doesn’t work after upgrading.
6. Do not frequently insert or pull out the SD card, batteries or plug in and
out the adapter when the camera is on.
7. Do not have any floating objects, such as leaves, strings, or ribbons in the
5 ft motion detection zone of cameras, to avoid unwanted photos or videos.
8. Do not keep the camera next to hot objects, air conditioner, exhaust vents,
lights, etc. to avoid unwanted photos or videos.
9. The camera has a 110° PIR lens and 57 IR LEDs. To ensure that all 57 IR
LEDs can oer enough flash for night vision photos, we recommend using
the rechargeable batteries from ENELOOP PRO by Panasonic or our EGREEN
Solar Panel.

18
Introduction
0.35 Seconds
Trigger Speed
1. 0.35 seconds trigger speed
2. Wide lens model: 100 degrees FOV lens;
110 degrees PIR angle
3. Photo Max. Quality: 12MP
Video: 1080p@30FPS
4. Programmable 5/8/12 Megapixel high quality
resolution – if you want to save space
5. 57pcs invisible IR LEDs - oer 20 meters
(65 feet) real night vision distance and 75 feet
daytime
6. Crystal clear day & night photo/video quality
7. 1 Photo burst per second to get full moving
track of object
8. Supports multiple functions: adjustable PIR
sensitivity, Multi-shot (1~5 photos per trigger),
the programmable delay between motions,
Time Lapse, Timer, TV out, the stamp (camera ID,
date/time, temperature, moon phase) on every
single photo
9. Operating conditions:
Temperature: -13°F to 140°F (-25°C to 60°C)
1080 Video
12 MP Photos
57 Infrared LEDs
65 ft. Range
AT&T SIM Card
Compatible
Time Lapse
3.5 Key Features
19
Introduction
10. Built-in 2.0” TFT color screen
11. With MMS/3G/SMTP/FTP function ON, the
camera can transmit photos to 1-5 preset mobile
phones and 1-5 emails per trigger – please allow
30sec to 1 min to send
12. Supports AT&T 2G, 3G and 4G Sim Cards
13. Optional small size(640*480), large size
(1920*1440), and 5/8/12MPEmail/FTP photos
1 to 5 Photos
per Trigger
Wildlife
Monitoring
Home & Farm
Security
IP54
Weatherproof
Wide Lens
100° Angle

20
Operation List
4.1 Photo/Video Playback
Switch ON “Power Switch”, Press “OK” once to turn on the screen and enter
Setup Mode, press arrow button “ ” to enter Playback; press “ ” and “ ” for
selection, press “OK” to play video.
2. Press the “ ” button again to exit.
3. In Playback Mode, press “Menu” button to delete files, or format
4.2 Delete Files
1. To delete selected photo/video:
Press “ ” and “ ” for selection -> Press
“Menu” to select -> Press “OK” -> Select “Yes” to confirm, “No” to exit to the
previous page.
2. To delete all photos/videos:
Press arrow button “ ” to enter Playback -> Press “Menu” -> Select “Delete
All” -> Select “Yes” to confirm, “No” to exit to the previous page.
4.3 Format SD Card
1. No
2. Yes: to format SD card via camera.
3. Press “ ” and “ ” for selection, “Yes” to confirm, “No” to exit to the
previous page.
4.4 Auto Power O
In Setup Mode (where you can see what the camera is filming), the camera
will automatically enter “Auto Motion Detection” mode if no keypad is
touched within 60 seconds. Please press “OK” if you want to do some further
settings configuration.
*Note: The camera doesn’t enter “Auto Motion Detection” mode if the camera
is in any of the “Main Menu” pages. It must be on the main screen where you
can see what the camera is filming, and it will go in “Standby” mode within
60 seconds.
Table of contents
Other Creative XP Scouting Camera manuals


